
DIY Absorbers for the Less-than-Handy Man: Part 1
I don't profess to be an acoustical engineer or some sort of sound guru. I'm a normal guy, married with a kid, who has recently purchased my first house. I've been an audio nut for years with very little money to invest. My poor wife has been listening to me over the dinner table talk about this speaker or that receiver. I've picked out systems for friends and family all the while listening to a mishmash of different speakers (timber matching, what's that?) with an old analog Onkyo receiver. My wife (if she had her way) would almost never turn the TV on and when she did it would be either the news or the weather channel (with the occasional American Idol and 24 thrown in). However, out of love for me and the promise that the TV would not be visible from the dinner table, she agreed to allow me to purchase all new equipment (except for a TV, still working on that one) and gave up a whole room.
So, now I have a home theater room (I've been informed that it is not an actual home theater because it's open to other parts of the house). It's not the best laid out room for home theater, but it is all mine to do with as I will (within reason of course). The biggest problem is that it is small (14.5' by 12.5' by 8') so there is little room for natural absorbers, diffusers and other such furniture. The room will have only the HT equipment and seating, so I knew two things right away:
- I would need absorption for the room (the clap test is almost painful)
- There would be absolutely NO WAY I was going to convince my wife to spend the type of money that companies charge for quality room treatments after buying all that equipment.
Now, it bears repeating: I've just purchased my first house. Which means I've been living in apartments. Which means I've never had a garage (or work room, etc.). Which means that I own almost no tools. I think you're getting the picture. Not exactly handy around the house. But hey, I've got a college degree, how hard can this be?
A short caveat. My father IS handy around the house. He has many tools. I think (debatable) I was there when he worked on things, but I don't think I paid much attention and I probably killed the brain cells that stored such information in college (hey, I didn't think I'd need that knowledge at the time) so consider me a blank slate.
Room Treatments
There are two basic types of room treatments, absorbers and diffusers. Absorbers absorb sound and diffusers spread sound that would normally bounce in a single direction into many directions (for much more information see here). While I may decide to build diffusers in the future, this article addresses my room's desperate need for absorption. As anyone who has done any research into home theater room treatments knows, absorbers are usually made out of some sort of acoustical foam (like the stuff you see in recording studios or anechoic chambers, looks like egg cartons) or rigid fiberglass board (Owens-Corning 700 series or similar type). The problem with the acoustical foam is that it's ugly, comes in weird shapes, is ugly, is usually only available a handful of colors, is ugly, and is not as effective (per square inch) as fiberglass absorbers. The problem with the fiberglass absorbers is that, if you buy them pre-made, they are expensive (easily $1000 and up to treat a room of my size), and if you make them yourself, it's hard to find someone to sell you the fiberglass (they don't carry it at Home Depot or Lowe's though I heard you can get them to order it for you, but they charge you an arm and a leg), and you will have to build something to house them (fiberglass fibers floating around your house would probably have a low WAF).
In the end, I decided that the best bet would be to build some rigid fiberglass absorbers. Enter everyone's best friend: Google. After a number of days of searching I found a couple of useful sites that helped me on my way to building my DIY absorbers (see links at the end of this article). I found a thread that indicated that a company named SPI would sell the fiberglass to joe public at a reasonable rate. I also discovered that they had a location about 2 miles from my work (yippy!) so after some discussion (read: begging, pleading, and pointing out the cost of professional absorbers) with my wife, I picked up a box of six sheets of 2" thick rigid fiberglass board with facing.
When purchasing fiberglass, you may (or may not) have a choice between faced or unfaced. Faced means that on one side of the fiberglass is some sort of material that I can only assume has some value for the fiberglass's actual application. From the perspective of creating absorbers, you only need to know that keeping the facing on will reflect high frequencies. I would suggest purchasing faced as it can always be removed depending on your needs.
Two things should be noted: 1) before I started this process I didn't even know what rigid fiberglass board was! Bpape and Ethan Winer filled me in and gave me some great advice on a thread I started here . I also would like to give special thanks to Ethan Winer because he owns a company that makes room treatments and he STILL gave me advice on how to make my own. If I had the money to buy them, I'd buy them from him simply because of his ethics. 2) I did mention that wasn't very handy around the house, right? To be more specific, when we purchased the house my only power tool was a drill! Luckily, we purchased the house just before Christmas and when my parents asked what I wanted, I screamed, "TOOLS!"
The First Attempt
So, armed with my drill, a brand new circular saw and cordless driver (power screwdriver for the uninitiated), and a box a fiberglass, I headed out to Lowe's to pick up the 1x4's I decided I would use to frame up the fiberglass. I had a design in mind (that I'm not going to describe here because I didn't end up using it) and I knew how large I needed to make the frames. Did I do the math beforehand, know exactly how many and what size lumber to buy, know what hardware I would need to put everything together? Hell no! I got there, stared at the lumber for a while, did some quick math in my head, added two boards to the number I came up with, grabbed some wood screws, and off I went! As I was in line to check out, I realized that I had not taken into account one aspect of my original design and I would probably need a good deal more wood than I had planned (using the word "planned" very loosely). But heck, I was next and I didn't want to wheel my cart (yes cart, not one of those special lumber carrying things but the plain old grocery cart with about 6 feet of lumber sticking out the front, precariously balanced, a danger to myself and everyone around me) back to the lumber section. Hey, I could always come back, right?
The fiberglass board comes 2' by 4', so, in my infinite wisdom, I bought 8' long, 1" by 4" boards thinking all I had to do was bisect the board in order to get two of the sides for my frames. This is good thinking because 1) I'd only used a circular saw a handful of times in my life so I figured that I should try to minimize the cuts I would have to make and 2) when it says that it is an 8' board, it's dead on 8' right? Not exactly. It's usually pretty close to 8' (a lot closer than I would have gotten it I was soon to find out) but you can't assume that it is dead on. You also can't assume it's exactly an inch thick but this is less important to my story. When I shared this "revelation" to my Father, he quickly informed me that I had "discovered" what 90% of the world already knew. Hey, I'm in the upper 10%! Or is it bottom?
I quickly discovered three things: 1) Apparently, tape measures will give you a different length every time you use them. I think it has something to do with Heisenberg's Uncertainty Principle - where you change the thing you measure simply by measuring it. 2) Cutting a straight line is a lot harder than you think, especially if the person that measured the two points you needed to draw the guide line can't measure. 3) Pilot holes for wood screws are a must (hey, I did mention I wasn't handy right?).
Truth be told, I didn't learn number three until later so my first attempt at building a frame ended with thrown lumber, stripped screws, swearing, sweating, a deflated ego, and a nagging suspicion that they don't teach you everything you need to know in life in college.
Jimmy to the Rescue
Enter Jimmy. I mention him by name because he deserves the recognition. Jimmy is a framer. For those of you that don't know what that is, he puts up the wood frames of houses. But before Jimmy was a framer he worked for a home remodeling company that had him doing a little of everything. As far as I'm concerned, Jimmy is the unrecognized forth leg in the Holy Trinity. Jimmy is also one of my climbing buddies (rock climbing). After my disastrous first attempt at building my own absorbers, I would slip little questions about problems I was having with my absorber frames as well as other home projects to Jimmy while climbing that he would casually answer without so much as a look that indicated how elementary he felt the question was. Now, that could have been because I asked the questions while he was hanging on the other end of a rope and one smart aleck remark could be the difference between a leisurely ride to the ground and a quick descent into pain, but I like to think Jimmy is a kind and patient person so I'm going with that. So, armed with new knowledge that every kid who has ever taken shop class probably knew before entering the class, I went back to the drawing board.
The How-To Section Part 1 - Construction & Materials
Needed equipment:
- Some sort of saw (preferably power, I used a handheld circular saw)
- Drill
- Screwdriver
- Staple gun
- Putty knife
- Sharp scissors
- Gloves
- Mask
Optional Equipment (if you have this, you probably don't need to read this article):
- Table saw
Necessary hardware:
- 1x4's
- Rigid fiberglass board
- Wood screws
- Staples
- Fabric
- Batting (think quilt stuffing)
- Picture handing hardware
Knowledge base required:
- Just enough common sense not to dismember yourself with a power tool
- No previous experience building anything.
This is the portion of the article where one would post pictures of the absorbers at different points in their construction. If I had taken pictures. Which I didn't.
So…..anyhoo…..you won't need pictures, they are not that complicated.
DIY Absorbers for the Less-than-Handy Man: Part 1 - page 2
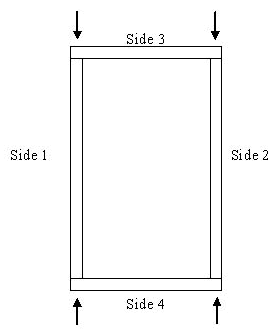 Since I had discovered that the tape measure was not my friend, I gave up on measuring anything and simply placed the fiberglass board next to the lumber and marked each piece individually. I made my cuts (which were invariably a little too long or short and usually at some sort of angle), drilled pilot holes for the wood screws (a pilot hole is a pre-drilled hole slightly smaller than the screw you are about to use that enables you to set the screw without stripping the head - hey, this is "DIY Absorbers for the Less-Than-Handy Man" and I needed Jimmy to remind me to use them), and set the screws. As the diagram below illustrates, I didn't use any fancy dovetail joints, biscuits, mitered edges, or other techniques I've seen on This Old House (I know, you're shocked), but I didn't have to, the entire thing is going to be wrapped in fabric and placed in a dark room so who cares what it looks like (though getting the corners as square as possible is a plus as it may be noticeable through the fabric if they are too off).
Just know that I cut sides one and two first, then side three, secured side three to sides one and two with the fiberglass in place getting the boards as tight as I could on the fiberglass, then I measured (put the wood board in place and marked it) and cut side four and got that secured as tight as I could on the fiberglass as well. The arrows indicate where the screws went in (two per arrow). Make sure that you buy the straightest boards they have. As luck would have it (and I had a lot of luck on this project) all of my boards were straight, except for one. I didn't realize that the not straight board was warped until it was too late (will discuss the "solution" to this later).
I thought I was going to need to attach the fiberglass to the frame in some way, but because I suck so much at measuring and cutting, each frame is a little off, holding the fiberglass in place securely. Now, I can't say that the fiberglass won't sag someday and will need to be secured, but so far I've not had any problems. It's called rigid fiberglass, but it's not like a piece of wood. I'm not concerned with it sagging, but we all know how far to trust my opinion, right? If you're really worried about it I can give you Jimmy's number.
Remember, this fiberglass is itchy stuff. Wear gloves (I used rubber surgical gloves) and a mask when handling the fiberglass. This is especially important when you are cutting the fiberglass. If you really want to be safe, wear long sleeves and pants when handling, but this probably won't be necessary.
The How-To Section Part 2: Covering
 The next step is to pick the fabric, which is where the wife comes in. She took paint samples from the home theater room and two adjoining areas as well as a leather sample from our couch and picked out some fabric to "bring them all together" whatever that means. Now, there has been a lot of discussion about what types of fabric to use. The consensus seems to be that as long as you can easily blow air through the fabric it will probably be OK. Therefore, my only instructions to my wife were that she could easily blow air through the fabric, and that it did not have a geometrical pattern (that I would never be able to align correctly on the frames). Luck once again came to the rescue as my wife returned with some hideous 100% cotton fabric (which she immediately changed her mind about once she saw it in the room) and a whole bunch of black speaker grill fabric (thank you God). Once she saw a few with the black fabric on them she remarked that they looked kinda cool, like great big speakers (to which I replied, "Well, you know, if you want great big speakers we could always get Martin Logans." You can imagine her reaction) and decided to cover them all with the black. One note, you may never convince your significant other of this, but my wife thinks the all black absorbers actually lighten the room.
The last piece you'll need to acquire is batting . Batting is used to help contain the fiberglass fibers to ensure that none escape into the air. Some of the absorber designs recommended using batting while others indicated that if the weave of the fabric is tight enough, you won't need it. With a 20 month old running rampant, even if we had used the 100% cotton fabric, I would have erred on the side of safety and used batting. Bating is usually sold in the same stores as fabric. Have your wife/significant other/interior decorator get some when they pick out the fabric (I think I ended up using two 90" by 108" rolls).
 Covering the absorbers is easier than you think. The first thing you want to do is cover all the exposed fiberglass with the batting. The batting pretty much sticks to anything it touches (especially the wood frames). Cut the batting about an inch longer than the frame and use a putty knife (I used a cheap plastic one I picked up at Lowe's for less than a buck) to tuck the batting between the frame and the fiberglass. I found it easiest if I tucked in a few points first (as shown in order below). This ensured that the batting was adequately secured at all points before tucking in all the rest.
I should remark that I installed the batting on the back first before I installed the front. This is because when you tuck in the batting you will inevitably push the fiberglass down. If you do the front last, then you can push it from behind to keep it flush with the front of the frame which will actually pull the batting tighter rather than loosen it up. If you decide to keep the facing on, you probably don't need to add the batting.
Now, all you need to do is cover the absorbers with the fabric. Since my wife decided to go with the grill cloth on all the absorbers, I can't tell you how the cotton fabric will act. The grill cloth was very stretchy and forgiving. The cotton seemed quite a bit more firm and probably would take more care in securing to the frame. The cotton may hide uneven corners better. Please view this link for a good demonstration on how to stretch fabric over a frame. Essentially, I laid the fabric down on the ground with the absorber face down on top of it and cut enough around the edges so that when I stretched the fabric I would have an inch or two (or sometimes a lot more) over the edge of the frame. I first stapled the fabric to the edge of the frame at the midpoint of every side (as the preceding link indicates) and slowly stapled toward the corners alternating sides every 4 to 6 inches or so. I tried to fold the corners so that there was little visible overlap (see frame 9 on the previous link). The key is to have the edge of the folded over material line up with the corner of the frame. This makes for a really clean edge. The last thing is to secure any additional fabric to the inside of the frame with a few staples. This will keep it out of sight and your edges clean.
The How-To Section Part 3: Hanging the Absorbers
 Now these things are light. They weighs less than many of the pictures I have hanging (at various angles) around the house so you can easily take some picture hanging wire or some other picture hanging hardware and attach it to the absorber frame and hang it like a picture (see here for a possible solution, and here for detailed instruction on how to hang a picture). When I finished, I had three different sizes of absorbers. Because of the different sizes and other considerations (like I kept running out of stuff and had to improvise), I used four different methods to secure them in the room (as described below):
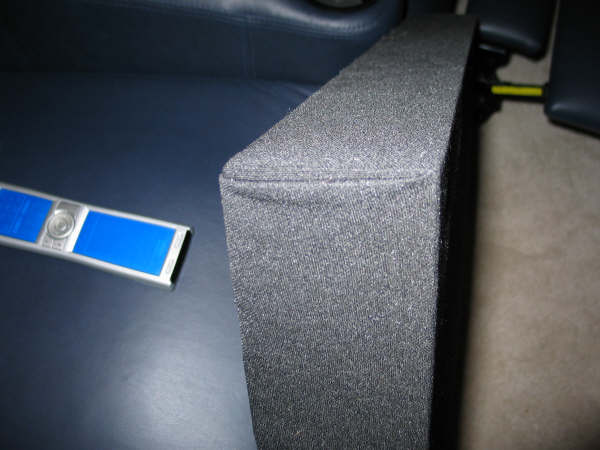
The Wedge : The largest (tall) of the three were Nearly 8 feet tall and a foot wide. These were designed to fit in the rear corners of the room as bass traps. I left the facing on both of these (all the rest had the facing removed). All I did was make sure that the absorber frames would just barely fit in the room and I wedged them into the corners. They were tight enough that I didn't feel the need to secure them to the wall or the ceiling. If I had more room, I would have made them the full two feet across. This would have made them much more effective (because of the added space between the fiberglass and the corner of the room. But as it was, the difference in the bass (which was reverberating around the room like crazy) was dramatic. It didn't fix all my problems, but it did dramatically reduce the amount of reverb.
The French Cleat : The mid-size absorbers used a full 2' by 4' sheet of fiberglass. While I felt that I could have used picture hangers for larger pictures , I wanted to try a technique that bpape suggested called a French Cleat . No really, check out the link. I'm not going to even try to explain it (actually, I have tried, but I keep deleting the woefully inadequate and potentially embarrassing description). Suffice it to say that I probably would be missing a few fingers if I had tried to make the angle cut myself with the leftover 1x4 scraps that I used to make the cleats. Luckily, I had a friend (not Jimmy but a different climbing buddy) that made the cuts for me. Disclaimer: I didn't do this so I'm sure you shouldn't either. My friend said that he turned his circular saw upside down so that the blade was at an angle, supported the saw with excess wood so that it wouldn't rock, and used other wood to construct a makeshift guide. I think if you can find a friend with a table saw, those blades can be angled without the inherent danger of my friend's solution. I should say that he does have all his fingers. The reason that he volunteered to make the cuts for me is because he has a compound miter saw and thought that he could use it. When he found out that he couldn't, he came up with this solution. I would have stopped him had he informed me of his plan beforehand.
Now, as I mentioned earlier, one of my frames was warped. I tried to find a wall where the warp would not be visible but nothing was acceptable to my wife. She said, "Either figure out a way to hang it straight or rebuild it." Well, I wasn't about to rebuild it (mostly because, by luck, I had purchased the perfect amount of wood and was highly resistant to going back for more) so what I did was hang it on the wall using a French Cleat, measured from the floor to the bottom of the absorber, attached a piece of wood to the wall that would sit flush to the INSIDE of the bottom of the frame, pushed the absorber flush to the wall, then attached the bottom of the absorber to the wall mounted wood. This held the absorber flush to the wall.
Unfortunately, flush did not necessarily equate to straight (as I had hoped). The warp of the board made the entire top of the frame curve to the right. This was not noticeable until I hung the absorber on the wall (and actually wasn't very noticeable at all, but I knew it was there). I'm still staring at it and kicking myself for being so stubborn. I know that it was blind luck that I got the right amount of wood but for some reason I just can't bring myself to rebuild that absorber.
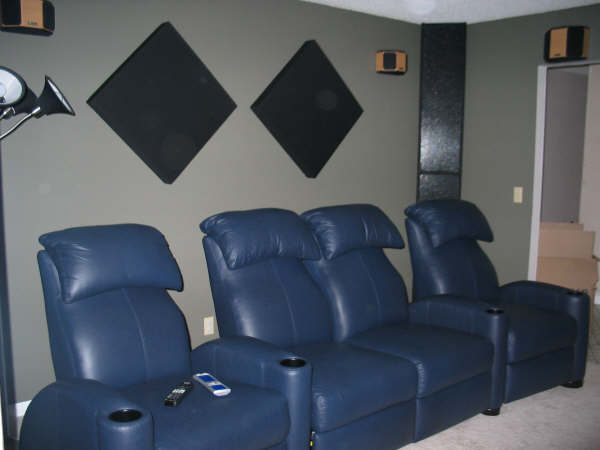 Like a Picture : The last four absorbers were 2' by 2'. For two, I used picture hanging wire secured by about 7 inches down from the top on the inside of the frame. This seemed to work very well and was easily adjustable (follow the instructions for installing the wire on whatever kit you buy). For the other two, I suggested that we hang them on the back wall with a point towards the ceiling so that they looked like diamonds. Much to my amazement, my wife agreed. Then I started thinking about the logistics of hanging them and I couldn't even contemplate how to utilize the French Cleats or wire with the diamond shape while ensuring the diamonds are equidistance from the walls, ceiling, and each other. I decided that they were light enough to use some picture hangers that I had lying around.
What I did is place a nail in the wall about where my wife indicated that she thought the absorber looked good. Then I measured from the side wall and the ceiling and placed a nail in exactly (well, more likely near) the same spot on the other side. I then installed the picture hanger on the corner that I wanted to go up. I tried to get the picture hanger as low (from the top) into the corner as possible so that it would not be visible. Overall, I think I succeeded.
Continue on to Part Two
As Associate Editor at Audioholics, Tom promises to the best of his ability to give each review the same amount of attention, consideration, and thoughtfulness as possible and keep his writings free from undue bias and preconceptions. Any indication, either internally or from another, that bias has entered into his review will be immediately investigated. Substantiation of mistakes or bias will be immediately corrected regardless of personal stake, feelings, or ego.
View full profile