
DVD Player Setup
Onkyo's DV-SP1000
Let's dispel the mystery about the back of your DVD player by using the most complex type of DVD player available as our example, the Universal DVD player. Universal DVD players like Onkyo's DV-SP1000 has more connection options than most DVD players; if you can hook up a Universal DVD player to an A/V receiver you'll have the fundamentals to make any DVD player connection.
Despite the plethora of connections this player has everything laid out neatly. From left to right, special digital outputs are located on the left side; HDMI, RS232 and iLink (IEEE 1394). Analog video output options beside those, then digital audio outputs, and finally your analog audio outputs (below those are an extra set of Component video outputs).
Digital Outputs
The most important connection option available here is the HDMI output (the small flat slot on the right). This carries digital audio and video information from the player to your A/V receiver. Only high-end DVD players and receivers will include an HDMI connection, they provide the best possible audio and video reproduction from source material available. iLink (bottom left) and RS232 (top left) connections are special outputs only for devices which could include computers that might make use of unprocessed digital signals.
DVD Player to Receiver and HDTV
- Connect the digital audio output (S/PDIF) output to your A/V receiver's input. (either optical or digital coax). This will provide the best possible audio to your receiver and will allow your receiver to decode Dolby Digital or DTS if available.
- Connect the DVD player's component video out to the receiver's component video input.
- Connect the receiver's component video output to the component video in on your HDTV, this will provide de-interlaced video to your HDTV.
Analog Video
These are the DVD player's standard video output options, all of them send an analog video signal to the A/V receiver or directly to the television. Component outputs are the red, green and blue connectors at the top. Component outs are present in any progressive scan DVD player and can be connected to an A/V receiver that includes component ins and outs or they must be directly connected to your HDTV set for the best possible analog video.
The other two options are S-Video and Composite shown side by side. These are designed for regular TV, NTSC video (non-HDTV). Use the S-Video out whenever possible as they're the best possible analog video for a standard TV, these can also pass through your receiver or connect directly to your TV.
DVD player to receiver (NTSC only - non-HD )
- Connect the digital audio output (S/PDIF) output to your A/V receiver's input. (either optical or digital coax). This will provide the best possible audio to your receiver and will allow your receiver to decode Dolby Digital or DTS if available.
- Connect the s-video output on the DVD player to the s-video input on the A/V receiver. S-video will provide the best possible NTSC (non-HD) video quality. S-video output on the receiver to the s-video in on the TV.
Digital Audio Output
Digital audio output is also called S/PDIF format and is essential for multi-channel surround formats like Dolby Digital and DTS and is generally considered to provide the best audio quality. Two sets of digital outs (Digital 1 and Digital 2) means this player can provide sound to two receivers at the same time and in keeping with the high end mentality of this model it provides you with either S/PDIF format digital coax or Toslink.
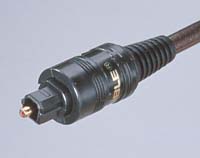
Toslink connector
Both are equal in audio quality so coax makes the obvious choice because the cable itself is much cheaper than Toslink.
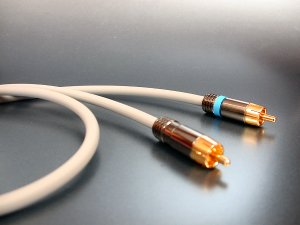
Digital coax is in indistinguishable from a standard RCA cable, except that it's rated at exactly 75 Ohms. Toslink, also called fiber-optic, sends the digital signal as beams of light. Since there are two standards you have to be sure to match them up appropriately with what's available on your A/V receiver's inputs.
Analog Audio Outputs
Connected with standard RCA cables (sometimes simply called interconnects). These outputs on the DVD player are to be connected to any receiver with a cluster of similar inputs they call 5.1 inputs. These are generally used for the high resolution audio formats, SACD and DVD-Audio. They can also be used instead of a digital audio output because it will send the multi-channel signals to the receiver. The outputs will have corresponding inputs on a Home Theater receiver that has pre-ins or 5.1 inputs.
Universal DVD player with HDMI
- Connect the digital audio output (S/PDIF) output to your A/V receiver's input. (either optical or digital coax). This will provide the best possible audio to your receiver and will allow your receiver to decode Dolby Digital or DTS if available.
- In addition to the S/PDIF digital output to the receiver you'll want to use your analog audio outs. Six separate RCA cables will connect each channel's output from the Universal DVD player to the A/V receiver for playback of high resolution audio. (*see #4)
- In this example the HDMI output on the Universal DVD is connected directly to your HDTV with an available HDMI input. The HDTV will have its digital video input selected separately from the A/V receiver to watch DVD.
- Optional: The IEEE 1394 connection can be used with a compatible receiver to send universal DVD-Audio and SACD signals from the universal player to the receiver (assuming the receiver has an IEEE 1394 connection.) If you are able to do this then you simplify your setup by eliminating the need for analog audio cables (step #2 above)

Standard RCA connector
The important things to note when making all of these connections is to be sure and join the outputs on the DVD Player with the corresponding input on the receiver using the appropriate cables. Keep left and right consistent, always join the left out to the left in. Don't put all your faith in the color scheme (red=right, white=left) as these are not necessarily universal standards and other colors can be introduced.
Special Thanks to Home Theater Focus
Wayde is a tech-writer and content marketing consultant in Canada s tech hub Waterloo, Ontario and Editorialist for Audioholics.com. He's a big hockey fan as you'd expect from a Canadian. Wayde is also US Army veteran, but his favorite title is just "Dad".
View full profile