
Powerstrip Program Guide - A User Manual
Powerstrip program
Powerstrip
is indeed "the killer app" of the HTPC world. It is
possibly the most important program today in the "convergence" market
between computers (PC only unfortunately!) and the
high definition television (HDTV) or Projector marketplace.
With it you can craft a custom resolution and sync
timings to enable the best possible display of your
computer Desktop, DVD's and other video sources from
an HTPC to an HDTV or Projector.
To use Powerstrip, you must have a video card that supports custom resolutions.
Some of the cards that support custom resolutions are the ATI Radeon series,
Matrox G-series, Parhelia, NVidia or 3dfx graphics cards. Some of the cards
that do not support custom resolutions are the S3, SiS, Trident, Intel, ATI
Rage and Rage128 cards.
This guide is only meant to augment the great wealth of information on this
program that is already available. It is by no means complete and certainly
not guaranteed to be 100% accurate. The idea was to try and create a "Powerstrip
for the Powerstrip impaired" type of guide, with pictures to make it a little
easier. This is truly easier said than done. Hopefully this guide
will be helpful. Any suggestions will certainly be appreciated.
You will need to understand the difference between "i" (Interlaced) and "p" (Progressive)
video before continuing.
Forewarned is forearmed, so before we even get started there are things you
need to know.
What you need:
- Powerstrip: www.entechtaiwan.com
- Setup/emergency "CRT" Monitor (in addition to your main HDTV Display)
 A CRT monitor (regular old, "picture tube" type monitor) of pretty good size
is recommended for troubleshooting and setup. The bigger and bolder the display
is, the better it will be for this - especially if you will be shooting for
higher resolutions or "interlaced" resolutions. Monitors that support
a wide variety of resolutions and refresh rates are best.
A CRT monitor (regular old, "picture tube" type monitor) of pretty good size
is recommended for troubleshooting and setup. The bigger and bolder the display
is, the better it will be for this - especially if you will be shooting for
higher resolutions or "interlaced" resolutions. Monitors that support
a wide variety of resolutions and refresh rates are best.
Big,
old Sony Trinitrons are often favored. You
can certainly use a smaller monitor if your intended
resolutions
will work on it. You just have to be more careful.
Note1: There are a number of old "Workstation" monitors out there on the used market which are "fixed frequency", these will not work for this.
Note2: You cannot create resolutions which have a greater resolution than what your Displays driver allows. If Windows believes your monitor is only capable of 1284x1024, these are the maximum horizontal and vertical resolutions windows will allow you to use. The "workaround" is to change your Display Driver in "Device Manager".
An
often used display
driver for this is the Sony GDM-W900, since it will
take a very wide range of resolutions and refresh rates.
While it's true you can fool windows into thinking
your monitor can handle more than it should, remember,
you can't fool your monitor. If it's not a GDM-W900,
or something similar, it will not display any crazy
thing you send at it. Be careful.
3. Patience and "Nerves of Steel"
Powerstrip is very powerful, but also quite capable of causing your computer
and display to stop "communicating" properly, this could cause the display
to start rolling, doubling or generally freaking out. It is important
that you don't freak out as well. It is recommended that you know how
to start up your computer in "Safe" mode and "VGA" mode (safe mode for Win9x
users) , uninstall and reinstall drivers and get around in "Device Manager" if
you wish to use this software.
Legal disclaimer thingy: Use at your own risk! We are not aware of anyone causing damage to their display devices using this software, or any of the methods used in this guide, but if any damage should occur, we are certainly not responsible. Please sue someone else.
4. You need to have an HDTV or Projector capable of resolutions over 640x480i
(standard NTSC Television) in general to get the most from the software.
What you need to know Beforehand:
AFTERSHOCK!
OK, after you have Powerstrip installed and have a setting that actually works,
what problems might you expect then?
Over-scan/Under-scan/ Screen Positioning:
You are going to have to deal with screen positioning,
size and "over-scan" or "under-scan" issues. This
is normal. For each resolution you set on an HDTV, you will need to tweak it
for over-scan, under-scan, screen sizing and screen positioning. Powerstrip
provides a variety of buttons for adjusting these parameters, or you can use "manual
settings" by typing them in. You can adjust settings for such strange things
as "front porch", "rear porch", "polarity" and more. Powerstrip does
make this a bit more user friendly than is sometimes good for an HTPC user,
since you will be tempted to "tweak" things faster than you should. Remember
- make slight adjustments and save them. Then make more slight adjustments
and save them.
You will possibly need to do a lot of "Window Resizing" to tame Windows obsession
with opening things in windows that will not fit on the display. Most
modern Windows versions will want to open windows that will not fit your
resolution, especially if you have an RPTV display that cannot do 720p. In
many cases you can resize all of the "important" windows to display properly. Some
windows, such as the "Advanced Display Properties" window may very well be
too tall for the screen, and you will not be able to resize them. For
these windows, either unplug the "intended final display monitor" (your HDTV)
and switch to your CRT monitor, or use the "lucky tab" method - use the <tab> key
until you think you have the "OK" button selected and the press <Enter>. Some
popular programs will not work without a resolution of at least 800x600.
These programs will not work if you can't get a resolution that high. For many
RPTV users you'll need to switch to your CRT or another monitor that supports
the resolution if you wish to use these programs. Either that or get
a HDTV, plasma screen, Projector or other display which can handle at least
800x600.
Getting Started
OK, on with it...
Connect the CRT!
Install Powerstrip, restart.
"Click" the Little Powerstrip icon.
Select "Options..." -> "Preferences..."
The following screen will appear...
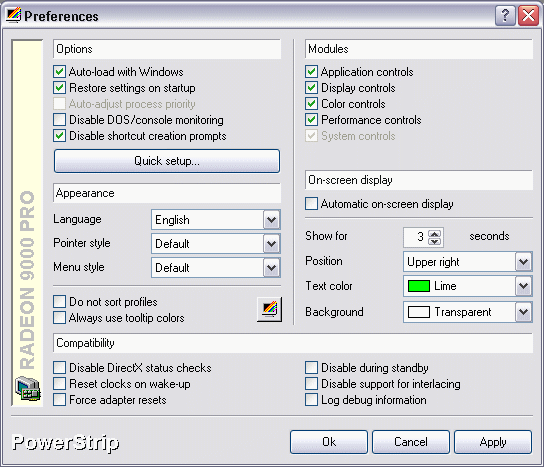
At
the top left, find the checkbox for "Auto load with Windows",
and check it.
Click the "OK" button.
Try a new display setting:
First try a default Display Profile:
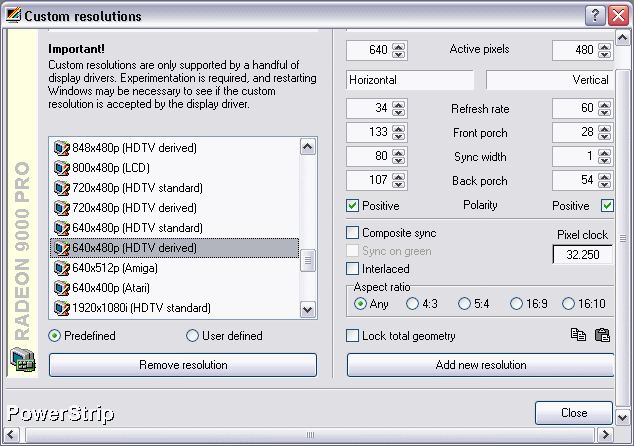
Click the Powerstrip tray icon and select "Display Profiles" -> "Configure".
Select the "Advanced timing options" button.
Select the "Custom Resolutions" button.
With the resolutions set to "Predefined" (default) rather than "User defined" Select
640x480p, or another resolution that is compatible with your HDTV.
Check to make sure everything looks ok. For instance, if using the Key
Digital KD-VTCA2 Transcoder, make sure the sync Polarity is set the same in
Powerstrip as it is set on the Dip Switch on the Transcoder.
Click the "Add new Resolution" button.
the following screen usually appears the first
time you use a custom resolution.

You
can either click "restart" now or continue and add
more resolutions by clicking the "continue" button.
When finished adding resolutions you want to try
using, click "Restart". Remember not to get too ambitious
with resolutions at first.
Your computer will start up again into the original resolution you were using,
not the newly added resolutions, so don't get ready to panic yet. Wait until
later.
Powerstrip - Configuring for Your Display
If things are working fine after restarting, you are ready to try the new resolution.
Click the Powerstrip tray icon and select "Display Profiles" -> "Configure".
Use the "Resolution" Slider to find your Resolution. In this case it
should be "640x480 pixels", or the resolution you are trying to use.

To see if your display accepts the resolution, click the "Advanced Timing options" button.
You will get the following popup window...
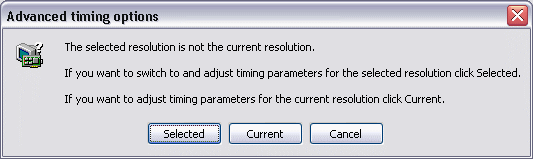
Click the "Selected" button to choose your newly set resolution.
If you get an unusable display, wait 15 seconds or hit the <Esc> key and you should go back to your regular settings.
If you can view the display, you should get the following popup window...
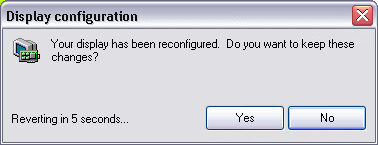
The
time should count down from 15 seconds and reset your display back to
normal if you don't click the "Yes" button. If you're able to see
things somewhat properly, ready to start adjusting things, click "Yes".
Note: If the display is not centered, too tall or too narrow, you will need to tweak things, so you'll need to click "Yes" to do that. Don't expect things to be perfect, just "useable".
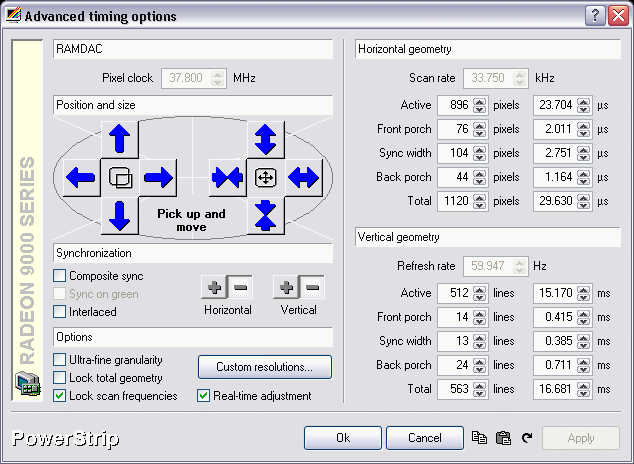
You should get the following screen...
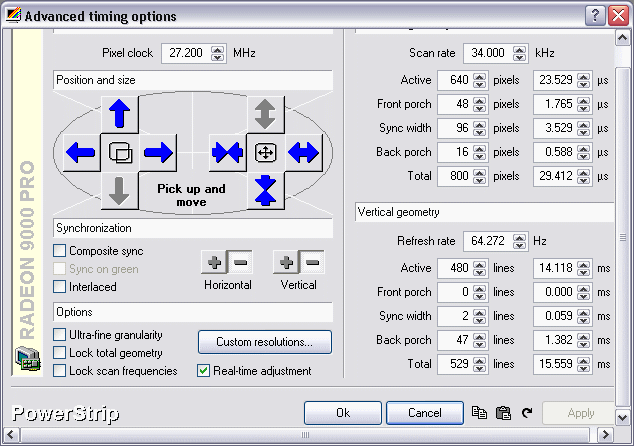
Notice above how the Horizontal and Vertical "+" and "-" buttons are depressed or not depressed. The above setting is for negative sync.
Note: You should usually not change the sync settings using your HDTV, use the CRT for that.
Testing with Your HDTV
Now you are ready to plug in your HDTV. If you get an unusable display,
plug your CRT back in and relax a bit. If you get a display that
doesn't roll and looks relatively ok, you are ready to start "Tweaking"
the display.
If you have a Problem:
If things are bad, reattach the CRT and check your settings. A monitor will usually be far more forgiving than your HDTV, so you need to be more detail oriented when trying to make it work. Make sure the settings look like they should work with your transcoder if you are using one. Is the polarity correct? Resolution compatible and properly set on the transcoder or projector?
If this does not work, try a different "Predefined" resolution. If things don't work only when connecting the HDTV or Projector (PJ) , recheck your transcoder settings and/or Display devices supported resolutions. Maybe it does not support 640x480p? Scan rate not correct? Try again, repeat as necessary.
If you get upset. STOP! Try again when you feel calm and relaxed. Browse the aforementioned forums for clues.
OK, then, assuming you get this working. We are not going to "tweak" the settings yet. For instructions on doing this see the "tweak" section. The thrill of 640x480p will certainly wear off quickly. Not enough room!
Next you may want to experiment with more of the "Predefined"
resolutions, if you think they should be compatible with your display.
848x480 is a good place to start for people with widescreen 16:9
displays that accept 540p/1080i vertical resolutions. Use the same
techniques you used above, especially the part about stopping and
relaxing when things aren't working.
Custom Resolutions
We are now going to create a new Display Profile. We will be using
1080i/540p based timings to match our RPTV HDTV display which does not
support 720p.
[note] If your display supports 720p (you're sure?) we highly recommend
you use 720p (around 45 kHz Horizontal)... Make very sure your set
REALLY supports 720p, some will convert 720p to 480p or 1080i, in which
case it will not accept the necessary Horizontal scan rate and won't
work!
Scan rates
480p and 960i should use a Horizontal Scan Rate of 31.5 KHz.
540p and 1080i should use a Horizontal Scan Rate of 33.75 KHz.
720p and 1440i should use a Horizontal Scan Rate of 45.0 KHz.
Fudging these numbers a bit is possible to a small degree, depending on the display.
Click the Powerstrip tray icon and select "Display Profiles" -> "Configure".
Select the "Advanced timing options" button.
Select the "Custom Resolutions" button.
Change the resolution button to "User defined" rather than the "Predefined" (default).

Note: Your horizontal resolution for most video cards should be divisible by 8. Good resolutions to use are therefore 848, 856, 864, 872, 880, etc. For those mathematically challenged, 8x112=896. Keep multiplying 8 times some other number to find resolutions to try. For a 16:9 display, with an 896 horizontal resolution, you would take 896, multiply by 9 and then divide by 16. You get 504.
["horizontal-resolution" x 9 / 16 = "vertical-resolution"]
Use the same technique for 4:3 displays. You will probably want to shoot for smaller horizontal resolutions than a widescreen display.
["horizontal-resolution" x 3 / 4 = "vertical-resolution"]
We will use 896 for Horizontal and 504 for vertical resolutions.
Set the Horizontal refresh rate to 34 Hz.
Make sure "Polarity" settings are the same as what you found to work previously.
Keeping the "Aspect Ratio" on "Auto" is usually a good idea, but you can change this if you need to.
Click the "Add New Resolution" button and you should again get this screen...
You can either click "restart" now or continue and add more resolutions by clicking the "continue" button. When finished adding resolutions you may want to try, click "Restart".
After restarting
Click the Powerstrip tray icon and select "Display Profiles" -> "Configure".
Change to the new resolution, in this case "896x504".

Click the "Advanced timings options.." button.
Note: If you now have a problem with the display, again, DO Nothing for fifteen seconds and the display should change back to the previous settings and start working again.
If not, try these key combinations:
"backspace" key - undo, cancels last adjustment.
"ALT-R" key combination - resets display , continue.
"escape" key - reset and close display.
Assuming you get this working... on to tweaking...
Powerstrip - Tweaking and Conclusion
Tweaking
Section
First of all, you may (especially with an RPTV) have
to compromise between resolutions and amounts of
over-scan and/or under-scan on both horizontal and
vertical resolutions. Much depends on your display.
Terms
- Horizontal - wide, narrow - left, right.
- Vertical - tall, short - up down.
- Over-scan - The desktop or other video input is too wide or tall for the display, and is "cropped", or sort of, "past the top/bottom/sides of the display".
- Under-scan - The visual content is too short, or too narrow to fit the display.
- Position - The screen is not centered!
Making Adjustments:
Setting the proper scan rates - Important!
Set the Horizontal scan rate to 33.75 and hit your "Tab" key (540p/1080i).
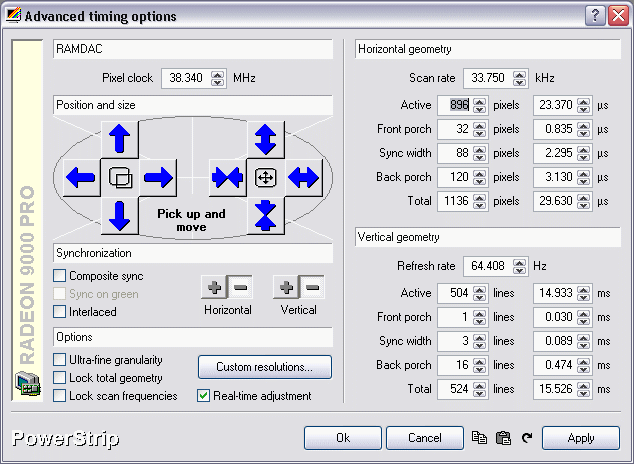
Set the "Total lines" in the "Vertical geometry" section to "563"(540p/1080i)
Note: Set this for 525 for 480p/960i. See below...
Why? See this excellent guide at Keohi HDTV: http://www.keohi.com/keohihdtv/experttips/markrehjon/htpc_superguide.html
Will other totals work? Sure, depending on the display. Notice how above, the
Horizontal scan rate is 33.75 and the vertical scan rate is 59.94? This is
ideal for "standard" HDTV 540p/1080i. Use settings as close as possible to
these for 540p/1080i! Reread the above guide if you have questions.
[note] Don't save this setting until you verify you can "get to" the taskbar!
Make enough vertical (up/down) adjustments until you can see enough of it to
get back into Powerstrip, etc.
Tip: It is probably a very good idea to check the "Lock scan frequencies" checkbox at this point. This will keep your Horizontal scan rate locked at 33.750 kHz and your Vertical scan rate locked at 59.94kHz. See below...
Each
time you save your settings and go back into the
adjustment
screen you will need to "recheck" the "Lock scan frequencies" button.
Connect your HDTV.
We have found it useful to not "tweak" our settings for the "Setup" display unless necessary. Get things to sync up, and be viewable on the Setup Display, then do your final position/size tweaks with the HDTV attached. Have the CRT monitor ready for your inevitable forays into "nonviewability".
Now is the time to be very careful and save settings very frequently. Very, very frequently. To save your settings you must click the "OK" button on the "Advanced timing profiles.." screen as well as the "Ok" button on the "Display Profiles" screen in Powerstrip. Since we don't want to say that over and over again, we will designate that process as "Ok-Ok".
Adjustments should be made very slowly. Try moving your screen horizontally by clicking the horizontal "Position" button
twice, towards the side it is farthest away from. "Ok-Ok".
Note: if the screen freaks out, hit the "escape" (<Esc>) key on the keyboard to get back to the "display Profiles" screen. This is probably going to be your favorite key in the world when using this program. Try this again while watching the "front porch" and "Back porch" settings. Notice how they change?
Wow! When you move left or right, one porch gets bigger and the other smaller.
When you move left, your horizontal front porch gets bigger and your horizontal
front porch gets smaller. When you move up, your vertical front porch gets
bigger, while your vertical back porch grows smaller. If you want to adjust
your porches manually, keep this in mind, and carefully move your porches in
this fashion. If you keep changing a front porch without adjusting the back
porch, you will soon be using the <Esc> key!
Remember to be very careful not to let the start menu (Taskbar) disappear from
the screen (too low) before saving. You should also be careful to make sure
your maximized windows are not too large to fit the screen. Don't do this
by maximizing the window! Use your mouse to investigate your screen. If it
disappears from your screen in one direction, you're adjusted past the edge
on that side. You should move your display towards the opposite side. If
you save your settings before doing this, you may not be able to reach important
things like the "X" (close button) or other important parts of some windows.
It is easiest to just use the buttons for making adjustments to your screens
width and height. Use the directional arrows to move towards the direction
the arrow is pointing in. The arrows pointed towards each other buttons will
shrink the screen, arrows pointed away from one another buttons will enlarge
the screen. Careful! Save often. When an arrow button is "grayed out" you cannot
adjust this aspect further.

You will probably hit "the wall" at some point. You will have adjusted as far
as you can go, and will have to live with the over-scan/under-scan for the
displays resolution settings. You can always try a different resolution. If
you are over scanned, try a slightly smaller number for the resolution for
the aspect which is too large. Remember the divisible by 8 rule. Keep the aspect
ratio close to 16/9. Make sure your scan rates are correct for your display
and "lock" them while adjusting. Hopefully you won't need that CRT anymore
after awhile.
Stuff to remember:
- "backspace" key - undo, cancels last adjustment.
- "ALT-R" key combination - resets display , continue.
- "escape" key - reset and close display.
- PowerStrip safe mode hot key - Ctrl+Alt+S
Uncheck "Positive" Polarity for both Horizontal and Vertical, if your transcoder
is set for negative polarity sync and your HDTV "likes it".
*note* Changing polarity will generally freak out your HDTV display if it is
attached, and you may need to connect your "setup" CRT for this procedure and
possibly restart.
We would like to thank Ram Electronics Industries, Inc. for allowing us to reprint this informative article.
Powerstrip's official forum: http://pub28.ezboard.com/bentech
Excellent guide at Keohi HDTV: http://www.keohi.com/keohihdtv/experttips/markrehjon/htpc_superguide.html
Other forums
with good stuff:
http://www.hometheaterforum.com
http://forums.theatertek.com/
The Official Entech PowerstripForum - Great in-depth information.
http://pub28.ezboard.com/bentech
Then there's TigerDave's Custom Game Resolutions Matrix:
http://www.tigerdave.com/custom_res.htm