
Building a Home Theater PC - A Targeted Guide
Building an HTPC
Intended
Goals for This Article
- Output RGB/VGA to LCD projector for DVD playback on large screen
- Attain Dolby Digital/DTS pass-through to receiver
- Play MP3s, MPEG-4 video from library
- Play PC games with premium sound
- Browse the web
Additional HTPC Articles May/Will Address
- Installing Software and Configuration
- DVR Functionality
- Integrating Cable TV & program guides
Introduction
I have always had a fascination with computers - I think it started in second grade when we were allowed to design simple ASCII art programs on a Commodore Pet. With the advent of current technology, and the inevitable merging of the computer with the entertainment system, my fascination has recently manifested itself into a near-obsession with the Home Theater PC, or HTPC. The idea for this article came from talking with lots of people who weren't familiar HTPCs and what they meant in terms of entertainment devices. This article will not only explain HTPCs and their strengths, but will also serve as a basic guideline for building your own Home Theater PC. Along the way, we'll clue you in on where to obtain certain components to build a working model of your own.
Whether you are into building PCs or not, one thing this document will do is give you a better understanding of why HTPCs are coming to your home, and what all the hoopla is surrounding the technology. Avoid it if you want to, but even the major manufacturers of home theater equipment are getting into the game by producing a whole new line of wireless and networked technologies designed to accomplish at least some of the functions of a good Home Theater PC.
OK, So What Exactly IS a HTPC?
Simply put, a Home Theater Personal Computer accomplishes some or all of the following:
- Allows you to store digital audio & video files for playback
- Facilitates the pass-through of digital audio and Dolby Digital/DTS signals to your receiver for accurate surround sound processing
- Allows playback of DVD, CD, VCD, SVCD, MP3 and other formats
- Outputs high-resolution video to your HD television or LCD/DLP projection system (alternatively, an HTPC can also output S-Video or component NTSC video, but we feel this defeats one of the main advantages of the HTPC)
- Allows you to output computer-only content to your display system (i.e. games, streaming content, internet browsing, etc)
- Add your preferred use here...
How much of this it accomplished depends upon your goals and your other system components. In talking with others about HTPCs, I have found many different reasons for setting one up:
- Allowing high quality video to display on an HD monitor
- Allowing DVD playback on an LCD/DLP projection system
- Desiring to convert NTSC input signals to HD for high-resolution playback
- Wanting to browse the internet in your living room
- Wanting a single location for all entertainment media
- Desiring high-quality surround audio playback for games
- All of the above!
Building an HTPC - Parts List
So Why Build One?
Building an HTPC is going to be FAR more cost effective than purchasing a pre-configured system outright. However, if you are uncertain of your PC-building and/or troubleshooting skills, HTPCs can be bought for around $2000 (prices vary up or down).
If
you are adventurous or technically-inclined, building
your own HTPC can be an exciting and rewarding project.
You are certain to have your share of headaches along
the way, but the results are worth it, and the savings
are substantial . Utilizing this guide as a
reference, you can build an HTPC for anywhere between
$500 - $1000 depending upon the parts you choose and
the goals you have in mind. And yes, you can always
spend more!
Starting at the Top: The Parts List
Starting from the top you need to have the necessary parts to make an HTPC. As this is an intensive process, I've started with a unit that will primarily be used to get high-resolution video signal to my LCD projector and store my music and game files.
What kind of computer does it take to run an HTPC? Depends on what you want to accomplish. In this design, we are using an Athlon 900MHz processor on an old ASUS A7V motherboard. This processor/motherboard combination was great in its day, but is now considered relatively slow by today's standards. The surprising fact is, this type of motherboard/processor combination is more than enough to build a basic HTPC, provided you aren't attempting to decode the new HD formats supported by Windows Media Player 9. Let's take a look at the actual components utilized in the construction of this particular HTPC as well as comparable currently shipping parts:
|
Part (actual) |
Part (present-day) |
Price |
Where to Buy |
|
DVD-ROM Drive (Lite-on) |
DVD-ROM Drive (Lite-on) |
$34 |
|
|
Motherboard (ASUS A7V) |
Motherboard (ASUS A7V8X-X) |
$67 |
|
|
AMD Athlon 900 MHz |
AMD AthlonXP 2000+ |
$65 |
|
|
256MB PC133 SDRAM |
256MB PC3200 DDR RAM (CRUCIAL OEM) |
$54 |
|
|
40GB HD (WESTERN DIGITAL) |
80GB 7200RPM HD (MAXTOR, WD) |
$49 |
|
|
10/100 NIC Card |
On-board LAN |
$0 |
|
|
SoundBlaster Live! 5.1 OEM |
SoundBlaster Live! 5.1 OEM |
$33 |
|
|
nVidia Geforce4 MX |
Geforce4 MX440 (CHAINTECH) |
$47 |
|
|
PSI Vision II HTPC Case |
PSI Vision II HTPC Case* |
$329 |
|
|
Matrix Orbital VFD |
Matrix Orbital VFD |
$89 |
|
|
350W Power Supply |
350W Power Supply |
$32 |
|
|
BTC 5113RF Wireless Keyboard/mouse |
BTC 5113RF Wireless Keyboard/mouse |
$20 |
|
|
Chassis cooling fans (2) |
Chassis cooling fans (2) |
$10 |
|
|
Total Cost for HTPC |
$829 |
|
|
|
Total Cost for HTPC without Case/VFD |
$411 |
|
|
*If you absolutely cannot afford a true HTPC case, then you may substitute a Cooler Master ATC-610-GX1 for around $137, or even purchase a regular ATX case with power supply for under $60.
Building an HTPC - Not a PC
Building an HTPC, or Building a Computer?
 One
thing I insisted on when building this HTPC was a clean,
integrated look with the rest of my system. I wanted
the HTPC to look like another piece of audio gear, not
just a computer sitting beside my home theater equipment.
What does this mean to cost? It can actually mean quite
a lot. In the pricing matrix above, you'll notice that
with the PCI Vision II Case, you increase your HTPC
cost by $329. Add a vacuum fluorescent display and the
price is bumped by another $89. So why opt for the more
expensive case? Because it looks GREAT - and you will
have purchased a quality component that will stand the
test of time. If you're serious about home theater,
you will definitely want to consider spending a little
extra to make sure that your HTPC looks as good as it
performs.
One
thing I insisted on when building this HTPC was a clean,
integrated look with the rest of my system. I wanted
the HTPC to look like another piece of audio gear, not
just a computer sitting beside my home theater equipment.
What does this mean to cost? It can actually mean quite
a lot. In the pricing matrix above, you'll notice that
with the PCI Vision II Case, you increase your HTPC
cost by $329. Add a vacuum fluorescent display and the
price is bumped by another $89. So why opt for the more
expensive case? Because it looks GREAT - and you will
have purchased a quality component that will stand the
test of time. If you're serious about home theater,
you will definitely want to consider spending a little
extra to make sure that your HTPC looks as good as it
performs.
OK, Let's Start with the Case, Then.
 That's
right, you simply can't build an HTPC without a case.
Now, you'll have to ask yourself just one question:
Do I want a PC hooked up to my entertainment system,
or do I want a sleek, integrated piece of gear that
looks as good as the rest of my equipment? My
answer to this question is pictured on the right. No
way was I going to be satisfied with just a PC - I wanted
it to look sleek. And why not, this is a valid piece
of my entertainment center and should be treated as
such.
That's
right, you simply can't build an HTPC without a case.
Now, you'll have to ask yourself just one question:
Do I want a PC hooked up to my entertainment system,
or do I want a sleek, integrated piece of gear that
looks as good as the rest of my equipment? My
answer to this question is pictured on the right. No
way was I going to be satisfied with just a PC - I wanted
it to look sleek. And why not, this is a valid piece
of my entertainment center and should be treated as
such.
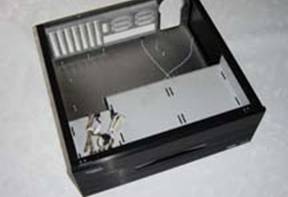
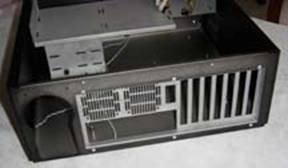
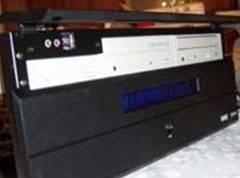
Probably the best HTPC case I've seen to date is Projection Systems, Inc's Vision II. The Vision II just looks solid. In fact, it appears to be built more ruggedly than any of my other components, including my 7-channel amplifier. The Vision II is about 7" tall and fits a full ATX motherboard inside, unlike some other HTPC cases that force you buy the miniATX for factor. One of the biggest advantages of this is the ability to use an older PC you may have lying around, which is exactly what I did.
The Vision II is quiet. Its 1/4" thick faceplate and solid 17.25" x 17.375" galvanized chassis hides nearly all of the hard drive and CPU fan noise inside of the case - where it belongs. The chassis features a removable top and independent removable side panels for easy component access and installation. The side panels lock into place and are held down by the cover. The top cover slides into retaining groves and is held securely with 2 thumb screws on the back panel. No tools whatsoever are needed for removal.
Building an HTPC - Adding the Components
This guide to building your HTPC will give you the basics, and teach you some things to watch out for, but your mileage will vary as all installs are different, as is each installer's level of experience. We'll try to give you some pointers along the way and do our best to help you avoid some of the common pitfalls.
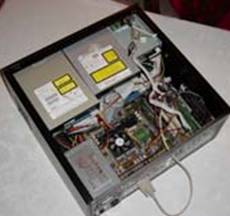
Step One: Open up the chassis/case
 Getting
familiar with your HTPC case, or in this case, chassis,
will help you avoid common pitfalls and ensure the correct
order of events. Open up the chassis and take a look
at the way it is assembled so that you can determine
the correct order of component insertion. In the case
of the Vision II, you will want to remove the hard drive
retainer and make any modifications to the display filter
first. I chose to remove the standard red filter and
replace it with blue. I also took this time to attach
the vacuum florescent Matrix Orbital display to the
front of the unit via the threaded mounts provided.
Be careful when attaching these glass displays to the
pre-mounted bolts - one slip and you will have $90 worth
of cracked glass! Order is important - in the case of
the Vision II there is no way to make changes to the
display once you insert the motherboard and drives!
Getting
familiar with your HTPC case, or in this case, chassis,
will help you avoid common pitfalls and ensure the correct
order of events. Open up the chassis and take a look
at the way it is assembled so that you can determine
the correct order of component insertion. In the case
of the Vision II, you will want to remove the hard drive
retainer and make any modifications to the display filter
first. I chose to remove the standard red filter and
replace it with blue. I also took this time to attach
the vacuum florescent Matrix Orbital display to the
front of the unit via the threaded mounts provided.
Be careful when attaching these glass displays to the
pre-mounted bolts - one slip and you will have $90 worth
of cracked glass! Order is important - in the case of
the Vision II there is no way to make changes to the
display once you insert the motherboard and drives!
Step Two: Hard Drives, Power Supply and Motherboard
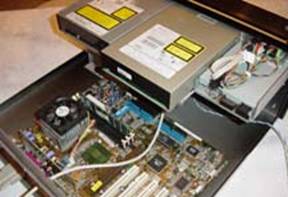 You
will want to mount your hard drives first, if you have
a removable tray system. In the case of most traditional
PC cases, you can install the hard drives after the
motherboard and Power Supply. With the Vision II, the
order was: hard drive, motherboard, power supply. This
offered me the most room to move and enabled a simple
installation process. Regarding hard drives, we'd recommend
at least 80GB if you want to store large amounts of
files for playback on your HTPC, even larger [dedicated]
drives can come in handy if you plan to use your HTPC
for recording video (to be covered in a subsequent article).
If you are running anything over an 800MHz processor
you should be looking at a 300W power supply minimum.
Anything above 1.7GHz will most likely want a 350W power
supply. Getting a power supply that is too small may
result in spontaneous reboots in WindowsXP due to not
having enough power to drive all peripherals like hard
drives, VFDs, NIC cards, sound cards, and even some
video cards which require additional power to run.
You
will want to mount your hard drives first, if you have
a removable tray system. In the case of most traditional
PC cases, you can install the hard drives after the
motherboard and Power Supply. With the Vision II, the
order was: hard drive, motherboard, power supply. This
offered me the most room to move and enabled a simple
installation process. Regarding hard drives, we'd recommend
at least 80GB if you want to store large amounts of
files for playback on your HTPC, even larger [dedicated]
drives can come in handy if you plan to use your HTPC
for recording video (to be covered in a subsequent article).
If you are running anything over an 800MHz processor
you should be looking at a 300W power supply minimum.
Anything above 1.7GHz will most likely want a 350W power
supply. Getting a power supply that is too small may
result in spontaneous reboots in WindowsXP due to not
having enough power to drive all peripherals like hard
drives, VFDs, NIC cards, sound cards, and even some
video cards which require additional power to run.
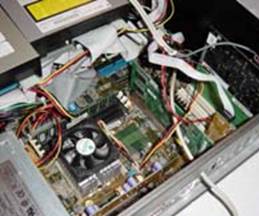
Step Three: Fans, Processor & RAM
 Once
the mother board is placed within the chassis or case,
you can add the CPU, chassis fans and RAM. We recommend
256MB of RAM or more for a successful HTPC. It will
free up 128MB for Windows XP and provide you with enough
additional RAM to run your DVD software and other applications.
We will also go ahead and recommend at least 800MHz
to run a decent HTPC for DVD, CD and MP3 playback. Again,
be sure to get something at or above 2GHz if you plan
to run Windows Media Player 9's new HD video format.
WeÕve found that the best bang for the buck can
be found at the AthlonXP 2000+ level.
Once
the mother board is placed within the chassis or case,
you can add the CPU, chassis fans and RAM. We recommend
256MB of RAM or more for a successful HTPC. It will
free up 128MB for Windows XP and provide you with enough
additional RAM to run your DVD software and other applications.
We will also go ahead and recommend at least 800MHz
to run a decent HTPC for DVD, CD and MP3 playback. Again,
be sure to get something at or above 2GHz if you plan
to run Windows Media Player 9's new HD video format.
WeÕve found that the best bang for the buck can
be found at the AthlonXP 2000+ level.
When inserting the processor, be sure to use suitable thermal conductive grease between the processor and the heatsink. Failure to do this will result in a poor thermal connection between the processor and heatsink - and problems are almost sure to follow.
Be sure to get some quiet chassis fans and ensure they cause air to flow across the motherboard to aid in cooling the processor and carry heat out of the case. I usually prefer to use 2 lower RPM fans, one for intake and one for outputting hot air. There are a number of inexpensive, low-noise solutions out there. IN addition, many motherboards will regulate fan speed based on temperature, a nice feature which serves to reduce noise when the CPU isn't being taxed too heavily.
Step
Four: Add Your Optical Device(s)
 I
have found that computers no longer need floppy drives,
however if you have an extra one lying around - go ahead
and add it to the system. The one optical drive you
will absolutely need is a DVD-ROM drive. It may also
be nice to include either an integrated or separate
CD-RW drive for backing up media and storing it for
later retrieval. In the Vision II case, up to two (2)
optical drives are mounted side by side, next to an
(optional) floppy drive.
I
have found that computers no longer need floppy drives,
however if you have an extra one lying around - go ahead
and add it to the system. The one optical drive you
will absolutely need is a DVD-ROM drive. It may also
be nice to include either an integrated or separate
CD-RW drive for backing up media and storing it for
later retrieval. In the Vision II case, up to two (2)
optical drives are mounted side by side, next to an
(optional) floppy drive.
Building an HTPC - AGP, PCI Cards and Connections
There's no special order to installing PCI cards and your AGP graphics card, but there are some tricks to getting the best possible performance out of the configuration.
AGP Graphics Cards
We recommended the use of a GeForce4 MX440 card. This is what we felt to be a good 'bang-for-buck' card that will provide decent VGA performance at a bargain price. For those desiring to spend a little more for the best and acquire something that can be used for capturing and playing back CATV, we recommend an ATI Radeon AIW 9700Pro or 9800Pro series. The ATI All-In-Wonder cards include an RF jack and integrated TV tuner for use as a CATV [playback/capture] card. There are also some incredible HD cards available now which include scan doublers, etc. Depending upon your setup, your mileage may vary.
One thing to note when installing your video card is that you may want to leave the adjacent PCI slot open. On several motherboards this PCI slot will share an IRQ with the video card, not to mention that it often reduces air flow to the video card's heatsink/fan.
 PCI
Audio Card
PCI
Audio Card
With respects to Audio, we recommend a budget solution of the SoundBlaster Live! 5.1 OEM card. This card has SPDIF output through a 1/8" mini jack on the back of the card. Simply use a 1/8" stereo mini jack to stereo RCA and enable SPDIF digital output on the card to send AC3-encoded signal out the card and into your receiver's coax digital input. These 16-bit cards will pass Dolby Digital 5.1, 6.1, DD EX, DTS and DTS-ES signals. For those seeking a 24-bit audio solution, feel free to upgrade to the Audigy2 line of products. There are more selections and manufacturers of course, including the Turtle Beach Santa Cruz and the M-Audio Revolution, and we encourage you to work with a solution you are comfortable with. If you are determined to have a solution that features optical TOSLink SPDIF, you want to look into getting an Optical Digital I/O Card II from SoundBlaster. It will work with both SB Live! 5.1, and Audigy2 cards.
In selecting a PCI slot for your audio card, we would recommend placing it in the last PCI slot (farthest from the AGP). This usually (but no, not always) results in the sound card receiving its own IRQ, or at least one separate from the video card, resulting in reduced bottlenecks. I have found the basic SB Live! 5.1 OEM card to be more than adequate for sending digital signal to my receiver for decoding DVD content.
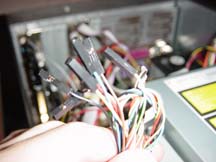
Step Six: Making Connections
 When
making connections, including hard drives, power, USB
connectors and the like, the key is accessibility
. Start with the most remote, hard to reach
connection and work towards the easier to reach connections.
In the case of the Vision II, you'll want to connect
the VFD serial cable first, followed by the hard drive(s),
and then proceed to the CD/DVD-ROM drives. Connecting
power to the Vision II can be a struggle as the distance
between most strung power connectors is too short to
go between two optical drives. We recommend getting
an extender for use with one of the drives.
When
making connections, including hard drives, power, USB
connectors and the like, the key is accessibility
. Start with the most remote, hard to reach
connection and work towards the easier to reach connections.
In the case of the Vision II, you'll want to connect
the VFD serial cable first, followed by the hard drive(s),
and then proceed to the CD/DVD-ROM drives. Connecting
power to the Vision II can be a struggle as the distance
between most strung power connectors is too short to
go between two optical drives. We recommend getting
an extender for use with one of the drives.
Your HTPC can easily end up looking like spaghetti inside if you use standard cables. If you are a neat freak, it may be a good idea to spring for some round IDE cables and tie wraps.
Step Seven: Hook it up to your system!
 Hook
it up! This is the easy part. You'll want to
plug in the optional VFD to the serial port, running
it through the provided opening on the back of the Vision
II chassis. For other cases, the rest of the instructions
are identical. Connect your VGA output (or S-Video output
if you aren't connecting to an HD monitor or projector),
the SPDIF output to your receiver's coax digital input
(optical if you purchased a breakout box or sound card
with a TOSLink connector) and your RJ45 connector to
your hub or wireless access point.
Hook
it up! This is the easy part. You'll want to
plug in the optional VFD to the serial port, running
it through the provided opening on the back of the Vision
II chassis. For other cases, the rest of the instructions
are identical. Connect your VGA output (or S-Video output
if you aren't connecting to an HD monitor or projector),
the SPDIF output to your receiver's coax digital input
(optical if you purchased a breakout box or sound card
with a TOSLink connector) and your RJ45 connector to
your hub or wireless access point.
Some Nice Extras
 If
you can manage the extra money, we really encourage
you to go the distance and make your HTPC look as good
as your other audio gear. As someone who had a PC hooked
up to my Reference System for some time now, I can tell
you it's an amazing difference, one that I feel is worth
the extra money.
If
you can manage the extra money, we really encourage
you to go the distance and make your HTPC look as good
as your other audio gear. As someone who had a PC hooked
up to my Reference System for some time now, I can tell
you it's an amazing difference, one that I feel is worth
the extra money.
With
respects to the Vision II, some of the nice extras were
the presence of sophisticated audio input and output
jacks on the front of the unit as well as a USB port.
Each of these came with a standard ATX connector as
well as split-out pins for a pin-by-pin connection to
legacy or non-standard motherboards. You may want to invest in some round IDE cables - they not only look nicer, but keep your chassis cooler as well by encouraging greater air flow.
Building an HTPC - Keyboard, Mouse, Conclusion
When examining available keyboard/mouse options, you will run into several options. Depending upon your responses to the following issues, you have several solutions:
- Will you want to play FPS or similar games on your HTPC?
- How close will you be sitting to your HTPC?
- Are you on a budget?
In taking the above list into consideration, you have several options:
- IR/RF wireless keyboard/mouse combo
- IR/RF wireless keyboard & IR/RF wireless mouse
- Wired keyboard & mouse
- RF wireless pointing device/mouse
IR (infrared) solutions will work well provided you have line-of-sight to the receiver. RF (radio frequency) solutions need to be rated for the distance you will be from the receiver. Keep in mind, most RF keyboards and mice are only rated for 1m (3 feet). We found and used a great RF wireless keyboard/mouse combo that will serve our needs well. There are no plans to use the
HTPC
for active FPS (first person shooter) or similar games,
so we went with a dual-channel RF keyboard with integrated
mouse. As the seating position is over 8 feet from the
HTPC, a wireless solution was essential to a successful
HTPC experience. With this in mind, gaming is not the focus of an HTPC - but it can still be cool.
Install OS and Update Drivers
Now is the time to install the OS (we recommend Windows XP Media Center Edition) and associated software. While we'll address the actual multimedia software in a later article, you'll want to upgrade WindowsXP to the latest version and update all of your drivers (especially nVideo or ATI display drivers where appropriate). You can also test your hardware, making sure that your DVD-ROM drive and hard disk are on separate IDE buses (you should notice this during the boot process). You may also wish to install some preliminary DVD software and test your ability to output AC-3 digital audio. We will be using PowerDVD.
What's Next?
Well, you have (hopefully) just successfully learned the basics to putting together an HTPC. Your next step, and ours, will be to install and configure the software and get your unit up and running. After that, we'll get into the real meat and potatoes and convert what is essentially a PC connected to a monitor into a home entertainment media center. We'll do this by integrating DVR functionality, channel guides and a host of other software solutions that bring out the best in a HTPC.
Right now, however, I'm going to go watch a DVD on the big screen!
Clint Deboer was terminated from Audioholics for misconduct on April 4th, 2014. He no longer represents Audioholics in any fashion.
View full profile