
Denon DVD-2910 DVD Player Review
Denon DVD-2910 DVD Player
- Product Name: DVD-2910 DVD Player
- Manufacturer: Denon
- Performance Rating:

- Value Rating:
- Review Date: March 28, 2005 19:00
- MSRP: $ 729
|
Supported
Formats Video
Features |
Inputs Audio
Features |
Pros
- Excellent Build Quality
- Intuitive easy to navigate GUI
- Extensive user adjustments and controls
- Excellent Audio & Video performance
- Fast Load times, very responsive to user commands
- Feature packed
- Progressive and interlaced outputs active simultaneously
Cons
- Remote control not back lit
- Fixed 80Hz Crossover
- Not able to shut off power indicator light on front panel
- 7.5 IRE Black level setting too low
- Failed Film Detail test
- Macro blocking bug
DVD-2910 Overview and Setup
Denon surprised many of us hard-core videophiles at this year's CES with their top of the line DVD-5910 DVD player. I was happy and excited when I became aware that I was going to review its little cousin the DVD-2910. This is the mid-priced player in their Universal DVD line up for 2005. Denon has proven they can consistently design and build quality DVD players that meet the performance level demanded by the home theater enthusiast. Will the Denon DVD-2910 prove to be another great player? Read on to find out.
Opening the factory box I found that the Denon DVD-2910 was well packed. The box contained the Denon DVD-2910, one Denon RC-985 remote control, two AA batteries, one user manual, one power cord and one set of 1 meter RCA interconnects. The factory must assume that you have a portable CD player at home to use them on because they are not suitable for hooking up this DVD player.
After unpacking and placing it on my makeshift stand (the box it was packed in), I noted that the Denon DVD-2910 is beautifully constructed. The front panel looks refined and classy. The circular buttons are easy to push and are slightly recessed from the front panel. The oversized standby button lights green when the DVD-2910 is on and red when in standby mode. I was not able to turn the power indicator light off. If the DVD-2910 is placed close to your monitor in a dark room the glow could be a minor annoyance. The front panel display is easy to read and provides all the information necessary to operate the DVD-2910.The back panel of the DVD-2910 offers a whole host of output connection possibilities including one each of digital coax, toslink, component, S-video, composite, HDMI and DVI. All RCA outputs are gold plated. One thing I noticed was how solid the HDMI and DVI connectors were fitted into the chassis. Many times I have seen these connectors installed into products without sufficient reinforcement. As a result, the connection wobbles and rocks inside the chassis and it's just a matter of time until they develop bad contacts. The Denon DVD-2910 has no such problem The player also comes with a detachable power cord.
Setting Up the Denon DVD-2910 Player
For the review of the Denon DVD-2910, I wanted to use multiple display devices and evaluate the video performance with both component progressive and DVI outputs. The Denon DVD-2910 also has an HDMI output but I did not use it. Regarding cables, I would admit to being a bit skeptical in regards to so-called "high end" products. I generally recommend and install cables based on these guide lines: #1 build quality, #2 reliability, #3 shielding, #4 termination, and #5 price-to-performance ratio. In my opinion these are the most important aspects of a cable. One of the staff members here at Audioholics suggested that I try some of the cables from Impact Acoustics. Being the skeptic that I am, I ordered them only because I respect the opinion of the staff member recommending them. I ordered the 10 meter Sonic Wave DVI cable because I wanted to see if there were any problems with the DVI connection at that length. I have run into problems with sparkling and artifacting on DVI cables over 7 meters in length. In addition, I ordered 4 pairs of 1 meter Sonic Wave analog interconnects and a 1 meter Sonic Wave digital interconnect. I don't want to go into an in-depth review of the Impact Acoustics cables; however, I must say that I was very impressed with these products. The DVI cable worked flawlessly, without any artifacting or sparkling.
 Just
for fun, I wanted to see if I could introduce RF into the cable by
wrapping an amplifier power cord cable around the DVI cable (Many times
the DIY'er will inadvertently run cables across 110v romex and this
will trigger many problems). The photo below shows the power strip and
amplifier power cable wrapped around the Impact Acoustics DVI cable.
The amplifier I used has a little transformer hum even when sitting
Idle. I was unable to introduce any noise or RF interference into the
cable revealing that the Impact Acoustics DVI cable has excellent
shielding. In addition to that, its build quality is exceptional.
Just
for fun, I wanted to see if I could introduce RF into the cable by
wrapping an amplifier power cord cable around the DVI cable (Many times
the DIY'er will inadvertently run cables across 110v romex and this
will trigger many problems). The photo below shows the power strip and
amplifier power cable wrapped around the Impact Acoustics DVI cable.
The amplifier I used has a little transformer hum even when sitting
Idle. I was unable to introduce any noise or RF interference into the
cable revealing that the Impact Acoustics DVI cable has excellent
shielding. In addition to that, its build quality is exceptional.
I used four pairs of Impact Acoustics Sonic Wave analog interconnects for the multi-channel output and the right and left mixed analog output. For the digital audio connection, I used one Impact Acoustics Sonic Wave digital audio interconnect. These cables are better built than the mass marketed over-hyped brands and offer more of the all-important price-to-performance ratio. You don't get any fancy packing with the non-retail versions of the Impact Acoustics cables, but you do get a nicely constructed cable for your hard-earned dollar and that is what turned this skeptic into a believer.
The Denon operating instruction manual is well written and easy to comprehend. Entering the setup menu is as easy as a push of the button labeled Setup on the RC-985 remote. I found the Setup menu easy to use and navigate. The first page of the menu contains the language setup dialogue. I chose the factory default English; the next setting was subtitles. I chose the factory default "Off". Reading the manual, it says that you can select any one of 124 different languages.
 The
next page in the Setup menu contains the digital interface setup. On
this page there are two selections: HDMI/DVI black level. I selected
the factory default normal and HDMI. In audio setup I selected the
factory default 2 channel. The HDMI/DVI black level setting allows you
to choose Normal or Enhanced. If you are using the HDMI or DVI
connection and your black level is too low or your image appears washed
out, selecting the enhanced level will correct this. I chose to leave
the player in the factory default setting and adjust the black level on
my monitor. The other setting on this page is for the HDMI audio set
up. I did not have a receiver or pre-amp with a HDMI input so I was
unable to select this. It states in the user manual that you can select
Multi-channel output from the HDMI but I was unable to confirm this.
The
next page in the Setup menu contains the digital interface setup. On
this page there are two selections: HDMI/DVI black level. I selected
the factory default normal and HDMI. In audio setup I selected the
factory default 2 channel. The HDMI/DVI black level setting allows you
to choose Normal or Enhanced. If you are using the HDMI or DVI
connection and your black level is too low or your image appears washed
out, selecting the enhanced level will correct this. I chose to leave
the player in the factory default setting and adjust the black level on
my monitor. The other setting on this page is for the HDMI audio set
up. I did not have a receiver or pre-amp with a HDMI input so I was
unable to select this. It states in the user manual that you can select
Multi-channel output from the HDMI but I was unable to confirm this.
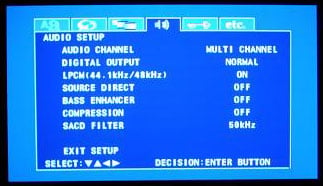
The next page in the Setup menu is for configuring the Audio Setup. The first setting is for audio channel speaker configuration. I chose the factory default multi-channel, because I have a multi-channel system. You can also select 2 channel SRS off or 2 channel SRS on. Highlighting the Multi-channel setting takes the user to a sub menu. On this sub menu page, there are the speaker configuration, channel level, delay time and audio set ups. I configured all my speakers to Large because they are full range speakers. I selected subwoofer on. Selecting the Small speaker setting will activate the 80Hz crossover on the analogue outputs. This is a usable crossover and is much more effective than the 100-120z crossovers found in some other DVD players. With that said we would still like to see a fully adjustable cross over for the analog outputs on even mid-priced DVD players. 40Hz-150Hz would be the desired range. The next item in the sub user menu is the internal test tone generator for the player. You can apply the test tone individually to the front left, front right, center, surround right, surround left and subwoofer channels. The user can adjust individual channel levels from 0dB to -10db (there is no gain which is as it should be). There is also a setting for adding +10dB to the subwoofer in conjunction with the subwoofer level adjustment. This setting is very useful in cases where the subwoofer's relative level is simply too low when using the analogue outputs of the player. The user can then trim the added gain by adjusting the subwoofer level. The next group of settings is for speaker delay times; they are available in both feet and meters. We have to applaud Denon for providing actual length adjustments instead of the millisecond adjustments found in many other players.
Back in the Audio setup menu I left the Source Direct in the factory default Off. When On is selected, it allows analogue output of the audio signal without adding any of the speaker size settings or delay times that were configured in the multi-channel sub menu. I left Bass Enhancer in the factory default Off position. The bass enhancer does not affect the digital outputs on the DVD-2910. The purpose of Bass Enhancer is to output the bass from the main channels to the subwoofer for two channel sources. This is a useful feature for those using non full range front speakers and require the subwoofer to be active to achieve full range sound. There is a final adjustment for SACD filter/crossover setting. You can select 50 kHz or 100 kHz and, unless you are a dog, we'd suggest leaving it at 50 kHz. I was very impressed with the amount of user controls and adjustments that can be made in the audio section of this player. With all the settings available to the user, it will be very easy to dial-in and calibrate a multi-channel system.
Pressing the Pure Direct button on the RC-985 remote or on the Denon DVD-2910 front panel allows you to select Normal, Pure Direct Mode #1, or Pure Direct Mode #2. The user can store the Pure Direct mode of their choosing: digital output on/off, video output on/off, display on/off, all on or all off or any combination in the two provided memory banks. In the SACD Setup menu you can choose to select the SACD mode Multi-channel, Stereo or CD. The wide range of user adjustability with the DVD-2910 is very impressive. The Denon engineers have hit a home run with the development of this user interface and impressive list of options and adjustments. They should be applauded for their efforts.
The DVD-2910 allows selection of five different progressive settings: auto 1 is the factory default, auto 2 is thirty frames per second film mode, video 1 is for regular video material, video 2 is for video material that has little movement, and video 3 is for video that has a lot of movement. Squeeze Mode in the "On" position displays 4:3 source DVDs in the correct aspect ratio on 16:9 screens while in progressive mode.
 Pressing
the Picture button on the RC-985 remote brings up a submenu that
contains extensive user adjustable picture controls. The user has five
different configurable picture mode settings. The user can adjust
contrast, brightness, sharpness, tint, cross color suppression, white
level, color density, chroma delay, noise reduction, horizontal
position, vertical position, and set up level either 0 IRE or 7.5 IRE
(factory default is 7.5 IRE.) The DVD-2910 even includes full Gamma
adjustments! Denon has thought of just about everything to get your DVD
player and monitor calibrated to correct levels and has given the user
an extensive amount of control. The use of five different memory banks,
all configurable makes this one of the most adjustable DVD players on
the market, and a videophile's dream come true. The forward thinking
and intellect to produce this kind of control is highly appreciated.
This is the new standard for user control and GUI. For this review I
left all the Picture adjustments at the factory default levels.
Pressing
the Picture button on the RC-985 remote brings up a submenu that
contains extensive user adjustable picture controls. The user has five
different configurable picture mode settings. The user can adjust
contrast, brightness, sharpness, tint, cross color suppression, white
level, color density, chroma delay, noise reduction, horizontal
position, vertical position, and set up level either 0 IRE or 7.5 IRE
(factory default is 7.5 IRE.) The DVD-2910 even includes full Gamma
adjustments! Denon has thought of just about everything to get your DVD
player and monitor calibrated to correct levels and has given the user
an extensive amount of control. The use of five different memory banks,
all configurable makes this one of the most adjustable DVD players on
the market, and a videophile's dream come true. The forward thinking
and intellect to produce this kind of control is highly appreciated.
This is the new standard for user control and GUI. For this review I
left all the Picture adjustments at the factory default levels.
DVD-2910 Remote Control and Build Quality
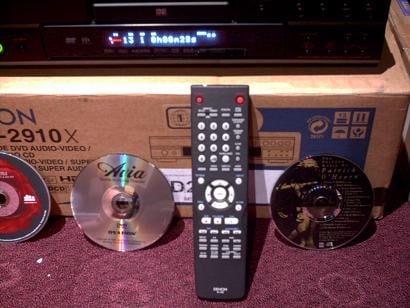 The Denon RC-985 is much better than typical remotes that come with DVD players. It is very responsive,
the buttons are well laid out, and it works from long distances and even at extreme angles. It is not
backlit and that's something we think is important assuming this remote will actually get used. In all
reality, we can see most users using this remote to program a universal remote - and Denon probably
realizes this. After transferring the functions, store it away for back up or set up functions
only.
The Denon RC-985 is much better than typical remotes that come with DVD players. It is very responsive,
the buttons are well laid out, and it works from long distances and even at extreme angles. It is not
backlit and that's something we think is important assuming this remote will actually get used. In all
reality, we can see most users using this remote to program a universal remote - and Denon probably
realizes this. After transferring the functions, store it away for back up or set up functions
only.
Build Quality: A Look Inside the Denon
DVD-2910
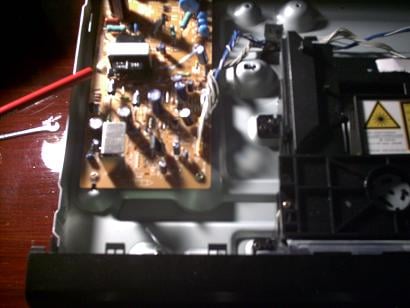
 Removing the top cover of the Denon DVD-2910
revealed the heart of the DVD player. The Denon DVD-2910 is beautifully constructed with high quality
components and its board layout and design are well engineered. Please don't remove the cover from your
DVD player. I am a qualified technician with the knowledge and tools to do this.
Removing the top cover of the Denon DVD-2910
revealed the heart of the DVD player. The Denon DVD-2910 is beautifully constructed with high quality
components and its board layout and design are well engineered. Please don't remove the cover from your
DVD player. I am a qualified technician with the knowledge and tools to do this.
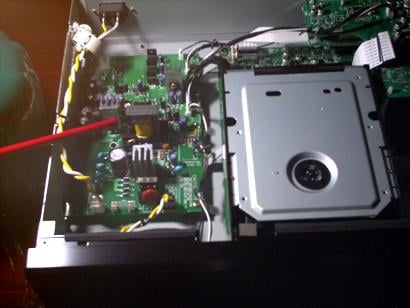
The Denon DVD-2910 uses a very robust power supply. Also note the ferrite core on the primary power cable and the size of the heat sinks!
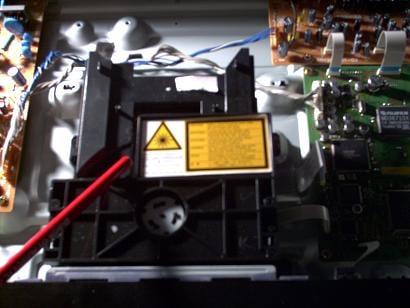
The DVD-2910 uses a very high quality transport that is mounted up high and away from heat generating sources. It is a vibration resistant design to reduce the effects of unwanted vibration from outside sources.
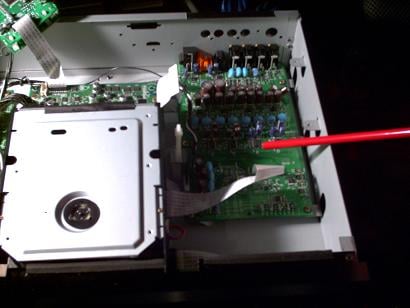
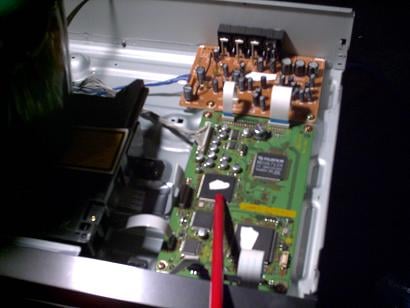
The DVD-2910's video board and FL2310 processor uses a 12bit/216 MHz video D/A converter. Once again very high quality components are used on this player's video board and the physical PC board was secured to the chassis with 10 screws.
The Denon DVD DVD-2910's audio board is mounted directly below the video board. I removed the video board for a closer look and found that the DVD-2910 uses 24 bit, 192kHz DSD-1791 audio DACs, an Analog Devices 32-bit processor and 80 Hz crossover with 12dB and 24dB low pass slopes, HDCD decoder, and 24/96kHz compatible digital outputs.
Now just for perspective let's take a look at the inside of a well-known DVD player that many of the electronics chain stores sell for about $200.
As you can see from these pictures the power supply power board and general power board layout is much smaller than the Denon DVD-2910. This is the typical transport found in lower end DVD players. It is an open design that is not isolated from vibration. You should also be able to see the video board and the small audio board located just behind. These pictures, visually at least, show the difference between a higher-end DVD player and a low-end DVD player. This particular DVD player was well regarded for its price point. But in this case you really do get what you pay for. There are simply no short cuts to building a high quality player. Engineering, R & D and higher quality components cost money; and in this case the Denon DVD-2910's build quality is exemplary.
DVD-2910 Benchmark Testing
Testing and evaluating a DVD player's performance with test discs and various display devices is somewhat subjective to the reviewer's interpretations of the test results and are not absolutely scientific. Thus, this review should be used as a guideline only. For review of this DVD player, the performance was based on the player and the display monitor. I used the new Hitachi VS810 70" LCD, Infocus 4805 DLP projector, and the Phillips 30PW850WH 30" HDTV. I used Avia, Digital Video Essentials and the Silicon Optix HQV Technology benchmark DVD test discs.
The Audioholics/HQV testing is rigorous. The simple fact is that many of the high-end DVD players cannot pass all the Audioholics/HQV tests. We at Audioholics feel there should be no compromise on borderline judgment calls on the tests. The DVD player either passes the test or it doesn't. It is our hope that with this testing, the DVD player manufacturers will continue to upgrade their implementation of the technologies and strive to make products that are fully capable of passing these rigorous test standards. A modest score on our test does not necessarily indicate that a DVD player performs poorly in real world installations. Please read the conclusions for our thoughts on the DVD player's performance.
All tests were performed with the DVD-2910 set in progressive scan mode (AUTO 1). Using the Avia test DVD I checked the player's resolution capabilities. The 6.75MHz pattern in the test was clearly visible and well defined, indicating that it correctly resolves high-resolution images. Switching to DVI at 1080i I was unable to detect any significant difference in the resolution pattern I also noticed very little pixel cropping with the DVI 1080i connection - approximately 2 pixels horizontally and 1-2 pixels vertically.
 After the resolution check, I proceeded to the black level test using Digital Video
Essential's pluge test pattern. The ability to display correct black level is an important part of a
DVD player's performance.
Correct black level settings will preserve shadow detail and improve
the depth and contrast of an image. Viewing the pluge pattern, I noted that when the Denon DVD-2910 is
in the factory default setting, and the picture setting is set to Standard. The black level was way too
low and the image was washed out. The blacker than black pluge was clearly visible. I entered the
picture setup sub menu and selected M1 or Memory 1. I attempted to correct the brightness level but the
brightness control only lets you
increase
the black level. I then selected Set in the same
picture sub menu; this allows you to change the IRE level from the factory setting of 7.5 IRE to 0 IRE.
When I selected 0 IRE my black level was near perfect; but all shadow detail was lost. I then
reselected M1 or memory one and began to adjust the brightness and contrast controls. Oddly you can
adjust the contrast control to a negative setting but not the brightness. I was able to obtain perfect
Blacker than black and perfect whiter than white with all three of the monitors I used.
However,
shadow detail was not correct; I reselected 7.5 IRE and then calibrated black level using the setup
menu in the display devices rather than the DVD player. I have been told that the current firmware
upgrade has corrected the 7.5 IRE black level gain and is available to all current owners of the
DVD-2910. Note that you can see the change made to the image because the picture setup menu is
minimized when you adjust a specific item. This makes it very easy to calibrate a display device with a
test disk and the user adjustments found on the Denon DVD-2910.
After the resolution check, I proceeded to the black level test using Digital Video
Essential's pluge test pattern. The ability to display correct black level is an important part of a
DVD player's performance.
Correct black level settings will preserve shadow detail and improve
the depth and contrast of an image. Viewing the pluge pattern, I noted that when the Denon DVD-2910 is
in the factory default setting, and the picture setting is set to Standard. The black level was way too
low and the image was washed out. The blacker than black pluge was clearly visible. I entered the
picture setup sub menu and selected M1 or Memory 1. I attempted to correct the brightness level but the
brightness control only lets you
increase
the black level. I then selected Set in the same
picture sub menu; this allows you to change the IRE level from the factory setting of 7.5 IRE to 0 IRE.
When I selected 0 IRE my black level was near perfect; but all shadow detail was lost. I then
reselected M1 or memory one and began to adjust the brightness and contrast controls. Oddly you can
adjust the contrast control to a negative setting but not the brightness. I was able to obtain perfect
Blacker than black and perfect whiter than white with all three of the monitors I used.
However,
shadow detail was not correct; I reselected 7.5 IRE and then calibrated black level using the setup
menu in the display devices rather than the DVD player. I have been told that the current firmware
upgrade has corrected the 7.5 IRE black level gain and is available to all current owners of the
DVD-2910. Note that you can see the change made to the image because the picture setup menu is
minimized when you adjust a specific item. This makes it very easy to calibrate a display device with a
test disk and the user adjustments found on the Denon DVD-2910.
Viewing Performance and Testing - The Audioholics/HQV Bench Tests
Perfect Score:
130
Denon DVD-2910 Score: 86
(This indicates an exceptional
player
at this price point)
|
Test |
Max Points |
Results |
Pass / Fail |
|
Color Bar |
10 |
10 |
Pass |
|
Jaggies #1 |
5 |
3 |
Pass |
|
Jaggies #2 |
5 |
3 |
Pass |
|
Flag |
10 |
10 |
Pass |
|
Detail |
10 |
10 |
Pass |
|
Noise |
10 |
5 |
Pass |
|
M otion adaptive Noise Reduction |
10 |
5 |
Pass |
|
Film Detail |
10 |
0 |
Fail |
|
Cadence 2:2 Video |
5 |
5 |
Pass |
|
Cadence 2:2:2:4 DV Cam |
5 |
5 |
Pass |
|
Cadence 2:3:3:2 DV Cam |
5 |
5 |
Pass |
|
Cadence 3:2:3:2:2 Vari-speed |
5 |
0 |
Fail |
|
Cadence 5:5 Animation |
5 |
0 |
Fail |
|
Cadence 6:4 Animation |
5 |
0 |
Fail |
|
Cadence 8:7 animation |
5 |
0 |
Fail |
|
Cadence 24fps film |
5 |
5 |
Pass |
|
Scrolling Horizontal |
10 |
10 |
Pass |
|
Scrolling Rolling |
10 |
10 |
Pass |
|
Total Points |
130 |
86 |
|
After conducting the bench mark tests, I was anxious to see how the Denon DVD-2910 would perform with real material. It did exceptionally well with the bench mark testing. I have stated in the past that I am not a believer in evaluating a DVD player or any other display device with reference quality DVD's like Shark Tale or Finding Nemo. These are great disks to show off your system but they make everything look good, Heck even the 13" TV in my RV looks great displaying Shark Tale. For this round of evaluating I chose the following DVD's: Dances with Wolves, Rush Hour 2, and Gladiator. As I loaded the first DVD, I timed how long it took the DVD player to load up the disk. It was a very fast 8.5 seconds. The transport was very quiet loading and dead silent when running.
DVD-2910 Viewing Tests
 DVD: Dances With Wolves
Dances With Wolves is an early
released DVD with average transfer quality. The image below is very good for evaluating DVD players. I
generally look for jaggies and flashing on the uniform buttons, moiré and image softening on the log
fence and grain and loss of detail in the background. The Denon DVD-2910 did an excellent job of
reproducing the scene. Everything looked crisp, clear and detailed with the 480p component connection.
The 1080i DVI connection looked slightly sharper but there was a hint of flashing along the log
fence.
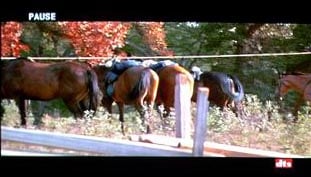 The next scene from Dances With Wolves is also very good. In this scene there is a lot of
motion, the horsetails are swinging and the leaves on the trees are rustling. There are several
straight lines to observe the rope across the horses and the fences. The background is also very
detailed and in focus. The DVD-2910 did a magnificent job of displaying this scene; there were no
jaggies, no flashing or motion blur, and the image remained crisp, smooth, and
detailed.
The next scene from Dances With Wolves is also very good. In this scene there is a lot of
motion, the horsetails are swinging and the leaves on the trees are rustling. There are several
straight lines to observe the rope across the horses and the fences. The background is also very
detailed and in focus. The DVD-2910 did a magnificent job of displaying this scene; there were no
jaggies, no flashing or motion blur, and the image remained crisp, smooth, and
detailed.
DVD: Rush Hour 2 The Next DVD I used for evaluation was Rush Hour 2. This DVD is a good to very good quality transfer
and the scene below is more appealing to me than the one above for obvious reasons.
The Next DVD I used for evaluation was Rush Hour 2. This DVD is a good to very good quality transfer
and the scene below is more appealing to me than the one above for obvious reasons.
This is another very good scene for evaluating a DVD player's performance. This scene has a lot of motion. The objects in the background are in full focus and there are contrasting colors black, white, flesh tone, red and gold. The bookcase on the extreme right side has several vertical and horizontal lines with contrasting colors; and there is a very fast pan from right to left The Denon DVD-2910 performed flawlessly with this scene. There was no moiré. The objects in the background remained well defined, there was no flashing around the glasses, and there was no noise evident on the deep red background. The blacks were inky black and the white dress was bright white with no blooming and looked very balanced. Flesh tones also looked natural. I tried several times but failed to note a significant difference between the 480p component connection and the 1080i DVI.
 DVD: Gladiator
The next DVD I used was Gladiator. This is a near reference quality DVD. The opening scene of this movie is a virtual torture test for DVD players. The heavy smoke, fast moving arrows, fire and dark scenes make it an excellent DVD for evaluation.
The Denon DVD-2910 proved once again that it was a very capable DVD player. In this particular scene there is a smokey background combined with bright fire and lots of motion. The image was very smooth with a lot of detail. The background remained well defined: there was no obvious flashing or ringing, but I did detect very slight macro blocking. It was brief and very hard to detect and I had to replay the scene several times to confirm it was there. In addition I also detected a hint of mosquito noise in the fog but overall the Denon DVD-2910 displayed this scene very well.
The Denon DVD-2910's video performance was excellent and exceeded my expectations. Coupled this with the fact that you can adjust just about anything you want in the user setup menu and you have a winning combination for any source device. This player would be an excellent choice for rear projection CRT based monitors, high end fixed pixel displays or front projection systems. You simply cannot go wrong with its video performance.
DVD-2910 Listening Tests and Conclusion
Listening Evaluation: Multi-Channel DTS
Moving on to the listening evaluation, I connected
the Denon -DVD-2910 to my Yamaha RX-V2500. I used the Impact Acoustics
Sonic Wave
digital interconnect cable for the digital output and Impact Acoustics
Sonic Wave Analog interconnects for the multi-channel analog outputs. I
used the Klipsch Reference system: RF-7 fronts, RC-7 center, RF-35
surrounds, and RSW 15 subwoofer for my evaluation. These are very
revealing speakers and they will unmask any shortcomings that your
system or your listening material may have.
With the Yamaha receiver set to Auto DVD and surround Normal. I listened to the excellent DTS soundtrack from Dances With Wolves. The Denon DVD-2910 sounded like every other DVD player that I have heard in its price range with a digital connection. The Yamaha RX-V2500 locked onto the bitstream, there were no lags, clicks, or pops. As I have said in the past, if there are performance differences in similarly-priced DVD players' digital outputs then these ears are surely not golden enough to hear them.
Progressing to the next part of the evaluation, I loaded my Steve Stevens Flamingo A Go Go DVD-Audio disk. This disk contains everything from high-energy fast-paced music to soft plucking of the acoustical guitar and is highly recommended for anyone building a DVD-Audio collection.
I started with the second track on the disk "Cinecitta". This track opens with very quiet crickets and birds singing in the surround speakers. A very delicate acoustical guitar strumming in the front is then followed by a single bang of a bass drum. The Denon DVD-2910 reveals the subtle nuances of this opening sequence beautifully. As the track progresses, the strumming of the guitar migrates and then mixes into the surround channels. The Denon DVD-2910 reproduced this effect faithfully. There was a lot of energy in the rear surrounds and there was no audible hiss in any of the recording. I then selected track 5 "Feminova". This track starts out with shallow drumbeats and then a very fast hard pan of a male voice from the front speakers to the surrounds. The Denon DVD-2910 sounded robust and articulated this fast pan with authority. Many of the other DVD players I have had in this system sounded dry and thin with this track. Progressing through the track you will find it mixed with 70's style synthesizer music intertwined in a James Bond style theme. There is one point in the track when a female voice distinctively states "No Never" in the surrounds. I have always heard a hint of distortion in the other DVD players I have used with this Track. However, the Denon DVD-2910 handled this part masterfully and I detected no audible distortion. The whole track sounded neutral, full and precisely balanced.
I think the easiest way for me to describe the way this player sounded with DVD-A is: it is wonderfully neutral going along about its job faithfully reproducing the track as it should be with no obvious colorization and it does not omit any content of the information provided on the disk.
SACD: Police
Every Breath You Take
I loaded in the Police SACD
Every Breath You Take. This is a fine sounding SACD with
lots of various songs by the Police. I selected the first track
"Roxanne". Sting's voice was dead center in the front sound stage and
there was a lot of detail in the surround channels. I did however feel
that the bass seemed a bit dry in the mix. I concluded my listening
evaluation with some other selections and really enjoyed the spacious
and accurate sound of the player. The Denon DVD-2910 proved once again
that it is a potent performer. It was very smooth and articulate and it
sounded very natural with SACD maybe even a little laid back. All the
speakers were very quiet between tracks and during soft passages and
there were no glitches. Over all it was a very satisfying listening
session.
I can say that overall I was pretty impressed with the sound of SACD
from this player.
Redbook CD Listening
Evaluation
For this part of the two-channel listening evaluation I wanted to do
something a little different.
My desire was to compare two very competent DVD players in an A/B
listening test. I rigged up a Radio Shack passive analog switcher and
connected one set of inputs from the switcher to the Denon DVD-2910
mixed Analog R/L output and one set to a Yamaha DVD-S1500 mixed right
and left analog output. The switcher's main R/L output would then be
terminated to the receiver's DVD analog input. The Yamaha DVD-S1500 is
about $300 cheaper than the Denon DVD-2910, but it is no slouch in the
audio department and its Redbook performance is stellar for a $449 DVD
player. As I proceeded, I verified that channel levels were the same
and that there was no degradation cause by interference or physical
cable issues. I inserted my trusty AVIA DVD into both players and used
my SPL meter and the test tones on the disk to level match. The Yamaha
was more than 2.5 dB down. I made note of that and continued with the
listening evaluation increasing the volume on the receiver 2.5 dB every
time I used the Yamaha DVD-S1500 to ensure that levels were identical.
Volume can be very deceiving when evaluating any piece of equipment. If
the volume is louder it is human nature to perceive that it is better -
it's just the way we are psychologically wired. I placed my copy of The
JVC XRCD sampler into one machine at a time and began to listen. I
selected track 4 In
A Sentimental
Mood
by Ernie Shaw. I listened to this track very carefully more than a
dozen times switching DVD players as fast as they would load. Each time
I wrote down what I heard. The following is the direct result from my
listening notes. The Denon DVD-2910's center is very focused with lots
of air.
M
usic comes across as being very balanced and there is a deep sound
stage, well-articulated bass, and a very low noise floor. There was a
slight hint of sibilance. I would characterize the sound as neutral but
ever so slightly laid back. Please be aware that the observational
differences between these two players are not night and day but they
are noticeable. The Yamaha was not as focused and centered as the Denon
DVD-2910. It had a more forward presentation and notes seemed to decay
faster. I also felt it had a slightly shallower sound, indicating a bit
less detail. There was a little more noise with the Yamaha DVD-S1500.
If I had to grade the two I would give the Denon DVD-2910 an A+
(Excellent) and the Yamaha DVD-S1500 a B+ (Very Good.) The Denon
DVD-2910's Redbook performance exceeded my expectations. Until recently
I have always recommended that serious audiophiles that using their
system for Home Theater applications and two-channel listening use a
dedicated CD player/transport. I actually think that the DVD-2910
performs well enough for me to abandon this advice and I can without
reservation recommend the Denon DVD-2910 as a one-box solution for the
audiophile that combines home theater with serious two-channel
listening.
Conclusion
Denon has done a brilliant job in the design, build quality, functionality, and performance of the DVD-2910. This DVD player would do a wonderful job in any home theater system. It is a videophile's dream with all the user adjustments and the audio performance is stellar at this price point with a nice transport. It appears that the under $1000 DVD player competition is heating up and in the war between manufactures Denon brought a Bazooka to a knife fight. Highly Recommended.
MSRP: $720
http://www.usa.denon.com
The Score Card
The scoring below is based on each piece of equipment doing the duty it is designed for. The numbers are weighed heavily with respect to the individual cost of each unit, thus giving a rating roughly equal to:
Performance × Price Factor/Value = Rating
Audioholics.com note: The ratings indicated below are based on subjective listening and objective testing of the product in question. The rating scale is based on performance/value ratio. If you notice better performing products in future reviews that have lower numbers in certain areas, be aware that the value factor is most likely the culprit. Other Audioholics reviewers may rate products solely based on performance, and each reviewer has his/her own system for ratings.
Audioholics Rating Scale
 — Excellent
- — Very Good
- — Good
- — Fair
- — Poor
| Metric | Rating |
|---|---|
| Standard Definition Video Performance | |
| High Definition Audio Performance | |
| Analogue Audio Performance | |
| Bass Management | |
| Build Quality | |
| Ergonomics & Usability | |
| Ease of Setup | |
| Features | |
| Remote Control | |
| Performance | |
| Value |