
Vizio SV470XVT 47-inch LCD
Vizio SV470XVT LCD TV
- Product Name: SV470XVT 47-inch LCD TV
- Manufacturer: Vizio
- Performance Rating:

- Value Rating:
- Review Date: September 24, 2008 07:34
- MSRP: $ 1699
| Integrated
NTSC/ATSC/QAM HDTV Tuner Native Panel Resolution: 1920 x 1080 Supported PC Resolutions: 1920 x 1080, 1366 x 768, 1024 x 768, 800 x 600 Supported resolutions: 480i, 480p, 720p, 1080i, 1080p Panel Type: 47" Diagonal, Color TFT Active Matrix LCD Anti-Static and hard coated surface Response Time: 5 ms (typical) Colors: 1.06 Billion Brightness: 500 cd/m2 (typical) Contrast Ratio: 6500:1 (w/DCR) Viewable Angle: <178 degrees (horizontal and vertical) Inputs RF: 1 HDMI with HDCP: 4 (includes 2 side) Analog Stereo Audio for HDMI Inputs: 1 Component YPbPr plus Stereo Audio: 2 (includes 1 side) Composite Video: 2 S-Video plus Stereo Audio: 1 Computer RGB (HD15) plus Stereo Audio: 1 Outputs Analog Audio out (RCA): 1 5.1 SPDIF Digital Optical Audio: 1 |
Additional Information Picture-in-Picture (PIP); Picture-outside-Picture (POP) Closed Caption (CC) V-Chip 3D Comb Filter Zoom Freeze 3:2 or 2:2 Reverse Pull-down ATSC with 8VSB & QAM demodulation & MPEG-2 decoding SRS TruSurround XT Color Temperature: 6500K (standard), 5400K and 9300K Color Fine Tuning: Independent Red, Green and Blue Audio: Built-in 10W x 3 Panel Life: 50,000 hours Power: Removable IEC Connector Voltage Range100 ~ 240 Vac at 50/60 Hz Power Consumption: 400W average Removable Base Vizio One Year Parts & Labor Warranty Free Lifetime Technical Support Free On-Site Repair on VIZIO Televisions 30" and above Zero Bright Pixel Defects Guaranteed Weight Gross: 77.8 lbs Net: 62.4 lbs (56.9 lbs without stand) Dimensions 43.9" W x 29.7" H x 10" D (with stand) 43.9" W x 28.1" H x 4" D (without stand) |
Pros
- Good color reproduction
- Good value for picture quality
Cons
- 120Hz mode is unpolished
- Unusually cluttered side inputs
- Remote lacks discrete inputs, has insufficient backlighting
- Only 1 component video input on rear of set
Vizio SV470XVT Build Quality and Features
High definition television, for most readers hitting the pages of Audioholics, is almost passé. OK, not quite, but it's certainly nothing that amazes our readers in and of itself. For the most part, any display can get HD content to the screen. The key to visual bliss is found in one of two categories: a) which displays do it best, or b) which displays do it "good enough" that they become bargains for consumers. Nobody wants a TV that sucks, but they might take a cheaper model if it still performs well. Those TVs often get gobbled up by friends and family spreading their joy around and extolling the virtues of their newfound 1080p masterpieces.
In particular, Vizio has always intrigued me. It's the brand I get asked about the most - probably because it's available in a majority of big box stores like SAMs, Costco and Sears. Heck, even Dell sells them online. So it's almost a monthly (sometimes weekly) event where I'll get a call from somebody asking me about the latest Vizio deal they found while they were shopping for lawn gnomes and 5 pound bags of white rice. The company has certainly made its mark on US consumers. My job, as I see it, was to see if that mark should extend to those readers who grace the pages of our magazine.
Vizio currently has 11 displays which fall into its 42- to 49-inch category. Of those, prices range from $799 (for plasma solutions) to $1699 (for this display - their top-of-the-line 120Hz LCD model). As their flagship product (the only thing more expensive is a 52-inch LCD), the SV470VXT is still a bargain when compared to other 120Hz models. 120Hz is quickly becoming the buzzword technology of 2008, promising to eliminate "judder" a motion effect that results from converting 24fps film to 30fps video. We've found it to be hit or miss, but it's a technology that certainly shows lots of promise.
Features
The Vizio SV470XVT has a nice list of new and possibly compelling features:
- 120Hz "Smooth Motion" processing
- 4 HDMI and 2 YPbPr inputs (half of the inputs are located on the side of the unit)
- Redesigned menu system
- Integrated Digital/QAM television tuner
- Updated chassis design
Delivery and Build Quality
 The Vizio came in a standard "lift-off" box that
arrived shrink-wrapped for additional protection. Once I pulled off the
protective cover I had easy access to the television and included accessories.
It was a two-man lift to get it out of the box, but we were able to easily
remove the integrated stand and mount it to our StudioTech
DP-2 TV stand. If it were up to me, built-ins would be outlawed in the land
of flat panels. LCD and plasma displays are meant to be hung on the wall, but
it seems people are still trying to utilize their old stands and wall systems
which housed previous CRT models. Perhaps in another decade rooms will truly
reflect the promise of minimalistic beauty that flat panels are capable of
delivering.
The Vizio came in a standard "lift-off" box that
arrived shrink-wrapped for additional protection. Once I pulled off the
protective cover I had easy access to the television and included accessories.
It was a two-man lift to get it out of the box, but we were able to easily
remove the integrated stand and mount it to our StudioTech
DP-2 TV stand. If it were up to me, built-ins would be outlawed in the land
of flat panels. LCD and plasma displays are meant to be hung on the wall, but
it seems people are still trying to utilize their old stands and wall systems
which housed previous CRT models. Perhaps in another decade rooms will truly
reflect the promise of minimalistic beauty that flat panels are capable of
delivering.
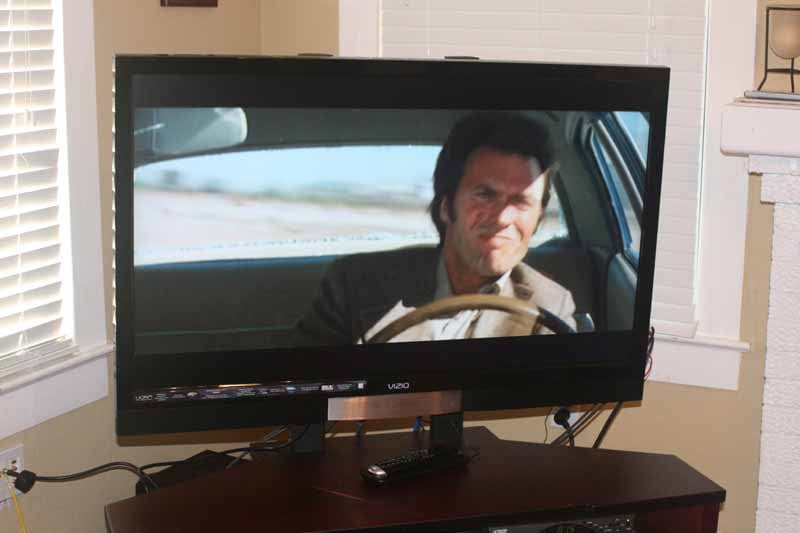
The display is truly beautiful. It features a piano gloss black bezel that is just over an inch in height on the top and sides of the display. The bottom is adorned with the permanently-affixed speakers and a silver central accent area that is really an inactive center channel speaker. There is a wireless 5.1 surround system option that is talked about in the manual (but not to be found anywhere on the Vizio website). When activated with a valid 5.1 source signal, the bottom right of the center channel lights up with a red LED logo that spells out "5.1". Nifty, and I would have liked to have seen this discrete center channel used even without the wireless surrounds.
The back of the Vizio SV470XVT has two HDMI inputs, a component video input, HD15 (PC) input, Composite/S-video (shared), and an F connection point for NTSC/ATSC/QAM. There are also analogue and TOSLink digital audio outputs which allow the TV to be used as a source device for your AV receiver. This is extremely helpful for those who do not have a dedicated cableTV set-top receiver. Both rear HDMI inputs can handle audio, and a single analogue stereo pair of audio can be used between both inputs when needed. The HD15/PC input has an 1/8-inch input for stereo audio and the component video and AV inputs have their own analogue stereo audio inputs as well.

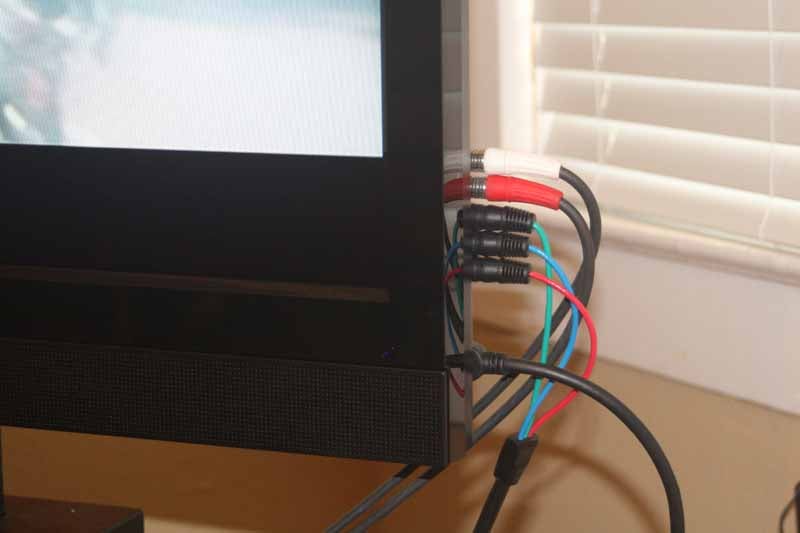 Where
it gets a bit dicey is the fact that there are two more HDMI inputs, another
component video input and a composite video input on the side of the Vizio. And when I say "side" I mean it. Right
on the edge of the bevel of the right-hand side of the display. The fact that
Vizio didn't place one of these extra HDMI inputs on the back of the display is perplexing. In my opinion, side inputs are for temporary connections - so having more than one of any type is a waste. Their presence on the very edge of the screen
also means that you'll have all manner of unsightly cables splayed all over a very
visible area of the display. The stereo analogue audio present on the side connectors
is shared between the component and composite video inputs. The HDMI side
inputs need to carry the audio as well since there is no analogue option
provided.
Where
it gets a bit dicey is the fact that there are two more HDMI inputs, another
component video input and a composite video input on the side of the Vizio. And when I say "side" I mean it. Right
on the edge of the bevel of the right-hand side of the display. The fact that
Vizio didn't place one of these extra HDMI inputs on the back of the display is perplexing. In my opinion, side inputs are for temporary connections - so having more than one of any type is a waste. Their presence on the very edge of the screen
also means that you'll have all manner of unsightly cables splayed all over a very
visible area of the display. The stereo analogue audio present on the side connectors
is shared between the component and composite video inputs. The HDMI side
inputs need to carry the audio as well since there is no analogue option
provided.
Vizio SV470XVT Menu System
The Vizio is truly built with the consumer in mind. With a few notable exceptions, the User Manual is written with color photos and easy-to-read language that lets consumers know that Vizio isn't assuming they know too much about flat panel sets. It certainly doesn't talk over their heads, and even provides a glossary of terms at the back.
 The newly redesigned Menu system is one that I have mixed
feelings about. While I like its graphic look and diminished presence, it also
forces users to spend a lot of time navigating back and forth and pushing
buttons in a manner that doesn't follow the best practices of GUI design. It
also fails to show you the current settings of each control until you actually
navigate to that control and are able to adjust it. The four main areas are:
Picture, Audio Mode, TV (tuner setup) and Setup (global settings). Once you
understand where Vizio is coming from on these names, it starts to make more
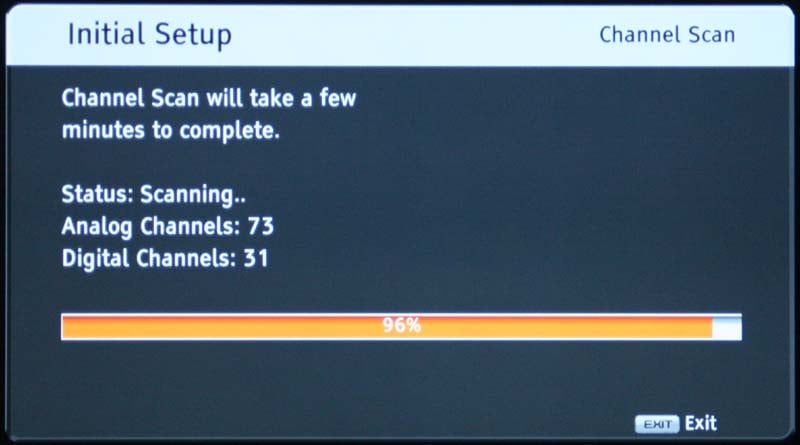
sense. Upon power up I was greeted with the Vizio "Setup Wizard" - a
helpful application that guided me through the process of selecting my language,
input source (antenna or cable), and performing an initial channel scan to load
up the set with the proper stations. It took several minutes, but when I was
done I had loaded around 104 channels, included several HD channels via the QAM
tuner.
The newly redesigned Menu system is one that I have mixed
feelings about. While I like its graphic look and diminished presence, it also
forces users to spend a lot of time navigating back and forth and pushing
buttons in a manner that doesn't follow the best practices of GUI design. It
also fails to show you the current settings of each control until you actually
navigate to that control and are able to adjust it. The four main areas are:
Picture, Audio Mode, TV (tuner setup) and Setup (global settings). Once you
understand where Vizio is coming from on these names, it starts to make more
sense. Upon power up I was greeted with the Vizio "Setup Wizard" - a
helpful application that guided me through the process of selecting my language,
input source (antenna or cable), and performing an initial channel scan to load
up the set with the proper stations. It took several minutes, but when I was
done I had loaded around 104 channels, included several HD channels via the QAM
tuner.
After basic setup I decided to cruise the menu system to see what I could mess with to get the picture as good as possible.
Picture Menu
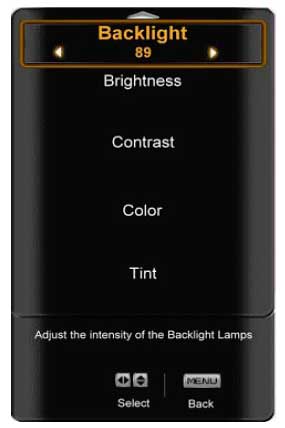 This allows you to adjust the florescent Backlight level, Brightness, Contrast, Color, Tint, Sharpness, and
more. We'll get to the "More" later. The first thing I did was
configure the Brightness and Contrast. The Vizio passes below black
(blacker-than-black) and above white (whiter-than-white) information so it was
easy to get the correct levels. I also found, as will be described later, that
adjusting the Backlight didn't affect
the black or white levels in the least, but merely varied the overall output of
the television. This is good, and means that you might as well use a level of 0
for nighttime viewing, and 100 for daytime.
This allows you to adjust the florescent Backlight level, Brightness, Contrast, Color, Tint, Sharpness, and
more. We'll get to the "More" later. The first thing I did was
configure the Brightness and Contrast. The Vizio passes below black
(blacker-than-black) and above white (whiter-than-white) information so it was
easy to get the correct levels. I also found, as will be described later, that
adjusting the Backlight didn't affect
the black or white levels in the least, but merely varied the overall output of
the television. This is good, and means that you might as well use a level of 0
for nighttime viewing, and 100 for daytime.
I found no reason to adjust either the Tint or Color controls. They are often unpredictable when combined with custom RGB controls (which were available - at least in part - on the SV470XVT). Continuing through the Picture menu I landed on Sharpness. From my testing I found that the default value of 4 causes excessive edge enhancement that could be noticed by a clinically blind housekeeper vacuuming the carpet in an adjacent room. Turn it down to around 1 for best results. This finally brought me to the Advanced Video settings.
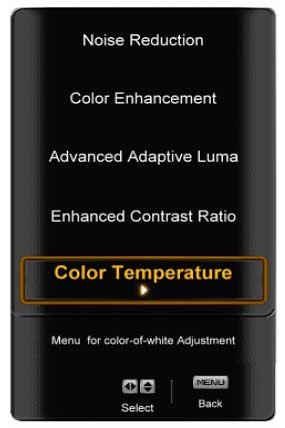 The Vizio SV470XVT allows for adjustment of Noise Reduction which I found to be
adequate but not stellar. It certainly reduced the amount of noise when maxed
out, but the panel speed also showed a lot of blurring, which the NR circuitry
didn't exactly help (though it didn't seem to accentuate it too much either). I
ended up giving the Vizio half credit in this area. You'll want to leave the Color Enhancement circuit Off - it will
only artificially adjust the color in a way that is not at all accurate. Advanced Adaptive Luma is almost the
polar opposite of Enhanced Contrast Ratio
(DCR). The first, adjusts gamma to compensate for darker scenes where detail is
hard to discern. This may be good for video games (go ahead and try it out),
but is sure to cause excessive visibility of macroblocking artifacts in feature
films. The DCR circuit actually adjusts the backlight - dimming it during dark
scenes, and raising it during bright scenes. The problem is that it takes, on
average, about 4 seconds to make a smooth transition from one extreme to the
next. This is both good and bad, but mostly good. Since the transition is slow,
and most movies don't go back and forth from light to dark rapidly, the effect
is that you'll probably enjoy a better overall contrast experience. This is one
of those functions best left to the user to decide if and when they choose to
implement it.
The Vizio SV470XVT allows for adjustment of Noise Reduction which I found to be
adequate but not stellar. It certainly reduced the amount of noise when maxed
out, but the panel speed also showed a lot of blurring, which the NR circuitry
didn't exactly help (though it didn't seem to accentuate it too much either). I
ended up giving the Vizio half credit in this area. You'll want to leave the Color Enhancement circuit Off - it will
only artificially adjust the color in a way that is not at all accurate. Advanced Adaptive Luma is almost the
polar opposite of Enhanced Contrast Ratio
(DCR). The first, adjusts gamma to compensate for darker scenes where detail is
hard to discern. This may be good for video games (go ahead and try it out),
but is sure to cause excessive visibility of macroblocking artifacts in feature
films. The DCR circuit actually adjusts the backlight - dimming it during dark
scenes, and raising it during bright scenes. The problem is that it takes, on
average, about 4 seconds to make a smooth transition from one extreme to the
next. This is both good and bad, but mostly good. Since the transition is slow,
and most movies don't go back and forth from light to dark rapidly, the effect
is that you'll probably enjoy a better overall contrast experience. This is one
of those functions best left to the user to decide if and when they choose to
implement it.
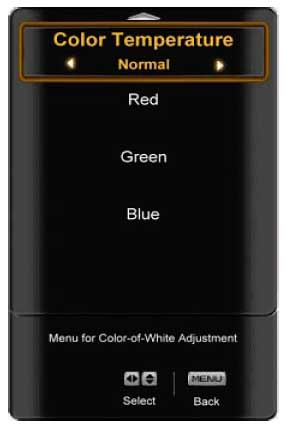 The Advanced Video
menu is also where you'll find the Color
Temperature system, which allows you to choose between Cool, Normal, Warm, or Custom.
Here's how it broke down for us when measuring the system:
The Advanced Video
menu is also where you'll find the Color
Temperature system, which allows you to choose between Cool, Normal, Warm, or Custom.
Here's how it broke down for us when measuring the system:
- Cool - 8700K
- Normal - 6200K
- Warm - 5300K
With the Custom setting, we adjusted Blue to 86 and left Red and Green at their default settings of 128. The result was a pretty respectable RGB color response from 7.5 IRE through 100 IRE. This was a pleasant surprise since we couldn't adjust gain and cut separately for each color. While HDMI and component video retained their own custom color settings, we found an odd quirk where if we changed the Color mode for one input, all inputs were equally affected.
Audio Mode
The Audio Mode menu system has presets for Flat, Rock, Pop, Classic or Jazz, but can also enter you into the submenu which provides controls for a 5-band EQ. The EQ can be customized for each of the Audio Modes and is defeated if you have Tru Surround XT (SRS TSXT) engaged. Tru Surround XT is a DSP surround mode (from SRS Labs) whereby two channels can be utilized to deliver enhanced bass & dialogue with a pseudo-surround experience that serves to open up the soundstage. It's nifty for PC speakers, but typically less effective with a flat panel television due to varied seating positions and the distance to the drivers.
Dynamic Range Compression (DRC) is also provided for compressing Dolby soundtracks and it can be adjusted in one of 4 settings if engaged. Lip Sync delay is also provided and the control can adjust from 0 to 5 (very coarse adjustments only). The analogue audio output can be set to fixed or variable volume control. Variable volume is good for when you are outputting directly to an amplifier. The TOSLink Digital Audio Out can also be configured for Dolby Digital, PCM or Off. The on-board speakers can be disabled - a feature I really like to see in flat panels.
TV Menu
The TV menu is really the "tuner" menu and is the place to select antenna or CableTV and also program (or remove) channels into the system. Here you can set the MTS mode (great for those who want to listen in Spanish) and also set the Time Zone and Daylight Saving time for the program guide. I was actually never able to successfully get the Program Guide to show me anything beyond the currently-playing show - despite the user manual claiming it will go up to 2.5 hours out. This could be a function of my local cable provider, but if so then it's important to note potential difficulties in certain markets.
Setup menu
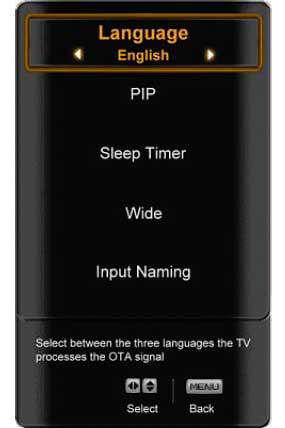 The Setup menu
is the catch-all for all remaining global functions. This includes Language, Picture-in-Picture (PIP) functions, Sleep Timer, the aspect ratio (called Wide), Input Naming, Closed Captioning (CC), and Parental
controls. Input naming is cool in that it places the custom input name below
the actual input designation. You can call it anything, so long as it's no more
than 8 alphanumeric characters in length. This helps you to never forget that
your "Netflix" box is on Component 2. The PIP functions had the
expected controls, with source selection, position, size and even audio source
(so you can select which audio is going to the television's speakers or outputs).
The Setup menu
is the catch-all for all remaining global functions. This includes Language, Picture-in-Picture (PIP) functions, Sleep Timer, the aspect ratio (called Wide), Input Naming, Closed Captioning (CC), and Parental
controls. Input naming is cool in that it places the custom input name below
the actual input designation. You can call it anything, so long as it's no more
than 8 alphanumeric characters in length. This helps you to never forget that
your "Netflix" box is on Component 2. The PIP functions had the
expected controls, with source selection, position, size and even audio source
(so you can select which audio is going to the television's speakers or outputs).
The Wide, or aspect ratio, modes are incorrectly shown in the User manual, but easy enough to figure out. There is Normal, Wide, Panoramic, and Zoom mode. All modes are available with SD content, however only Zoom and Wide are present for HD material via HDMI.
Vizio SV470XVT Remote and Calibration
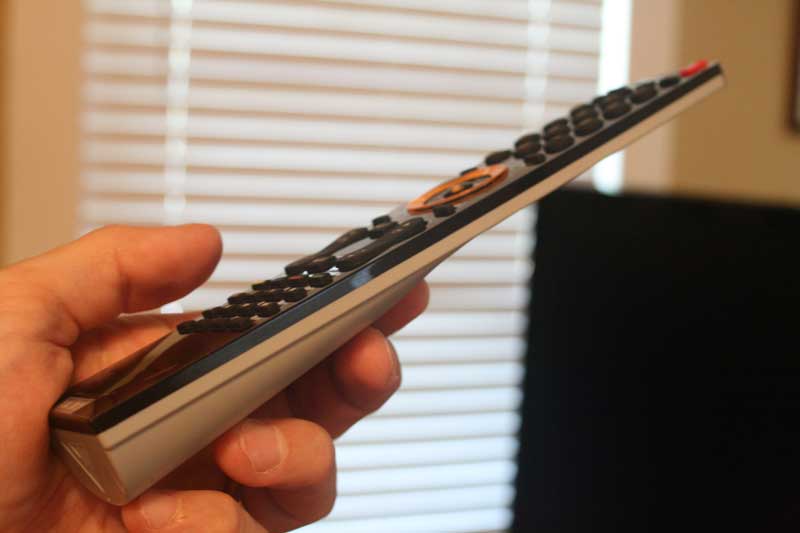 I love the look and feel of the Vizio SV470XVT remote. It
is beautifully thin at top and tapers out just enough at the bottom to house
the two AAA batteries. Even the way the batteries insert is cool - they drop in
from the bottom rather than popping in from behind. The remote is not backlit,
except for the center ring, which is really a directional arrow pad with a
centered select button in the middle. It's technically capable of controlling a
few other AV devices, but ultimately you'll want to get a good universal remote
control to handle those duties. I didn't like the positioning of the input
selection buttons at the top of the remote as they are a bit out of the way.
Additionally, there are no direct inputs for each input, merely each input type. This means that you'll need to hit
the HDMI button 4 times to get to HDMI 4. Taking up prime real estate is the
5.1 audio button, which is useless unless you have the optional 5.1 Surround
Sound Upgrade (which I've not seen anywhere, including the Vizio website).
I love the look and feel of the Vizio SV470XVT remote. It
is beautifully thin at top and tapers out just enough at the bottom to house
the two AAA batteries. Even the way the batteries insert is cool - they drop in
from the bottom rather than popping in from behind. The remote is not backlit,
except for the center ring, which is really a directional arrow pad with a
centered select button in the middle. It's technically capable of controlling a
few other AV devices, but ultimately you'll want to get a good universal remote
control to handle those duties. I didn't like the positioning of the input
selection buttons at the top of the remote as they are a bit out of the way.
Additionally, there are no direct inputs for each input, merely each input type. This means that you'll need to hit
the HDMI button 4 times to get to HDMI 4. Taking up prime real estate is the
5.1 audio button, which is useless unless you have the optional 5.1 Surround
Sound Upgrade (which I've not seen anywhere, including the Vizio website).
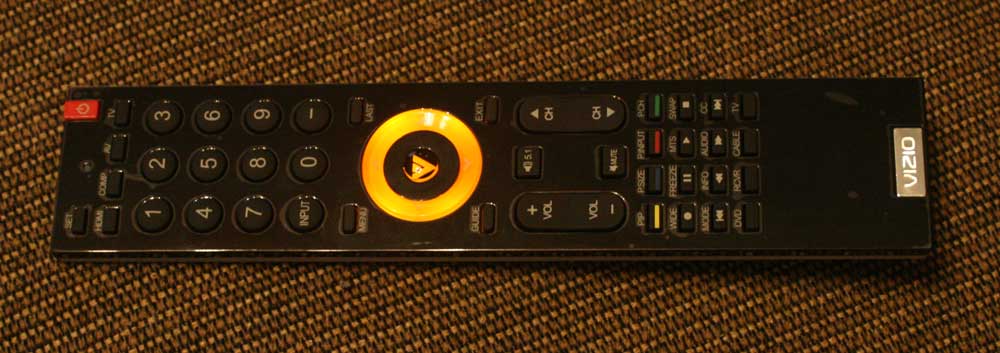
Below the Volume and Channel controls you'll find a whole transport section which is also a dual-use area for functions such as Wide (scaling), Info, Audio, MTS and PIP controls. Below that, at the very bottom, are the controls for selecting and using other programmed AV devices. It's an acceptable remote, but it could be a lot cooler.
Calibrating the Television
We calibrated the display using Datacolor’s Colorfacts Professional 6.0 software and found that while the set was a tad "blue" to begin with, we were able to quickly dial it in to very reasonable levels. The SV470XVT has Red, Green and Blue controls but they are not separated into Gain and Cut controls. The biggest items we wanted to test were the new 120Hz modes and the display's ability to process (correctly) 480i DVD content. Let's face it, there are a lot of consumers who will purchase this TV who many not necessarily be interested in updating their DVD players just yet. For those using Blu-ray or higher end upconverting players, I wanted to make sure the new 120Hz processing didn't compromise the already pristine image.
CIE Chart – Color Reproduction & Saturation Potential
After measuring the primaries of the SV470XVT, we noted that it really nailed both Red (almost) and Blue (completely) with Green coming in a tad more towards Cyan (which I prefer to drifting towards Yellow). What this means is that the Vizio has excellent color reproduction - better than several more expensive displays we've tested this year.
In comparing the CIE charts of the Vizio vs the recent Mitsubishi LT-46148 LCD review, you can see that the SV470XVT stacks up pretty well in terms of color reproduction:

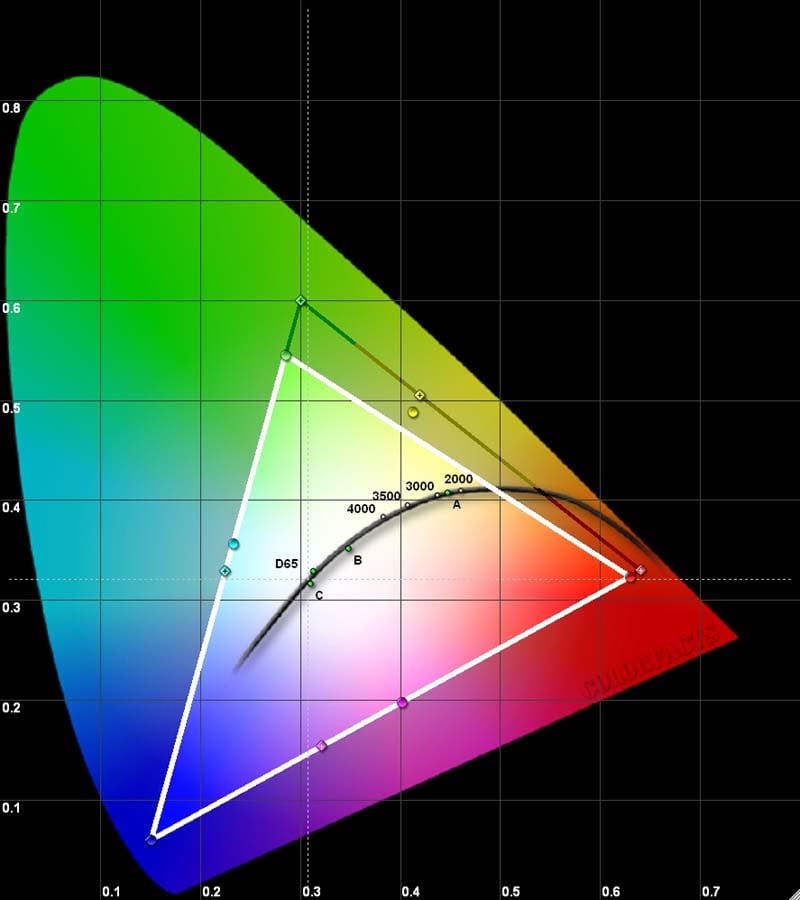
Mitsubishi LT-46148 LCD (left) and Vizio
SV470XVT (right)
ANSI contrast was measured at 324:1 with Color Temp set to "Normal" and with Contrast and Brightness correctly set for night time viewing. The backlight was also set to 0 – its lowest setting. This is a respectable real-world contrast measurement, but we've seen better and you'll see tons more from a plasma or LED-backlit model. What's interesting to note is that even if you adjust the backlight from 0 to 100 (we tried it in steps of 30) the contrast ratio stays about the same and Black and White levels remain properly calibrated. This is rather freeing and means that users should feel free to crank up the backlight to 100 during the day and then bring it all the way down to 0 at night.
We ended up setting Brightness to 35 and Contrast to 52 and set Color Temp to Normal. At this setting, measured color temperature was 6200K. In Warm mode it dropped to 5300K (perfect for Black & White movies). Setting it to Cool yielded 8700K color temperature (which is lower than many other sets' Normal settings). With our colorimeter in place, we calibrated a custom color temperature by setting Blue to 86 (Red and Green stayed at the default 128) and got the following measurements:
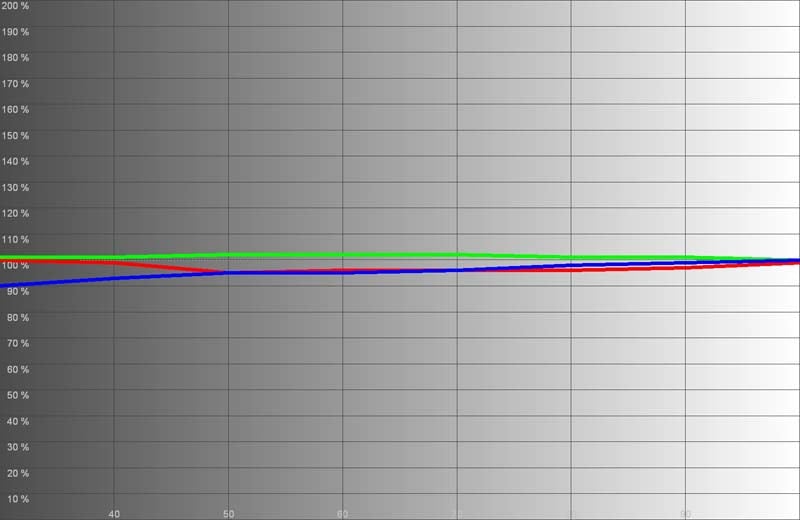
Not bad considering there are no Gain/Cut controls
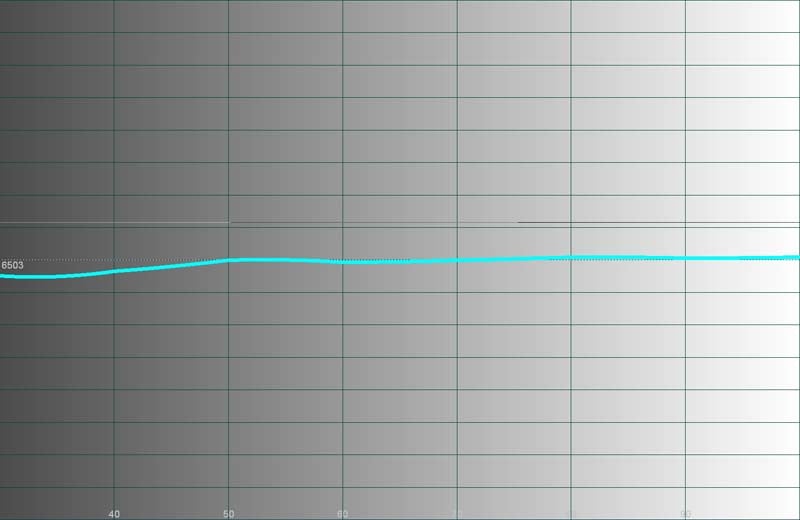
Color temperature maintained a steady ~6500K from 30 IRE to 80 IRE.
Calibration overall is only possible in a limited way. The HDMI and component inputs are shared, so even settings like Brightness, Contrast, Color, Tint and Sharpness cannot be changed on a per-input basis as we'd prefer. One saving grace is that Color Temperatures do differ from HDMI to component, so you can have custom configurations for each.
Audioholics/HQV Bench Testing Summary Results
Perfect Score is 130
Vizio SV470XVT Benchmark Score: 61 (acceptable, but plan to use a decent DVD player)
|
Test |
Max |
Component |
Component |
|
Color Bar |
10 |
10 |
Pass |
|
Jaggies #1 |
5 |
3 |
Pass |
|
Jaggies #2 |
5 |
3 |
Pass |
|
Flag |
10 |
0 |
Fail |
|
Detail |
10 |
0 |
Fail* |
|
Noise |
10 |
5 |
Pass |
|
Motion adaptive Noise Reduction |
10 |
5 |
Pass |
|
Film Detail |
10 |
10 |
Pass |
|
Cadence 2:2 Video |
5 |
0 |
Fail |
|
Cadence 2:2:2:4 DV Cam |
5 |
0 |
Fail |
|
Cadence 2:3:3:2 DV Cam |
5 |
0 |
Fail |
|
Cadence 3:2:3:2:2 Vari-speed |
5 |
0 |
Fail |
|
Cadence 5:5 Animation |
5 |
0 |
Fail |
|
Cadence 6:4 Animation |
5 |
0 |
Fail |
|
Cadence 8:7 animation |
5 |
0 |
Fail |
|
Cadence 3:2 24fps film |
5 |
5 |
Pass |
|
Scrolling Horizontal |
10 |
10 |
Pass |
|
Scrolling Rolling |
10 |
10 |
Pass |
|
Total Points |
130 |
61 |
|
* Display defaults to a setting where edge enhancement is painfully obvious. Adjusting the Sharpness setting to "1" alleviates the problem and allows it to pass this test. We failed it since the default settings failed.
Comments on Bench Testing
Sharpness is simply set too high by default. Drop it to 1 and you'll immediately notice a decrease in perceived standard definition noise and edge artifacts. At the default setting you will literally see jaggies on any high contrast edges. All Moving Zone Plate tests failed miserably, both with and without Smooth Motion engaged.
Smooth motion is a tough nut to crack. After trying tons of combinations on both standard definition and HD content (it affects both) my final determination is that it should probably be left off. Even at its lowest settings it results in unpredictable artifacts on high contrast edges in motion. You may luck out depending on what type of content you are watching, but since I have some excellent sources I'd probably bypass the feature until it is perfected. 120Hz Smooth Motion is something I wanted to use. It certainly did stabilize some moving images across the screen, just not without introducing artifacts - such as with race cars going around the track (I'm a closet NASCAR fan). Once I deactivated the feature, motion blur returned, but the tearing stopped. If you are going to use the system, be sure to place Real Cinema Mode on Precision as it produces slightly less tearing. Note that without Real Cinema Mode engaged, the Smooth Mode Effect feature really doesn't reduce motion blur.
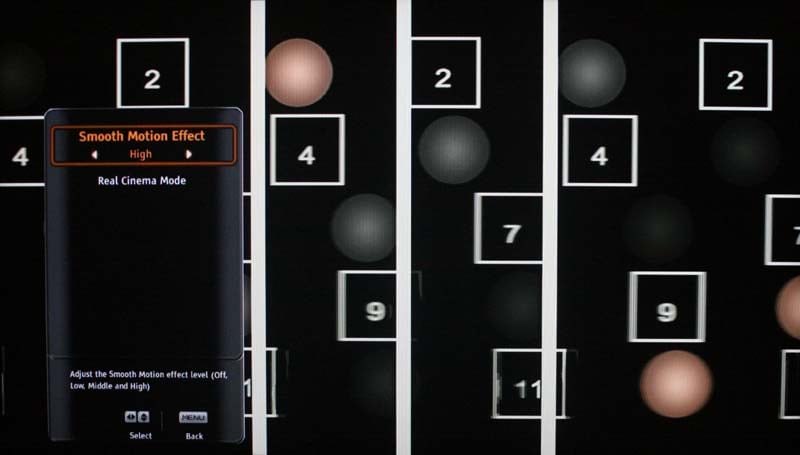
Smooth Motion set to High (it's a cool feature, but notice the artifacts on the
bottom #11 square)
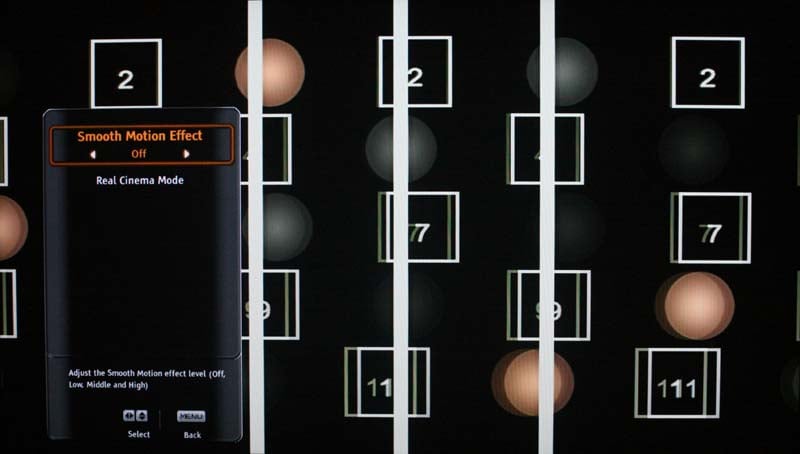
Smooth Motion Off
When playing 480i sources via the component video input we noticed a lot of cropping. The SV470XVT took off 25 pixels from the left, 22 from the right, 10 from the top and 15 from the bottom. None of the Wide modes fixed this and I triple checked to make sure the obscure scanning settings were optimized (they were). There was absolutely no cropping via HDMI.
Vizio SV470XVT Viewing Evaluation and Conclusion
I'm going to be less verbose here than normal and let the pictures speak for themselves. Suffice it to say, the Vizio produced excellent color and I was pleased overall with the black levels for an inexpensive florescent-lit LCD panel. I've definitely seen worse, and of course there is better. This model is priced well, but it does face some competition. Looking at the images below, however, it would be hard to imagine anyone not enjoying the picture it produces.
DVD: Forbidden
Kingdom
This film is rather
dark, and it also has lots of detail and beautiful moments where you could
really peer into dark crevices and areas that on lesser displays would
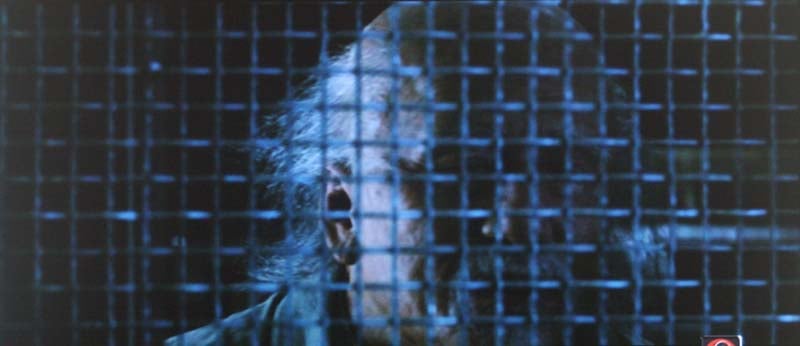
absolutely be crushed to bits. I noted the many opportunities Forbidden Kingdom
afforded us to notice shadow detail and really take in the Vizio's performance.


DVD: Golden
Compass
Golden
Compass had as
mystical a color palette as it did a mystical tale. We really enjoyed seeing
this movie glorified by the color reproduction ability of the Vizio.


Not too colorful, but note the hair and clothing detail. This spirit cat also did a great job showing off the SV470XVT for our readers.
DVD: Hairspray
I really liked this movie and it was certainly giving the Vizio's pastellarometer a good workout!


I watched a ton more programming on this TV - all of it impressive. From HD news shows to shoot 'em up movies, the Vizio performed very well and presented a clean, clear, and consistent picture.


That's not banding in the background, the image actually looks like that
Conclusion
Vizio SV470XVT
$1699
Vizio Inc
39 Tesla
Irvine, CA
92618
http://www.vizio.com
877.698.4946
About Vizio
Inc
VIZIO, Inc.
"Where Vision Meets Value," headquartered in Irvine,
California, is America’s fastest-growing HDTV and
consumer electronics company. In only a few short years, VIZIO quickly
skyrocketed to the top by becoming the #1 selling brand of flat panel HDTV’s in
North America and became the first American brand in over a decade to lead
major categories in 2007 U.S. TV sales. VIZIO has sold more than 5-Million flat
panel televisions in the U.S.
alone. By listening intently to our customers and reacting to the ever-growing
needs of flat panel television enthusiasts, VIZIO continues to offer
feature-rich flat panel televisions and consumer electronics solutions to
market at a value through practical innovation.
The Score Card
The scoring below is based on each piece of equipment doing the duty it is designed for. The numbers are weighed heavily with respect to the individual cost of each unit, thus giving a rating roughly equal to:
Performance × Price Factor/Value = Rating
Audioholics.com note: The ratings indicated below are based on subjective listening and objective testing of the product in question. The rating scale is based on performance/value ratio. If you notice better performing products in future reviews that have lower numbers in certain areas, be aware that the value factor is most likely the culprit. Other Audioholics reviewers may rate products solely based on performance, and each reviewer has his/her own system for ratings.
Audioholics Rating Scale
 — Excellent
- — Very Good
- — Good
- — Fair
- — Poor
| Metric | Rating |
|---|---|
| Detail and Resolution | |
| Deinterlacing & Scaling | |
| Contrast and Black Levels | |
| Color Reproduction | |
| Noise Reduction | |
| Calibration Options | |
| Build Quality | |
| Ergonomics & Usability | |
| Ease of Setup | |
| Features | |
| Remote Control | |
| Fit and Finish | |
| Performance | |
| Value |
Clint Deboer was terminated from Audioholics for misconduct on April 4th, 2014. He no longer represents Audioholics in any fashion.
View full profile