
Samsung LN52A750 LCD TV Review
Samsung LN52A750 LCD
- Product Name: LN52A750 LCD Television
- Manufacturer: Samsung
- Performance Rating:

- Value Rating:

- Review Date: June 26, 2008 14:55
- MSRP: $ 3499
| Video Screen
Size: 52" Audio Inputs |
Dimensions Weight Power consumption |
Pros
- Fantastic out of the box performance
- Top of the line deinterlacing and scaling
- Lots of calibration options (not that you'll need them)
- Great styling
- Tons of extras for you to experiment with
Cons
- Pricey
- Stylized edge sometimes reflects image
- Slow response to remote commands
LN52A750 Build Quality and Setup
The first thing I do when I get a unit in for review is set it up and just play with it for a few days before ever cracking the manual. It's sort of this "Joe Everyman" thing I do to see how intuitive a device is. It didn't take me long to realize that the Samsung LN52A750 is a special display. The styling cues are dead on - that "Touch of Color" (which might be more accurately labeled "Touch of Red") is just enough to make it stand out without being gaudy. The panel is thin enough to be ahead of the curve. But the picture… out of the box I was very impressed. I'm used to turning on a set and having to deal with too much blue or red. Not this one. It looked dead on to me. And that, alone, was reason enough to be impressed.
First Impressions and Build Quality
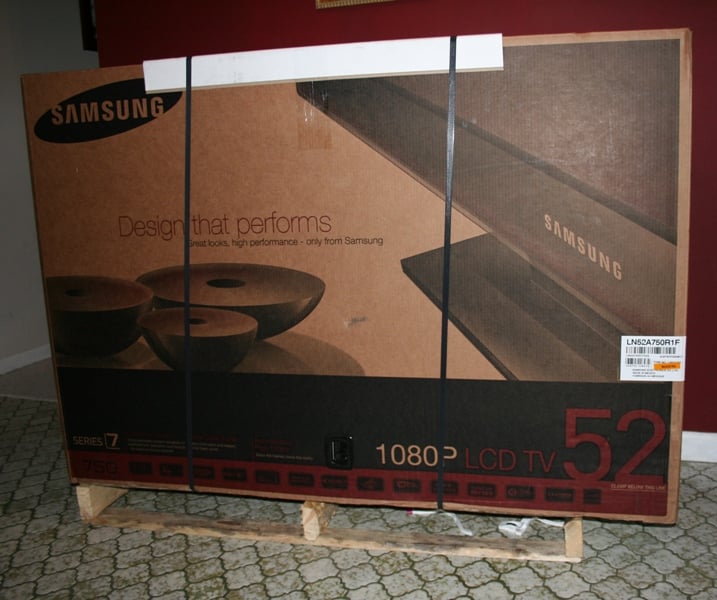 The Samsung LN52A750 arrived
as displays always do these days - in a tall, thin box strapped to a half
pallet. In all honesty, I can't believe that more of these displays aren't
damaged in transit. The standard packaging that everyone seems to use just
seems a bit inadequate to me. But, after doing so many reviews of displays, I
have to admit that it must be working as I've seen damaged boxes but no damaged
displays.
The Samsung LN52A750 arrived
as displays always do these days - in a tall, thin box strapped to a half
pallet. In all honesty, I can't believe that more of these displays aren't
damaged in transit. The standard packaging that everyone seems to use just
seems a bit inadequate to me. But, after doing so many reviews of displays, I
have to admit that it must be working as I've seen damaged boxes but no damaged
displays.
The 52" Samsung isn't all that heavy but it is a bit impossible to handle by yourself. You're going to want to get some help. Even then, the stylized beveled edge tends to bite into your hand if you don't use a towel or glove or something to protect it. The display sits on its own attached stand which can be removed for wall mounting if you prefer. I had the review unit sitting on top of my Diamond Case TT-400 Credenza. Most of the connections are on a panel on the back though there are a few on the side.
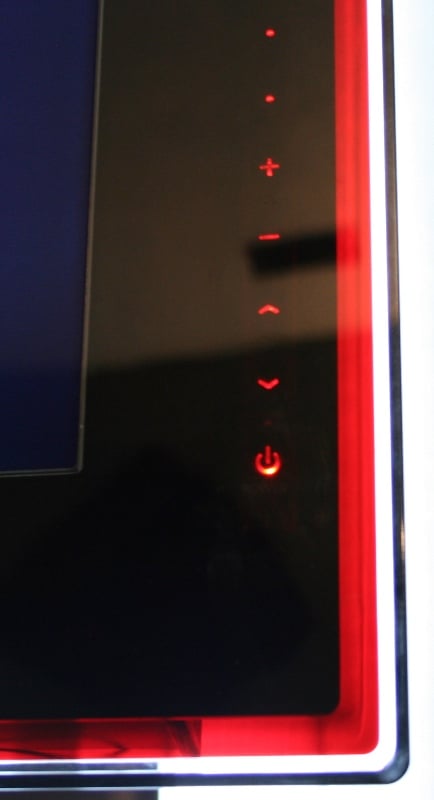
The front of the LN52A750 is as clean as can be. In fact, you'll probably have a hard time finding the front controls. Gone are the buttons that my kids are so used to playing with. The Samsung has a small touch screen on the right with labels that are so light that you can only see them in the right light (and even then, only on an angle). When the unit is powered off, you can find the power button by looking just below the red "standby" light. When the unit is powered on, the standby light is not illuminated which means you'll have to memorize the location for just take a stab at it. The "buttons" don't have any feedback so it is a little "hunt and peck" but once you hit the power button, all the rest of the buttons illuminate. The channel and volume controls illuminate with their normal arrow shapes making them easily identifiable but the source and menu buttons are just dots. Since the control labels are so faint, it is generally pretty hard to use these functions correctly without memorization.
 The LN52A750 is a very sharp looking display with all gloss black for
the case and stand and a large ~3 inch glass border (a little more on the
sides, a little less on the top and bottom). The border is mostly black which
switches to a red layer and finally clear. The "Touch of Color" is
actually a very nice aesthetic addition that mostly goes unnoticed but really
stands out when you see it. The only real issues is the beveled edge of the
glass is hard to handle when you move it (as mentioned) and it tends to reflect
what is shown on the screen. Generally, when the screen image is all the way to
the edge (i.e. not letterboxed), the bevel will reflect on two sides. This
wasn't noticeable all that much except is a very dark room and even then, only
occasionally.
The LN52A750 is a very sharp looking display with all gloss black for
the case and stand and a large ~3 inch glass border (a little more on the
sides, a little less on the top and bottom). The border is mostly black which
switches to a red layer and finally clear. The "Touch of Color" is
actually a very nice aesthetic addition that mostly goes unnoticed but really
stands out when you see it. The only real issues is the beveled edge of the
glass is hard to handle when you move it (as mentioned) and it tends to reflect
what is shown on the screen. Generally, when the screen image is all the way to
the edge (i.e. not letterboxed), the bevel will reflect on two sides. This
wasn't noticeable all that much except is a very dark room and even then, only
occasionally.
When powered on, there is a red light in the lower right of the border that illuminates whenever an IR signal is received from the remote. In fact, I've noticed it illuminating when IR signals are received from a number of remotes. Now, this illumination only seems to translate into action when it is the Samsung's remote that is being used and I couldn't seem to get it to consistently illuminate with any specific button push on any other remote but it was weird that it would light up.
Set-Up & General Use
 Setting up the LN52A750 isn't much different from any
other display - just plug everything in and you're good to go. I set mine up
with component and HDMI cables from Impact Acoustics.
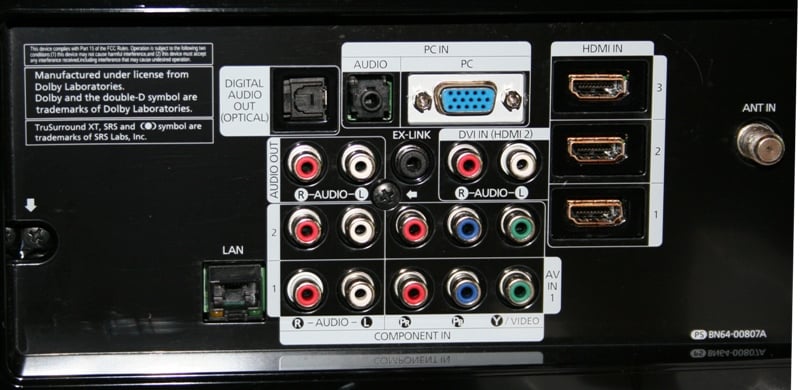
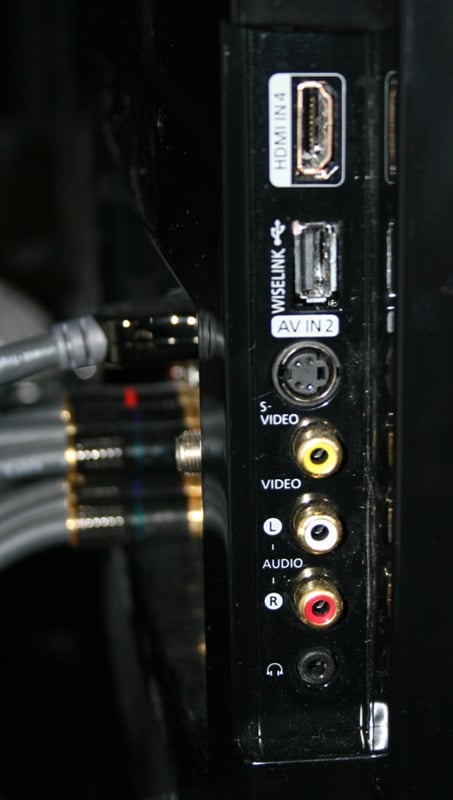
The LN52A750 has 4 HDMI inputs which is more than enough for most users. There
is a PC input for those still holding on to the promise of an HTPC and a couple
of Component inputs. Samsung also included a Composite and S-video input or two
but at this price point, no one really expects the user to have many of these
devices left.
Setting up the LN52A750 isn't much different from any
other display - just plug everything in and you're good to go. I set mine up
with component and HDMI cables from Impact Acoustics.
The LN52A750 has 4 HDMI inputs which is more than enough for most users. There
is a PC input for those still holding on to the promise of an HTPC and a couple
of Component inputs. Samsung also included a Composite and S-video input or two
but at this price point, no one really expects the user to have many of these
devices left.
Usually, this is the portion of the review where I tell you everything you need to do in order to get your picture as good as possible. That usually involves multiple steps including changing some settings. Not this time. If you have a brand new display on your hands - turn it on and make sure it is in "Movie" mode. If you have an "open box" special or a display unit, turn it on, enter the Picture menu, and enable the "Restore Defaults" option. Again, check to see if you are in "Movie mode" and you are done. You are now 99% of the way to a near perfect picture. In fact, for most of your viewing, this is about as good as it gets. The only thing left to do in this "calibration" is to enter the Picture menu and set Film Mode under Picture Options to "Auto." This setting defaults to "Off" (at least it did on our sample) and can only be accessed when there is an interlaced signal coming in. For each input that has the possibility of an interlaced signal, you'll want to make sure that you are switching the Film Mode on. This will ensure that you are getting the very best picture possible. After that - you're done!
 One of the concerns we often (too often in my book) hear about with LCDs is viewing angles. Early
LCDs had a tendency to "wash out" as you moved off axis (meaning as
you were viewing from an angle rather than head on. Samsung claims that the
LN52A750 has a 178 degree viewing angle. That's right, pretty much if you can
see it, the colors shouldn't wash out. At all. Not even a little. You might
find this hard to believe, I certainly did. But I can tell you that it is
absolutely true. The funny thing was that I noticed it even before I read the
spec. The day I set up the display, I was walking back into the room and was
amazed that the picture was still so bright from that angle. So of course I
started experimenting and found that the picture would disappear behind the
case before the colors would dim. I was amazed.
One of the concerns we often (too often in my book) hear about with LCDs is viewing angles. Early
LCDs had a tendency to "wash out" as you moved off axis (meaning as
you were viewing from an angle rather than head on. Samsung claims that the
LN52A750 has a 178 degree viewing angle. That's right, pretty much if you can
see it, the colors shouldn't wash out. At all. Not even a little. You might
find this hard to believe, I certainly did. But I can tell you that it is
absolutely true. The funny thing was that I noticed it even before I read the
spec. The day I set up the display, I was walking back into the room and was
amazed that the picture was still so bright from that angle. So of course I
started experimenting and found that the picture would disappear behind the
case before the colors would dim. I was amazed.
LN52A750 Menus and Features
 Usually, I'm running through menu options to give you a quick look at
where all the stuff is you'll need to adjust and calibrate your set. Honestly
there's simply no need. This is basically a "plug and play" display -
at least to get a great picture. Still, there are a few functions that you're
going to want to know about, so we'll outline them briefly here. The Input menu lets you designate inputs by
selecting a preconfigured name from a list. I'd have preferred either a more
complete list ("Game" doesn't really allow for more than one game
system) or the ability to rename them manually. The Sound menu has the one
option I was interested in (Speakers: Off) plus other stuff like EQs, SRS, and
Auto Volume. The Channel menu allows you to set up and utilize the internal
tuners (great for those getting their content off the air) including a detailed
channel list though there is no CableCARD support which means your premium
channels will still be blocked. Those that have been looking forward to the
"now approved" two-way CableCARDs are going to be out of luck with
this display. There is even a "fine tuning" function for analogue
channels which should help in getting the best picture possible.
Usually, I'm running through menu options to give you a quick look at
where all the stuff is you'll need to adjust and calibrate your set. Honestly
there's simply no need. This is basically a "plug and play" display -
at least to get a great picture. Still, there are a few functions that you're
going to want to know about, so we'll outline them briefly here. The Input menu lets you designate inputs by
selecting a preconfigured name from a list. I'd have preferred either a more
complete list ("Game" doesn't really allow for more than one game
system) or the ability to rename them manually. The Sound menu has the one
option I was interested in (Speakers: Off) plus other stuff like EQs, SRS, and
Auto Volume. The Channel menu allows you to set up and utilize the internal
tuners (great for those getting their content off the air) including a detailed
channel list though there is no CableCARD support which means your premium
channels will still be blocked. Those that have been looking forward to the
"now approved" two-way CableCARDs are going to be out of luck with
this display. There is even a "fine tuning" function for analogue
channels which should help in getting the best picture possible.
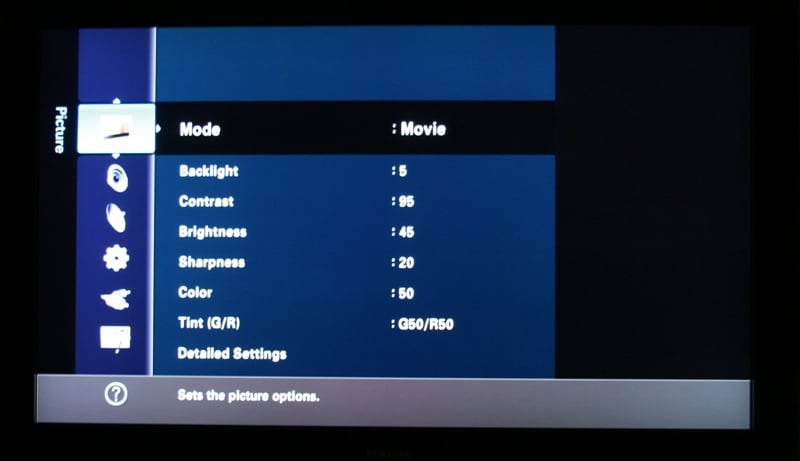
Picture Menu
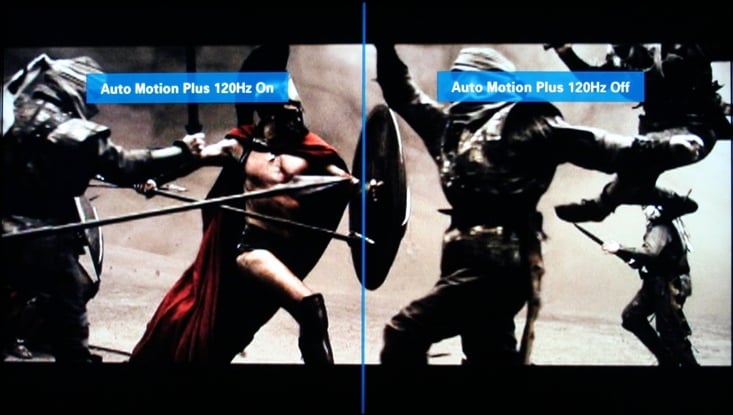 There are tons of
options under the picture menu, very few of which you'll ever have to use. I
would definitely suggest going into the Picture
OptionsDetailed Settings submenu and play with the Auto Motion Plus 120Hz options. It
defaults to Low but has a very nice "Demo" function has overlays on
what you are actually watching with half the screen the 120Hz on and the other
half off. The Brightness, Contrast, Sharpness, Color and more are easily
accessible. If you want more direction control, look under for Black Adjust, Dynamic Contrast, Gamma, and
the all important White Balance. While all these controls are nice, for most
installations, just set the Mode to "Movie" and Film Mode to "Auto"
and you're good to go.
There are tons of
options under the picture menu, very few of which you'll ever have to use. I
would definitely suggest going into the Picture
OptionsDetailed Settings submenu and play with the Auto Motion Plus 120Hz options. It
defaults to Low but has a very nice "Demo" function has overlays on
what you are actually watching with half the screen the 120Hz on and the other
half off. The Brightness, Contrast, Sharpness, Color and more are easily
accessible. If you want more direction control, look under for Black Adjust, Dynamic Contrast, Gamma, and
the all important White Balance. While all these controls are nice, for most
installations, just set the Mode to "Movie" and Film Mode to "Auto"
and you're good to go.
Setup Menu
There is not much to do under the Setup menu unless you have the internal decoders on the LN52A750 in use. If you do, you'll be able to set up the V-Chip (to keep your kids out) and Captioning. You'll also use this menu for the setup of your Cable network, your Wireless or Wired network, PiP, and software upgrades (easily performed through the USB port). There is an Energy Saving feature for those that can afford a $3500 display but not the power to run it. Or maybe it is just the guilt, I don't know. All it really does is lower the overall brightness of the display which isn't really needed to achieve great black definition. The Auto function reacts to the scene so that it lowers the output on the bright scenes but leaves the dark ones alone.
Application Menu
 The Application menu allows
you to configure and setup some of the network abilities of the LN52A750 such
as the WISELink Pro and Anynet+. WISELINK Pro allows you to access and play
content such as MP3s, JPG, AVI, and other movie formats off of a USB key. It
also allows you to connect through an Ethernet connection to your router and
access content off your computer with a program called DLNA. Of course, you'll
have to install a program on your computer as well. The same connection can be
configured to give you access to Samsung's InfoLink giving you onscreen access
to news, stocks, weather, and more. Anynet+ allows you to control other Samsung
Anynet+ capable devices with your Samsung remote. Lastly there is the oddly
named "Content" which can be accessed directly from the remote as
well. Here you can display cycling artwork or pictures (included with the
display), play fairly lame games, and even get recipes and/or exercise advice.
While you won't be spending days in this menu, the Gallery is nice for parties
as the images are very high quality and really show off the abilities of the
display.
The Application menu allows
you to configure and setup some of the network abilities of the LN52A750 such
as the WISELink Pro and Anynet+. WISELINK Pro allows you to access and play
content such as MP3s, JPG, AVI, and other movie formats off of a USB key. It
also allows you to connect through an Ethernet connection to your router and
access content off your computer with a program called DLNA. Of course, you'll
have to install a program on your computer as well. The same connection can be
configured to give you access to Samsung's InfoLink giving you onscreen access
to news, stocks, weather, and more. Anynet+ allows you to control other Samsung
Anynet+ capable devices with your Samsung remote. Lastly there is the oddly
named "Content" which can be accessed directly from the remote as
well. Here you can display cycling artwork or pictures (included with the
display), play fairly lame games, and even get recipes and/or exercise advice.
While you won't be spending days in this menu, the Gallery is nice for parties
as the images are very high quality and really show off the abilities of the
display.
Remote Control
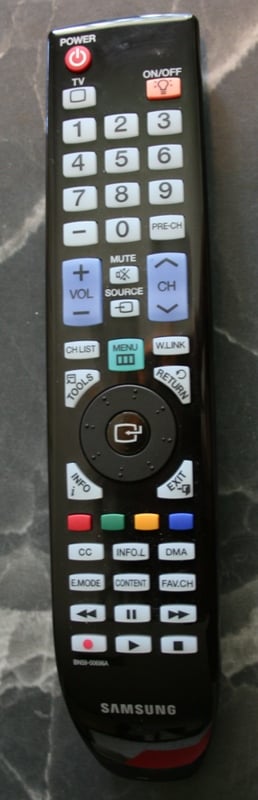 The remote for the
Samsung LN52A750 is very hit or miss for me - mostly hit. It sports a glossy
black top to match the display with large, easy to read buttons. The power
button is on the top left and is isolated so it is easy to identify and use.
Just under it and to the right is the backlight button - which lights up every
button on the remote except for the wheel and it's center button. This is probably
one of the cooler aspects of the remote. If you turn the backlight on and let
it time out, then the remote becomes motion sensitive and will light up at the
slightest provocation. We've experienced remotes like these before and a
generally annoyed by how reactive they are and how quickly they go through
batteries. Luckily, if you turn off the backlight manually, the motion
sensitive feature is disabled saving your batteries. Awesome.
The remote for the
Samsung LN52A750 is very hit or miss for me - mostly hit. It sports a glossy
black top to match the display with large, easy to read buttons. The power
button is on the top left and is isolated so it is easy to identify and use.
Just under it and to the right is the backlight button - which lights up every
button on the remote except for the wheel and it's center button. This is probably
one of the cooler aspects of the remote. If you turn the backlight on and let
it time out, then the remote becomes motion sensitive and will light up at the
slightest provocation. We've experienced remotes like these before and a
generally annoyed by how reactive they are and how quickly they go through
batteries. Luckily, if you turn off the backlight manually, the motion
sensitive feature is disabled saving your batteries. Awesome.
The button layout is fairly well done, and though the buttons are a little too uniform, the backlight really negates this problem. There is a control wheel similar to something on the iPod though it doesn't work nearly as well. Fortunately, you can forgo the use of the wheel and just click on it in the cardinal directions. The only real problem I had with the button layout was the proximity of Menu and Source buttons. Changing sources is something that I'd have to do a lot and tended not to want to switch on the backlight. The proximity of the two buttons and the fact that the Menu button was larger meant that when I was trying to change sources I often engaged the menu. The switching of the location of the two buttons would have been fine in my book.
While most of the above is nitpicky at best, the one real problem with the remote isn't so much with the remote as it is with the display. It seems that Samsung just decided to put so much stuff into the LN52A750 that it wasn't responsive to commands. At the best of times, it took nearly a second to respond. On occasion, it would slow down (this seemed to happen if it was negotiating the HDCP handshake while I was in the Menu) to an absolute crawl. This was on of the reasons that the control wheel was pretty useless. By the time it reacted, you had rotated a full two or three times.
LN52A750 Measurements and Viewing Evaluation
For calibration I'm using both the Sencore ColorPro5000 and Colormetre HCFR software. Basically, Sencore is great for calibrating your set but doesn't give you the pretty graphs that we like to show in our reviews. That's where Colormetre comes in. From the default settings, I measured:
Dynamic - 11000k (4850:1 contrast ratio)
Standard - 8500k (2300:1 contrast ratio)
Movie - 6500k (1450:1 contrast ratio)
Calibration options were nearly unlimited on the LN53A750 not that you needed them. All the standard stuff was there (Brightness, Contrast, Tint, etc) along with your gain and cut adjustments under the White Balance menu under Detailed Settings. I fiddled with these controls but in the end, I don't think you need to do much else other than turn the set on. I was able to achieve these measurements from the default Movie setting (Note: throw out any color readings below 30IRE due to limitations of the colorimeter I am using):
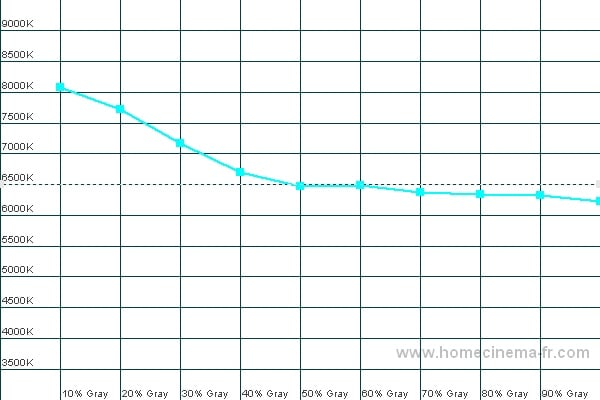
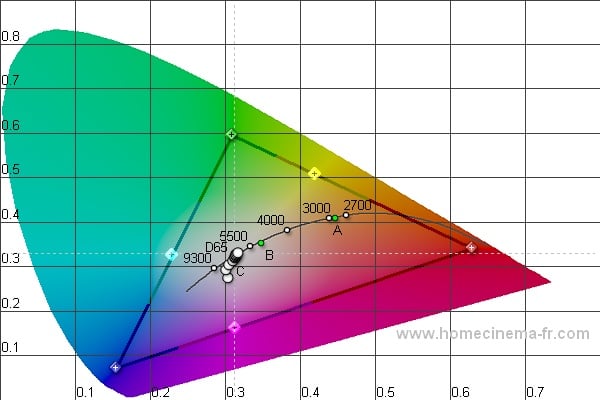
Color Temp (left); CIE (right)

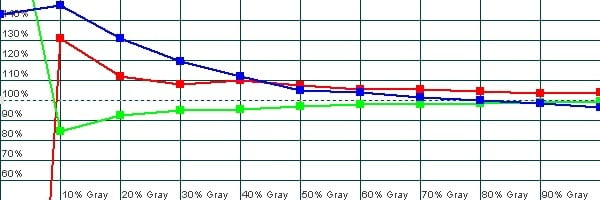
Luminance (left); RGB (right)
Audioholics/HQV Bench Testing Summary of Test Results
Perfect Score is 130
Samsung
LN52A750 Benchmark total score: 120/130.
All tests were run through the HDMI 1 input.
|
Test |
Max |
Results |
Pass/Fail |
|
Color Bar |
10 |
10 |
Pass |
|
Jaggies #1 |
5 |
5 |
Pass |
|
Jaggies #2 |
5 |
5 |
Pass |
|
Flag |
10 |
10 |
Pass |
|
Detail |
10 |
10 |
Pass |
|
Noise |
10 |
5 |
Pass |
|
Motion adaptive Noise Reduction |
10 |
5 |
Pass |
|
Film Detail |
10 |
10 |
Pass |
|
Cadence 2:2 Video |
5 |
5 |
Pass |
|
Cadence 2:2:2:4 DV Cam |
5 |
5 |
Pass |
|
Cadence 2:3:3:2 DV Cam |
5 |
5 |
Pass |
|
Cadence 3:2:3:2:2 Vari-speed |
5 |
5 |
Pass |
|
Cadence 5:5 Animation |
5 |
5 |
Pass |
|
Cadence 6:4 Animation |
5 |
5 |
Pass |
|
Cadence 8:7 Animation |
5 |
5 |
Pass |
|
Cadence 24fps film |
5 |
5 |
Pass |
|
Scrolling Horizontal |
10 |
10 |
Pass |
|
Scrolling Rolling |
10 |
10 |
Pass |
|
Total Points |
130 |
120 |
|
Comments on Audioholics DVD Torture Tests
The only change I made from
the default settings was to set Film Mode
under Picture Options to "Auto." Without this enabled, the unit
failed the Film Detail and all the Cadence tests including 2:3 pulldown when
fed an interlaced signal. The Samsung LN52A750 passed the HQV test with flying
colors. Feel free to set each of your components to interlaced output and let
the display do the work - unless you spent a lot of money on your source (or you
have a Blu-ray player), you aren't going to do much better than this display.
Viewing Evaluation
It is clear that the Samsung LN52A750 is providing a great deinterlacing as per the HQV tests. It is also clear that you the consumer needs to do little other than shell out the asking price to get that fantastic performance. But the real question is, "How does it look in real world applications?"
DVD: 300
300 is easily one of
my favorite movies to use in reviews. The picture quality is a little grainy
(by design) but there are tons of dark scenes, brown tones, and deep reds not
to mention a lot of action. I used this disk for a number of subjective
evaluations including dark definition. The Samsung LN52A750 showed all the
proper definition in the prodigious amount of darkness in this movie. Even
during the night scenes, you could pick out the detail in hair and backgrounds.
While Lionidas is climbing the hill to see the oracle, even through the smoke
and darkness, there is never any sense of loss of detail. Is it as good as a
high definition disc? No, of course not. But it is still very good and sure to
impress your friends.


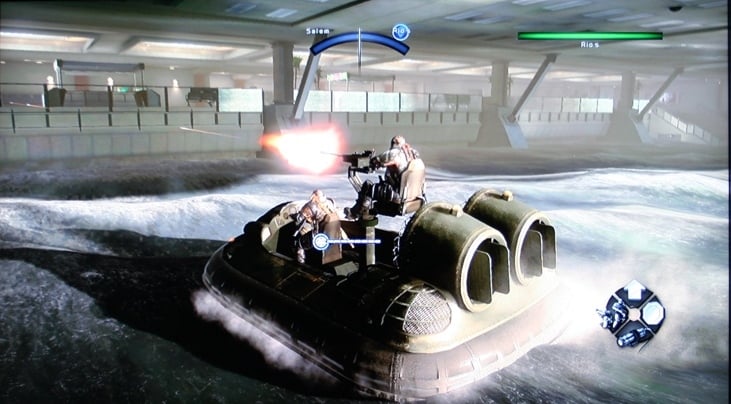
Xbox 360: Army
of Two
With the recent update
of this game, Army
of Two has recently hit my play rotation again. For the purposes of this
review, however, I was looking at vibrancy of color, ability to handle fast
motion, and over all picture quality. Army of Two has some of the most stunning
graphics (in game or cut scene) that I've ever seen. The LN52A750 absolutely
shined through this portion of the review. The 4ms response time in conjunction
with the default setting of "Low" on the Auto Motion Plus 120Hz
setting made for a very clean and fluid image. While I played around with the
Auto Motion Plus setting a bit, I never really experienced that "too real"
phenomenon that people associate with it. Often, this is because real film
doesn't refresh that quickly. To me, it just looked gorgeous. All the
characters were rendered beautifully and the colors really popped. If it wasn't
for all the people shooting at you, you could get lost in the graphics of this
game. And don't even get me started on the lush cut scenes. Rarely is there a
game where I will voluntarily watch the cut scenes more than once. With Army of
Two, it is rare for me to skip them.


LN52A750 Viewing Evaluation Continued and Conclusion
HD DVD: The Italian Job
The Italian Job is a
nice popcorn flick with an interesting plot and a great cast of actors. While
not my favorite movie, it is one that I got for free with the HD DVD purchase
which is a heck of a lot better than paying $30 for it. Lots of motion and cityscapes
gives the Samsung a chance to display jaggies or moiré. Not here. As clean as
clean can be is the order of the day and the LN52A750 didn't disappoint. When I
said earlier than you should set all your devices to interlaced, I meant it.
This was one time when I wasn't sorry that the Toshiba
HD-A2 could only output 1080i.

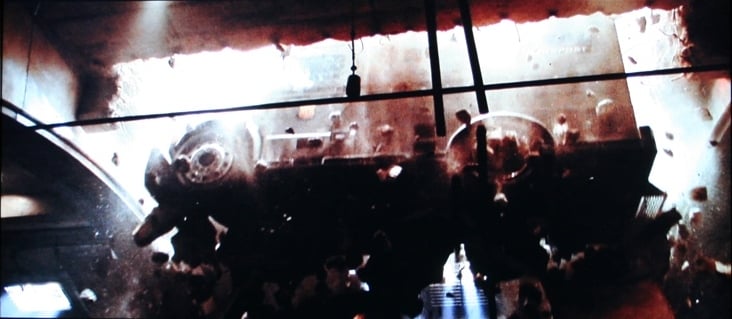

HDTV: Various Shows
One thing that the
LN52A750 cannot do is fix a bad cable signal. Motion blur and stuttering is as
often a sign of an overcompressed HD signal than anything else. For example,
the picture I took of Burn Notice was
from a late night recording that stuttered badly and generally had poor picture
quality while the second picture was from a special on the History Channel
about Indiana Jones during or near prime time. The difference is pretty
astounding. Just to check, I played with a number of the settings on the
Samsung to try to clean up the bad signal as much as possible on Burn Notice but nothing helped. A bad
source is a bad source. When you are running a display as good as the LN52A750
and you see something wrong, it is one of two things. Either the unit has a
setting enabled that it shouldn't or your source is bad. In this case, it was
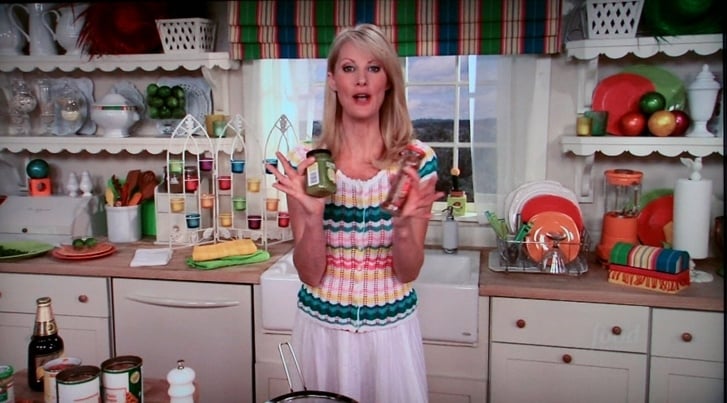
the latter. I also grabbed a few shots from FoodTV specifically for the detail
and the color. I'm not sure what show that is but it looks like a box of
crayons threw up all over her home. If I every walk into a home like that, I
guarantee you that I'll turn right around and walk out. It's either that or
gouge out my eyes.


Conclusion
Samsung LN52A750 52-inch LCD Display
$3499
Samsung
Electronics, Inc.
Samsung
105 Challenger Rd.
Ridgefield Park, NJ
07660-0511
About Samsung Electronics America, Inc.
Headquartered in Ridgefield Park, NJ, Samsung
Electronics America, Inc. (SEA), a wholly owned subsidiary of Samsung
Electronics Co., Ltd., markets a broad range of award winning, advanced digital
consumer electronics and home appliance products, including HDTVs, home theater
systems, MP3 players, refrigerators and laundry machines. A recognized
innovation leader in consumer electronics design and technology, Samsung is the
HDTV market leader in the U.S.
and is the only manufacturer that produces all four major digital television
technologies.
The Score Card
The scoring below is based on each piece of equipment doing the duty it is designed for. The numbers are weighed heavily with respect to the individual cost of each unit, thus giving a rating roughly equal to:
Performance × Price Factor/Value = Rating
Audioholics.com note: The ratings indicated below are based on subjective listening and objective testing of the product in question. The rating scale is based on performance/value ratio. If you notice better performing products in future reviews that have lower numbers in certain areas, be aware that the value factor is most likely the culprit. Other Audioholics reviewers may rate products solely based on performance, and each reviewer has his/her own system for ratings.
Audioholics Rating Scale
 — Excellent
- — Very Good
- — Good
- — Fair
- — Poor
| Metric | Rating |
|---|---|
| Detail and Resolution | |
| Deinterlacing & Scaling | |
| Contrast and Black Levels | |
| Color Reproduction | |
| Noise Reduction | |
| Calibration Options | |
| Build Quality | |
| Ergonomics & Usability | |
| Ease of Setup | |
| Features | |
| Remote Control | |
| Fit and Finish | |
| Performance | |
| Value |
As Associate Editor at Audioholics, Tom promises to the best of his ability to give each review the same amount of attention, consideration, and thoughtfulness as possible and keep his writings free from undue bias and preconceptions. Any indication, either internally or from another, that bias has entered into his review will be immediately investigated. Substantiation of mistakes or bias will be immediately corrected regardless of personal stake, feelings, or ego.
View full profile