
Proton LX-37B1C2 37-inch LCD TV Review
Proton LX-37B1C2 LCD TV
- Product Name: LX-37B1C2 37-inch LCD TV
- Manufacturer: Proton
- Performance Rating:


- Value Rating:
- Review Date: October 05, 2005 20:00
- MSRP: $ 2999
|
Video Features Audio Features |
LCD Panel Inputs: DVI-D (no HDCP), D-sub
(HD15/VGA) Dimensions: 44.9" W x 25" H x 9.3" D (with
stand/speakers) Weight: 59.4 lbs | |
Pros
- Adjustable backlight level
- Adjustable color temperature settings
- "Room Lighting" setting can be used for day/night modes
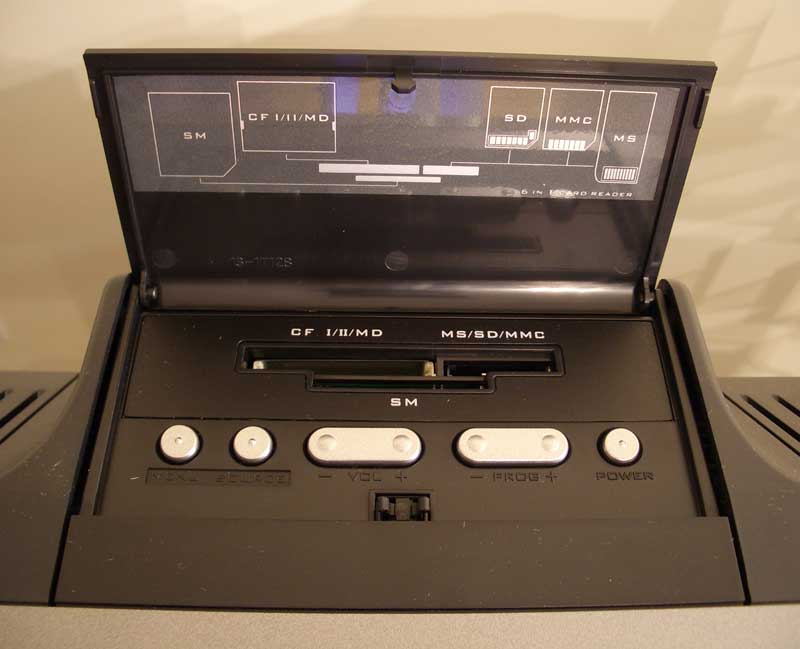
- 6-in-1 memory card reader
Cons
- No HDCP
- No RGB gain/cut in user controls
- Occasional lockups during normal channel change operations
- PIP does not remember last input or search for valid inputs
- Vague and simplistic user manual with almost no descriptions of advanced TV functions
Proton LCD Features & Build Quality
It's no great secret that there have been a flood of LCD televisions hitting the market in the past year or so, and it can be terribly difficult to separate the "wheat from the chaff" unless you know what to look for. Proton's newest 37" LCD television presents a nicely "tweakable" set with a reasonable amount of user settings to dial in the television picture quality to respectable viewing levels.
Features and Favorites
The Proton sports some useful features and controls that, as indicated above, give it a leg up in configuring the set for use in the home and attaining acceptable color, brightness and contrast settings. There are also some helpful convenience features that make the Proton stand out in a lineup:
-
6-in-1 Memory Card Reader
While not unique to Proton, the inclusion of an easy-to-access multi-format memory card reader is a useful feature. Allowing the remote control to navigate, rotate, zoom and browse the cards in a slideshow format is icing on the cake.
-
User Adjustable Color Temperature Control
Many televisions allow users to select from preset color temperature options, but the Proton takes it a step further by giving users a control a slider to specifically dial in the temperature adjustment. This allows you to configure a lower color temperature for use, as an example, with black and white feature films.
-
Removable Speakers
Often overlooked, the option to completely remove the speakers nets you a reduced overall display footprint and makes for a much cleaner look if you intend to use your own speaker system and/or wall mount the display.
-
Backlight Control
Granting access to a backlight control allows you to truly dial in the black (brightness) levels and make the LCD TV optimize its potential contrast ratio and overall performance.
-
Multiple PIP Modes
While many people disregard the use of picture-in-picture, I find that during football season it becomes extremely useful. The Proton gives you the standard fare (split screen, PIP with various locations and sizes, etc) but also adds a mode whereby the television can display a DVD on the left, for example, and also show a split screen with up to 3 channels that constantly cycle and update on the right.
-
Room Lighting Setting
This is really a sort of gamma control that allows you to select from four presets: factory, normal, bright, and movie. These presets essentially allow you to get a little more gain out of the set during daytime hours and then switch back to a more calibrated setting at night for movies. This isn't as good as the full ISF day/night settings feature, but it's a step in the right direction.
Delivery and Setup
To be absolutely safe, the Proton television is a two-person install, but LCD TVs are much easier to maneuver than their plasma and rear projection counterparts. For their size, flat panel LCD televisions weigh about 20-30% less than comparable plasma TVs and LCD rear projection units. In this case, the Proton is about 60 pounds, so it's no slouch either. The television came well-boxed, with plenty of protective packing materials and a plastic screen cover that kept the screen from getting scratched or damaged during transit. Unlike many sets I've seen, the Proton's stand comes pre-attached, so physical setup is a breeze - just lift it out and set it on a table or cabinet.
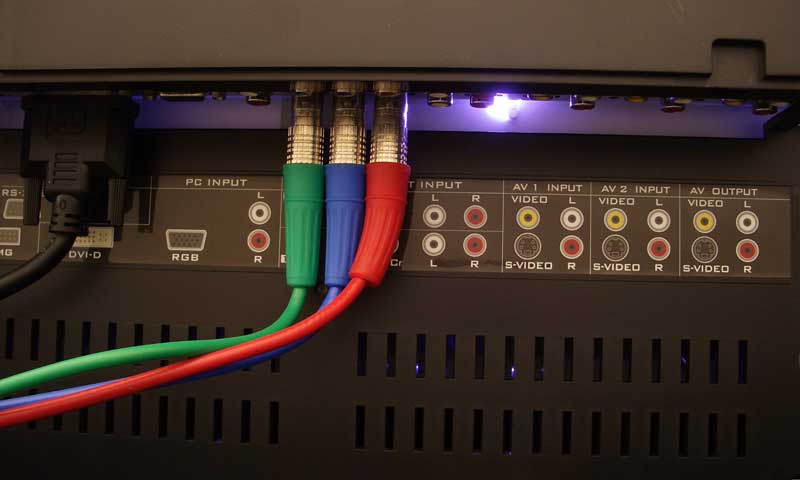
The inputs are easily accessible on the rear of the unit and full color labels show the location of all connectors. This television does not have an HDCP-equipped DVI input, so unless you have a non-HDCP DVD player, you'll be reserving that input for a PC. We connected source devices to the component video inputs which were also used during all of our display calibration tests and procedures.
Before you will be able to use the on-board NTSC tuner, you'll first need to go into the menu system and navigate to the "Settings" tab. Be certain that the television is on the "TV" source. Once in the "Settings" submenu, select "TV Tuner" and then ensure that you have the television correctly set to use either "antenna" or "cable" as the source. Selecting "autoset" at this point will initiate a fairly quick programming sequence whereby all available channels will be scanned and unavailable channels will be discarded (channels can then be manually added or subtracted later using "edit channels" if needed).
Proton LCD Menu System, Remote & Calibration
I checked all of the available inputs and determined that the Proton correctly allows for independent user settings for each. The available inputs are:
- DVI-D
- VGA/RBG/HD15 (up to 1280x1024 @ 60Hz, or 1024x768 @ 75Hz)
- Memory card (CF/MicroDrive/SM/MS/SD/MMC)
- Component video (2) [480i/480p/720p/1080i]
- Composite/S-video (2)
Switching inputs is accomplished through the remote - but be quick, the menu only stays up for about 2 seconds. Hitting the "Source" button brings up a menu of input choices (including the "Card Reader" and TV tuner inputs). You can either continue pressing the "Source" button to toggle through your options (stopping activates that input after a brief delay), or use the remote control's navigation keys to scroll up or down (and hit the "OK" button to select).
Both of the component inputs can handle 480i, 480p, 720p or 1080i input. All inputs retain their own picture settings - a big plus and considered a requirement for any serious display. The menu system is broken up into six icon-labeled sections for layout, picture, window, audio, options, and settings.
 Layout
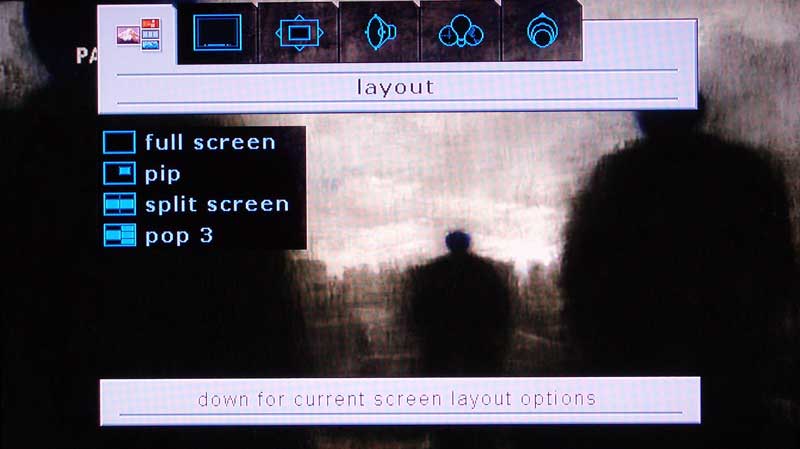
This menu section controls the picture-inon-picture and split-screen functions. There are four options. The first two, full screen and PIP, can also be cycled and accessed via the remote control's PIP button. The last two are somewhat special and involve split screen and multi-view modes. We mentioned the pop 3 mode earlier when we outlined some of the Proton's features, but it's important to note that it does this multi-channel update feature with only a single NTSC tuner, cycling through each channel as needed to update the image (the channels freeze during the cycle period). You can also feed any of the AV inputs into these screens should you really want to multitask.
 Picture
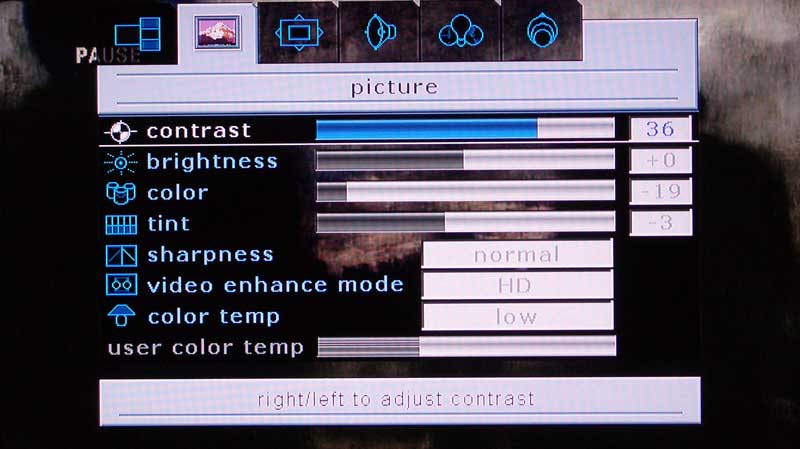
The picture menu is by far the most feature-packed section of the user menu. It features color, tint, sharpness, contrast & brightness settings. There are also three color temperature settings plus a fourth "user" setting whereby you can dial in the color temperature incrementally to a desired value (there is no numeric designation). A "digital focus" setting seems to act as a sort of noise reduction circuit and makes analogue cable channels look quite a bit better, reducing some of the grain inherent in those lower channels.
A room lighting feature has 4 settings allowing you to alter the gamma settings of the display for Normal, Bright, Movie, or Factory modes. Factory supports the best black levels, but you can use the "Movie" or "Bright" modes for daytime viewing once you have calibrated the system for nighttime use.
Window
The window menu, like all of the menu items is contextually aware and features settings and controls for image size (aspect ratio and zoom control), h position, v position, pip size, pip position, freeze window, and digital pan and zoom. Most of these features are self explanatory; however the image size is the one that will likely get used the most. Here is how the settings affect a simple 4:3 circle crosshatch pattern:
|
|
|
|
|
Normal |
Anamorphic |
Fill All |
|
|
|
|
|
Video Game Zoom |
Zoom |
Wide |
As you can see, the Normal and Anamorphic settings perform as you would expect (and I noticed only a few pixels of difference between Anamorphic and Fill All). The Zoom mode maintains the aspect ratio when viewing 4:3 content on a 16:9 screen by simply enlarging the picture to where the top and bottom are lopped off, leaving the center to fill the entire screen. Video Game Zoom vertically compresses the image a bit in order to net a bit more screen real estate for heads up displays and CG data that is common in games. The Wide setting cuts off a little bit of the top and bottom in order to deliver a slightly more true-to-shape image over Anamorphic. I was disappointed to not find a logarithmic scalable mode whereby the center of the screen remains less horizontally stretched than the edges. Many new displays have this and it is a very effective way to stretch 4:3 content to fit on a 16:9 television.
Remote Control
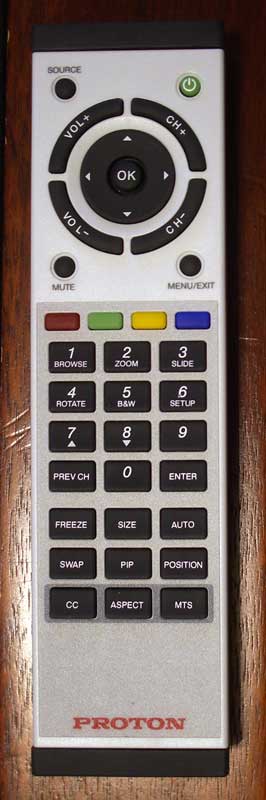
The top of the remote has the navigation keys for using the menu system as well as volume and channel buttons. The navigation area is bordered by four buttons which engage the menu, mute, source and power functions. "Menu" and "Source" can be toggled or you can interact with the navigation controls to make selections.
There are four colored buttons on the remote, however the manual does not tell you much about them let alone if they are programmable (we do not believe they are). Here is an Audioholics exclusive:
- Red - Adjusts PIP size
- Green - Swaps PIP
- Yellow - Turns PIP on and off
- Blue - Toggles the PIP mode and/or movies it if engaged.
The upper button section features a numeric keypad, but also performs double duty as controls for memory card functions. With them you can browse, zoom, rotate, and increment photos as well as engage a slideshow and show the photos as black & white images. A dedicated setup menu allows you to set the slideshow delay, select the card source, adjust the display mode (full screen or actual image proportions), set the slideshow transitions, erase photos or display photo information.
The lower button section on the remote takes care of such features as freeze frame, which freezes the current image on the screen, PIP functions (size, position, swap, etc), aspect ratio adjustment, MTS audio, and closed captioning. All in all, this remote is sufficient (except for the IR range), but nothing fancy.
Calibrating the Television
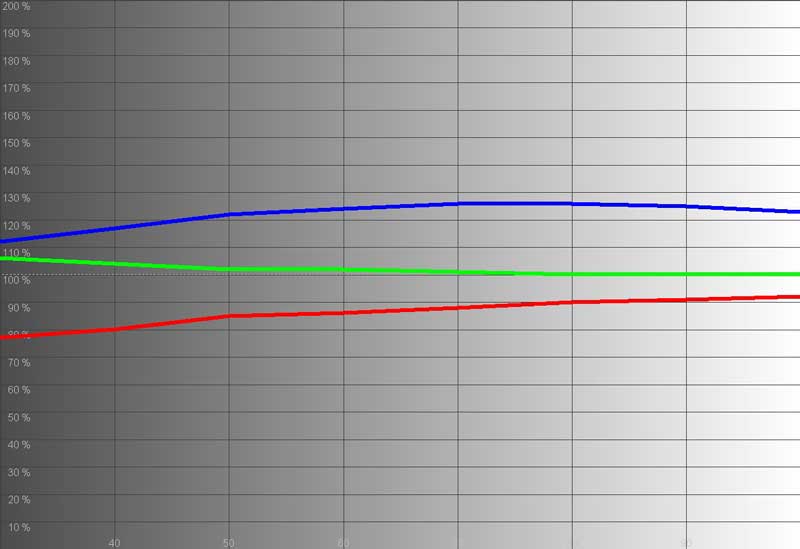
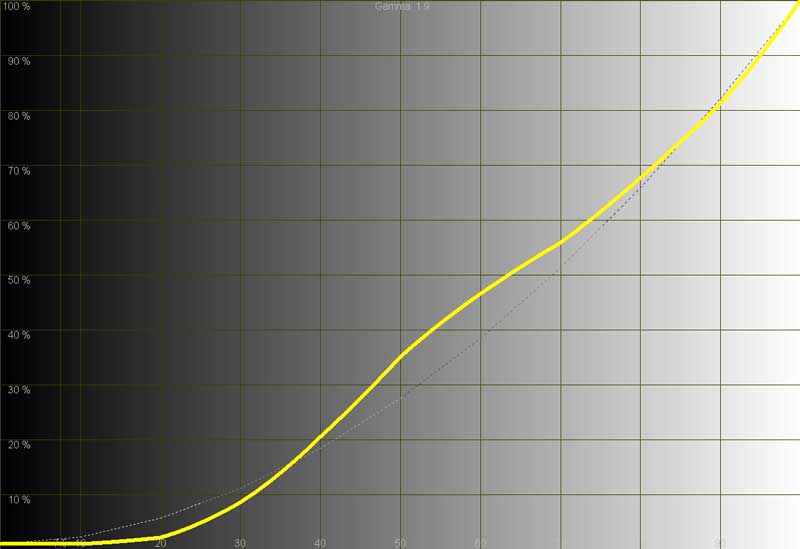
We used Datacolor's Colorfacts Professional 5.0 software to measure and help calibrate this LCD television. It allowed us to evaluate grayscale uniformity and contrast on the set as well as generate some telling histograms and CIE information. The worst thing I could say about the Proton television in terms of its default calibration was that it's color temperature is a bit high, making skin tones and such a tad on the blue side. The default Color Temp setting is medium, but we recommend setting it to just above the "low" value by using the User controls to manual adjust it. The other thing I quickly noted was that black levels at the bottom end 2.5-20 IRE were crushed - meaning you couldn't differentiate anything from 0-20 IRE. After turning down the backlight to 50% I was able to get much better dark resolution without reducing the overall contrast ratio (in fact it increased it by exactly 1 to 113:1 ANSI). While this isn't the best contrast ratio we've measured, the real-world picture quality still seems quite reasonable.
|
Before Calibration |
After Calibration |
|
|
|
|
In checking the RGB Level Histogram I found that there was a significant amount of blue in the picture. Whites looked really cool, but we were going for a more accurate calibration. |
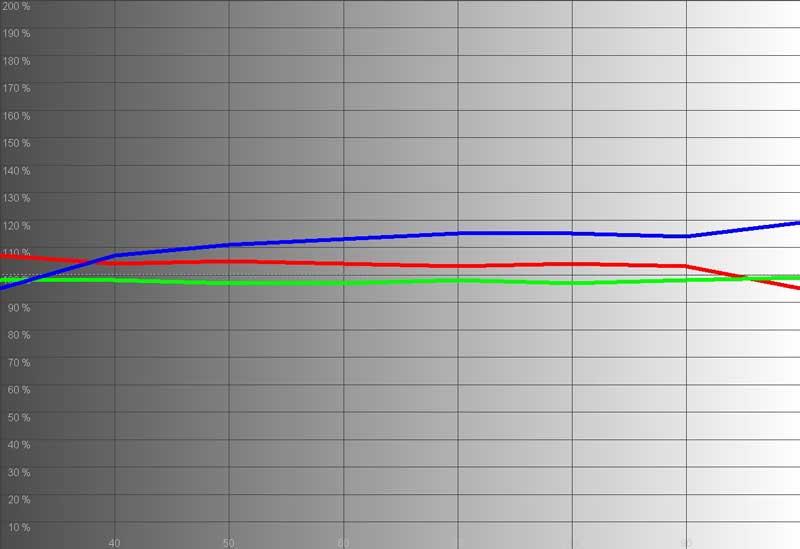
After calibrating the LX-37B1C2, we were able to get better accuracy out of the red and blue levels; green stayed pretty much dead on. This was all accomplished using only color temperature, tint and color settings along with adjusting the backlight level. RGB gain and cut is not available in the user controls. |
|
|
|
|
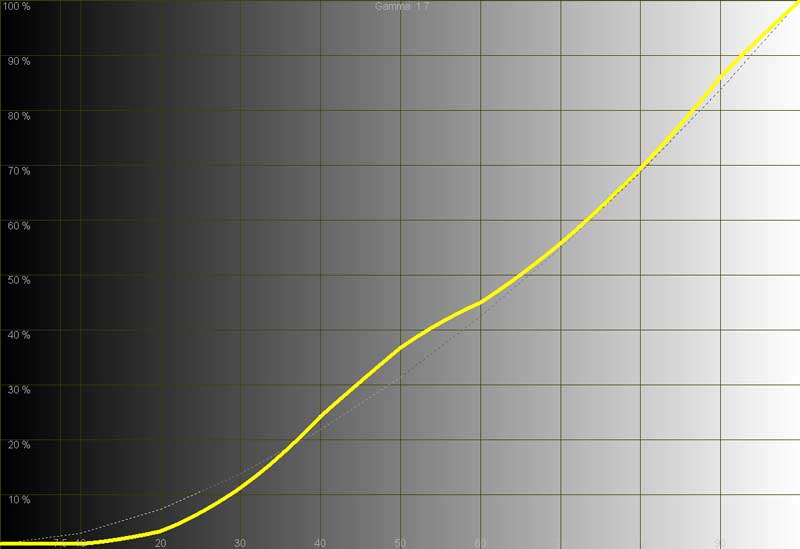
As you can see here in the Luminance Histogram, the gamma curve is such that the black levels are crushed up to around 20 IRE and there is a bit of a hump between 40 and 70 IRE. |
After adjusting the set, we got a slight amount of gain (resolution) at 20 IRE and smoothed out our hump to contain it to between 40-60 IRE and reduce the size. |
|
|
|
|
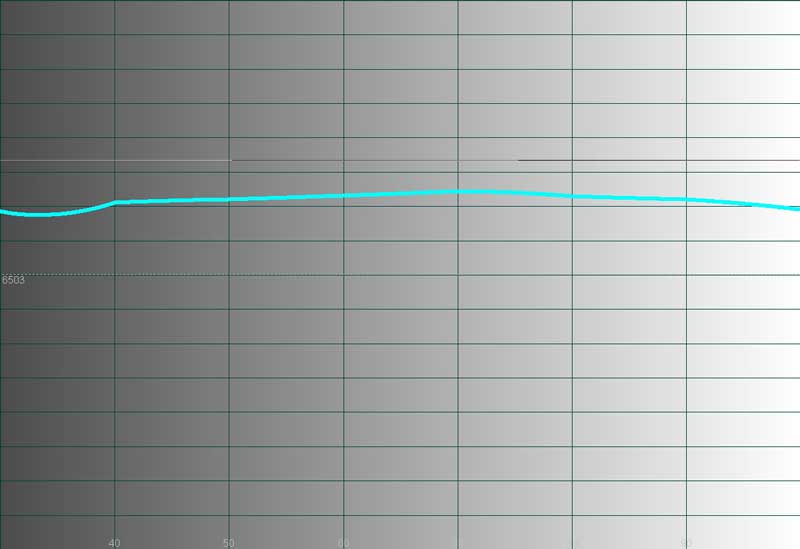
The initial Temperature Histogram shows what we noted about the high color temperature of the set. This showed that it was universally high from black to white (0-100 IRE). |
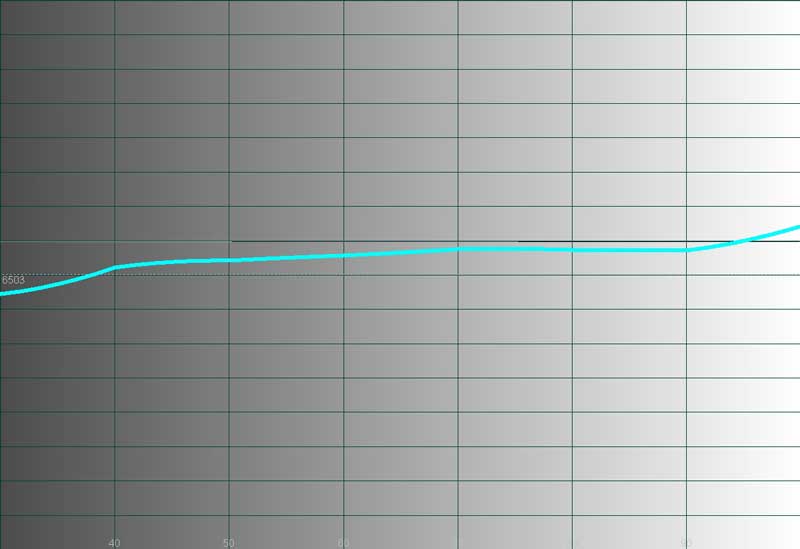
After dialing in the color temperature by hand sing the User controls, we got it down to a respectable level, more closely matching the ideal 6500K target. |
Proton LCD Testing, Viewing & Conclusion
 CIE
Chart - Color Reproduction
&
Saturation Potential
CIE
Chart - Color Reproduction
&
Saturation Potential
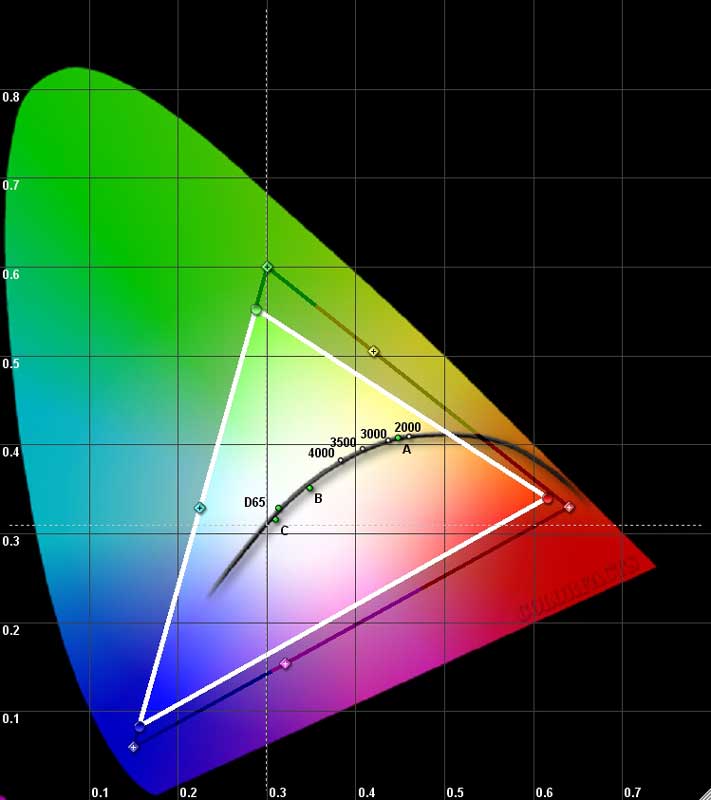
The Datacolor ColorFacts CIE Chart is used to display the colors the Proton LX-37B1C2's LCD television is able to reproduce. This appears as a white triangle overtop of a darker triangle which represents the gamut of colors in the HDTV-capable range. The full "shark fin" chart is a representation of everything we are capable of seeing with the human eye.
This color gamut triangle on the CIE chart determines how "deep" or "rich" the colors will be from a display. For instance, a Red primary that is too high on the chart will indicate that the display device may only be able to produce an orange-red instead of a deep red. Similarly, a Green primary that is too low may indicate that the display device will produce greens that are closer to yellow than what may be desirable. A wide color gamut indicates that the device is able to produce rich, saturated colors.
Please note that since the AVIA Pro calibration disc was used for this test, the results may be slightly different when run from a higher quality source such as a test signal generator. We chose to use AVIA Pro so that we could calibrate the entire system using the full DVD-to-television path.
Audioholics/HQV Bench Testing Summary of Test Results
Perfect Score is 130
Proton LX-37B1C2 Benchmark Score: 15
(don't expect this TV to
do any deinterlacing or noise reduction, simply use it with a good quality source component)
|
Test |
Max
|
Component
|
Component
|
|---|---|---|---|
|
Color Bar |
10 |
0 |
Fail |
|
Jaggies #1 |
5 |
0 |
Fail |
|
Jaggies #2 |
5 |
0 |
Fail |
|
Flag |
10 |
0 |
Fail |
|
Detail |
10 |
5 |
Pass |
|
Noise |
10 |
0 |
Fail |
|
Motion adaptive Noise Reduction |
10 |
0 |
Fail |
|
Film Detail |
10 |
5 |
Pass |
|
Cadence 2:2 Video |
5 |
0 |
Fail |
|
Cadence 2:2:2:4 DV Cam |
5 |
0 |
Fail |
|
Cadence 2:3:3:2 DV Cam |
5 |
0 |
Fail |
|
Cadence 3:2:3:2:2 Vari-speed |
5 |
0 |
Fail |
|
Cadence 5:5 Animation |
5 |
0 |
Fail |
|
Cadence 6:4 Animation |
5 |
0 |
Fail |
|
Cadence 8:7 animation |
5 |
0 |
Fail |
|
Cadence 3:2 24fps film |
5 |
5 |
Pass |
|
Scrolling Horizontal |
10 |
0 |
Fail |
|
Scrolling Rolling |
10 |
0 |
Fail |
Total Points |
130 |
15 |
|
Comments on HQV Testing
As you can see, the Proton television does not contain a sophisticated deinterlacer or noise reduction engine. As such, we simply recommend that you use it with a high quality source component. There is no reason why you shouldn't be completely satisfied with this television if you are feeding it with a relatively good quality DVD player or cable/satellite box. Remember, if you are feeding a progressive signal to a television, it is not handling deinterlacing, jaggie reduction, or cadence detection, only scaling of the image to the display's native resolution.
Viewing Evaluation
After running the measurements and test patterns I decided to pop in a few movies to see how the Proton television played some of my favorite test scenes. I chose the following movies and scenes because I wanted to specifically evaluate color reproduction, detail, and noise reduction. Viewing distance was 10 feet from the display in a light-controlled environment (but not completely darkened). The reference player, a Denon DVD-5900, was connected to the Proton LX-37B1C2 via component as this is likely to be the most commonly used input on this set which lacks HDCP support. All viewing tests were viewed at 480p and were performed after the television was calibrated via the User-level controls. The HQV video test results above are moot since we were using the deinterlacer and video processing found in our reference DVD player to drive these viewing sessions.
 DVD:
Shark Tale (emphasis on color
reproduction)
DVD:
Shark Tale (emphasis on color
reproduction)
The color and picture was phenomenal. I would describe the color detail as being rich and extremely vibrant, yet not oversaturated. There were no issues of noise in this film since it was 100% CG. Dark scenes, like those in the shark's den showed acceptable black detail for an LCD panel. Except for during the darkest scenes, I was pleased overall with the detail available and didn't find the occasional crushed blacks to be overly distracting. In general, I almost couldn't believe the incredible picture quality. There is a scene where Oscar, the "shark slayer", confronts the Godfather. The skin detail on each of the sharks was fantastic. When Lola entered the scene, her hair and facial texture almost popped off the screen.
 DVD: Spartan (picture detail and pixel refresh rate)
This movie stars Val Kilmer and is a great DVD in that it has lots of natural detail and plenty of scenes that challenge a display's capability to handle low black levels. There isn't a lot of edge enhancement present on the transfer (it's certainly no Tombstone Vista Series) though I did note a bit of it in some places. The variety of shooting locations made for some diverse and revealing viewing material. It was with this real film material that I had a chance to observe the way the set dealt with in-motion picture detail. There were a lot of handheld-style camera shots in this film which demonstrated the Proton LCD TV's speed and refresh agility in handling fast motion without causing images to blur. Close-ups of faces and the bark texture on trees consistently demonstrated a strong aptitude for keeping and holding detail during motion-intensive scenes. A night scene revealed some of the black level limitations with some content below 20 IRE appearing almost black and lacking in the detail that was most certainly present on the source.
Whenever facial close-ups came on the screen, such as when one of the main characters gets behind a sniper rifle mid-way through the movie, the textures and resolution are breathtaking. This television has an uncanny strength when it comes to showing off its resolution. A lot of times LCD TVs will show good resolution on ground, a tree, or a facial close-up, only to blur when the head turns or scene is put into motion and travels across the screen. The Proton could lock onto detail and hold the resolution across the screen.
 DVD: Hulk Special Edition (picture detail and color reproduction)
Hulk is an example of a movie that almost constantly mixes CGI and actual location shots - making for a nice combination of real footage and clean computer animated elements. There is a gamma ray/nano-med sequence involving a frog that delivers plenty of opportunity to check out skin detail as well as fine hair and skin detail present on Eric Bana and Jennifer Connelly. Later in the movie there were some fantastic shots during a helicopter dual with the Hulk in the desert. This just firmed up for me that CG and animation are what really shine on this television - not to the exclusion of film material mind you, but in a way that is simply worthy of note.
A couple chapters later, airborne water shots, including some underwater explosions and a suspension bridge, painted a perfectly detailed image that all looked magnificent. Subsequent cityscapes and street-level shots showed off just how perfectly a well-lit film-based scene could look on the Proton. This movie really made the LX-37B1C2 shine.
Cable Television
Watching cable television on the Proton LX-37B1C2 was the only place where I would recommend trying to use a better quality external cable box. Football games, Nascar races, etc had a tendency to reveal the poor deinterlacing ability of the set (as did any material with lots of diagonal lines moving across the screen). Color was always superb and the Proton never smeared images - the pixel response time was very quick. On more than one occasion (but not so much as to qualify as epidemic) the television would freeze up when entering a channel directly on the remote. The only way to free up the TV was to do a hard boot (hit the main power button on the front of the unit). This happened a total of 4 times over the course of a month. Overall I was pleased with the tuner performance. Changing channels was pretty responsive and the remote had a channel recall feature which I feel is important.
Conclusion
The Proton LCD television is a fast response display with more than enough resolution to satisfy. While it is not a good deinterlacer, using it as a monitor and pairing it with some good quality source components makes for a very pleasing viewing experience. Calibration options are meager but a few gems like User-configurable color temperature and backlight control stand out. The addition of RGB gain/cut in future models would make the user settings even better. We would love to see a better video processor for watching cable TV, but the excellent picture quality and color reproduction more than compensate for some shortcomings.
MSRP: $2999
http:/www.proton-usa.com/
About Proton Electronic Industrial Co
Proton Electronic
Industrial Co. is a leading manufacturer of high quality Digital TV, LCD TV and HDTV products. Each
Proton television combines forward-thinking industrial design with some of the most advanced
electronic engineering available today. The result is a line of televisions which regularly win the
admiration
舑
and the awards
舑
of the industry's leading video/home theater
publications. Progress through innovation and persistence to achieve the Puriti by Proton. Proton
Electronic Industrial Co. is headquartered in Taiwan.
The Score Card
The scoring below is based on each piece of equipment doing the duty it is designed for. The numbers are weighed heavily with respect to the individual cost of each unit, thus giving a rating roughly equal to:
Performance × Price Factor/Value = Rating
Audioholics.com note: The ratings indicated below are based on subjective listening and objective testing of the product in question. The rating scale is based on performance/value ratio. If you notice better performing products in future reviews that have lower numbers in certain areas, be aware that the value factor is most likely the culprit. Other Audioholics reviewers may rate products solely based on performance, and each reviewer has his/her own system for ratings.
Audioholics Rating Scale
 — Excellent
- — Very Good
- — Good
- — Fair
- — Poor
| Metric | Rating |
|---|---|
| Detail and Resolution | |
| Deinterlacing & Scaling | |
| Contrast and Black Levels | |
| Color Reproduction | |
| Noise Reduction | |
| Calibration Options | |
| Build Quality | |
| Ergonomics & Usability | |
| Ease of Setup | |
| Features | |
| Remote Control | |
| Performance | |
| Value |
Clint Deboer was terminated from Audioholics for misconduct on April 4th, 2014. He no longer represents Audioholics in any fashion.
View full profile