
Pioneer PDP-5070HD Plasma Display Review
Pioneer PDP-5070HD
- Product Name: PDP-5070HD
- Manufacturer: Pioneer
- Performance Rating:

- Value Rating:
- Review Date: June 04, 2007 10:45
- MSRP: $ 3000
VIDEO PROCESSING TECHNOLOGY
Pure Drive II Signal Processing – Full time 10-bit Digital Video Processing delivers a low noise, high contrast, natural colored image
ACE IV (Advanced Continuous Emission) for reproduction of billions of colors and improved grey-scale rendering in dark picture areas
Advanced Pure Cinema with 3:3 pull down so that film-based material on DVD, videotape or even regular TV will match the smooth and natural reproduction seen in a movie theater
Color Temperature Adjustment – 3 settings (high/mid/low)
Digital Noise Reduction – 4 Settings (off/high/mid/low)
MPEG Noise Reduction – 4 Settings (off/high/mid/low)
Digital CTI – Color Transient Improver (on/off)
Natural Resize
Natural Enhancer
Digital Chroma Decoder (10-bit)
CONVENIENCE FEATURES
Fully Integrated Media Receiver with Dual NTSC and ATSC Tuner with CableCARD™ Interface
Independent HDMI Inputs (10-bit processing) with the ability to accept a 1080p/24Hz signal
TV Guide On Screen® Interactive Program Guide for easy navigation of TV program services*
A/V Selection Memory – 6 options for viewing preferences (Standard/Dynamic/PURE/Movie/Game/User)
Aspect Ratio Control – 5 positions (Wide/Zoom/Cinema/ Full/4:3) “Dot by Dot” for PC
Split Screen/Picture in Picture display modes to view multiple sources at one time
Home Gallery offering a convenient way to view photos via USB connection
V-Chip Parental Control
New Remote Control with preset, glow in the dark, direct input selection and TV Guide On Screen control
PRODUCT DIMENSIONS
Display (W x H x D): 48-3/16” x 30-7/8” x 4-1/2” - With Detachable Speaker
Display Weight: 75.1 lbs.
VERSATILE VIDEO AND AUDIO CONNECTIVITY
Inputs
Independent Dual HDMI with Audio
Component (1 side/2 rear with Audio)
Composite [1 side/3 rear (1 rear with Audio)]
S-Video [2 rear (1 rear with Audio)]
Antenna A & B
USB (Mass Storage Class) (Side Input)
PC
Outputs:
Optical Digital Audio
Monitor Out – Composite/Audio LR
Subwoofer
SR+
SOUND TECHNOLOGY
13 Watt Stereo Amplifier With TruBass 2-Way Stereo Speakers
SRS® WOW/FOCUS/TruBass Surround Sound Audio
Bass Boost Loudness
OTHER
Table Top Stand – Included
Detachable Bottom Speaker – Included (PDP-S40)
Flat Wall Mount – Optional (PWM-F110)
CARTON DIMENSIONS
W x H x D: 53” x 38-1/4” x 20-1/4”
Weight: 113 lbs.
Pros
- Great picture
- Removable bottom mounted speaker
- Good signal processing
- Plenty of neat extras (freeze frame, USB input)
Cons
- Price
- Lack of calibration options
PDP-5070HD Build Quality and Inputs
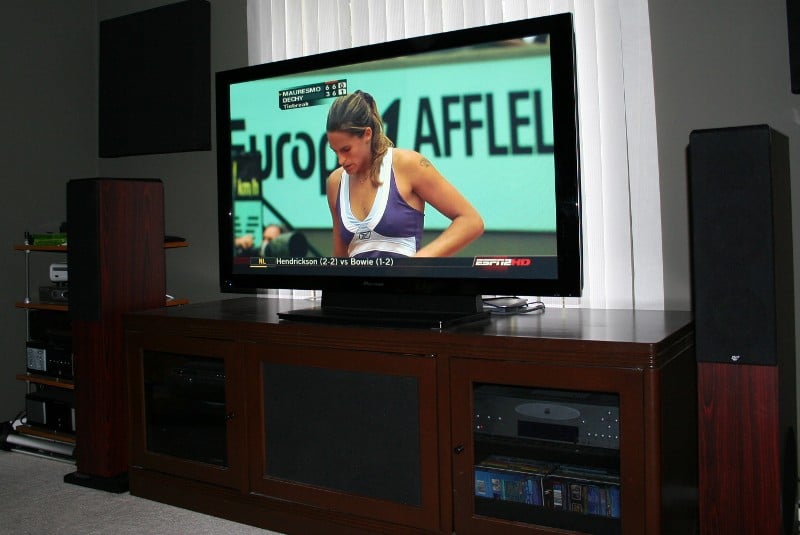
My first display review was a plasma and I’ve long held that I prefer plasmas to LCDs (in general). It’s easy to make such generalizations when you’ve reviewed 3-1 plasma v. LCD. But I’ve been living with a 1080p LCD for a while now and have gotten used to it. And no matter how objective you try to be, it is hard (at first) to get past the propensity to prefer what you know. Pioneer has had a reputation for putting out quality displays and I’ve never had the pleasure of reviewing one. It wasn’t hard for me to get excited about a Pioneer review much less a Pioneer plasma review - even if it was "only" a 720p display.

advertisement
Build Quality
 The PDP-5070HD weighs in at over 75 pounds so you’re going to want to
have a little help moving it. The supplied base will be attached (which will
make your life a lot easier) so all you’ll have to do is pick the unit up out
of the box and set it up on whatever plasma stand you choose. Wall mounting is
of course an option with the purchase of a wall mounting bracket. The speakers
are included but not installed on the unit. Basically, they are mounted to the
bottom of the display with the supplied hardware. There are a number of reasons
why the speaker isn’t installed for you, the most important being that its
location would make it far too easy for someone to use it as a handhold when
setting up the unit. And that would be bad as it would certainly break right
off under the strain. I’d hope that people spending three grand on a display
wouldn’t consider using the supplied speakers but I know there are some out
there that would (for shame!) Installing the speaker is as easy as attaching
three brackets, securing the speaker to the brackets, and connecting the
speaker wire. Pioneer suggests that you lie the unit face down on a protective
cover (like a thick blanket) on top of a strong table (with the tip of the base
overhanging the edge of the table if it is attached or will be). This will give
you the access you need to attach the speaker or remove/install the base.
The PDP-5070HD weighs in at over 75 pounds so you’re going to want to
have a little help moving it. The supplied base will be attached (which will
make your life a lot easier) so all you’ll have to do is pick the unit up out
of the box and set it up on whatever plasma stand you choose. Wall mounting is
of course an option with the purchase of a wall mounting bracket. The speakers
are included but not installed on the unit. Basically, they are mounted to the
bottom of the display with the supplied hardware. There are a number of reasons
why the speaker isn’t installed for you, the most important being that its
location would make it far too easy for someone to use it as a handhold when
setting up the unit. And that would be bad as it would certainly break right
off under the strain. I’d hope that people spending three grand on a display
wouldn’t consider using the supplied speakers but I know there are some out
there that would (for shame!) Installing the speaker is as easy as attaching
three brackets, securing the speaker to the brackets, and connecting the
speaker wire. Pioneer suggests that you lie the unit face down on a protective
cover (like a thick blanket) on top of a strong table (with the tip of the base
overhanging the edge of the table if it is attached or will be). This will give
you the access you need to attach the speaker or remove/install the base.
It seems that you can’t start a thread about a flat panel display without someone wondering about the fan or other noise that the unit produces. Personally, I’ve never run into a display that was so noisy I thought it was distracting. The Pioneer PDP-5070HD is no different. While a slight whine can be heard from the back of the unit I didn’t notice it until I was back there checking my connections with my ear right up to the vent. Pioneer seems to be very concerned with the stability of this unit and has a number of suggestions in their manual about it. First, the base has two holes so that the unit can be physically attached to your furniture by screws (yeah right). They also suggest attaching the unit to the wall with a rope or chain. Perhaps this is just for legal reasons as I never really found that this unit was any less steady than other units I’ve tested. The base is sort of lightweight and perhaps that’s where this paranoia comes from. You’ll have to use your best judgment here. Aesthetically the unit is gorgeous with a gloss finish around the screen and only a very small blue light to indicate power.
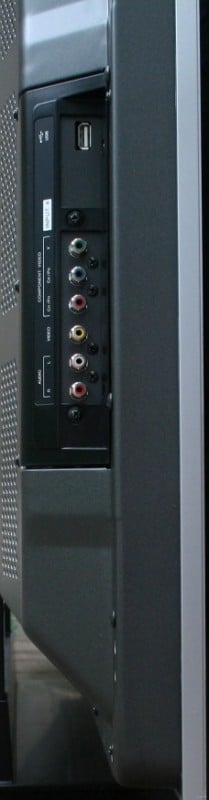
Input Configuration
 The back of the PDP-5070HD
is full of inputs that you can see and a few that you can’t. The inputs are
labeled numerically (even in the menu) rather than by function (composite,
component 1, component 2, HDMI 1, etc). There are three connection points, one
on the back of the unit parallel to the screen, one on the back of the unit
perpendicular to the screen, and one on the side of the unit. You’ll want to
familiarize yourself with the inputs that are perpendicular to the screen
before you set the unit up (and perhaps go ahead and connect a couple of
cables). I’ll take you through the inputs one by one and list their type and
location:
The back of the PDP-5070HD
is full of inputs that you can see and a few that you can’t. The inputs are
labeled numerically (even in the menu) rather than by function (composite,
component 1, component 2, HDMI 1, etc). There are three connection points, one
on the back of the unit parallel to the screen, one on the back of the unit
perpendicular to the screen, and one on the side of the unit. You’ll want to
familiarize yourself with the inputs that are perpendicular to the screen
before you set the unit up (and perhaps go ahead and connect a couple of
cables). I’ll take you through the inputs one by one and list their type and
location:
-
Input 1 – S-video, composite video, analogue audio – back parallel
-
Input 2 – Component video, s-video, composite video, analogue audio – back parallel
-
Input 3 – Component video, analogue audio – back parallel
-
Input 4 – Component video, composite video, analogue audio – side
-
Input 5 – HDMI – back perpendicular with additional analogue audio on the back parallel
-
Input 6 – HDMI – back perpendicular with additional analogue audio on the back parallel

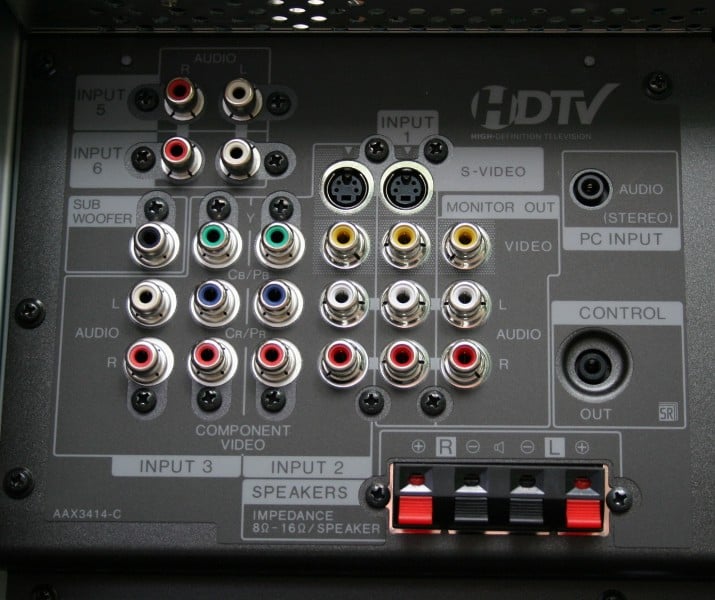
Other inputs of note:
-
PC – video is on the back perpendicular but the audio is on the back parallel
-
USB – for pictures and movies to be displayed – side
-
Cable CARD – for direct control of digital cable service – back perpendicular
-
Cable/Antenna input – two are located on the back perpendicular
-
Subwoofer out (to supplement the display’s speakers – back parallel
-
Digital out – TOSLink connect if you want to route your audio/video through the display and out to the receiver – back perpendicular
-
G-link – an IR flasher to control a VCR if you want to use one to record your programming – back perpendicular
-
Monitor out – Composite, analogue audio – out to a VCR or other recording device – back parallel
The only thing missing is a digital input for audio other than the HDMI’s. Since display's don't typically offer bass management, however, the analogue inputs typically serve 99.9% of anyone's needs should they want audio to be routed through the television.
PDP-5070HD Menu
Since I have a cable box and not a CableCARD I went and installed a splitter between the wall and the cable box and connected one output to the cable box and the other into the Ant A input on the back of the PDP-5070HD. Note that with a splitter you'll experience a reduction in signal strength which could affect reception of some channels. For me, G4 pretty much went out and was a pixilated mess. Once you run the cable to the TV, it’s a simple matter of navigating to the tuner section of the menu and starting the automatic channel setup. I connected my cable box through the Denon AVR-2307CI (which is hanging around in my setup until Denon sends me a shipping label to send it back) along with the OPPO OPDV971HD upconverting universal DVD player via a DVI-to-HDMI cable supplied by Impact Acoustics or Blue Jeans Cables. The Xbox 360 and Escient DVDM-300 were routed through the receiver via component. The SMS-1 was sent via composite video. Overall, I pretty much had everything but the PC input and the CableCARD in use.
The only real stumbling block I ran across was the Xbox 360. Apparently, the PDP-5070HD doesn’t like 1080i over component (it’ll accept 1080p over HDMI but downconverts it to its native resolution of 720p). It took me a while to figure that out and for once I was thankful for the HD switch on the Xbox 360’s component cable. I switched it to standard definition, changed the resolution to 720p, and flipped the switch back to HD. Problem solved.
The menu system is as intuitive as it is pretty. It has all of the standard controls but lacks some of the fine tuning that you’ll need to really dial in the picture. For that, you’ll have to either hire a professional or risk accessing the system menu yourself (Inexperienced users shouldn't. If you do, write down EVERYTHING before you make any changes, but seriously, don’t try this if you aren't sure of what you are doing.) Let’s run through everything one at a time:
-
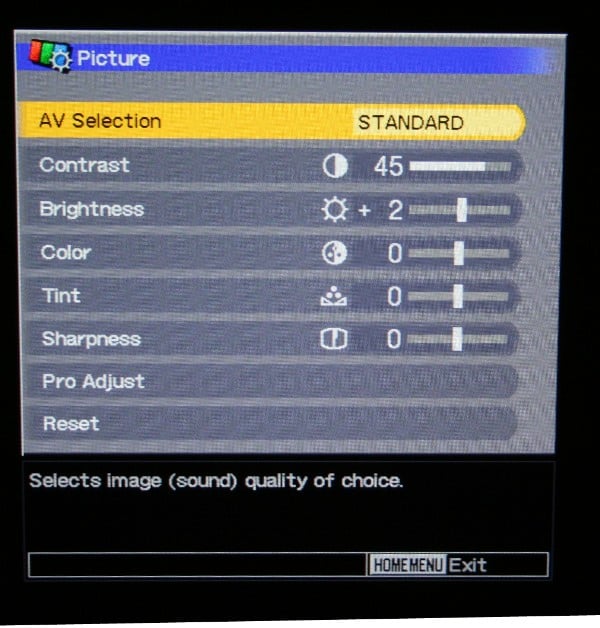
 Picture
 -
AV Selection (each of these is a general setting for all inputs except for User which is specific to each input)
-
Standard – for a highly defined image in a normally bright room
-
Dynamic – for a very sharp image with maximum contrast (torch mode)
-
Movie – for movies (is a little softer than standard – only good in a dark room)
-
Game – Lowers image brightness for easier viewing (seemed to be a little too sharp for me, lots of ghosting on hard lines)
-
User – user defined setting
-
Contrast
-
Brightness
-
Color
-
Tint
-
Sharpness
-
Pro Adjust
-
PureCinema – Off, Standard, Advanced – this is the PDP-5070HD’s deinterlacing program. The ADV setting works on all settings except 1080p and coverts the signal to 72Hz while the standard only works on interlaced signals
-
Color Detail
-
Color Temp – High, Mid, Low – High will accentuate the blues while Low will accentuate the reds. If you are having a problem with one or the other, you can adjust it here otherwise, leave it on Mid
-
CTI – Off, On – Stands for Color Transient Improvement – try it out and see if it does anything for you, it didn’t for me
-
NR (Noise Reduction)
-
DNR (Dynamic Noise Reduction) – My testing revealed differences between On and Off but no real substantive differences between High, Mid, and Low. These differences were only really noticeable on extremely noisy standard definition signals
-
MPEG NR – the same as above but for DVDs.
-
Reset – resets to factory settings
-
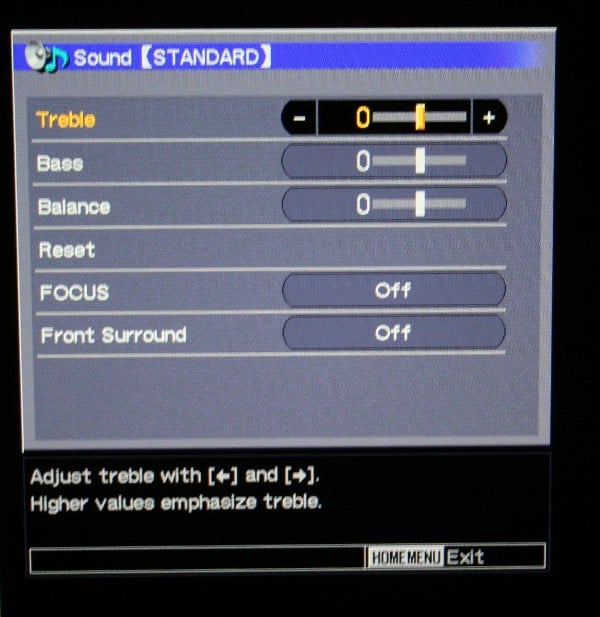
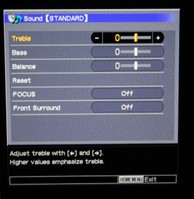 Sound
Sound -
Treble
-
Bass
-
Balance
-
Reset
-
Focus (Off, On) – According to the manual this “shifts the sound-source direction (sound image) upward and produces clear sound contours” whatever that means.
-
Front Surround
-
Off
-
SRS – A sort of virtual surround
-
TruBass – Increases bass output
-
TruBass+SRS - Both
-
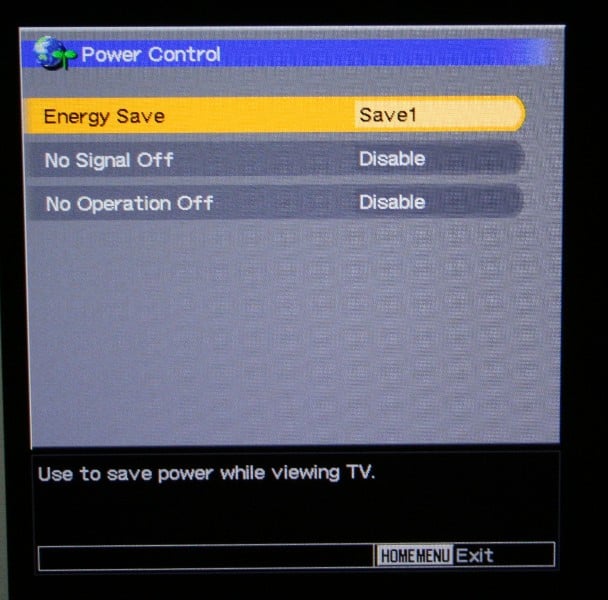
 Power
Control
Power
Control -
Energy Save
-
Standard – does not decreases picture brightness
-
Save1 – slightly lowers power consumption while slightly suppressing the brightness drop level
-
Save 2 – decreases the picture brightness and lowers power consumption
-
Picture Off – turns the picture off (I suppose you’d do this if you were listening to music?)
-
No Signal Off (Enable, Disable) – can set the display to turn off when a signal is not present for 15 minutes
-
No Operation Off (Enable, Disable) – can set the display to go into standby mode if no operation is performed for three hours (probably want to disable this if you are a Lord of the Rings fan).
-
Sleep Timer (Off, 30 min, 60 min, 90 min, 120 min)
-
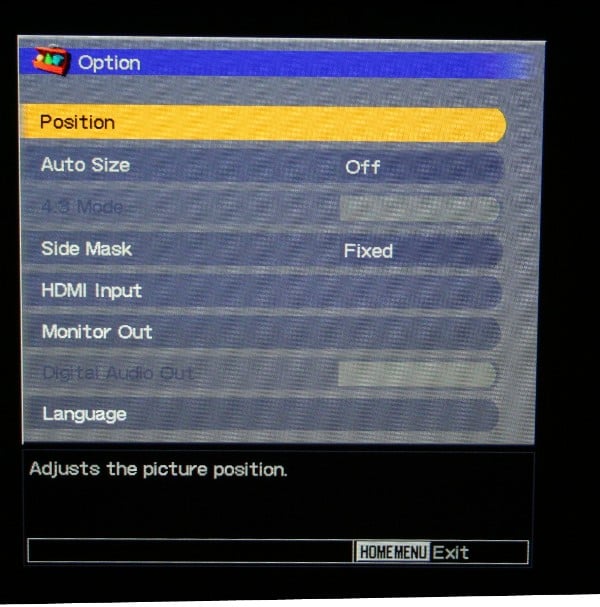
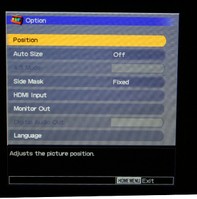 Option
 -
Position (reposition of the picture in the screen up, down, or side to side)
-
Side mask (fixed (grey) or Auto (duplicates the side of the screen in black and white – kinda annoying)
-
Monitor Out (can enable or disable the output of any/all inputs individually)
-
Digital Audio Out (Dolby Digital or PCM)
-
Language (English, Spanish, or French)
-
Tuner Setup
-
Parental Control – This is sort of neat because you can chose, within every rating scale which things to block. So within the MPAA ratings you can block R and NC-17 (for instance), while under the TV Ratings you can block TV-MA. Perhaps you’re ok with some violence but not nudity? Under the TV Parental Guidelines you can block violence (but not Fantasy Violence, Sexual Situations, Adult Language, and Sexual Dialog. They’ve got all the Canadian English ratings, the Canadian French ratings, and a setting for unavailable ratings (just in case). The manual conveniently has detailed listings of each of the ratings in case you don’t know them off the top of your head. This is by far the most comprehensive and intuitive parental system I’ve ever seen much less used. Parents can for once feel like it might be effective.
-
Favorites – Assign channels for the four different favorites buttons
-
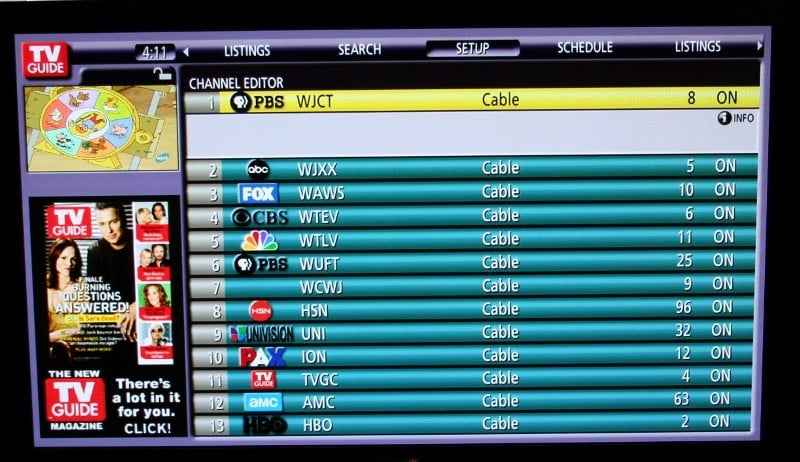
Channel setup – Have the display detect channels or you can modify (add, subtract) if you want. There is also an option to check signal strength which is useless for a cable connection but will help if you are trying to position an antenna.
-
Closed Captions – can choose the type and style for both the digital and analogue signals. A nice feature is that you can have the captions activate whenever the set is muted (something that I really like).
-
Clock – just choose your time zone. It will automatically set the correct time for you with a cable signal.
-
Home Gallery – used to control the content on a connected USB device (see below)
PDP-5070HD Additional Functionalities and Remote
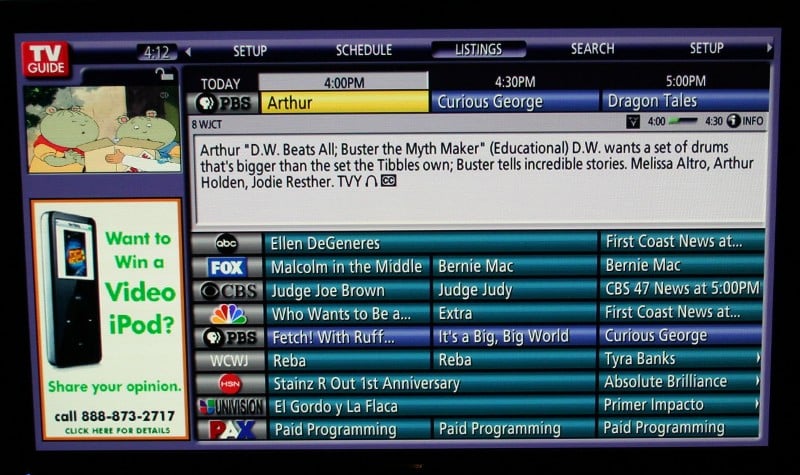 The PDP-5070HD comes equipped with the TV Guide channel menu system. Yep,
it is a trademarked TV Guide menu system for viewing current and future shows.
It only updates up to 8 days in the future but it works for most cable and
over-the-air feeds. All you need to do is enter your zip code and tell it what
type of connection you have hooked up to each of the inputs (cable or antenna).
This doesn’t work for satellite (where’s the love?) sources. When you first
turn on the unit you’ll be taken to this screen automatically, but if you want
to access this setup screen later, hit the TV Guide button on the remote and
click down to Setup. Once you enter the requisite data, it will start
downloading the Guide information. It will only do this when the display is off
so it may take a day or so to get all the updated listings. It may ask you to
confirm the signal source (if you have multiple providers in your area).
The PDP-5070HD comes equipped with the TV Guide channel menu system. Yep,
it is a trademarked TV Guide menu system for viewing current and future shows.
It only updates up to 8 days in the future but it works for most cable and
over-the-air feeds. All you need to do is enter your zip code and tell it what
type of connection you have hooked up to each of the inputs (cable or antenna).
This doesn’t work for satellite (where’s the love?) sources. When you first
turn on the unit you’ll be taken to this screen automatically, but if you want
to access this setup screen later, hit the TV Guide button on the remote and
click down to Setup. Once you enter the requisite data, it will start
downloading the Guide information. It will only do this when the display is off
so it may take a day or so to get all the updated listings. It may ask you to
confirm the signal source (if you have multiple providers in your area).
When I hooked up my cable feed, I was pleasantly surprised to find a number of digital and HD channels available to me. All of my local stations plus the MTV HD channel were available along with a number of digital cable equivalents of my standard definition channels. SciFi, Comedy Central and a few others were there and the difference in picture quality was amazing. QAM tuners can be hit or miss depending on how your cable company configures their signal but in my area, I’d be tempted to drop the digital cable box and just plug in the cable. Of course, the channel numbers are all weird (104.001 for example) but I can get used to that.
The weird issue that came up is with the TV Guide interface. Because it knows that I was supposed to be receiving analogue cable, it programmed in the proper channels and left off all the unlocked digital ones. It then orders the channels in the guide in what appears to be a fairly random order. You'll see a bunch of other channels that could be available but they'll all be disabled. What I had to do was to scroll through each of the digital channels I was getting, watch it long enough to identify the channel, and then write down each channel number and description (73.001 - Discovery HD for instance). I then had to go to the menu and manually enable each channel and enter the proper channel. For channels that were duplicates of standard definition channels, I could just overwrite the channel number with the digital equivalent.
 Following me so far,
'cause this next part gets confusing. I mentioned that the guide is ordered
randomly (it doesn't follow the numerical order of the channels) BUT it does
have a numbering system. So TV Guide 1 may be channel 8, TV Guide 2 may be
channel 5, etc. But those TV Guide numbers have no function outside the TV
Guide interface. If you want to get to TV Guide 1, and you aren't on the
interface screen, you need to type in 8. Not really a huge deal until you
remember that those digital channels all had weird numbers. So, you are left
with a choice, always use the TV Guide interface, or memorize that SciFi, which
has always been 66, is now 104.003… unless you go to a friend's house and then
it is 66 again. But, it is free so I suppose I shouldn't complain. You can also
add reminders and set recordings (if you have a VCR connected with the G-link).
The display at the top right isn't actually what is playing on the current
channel you're watching (like it is for every single other interfaces like this
that I've used), it is what is one the channel you're scrolling past. The
advertisements on the left are annoying (and can actually be selected so that
you can learn more about the products) but the channel information window can
be expanded from just a few lines to taking up most of the screen which pretty
much eliminates scrolling.
Following me so far,
'cause this next part gets confusing. I mentioned that the guide is ordered
randomly (it doesn't follow the numerical order of the channels) BUT it does
have a numbering system. So TV Guide 1 may be channel 8, TV Guide 2 may be
channel 5, etc. But those TV Guide numbers have no function outside the TV
Guide interface. If you want to get to TV Guide 1, and you aren't on the
interface screen, you need to type in 8. Not really a huge deal until you
remember that those digital channels all had weird numbers. So, you are left
with a choice, always use the TV Guide interface, or memorize that SciFi, which
has always been 66, is now 104.003… unless you go to a friend's house and then
it is 66 again. But, it is free so I suppose I shouldn't complain. You can also
add reminders and set recordings (if you have a VCR connected with the G-link).
The display at the top right isn't actually what is playing on the current
channel you're watching (like it is for every single other interfaces like this
that I've used), it is what is one the channel you're scrolling past. The
advertisements on the left are annoying (and can actually be selected so that
you can learn more about the products) but the channel information window can
be expanded from just a few lines to taking up most of the screen which pretty
much eliminates scrolling.
In addition the PDP-5070HD has your standard Picture-in-Picture modes (if you have a split signal coming into both antenna inputs) so that you can switch between them. It also had what they call a G-link (not at all what I thought it was) that is essentially an IR flasher to control a VCR. What you can do is set your TV to record a show and the TV will control the VCR via the g-link. I have neither a VCR nor a desire to ever own one again so we’ll all have to take Pioneer’s word for it that it works. I'd assume it also works with DVD recorders as well though there is no mention of it in the manual.
Under the little flap at the bottom of the remote, along with the PiP functions is a little button titled “freeze”. Well, this button does exactly what it says. It freezes the action on the screen and puts up a side by side with the frozen image on one side and the live broadcast on the other. This little button gave me no end of pleasure and is the bane of my wife. It is just too much fun to wait for someone to get a stupid look on their face and hit “freeze.” Hilarity ensues.
The screen size can be selected manually and remembered by the display for each type of signal. Basically, I use 4:3 for standard definition signals in general and full for HD signals. The only real difference is when the SD show is letterboxed and then I’ll use Zoom which pretty much fills up the whole screen. Regardless, these are your options:
-
4:3 – Gives side bars so that standard definition signals are presented at the proper ratio
-
Full – Stretches a standard definition signal or presents an HD signal in the proper ratio
-
Zoom – Basically zooms in on a 4:3 signal. This is great if the program you are watching is a) standard definition and b) letterboxed
-
Cinema – For 14:9 letterbox pictures
-
Wide – Signal is stretched progressively toward each side of the screen (stretched more at the sides than it is in the center)
You’ll have to experiment with these to decide what you like best. If I have one complaint it is that the side bars on the 4:3 mode are not configurable. It wouldn’t be so bad if they weren’t grey. But they are. I’d prefer black. I know that they are grey to ensure that all areas of the display are ageing similarly so that you don’t have vibrant edges with a dull center but I don’t care. There is also an Auto aspect option that is fine for HD but seems to prefer Wide for everything else. I don't prefer Wide so I don't use it.
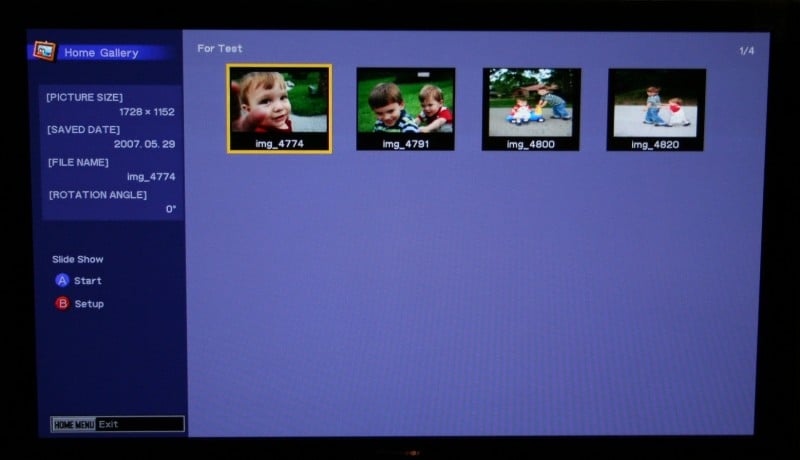 Last I tested the USB input with a couple of pictures of my kids on a
memory stick. The Pioneer had no problems recognizing the stick or identifying
the pictures. From there, it was simply a matter of choosing the configuration
for the slide show and it was off to the races. All of the configuration
options are self explanatory except for the normal versus full display. With
normal you get the side bar with the controls on it and with full it loses the
side bar and blows the picture up as much as it can. I wish you could change
the background from the muted purple but you can't. I thought this was going to
be pretty gimmicky (and perhaps it is) but it is so easy to use that I can
totally see myself setting up a quick slideshow on a memory stick, set the
display to loop with a 5 or 10 second delay between each picture, and watching
my parents sit down with popcorn for hours.
Last I tested the USB input with a couple of pictures of my kids on a
memory stick. The Pioneer had no problems recognizing the stick or identifying
the pictures. From there, it was simply a matter of choosing the configuration
for the slide show and it was off to the races. All of the configuration
options are self explanatory except for the normal versus full display. With
normal you get the side bar with the controls on it and with full it loses the
side bar and blows the picture up as much as it can. I wish you could change
the background from the muted purple but you can't. I thought this was going to
be pretty gimmicky (and perhaps it is) but it is so easy to use that I can
totally see myself setting up a quick slideshow on a memory stick, set the
display to loop with a 5 or 10 second delay between each picture, and watching
my parents sit down with popcorn for hours.


Remote Control
 As remotes go, the one for the PDP-5070HD
isn’t very good. It has all the necessary functions and the layout is generally
OK but there are some glaring flaws that just can’t be forgiven. First, no
backlight - it is glow-in-the-dark but I've learned that GitD is a poor
substitute for actual backlight. That’s generally a strike, though with the
proper layout it can be forgiven. Which leads me to my second complaint - bad
layout. My most used buttons are just not where I need them to be. Especially
if I’m going to be hunting around for them in the dark. Say that I’m
controlling the channels through the TV (I’m not, but say I am) the volume and
channel buttons are on the bottom of the remote. The TV Guide, info, and
directional buttons are near the top and the aspect button (the one that I use
the most) is small and off to one side at the top surrounded by inputs and the
info buttons. Not a very good layout. The remote can be used as a universal
though you’ll have limited controls most of which is hidden under a little flap
at the bottom of the remote. With some of the components you’ll also use the
Channel buttons and with the Cable/Satellite control you’ll get to use more of
the buttons on the remote but for the most part you’re confined to the itty
bitty uniformly shaped buttons under the little flap. Have fun with that. On
the plus side (and this is a big plus) the remote seems eerily RF. I could
literally point the remote at the couch and the display would respond a good
bit of the time. Oh, and either this remote shares codes with the Emotiva RSP-1
reference stereo preamp or my home theater is haunted. That’s all I’m saying
about that.
As remotes go, the one for the PDP-5070HD
isn’t very good. It has all the necessary functions and the layout is generally
OK but there are some glaring flaws that just can’t be forgiven. First, no
backlight - it is glow-in-the-dark but I've learned that GitD is a poor
substitute for actual backlight. That’s generally a strike, though with the
proper layout it can be forgiven. Which leads me to my second complaint - bad
layout. My most used buttons are just not where I need them to be. Especially
if I’m going to be hunting around for them in the dark. Say that I’m
controlling the channels through the TV (I’m not, but say I am) the volume and
channel buttons are on the bottom of the remote. The TV Guide, info, and
directional buttons are near the top and the aspect button (the one that I use
the most) is small and off to one side at the top surrounded by inputs and the
info buttons. Not a very good layout. The remote can be used as a universal
though you’ll have limited controls most of which is hidden under a little flap
at the bottom of the remote. With some of the components you’ll also use the
Channel buttons and with the Cable/Satellite control you’ll get to use more of
the buttons on the remote but for the most part you’re confined to the itty
bitty uniformly shaped buttons under the little flap. Have fun with that. On
the plus side (and this is a big plus) the remote seems eerily RF. I could
literally point the remote at the couch and the display would respond a good
bit of the time. Oh, and either this remote shares codes with the Emotiva RSP-1
reference stereo preamp or my home theater is haunted. That’s all I’m saying
about that.
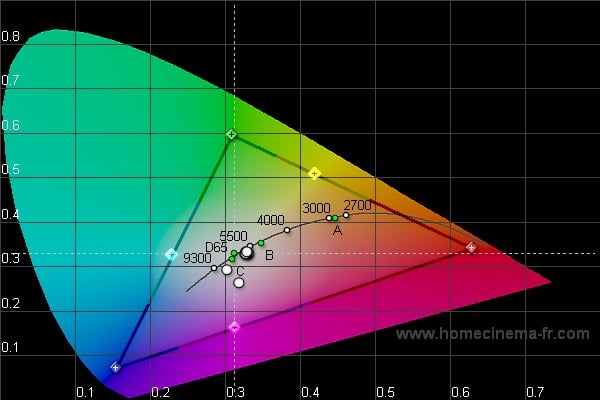
PDP-5070HD Calibration and Measurements
I used the Sencore ProColor 5000 to calibrate the PDP-5070 and the Colorimetre HCFR to create the pretty graphs you see below. The fist order of business was to measure what the default settings were doing to the set.
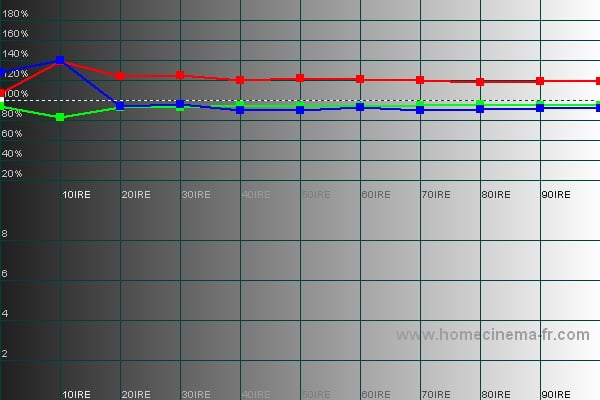
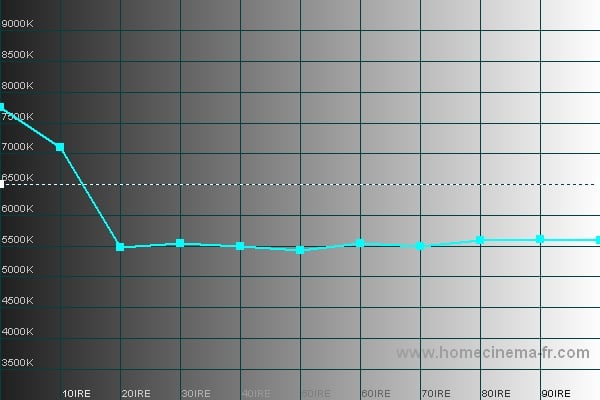
Dynamic RGB Dynamic Color Temp
As you can see, under the Dynamic setting the red and green line up nicely but the blue is pretty far out of wack. The big problem, of course, is that this is torch mode as evidenced by the literally off the charts color temp. Wow, if you want to experience burn-in, living with this setting and a couple of static images would surely do it.


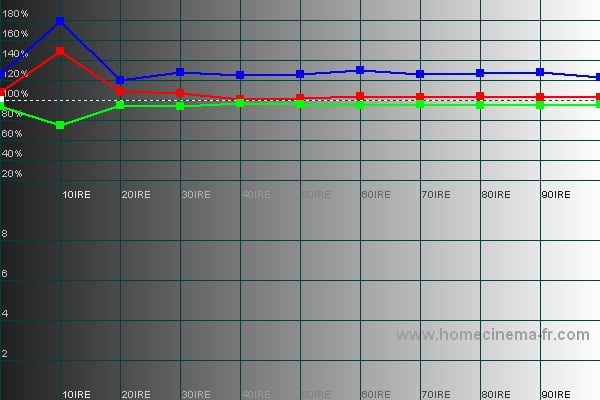
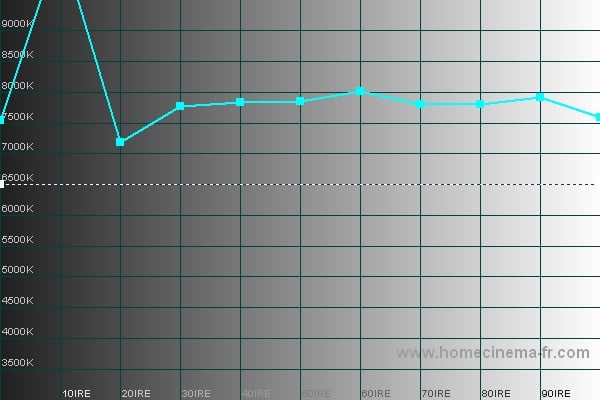
Game RGB Game Color Temp
Similar RGB graphs give way to a still hot Color Temp graph under the Game setting. I guess if I were playing Doom or something equally dark this might be ok but it is still way to hot for normal viewing.
Movie RGB Movie Color Temp
The Movie setting exchanges the blue emphasis for a red one and lowers the color temp all the way to a dead flat 5500k. This is pretty dark but should reduce eye fatigue in a really dark room.
Standard RGB Standard Color Temp
Alright, we are getting more normal here but still there is a blue emphasis with a fairly flat color temperature around 7800k (too high for our 6500k target). On a whim, I decide to engage the Low setting on the Color Detail (which says it accentuates the red). My thought is that it might balance out that little bit of blue emphasis and perhaps lower that color temp a bit. This is what I got:
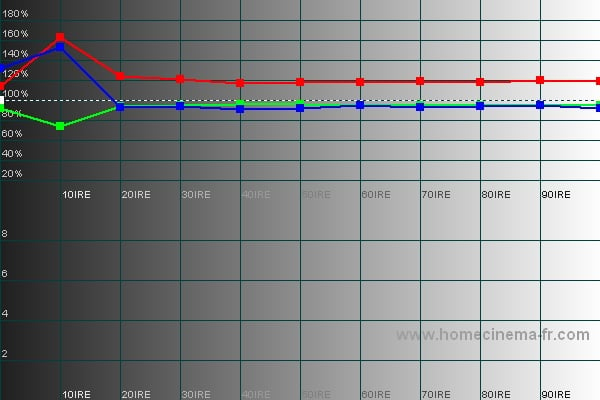
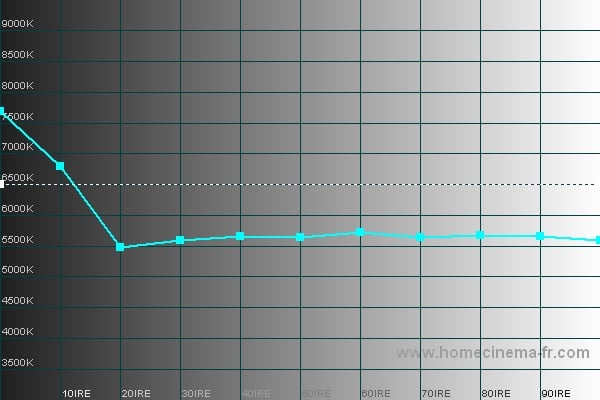
Standard (low) RGB Standard (low) Color Temp
 Basically,
I ended up with the Movie setting except for the red being a little closer to
the green and blue and the color temp a smidge higher. I decided to start with
this as my baseline and adjust from there. Well, without going into the service
menus, the calibration options on this display are really non-existent (though
as many will tell you, accessing Pioneer's service menu is not too difficult). I
maxed out and bottomed Color and Tint with no significant effect on the
measurements. The only thing that really
made a difference was the Color Detail (as noted above) so experiment with that
setting to see what looks most natural to you. I went with Color Detail set on
low as it wasn't as torched out as the other settings while retaining a fairly
tight RGB graph.
Basically,
I ended up with the Movie setting except for the red being a little closer to
the green and blue and the color temp a smidge higher. I decided to start with
this as my baseline and adjust from there. Well, without going into the service
menus, the calibration options on this display are really non-existent (though
as many will tell you, accessing Pioneer's service menu is not too difficult). I
maxed out and bottomed Color and Tint with no significant effect on the
measurements. The only thing that really
made a difference was the Color Detail (as noted above) so experiment with that
setting to see what looks most natural to you. I went with Color Detail set on
low as it wasn't as torched out as the other settings while retaining a fairly
tight RGB graph.
One interesting thing of note is that all these settings are locked (you can't adjust the brightness, contrast, etc.) EXCEPT for Standard. Standard is a global setting that you can change. User, on the other hand, is an input specific setting that you can set for each as you wish. This means you can make your adjustments on User and replicate them for each input with minor changes or you can find an overall setting that you like and just adjust it under Standard. A nice option in my opinion.
Audioholics/HQV Bench Testing Summary of Test Results
Perfect Score is 130
Pioneer PDP-5070HD Benchmark Score: 75
|
Test |
Max |
HDMI |
HDMI |
|
Color Bar |
10 |
10 |
Pass |
|
Jaggies #1 |
5 |
5 |
Pass |
|
Jaggies #2 |
5 |
5 |
Pass |
|
Flag |
10 |
5 |
Pass |
|
Detail |
10 |
5 |
Pass |
|
Noise |
10 |
0/0/0/10* |
Pass |
|
Motion Adaptive NR |
10 |
0/0/0/10* |
Pass |
|
Film Detail |
10 |
0/10/10** |
Pass |
|
Cadence 2:2 Video |
5 |
0 |
Fail |
|
Cadence 2:2:2:4 DV Cam |
5 |
0 |
Fail |
|
Cadence 2:3:3:2 DV Cam |
5 |
0 |
Fail |
|
Cadence 3:2:3:2:2 Vari-speed |
5 |
0 |
Fail |
|
Cadence 5:5 Animation |
5 |
0 |
Fail |
|
Cadence 6:4 Animation |
5 |
0 |
Fail |
|
Cadence 8:7 animation |
5 |
0 |
Fail |
|
Cadence 3:2 24fps film |
5 |
0/5/5** |
Pass |
|
Scrolling Horizontal |
10 |
10/0/0** |
Pass |
|
Scrolling Rolling |
10 |
10/10/10** |
Pass |
|
Total Points |
130 |
75(max) |
|
* The fist
score is with DNR or MPEG DNR off, then Low, Medium, and High.
**The first
score is with PureCinema off, then Standard and last Advanced.
Comments on HQV Testing
As you can see, there was little difference between the Noise Reduction settings of Off/Low/Medium while High made a huge impact. Also, the PDP-5070HD passed the Film Detail and 3:2 pulldown tests with the PureCinema on (either setting) but failed the Horizontal scrolling text test (something I haven’t seen anything fail before). An interesting result. Overall, the display scored well and should make a good primary display.
PDP-5070HD Viewing Tests and Conclusion
It is hard not to love a plasma display. The blacks are deep and rich, the colors and vibrant, and the overall picture quality is excellent.
DVD - The Prestige
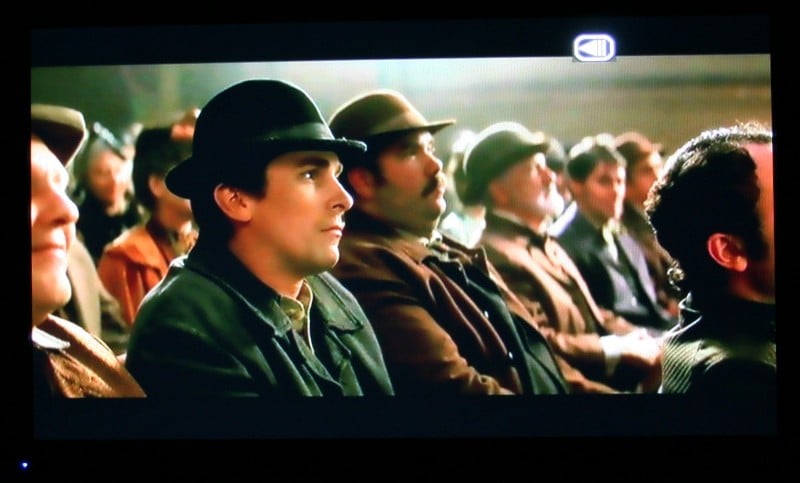
While I was pretty let down by the plot, writing, and overall story of this movie, it was filled with dark scenes and muted colors. There were a few instances of jaggies which gave some of the lines a softer look than they should have had but for the most part, the PDP-5070HD sailed through with flying colors.
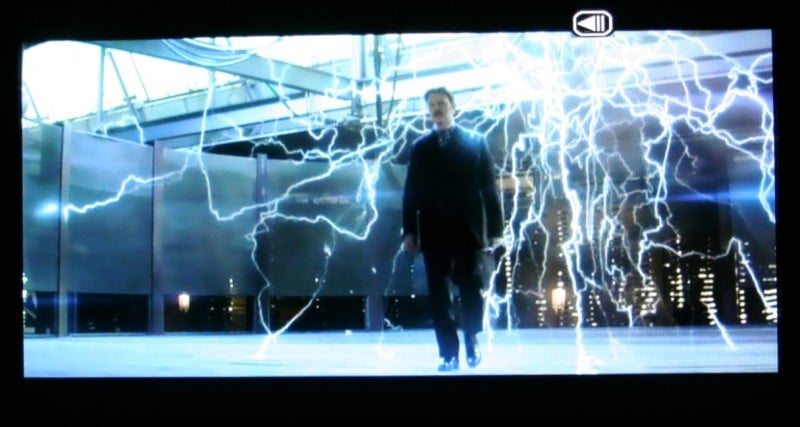
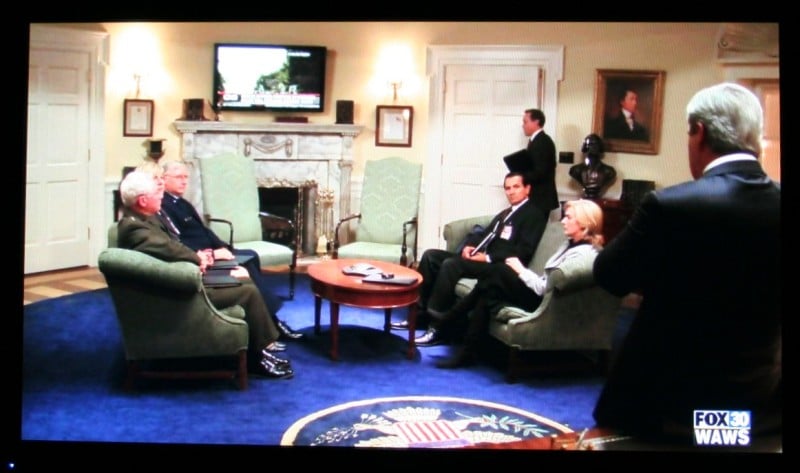
HDTV - 24
This episode of 24 (not the finale - I haven’t watched it yet) was full of twists, turns, and backstabbing (isn't it always?). It is also proof positive that there are multiple Daniel Jackson's in the universe so their will always be hope for SG-1. If don't know what I'm talking about, don't worry about it. Plenty of industrial lighting and darks scenes contrast nicely with well lit and beige interiors of the White House. Again, the PDP-5070HD did an admirable job with the presentation of this show.


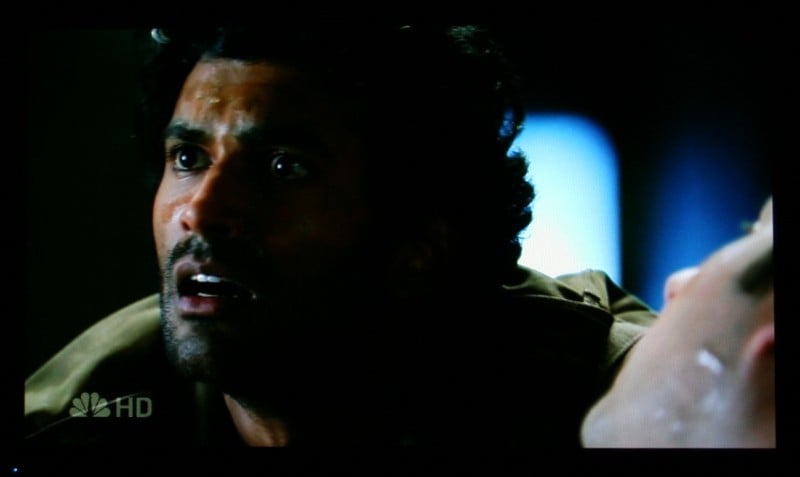
HDTV - Heroes
Texture, texture, texture. This season finale of Heroes was full of meaningful looks and close-ups. Plenty of chances for the PDP-5070HD for show off its ability to display faces up close and personal. Lots of lines, little imperfections, and more came through without a hitch.


Conclusion
The Pioneer PDP-5070HD is a fine display. It's deinterlacing and scaling
abilities (aside from a few quirks) are above par. The picture is vibrant and
clear and blacks (and black detail) are exceptional. The only real strike
against this unit is the price. 1080p displays are getting more and more common
and, as this happens, the 720p sets are dropping like stones. With the added
functionalities including the USB port, QAM tuner, multiple HDMI inputs and
more if you can find this one on sale, you should snatch it up.
About Pioneer
Pioneer was founded in 1938 in Tokyo, Japan by Nozomu Matsumoto -
a man with a passion for music that he hoped to share with the world through
high quality audio speakers. That passion began with a small operation to
repair and manufacture speakers in Matsumoto's garage. It has since grown to
international stature as a manufacturer of audio and video products for use at
home, in the car and in business environments.
The element that has not changed in nearly 70 years is the passion for audio and video products that we hope to share with the world. From the employees at our research labs looking for the "next big thing" to the engineers at our factories focused on quality assurance to our product trainers explaining the new technology to our customers - we remain passionate about creating an unbeatable entertainment experience.
The Score Card
The scoring below is based on each piece of equipment doing the duty it is designed for. The numbers are weighed heavily with respect to the individual cost of each unit, thus giving a rating roughly equal to:
Performance × Price Factor/Value = Rating
Audioholics.com note: The ratings indicated below are based on subjective listening and objective testing of the product in question. The rating scale is based on performance/value ratio. If you notice better performing products in future reviews that have lower numbers in certain areas, be aware that the value factor is most likely the culprit. Other Audioholics reviewers may rate products solely based on performance, and each reviewer has his/her own system for ratings.
Audioholics Rating Scale
 — Excellent
- — Very Good
- — Good
- — Fair
- — Poor
| Metric | Rating |
|---|---|
| Detail and Resolution | |
| Deinterlacing & Scaling | |
| Contrast and Black Levels | |
| Color Reproduction | |
| Noise Reduction | |
| Calibration Options | |
| Build Quality | |
| Ergonomics & Usability | |
| Ease of Setup | |
| Features | |
| Remote Control | |
| Fit and Finish | |
| Performance | |
| Value |
As Associate Editor at Audioholics, Tom promises to the best of his ability to give each review the same amount of attention, consideration, and thoughtfulness as possible and keep his writings free from undue bias and preconceptions. Any indication, either internally or from another, that bias has entered into his review will be immediately investigated. Substantiation of mistakes or bias will be immediately corrected regardless of personal stake, feelings, or ego.
View full profile