
Pioneer 42" PDP-42A3HD Plasma TV Review
Pioneer PDP-42A3HD plasma
- Product Name: PDP-42A3HD plasma TV
- Manufacturer: Pioneer
- Performance Rating:

- Value Rating:
- Review Date: March 14, 2006 19:00
- MSRP: $ 2499
|
High Definition / XGA Resolution (1,024 x 768p) 42" Diagonal /16:9 Wide-Screen Aspect Ratio
PANEL TECHNOLOGY Encased Cell Structure
VIDEO PROCESSING TECHNOLOGY - Video Noise Reduction System - Color Temperature Control - AV Selection Memory: Standard, Dynamic, Movie, Game, USER Preset
CONVENIENCE FEATURES - Built-in TV Tuners for receiving over-the-air High Definition and Standard Definition Broadcasts. (Over-the-Air Antenna not included). - NTSC Tuner and ATSC Tuner - Picture-in-Picture mode and Swap Function to meet customer operation preferences - Aspect Ratio Control: Wide, Zoom, Cinema, Full, 4:3 - Full Function Remote Control
OTHER - Table Top Stand (included) |
SOUND TECHNOLOGY - 10 watt x 2 Stereo Amplifier with built-in Stereo Speakers - SRS TrueSurroundXT Surround Sound
VERSITILE VIDEO AND AUDO CONNECTIVITY Inputs - Antenna x 2 (F-Type Connection) - HDMI (with HDCP) x 1 with composite L/R Audio - Composite or S-Video x 3 (Selectable) with composite L/R Audio - Component Video x 2 with composite L/R Audio - SPDIF Digital Audio x 1 (Dolby* Digital / PCM) Outputs - Composite Video x 1 with composite L/R Audio
DIMENSIONS(W x H x D) Without Stand: 48.6" x 26.5" x 4.7" With Stand: 48.6" x 27.5" x 9.9"
WEIGHT: Without Stand: 77 lbs. With Stand: 89.1 lbs. |
Pros
- Super slim display
- Excellent quality and "bang for the buck"
- High measured ANSI contrast ratio
- ATSC and NTSC tuners
Cons
- "S-curve" gamma with crushed blacks
- Intrusive orbital screen saver on by default
- Limited color temperature controls
- Limited picture controls in user menu
- Flimsy, extraneous remote control cover
PDP-42A3HD Plasma Features & Build Quality

Features
The Pioneer PDP-42A3HD is a reduced feature set sixth-generation HD 42" plasma display panel with a 1024x768 pixel resolution. It is also marketed in some retail locations as the PDP-4214HD. This plasma display comes in at a lower retail price point due to some reduced features that enabled Pioneer to provide a more budget-conscious product. Here are some items not found in the PDP-42A3HD which are present on the newest PureVision 43" models:
- Advanced Pure Cinema 3:3 pull-down (operates at 72Hz)
- Advanced Continuous Emission (ACE) IV for improved grayscale rendering
- Expanded noise reduction features
- PureDrive II 10-bit digital video processing
Delivery and Build Quality
I once again bribed the local delivery person to help me carry this display up the stairs to Reference System 3 where it would reside for the duration of this review (come to think of it I have some very nice and accommodating delivery people). There was no question that, once unboxed, the Pioneer PDP-42A3HD is meant to impress. The aesthetics of this unit, from the darkened glass trim which surrounds the picture, to the sleek silver speakers which peek out from behind the face of the unit, this television makes for an attractive addition to any living room. The display comes with a built-in, removable, stand and is only 4.7" deep should you want to mount it to the wall (and who wouldn't).
The inputs can be accessed from the rear of the television, with a single isolated side input for composite and s-video connections (with corresponding analogue audio inputs). As is typical with many displays these days, the rear connections are a bit difficult to get to - and there is no room for a DVI-to-HDMI adapter on the back panel, so make sure you have the correct cables if you are going digital (and you should be). The difficulty of the input connections is such that the plasma can be more easily wall-mounted. Giving up a bit of convenience for flexible mounting options is a good compromise in my opinion, so you won't hear me complaining.
There are definitely enough discrete inputs on the Pioneer PDP-42A3HD to satisfy most users
PDP-42A3HD Inputs & Menu System
We were pleased to note that the Pioneer PDP-42A3HD correctly allows for independent picture settings for each input. In fact, the inputs are "smart" in that they are not available as selectable options unless there is an active source plugged in. And when I say each input has its own picture settings, I mean it - all six (three each) of the s-video and composite inputs are completely independent except that they share audio inputs. This is exceptional as many manufacturers have cut corners in this area, especially on their budget models.
Selecting inputs on the Pioneer is a simple process, with a single "Input" button being present on the remote control. This calls up an on-screen menu showing the active (utilized) inputs, with unused inputs being grayed out. Simply scrolling to an available input will select it after a second or two, or you can use the remote's "Input" button as a toggle control to flip through the inputs as needed. You can also access inputs via the Screen > Main Input submenu of the Menu system.
Available Inputs:
- DIGITAL CH
- ANALOG CH
- VIDEO 1
- VIDEO 2
- VIDEO 3
- S-VIDEO 1
- S-VIDEO 2
- S-VIDEO 3
- COMPONENT 1
-
COMPONENT 2
- HDMI
Both of the component video inputs are capable of accepting 480i, 480p, 720p, or 1080i input signals. As mentioned above 60Hz is the frequency used for all of the Pioneer inputs in this model.
Tuner Setup
The first time you utilize the TV for NTSC viewing, you will need to go into the Tuner Setup menu and select "Scan Channels". This will initiate an automatic scanning of analogue (cable or OTA) channels on your television. You can also scan for digital channels and store them for use when selecting the DIGITAL CH input of the Pioneer. The PDP-42A3HD also allows for fine tuning of analogue channels, though the auto tuning seemed to work best in my location.
Picture


- Standard: Bright image with less dynamic range
- Dynamic: Produces a very sharp image with high white levels.
- Movie: Good starting point for more accurate picture quality
- Game: Pulls back white levels, making it easier on the eyes (and helpful for reducing burn-in)
- User: Activated with the use of any of the picture controls
Editor's Note on Display Modes
We really cannot emphasize enough that your typical "torch" mode is what is seen in most retail stores. On the Pioneer this corresponds to the "Dynamic" AV Selection mode. What is disturbing to us is the number of consumers who try to compare televisions in the stores while they are all set in this mode. Using this logic, any television set to a Cinema mode (with more accurate color reproduction, color temperature, and white levels) will appear "washed out" or flat compared to the super-bright lighthouses positioned next to them. If you want to get a reasonable comparison of television in a retail environment - shop for features and budget first. Once you have found 2-3 displays that you are interested in, locate the Picture modes in the setup menu and activate the one labeled Cinema , Theater or Movie - so that you can get a better feel for each display's true capabilities.
Sound


- Flat: Flat unprocessed sound
- Speech: Emphasis on dialogue frequencies; picture a U-shaped EQ
- Movie (default): This mode slightly emphasizes bass and treble
- Music: This mode also emphasizes bass and treble; picture an upside-down U-shaped EQ
- User: Activated with the use of any of the sound controls

You can use the Screen menu to select inputs (as mentioned previously) as well as gain access to PIP functions and the "Orbiter" screen saver mode (more on this later). The Screen Size selections affect the way the input image is scaled to the display. HDMI and HD content only allows the "Full" setting, but here are the full suite of options available with analogue video inputs:
- Zoom: .If you absolutely hate seeing black bars on the top and bottom of 1.85:1 or 2.39:1 movies, you can use this mode to zoom/scale the entire image to the screen, while sacrificing a bit of the picture on the left and right sides. Honestly, we recommend getting used to seeing some black and using the Full mode with DVDs for the best possible picture.
- Cinema: This is stated to be used with 14:9 letterbox pictures, but I do not believe this mode will be very useful for most users.
- Full: This stretches the input signal to the width of the display while maintaining correct aspect ratios for DVDs. Use for 16:9 HDTV content and widescreen anamorphic DVDs.
- 4:3: This avoids scaling standard definition 4:3 content, leaving side bars on your television.
- Wide: This is a non-linear scaling mode that takes 4:3 material and fits it to the 16:9 aspect ratio of the screen while keeping center-focused content less scaled than the outer edges. This is handy for watching standard definition television, provided there is not a ton of left to right movement.

Some common sense steps to avoid burn-in:
- Be sure to change up your viewing habits. Avoiding viewing 4:3 material with the presence of side black bars for extended periods of time. Alternate with Full/Wide mode to allow the entire screen to become utilized. Full/Wide screen viewing should make up at least 75% of your viewing time.
- Do not park your television for hours on end on a news channel or other program source with a continuous ticker tape at the bottom or top of the screen.
- Avoid playing video games for extended durations which have fixed on-screen or heads-up displays that do not change or move locations.
- Calibrate your display or at least put it in Cinema mode so as to lower the overall contrast and prevent the display from putting out overloaded white levels.
One last thing the Pioneer provides is a Full White mode which is helpful in clearing out any temporary burn-in images. This mode puts a full white screen up for 20 minutes or until you exit out using the remote control. This will pretty much eliminate residual burn-in effects by evenly engaging the phosphors across the entire screen. If you are an avid gamer, it may be a good idea to run this following each extended gaming session.
System
This menu is very basic and sets the clock and language options for the Pioneer (including Auto Power Off, Sleep, and timer functions). It also allows access to the Parental controls which function on Age-Based (MPAA), TV-Content and even Canadian TV ratings.
Closed Caption
The Pioneer accepts standard Closed Captioning for regular analogue channels and also offers the new DTV Closed Captioning options whereby you can select the Font Size, Style, Foreground Color, Background Color, and Digital Option.
PDP-42A3HD Remote, Calibration & Benchmark Tests

Calibrating the Television
We used Datacolor's Colorfacts Professional 6.0 software to measure and help calibrate black and white levels on this plasma television. The new and improved Datacolor system implements a new Spyder Colorimeter which we liked due to its flexibility and placement options. Regarding calibration, we really couldn't do too much more beyond white and black level settings other than adjust the color temperature from the default "High" to the more accurate "Low" setting. The only other options available to us were for Color, Tint and Sharpness which really didn't need to be adjusted beyond their defaults.
Like most plasma displays we've seen, getting a full field of 100IRE is almost impossible due to the nature of a plasma display's power distribution. In real world situations this isn't typically an issue, though I would surmise that some scenes in Ice Age would be dimmer than on a comparable LCD or DLP television.
During the course of our calibration we noticed a ton of banding in the darker areas of the picture - so much so that we really had a difficult time dialing in the black level to what we would deem satisfactory levels. A higher end PureVision plasma from Pioneer implements Advanced Continuous Emission (ACE) IV technology and PureDrive II which is specifically designed to help out in this area. The best measured ANSI contrast we could get form this display was 109:1 - not the greatest for a plasma display and likely due to the high readings we got on the black levels, which never seemed to get as black as we had hoped.
|
Component Input (default) |
Component Input (w/B & W levels calibrated) |
|
|
|
|
The default color temperature on our set was "High" which produced a bluish picture. Turning the Color Temp control to "Mid" and "Low" settings resulted in the appearance of a reddish-looking white field (when viewing a 100IRE field, but only in contrast to the overly blue default.) |
Setting the Color Temp to "Low" allowed us to get a more reasonable RGB readout during grayscale calibration. Service Menu level adjustments will likely result in a more accurate result (not covered). |
|
|
|
|
The luminance histogram for the Pioneer PDP-42A3HD was showing an S-curve gamma response with somewhat crushed blacks and whites that we saw during the calibration process. Unfortunately, there was really no way to solve the problem entirely in the user menu. |
After setting black and white levels as correctly as we could, the display fared just a little bit better, but the net effect was the same - a reduced, non-linear grayscale dynamic range. A trip to the service menu is really needed with this set (not covered here). |
|
|
|
|
The color temperature reading before calibration approached 10K 舰 |
Afterwards we got it down to an average of 7K, which was much better than where we started. This reflected the "Low" setting of the Color Temp control. |


 CIE Chart - Color Reproduction
&
Saturation
Potential
CIE Chart - Color Reproduction
&
Saturation
Potential

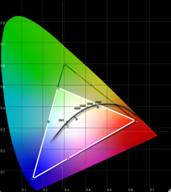
The Datacolor ColorFacts CIE Chart is used to display the colors the Pioneer PDP-42A3HD plasma television is able to reproduce. This appears as a white triangle overtop of a darker triangle which represents the gamut of colors in the HDTV-capable range. The full "shark fin" chart is a representation of everything we are capable of seeing with the human eye.
This color gamut triangle on the CIE chart determines how "deep" or "rich" the colors will be from a display. For instance, a Red primary that is too high on the chart will indicate that the display device may only be able to produce an orange-red instead of a deep red. As you can see, the Pioneer produces reduced greens while maintaining an excellent (much better than average) color response in red and blue. If you are going to be soft on a color, I suppose green isn't a bad place to do it as our eyes see green much more easily than the other wavelengths. And with the excellent measurements of red and blue, this is simply a stunning display to view.
Audioholics/HQV Bench Testing Summary of Test Results
Perfect Score is
130
Pioneer PDP-42A3HD Benchmark Score:
70
(one of the better performers at this
budget)
|
Test |
Max
|
Component
|
Component
|
|---|---|---|---|
|
Color Bar |
10 |
5 |
Pass |
|
Jaggies #1 |
5 |
5 |
Pass |
|
Jaggies #2 |
5 |
5 |
Pass |
|
Flag |
10 |
5 |
Pass |
|
Detail |
10 |
10 |
Pass |
|
Noise |
10 |
0 |
Fail |
|
M otion adaptive Noise Reduction |
10 |
0 |
Fail |
|
Film Detail |
10 |
10 |
Pass |
|
Cadence 2:2 Video |
5 |
0 |
Fail |
|
Cadence 2:2:2:4 DV Cam |
5 |
0 |
Fail |
|
Cadence 2:3:3:2 DV Cam |
5 |
0 |
Fail |
|
Cadence 3:2:3:2:2 Vari-speed |
5 |
0 |
Fail |
|
Cadence 5:5 Animation |
5 |
5 |
Pass |
|
Cadence 6:4 Animation |
5 |
0 |
Fail |
|
Cadence 8:7 animation |
5 |
0 |
Fail |
|
Cadence 3:2 24fps film |
5 |
5 |
Pass |
|
Scrolling Horizontal |
10 |
10 |
Pass |
|
Scrolling Rolling |
10 |
10 |
Pass |
|
Total Points |
130 |
70 |
|
Comments on HQV Testing
Failing obscure cadence tests and featuring an almost nonexistent noise reduction system, the Pioneer Plasma fared very well where it counted. Its deinterlacing ability is second to none in my opinion, even performing better in the Jaggies #1 test than most Faroudja-based systems I've measured. I was tempted to give half credit on the Scrolling Horizontal test but decided to let it pass fully as the amount of jaggies I saw in the background was minimal and the text (the main point of the test) was completely unblemished. This is a display that can certainly handle unflagged film material and bad edits without breaking a sweat - which is more than I can say for many other displays in this class.
PDP-42A3HD Viewing Evaluations
I was concerned about the Pioneer's performance in grayscale as I witnessed significant banding and colorization during low IRE gradients. How this would translate into real-world picture material was an unknown, but something I was determined to find out. The difficult thing about flagging a problem early is the temptation to keep at it until you figure out how to make it reproduce the problem. I tried to keep this in mind during my viewing commentary lest you place too much emphasis on what was clearly, at times, a witch hunt.
DVD: The Brothers Grimm
This movie was terrific in that it featured tons of color, detail and a healthy serving of dark scenes with which to test and evaluate the complete gamut and dynamic range of this display.


Detail received an A+ rating. Color was outstanding and showed that Pioneer has what it takes to reproduce vibrant colors and a truly dynamic and satisfying picture. Black levels, however, were consistently poor - surprising for a plasma display, though we understand that Pioneer produced this television to address consumers who want to get into an HD set on a lower budget. Where there should be detail in darker scenes I found large swatches of black. There was also a stark difference between the beautiful jet black frame which bordered the display and the black picture which appeared a darkish gray by comparison (more akin to what you would expect from an average LCD display).
DVD: Four Brothers
It was a "brothers" theme this week as we queued up Four Brothers , a film which gave us plenty of high quality source material with which to evaluate the Pioneer plasma display.


Again, color was outstanding, though I'll admit we didn't happen to view material that would challenge the Pioneer's apparent green gamut deficiency - something I really don't think would be much of a bother in real-world viewing. Facial detail was exceptional, though we did note several instances of moiré pattern, especially in the sweater-shirt as pictured in the second frame shown here. A later scene depicting an SUV cruising through a snowy terrain lacked some detail in the white levels, which came across a bit flat and untextured.
HDTV - Discovery HD: American Chopper
This is just a great show. It's a little bit like watching the Simpsons - but in real life. You've got the idiotic son, the domineering, but not particularly intelligent paternal figure, and the sensible "other" sibling who keeps the whole place from falling apart. Oh yeah, they make really cool custom motorcycles for charities, businesses and rich people - some of which who look like they've never ridden a bike in their lives.


At last I was able to able to take a look at that green saturation. As I expected, there was simply no problem in that area. The Pioneer has excellent overall color response, better than many flat panels I have seen lately - at least with respect to critical reds and blues.
As for the rest of my HDTV evaluation, I focused mostly on seeing how well the PDP-42A3HD handled detail. For a cable TV picture in high definition, it did a fine job. The bikes, background, and facial features offered up plenty of opportunity for mucking up the image - it simply never happened. The Pioneer came through and produced a vibrant, detailed image every time.
Black Level Banding

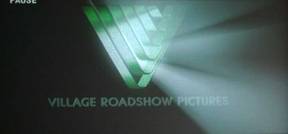
The image on the left is the Village Roadshow Pictures introduction to Matrix: Reloaded as seen by the Pioneer PDP-42A3HD (and as rendered by my Pentax digital camera). The image on the right was snapped with the same camera, but from a Sanyo LCD projector. The DVD player used to generate both images was a Denon DVD-5900. Not only is there significant banding in the dark areas of the Pioneer image, but the dark bands do indeed take on the reddish colorization as I witnessed when calibrating the display. White levels are crushed as well and overall the net effect is a greatly diminished dynamic range. This is something that will need to be adjusted in the service level menus of the display to achieve the maximum potential for this device.

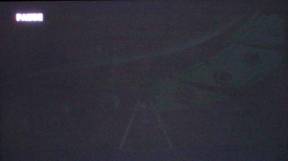
This image was from one of the earlier scenes of The Brothers Grimm . Here you could again see the dark banding when an image fades towards black, achieving a posturization effect rather than a smooth, even gradation.
PDP-42A3HD Temporary Burn-in and Conclusion
The other issue that plagued this television was its propensity to rather quickly burn images into the phosphors of the screen.
I enhanced both of these images for clarity. The left screen is simply an example of what happens when you watch an hour of Television in 4:3 mode and then switch over to watching a widescreen DVD. The left and right bars are present on the screen as they represent relaxed, unused phosphors. On the right, the Yamaha RX-V2600's on-screen display background is present on a completely black screen (such as those found during the intro of a movie or scene transition). This Yamaha menu is somewhat subdued and not high contrast in nature, yet after being up for only 30 minutes it burned itself into the screen for quite some time.
Engaging the "Full White" mode from the Screen Saver menu will eliminate any of these burn-in issues, as will simply allowing the TV to run in full screen for some time. This is still, however, somewhat annoying - and something that I feel is a bit of a nuisance, even for a budget television. You can certainly avoid these issues by following some of the guidelines mentioned previously. I purposefully initiated these burn in artifacts in an effort to push the set to see how it reacted, but realize the potential for this temporary burn-in.
Conclusion
The Pioneer PDP-42A3HD plasma television has excellent color and detail reproduction. Its ability to function as a high definition display, with progressive scan and upconversion capability is both effective and recommended should you not have the ability to feed it a better source signal. Where the Pioneer stumbles is in black level detail and overall dynamic range. We have seen better performances and feel that the Pioneer ends up being an average (that is to say still good) performer in a sea of competitive displays. Still - $2499 MSRP for a Pioneer plasma display is a tempting choice when evaluating the 42" flat panel market. We look forward to evaluating one of the company's higher end PureVision plasmas as we feel they possess technologies and features that are purposefully left out of the PDP-42A3HD in order to appeal to a more cost-conscious consumer.
Pioneer PDP-42A3HD 42" Plasma TV
MSRP: $2499
715 Sycamore Drive
Milpitas, CA 95035 USA
Tel
: 408-383-3700
Fax
: 408-383-3702
About Pioneer
Electronics
Pioneer Electronics' headquarters is located in Long Beach,
California
Its parent company, Pioneer Corporation, is a leader in optical disc
technology and a preeminent manufacturer of high-performance audio,
video and computer equipment for the home, car and business markets.
The company focuses on four core business domains including DVD,
display technologies, Digital Network Entertainment,
and components.
Founded in 1938 in Tokyo, Pioneer Corporation employs more than 39,000
people worldwide.
Its shares are traded on the New York Stock Exchange.
The Score Card
The scoring below is based on each piece of equipment doing the duty it is designed for. The numbers are weighed heavily with respect to the individual cost of each unit, thus giving a rating roughly equal to:
Performance × Price Factor/Value = Rating
Audioholics.com note: The ratings indicated below are based on subjective listening and objective testing of the product in question. The rating scale is based on performance/value ratio. If you notice better performing products in future reviews that have lower numbers in certain areas, be aware that the value factor is most likely the culprit. Other Audioholics reviewers may rate products solely based on performance, and each reviewer has his/her own system for ratings.
Audioholics Rating Scale
 — Excellent
- — Very Good
- — Good
- — Fair
- — Poor
| Metric | Rating |
|---|---|
| Detail and Resolution | |
| Deinterlacing & Scaling | |
| Contrast and Black Levels | |
| Color Reproduction | |
| Noise Reduction | |
| Calibration Options | |
| Build Quality | |
| Ergonomics & Usability | |
| Ease of Setup | |
| Features | |
| Remote Control | |
| Performance | |
| Value |
Clint Deboer was terminated from Audioholics for misconduct on April 4th, 2014. He no longer represents Audioholics in any fashion.
View full profile