
Panasonic Viera TC-37LZ800 LCD TV Review
Panasonic TC-37LZ800
- Product Name: Viera TC-37LZ800 LCD Television
- Manufacturer: Panasonic
- Performance Rating:

- Value Rating:
- Review Date: February 16, 2009 10:35
- MSRP: $ 1399
|
Video
Audio:
|
Inputs
Vitals
|
Pros
- Respectable picture quality out of the box
- Fast channel changes
- Digital only channel scanning
Cons
- Uneven backlight
- HDMI input positioning may interfere with mounts
- No advanced user-level calibration options
TC-37LZ800 Build Quality and Menu Setup
 Panasonic's use of IPS (In-Plane Switching) in their LCD
panels has been a favorite choice of ours for the simple reason that light
output remains almost constant from all viewing angles. When you're not the
only one watching TV in a room, this can be a big deal. The TC-37LZ800 uses a
newer generation of this technology called IPS-Alpha (see our Tech Note) which
improves upon earlier designs. Panasonic is the #3 plasma display manufacturer
in the world (beat out of the #1 spot just this year thanks to an emergence in
smaller sized displays that flooded the market), but the company seems to have
a very good understanding of what makes a great LCD television.
Panasonic's use of IPS (In-Plane Switching) in their LCD
panels has been a favorite choice of ours for the simple reason that light
output remains almost constant from all viewing angles. When you're not the
only one watching TV in a room, this can be a big deal. The TC-37LZ800 uses a
newer generation of this technology called IPS-Alpha (see our Tech Note) which
improves upon earlier designs. Panasonic is the #3 plasma display manufacturer
in the world (beat out of the #1 spot just this year thanks to an emergence in
smaller sized displays that flooded the market), but the company seems to have
a very good understanding of what makes a great LCD television.
Tech Note: In-Plane-Switching (IPS-Alpha)
IPS-Alpha was created through a joint partnership of Panasonic, Hitachi and Toshiba. IPS-Alpha claims to increase transmittance (the representative amount of light that passes through the system) by 50% and triple the contrast ratio when compared to the early IPS method. While the viewing angle is generally displayed at a contrast ratio of 10:1, this technology enables a contrast ratio of 100 or more in all directions.
Build Quality and Features
The face of the TC-37LZ800 sports a wide bezel with a piano gloss finish. The screen, inset about 1/4-inch into the unit utilizes a glossy "plasma-like" Plexiglas surface that is highly reflective but presents an incredibly vivid picture. The whole TV is less than 4-inches deep, not counting the little "chin" at the base of the monitor that adds maybe 1/3 of an inch. The right side of the television (looking at it from the front) has a membrane control surface for Power, Channel, Volume, Input and Demo functions. Nearby are the side inputs, which include HDMI, composite, analogue audio and an 1/8-inch headphone output. Just below is an SD/SDHC card (up to 16GB) reader for cards containing JPG, DCF, and/or EXIF formatted image files.
The back of the TV supports two HDMI inputs, two component video inputs, a PC input and a shared composite/S-video input. Separate stereo audio channels are included for use with all of the non-digital inputs (HDMI requires audio be sent over HDMI if you want to use the TVs internal speakers).
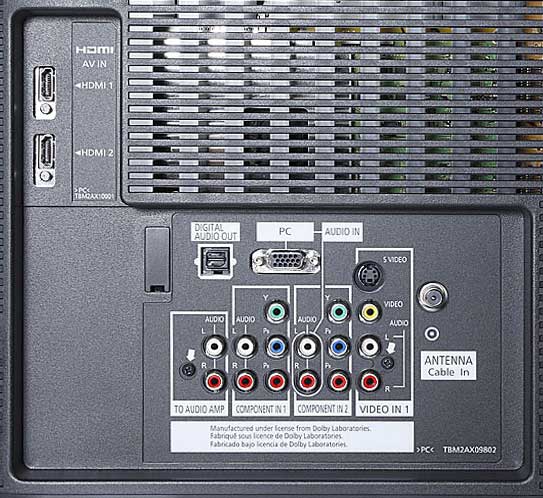
One very important thing to note is that the HDMI inputs will be covered up if you use a full size traditional flat panel mount that includes a full face horizontal mounting plate (see below).


The mount on the left will not play well
with accessing the two rear HDMI inputs on this TV; the model on the right will
give you a fighting chance but is still not a guarantee and is sure to be
awkward.

This type of open-backed mount is going to be your best bet.
Setup and Menu System
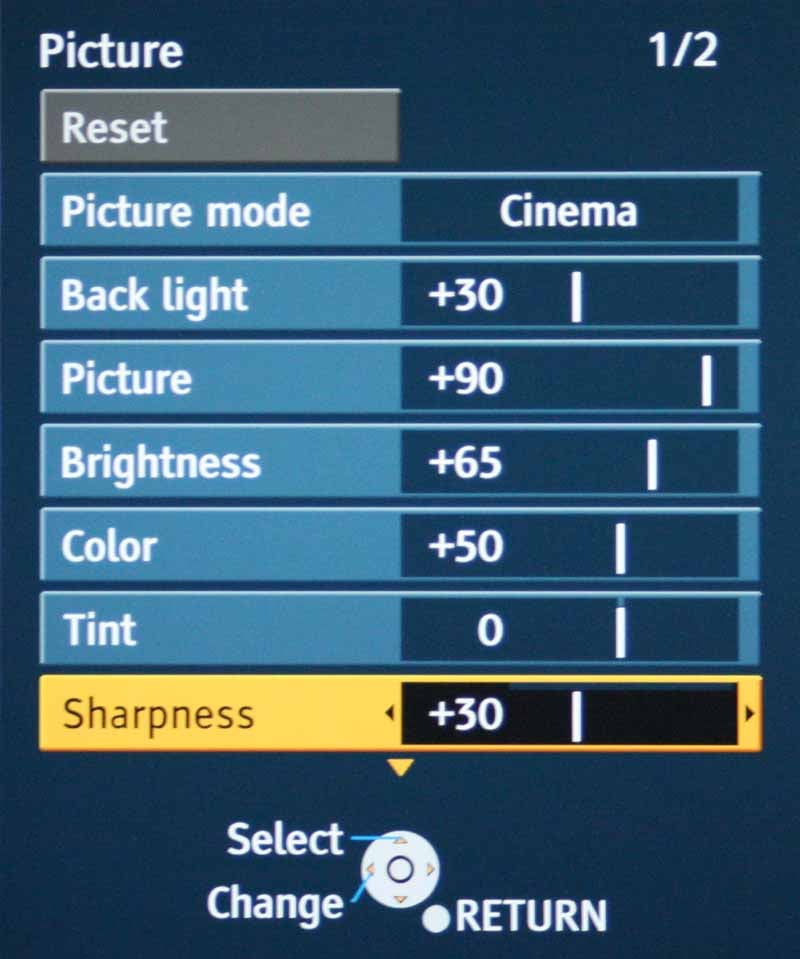 There is a lot to like about the menu system on the Panasonic. It's
easy to navigate and it's very simple. Of course, that's also because there
aren't a ton of truly advanced picture controls (at least not until you venture
into the Service menus which we won't get into here). Primarily, after first
setting up the display, you'll land squarely in the Picture menu for most of
your tweaking. Here you can select between Cinema, Game, Vivid and Standard
color modes. We go into detail later about how each of these affected lumen
output and color temperature, but suffice it to say Standard and Cinema will be
your best bets for serious viewing. Within this menu there are two pages. The
first addresses the basics like Back Light, Picture (Contrast or White level),
Brightness (Black level), Color and Tint. We dropped the Sharpness setting to 0
for the best "halo-free" picture. Anything higher and you'll see
artificial edge enhancement which detracts from the picture. With the television
set to Cinema Mode, here were our settings:
There is a lot to like about the menu system on the Panasonic. It's
easy to navigate and it's very simple. Of course, that's also because there
aren't a ton of truly advanced picture controls (at least not until you venture
into the Service menus which we won't get into here). Primarily, after first
setting up the display, you'll land squarely in the Picture menu for most of
your tweaking. Here you can select between Cinema, Game, Vivid and Standard
color modes. We go into detail later about how each of these affected lumen
output and color temperature, but suffice it to say Standard and Cinema will be
your best bets for serious viewing. Within this menu there are two pages. The
first addresses the basics like Back Light, Picture (Contrast or White level),
Brightness (Black level), Color and Tint. We dropped the Sharpness setting to 0
for the best "halo-free" picture. Anything higher and you'll see
artificial edge enhancement which detracts from the picture. With the television
set to Cinema Mode, here were our settings:
- Brightness +42
- Picture +80
- Backlight 0
- Color Temp - Warm (the default when Cinema Mode is selected)
Making adjustments on the TC-37LZ800 is an exercise in frustration. One second after making any adjustment, the menu snaps the sub-setting you are working on back to the big menu window - obscuring any test pattern you may be looking at. As a result, it was nearly impossible to set Black and White levels perfectly without guessing at the final exact setting.
The set has a significant overscan in SD mode which cannot be defeated, though HD sources correctly displayed with an option to set the HD Size to either 95% (5% overscan) or 100% (no overscan).
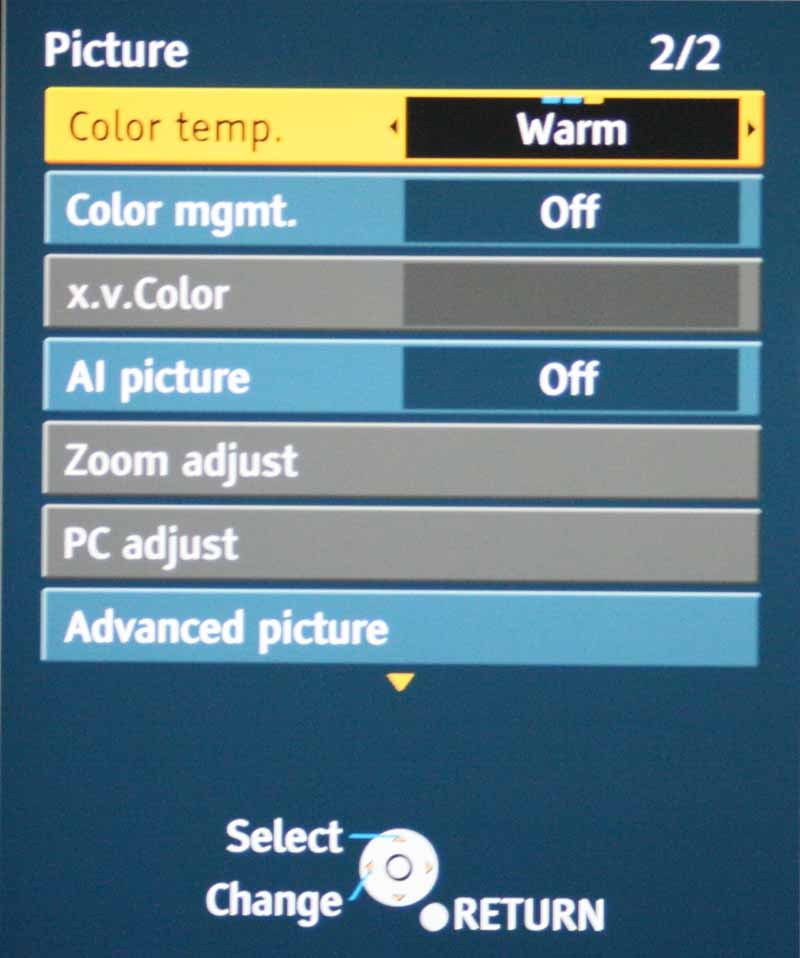 The second page of the Picture menu (accessed by merely scrolling up or
down until the page changes) allows you to change the Color Temperature and
engage options like Color Management and AI Picture. Color Management is a
setting you should leave off - it enhances greens and blues and is mainly for
people who want sports-related colors to pop at the expense of accuracy (for
shame!).
The second page of the Picture menu (accessed by merely scrolling up or
down until the page changes) allows you to change the Color Temperature and
engage options like Color Management and AI Picture. Color Management is a
setting you should leave off - it enhances greens and blues and is mainly for
people who want sports-related colors to pop at the expense of accuracy (for
shame!).
AI Picture messes with black levels, but not in a way that is helpful to accuracy. It's a sort of gamma control for the darker scenes in movies and program material. x.v.Color can be enabled with HDMI sources to allow for the display to properly display and deal with 10-bit color sources (or simulated 10-bit sources as the case may be). PC Adjust is used when a PC is connected to the HD15 ("VGA") input and you can configure Phase, Position, Sync, etc... all the things that make geeks stay up at night chatting away on instant message boards. Zoom adjust is extremely cool in that it can adjust the image such that the Zoom function provides a custom experience tailored to your most common needs. This can include adjusting the vertical position up or down, or even changing the vertical size to fill the screen as needed.
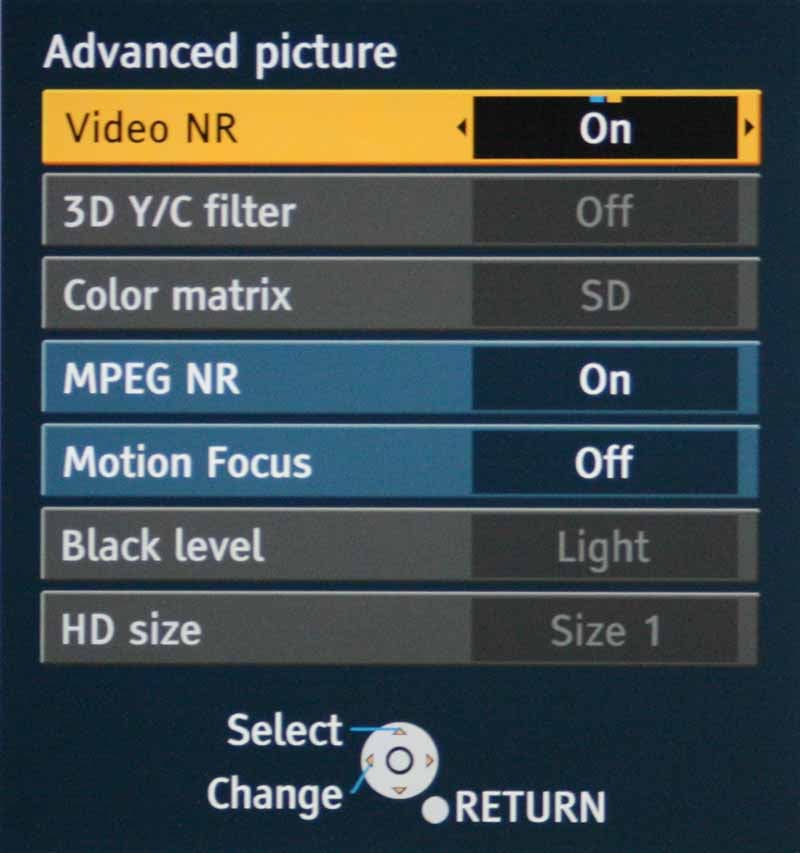 Advanced Picture controls, while not all that advanced, do deliver
access to Video and MPEG Noise Reduction, 3D Y/C filter controls and Motion Focus.
Motion Focus, unlike 120Hz refresh systems, utilizes the advantages of
IPS-Alpha's bright light output to allow for blanking in between the video
frames. This gives the LCD screen (and your eye) and artificial refresh which
results in a real reduction of motion blur. Since the panel puts out extra
light due to the nature of IPS, the blanking takes away overall panel
brightness, but doesn't negatively affect the user experience.
Advanced Picture controls, while not all that advanced, do deliver
access to Video and MPEG Noise Reduction, 3D Y/C filter controls and Motion Focus.
Motion Focus, unlike 120Hz refresh systems, utilizes the advantages of
IPS-Alpha's bright light output to allow for blanking in between the video
frames. This gives the LCD screen (and your eye) and artificial refresh which
results in a real reduction of motion blur. Since the panel puts out extra
light due to the nature of IPS, the blanking takes away overall panel
brightness, but doesn't negatively affect the user experience.
Let's talk about setup. While the Picture menu is where you will spend most of your time, the Setup menu is where you'll first configure the television to do your bidding. In addition to setting up the internal tuner for analogue and digital (QAM in my case) channels, the Setup menu lets you browse channels via Favorites, Analogue Only, Digital Only or All. This means that if you're a digital/HD snob (like me) you can surf your TV in Digital only mode and skip all those annoying analogue channels. And why not? The QAM tuner ensures that I have my networks, Food, Discovery, Sci-fi, FX and more - all in wondrous HD. And that doesn't count all of the digital CD channels.
Audio can be taken from the TV via optical or analogue outputs. We actually took a feed off the analogue outs and sent it to a subwoofer in the room. If you have a sub that has an automatic wake-up feature then you would do well to couple this TV with some low end. The subwoofer filled in the missing low frequency information nicely and created a much better overall sound in our listening room. The speakers (twin 10 watt drivers) by themselves aren't so bad, but it's always good to add some real bass whenever possible.
Beyond what I've mentioned here, you're likely to spend more time watching this TV (go figure) than messing around with anything you find in the menu system... and that's a good thing.
TC-37LZ800 Calibration and Bench Testing
 Using our reference Datacolor
Colorfacts Professional software, we measured grayscale and primary colors
as well as the contrast of the TC-37LZ800. Color reproduction, as seen by the
CIE chart was pretty good, though red really looked off - like it was leaning
towards a more pinkish hue. This bore out in our results, but not as much as I
had initially guessed, showing me that instrumentation is a vital addition to
my eyes.
Using our reference Datacolor
Colorfacts Professional software, we measured grayscale and primary colors
as well as the contrast of the TC-37LZ800. Color reproduction, as seen by the
CIE chart was pretty good, though red really looked off - like it was leaning
towards a more pinkish hue. This bore out in our results, but not as much as I
had initially guessed, showing me that instrumentation is a vital addition to
my eyes.
We again used the AVIA Pro DVD to set up our grayscale calibration and set our Black and White levels. After proper configuration we were able to record an ANSI contrast ratio of 527:1 - and that was while n a tweaked in cinema mode. This represents a very nice real-world contrast ratio and one of the better measurements we've seen in the past year. Bringing up an 80 IRE gray field we measured 6200K in the Cinema color mode. Here's how the color temp broke down in each of the various color modes (with their default color temps selected):
- Cinema Mode - 6200K
- Game Mode - 8550K
- Vivid Mode - 11000K
- Standard Mode - 8600K
You can bet that Vivid mode is what you see in stores. One recommendation we'd make is to go ahead and use the provided Custom picture mode to set up a Cinema "Day" mode where you have the same semi-accurate color temperature, but you raise the backlight all the way up for greater light output during daytime viewing. Back in Standard mode we actually tested the three color temperature modes to see how they changed the white levels at 80 IRE. Our results yielded:
- Normal Color Temp - 8600K
- Warm Temp - 6400K
- Cool Temp - 11000K
Lumen output was varied, of course, from mode to mode. We found that you could get an insane amount of light (155 fL) from this panel and the darkest mode (Cinema Mode with the backlight to 0) still yielded plenty of light. These are all screen surface measurements:
- Standard - 54 fL
- Cinema (default) - 43 fL
- Cinema (backlight to 0) - 21 fL
- Game - 50 fL
- Vivid - 155 fL
Even though the panel warmed up for over an hour before we began these tests, the CCFL stability was a bit odd. In Vivid mode I literally watched the lumen output climb from 125 fL to over 155 fL. Conversely, when I dropped it back to Standard, the output dropped steadily from about 65 fL down to the initially measured 54 fL. The other thing to note is that the edges of the screen lack uniformity when displaying a solid black (or dark) image. This is light from the CCFL backlight sneaking around the edge of the screen and is a common issue with many LCD displays. One good thing about the backlight in the Panasonic is that its level is affected by the Picture modes of the television. This means that Vivid mode jacks up the backlight level while Cinema mode backs it down. In my experience many backlight settings are universal to all inputs and modes, so this is a great feature to look for in a television.
The TC-37LZ800 passes both Blacker than Black (below Black) signals as well as Whiter than White, making it easy to guarantee the correct levels for viewing (aside from a pesky menu system that seems to have ADHD).
Considering the grayscale cannot be adjusted in the user menu, the best RGB performance I measured wasn't too bad. There is a bit of Red topping out on the television, but easing off the saturation control might help a bit. Overall it’s an apparent attempt to goose up the weakest color of the set and the real-world performance of the set doesn't bear out any sort of deficiency - at least not to my eye:

Temperature tracked consistently, though not quite the D65 that we would have hoped for. You may actually find slightly more accurate color in the Standard mode as compared to Cinema, but you'll need to make other adjustments as well.

Gamma measured out at 2.47 and was a nice gradual track with no crushing of Black or White anywhere in the spectrum. This bore out with our viewing tests which showed an exceptional picture.

Audioholics/HQV Bench Testing Summary of Test Results
SD Perfect Score is 130
Panasonic TC-37LZ800 SD Benchmark Score: 50 (Gets a 70 when NR is enabled in the menu system)
|
Test |
Max |
Score |
Pass/Fail |
|
Color Bar |
10 |
10 |
Pass |
|
Jaggies #1 |
5 |
5 |
Pass |
|
Jaggies #2 |
5 |
5 |
Pass |
|
Flag |
10 |
10 |
Pass |
|
Detail |
10 |
10 |
Pass |
|
Noise |
10 |
0* |
Fail* |
|
Motion adaptive Noise Reduction |
10 |
0* |
Fail* |
|
Film Detail |
10 |
0** |
Fail** |
|
Cadence 2:2 Video |
5 |
0 |
Fail |
|
Cadence 2:2:2:4 DV Cam |
5 |
0 |
Fail |
|
Cadence 2:3:3:2 DV Cam |
5 |
0 |
Fail |
|
Cadence 3:2:3:2:2 Vari-speed |
5 |
0 |
Fail |
|
Cadence 5:5 Animation |
5 |
0 |
Fail |
|
Cadence 6:4 Animation |
5 |
0 |
Fail |
|
Cadence 8:7 animation |
5 |
0 |
Fail |
|
Cadence 3:2 24fps film |
5 |
5 |
Pass |
|
Scrolling Horizontal |
10 |
0 |
Fail |
|
Scrolling Rolling |
10 |
5 |
Pass |
|
Total Points |
130 |
50 |
|
Note: Tests were done at 480i via component video input #1 from a Denon DVD-2930CI. *Once NR was enabled (off by default) these tests passed. **Film detail did eventually lock, but well after the time it was supposed to. We failed it since it was so slow to lock onto the unflagged signal.
HD Perfect Score is 100
Panasonic TC-37LZ800 HD Benchmark Score: 65
|
HD Tests (via Pioneer BDP-05FD @ 1080i) |
Max |
Score |
Pass/Fail |
|
HD Noise |
25 |
15 |
Pass |
|
Video Resolution Loss |
20 |
20 |
Pass |
|
Video Reconstruction |
20 |
20 |
Pass |
|
Film Resolution Loss |
25 |
0 |
Fail |
|
Film Resolution Loss Stadium |
10 |
10 |
Pass |
|
Total Points |
100 |
65 |
|
As noted, we utilized a Denon DVD-2930CI player to send 480i component video to this TV to test. While slow to lock onto unflagged signals, the television does an acceptable job at jaggie reduction - my biggest pet peeve. This is one of the few sets I've seen that allows some initial tearing in the horizontal mixed format scrolling text HQV test - again a symptom of its slow lock-on to 2-3 pull-down cadences.
The Moving Zone Plate 2:3 test failed in a very particular and blocky manner that I hadn't seen before. It was spectacularly bad, lol. Detail on this television is above-par. This was possibly the clearest TV I've seen in a long time and the resolution it provided on even standard definition sources was exceptional. The bottom line with this set is that it delivers an excellent quality picture when fed a decent SD or HD signal, so just give it a good source and you'll be very pleased with the results.
TC-37LZ800 Viewing Tests and Conclusion
Tests and measurements aren't everything, as we well know. When we began placing images onto the Panasonic TC-37LZ800 - something happened. We really liked what we saw. Whether it was the IPS-Alpha panel or the clear Plexiglas screen, the image was simply stunning and vivid. We also rather preferred using the Motion Focus technology, especially since it involved strobing the backlight and not introducing poorly rendered interpolated frames at 120Hz (something we don't think is quite mature enough yet for prime time). Rather than describe it in excruciating detail I'll pop up some photos of what we watched.
HDTV: Food Network
I don't know
what show this was... I don't really even care. The point was that the pastel
colors popped and the on-screen images were crisp and gorgeous.


HDTV: HGTV
I had a
similar experience with HGTV in high definition. Colors popped, edge detail was
crisp but not artificial. In the scene I snapped below the image alternated
between close-up shots of the flowers and the selection process which showed
the detailed stone wall in addition to leaf and ground cover that was ripe with
small, intricate patterns.


HDTV: DiscoveryHD - Mythbusters
I don't really
know anyone who doesn’t enjoy this show, male or female. There's just something
to be said for blowing away (literally, sometimes) myths that are circulating
around our culture for years. We recorded a show about rolling your own canon
out of a tree and decided this was a great place to capture some detailed shots.


SD: PBS / Public TV
Standard
definition looked awesome on this set as well, with digital standard definition
pictures coming in looking clean and crisp and clean. Our photography may not
have captured it since it was in motion at the time, but the TC-37LZ800 did a
great job of rendering fast motion imagery without difficulty.


Conclusion
Here's the skinny on the Panasonic TC-37LZ800 - it's a great display. It's not the cheapest LCD (by far), in fact you'll be able to find 42-inch models for the same price from other brands. What you won't find, however is a display that is this detailed and capable of putting out a vivid color representation to every seat in the house. That's where the Panasonic excels. Feed this television a high definition source and you've got one of the better pictures on the market. Calibrate it via the service menu and you can tweak it to even greater levels of performance. While the retail is $1399, we've seen this display for around $1100 (shipped) at online retailers.
Panasonic TC-37LZ800
$1399
Panasonic Corporation of North America
One Panasonic Way
Secaucus, NJ 07094
http://www.panasonic.com/
About
Panasonic
Best known by its former
brand name, Matsushita Electric Industrial Co., Ltd., Panasonic is a worldwide
leader in the development and manufacture of electronic products for a wide
range of consumer, business, and industrial needs. Based in Osaka, Japan,
the company recorded consolidated net sales of US$81.44 billion for the year
ended March 31, 2005. The company's shares are listed on the Tokyo,
Osaka, Nagoya, New York (NYSE:MC), Euronext Amsterdam and Frankfurt stock exchanges. For more information on the
company and the Panasonic brand, visit the company's website at http://panasonic.co.jp/global/index.html.
The Score Card
The scoring below is based on each piece of equipment doing the duty it is designed for. The numbers are weighed heavily with respect to the individual cost of each unit, thus giving a rating roughly equal to:
Performance × Price Factor/Value = Rating
Audioholics.com note: The ratings indicated below are based on subjective listening and objective testing of the product in question. The rating scale is based on performance/value ratio. If you notice better performing products in future reviews that have lower numbers in certain areas, be aware that the value factor is most likely the culprit. Other Audioholics reviewers may rate products solely based on performance, and each reviewer has his/her own system for ratings.
Audioholics Rating Scale
 — Excellent
- — Very Good
- — Good
- — Fair
- — Poor
| Metric | Rating |
|---|---|
| Detail and Resolution | |
| Deinterlacing & Scaling | |
| Contrast and Black Levels | |
| Color Reproduction | |
| Noise Reduction | |
| Calibration Options | |
| Build Quality | |
| Ergonomics & Usability | |
| Ease of Setup | |
| Features | |
| Remote Control | |
| Fit and Finish | |
| Performance | |
| Value |
Clint Deboer was terminated from Audioholics for misconduct on April 4th, 2014. He no longer represents Audioholics in any fashion.
View full profile