
Panasonic TH-50PHD8UK 50" Plasma Display Review
- Product Name: TH-50PHD8UK 50" Plasma Display
- Manufacturer: Panasonic
- Performance Rating:

- Value Rating:
- Review Date: June 27, 2006 20:00
- MSRP: $ 3995
Screen Size (inches): 50
Aspect Ratio: 16:9
Native Resolution: 1366 x 768
Displayable Colors (billions): 3.62 (full time), 8.58 (maximum)
Contrast Ratio: Up to 3000:1
Viewing Angle (degrees): More than 160
Real MACH System: Yes
Real Black Drive System: Yes
Dimensions (H x W x D): 28.5'' x 47.6'' x 3.7''
Weight: 94.8 lbs
Pros
- Beautiful picture
- Easy menus with lots of control
- Great user manual
- Attractive price
Cons
- No internal tuner
- Extremely limited number of inputs
- Optional HDMI/DVI-D inputs are additional
Build Quality
 Bragging rights. You want them, you know you do. We all do. Some
small (or large as the case may be) part of our mind wants people to be
impressed with our purchases, abilities, etc. Nothing is more
depressing than showing someone something that they should be impressed
by just to have them respond, "So, what is that again?"
Case in point, reviewing home theater equipment is full of interesting
items...
to other Audioholics. What does Joe Average say when you tell him you
are reviewing a new set of speakers, HTPC, media server, or receiver?
"Oh, that's nice."
What does he say when you tell him you are reviewing a 50"
plasma display?
"I hate you, man!"
Now, THAT is respect!
Bragging rights. You want them, you know you do. We all do. Some
small (or large as the case may be) part of our mind wants people to be
impressed with our purchases, abilities, etc. Nothing is more
depressing than showing someone something that they should be impressed
by just to have them respond, "So, what is that again?"
Case in point, reviewing home theater equipment is full of interesting
items...
to other Audioholics. What does Joe Average say when you tell him you
are reviewing a new set of speakers, HTPC, media server, or receiver?
"Oh, that's nice."
What does he say when you tell him you are reviewing a 50"
plasma display?
"I hate you, man!"
Now, THAT is respect!
Build Quality
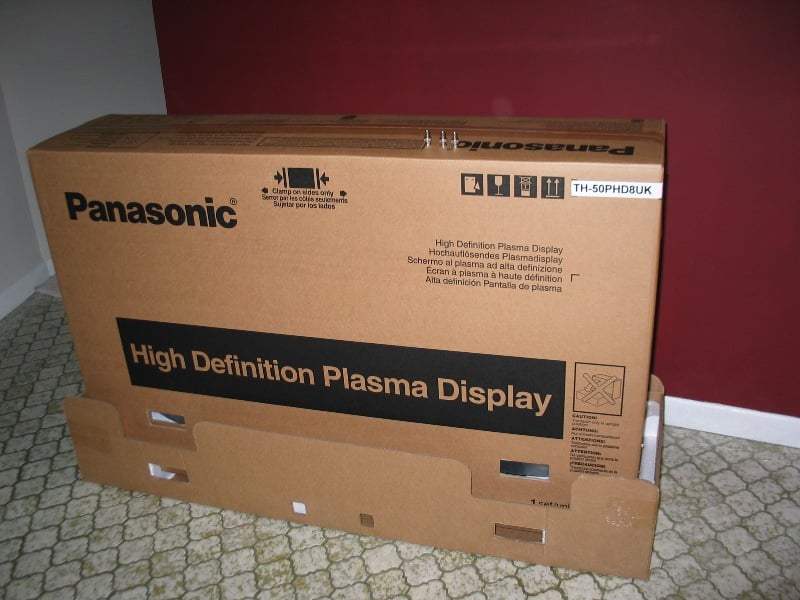
 The 50PHD is a hefty unit so you'll need at least a friend
(preferably two) to help you set it up. The set came triple boxed -
the outmost box seemed to be just a mask for the brand labeling on the
inner carton. Didn't want people to know that a plasma was being
shipped I suspect. Honestly, though, what else could it be? A thin box
that large has got to be a flat screen right? The delivery driver
helped me unpack it and inspect it for damage -
no problem there.
The 50PHD is a hefty unit so you'll need at least a friend
(preferably two) to help you set it up. The set came triple boxed -
the outmost box seemed to be just a mask for the brand labeling on the
inner carton. Didn't want people to know that a plasma was being
shipped I suspect. Honestly, though, what else could it be? A thin box
that large has got to be a flat screen right? The delivery driver
helped me unpack it and inspect it for damage -
no problem there.
As impressive as the box is (it's freaking HUGE), the screen is no less so. A 50" screen is the stuff of dreams (at least mine) and frankly, it lived up to my expectations. The back of the unit has two removable handles near the top that are useful when installing. I set the unit up on the TY-ST08 stand. There was some assembly required... a few screws is all... and the setup went well. All my male friends in town wanted to come over and help me set the unit up but none of them could come over until that evening. A few moments after I broke the news, my wife, who's main "workout" is picking up our children helped me get the unit set up. Afterward she told me someone else would have to help me take it apart, but we did it.
Configuration, Using the Set, and Remote
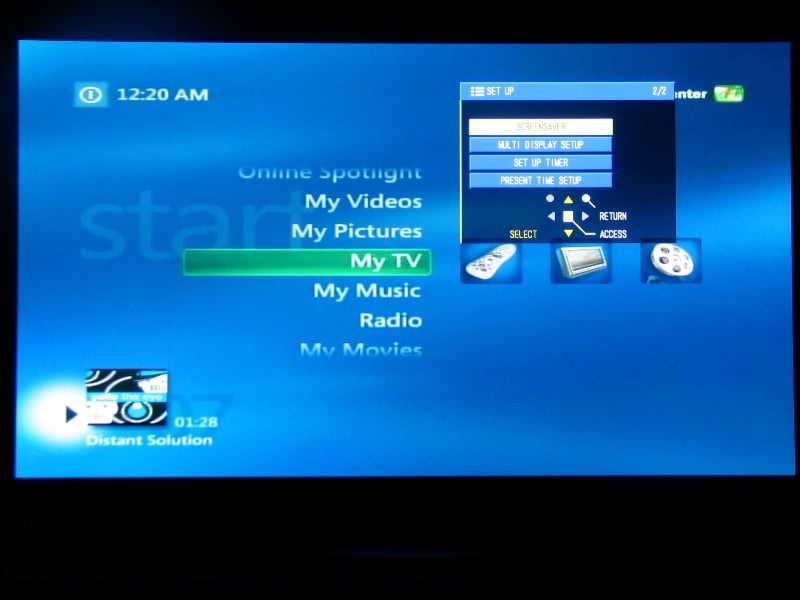
There are four separate set-up screens, three of which I will cover. The forth (sound) will not be covered and not only because the review unit didn't have speakers. Frankly, it irks me when I hear of someone spending thousands on a display and then cheaping out on the speakers. Of course I work for Audioholics so I may be a little biased but I think sound is every bit as important as the video.
Overall, the menu system was well laid out and intuitive. I especially appreciated the "normalize" button on each screen. Say you screwed everything up (or more likely, one of your loving children or drunken friends did). All you have to do is hit the "Normalize" button and it restores all the defaults. One quip, I'd like to see the position of the menus adjustable. During calibration, the menus would occasionally cover the test pattern I was viewing. If I could have changed the position of the menu on the screen, it would have helped. As it was, it was anchored in the upper right of the screen.
Author's Note: There are plenty of other little adjustments/menus that can be accessed in order to tweak the performance of the display. Since this display is designed for an industrial setting, many of these are business specific. One nice thing is that the manual is absolutely wonderful. As intuitive as the menus are (and they are... for the most part), the manual explains everything wonderfully. There is a nice diagram with the different menus at the front of the manual. Next to each of the menus, there are page numbers indicating where you can find information about that particular menu/functionality. On those pages, there are clear and concise directions and explanations. Now that is what I call helpful!
Position / Size
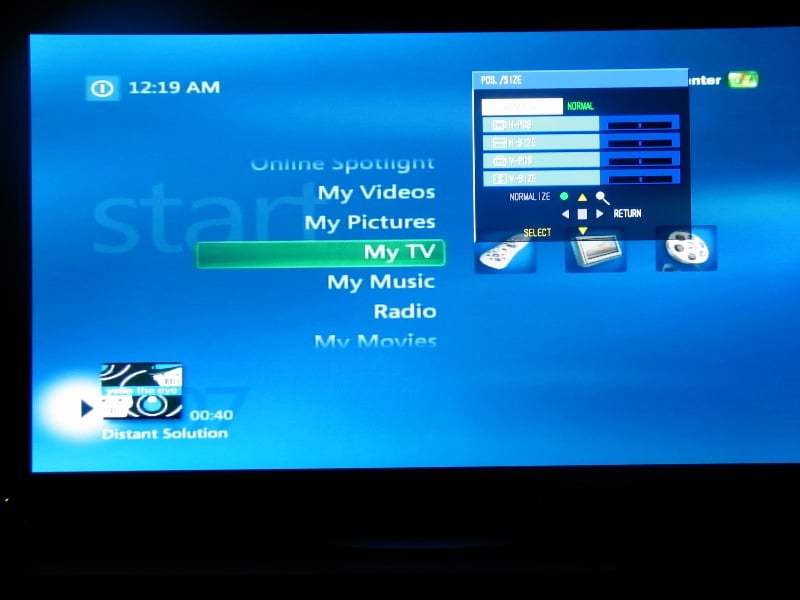 This menu adjusted the position and size of the image on the screen. I had no issues with the default settings. If you did, you could stretch/compress the
horizontal and vertical dimensions or reposition the image on the screen. With these settings you can
really dial in the display, especially when using it to complement a HTPC or other computer output.
This menu adjusted the position and size of the image on the screen. I had no issues with the default settings. If you did, you could stretch/compress the
horizontal and vertical dimensions or reposition the image on the screen. With these settings you can
really dial in the display, especially when using it to complement a HTPC or other computer output.
Setup
 The
Setup
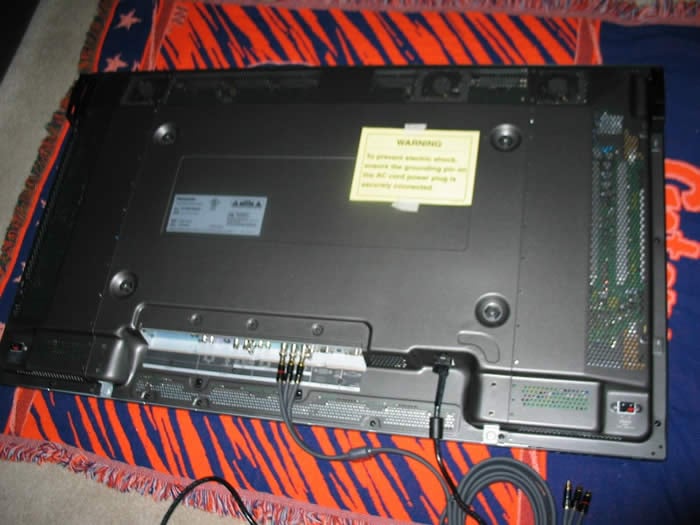
menu lets you select the input and define other
functionalities. The TH-50PHD8UK has only one component, one s-video, and one composite input which means
that you probably will have to do your video switching from an external source (switcher or receiver). I
decided to let my Denon AVR-3805 handle the switching duties and connected it via component video. There
were no DVI or HDMI inputs for this display which means that, except for a cable or satellite receiver,
the best resolution you can pass to the unit is 480p from most DVD players (unless you have something
like the Helios HVD2085 DVD player).
The
Setup
menu lets you select the input and define other
functionalities. The TH-50PHD8UK has only one component, one s-video, and one composite input which means
that you probably will have to do your video switching from an external source (switcher or receiver). I
decided to let my Denon AVR-3805 handle the switching duties and connected it via component video. There
were no DVI or HDMI inputs for this display which means that, except for a cable or satellite receiver,
the best resolution you can pass to the unit is 480p from most DVD players (unless you have something
like the Helios HVD2085 DVD player).

Authors Note: The empty slot 1 (diagram above) can be filled with an optional HDMI or DVI board for around an additional $155 or $145 respectively (both should include HDCP.) Not a bad investment in order to get the maximum performance out of the display.
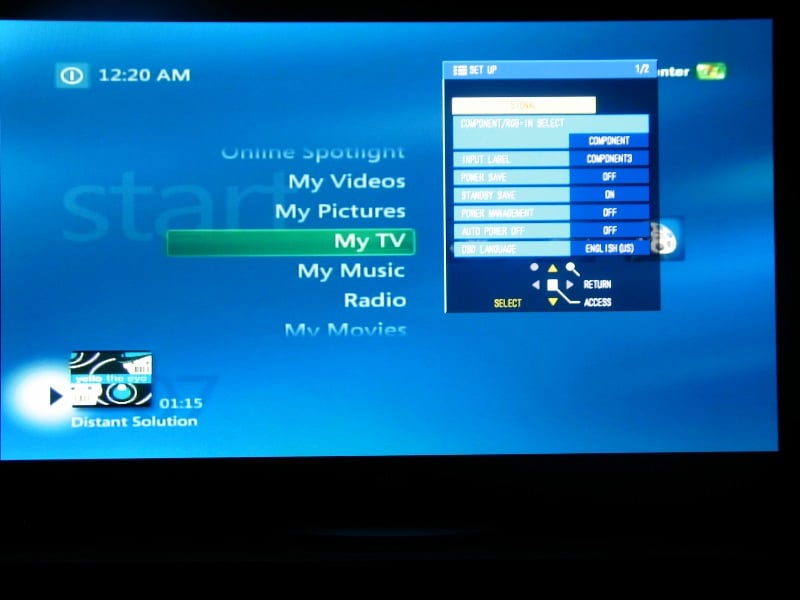 Other configurable
options included:
Other configurable
options included:
- Input Label - Select from a list
- Power Save - On/Off
- Standby Save - On/Off
- Power Management - On/Off
- Auto Power Off - On/Off
- OSD Language - Select from a list
- Screensaver - The most notable option in here is the "side bar adjust" which changes the color of the sidebars when viewing in "normal" mode (see Aspect). The default is "bright," which is a light grey. There is also "mid" and "dark" which are just shades of grey. I prefer black so I selected "off."
- Multi Display Setup - if you want to use more than one of these panels in unison (used for commercial environments).
- Set Up Timer - Auto turns on / off display (for commercial use)
Picture
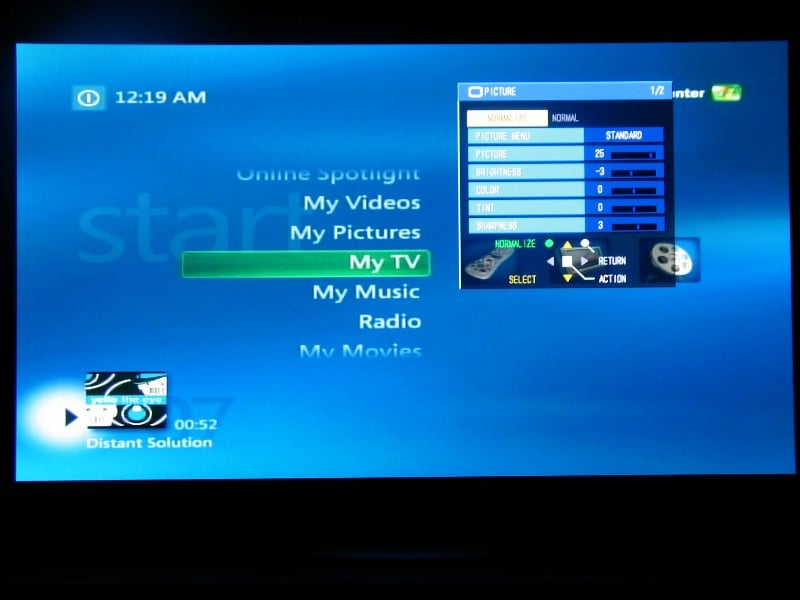 The Picture menu houses all your standard
picture adjustments. There are three different "Picture"
menus (default settings) that are
selectable. Out of the box, it was set to Dynamic which was a bit too bright but probably works well
under fluorescent lighting. Cinema mode seemed far too dark. Standard seemed to be the best out of the
box. Calibration confirmed this to be true.
The Picture menu houses all your standard
picture adjustments. There are three different "Picture"
menus (default settings) that are
selectable. Out of the box, it was set to Dynamic which was a bit too bright but probably works well
under fluorescent lighting. Cinema mode seemed far too dark. Standard seemed to be the best out of the
box. Calibration confirmed this to be true.
Other than your normal Picture, Brightness, Color, Tint, and Sharpness, the menu included an Advanced Settings area you could enable. Under this submenu, you could control your red and blue levels, the black extension, and gamma among others. Generally I left this alone as well.
Aspect Ratios
While not an actual menu per se, there are four different aspect ratios available (five in the
manual):
- Normal - Displays 4:3 material in its standard size with bars on the sides (default bar color is grey)
- Zoom - magnifies the center section of the picture which may cut off some of the top and bottom
- Full - Stretches the picture horizontally to fit the screen (everyone looks fat with 4:3 material) 舑 Note: with widescreen material, use this mode. If you opt for Normal (the "logical" choice when wishing to view something in its native resolution), the image will be compressed horizontally (everyone looks thin). I couldn't find an explanation for this in the manual
- Just - Similar to Full but stretches the sides more than the center (people in the center of the screen look normal but on the sides look extra wide "creates a peep hole" effect during pans)
I used the aspect ratio controls quite a bit depending on the material. With 4:3 material I used Full for the most part unless I was watching something fairly static (like poker) - then I used Just. I shied away from Normal for 4:3 content as it could lead to short-term burn-in effects.
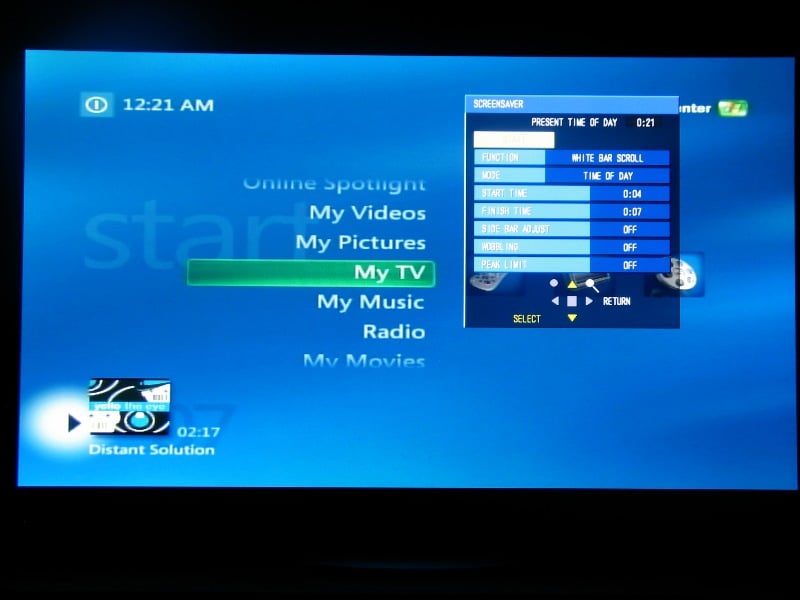 If you are going to use Normal mode or watch endless hours of news channels or are an
avid video gamer, you may be concerned about burn-in. The screensaver is a nice feature to reduce
burn-in. You can actually configure the screensaver to engage during certain times of day (though the
unit has to be on, it won't turn itself on -
a feature for future iterations of this unit
which would benefit commercial users).
If you are going to use Normal mode or watch endless hours of news channels or are an
avid video gamer, you may be concerned about burn-in. The screensaver is a nice feature to reduce
burn-in. You can actually configure the screensaver to engage during certain times of day (though the
unit has to be on, it won't turn itself on -
a feature for future iterations of this unit
which would benefit commercial users).
The two options are negative image (if a static image is shown during business hours, a negative would ensure that all the pixels are used equally) and white bar. The white bar will travel the screen from left to right.
Remote Control
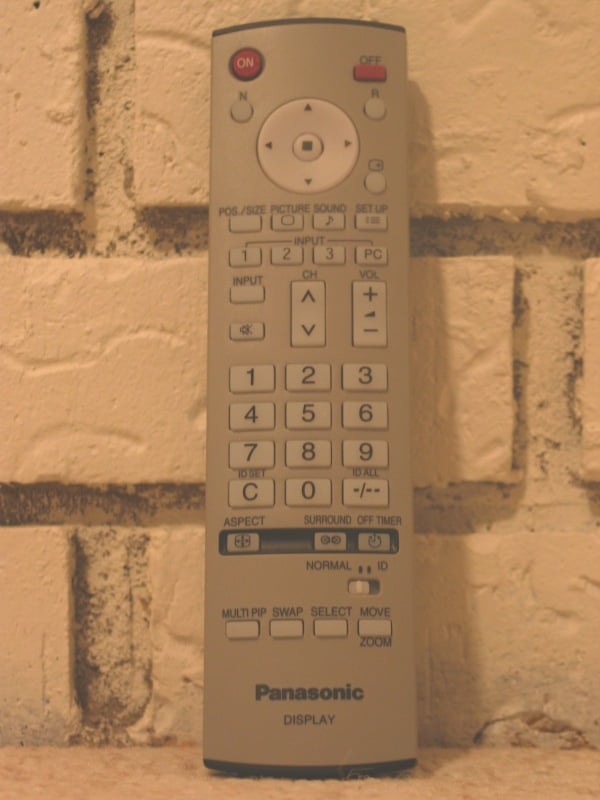 As
much as I like to bash remotes (and I do, really) this one wasn't so bad. Now, other than turning
the unit on and off, changing the aspect ratio, and adjusting the settings, I didn't have much use
for it. The buttons are fairly well laid out and it isn't too light. The directional keys at the
top work well and are very near the settings keys (which is a good thing). Personally, I'm pleased
to see Panasonic split the on and off functions into two separate buttons. This makes it incredibly easy
to program macros into even entry-level universal remote controls.
As
much as I like to bash remotes (and I do, really) this one wasn't so bad. Now, other than turning
the unit on and off, changing the aspect ratio, and adjusting the settings, I didn't have much use
for it. The buttons are fairly well laid out and it isn't too light. The directional keys at the
top work well and are very near the settings keys (which is a good thing). Personally, I'm pleased
to see Panasonic split the on and off functions into two separate buttons. This makes it incredibly easy
to program macros into even entry-level universal remote controls.
The remote is as ergonomic as a 7" piece of 1 x 2 and it wasn't backlit (though it looked like it could be). I found the lack of backlighting confusing as the buttons seemed to be made of the white, translucent plastic common on backlit remotes. My few complaints were that the aspect key and PiP keys at the bottom of the remote kept getting mixed up. My only other quip was that I sometimes had problems getting my unit to respond to the remote. Usually, this happened when turning on or off the unit. I'm not sure if it was the position of the sensor on the unit (bottom left) or an inherent issue with the IR transmitter/receiver system. I could see the light flicker indicating that a command had been received but then nothing would happen.
Calibration, Test Results, and Viewing Evaluation
The Dynamic setting was much too hot overall and was easily identified as such with the naked eye. Standard agreed with me most as Cinema seemed too muted. Picture, Brightness, and Sharpness needed little adjustment and were generally very agreeable. There was a significant blue emphasis which was only slightly noticeable during use. Using the Standard setting, most people would be perfectly happy with the picture and honestly, this is a good thing. Yes, I calibrated it and yes it made a difference. Was it night and day? Only after I was through. Beforehand, I thought it looked pretty darn good.
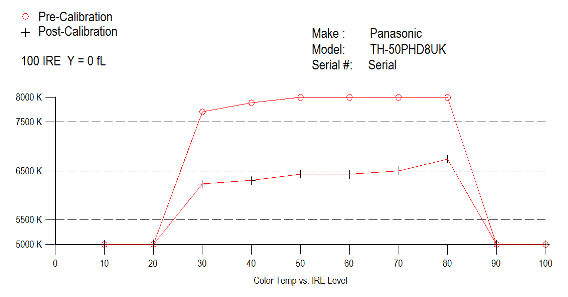
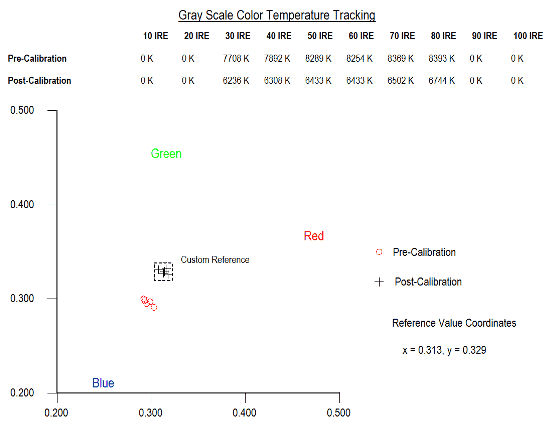
We used the Sencore Color Pro 5000 (CP5000) to calibrate the display. As you can see, the set ran cool out of the box (varied between 7700k and 8300k between 30 and 80 IRE) with a heavy blue emphasis. After correcting for the overabundance of blue, it was much closer to the target of 6500k between 30 and 80 IRE (ranging from 6200k and 6700k).
Audioholics/HQV Bench Testing Summary of Test Results
Perfect Score is 130
Panasonic TH-50PHD8UK Benchmark Score: 31
|
Test |
Max
|
Component
|
Component
|
|
|---|---|---|---|---|
|
Color Bar |
10 |
5 |
Pass |
|
|
Jaggies #1 |
5 |
3 |
Pass |
|
|
Jaggies #2 |
5 |
3 |
Pass |
|
|
Flag |
10 |
5 |
Pass |
|
|
Detail |
10 |
5 |
Pass |
|
|
Noise |
10 |
0 |
Fail |
|
|
Motion Adaptive NR |
10 |
0 |
Fail |
|
|
Film Detail |
10 |
0 |
Fail |
|
|
Cadence 2:2 Video |
5 |
0 |
Fail |
|
|
Cadence 2:2:2:4 DV Cam |
5 |
0 |
Fail |
|
|
Cadence 2:3:3:2 DV Cam |
5 |
0 |
Fail |
|
|
Cadence 3:2:3:2:2 Vari-speed |
5 |
0 |
Fail |
|
|
Cadence 5:5 Animation |
5 |
0 |
Fail |
|
|
Cadence 6:4 Animation |
5 |
0 |
Fail |
|
|
Cadence 8:7 animation |
5 |
0 |
Fail |
|
|
Cadence 3:2 24fps film |
5 |
0 |
Fail |
|
|
Scrolling Horizontal |
10 |
5 |
Pass |
|
|
Scrolling Rolling |
10 |
5 |
Pass |
|
|
Total Points |
130 |
31 |
|
|
Comments of HQV Testing
This unit isn't really designed to provide the best interlacing that money can buy. Its lot in life is to scroll arrival and departure times at the airport. As long as you provide it a good source, the picture quality will be stunning. As such, we simply recommend that you use it with a high quality progressive scan source component. There is no reason why you shouldn't be completely satisfied with this display if you are feeding it with a relatively good quality DVD player or cable/satellite box. Remember, if you are feeding a progressive signal to a television, it is not handling deinterlacing, jaggie reduction, or cadence detection, only scaling of the image to the display's native resolution.
Viewing Evaluation
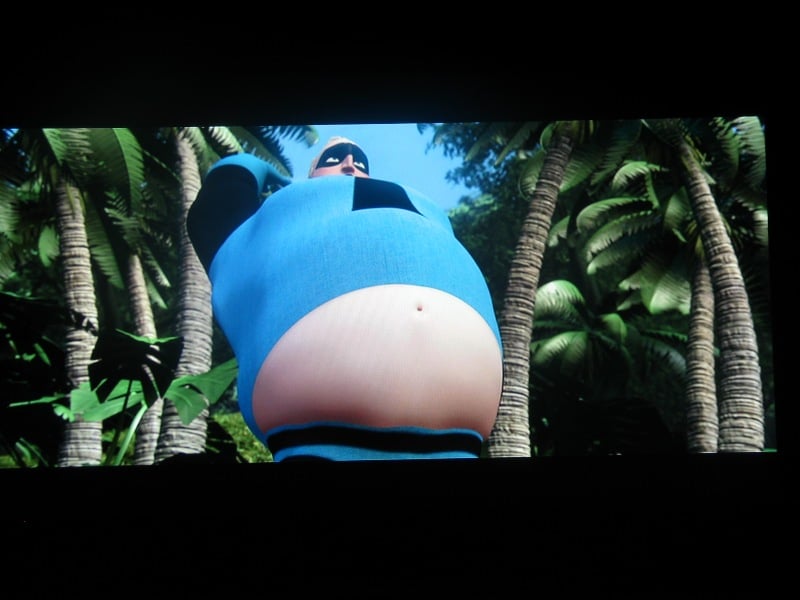
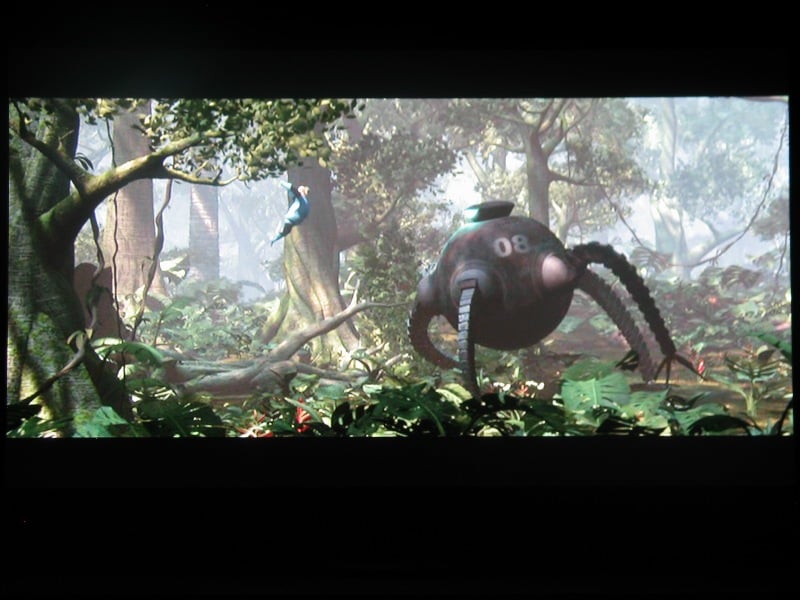
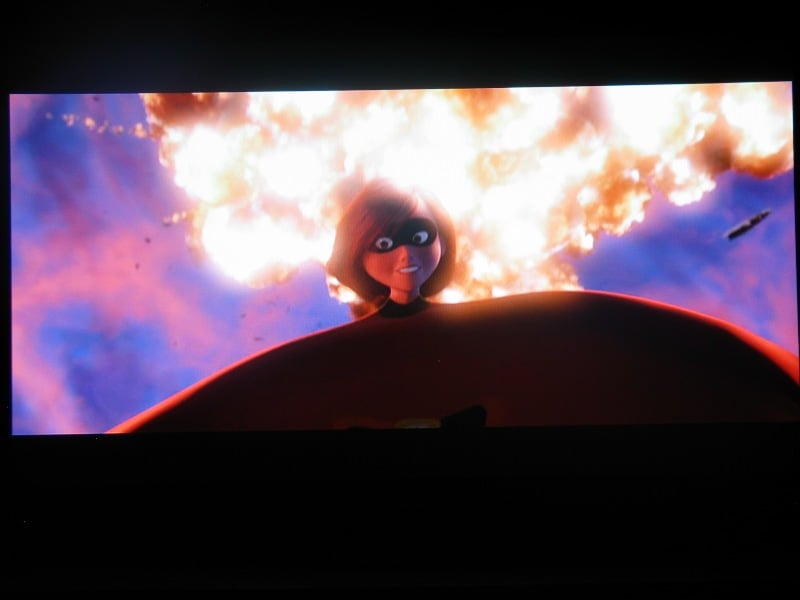
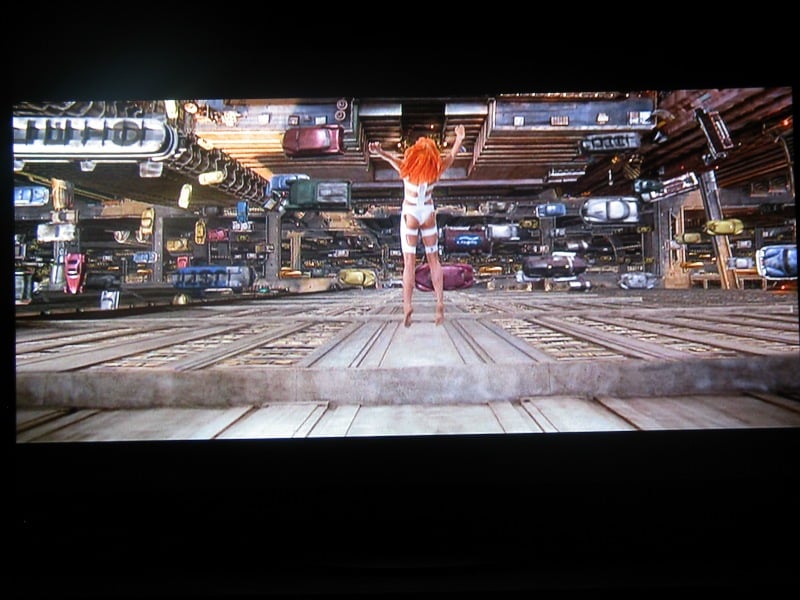
So, with bragging rights firmly in place, everyone I knew suddenly found a way to come over. Let's just say that I had no problem getting enough time with this display. The first thing I noticed was how vibrant and alive everything looked when providing a progressive signal from a DVD player. Pixar material (especially Finding Nemo and The Incredibles ) were particularly impressive.
Author's Note: The pictures of the display do not do the display justice. Aside from the obvious problems of taking a picture of an image on a direct-view pixel-based screen, our in-house digital cameras leave a bit to be desired.
The Incredibles
I freakin love this movie. In my opinion, it is by far Pixar's best work. Superheroes with a James Bondish plot?! Brilliant. I was noticing a ton of detail that I wasn't noticing before. The texture of the suits, the movement of the hair, a lot of little details that just weren't apparent on other displays. Colors were vibrant but not oversaturated. Blacks looked good as did the nuances of the textures on the uniforms. Motion was never blurred nor did I notice an abundance of macroblocking during the darker scenes or explosions.

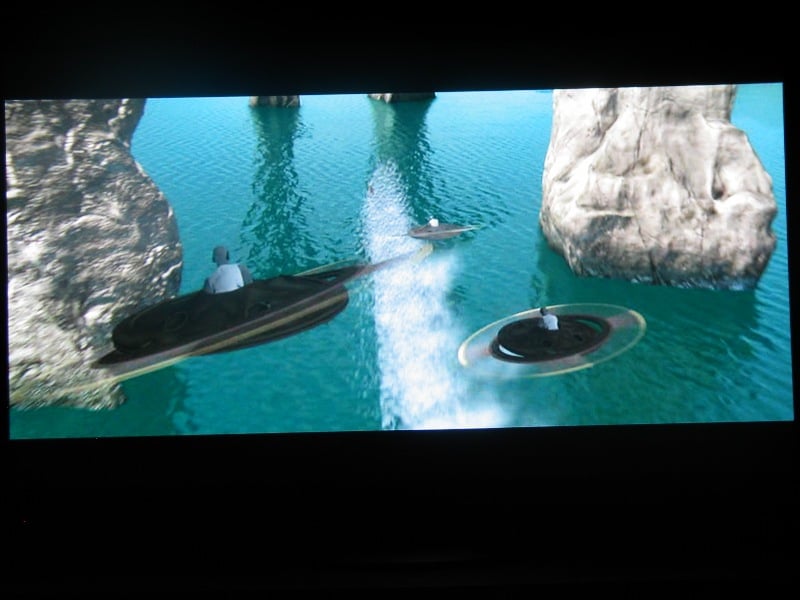
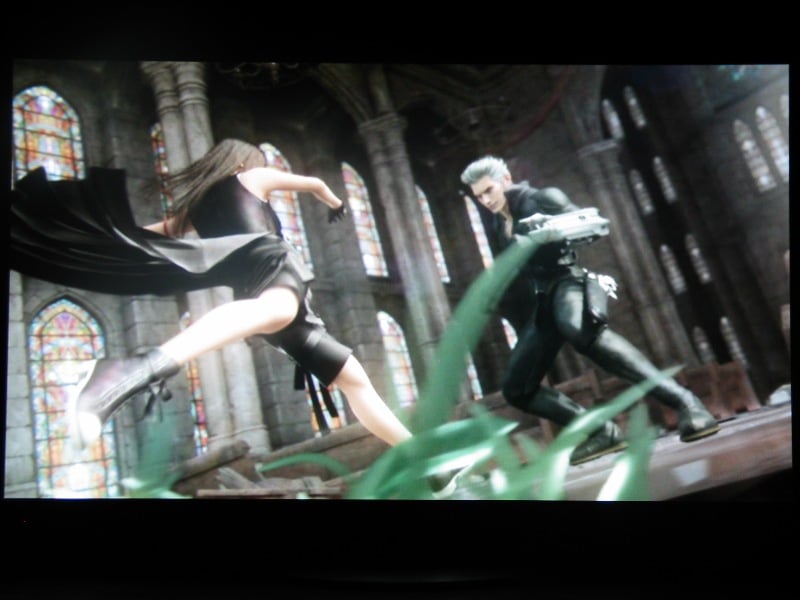
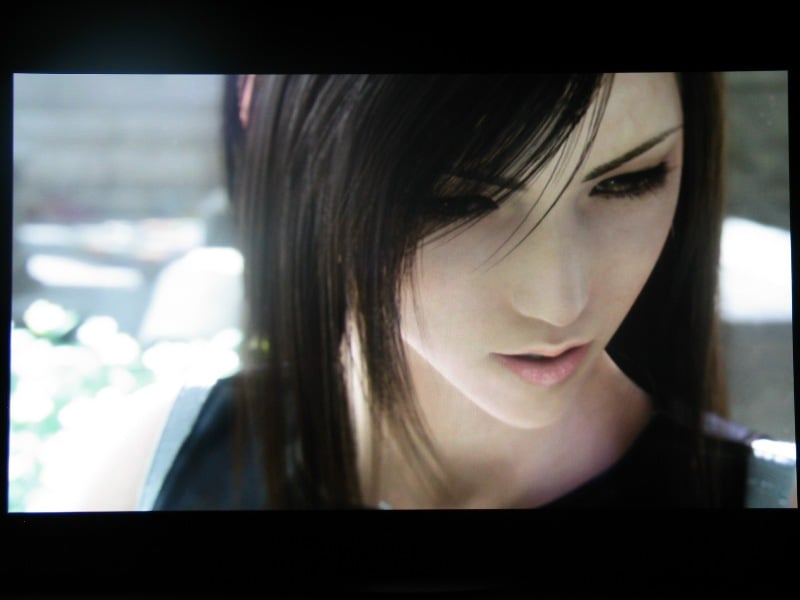
Final Fantasy VII: Advent Children
Now, for people that know and love the game, this movie might make sense to you. For everyone else, don't think this is Spirits Within part two... cause it ain't. I never was one for the epic RPGs that have such a rabid following so I wasn't familiar with the story. Fortunately, I have a friend (who brought the movie over for me to watch), so he translated... sort of. The prelude "movie" (really, just outtakes from the game) makes no sense even with a "translator" and I don't think I could sum up the plot of the main movie if I wanted to. "Disjointed"is a word, though "drug induced" might fit better. My comment after it was over, "Hey, man. Someone went to the bank and cashed a check after writing that story. They got paid for that! How do I sign up for that gig?" Anyways, it was a beautiful movie to look at if a bit smoky. It seemed as if there was a layer of haze over the entire movie. When it was clear, however, the textures were beautiful and the graphics intense. There were lots of action scenes that were intentionally blurred but those that weren't generally worked fairly well. There was some evidence of jaggies here and there and some graininess to the layer of fog but overall, it was fairly well done.


Viewing Evaluations Continued and Conclusion
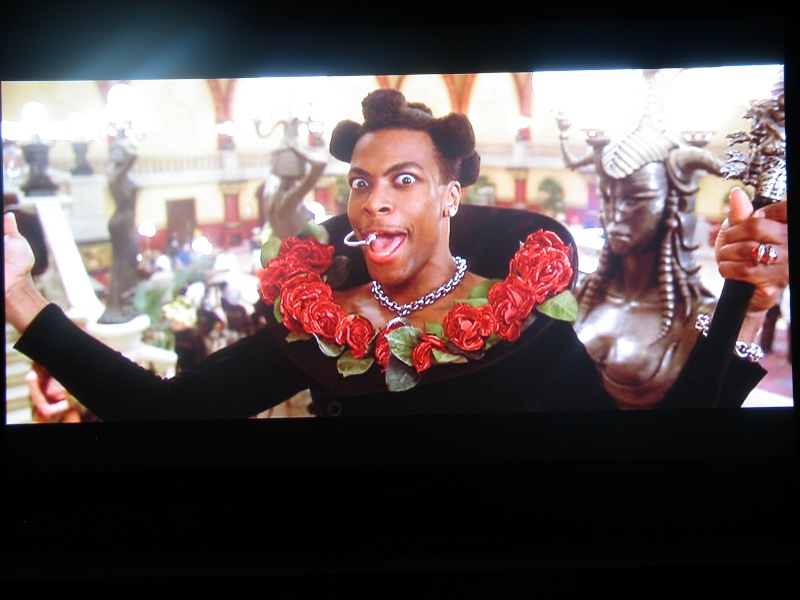
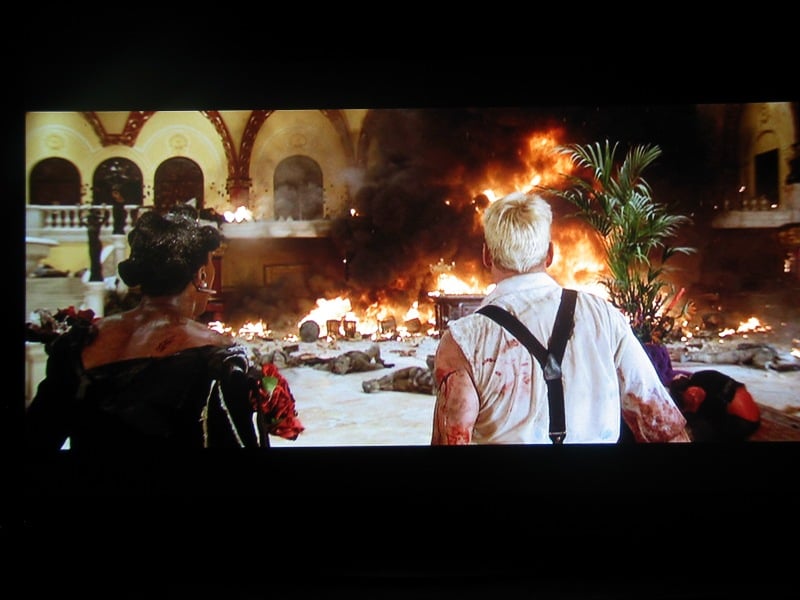
DVD: The Fifth Element Superbit
Ok, Ok, I know. Everyone uses
The Fifth Element
in display reviews. Frankly, I can give you 10 good reasons why and only the
first five are Milla Jovavich in "bandages."
Quirky story, epic storyline, fantastic acting,
and a killer DTS track on the Superbit version -
well, who
wouldn't
want to watch it over and over? The colors were as vibrant as I've ever
seen and there was little evidence of banding in dark scenes. The sets
provided plenty of opportunities to check out the detail capable by
this unit. With a good progressive signal, the clarity and colors on
this unit was nothing short of phenomenal. The detail on some of the
costumes for the aliens (a refreshing change from some of the poorly
done CGI we are subjected to) became even more apparent with the
clarity of the display.

Burn-in
Plasmas have a reputation for burn-in. But in recent years, such problems have been reduced... or so I've been told. Never one to "take someone's word for it," I went ahead and tested the display's resistance to burn-in. In order to torture the 50PHD as much as possible, I watched six straight hours of the 2006 FIFA World Cup. It was a tough assignment, but someone had to do it. I started by watching one game while DVRing the other. After the first was through, I watched the second. By that time, a new round of games was on so I watched a third. Of course, there was a static bar at the top for the score and a scrolling bar at the bottom during two of the games. To add to the torture, I viewed all six hours in "normal mode" with black bars on the sides. After all that, there was no evidence of burn-in with the unit. If you turn the screensaver on for a bit to clear out the screen each night I see very little reason to worry about long term burn-in with this unit.
The problems with the deinterlacer became very apparent when viewing my analog cable signal. Sports are notoriously hard on larger displays and soccer, with its wide viewing angles and tons of movement, was no exception. The players were little moving blurs and the lines on the field disintegrated into a fuzzy mess at the hint of movement. If you are planning on using this as your primary display, you need to make sure you are going to feed it a fairly high quality signal.
Conclusions and Overall Perceptions
So, it is a monitor, let's not beat around the bush. If you are looking for a huge screen that is easy to use and will provide a stunning picture with a good signal and you don't want to drop enough money to buy a car, this may be the display for you. Out of the box it needs little calibration though it may seem a bit cool. Overall, I could see this unit in use in a smallish dedicated home theater (where a projection system would be overkill) or as a second display used primarily for movies. The price is right and when fed with a good progressive source you'll be stunned at the picture. Just make sure you spring for the optional DVI or HDMI board.
The Score Card
The scoring below is based on each piece of equipment doing the duty it is designed for. The numbers are weighed heavily with respect to the individual cost of each unit, thus giving a rating roughly equal to:
Performance × Price Factor/Value = Rating
Audioholics.com note: The ratings indicated below are based on subjective listening and objective testing of the product in question. The rating scale is based on performance/value ratio. If you notice better performing products in future reviews that have lower numbers in certain areas, be aware that the value factor is most likely the culprit. Other Audioholics reviewers may rate products solely based on performance, and each reviewer has his/her own system for ratings.
Audioholics Rating Scale
 — Excellent
- — Very Good
- — Good
- — Fair
- — Poor
| Metric | Rating |
|---|---|
| Detail and Resolution | |
| Deinterlacing & Scaling | |
| Contrast and Black Levels | |
| Color Reproduction | |
| Noise Reduction | |
| Calibration Options | |
| Build Quality | |
| Ergonomics & Usability | |
| Ease of Setup | |
| Features | |
| Remote Control | |
| Performance | |
| Value |
As Associate Editor at Audioholics, Tom promises to the best of his ability to give each review the same amount of attention, consideration, and thoughtfulness as possible and keep his writings free from undue bias and preconceptions. Any indication, either internally or from another, that bias has entered into his review will be immediately investigated. Substantiation of mistakes or bias will be immediately corrected regardless of personal stake, feelings, or ego.
View full profile