
Velodyne HGS-15X Subwoofer Review
Velodyne HGS-15X
- Product Name: HGS-15X
- Manufacturer: Velodyne
- Performance Rating:


- Value Rating:
- Review Date: June 10, 2005 20:00
- MSRP: $ 1995
Features
- THX Ultra II
- High quality crossover system
- High Gain Servo System
- Selectable subsonic filter (15/35Hz)
- Infrared remote control (optional)
- Adjustable low-pass filter
- Subwoofer Direct crossover by-pass
- Phase adjustment
- XLR-Connector
- Auto On/Off
Amplifier: Class D 1250 Wrms (3000 W
peak)
Woofer: 15" forward-firing (12.7" piston
diameter)
Voice Coil: 3" Dual Tandem
push-pull
Excursion: 2" maximum
Magnet
Structure: 380 oz (24
lbs)
Cone: Kevlar
reinforced
High Pass Crossover: passive
80/100Hz (6db/octave filter)
Low Pass Crossover: 40Hz-120Hz (12db/octave initial; 48dB/octave
ultimate)
Crossover Bypass: Yes - subwoofer
direct
Anti-clipping Circuit:
Yes
Inputs & Outputs: Line Level &
Speaker Level
Frequency Response: 18-120Hz +/-
3dB
Phase: 0 or 180
degrees
Distortion: Less Than
1%
Weight:
95lbs
Cabinet: 19.875"H x 18" W x
17.875" D (including grill and feet)
Pros
- High End Audiophile Performance
- High Impact, WOW and Slam
- Excellent LFE Performance
- Very easy to integrate into room and custom cabinetry
- Excellent build quality (Built in the USA)
- Lots of performance at this price
Cons
- No Variable phase control
- No provision for aftermarket feet
Velodyne HGS-15X Technology Overview
Many of us audiophiles and videophiles are split personalities. We want our systems to sound great for music, be dynamic, and provide that intense impact and wow effect for home theater applications. One of the more daunting tasks an audiophile or videophile will endure when assembling their dream home theater or music system is the search for a satisfying subwoofer. This is a complex task because the subwoofer must appease the musical side of the audiophile and the SPL, bass hungry side of the videophile at the same time. What we want is a Dr. Jekyll and Mr. Hyde subwoofer. Typically the audiophile-type subwoofers are small in diameter, high excursion, low distortion designs that are able to reproduce very low frequencies. The problem is most of these audiophile subwoofers don't produce a lot of the SPL or slam needed for high impact home theater. Another thing to consider is placement flexibility. If the subwoofer is to be integrated into custom audio/video cabinetry, this is yet another performance hurdle that must be dealt with to accommodate limited placement flexibility.
 Velodyne has been manufacturing high end subwoofers for
well over 25 years - and that is pretty much their entire focus. 100% of the company's resources,
research, and development goes into producing subwoofers and subwoofer technology. Another very
important aspect of the company, at least for me, is that all Velodyne HGS-X series subwoofers are
designed, developed and manufactured in the USA.
Velodyne has indicated that this is to insure
quality control. I say Bravo, Velodyne!
Velodyne has been manufacturing high end subwoofers for
well over 25 years - and that is pretty much their entire focus. 100% of the company's resources,
research, and development goes into producing subwoofers and subwoofer technology. Another very
important aspect of the company, at least for me, is that all Velodyne HGS-X series subwoofers are
designed, developed and manufactured in the USA.
Velodyne has indicated that this is to insure
quality control. I say Bravo, Velodyne!
The Velodyne HGS-15X (High Gain Servo) subwoofer incorporates a 15-inch woofer with a massive 24lb magnet structure, a tandem 3" push pull voice coil, and a mind blowing 1250 watt RMS (3000 watt peak) class D amplifier. The enclosure is very solid and has a relatively small footprint for a 15" subwoofer, coming in at just 19.875" H x 18" W x 17.875" D. Did I forget to mention that the entire unit weighs a hefty 95lbs?
Obviously, from just reading the above specifications you can tell that this subwoofer should rock the house for home theater applications - but what about music?
The knock against very large displacement subwoofers among audiophiles has always been that anything bigger than a 12" woofer cone is just too big and slow to be musical. Pithy quotes from the audiophile community about large displacement subwoofers include words such as "boomy, tubby, muddy, sloppy, overextended" and "having a localized sound." It has always been the belief that smaller diameter subwoofers are very quick and tight sounding. For the most part, the audiophile community has been correct in its assessment of these large diameter subwoofers; however Velodyne has managed to solve most of the musical problems associated with large displacement subwoofers. Here is how they did it:
First they designed a very stiff and ridged 15" cone that is Kevlar impregnated. They did this because they realized as the displacement of the subwoofer is increased, stiffness must be maintained throughout the cone material. Next, they designed a motor that incorporated two coils operating out of phase in a push pull configuration suspended by dual spiders. This allowed the motor to have an enormous amount of linearity (1-1/8" of linear motion or a maximum mechanical limit of 2 inches.) This is a huge amount of travel for a large displacement subwoofer. Finally, they topped off the woofer design with a huge 24lb magnet.
The end result was a 15-inch large displacement woofer that had very low distortion and great accuracy. Or, in other words, it is very fast. I think that when people talk about the speed of a subwoofer, what they are really trying to covey is how much distortion the subwoofer produces in conjunction with its accuracy.
The next step Velodyne took was to incorporate their patented accelerometer servo control. This is a high gain system that is designed to improve the linearity of the motor and woofer assembly. It does this by monitoring the cone movement and making adjustments between the input signal and the subwoofer's output. This provides a very accurate low distortion control over the cone movement. Again, the key factors are how "accurate" and "low distortion" equate to a "fast" and "tight" subwoofer. Many would think that this servo system would reduce output of the subwoofer and create compression. Velodyne has taken this into consideration: the only time a limiter is activated in the amplifier is when the cone and motor structure are reaching their maximum limit of travel. This prevents the subwoofer from bottoming out. It is highly unlikely that anyone using this sub, even in a reasonably large room, is going to bottom out the HGS-X series.
Velodyne HGS-15X Amp and Remote

The final phase of the construction and development of the Velodyne HGS-15X was its enclosure. The enclosure is solid and well-built. It is a totally sealed design, meaning that you can place this subwoofer in custom cabinetry or build it into a custom home theater entertainment system 舑 important factors to note if you are looking for a good subwoofer to recommend for custom installation needs.
 Now that you know how and why they designed
the HGS-15X, its time to tell you what it looks like, how it functions, and most importantly, how it
performs.
Now that you know how and why they designed
the HGS-15X, its time to tell you what it looks like, how it functions, and most importantly, how it
performs.
As I unpacked the Velodyne HGS-15X, the first thing I noticed was the Black Ash vinyl wood grain finish. This is a change in the HGS-X line of subwoofers. Velodyne has indicated that this was done to offer a high-end subwoofer at a reasonable cost. I call this "less show and more go". Whatever the reason, the Black Ash finish is tastefully done with no visible seams. The black wood grain vinyl looks like real wood until you examine it very closely. Placing this subwoofer next to my other subwoofer (one with a real wood veneer) you cannot distinguish between the two under normal lighting conditions. I would have no problem incorporating this subwoofer out in the open in a high-end well-furnished room.
Editorial Note: Installing Subwoofers Into Custom Audio Video Cabinetry
Installing subwoofers into custom audio/video cabinetry can be a tricky proposition. Selecting the correct subwoofer for this type of installation is key for good performance. Sealed enclosure subwoofers are my first choice for this type of installation because they are easy to integrate and the custom audio/video cabinet can be built around them. Ported subwoofers should not be installed into enclosed cabinetry unless they are ported in the front. Downward firing subwoofers and passive radiator subwoofer should never be considered for installation into custom audio video cabinetry.Proper installation is crucial for good performance. The cavity the subwoofer sits in should be very close to the size of the subwoofer. I generally specify a three to four inch gap on either side of the subwoofer and a six to eight inch clearance on the top. The clearance on the top allows access to the plate amplifier if the subwoofer has no remote functions (a flashlight and a small mirror make adjustment easy.)
After the subwoofer is placed into the custom cabinetry, thick rubber foam is then packed in tightly between the sides and the top subwoofer and the furniture to aid in the reduction of unwanted resonance and rattling. Foam or acoustical material should not be placed at the rear of the subwoofer if the subwoofer has a built in plate amp because the amplifier generates heat that needs to be dissipated.
Installation of a 15-amp outlet in the subwoofer cavity should be considered when designing your custom cabinetry. The subwoofer should also never be placed on a hollow riser. If you must elevate the subwoofer make sure the riser is solid or filled with sand. The door that covers the subwoofer cavity should also have no cross support to interfere with the woofer cone.
All custom furniture and cabinetry should be built out of solid wood, and all doors should have strong closing springs. Foam bumpers should be used between the doors and the cabinet, preventing them from rattling against the cabinetry.
Glass doors have no place in custom audio/video rooms and should never be considered. Glass doors retain heat, rattle, and reflect light (great for bathrooms but very poor for home theaters.) If you must have knickknacks in and around your audio/video furniture, consider using rope calk to tack them down. Rope calk is available at many hardware stores. Remember, anything that you can do to reduce resonance or rattles will increase the overall performance of your system.
For more tips on integrating subwoofers into custom Audio Video cabinetry see:
Subwoofer Placement Tips for Cabinetry Installations
 Velodyne offer's an optional HGS Remote
Eye kit. This kit contains one remote eye pickup and the remote. The remote is pretty basic, with a
power button, volume up and down and a mute button. It is not backlit, so I suggest using it to program
its functions into your universal remote and then store it away. The remote kit is very handy for
installations in custom cabinetry or where access to the rear of the subwoofer is limited. It is also
very handy when calibrating and integrating the Velodyne HGS-15X into your Home Theater
system.
Velodyne offer's an optional HGS Remote
Eye kit. This kit contains one remote eye pickup and the remote. The remote is pretty basic, with a
power button, volume up and down and a mute button. It is not backlit, so I suggest using it to program
its functions into your universal remote and then store it away. The remote kit is very handy for
installations in custom cabinetry or where access to the rear of the subwoofer is limited. It is also
very handy when calibrating and integrating the Velodyne HGS-15X into your Home Theater
system.
The grill that covers the woofer is secured very tightly and takes quite a bit of effort to remove. This is done to prevent unwanted rattles at high SPL levels. On the bottom of the enclosure you will find 4 plastic feet about the size of a quarter. There is no provision for spiked or cone feet. I would have liked to see threaded inserts for aftermarket solutions.
Around the back of the Velodyne HGS-15X is the enormous subwoofer plate amplifier. The Velodyne HGS-15X subwoofer amp has nearly all the inputs, outputs, and control devices that anyone would ever need, including:
- Subwoofer volume
- Variable low pass crossover 40Hz-120Hz
- 0 or 180 degree phase switch (we would have preferred to see variable phase control)
- Subsonic switch with options for 15Hz THX setting or 35Hz
- Crossover bypass switch In/out
- Power switch (with Auto sensing or On)
- External remote input (for the optional HGS Remote Eye kit)
- Balanced left and right inputs
- High-pass crossover (80 Hz or 100Hz)
- Right and left speaker level adjustment
- 5-way binding posts
- Line level right and left Inputs and Outputs
- Main Power button and detachable power cord
Setting up the Velodyne HGS-15X was simple and straightforward. The instruction manual is very comprehensive and easy to read. I used the Impact Acoustics Sonic Wave subwoofer cable from my Aragon Stage One Preamp's LFE output and a Y-splitter connected to the HGS Line Level Right and Left input. The use of a Y-splitter is the preferred method of installation for the Line Level inputs because many subwoofers, including the HGS-15X, prefer the higher input gain. This is done to accommodate many different speaker sensitivities from extremely low to extremely high. The subwoofer amplifier is also less likely to clip with a higher input voltage.
Velodyne HGS-15X Setup
I use the RBH SI-760 in-walls in my family room for the mains. They have a low-end frequency cutoff of about 45Hz but I run them as "Small" in my home theater system. Setting the Aragon Sound Stage crossover for 80Hz (THX setting), I bypassed the variable crossover with the switch set to "Out" because I am using the one in the Pre-Amp. Using the bypass switch prevents the chance of cascading crossovers.
Setting the phase switch to 0 yielded the best results in my room; however, you should try it both ways. Generally, you would use the setting that provides the most gain at the listening position. I selected the Subsonic 15Hz THX setting. This is the correct setting for most installations unless for some reason you want to limit your low-end frequency response to 35Hz (such as a scenario where extremely high SPL's will be the norm). I then selected the "Auto On" setting for power. This senses input signal and will automatically turn the subwoofer on when an input signal is sensed. It will automatically enter "Standby" mode after longer periods of inactivity.
Calibration and subwoofer placement is critical for high-end home theater and multi-channel performance. It can be very frustrating and difficult to get the subwoofer placed in the correct location, blend in with the rest of the speakers, and yield the maximum impact without sounding boomy. Surprisingly, the Velodyne HGS-15X was a breeze to set up and calibrate. Using my SPL meter at the listening position, I calibrated the subwoofer's output using external test tones to level match the rest of my speakers.
The Velodyne HGS-15X likes to see high input voltage at its line level inputs, so I set the subwoofer volume control to about the 9o'clock position and the gain on my Aragon Sound Stage to about the half-way point. I noted that the Velodyne HGS-15X volume control was set to a very low level, a quarter of it's full potential, but the sub was still able to produce the reference level needed for my approximately 3000 cubic feet listening room.
 The next step was to check placement with my low
frequency sweep test. I began placing the subwoofer at various locations around the room. I noticed
right away that the Velodyne HGS-15X didn't particularly care where it was placed: corner
loading, 1/3 in from the sidewall, 1/2 in from the sidewall, and various other locations. It yielded
excellent results; it never sounded boomy, dry, flat, or localized - regardless of where it was placed.
This is an easy subwoofer to integrate into just about any installation regardless of placement
requirements. Let me point out this is not the normal occurrence when dealing with most subwoofer
integrations into high-end systems. Most of the time subwoofers require exact placement for proper
integration. The Velodyne HGS-15X was the exception; I placed the subwoofer 1/3 in from the sidewall on
the front wall for the rest of the evaluation. Using tests discs like those from
Rives
or other companies are useful when trying to determine subwoofer
placement and integration in your room
The next step was to check placement with my low
frequency sweep test. I began placing the subwoofer at various locations around the room. I noticed
right away that the Velodyne HGS-15X didn't particularly care where it was placed: corner
loading, 1/3 in from the sidewall, 1/2 in from the sidewall, and various other locations. It yielded
excellent results; it never sounded boomy, dry, flat, or localized - regardless of where it was placed.
This is an easy subwoofer to integrate into just about any installation regardless of placement
requirements. Let me point out this is not the normal occurrence when dealing with most subwoofer
integrations into high-end systems. Most of the time subwoofers require exact placement for proper
integration. The Velodyne HGS-15X was the exception; I placed the subwoofer 1/3 in from the sidewall on
the front wall for the rest of the evaluation. Using tests discs like those from
Rives
or other companies are useful when trying to determine subwoofer
placement and integration in your room
Listening Evaluation
Before I start writing the listening evaluation part of this review I must come clean and confess that I am a Bassaholic. I can't help it. I am addicted to low frequencies. I love it all, as long as it's deep, tight, accurate and non-localized. If, on the other hand, it's boomy, sloppy, and mushy, it totally ruins the experience and I would rather listen to nothing at all.
I started the listening evaluation with Domnerus playing Antiphone with Blues Sjokist at the organ in Spanga Church Sweden . For those of you that don't know this CD it is basically sax playing in concert with the pipe organ. While listening to track 2, sometimes I feel like a child. The organ is producing extremely low notes that last a very long time. The Velodyne HGS-15X reproduced every one of the notes with precision and balance The HGS-15X remained composed, never sounding congested or compressed. There was no overhang, and closing my eyes it was very hard to detect where the low frequency information was originating.
Next, I wanted to try track #5, Jag Vet En Dejlig Rosa. This track starts with Arne Domnerus playing his saxophone while Gustaf Sjokvist is playing the pipe organ in a duet fashion. I wanted to see if the Velodyne HGS-15X would be overbearing and play over my RBH SI-760 SE in-walls. Once again, the Velodyne HGS-15X proved that it was worthy of Audiophile status, blending perfectly with my in-wall speakers. The Velodyne HGS-15X never gave its location away. Listening to the track, it sounded as though I was listening to a pair of true full-range loudspeakers rather than a set of limited bandwidth in-walls and a dedicated subwoofer.
 After listening to the
pipe organ saxophone combination, I wanted to try some two-channel music with high impact, low
frequency slam.
If you want to test your system's ability to reproduce low frequency with
two-channel at higher SPL levels, might I suggest Craig Armstrong's
The Space Between Us
CD. Track #1, "Weather Storm"
starts out with the soft mellow strumming of the harp coupled
with violin and electronic piano. It almost lulls you to sleep and then WHAM! Huge high-impact
consecutive hits of the bass drum appear out of nowhere.
After listening to the
pipe organ saxophone combination, I wanted to try some two-channel music with high impact, low
frequency slam.
If you want to test your system's ability to reproduce low frequency with
two-channel at higher SPL levels, might I suggest Craig Armstrong's
The Space Between Us
CD. Track #1, "Weather Storm"
starts out with the soft mellow strumming of the harp coupled
with violin and electronic piano. It almost lulls you to sleep and then WHAM! Huge high-impact
consecutive hits of the bass drum appear out of nowhere.
I had the volume turned up a bit too much on my pre-amp and the first concussion of the bass drum rattled everything in the room. The single pane windows in my family room were vibrating and compressing in and out as the Velodyne HGS-15X moved massive amounts of air and filled the room with pant leg flapping, hair shaking low frequency. As the bass drum continued to strike throughout the track, the Velodyne HGS-15X faithfully reproduced the notes with a high degree of accuracy and slam, always sounding tight and tuneful. It never sounded boomy, slow, or tubby. The Velodyne HGS-15X played the entire track with authority as if to say "Bring it on, is that all you have!?!"
Bassahoilcs are addicted to movie soundtracks with lots of action and lots of LFE. With this in mind, I selected two DTS movies for evaluating the performance of the Velodyne HGS-15X with multi-channel movie soundtracks. Titan AE (utilizing the ice field scene) and The Haunting (with the bedroom/hallway scenes) provide excellent evaluation content for subwoofers
 These two DVDs are filled with intense high-impact LFE and are a virtual
torture test for a subwoofer.
These two scenes last a very long time and LFE is present almost
continuously. I have bottomed out many high dollar subwoofers with these DVDs whose amplifiers will
clip hard and run out of gas because of the duration of time they must endure providing LFE for these
extended chapters.
These two DVDs are filled with intense high-impact LFE and are a virtual
torture test for a subwoofer.
These two scenes last a very long time and LFE is present almost
continuously. I have bottomed out many high dollar subwoofers with these DVDs whose amplifiers will
clip hard and run out of gas because of the duration of time they must endure providing LFE for these
extended chapters.
First up was the Titan AE DVD. From beginning to end, the Velodyne HGS-15X pumped out massive amounts of low frequencies. The tactile response generated by the Velodyne HGS-15X was enormous at the listening position, shaking everything in the room. I thought for a moment that I had inadvertently left the motion actuators on in my chair. The Velodyne HGS-15X never sounded compressed or boomy throughout this rather lengthy LFE exercise. The subwoofer just went along belting out thunderous undistorted low frequency information. After the scene had ended, I wanted to see how hot the plate amplifier had become. To my surprise, it was barely warm to the touch.
 Next up was
The Haunting
Chapter 17,
the "Bedroom Hallway"
scene. Many loudspeaker manufacturers claim they can build adequate
subwoofers for the reproduction of high impact LFE. This DVD, more than any I know of, will test the
validity of their claims. I have used this DVD for many years to evaluate subwoofers and think that
many loudspeaker manufacturers would be better off sticking to building loudspeakers and not
subs.
Next up was
The Haunting
Chapter 17,
the "Bedroom Hallway"
scene. Many loudspeaker manufacturers claim they can build adequate
subwoofers for the reproduction of high impact LFE. This DVD, more than any I know of, will test the
validity of their claims. I have used this DVD for many years to evaluate subwoofers and think that
many loudspeaker manufacturers would be better off sticking to building loudspeakers and not
subs.
In the bedroom, after Nell breaks the window, all hell breaks loose as Hugh Crane's ghost goes on a rampage chasing Nell. The sonic concussion and LFE slam I heard (and felt) in my room made me feel as though Hugh Crane was trying to tear my house apart. I honestly did not think that my single pane windows were going to survive this time. There was so much slam, and the room felt so pressurized, that it was almost painful. I truly was in bassaholic heaven with this DVD and realized after the track had concluded that I would never find a cure for my addiction.
The Velodyne HGS-15X reproduced this whole track masterfully, pumping loads of undistorted LFE. The sub had no problems passing The Haunting Chapter 17 torture test at near reference levels in my 3000 cubic ft room and remained composed with exemplary pitch and definition.
Velodyne HGS-15X Measurements and Conclusion

As you can see from the frequency response, the Velodyne HGS-15X had very impressive low-end extension with useable high SPL starting at about 18Hz. The frequency response between 25Hz and 150Hz is fairly flat as shown in the below graph , confirming what I heard during the listening evaluation and explaining why the Velodyne HGS-15-X was able to integrate seamlessly and smoothly with my main speakers when crossed over at 80Hz.
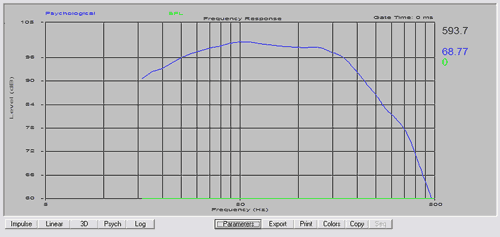
The frequency response graph and charted SPL levels show that this subwoofer can play ridiculously low frequencies with high SPL 舗 s and have a very flat response between 25Hz and 150Hz +-3dB. Low, loud and smooth equate to an audiophile subwoofer with slam.
Conclusion
Concluding this review, I must admit that I knew that the Velodyne HGS-15X was going to be a stellar performer even before I opened the box. I have installed various Velodyne subwoofers in various custom installations for the better part of 10 years and they have never let me down. This level of Velodyne subwoofer always seems to provide a very large performance to cost ratio.
There is a big difference between a good subwoofer and a great subwoofer. Good subwoofers can play low and loud. Great subwoofers can play low, loud and still maintain a high level of accuracy The Velodyne HGS-15X is a great subwoofer. Its placement flexibility and stellar performance with both two-channel and multi-channel make it an easy recommendation. The fact that it is entirely built here in the USA is icing on the cake.
 Despite my installation experience, this is
the first time I have had the Velodyne HGS-15X incorporated into one of my own systems. I must say it
was an impressive display of force and finesse. If you are a die hard two-channel audiophile looking
for a subwoofer to keep up with your exotic main channel speakers, a Bassoholic addicted to huge
dynamic high impact LFE, or a custom integrator looking for a flexible solution for custom audio video
placement, the Velodyne HGS-15X is the subwoofer you need to audition.
As I conclude this review,
I am reminded of a button I picked up at the Velodyne booth at CES about 10 years ago. It simply stated
"got bass?"
My answer to this is: I do now!
Despite my installation experience, this is
the first time I have had the Velodyne HGS-15X incorporated into one of my own systems. I must say it
was an impressive display of force and finesse. If you are a die hard two-channel audiophile looking
for a subwoofer to keep up with your exotic main channel speakers, a Bassoholic addicted to huge
dynamic high impact LFE, or a custom integrator looking for a flexible solution for custom audio video
placement, the Velodyne HGS-15X is the subwoofer you need to audition.
As I conclude this review,
I am reminded of a button I picked up at the Velodyne booth at CES about 10 years ago. It simply stated
"got bass?"
My answer to this is: I do now!
The Score Card
The scoring below is based on each piece of equipment doing the duty it is designed for. The numbers are weighed heavily with respect to the individual cost of each unit, thus giving a rating roughly equal to:
Performance × Price Factor/Value = Rating
Audioholics.com note: The ratings indicated below are based on subjective listening and objective testing of the product in question. The rating scale is based on performance/value ratio. If you notice better performing products in future reviews that have lower numbers in certain areas, be aware that the value factor is most likely the culprit. Other Audioholics reviewers may rate products solely based on performance, and each reviewer has his/her own system for ratings.
Audioholics Rating Scale
 — Excellent
- — Very Good
- — Good
- — Fair
- — Poor
| Metric | Rating |
|---|---|
| Bass Extension | |
| Bass Accuracy | |
| Build Quality | |
| Ergonomics & Usability | |
| Performance | |
| Value |