
JL Audio Fathom f110 Subwoofer Review
JL Audio Fathom f110
- Product Name: f110
- Manufacturer: JL Audio
- Performance Rating:


- Value Rating:
- Review Date: October 31, 2006 08:25
- MSRP: $ 2,100(satin black) / $2,200 (gloss black)
Enclosure Type: Sealed
Driver: Single 10-inch (nominal diameter)
Frequency Response (Anechoic): 27 – 111 Hz (±1.5dB)
–3 dB at 25 Hz / 120 Hz
–10 dB at 19 Hz / 155 Hz
Effective Piston Area: 60 sq. in. / 0.0387 sq. m.
Effective Displacement: 160 cu. in. / 2.6 liters
Amplifier Power: 900 watts RMS short-term
Dimensions (H x W x D): 15.64 in x 12.92 in. x 17.27 in.
Net Weight: 67 lbs.
Cabinet Finish: High-Gloss Black or Satin Black
Pros
- Tactile response and slam defies its diminutive size
- A pair of f110s have the ability to transform your systems overall performance to new heights
- Beautifully crafted with superb fit and finish
Cons
- Premature high frequency rolloff above 80Hz
- Available only in black
- Expensive
JL Audio f110 Design Overview
 I never
forget the first really good aftermarket car audio system I heard. I’m not talking about the Godzilla bass
machines driven by pimply faced boy racers doing their best to appear cool in
hopes of finally losing their virginity to a teen girl bassaholic. I sat in my friend's car and soaked in the
crystalline highs, excellent timbre balance and tight, well controlled
bass. It wasn’t until he popped the
trunk that the JL Audio emblems of the drivers and McIntosh amplifiers were
revealed to me. While I am normally not
a car audio enthusiast, this experience made me think twice about what could be
accomplished in the confines of a car.
Years later when I heard JL Audio broke out into the home theater
business, it piqued my interest. The
Fathom f112 proved to be a top notch performer in its size and price
class. But I wanted to see what JL Audio
could do in a reasonably small and lightweight package. The Fathom f110 was born. Its size was about what I’d consider compact
enough to earn a high WAF factor, but portable for most mere mortals it was
not. With a box volume of roughly 2ft^3,
and weighing in at nearly 70lbs, it was obvious that the f110 was born of Herculean
origins. I was eager to determine if the f110s would
evoke a similar emotional response to my first experience with the brand and
thus requested a review sample. JL Audio
obliged, but insisted upon sending two which I had no problems with accepting.
I never
forget the first really good aftermarket car audio system I heard. I’m not talking about the Godzilla bass
machines driven by pimply faced boy racers doing their best to appear cool in
hopes of finally losing their virginity to a teen girl bassaholic. I sat in my friend's car and soaked in the
crystalline highs, excellent timbre balance and tight, well controlled
bass. It wasn’t until he popped the
trunk that the JL Audio emblems of the drivers and McIntosh amplifiers were
revealed to me. While I am normally not
a car audio enthusiast, this experience made me think twice about what could be
accomplished in the confines of a car.
Years later when I heard JL Audio broke out into the home theater
business, it piqued my interest. The
Fathom f112 proved to be a top notch performer in its size and price
class. But I wanted to see what JL Audio
could do in a reasonably small and lightweight package. The Fathom f110 was born. Its size was about what I’d consider compact
enough to earn a high WAF factor, but portable for most mere mortals it was
not. With a box volume of roughly 2ft^3,
and weighing in at nearly 70lbs, it was obvious that the f110 was born of Herculean
origins. I was eager to determine if the f110s would
evoke a similar emotional response to my first experience with the brand and
thus requested a review sample. JL Audio
obliged, but insisted upon sending two which I had no problems with accepting.
Design Overview
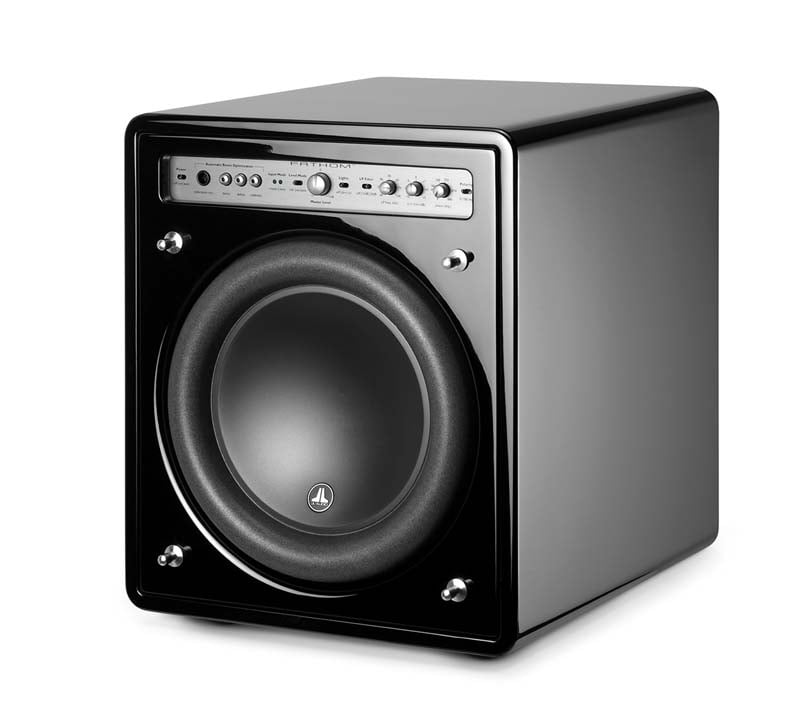
It was obvious from the moment the f110’s arrived that I had a special product on my hands. Just opening the well-packed boxed revealed this was a serious product. The f110 was of course wrapped in a sock like most audiophile products these days. JL Audio provides explicit instructions on how to properly unpack their subwoofers which I highly recommend following. They basically instruct you to remove the manual and mic calibration kit, loosen the sock and then replace the split foam packing on top of the subwoofer before turning the box upside down to get the subwoofer out. As usual, I was reluctant to read the instructions before unpacking the first sub which resulted in minor chipping of the finish towards the bottom of the cabinet when I flipped the box over on my floor. Since this sub is quite hefty, the split foam is essential for protecting the subwoofer from ground impact while unpacking it.
Once I got both f110s safely unpacked, I sat and stared in awe at their sheer beauty before continuing on.
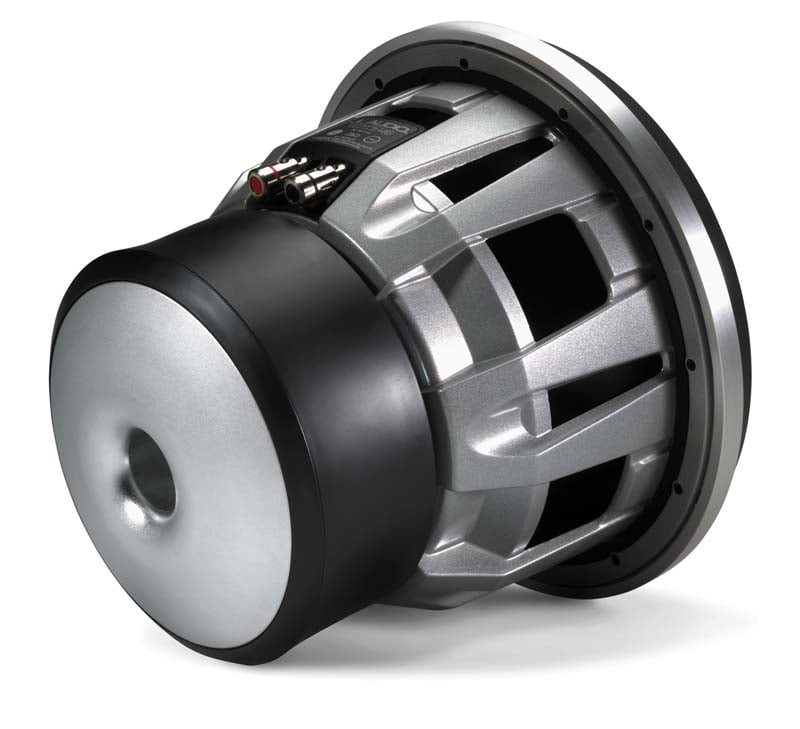
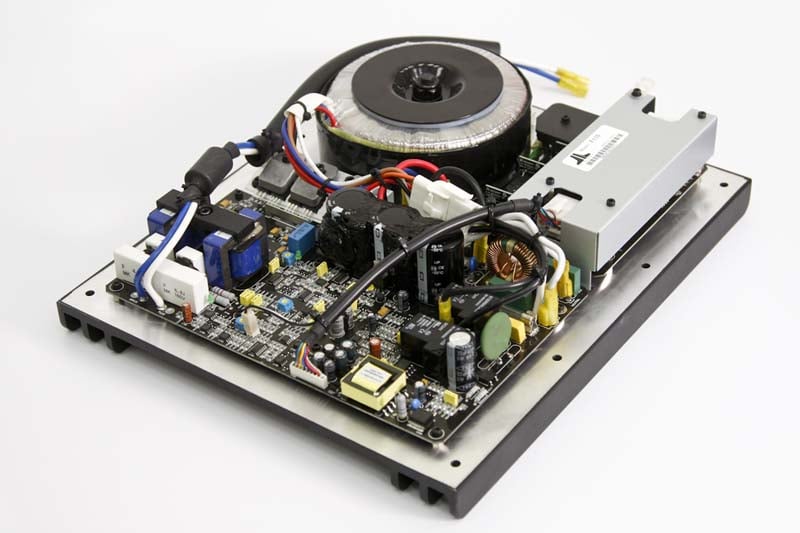
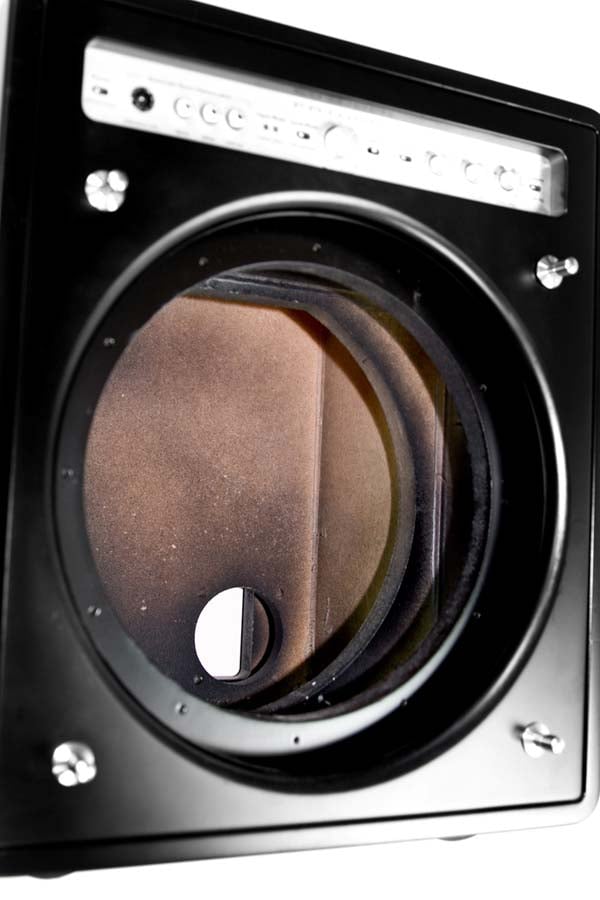
JL Audio W7 Driver (left); f110 amplifier (right)
W7 Driver
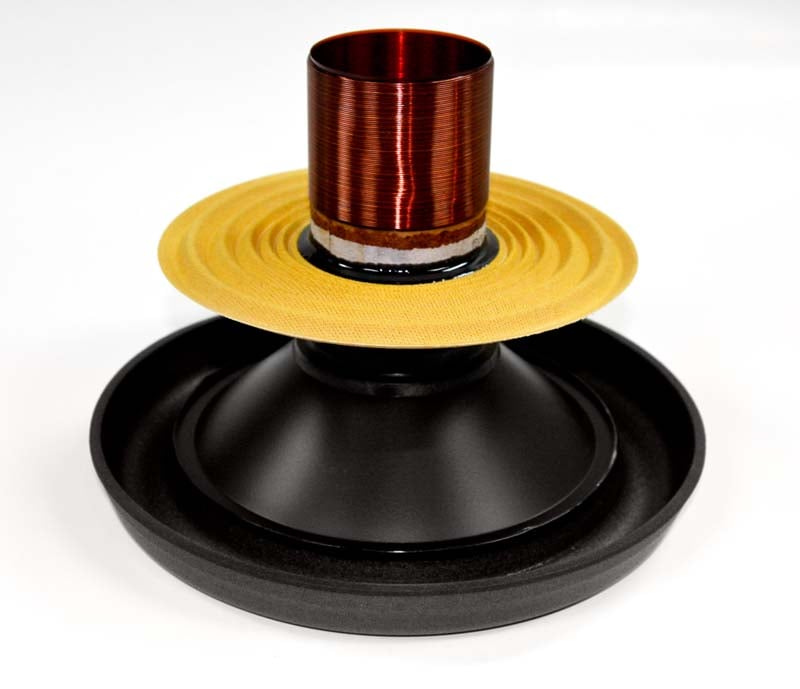 The woofer is based off their W7 platform from their
car audio drivers with a peak-to-peak excursion of over 2.5 inches. Doing a quick search online for some specs of
the W7 woofer, I discovered the retail price of this behemoth little 10” driver
is a whopping $600 which explains the highish product retail price. Peering through the f110s Operators Manual
reveals nearly a full page dedicated to all the cool patents bestowed upon this
driver. One in particular that stood out
to me was their OverRoll™ surround
which spans over the driver’s mounting flange.
JL Audio actually screws the driver into the cabinet before attaching
the removable surround. This allows the
use of a wider roll necessary to control high excursions without sacrificing
cone area. I can’t tell you how many
high excursion drivers I’ve seen touting to be 10” in diameter where they
measured less than 7” because of the thick roll surround. The JL driver is one of the few high mass
drivers that actually look like the size they claim it to be. In fact, I measured a cone diameter ¼” wider
than that of my 10” driver in my RBH T30-LSE speakers that utilize a much
thinner surround.
The woofer is based off their W7 platform from their
car audio drivers with a peak-to-peak excursion of over 2.5 inches. Doing a quick search online for some specs of
the W7 woofer, I discovered the retail price of this behemoth little 10” driver
is a whopping $600 which explains the highish product retail price. Peering through the f110s Operators Manual
reveals nearly a full page dedicated to all the cool patents bestowed upon this
driver. One in particular that stood out
to me was their OverRoll™ surround
which spans over the driver’s mounting flange.
JL Audio actually screws the driver into the cabinet before attaching
the removable surround. This allows the
use of a wider roll necessary to control high excursions without sacrificing
cone area. I can’t tell you how many
high excursion drivers I’ve seen touting to be 10” in diameter where they
measured less than 7” because of the thick roll surround. The JL driver is one of the few high mass
drivers that actually look like the size they claim it to be. In fact, I measured a cone diameter ¼” wider
than that of my 10” driver in my RBH T30-LSE speakers that utilize a much
thinner surround.
The Enclosure
 The f110 is
a sealed enclosure mated with a 900 watt switching amplifier utilizing a linear
power supply instead of a SMPS for greater headroom. Their amplifier has its own patent on its
feedback network which is said to improve damping factor for improved transient
response.
The f110 is
a sealed enclosure mated with a 900 watt switching amplifier utilizing a linear
power supply instead of a SMPS for greater headroom. Their amplifier has its own patent on its
feedback network which is said to improve damping factor for improved transient
response.
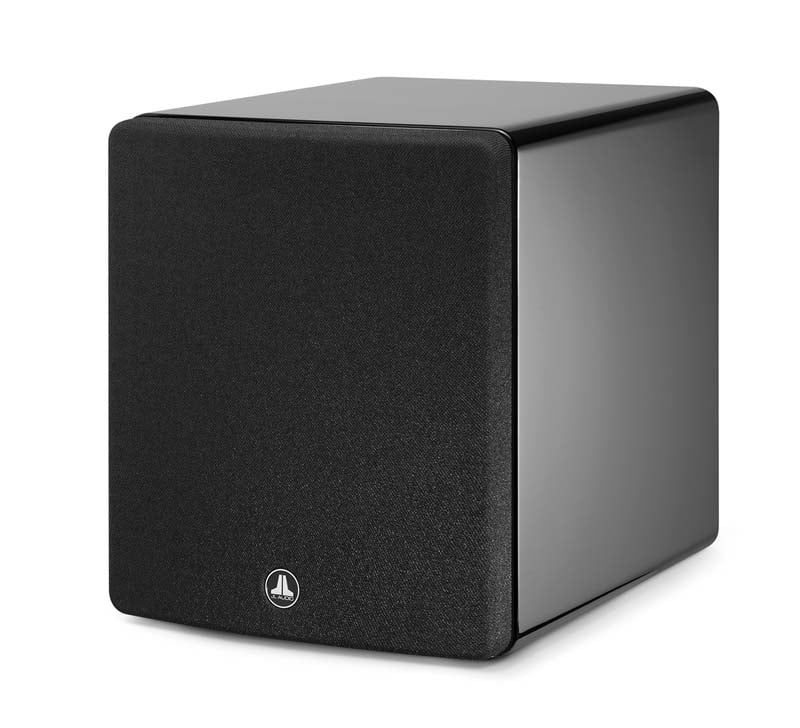
JL Audio f110 cabinet is solid, CNC-cut MDF with extensive bracing using what they proclaim to be advanced assembly techniques. I can vouch for the fact that these cabinets are well sealed based on my abusively loud SPL tests where I didn’t detect any leaks or cabinet rattles even at SPL levels exceeding the excursion limits of the driver. The radiused corners of the f110 cabinet put a nice finishing touch on the product that I wish some subwoofer companies still producing rectangular boxes would learn from. The cabinet comes in only two finishes, satin black and gloss black for a meager $100 premium. My review units came in gloss black which I’d highly recommend as they simply looked stunning in this finish.
The black cloth covered grille is formed of heavy thermoplastic mesh with recesses for steel lugs, mounted to the cabinet, for attachment. The subwoofer sits on four large, hemispherical rubber feet but has no option for carpet spikes which was a bit surprising at this price point. I’d suspect there are some customers that would prefer to swap out these stock rubber feet for some shiny silver or gold ones but they will just have to make due with the stock ones. Due to the sheer weight of the cabinet, the stock rubber feet make very good mechanical contact with the ground whether placed on a hard or carpeted surface.
The front baffle of the f110 is very clean and well laid out. The driver is neatly flush mounted with no visible screws, which really enhances its visual impact. The grill covers most of the front baffle and fits snugly enough to keep prying hands from removing it.
Features
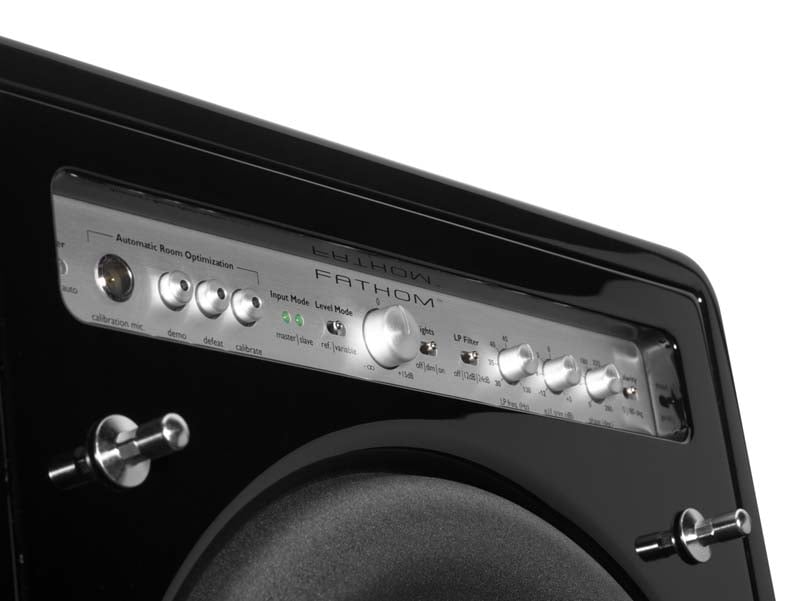 The
engineers at JL Audio must all have kids and recognize how irritating it can be
when you sit down with the wife late at night to enjoy a good flick only to be
blown out of your seat because your two year old discovered the volume knob on
the back of your sub. Unlike most
subwoofers that have all of their controls and adjustments on the back panel,
JL Audio recessed most of these on the front baffle which are only accessible
when the grill cover is removed. Front
panel controls include on/off/auto power switch, selectable 12dB and 24dB /
Octave adjustable LPF from 30Hz to 130Hz and a 0/180 degree phase switch as
well as 0-270 deg variable phase. Master
volume is selectable as variable or fixed and there is a -12dB to +3dB ELF trim
for low frequency boost or cut.
The
engineers at JL Audio must all have kids and recognize how irritating it can be
when you sit down with the wife late at night to enjoy a good flick only to be
blown out of your seat because your two year old discovered the volume knob on
the back of your sub. Unlike most
subwoofers that have all of their controls and adjustments on the back panel,
JL Audio recessed most of these on the front baffle which are only accessible
when the grill cover is removed. Front
panel controls include on/off/auto power switch, selectable 12dB and 24dB /
Octave adjustable LPF from 30Hz to 130Hz and a 0/180 degree phase switch as
well as 0-270 deg variable phase. Master
volume is selectable as variable or fixed and there is a -12dB to +3dB ELF trim
for low frequency boost or cut.
JL Audio also incorporates their own auto setup feature called ARO (Automatic Room Optimization) which operates as a multiple band PEQ to flatten bass peaks caused by room modes. Using ARO involves placing the supplied microphone at your primary seated position aimed up at the ceiling (preferably using a mic stand), hitting the calibrate button and running like hell out of the room while it runs a series of noise tests for about three minutes to optimize the subwoofer's in-room response. If you’re not happy with the results, you can hit the defeat button which illuminates red or simultaneously press and hold the “demo” and “defeat” buttons to clear out the calibration. There are 5 front panel LEDs which can be dimmed or defeated. I chose the middle setting which reduced the light output enough to not be noticed unless you really look for it.
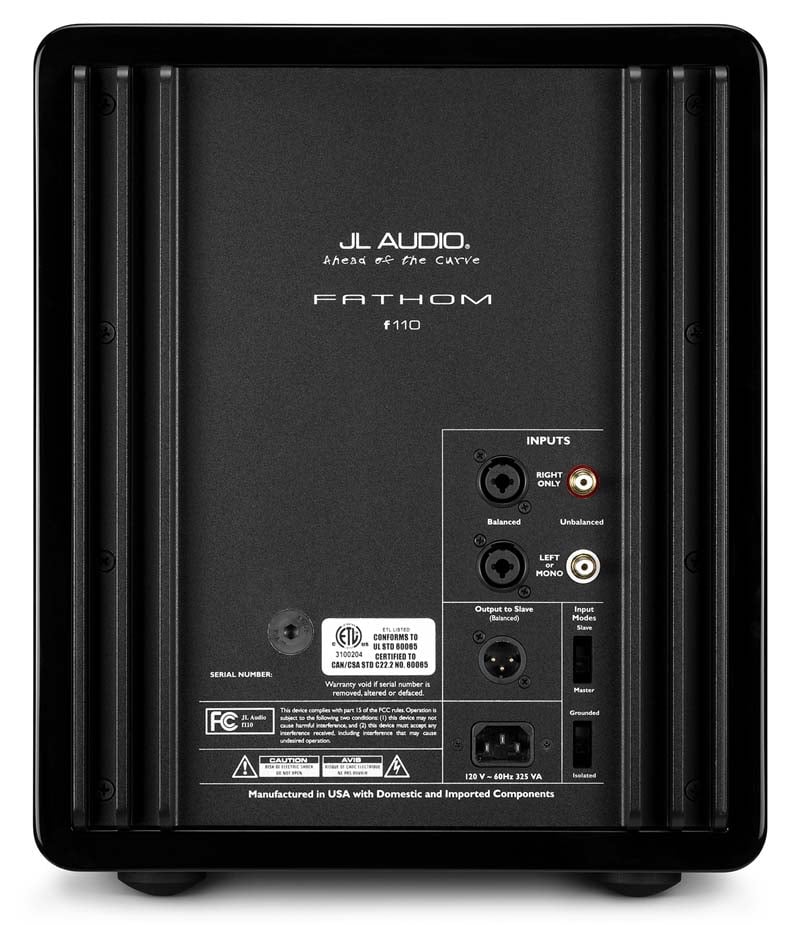
The amp plate on the back panel is flanked with heat sinks on both sides. The f110 sports Neutrik unbalanced and balanced connections and can be operated independently or as a slave to another f110. The slave mode can be useful for calibrating multiple f110s using the ARO system. There is a ground lift switch on the back panel that engages optical isolation for the RCA signal path as a countermeasure for those experiencing pesky ground loops in their system. The back panel switches are recessed making it difficult and unattractive for little prying hands to fiddle with. Notice the markings on the back panel “manufactured in the USA with domestic and imported components”. It’s nice to know some things are still being built here, especially in my own home state of Florida.
JL Audio f110 Set-Up & Installation
Before connecting the f110s to my system, I took them outdoors and conducted 1 meter groundplane measurements. I found one of my f110s exhibited excessive cabinet noise below 40Hz at high SPL levels. When I took it inside to test on my A/V system, I found at times the sub would simply oscillate out of control with no input signal. I immediately informed JL Audio of my findings and they not only decisively replaced that defective subwoofer but they insisted upon building me up two brand new ones. I received the second set of subwoofers less than one week later both of which operated flawlessly in my testing.
 Moving the f110s around my family room was a bit of a
chore for me. Despite their manageable
physical size, they were quite heavy as I mentioned earlier. Before placing the f110s into the most
practical and useful positions in my room, I referenced their user manual and
was pleasantly surprised to find some very solid recommendations not only for
placing one sub but multiple ones as well.
They show you a chart for placing a single sub in a corner and how
moving it slightly away from corner placement will yield smoother sound. They also show that the ideal listening
position is around 1/3rd of the total room length away from the back
wall. JL Audio proceeds to expend a full
two pages with illustrations on the most ideal locations for placing up to four
subwoofers in a room. Their preference for placing two subs favors the front of
the room near the main speakers which I can certainly understand as it does
have its advantages especially when running stereo subs. This allows you to set
a higher crossover point without being concerned about localization issues and
thus achieving a more seamless blend and potentially higher impact. In my family room, I have two prewired spots
for subwoofers which are diagonally located front left behind my couch and back
right near my potted plant in my room as per my illustration. This is also incidentally a recommended
placement from the JL Audio user manual as well as our recommended placement
suggestions in our article “Multi Subwoofer Connection Guide”.
Moving the f110s around my family room was a bit of a
chore for me. Despite their manageable
physical size, they were quite heavy as I mentioned earlier. Before placing the f110s into the most
practical and useful positions in my room, I referenced their user manual and
was pleasantly surprised to find some very solid recommendations not only for
placing one sub but multiple ones as well.
They show you a chart for placing a single sub in a corner and how
moving it slightly away from corner placement will yield smoother sound. They also show that the ideal listening
position is around 1/3rd of the total room length away from the back
wall. JL Audio proceeds to expend a full
two pages with illustrations on the most ideal locations for placing up to four
subwoofers in a room. Their preference for placing two subs favors the front of
the room near the main speakers which I can certainly understand as it does
have its advantages especially when running stereo subs. This allows you to set
a higher crossover point without being concerned about localization issues and
thus achieving a more seamless blend and potentially higher impact. In my family room, I have two prewired spots
for subwoofers which are diagonally located front left behind my couch and back
right near my potted plant in my room as per my illustration. This is also incidentally a recommended
placement from the JL Audio user manual as well as our recommended placement
suggestions in our article “Multi Subwoofer Connection Guide”.
Calibration
I proceeded
to calibrate and level match each subwoofer independently by using all of the
options such as variable phase, adjustable and LPF settings. I achieved the best integration with the LPF
on both subs defeated and the variable phase set to zero degrees. Since both of the subs were equidistant from
my primary listening seat and my RX-Z7 only has one subwoofer output, I used a
Cables-to-Go Y-splitter to connect both of them and set the subwoofer distance
to the average distance of both subwoofers.
Incidentally, JL Audio recommends you dial in the subs as best as
possible before engaging ARO or any external room correction device and I am in
much agreement on that point. Using the
supplied mic positioned at my primary listening seat, I calibrated each sub
independently using the ARO system and plotted the results below using LMS.
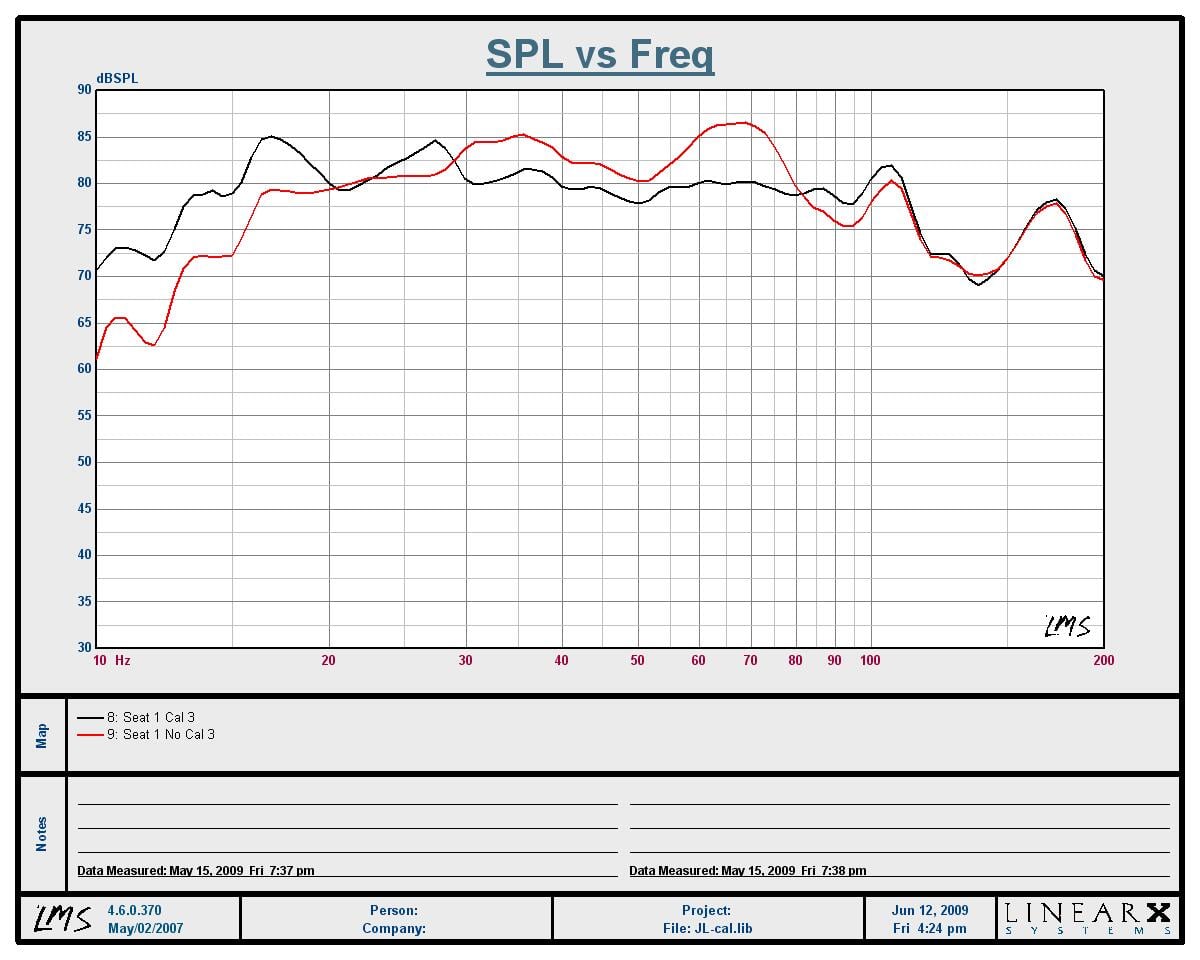
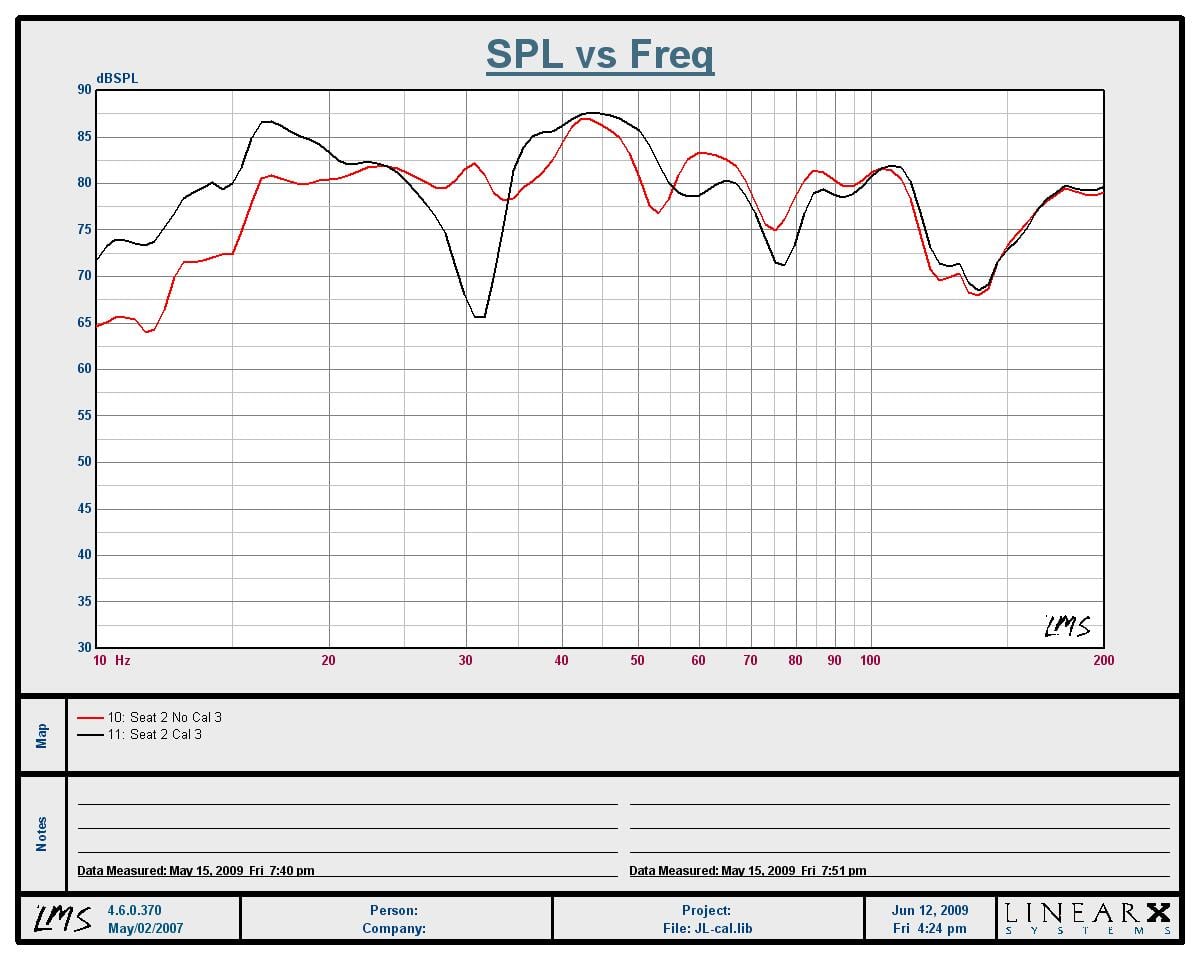
In-room measurements with (black) and without (red) ARO calibration (1/12th octave smoothed)
ARO seemed to produce measurably favorable results at the primary listening position where I placed the JL Audio calibration mic maintaining a +-5dB response from 12Hz to 100Hz. These results were quite encouraging until I measured the secondary seat where my mother-in-law often sits (left side couch near the end table). ARO caused a 15dB suckout centered at 32Hz with a Q of about 3.6.
I tried a variety of alternative ARO setups including moving the calibration point to this seat and even midpoint between the two primary seats, as well as only calibrating one sub with ARO. The end results were either worse at that seat or at my primary listening seat. Unfortunately ARO is limited to a single point calibration unlike some of the more advanced systems out there like Audyssey.
I conducted extensive listening tests with and without ARO enabled and found it did tighten things up a bit at the primary listening seat but some bass impact was lost, especially at the other listening areas. As a result, unless otherwise stated, my listening tests were conducted with ARO defeated. My advice here is to experiment with using ARO. At the very minimum it’s a tool to add to your bag of tricks to help you tweak out the best possible sound. As with all room correction systems, results will vary depending on your room and placement conditions.
Editorial Note on Auto Calibration Systems
Having ARO define the response for both subs instead of independently would have likely yielded better results. This can be accomplished by wiring the two f110s in series and setting the secondary sub to “slave” mode. If you experience similar performance trade offs as I did using ARO, this may be worth a try assuming you can accommodate connecting the two subs in this fashion.
Reference Equipment (Showcase Home Family Room)
I used the
Yamaha RX-Z7 as the A/V receiver with Blue Jeans Cable 1694 Coax cable fed to each f110
and their 10AWG speaker cables for all of my speakers. The Denon DVD-2930CI was the source and I
utilized the RBH Signature SE/R series speaker package with MC-615 in-ceiling
speakers for the back channels for a full fledged 7.2 system. Most of my listening tests were conducted in
either discrete 5.1 multi-channel (ie. DTS, DVD-A) or via Pro Logic IIx Music Mode for two-channel sources such as CD’s or Net radio.
JL Audio f110 Listening Tests
CD: Donald Fagen - Morph the Cat
 This isn’t my favorite Donald Fagen CD, but it does
contain a lot of deep bass info which is exactly what I was looking for to warm
up the f110s for my listening tests. Track
#1 “Morph the Cat” started right out the gate with some heavy hitting bass
guitar and bass drums that rattled my walls and let me know the f110s are awake
and ready to play. I moved around my
listening area and was pleasantly surprised to find the bass wasn’t boomy even
when sitting on the left couch a few feet from where I placed the front
f110. Track #2 “H Gang” is probably my
favorite track on the disc. It’s got a
cool funky beat mated with memorable harmonizing lyrics that you simply can’t
get out of your head after hearing a few times.
The bass produced by the f110s was both articulate and clean, sounding
better as the volume was pumped up.
Track #3 “What I Do” had my couch shaking which really enhanced the
enjoyment of the track for me. Using a
pair of f110s located diagonally across my room produced an excellent virtual
sub image which tricked my brain into thinking the bass was coming from my front channels and not two discrete locations
away from them.
This isn’t my favorite Donald Fagen CD, but it does
contain a lot of deep bass info which is exactly what I was looking for to warm
up the f110s for my listening tests. Track
#1 “Morph the Cat” started right out the gate with some heavy hitting bass
guitar and bass drums that rattled my walls and let me know the f110s are awake
and ready to play. I moved around my
listening area and was pleasantly surprised to find the bass wasn’t boomy even
when sitting on the left couch a few feet from where I placed the front
f110. Track #2 “H Gang” is probably my
favorite track on the disc. It’s got a
cool funky beat mated with memorable harmonizing lyrics that you simply can’t
get out of your head after hearing a few times.
The bass produced by the f110s was both articulate and clean, sounding
better as the volume was pumped up.
Track #3 “What I Do” had my couch shaking which really enhanced the
enjoyment of the track for me. Using a
pair of f110s located diagonally across my room produced an excellent virtual
sub image which tricked my brain into thinking the bass was coming from my front channels and not two discrete locations
away from them.
Miscellaneous CD’s
I ran through a gamut of CD’s during my listening sessions and took notes on the stuff that stood out the most to me. I spent a good deal of time listening to a few tracks on an Usher Audio Demo CD sampler that was handed to me at the CES trade show a couple of years back. The f110 was able to deliver good transient bass response without sounding muddy on track #6, “Don Juan”, though not as detailed or snappy as I’ve heard on my reference tower speakers that don’t utilize a crossover on the bass drivers and rely on the natural roll off of the driver themselves as the LPF function.
Next up was a CD I haven’t played in quite some time from Manheim Steamroller called Fresh Aire 7. Track #5 “The Seven Metals of Alchemy” has some insanely low end bass drops throughout the song that you will hear and feel if played back on a good system with excellent bass extension. The f110s seemed to really enjoy playing this song and strutting their stuff. I enjoyed the following seven tracks that individually dealt with the seven chakras of the body producing vibrantly low and sustained bass tones to stimulate the body and mind.
 I threw on some bass-heavy techno type music from the
likes of Depeche Mode and Roger Powell.
“Only When I Lose Myself” is one of those Depeche Mode mixes that they
brilliantly spin a CD off the hit single with remix options some of which work
while others don’t. The “Gus Gus
Longplay” is pretty trick so I went with that.
The bass in this song is extremely deep and highly distorted. On most systems it sounds like mud and will
easily send wimpy woofers on a trip past their excursion limitations. I was expecting the JL f110s to handle this
track without any issues and they didn’t disappoint. The bass was prominent and about as stress-free
as I’ve heard on some of the best subwoofers we’ve tested. I moved on to one of my favorite CH hit
singles from Depeche Mode when I was in High School “Enjoy the Silence”. Track #4 “Enjoy the Silence (Bass Line)” got
my chest thumping once the high energy bass line kicked in. Listening to this track at house shaking
volume levels was an oxymoron based on the title and lyrics and I am sure my
neighbors “enjoyed the silence” when
I was done testing these subs.
I threw on some bass-heavy techno type music from the
likes of Depeche Mode and Roger Powell.
“Only When I Lose Myself” is one of those Depeche Mode mixes that they
brilliantly spin a CD off the hit single with remix options some of which work
while others don’t. The “Gus Gus
Longplay” is pretty trick so I went with that.
The bass in this song is extremely deep and highly distorted. On most systems it sounds like mud and will
easily send wimpy woofers on a trip past their excursion limitations. I was expecting the JL f110s to handle this
track without any issues and they didn’t disappoint. The bass was prominent and about as stress-free
as I’ve heard on some of the best subwoofers we’ve tested. I moved on to one of my favorite CH hit
singles from Depeche Mode when I was in High School “Enjoy the Silence”. Track #4 “Enjoy the Silence (Bass Line)” got
my chest thumping once the high energy bass line kicked in. Listening to this track at house shaking
volume levels was an oxymoron based on the title and lyrics and I am sure my
neighbors “enjoyed the silence” when
I was done testing these subs.
SACD: Patricia Barber – Modern Cool & Nightclub
 I always like to throw in some of the fabulously
recorded SACD discs from Patricia Barber by Premonition Records. Track # 7 “Company” from Modern Cool is a really hip tune with a killer drum solo towards
the middle of the song. The f110s seemed
to play this track a bit heavy on the low end but still maintaining good tonal
quality and clarity in the bass drum. As
I turned the volume higher, the integration between my front speakers and the
subs seemed to blend in even better. The
f110s did a great job of convincing me into thinking the bass player in Track
#6 “Alfie” from Nightclub was sitting
in my family room playing a live event.
I enjoyed engaging the Jazz DSP modes in my Yamaha RX-Z7 for this track
as it provided the rich ambient reverberation of a small jazz club to compliment
the very tactile and surreal bass I was hearing.
I always like to throw in some of the fabulously
recorded SACD discs from Patricia Barber by Premonition Records. Track # 7 “Company” from Modern Cool is a really hip tune with a killer drum solo towards
the middle of the song. The f110s seemed
to play this track a bit heavy on the low end but still maintaining good tonal
quality and clarity in the bass drum. As
I turned the volume higher, the integration between my front speakers and the
subs seemed to blend in even better. The
f110s did a great job of convincing me into thinking the bass player in Track
#6 “Alfie” from Nightclub was sitting
in my family room playing a live event.
I enjoyed engaging the Jazz DSP modes in my Yamaha RX-Z7 for this track
as it provided the rich ambient reverberation of a small jazz club to compliment
the very tactile and surreal bass I was hearing.
DVD-A: Blue Man Group – Complex
 This is a great disc that I’ve shelved for quite some
time. It was time to dust off the
cobwebs and introduce the Blue Men to a pair of f110s. I started off with the disc configured for
the DVD-A soundtrack opening with track#1
“Above”. My RBH speaker system
integrated quite well with the pair of f110s giving me the illusion that the
bass was being projected from the main speakers. Track #2 “Time to Start” showed off the
weight of the bass drops when the f110s were handling bass duties. The section of the song where the heavy
percussions are dominant sounded wonderfully dynamic and deep when played at
very high levels (above 100dB). I don’t
condone listening at these levels but, hey I do it for the benefit of our
readers to ensure the products can handle real world torture tests.
This is a great disc that I’ve shelved for quite some
time. It was time to dust off the
cobwebs and introduce the Blue Men to a pair of f110s. I started off with the disc configured for
the DVD-A soundtrack opening with track#1
“Above”. My RBH speaker system
integrated quite well with the pair of f110s giving me the illusion that the
bass was being projected from the main speakers. Track #2 “Time to Start” showed off the
weight of the bass drops when the f110s were handling bass duties. The section of the song where the heavy
percussions are dominant sounded wonderfully dynamic and deep when played at
very high levels (above 100dB). I don’t
condone listening at these levels but, hey I do it for the benefit of our
readers to ensure the products can handle real world torture tests.
I switched over to the DTS 96/24 sound track via the DVD video portion of the disc to listen and watch “Sing Along” with Dave Matthews on vocals. I don’t know if it’s because of the visual impact or not biasing my judgment, but I subjectively feel the DTS version of this song sound better than the DVD-A version. The percussion section was delivered with aplomb as I was enveloped in the whipping sounds all around me. This track is so stunning both in terms of its audio and video that it’s a must demo to your guests that never experienced a really good surround playback system in a home environment. I finished off this demo with the “Drum Breakdown” (drum mix) track. This track shook me to my core with the percussive extravaganza that the Blue Man Group is known for. I had to lower the bass levels a bit as I found it a bit overpowering
DTS DVD: LTJ Bukem - Planet Earth I’m not
sure where i acquired this disc but it was sitting in my collection for over a
year until I decided to finally give it a whirl. Boy was I pleasantly surprised. After a short listening session I’ve begun to
realize this is one of the most bass intense multi-channel recordings I’ve ever heard. In fact, paired with the right subs, I’d say
listening this disc at reference levels would be a good homeopathic cure for
mild constipation. The multi-channel portion of this disc is recorded
in DTS ES and will work out your subs via an awesome array of funky beats,
riffs, mashes and slams. The bass lines
in track #1 “Makoto” were quite intoxicating.
The JL f110s were the guest of honor for track #2 “K-scope” which was
had spy like overtones layered in deep textured bass. There was a party in my ears and JL Audio was
invited. The bass had my heart pumping
and I’d heed a serious warning to anyone with a pacemaker to proceed with
caution. Track #7”Words 2B Heard” has
exceedingly low bass response that went unnoticed when I played this track on
my computer speakers to recall the tune while writing this review. The f110s displayed superb control during the
long bass transients demonstrating that their amplifiers had plenty of headroom,
thanks to the large linear supply, and the woofers had ample travel to deliver
clean sustained bass. This was
especially true for track #11 “Suspended Space” which sounded a lot like
Tubular Bells with an injection of Red Bull on the low end. Track #8 “Love Is” is a jazzy tune with gobs
of bass that sounded absolutely wonderful on my system thanks to the addition
of the two f110s. It was clear to me
that the f110s brought my family room reference system to new heights or, more
accurately stated, new lows that had
I’m not
sure where i acquired this disc but it was sitting in my collection for over a
year until I decided to finally give it a whirl. Boy was I pleasantly surprised. After a short listening session I’ve begun to
realize this is one of the most bass intense multi-channel recordings I’ve ever heard. In fact, paired with the right subs, I’d say
listening this disc at reference levels would be a good homeopathic cure for
mild constipation. The multi-channel portion of this disc is recorded
in DTS ES and will work out your subs via an awesome array of funky beats,
riffs, mashes and slams. The bass lines
in track #1 “Makoto” were quite intoxicating.
The JL f110s were the guest of honor for track #2 “K-scope” which was
had spy like overtones layered in deep textured bass. There was a party in my ears and JL Audio was
invited. The bass had my heart pumping
and I’d heed a serious warning to anyone with a pacemaker to proceed with
caution. Track #7”Words 2B Heard” has
exceedingly low bass response that went unnoticed when I played this track on
my computer speakers to recall the tune while writing this review. The f110s displayed superb control during the
long bass transients demonstrating that their amplifiers had plenty of headroom,
thanks to the large linear supply, and the woofers had ample travel to deliver
clean sustained bass. This was
especially true for track #11 “Suspended Space” which sounded a lot like
Tubular Bells with an injection of Red Bull on the low end. Track #8 “Love Is” is a jazzy tune with gobs
of bass that sounded absolutely wonderful on my system thanks to the addition
of the two f110s. It was clear to me
that the f110s brought my family room reference system to new heights or, more
accurately stated, new lows that had  previously been unachieved using a single
larger, or smaller dual subwoofers.
previously been unachieved using a single
larger, or smaller dual subwoofers.
Movies
I tend to favor music over movies when reviewing equipment but I did throw in a variety of movies ranging from the opening scenes of Star Wars Episode I Phantom Menace to Wall-E (yes I have kids, but it’s a very cool movie). Whether I was battling Sith lords or destroying Borg vessels, the dual f110s insured I was hearing every explosion and bone crushing scene to its fullest potential. The f110s produced so much tactile energy with the ship landing in Wall-E for example that it felt as if my chairs were armed with motion actuators. The JL Audio subs were avid movie goers providing a dimension of depth and slam to my system that persuaded me to watch more movies on it than I’d ordinarily do otherwise.
JL Audio f110 Measurements & Analysis
I moved the f110s outdoors to conduct some 1 meter groundplane measurements. I tested extension vs SPL by varying the input drive until I heard any audible distortion emanating from the sub.
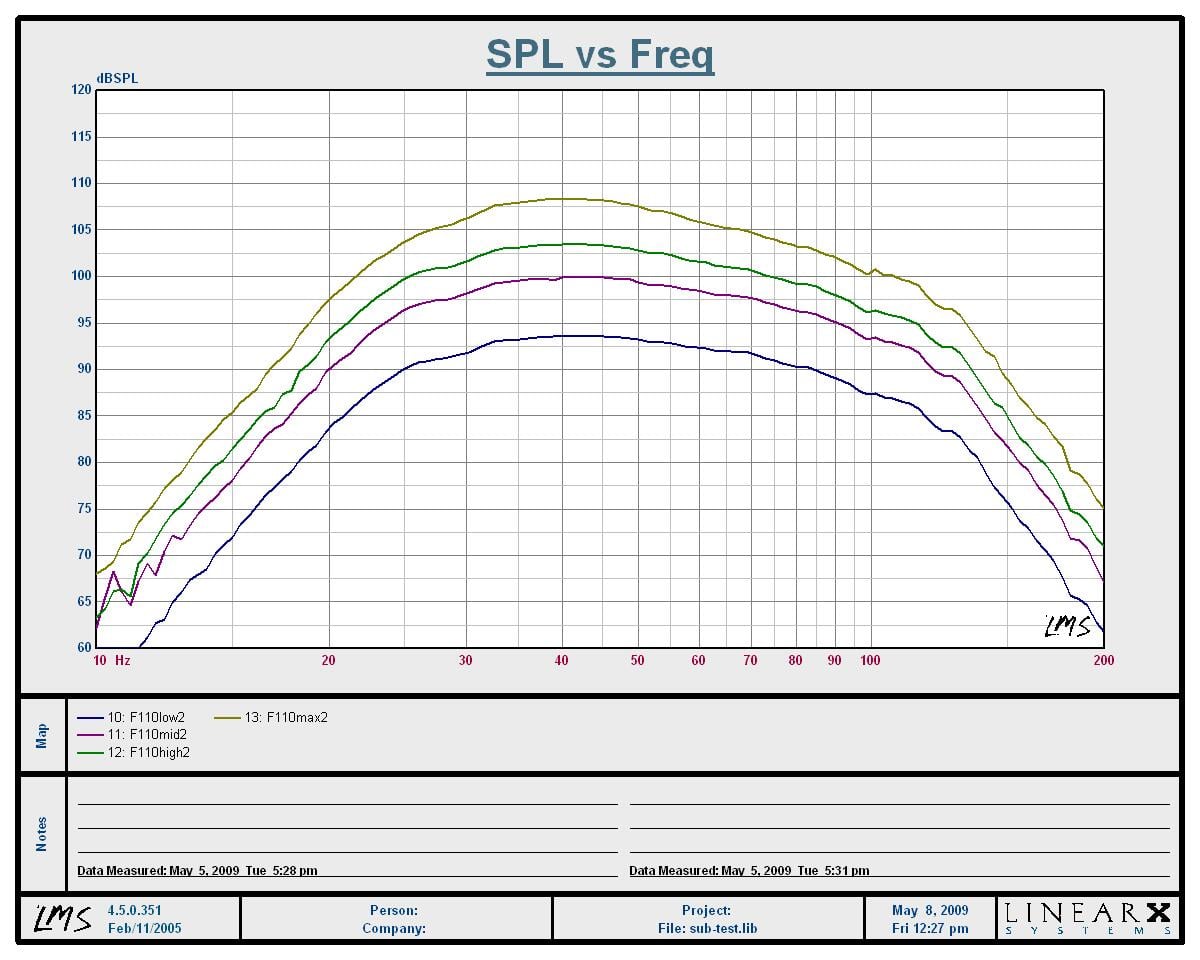

Fathom f110 (left graph); Axiom EP400 (right graph)
1 meter Groundplane measurement (no smoothing)
The output was very clean for the “low2”, “mid2” and “high2” traces with a slight hint of audible woofer strain below 30Hz for the “high2” trace. I didn’t detect any cabinet noise or leaks during my testing. I bumped the input level up a bit more for the “max” trace to see how much usable output I could achieve and found the f110 remained very clean until it swept below 30Hz. At that point the woofer was simply trying to play beyond its excursion limits. -3dB point appeared to be around 25Hz with a fairly steep (but expected for a sealed design) roll off of about 25dB per octave below that. Many DSP controlled subs tend to inject a brickwall filter right below the -3dB point such as the Axiom EP400. While this is certainly a valid design approach, especially for small drivers, I prefer the more gradual roll off that JL Audio employed on their f110. In my opinion it’s important to not simply discard low frequency bass info as a natural roll off below the -3dB point tends to improve tactile response. Inserting a brickwall HPF can result in negative temporal consequences of the signal in the range where our hearing is most sensitive to phase.
For comparative purposes, I pulled some measurements under the same test conditions for my Axiom EP400s. As you can see in the graphs, the f110 has considerably more output than the Axiom EP400 (+6dB more below 30Hz and between 10-14dB in the 40-80Hz range), but the EP400 exhibits flatter response above 30Hz than the f110 all the way out to 120Hz. Considering that the f110 has a bigger driver (10” vs 8”), larger enclosure, and is nearly double the price, it indicates that the EP400 is quite a potent little subwoofer.
I found it a bit puzzling that the f110 exhibited around -5dB of rolloff at 100Hz despite I had the LPF on the subwoofer disabled. This was especially vexing since the f112 measured flat to 100Hz in our testing which utilizes a larger driver. This measurement anomaly seemed to contradict the JL Audio -3dB at 120Hz published specification. Above 80Hz the f110 exhibited an 18dB/octave rolloff. When I questioned JL Audio engineering on this they said it was deliberate as the sub simply sounds better and plays cleaner by introducing this roll off. Using a high mass driver (with a large, high inductive voice coil) like the W7 JL Audio employed here, its understandable why. I personally feel the part of the reason why some subwoofers tend to sound “faster” is related to its output above 80Hz and how it preserves the harmonic content of the bass frequencies. Because of this issue, I deducted ½ point from my final performance rating for this product. It is a good idea to experiment with the crossover in your A/V receiver / processor by setting it higher than 80Hz and/or possibly defeating it, especially when placing two f110s as a stereo pair configuration near your front main channels like JL Audio recommends.
Editorial Note on f110 Bandwidth from Brett Hanes (JL Audio Senior Research Engineer)
While the baseline response above 80 Hz is somewhat rolled off compared to other subs you’ve tested, the ARO Calibration will significantly alter this condition. To elaborate on this point, listeners usually set the sub level according to its mid-band response (50-70 Hz). When this level gets pulled down by the ARO due to room-mode involvement (pretty common), the subsequent automatic level compensation will adjust for a similar mid-band level as before. Since the mid-band was cut by the system, this will bring up the "tails," effectively extending the sub's bandwidth. This can be seen in your own "with and without" ARO plots in the review and is always quite evident when you measure the subs by themselves after Calibration.
Our survey of dealers, installers and end-users indicates that the vast majority use our ARO feature, and they feel it improves performance dramatically. Calibration results in a substantial modification of the baseline response and produces an effective bandwidth extension. As a result, this can enhance the usability of the F110s with smallish satellite speaker systems. They will perform very well together in most room circumstances.
Since I don’t yet have the ability to accurately measure distortion vs SPL on my test gear, I asked JL Audio to provide me their data which is tabulated below. Also attached via a PDF file is their SPL vs distortion data plotted in MATLAB.
| Frequency | Vinput for SPLmax (dBV) | Vinput (volts RMS) | SPLmax (RMS) | THD @ SPLmax (%) | SPL RMS (10%) |
| 25 | -12.5 | 0.237 | 101.032 | 19.15 | 93.954 |
| 30 | -11.5 | 0.266 | 104.77 | 15.15 | 98.8 |
| 40 | -7 | 0.447 | 110.7 | 12.18 | 108.1 |
| 50 | -2 | 0.794 | 115.63 | 11.43 | 114.79 |
| 60 | 0 | 1.000 | 116.23 | 5.66 | N/A |
| 70 | 0.5 | 1.059 | 115.64 | 4.08 | N/A |
| 80 | 0.5 | 1.059 | 114.62 | 5.2 | N/A |
Max SPL vs Distortion Tests
Tested by Brett Hanes & Eric Krumme
The 1 meter ground plane signal amplitude is equivalent to a 1 meter, half space (2pi) test.
If you look at their data at 25Hz, you will see they measured 101dB max SPL and about 94dB at 10% THD which coincides closely with my “max2” and “med2” SPL plots, respectively. At higher SPL levels below 30Hz is where I started to hear woofer straining mostly because the W7 woofer reached its excursion limits. 10% THD is an industry standard threshold for measuring subwoofer distortion. While this limit can be audible with continuous sine wave sweeps, it is likely not audible with real program material. Above 25Hz, JL Audio reports much higher SPL #s than I measured. The reason for this is my sweeps were conducted at a constant input level across the entire bandwidth whereas JL Audio conducted discrete max SPL tests per frequency tested by varying the input level until they measured 10% distortion. This is a much more accurate way of testing max SPL as the frequency sweep tests I conducted are limited to the subwoofers low end output capability which rolls off drastically on the f110 below 30Hz. In the future I will add this test methodology to my reviews once my Audio Precision APx585 analyzer is upgraded to measure loudspeaker distortion.
Noise Leakage Test
When I ran low frequency sweeps from 300Hz down to 20Hz up to levels causing the f110 woofer to reach its excursion limits. At all power levels, I didn’t detect and leakage noise or cabinet rattling which is a tribute to how well put together this product is.
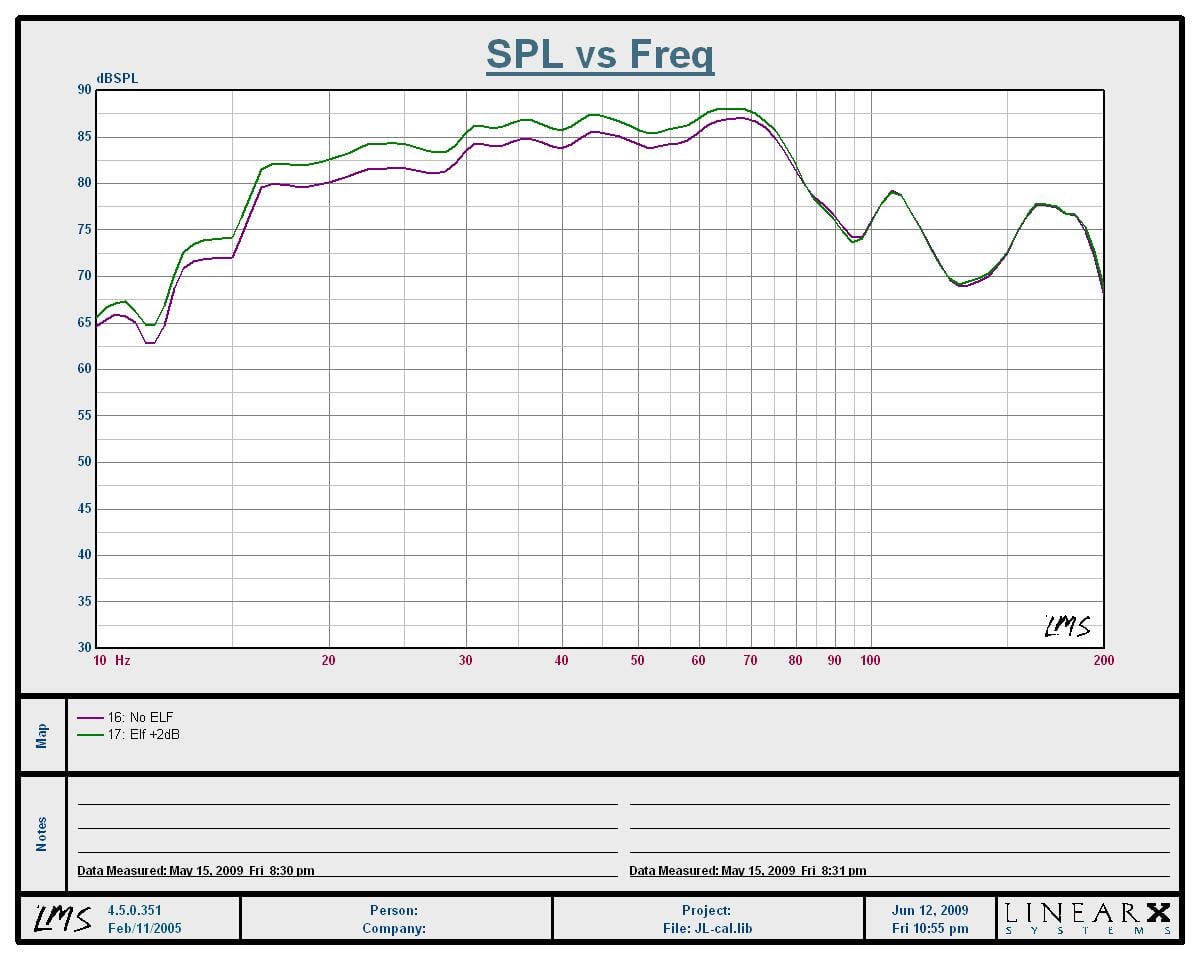
f110 with (green) and without (purple) E.L.F. boost
The f110 has an adjustable boost (+3dB) /cut (-12dB) feature centered at 28Hz which they refer to as E.L.F.(Extreme Low Frequency trim,; not to be confused with subwoofer manufacturer Bag End whom uses a similar name for their version and to my knowledge was the first to call it such). As you can see in the graph, with an ELF boost of +2dB the entire output did go with, especially below 28Hz as claimed by JL Audio. This is a useful feature to tame bass modes which are a common occurrence in that frequency range, especially when sitting near a back wall. It’s also equally useful for giving your low end a little boost if needed especially when dealing with anemically bass challenged music content or fighting non ideal subwoofer placement in your theater room.
JL Audio f110 Recommendations & Conclusion
 The JL Audio Fathom f110s operated virtually flawlessly for all of my
tests. The only minor issue I noted was
the triggered on feature seemed to be set a bit too sensitively. A simple power spike, fan switch toggle or
sneeze seemed to engage the power on the f110s immediately. There were times during the middle of the
night that I’d walk into the kitchen to get a late night snack and find one or
both f110s on for no apparent reason other than they were, like myself,
restless and eager to play.
The JL Audio Fathom f110s operated virtually flawlessly for all of my
tests. The only minor issue I noted was
the triggered on feature seemed to be set a bit too sensitively. A simple power spike, fan switch toggle or
sneeze seemed to engage the power on the f110s immediately. There were times during the middle of the
night that I’d walk into the kitchen to get a late night snack and find one or
both f110s on for no apparent reason other than they were, like myself,
restless and eager to play.
As with all high mass subwoofers drivers I’ve listened too, there were times I felt the f110s didn’t quite articulate the upper bass region as well as I heard on my tower speakers or other subwoofers. But, this was a deliberate trade-off for the output and extension they were producing for their given size which blew every other subwoofer with similar footprints out of the water we’ve had in our test labs.
Because of the rather sharp roll-off the f110s exhibit above 80Hz, I’d highly recommend choosing your main speakers wisely. The f110s are not an ideal solution for very small, bass deficient satellite speakers. Of course at this price, it is doubtful a consumer would be using such speakers in a system with these subwoofers but I’ve seen stranger things before. I agree with the JL Audio mantra of dual subs are better than one. In this case it not only produced a more seamless blend with my speakers but it also provided the necessary output to fill my largish family room which opens to my kitchen making that room challenging to fill with deep tactile bass.
I’d proceed
with caution when using ARO as I found its usefulness limited to only the primary
seated position. It’s a shame that at
this price JL Audio didn’t offer a multi-point correction scheme or an
adjustable EQ system for better fine tuning for the experienced installer. I was also a bit surprised to find the
adjustable interface of the f110s to be all push button unlike the much older
but slicker computer drive Velodyne DD series.
Still, the f110s come with a wide selection of adjustable options to
help the installer better integrate this product to your system.
Conclusion
 The JL Audio Fathom f110s may be small in size, but they are
not lacking in the performance department.
While there are certainly much larger subs than the f110s at the same
price or less, you will be hard pressed to find all of the performance
attributes the f110 has to offer in such a compact box. Not once did I find the f110s output lacking as
they were always able to rattle my walls and shake my couches when the source
material required it.
The JL Audio Fathom f110s may be small in size, but they are
not lacking in the performance department.
While there are certainly much larger subs than the f110s at the same
price or less, you will be hard pressed to find all of the performance
attributes the f110 has to offer in such a compact box. Not once did I find the f110s output lacking as
they were always able to rattle my walls and shake my couches when the source
material required it.
For those looking for small but potent subwoofer that looks as good as it sounds and can swing the rather hefty budget to own one, I’d suggest saving your dollars and getting two. A pair of Fathom f110s can be transform the fidelity of your system by providing the depth and slam and uniformity in bass response across all of your listening seats that would not be achieved by lesser designed subs or even a well engineered single subwoofer solution.
The f110s are small enough to tuck behind a couch or leave near a sidewall or corner without being obtrusive. I normally don’t say this about A/V gear, but the f110s have a lot of sex appeal. They look wonderful out in the open, and believe me, you will want to show them off to your audiophile friends or bassaholic girlfriends. It’s clear to me that JL Audio is as serious about high fidelity in the home environment as they have been in mobile audio since their inception. Bassaholics rejoice as JL Audio has produced a reference level product that will thump, and thump well, without requiring a refrigerator sized box that you neither have the space nor the accepting wife to accommodate.
JL Audio Fathom f110
MSRP: $2,100(satin black) / $2,200
(gloss black)
http://www.jlaudio.com
JL Audio, Inc.
10369 North Commerce Pkwy.
Miramar, FL 33025-3962, USA
Phone: 954.443.1100
About JL Audio
Founded in 1975 in Miramar, Florida, JL Audio is a privately held American company manufacturing high-end audio solutions for home audio, mobile and marine applications. JL Audio products are sold exclusively by specialty retailers throughout the U.S.A. and distributed in fifty-eight countries around the world. JL Audio loudspeakers, amplifiers and subwoofers incorporate technologies that have been awarded fourteen U.S. patents.
The Score Card
The scoring below is based on each piece of equipment doing the duty it is designed for. The numbers are weighed heavily with respect to the individual cost of each unit, thus giving a rating roughly equal to:
Performance × Price Factor/Value = Rating
Audioholics.com note: The ratings indicated below are based on subjective listening and objective testing of the product in question. The rating scale is based on performance/value ratio. If you notice better performing products in future reviews that have lower numbers in certain areas, be aware that the value factor is most likely the culprit. Other Audioholics reviewers may rate products solely based on performance, and each reviewer has his/her own system for ratings.
Audioholics Rating Scale
 — Excellent
- — Very Good
- — Good
- — Fair
- — Poor
| Metric | Rating |
|---|---|
| Bass Extension | |
| Bass Accuracy | |
| Build Quality | |
| EQ System | |
| Fit and Finish | |
| Ergonomics & Usability | |
| Features | |
| Performance | |
| Value |
Gene manages this organization, establishes relations with manufacturers and keeps Audioholics a well oiled machine. His goal is to educate about home theater and develop more standards in the industry to eliminate consumer confusion clouded by industry snake oil.
View full profile