
Yamaha YSP-4000 Digital Sound Projector Review
Yamaha YSP-4000 Digital Sound Projector
- Product Name: YSP-4000
- Manufacturer: Yamaha
- Performance Rating:

- Value Rating:
- Review Date: February 04, 2008 12:00
- MSRP: $ 1799
|
Category |
Digital Sound Projector |
|
Woofers |
4 3/8" x 2 |
|
Beam Drivers |
1 5/8" x 40 |
|
Magnetic Shielding |
• |
|
RMS Output Power (1kHz) |
2W x 40 + 20W x 2 |
|
Total Power |
120W |
|
Digital Amplifier |
• |
|
Highly Efficient Power Supply |
• |
|
IntelliBeam (With Optimizer Microphone) |
• (3rd Generation) |
|
On-Screen Display |
• |
|
Set-up Menu |
• (Easy, Manual) |
|
5Beam Mode |
• |
|
3Beam Mode |
• |
|
Stereo + 3Beam Mode |
• |
|
Stereo Mode |
• |
|
5Channel Stereo Mode |
• |
|
My Beam Mode |
• |
|
Target Mode |
• |
|
My Surround Mode |
• |
|
Dolby Digital |
• |
|
Dolby Pro Logic II |
• |
|
DTS |
• |
|
DTS Neo:6 |
• |
|
Surround Programs |
7 |
|
XM Satellite Radio Ready |
• |
|
Neural Surround |
• |
|
FM Tuner |
• |
|
iPod Compatibility (with Optional YDS-10) |
• |
|
Compressed Music Enhancer |
• |
|
SRS TruBass |
• |
|
Night Listening Mode |
• |
|
TV Equal Volume Mode |
• |
|
Memory Settings |
• (3) |
|
Room Equalizer |
• |
|
Parameter Settings |
• |
|
Horizontal Angle Adjustment |
• |
|
Vertical Angle Adjustment |
• |
|
HDMI (In/Out) |
• (2 / 1) |
|
HDMI 1080p Switching |
• (24Hz, 60Hz Refresh Rate) |
|
Analog video to HDMI Upconversion |
• (480p/720p,1080i) |
|
HDMI Upscaling |
• (up to 1080i) |
|
Audio Inputs |
• (2) |
|
Digital Optical Inputs |
• (2) |
|
Digital Coaxial Inputs |
• (2) |
|
Component Video (In/Out) |
• (2 / 1) |
|
Composite Video (In/Out) |
• (3 / 1) |
|
Front Panel Mini Jack |
• |
|
Subwoofer Output |
• |
|
RS-232C Interface |
• |
|
IR Pass Through |
• |
|
Detachable Power Cord |
• |
|
Preset Remote Control |
• |
|
Product Dimensions (W X H X D) |
40 9/16" x 7 5/8" x 4 5/8" |
|
Product Weight (lbs.) |
28 |
|
Shipping Dimensions (W X H X D) |
47" x 12" x 10 |
|
Shipping Weight (lbs.) |
37 |
|
Accessories (Optional) |
SPM-K30 |
Pros
- Single speaker solution is great for the aesthetic and space conscious
- Provides convincing audio envelopment
- Tons of options for pseudo-surround sound
- Essentially a receiver and 5.0 speaker system in one box
- Extremely easy setup
Cons
- Multi-channel music performance is sub-par
- Pinpoint rear effects can sound muddy and unfocused
- Pricy but you are paying for convenience
- Won't pass 480i over HDMI
YSP-4000 Build Quality and Setup
 Being an audio purest,
I've tried my best to stay away from excessive processing of my audio including
all those funky DSP (digital signal processing) modes that seem to be standard
on receivers these days. If the source is stereo, I listen in stereo. If the
source is DTS, I listen to DTS. I don't try to cram a stereo track into all 6
of my speakers just because I can. It usually sounds fake and overall reduces
the quality of the audio in my mind (and to my ear).
Being an audio purest,
I've tried my best to stay away from excessive processing of my audio including
all those funky DSP (digital signal processing) modes that seem to be standard
on receivers these days. If the source is stereo, I listen in stereo. If the
source is DTS, I listen to DTS. I don't try to cram a stereo track into all 6
of my speakers just because I can. It usually sounds fake and overall reduces
the quality of the audio in my mind (and to my ear).
When I was approached about a review of the YSP-4000, I was hesitant. OK, let's be honest, I was downright resistant. I didn't want to do a review of this product. It just doesn't interest me in any way. Oh, I had great excuses… my room is too small… I have openings in the side walls that will make it nearly impossible for the YSP to bounce sound around the room… I have high back chairs that would interfere with reflected sound… I'm allergic to DSP… but in the end, I decided (or it was decided for me, you be the judge) to do the review. What I'm saying is that I'm the Scully in this review. I not only have doubts that the YSP can do what it claims but I frankly don't think that I'll like it even if it does.
First Impressions and Build Quality
 Too
often I think that something looks lighter than it actually is. That is doubly
true of the YSP-4000. Not only was the box heavier than I expected, but every
time I went to move the unit, I thought, "Man, this thing is heavy!" It doesn't help that it is
awkward to move either. The box came fairly undamaged though one of the
styrofoam endcaps was cracked and something seemed to be moving around in there
whenever I moved the box. Nothing was damaged that I could see and all the
parts and accessories arrived in good working order. The provided cables (some
RCAs, a TOSLink, and a power cord), remote, and manuals were all securely
attached to a piece of cardboard that was placed between the endcaps and the
walls of the box. My guess is that the cardboard backing was sliding around a
bit but it didn't have a chance of causing any real damage.
Too
often I think that something looks lighter than it actually is. That is doubly
true of the YSP-4000. Not only was the box heavier than I expected, but every
time I went to move the unit, I thought, "Man, this thing is heavy!" It doesn't help that it is
awkward to move either. The box came fairly undamaged though one of the
styrofoam endcaps was cracked and something seemed to be moving around in there
whenever I moved the box. Nothing was damaged that I could see and all the
parts and accessories arrived in good working order. The provided cables (some
RCAs, a TOSLink, and a power cord), remote, and manuals were all securely
attached to a piece of cardboard that was placed between the endcaps and the
walls of the box. My guess is that the cardboard backing was sliding around a
bit but it didn't have a chance of causing any real damage.
The YSP-4000 is a tank. You know you are getting a piece of equipment with some heavy duty engineering when you pick the thing up. Either that or they filled it with lead. The YSP features two 4-3/8" woofers and 40 1-5/8" "beam" drivers which resemble little tweeters. The detachable power cord attaches at a right angle in the rear of the unit which also has four threaded inserts for wall mounting. The optional wall mounting bracket is sold separately. I can't imagine that there are drywall anchors sturdy enough to hold this thing to a wall for long, so I'm guessing you'll need to locate a couple of studs. Since the wall mounting option would almost certainly be used in conjunction with a wall mounted flatscreen TV, I can't imagine this would be a problem.
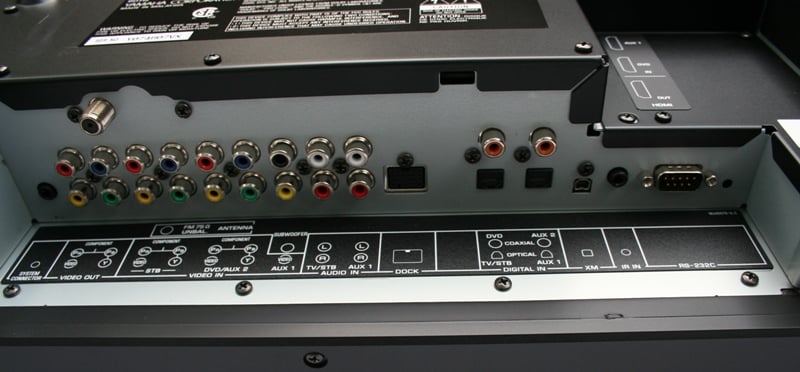
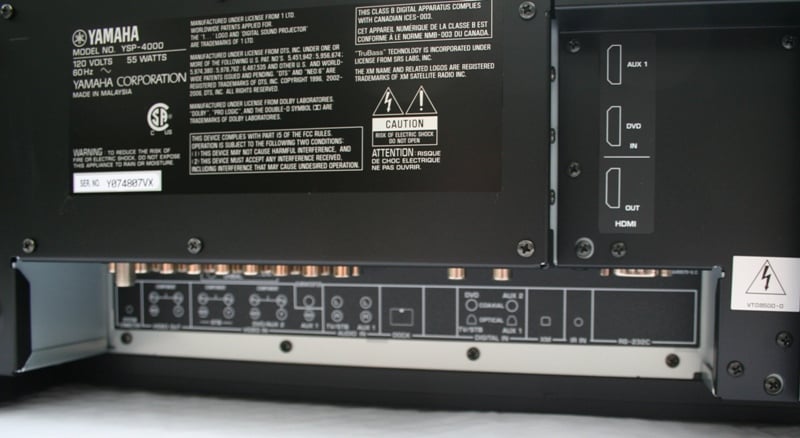 The back of the unit has almost all
your inputs and outputs. The two HDMI inputs and one output are located near
the center and need to be installed from the side. All the other inputs and
outputs are connected directly up into a recessed section of the bottom of the
unit. While the RCA and TOSLink connections usually have little problem winning
the battle over gravity (which is trying to pull them loose), the orientation
of the HDMI connections actually uses gravity to make a more secure connection.
Yamaha has really thought this one through as they also suggest using tape to
secure your HDMI cables to the YSP. This all becomes more intuitive when you
consider the fact that both the YSP-4000 and your matching flat panel display
are ultimately intended for wall mounting. The YSP-4000 sports a RS-232
connection and IR in for custom control.
The back of the unit has almost all
your inputs and outputs. The two HDMI inputs and one output are located near
the center and need to be installed from the side. All the other inputs and
outputs are connected directly up into a recessed section of the bottom of the
unit. While the RCA and TOSLink connections usually have little problem winning
the battle over gravity (which is trying to pull them loose), the orientation
of the HDMI connections actually uses gravity to make a more secure connection.
Yamaha has really thought this one through as they also suggest using tape to
secure your HDMI cables to the YSP. This all becomes more intuitive when you
consider the fact that both the YSP-4000 and your matching flat panel display
are ultimately intended for wall mounting. The YSP-4000 sports a RS-232
connection and IR in for custom control.
You essentially have three main inputs on the YSP-4000. Here's how they break down:
|
Input Name |
Video Type |
Audio Type |
|
TV/STB |
Component/Composite |
Optical |
|
DVD/Aux2 |
HDMI/Component/Composite |
HDMI/Coaxial/RCA |
|
Aux1 |
HDMI |
HDMI/Optical/RCA |
Now does this mean that your TV/STB can't use HDMI? No. Each of the inputs is assignable and renameable from the menu (we'll get into that later). There is also a dedicated XM input on the back as well as an Aux 3 on the front of the YSP-4000 for portable audio players (such as an iPod or MP3 player). This is simply a 3.5mm plug which will require the use of an external cradle or stereo plug connected to the headphone jack output of your player. Aux 3 can only be used for audio.
 The front of the YSP-4000 has a
small, single line LCD readout, the aforementioned Aux 3 jack, a jack for the
IntelliBeam mic, and input, volume, and standby/on buttons. The front grill is
massive, metal, and permanently attached. There are rubber feet on the bottom
of the unit to protect against scratches in the case of shelf mounting. The
unit arrives with a slew of cables - a composite video (yellow), digital audio
(coaxial - orange), and analogue audio (red/white) of the RCA variety. There is
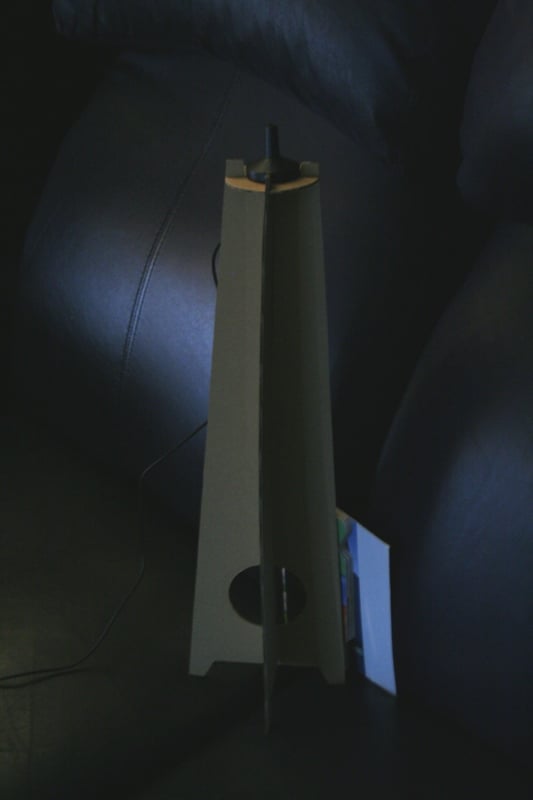
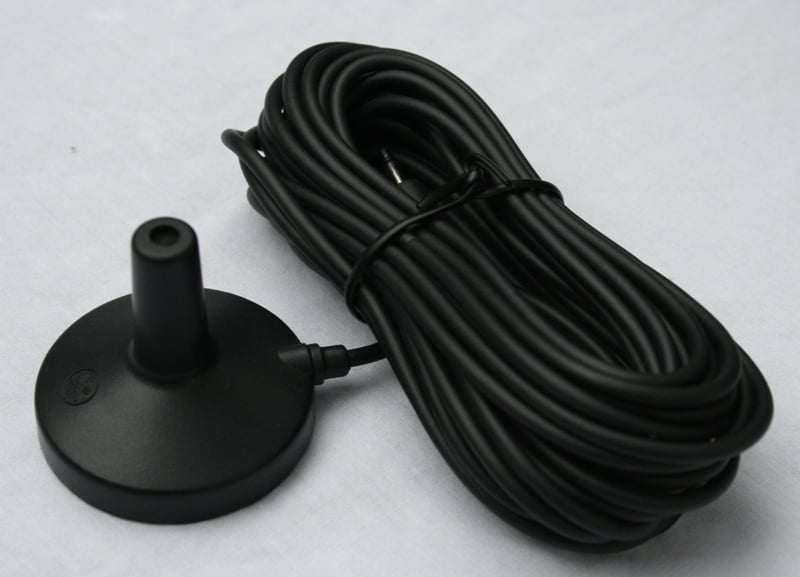
also an included optical cable, FM antenna, and power cord. The IntelliBeam mic
can be attached to your favorite camera tripod or placed on the included
cardboard stand (which is what I used). The cord to the IntelliBeam mic is
outrageously long. Your room is WAY too big if that cable isn't long enough.
There are also a host of fasteners, clamps, guides, and a remote control.
Really, the only thing that is missing here was an HDMI cable.
The front of the YSP-4000 has a
small, single line LCD readout, the aforementioned Aux 3 jack, a jack for the
IntelliBeam mic, and input, volume, and standby/on buttons. The front grill is
massive, metal, and permanently attached. There are rubber feet on the bottom
of the unit to protect against scratches in the case of shelf mounting. The
unit arrives with a slew of cables - a composite video (yellow), digital audio
(coaxial - orange), and analogue audio (red/white) of the RCA variety. There is
also an included optical cable, FM antenna, and power cord. The IntelliBeam mic
can be attached to your favorite camera tripod or placed on the included
cardboard stand (which is what I used). The cord to the IntelliBeam mic is
outrageously long. Your room is WAY too big if that cable isn't long enough.
There are also a host of fasteners, clamps, guides, and a remote control.
Really, the only thing that is missing here was an HDMI cable.
Set-Up
 With
limited cabinet space (and not nearly enough width to accommodate such a large
center channel), I set the YSP-4000 on top of my component cabinet in front of
my display. While this would be an unacceptable arrangement long term (it blocked
the bottom part of the screen and the IR receiver), it worked for the purposes
of this review. As Yamaha suggested, I placed the YSP-4000's front baffle near
the front of the shelf so that the shelf wouldn't interact with or diffract the
sound in any way. I connected my Denon DVD-3910 DVD player and my Axiom EP500
subwoofer directly to the YSP-4000.
With
limited cabinet space (and not nearly enough width to accommodate such a large
center channel), I set the YSP-4000 on top of my component cabinet in front of
my display. While this would be an unacceptable arrangement long term (it blocked
the bottom part of the screen and the IR receiver), it worked for the purposes
of this review. As Yamaha suggested, I placed the YSP-4000's front baffle near
the front of the shelf so that the shelf wouldn't interact with or diffract the
sound in any way. I connected my Denon DVD-3910 DVD player and my Axiom EP500
subwoofer directly to the YSP-4000.
Now the problem with my room is that there is no real good way to optimally accommodate the YSP-4000. Two of the walls have openings in them that lead either to a hallway or another room. These openings are large (about the size of a double door) and offset from each other (they don't line up). If I placed the YSP-4000 in front of one of the openings, the other would be at my back and there would be nothing left to reflect the sound. If I put it in a corner, I come up with an opening near my back on one side and near the speaker on the other. So I ended up just placing it where my speakers and TV are normally, in the middle of one of the solid walls. The geometry of the room was such that I figured it gave the YSP-4000 the best chance of having a surface for reflecting. The other problem is that I have high back couches. There is really nothing I can do about that so I just had to live with it.
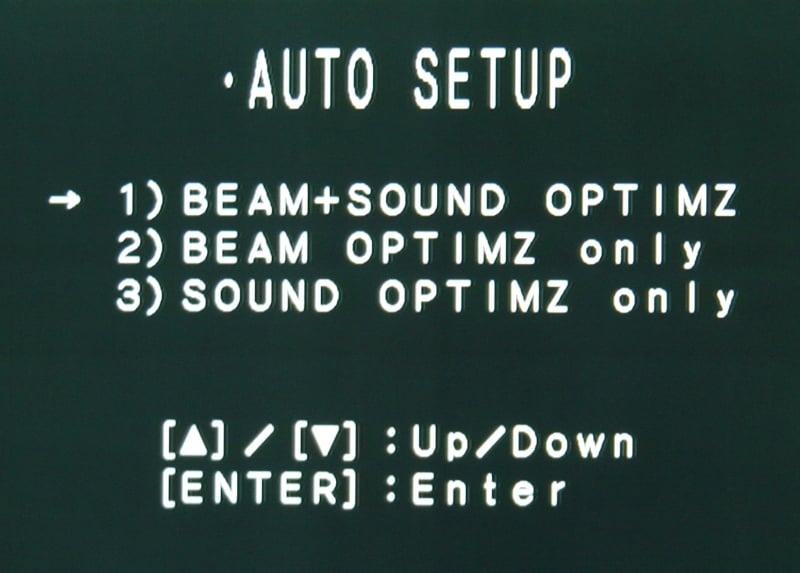 The
first step in the setup process involves running through the automatic
calibration process under the Auto Setup menu.
You have three choices - Beam+Sound, Beam only, Sound only. The Beam
calibration adjusts the angle of the sound that is bounced around the room, the
Sound calibrations optimizes beam delay, volume, and quality. During the
initial setup, you're going to want to do Beam+Sound as it does everything. The
nice thing is that there are three different memory locations so that you can
actually take three different measurements based on different room
orientations. "Like what?" You ask? If a wall has a window with
curtains you could measure with the curtains open and closed. Maybe there is a
chair that tends to move around (like from the side of the room when the whole
family is watching to the center when you're alone). Regardless, it is a nice
feature.
The
first step in the setup process involves running through the automatic
calibration process under the Auto Setup menu.
You have three choices - Beam+Sound, Beam only, Sound only. The Beam
calibration adjusts the angle of the sound that is bounced around the room, the
Sound calibrations optimizes beam delay, volume, and quality. During the
initial setup, you're going to want to do Beam+Sound as it does everything. The
nice thing is that there are three different memory locations so that you can
actually take three different measurements based on different room
orientations. "Like what?" You ask? If a wall has a window with
curtains you could measure with the curtains open and closed. Maybe there is a
chair that tends to move around (like from the side of the room when the whole
family is watching to the center when you're alone). Regardless, it is a nice
feature.
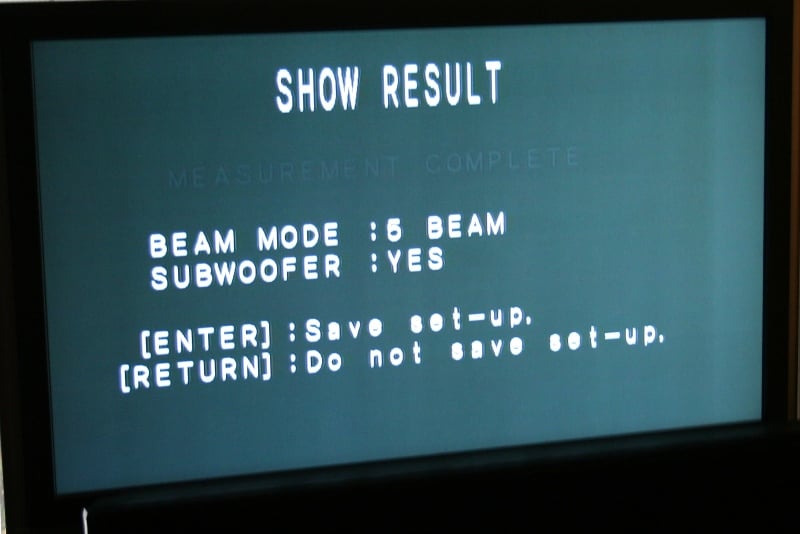 The auto-calibration is fairly
quick and painless and only requires a few things - quiet and the absence of "you".
Once you start the auto-calibration, you have 10 seconds to leave the room
before it starts. Once it begins you'll hear a number of beeps and clicks that
you can't imagine will actually do anything. In reality, that's all it really
takes for the majority of the calibration. It only takes about 3 minutes for
the entire setup, though it seemed less to me. I didn't receive any errors so I
can only assume that the YSP-4000 was able to overcome the limitations of my
room (at least in its mind). Afterward, I checked the settings and basically
agreed with everything but the subwoofer location. It just about doubled the
true distance to the sub (a common occurrence and something we tend to find
with most AV receivers). The crossover was set at 100Hz which seemed about
right though it does make the sub locatable at times. You're going to want to
be sure that your sub isn't too close to you with this setup - preferably very
near the YSP-4000. Since people that are purchasing this unit aren't really
looking to run cables, that shouldn't be much of an issue.
The auto-calibration is fairly
quick and painless and only requires a few things - quiet and the absence of "you".
Once you start the auto-calibration, you have 10 seconds to leave the room
before it starts. Once it begins you'll hear a number of beeps and clicks that
you can't imagine will actually do anything. In reality, that's all it really
takes for the majority of the calibration. It only takes about 3 minutes for
the entire setup, though it seemed less to me. I didn't receive any errors so I
can only assume that the YSP-4000 was able to overcome the limitations of my
room (at least in its mind). Afterward, I checked the settings and basically
agreed with everything but the subwoofer location. It just about doubled the
true distance to the sub (a common occurrence and something we tend to find
with most AV receivers). The crossover was set at 100Hz which seemed about
right though it does make the sub locatable at times. You're going to want to
be sure that your sub isn't too close to you with this setup - preferably very
near the YSP-4000. Since people that are purchasing this unit aren't really
looking to run cables, that shouldn't be much of an issue.
YSP-4000 Menus, Remote, and Beam Modes
 There
are four menus on the setup screen, only two of which you'll probably need to
look at more than once or twice. I already addressed the Auto Setup menu above. The Memory
menu is where you can load and save your audio settings. If you have run the
automatic setup more than once, you can store each here. It would be nice to
have a way of renaming each of these memory slots but you are stuck with Memory
1, 2, 3. The Language menu simply
sets the language of the display. There are choices of English, German, French,
Spanish, Italian, Dutch, and Russian. The other menu has a little more depth to
it so I'll go into them in more detail.
There
are four menus on the setup screen, only two of which you'll probably need to
look at more than once or twice. I already addressed the Auto Setup menu above. The Memory
menu is where you can load and save your audio settings. If you have run the
automatic setup more than once, you can store each here. It would be nice to
have a way of renaming each of these memory slots but you are stuck with Memory
1, 2, 3. The Language menu simply
sets the language of the display. There are choices of English, German, French,
Spanish, Italian, Dutch, and Russian. The other menu has a little more depth to
it so I'll go into them in more detail.
Manual Setup menu
The manual Setup menu has four options - Sound, Beam, Input, and Display.
Sound
 From this menu you can adjust the
Tone Control (adjust the treble or
bass from -12dB to +12dB) Subwoofer
Settings (which includes turning on and off the sub, setting the crossover
(80, 100, 120Hz), setting the LFE level (from 0 to -20dB in 1dB steps), and
setting the subwoofer distance in half foot units), and the Mute Level (either complete mute or
-20dB). The Audio Delay can be
adjusted if you're having lip syncing issues from 0-160 msec in 1 msec units as
well as the Room EQ (which asks you
to indicate if the unit is on the wall or a shelf and whether the room is Normal or Hi Echo). Dolby
Digital and DTS Dynamic range has a min/std/max setting where min is the least dynamic range (most compression)
is and max is the most dynamic range
(least compression). I'd suggestion Max unless you are listening at night and
don't want dramatic volume changes to wake up your neighbors. The TruBass was set as Mid for me which I
didn't prefer. I adjusted that to Off rather than Mid or Deep. This setting is
really more to boost the bass when you are not using a sub. The other option is
to turn this off and raise the crossover to 120Hz, giving the sub even more of
the bass duties and further taking the strain off the YSP-4000. You should
definitely play with these options and see what works for you given your
configuration and room.
From this menu you can adjust the
Tone Control (adjust the treble or
bass from -12dB to +12dB) Subwoofer
Settings (which includes turning on and off the sub, setting the crossover
(80, 100, 120Hz), setting the LFE level (from 0 to -20dB in 1dB steps), and
setting the subwoofer distance in half foot units), and the Mute Level (either complete mute or
-20dB). The Audio Delay can be
adjusted if you're having lip syncing issues from 0-160 msec in 1 msec units as
well as the Room EQ (which asks you
to indicate if the unit is on the wall or a shelf and whether the room is Normal or Hi Echo). Dolby
Digital and DTS Dynamic range has a min/std/max setting where min is the least dynamic range (most compression)
is and max is the most dynamic range
(least compression). I'd suggestion Max unless you are listening at night and
don't want dramatic volume changes to wake up your neighbors. The TruBass was set as Mid for me which I
didn't prefer. I adjusted that to Off rather than Mid or Deep. This setting is
really more to boost the bass when you are not using a sub. The other option is
to turn this off and raise the crossover to 120Hz, giving the sub even more of
the bass duties and further taking the strain off the YSP-4000. You should
definitely play with these options and see what works for you given your
configuration and room.
Beam
 Under
the Beam menu, you are directly
controlling how the sound is reflected around your room. If you decide to start
messing with these settings you're going to want to make sure that you have
them saved somewhere. Under the Setting
Parameters option you can define the location of the unit and the shape of
your room. Remember, the room may appear to be larger than it is if some of the
sound is being absorbed by room treatments or furniture or is getting lost through
openings. The Beam Adjustment option
allows you to adjust the horizontal and vertical angles, the beam travel
length, the focal length and the treble gain. This menu is really for those
interested in eeking the most out of their YSP-4000. You can make these beam
adjustments and then re-run the auto-setup with only the sound optimizer to
balance everything out. Of course, you can just grab your handy SPL meter and
tape measure and do the same thing. Honestly, there is about 1% of the
population that wanted this menu and Yamaha gave it to them. For the other 99%
of us, it isn't worth the time. Let the auto setup do this for you. Image
Location simply adjusts the mix of the front left and right channels that gives
the illusion of a central sound in the soundstage. If you are sitting off axis
(not directly in front of the speaker) and will always do so, you'd want to
adjust this toward your listening position.
Under
the Beam menu, you are directly
controlling how the sound is reflected around your room. If you decide to start
messing with these settings you're going to want to make sure that you have
them saved somewhere. Under the Setting
Parameters option you can define the location of the unit and the shape of
your room. Remember, the room may appear to be larger than it is if some of the
sound is being absorbed by room treatments or furniture or is getting lost through
openings. The Beam Adjustment option
allows you to adjust the horizontal and vertical angles, the beam travel
length, the focal length and the treble gain. This menu is really for those
interested in eeking the most out of their YSP-4000. You can make these beam
adjustments and then re-run the auto-setup with only the sound optimizer to
balance everything out. Of course, you can just grab your handy SPL meter and
tape measure and do the same thing. Honestly, there is about 1% of the
population that wanted this menu and Yamaha gave it to them. For the other 99%
of us, it isn't worth the time. Let the auto setup do this for you. Image
Location simply adjusts the mix of the front left and right channels that gives
the illusion of a central sound in the soundstage. If you are sitting off axis
(not directly in front of the speaker) and will always do so, you'd want to
adjust this toward your listening position.
Input
 Under the Input Menu you can assign inputs, choose to have the YSP-4000 auto
detect incoming digital signals upon power up or default to the last input
used, adjust the input trim (where you lower or raise the volume level of each
input from -6dB to 0dB), and rename inputs. With the rename function, you have
up to 8 characters to assign any lower or uppercase letter or number or a
variety of symbols (such as -,/,&). While 8 isn't a lot of characters to
play with, it is great that you aren't relegated to choosing from a
predetermined list which invariably won't have the choice you want. The XM Antenna Level menu simply displays
the strength of the XM signal.
Under the Input Menu you can assign inputs, choose to have the YSP-4000 auto
detect incoming digital signals upon power up or default to the last input
used, adjust the input trim (where you lower or raise the volume level of each
input from -6dB to 0dB), and rename inputs. With the rename function, you have
up to 8 characters to assign any lower or uppercase letter or number or a
variety of symbols (such as -,/,&). While 8 isn't a lot of characters to
play with, it is great that you aren't relegated to choosing from a
predetermined list which invariably won't have the choice you want. The XM Antenna Level menu simply displays
the strength of the XM signal.
 If
you have HDMI inputs, you're going to want to spend a few minutes on the HDMI Set submenu. Here you can select to
have the YSP-4000 play the audio coming from the HDMI inputs or to pass it
through to the HDMI output from the Support
Audio submenu. If you connect up your HDMI cables and get no sound, make
sure you check this option. It might have been switched to "other"
which is the pass-through mode. The Video
Info. submenu just gives you information on what type of signal is coming
in to the YSP-4000. This is a good menu to visit if you are having HDMI issues
as any error messages will be displayed. The Up-Scaling submenu will allow you to select the resolution to which
the analogue signals are upscaled to (480p, 720p, 1080i). Since the YSP-4000 does
a better job of scaling than deinterlacing, I'd suggest starting with 1080i so
that you'll get whatever deinterlacing your display can provide if your source
is non-progressive (standard definition). Otherwise, you can send a progressive
signal and have the YSP-4000 upscale it to whichever is the native resolution
of your display. Of course, if you'd like it to leave the signal alone, you can
select "through" (our preferred setting) which you would think would
send the signal through unaltered (see below). The Aspect Ratio submenu allows you to send a signal through unaltered
or to adjust it using the "Smart Zoom" options (fitting a 4:3 picture
to your screen) or "16:9 Normal"
(black bars on the sides for 4:3 signals). More than likely your display or
your source (or both) already do this. Again, "Through" is probably
your best bet. If you have an HDMI Control-capable display or other component
(such as a Panasonic's with EZ Sync) you can turn on this option from the HDMI Set menu as well. This will allow,
with no additional programming, your YSP-4000 remote to control your device.
If
you have HDMI inputs, you're going to want to spend a few minutes on the HDMI Set submenu. Here you can select to
have the YSP-4000 play the audio coming from the HDMI inputs or to pass it
through to the HDMI output from the Support
Audio submenu. If you connect up your HDMI cables and get no sound, make
sure you check this option. It might have been switched to "other"
which is the pass-through mode. The Video
Info. submenu just gives you information on what type of signal is coming
in to the YSP-4000. This is a good menu to visit if you are having HDMI issues
as any error messages will be displayed. The Up-Scaling submenu will allow you to select the resolution to which
the analogue signals are upscaled to (480p, 720p, 1080i). Since the YSP-4000 does
a better job of scaling than deinterlacing, I'd suggest starting with 1080i so
that you'll get whatever deinterlacing your display can provide if your source
is non-progressive (standard definition). Otherwise, you can send a progressive
signal and have the YSP-4000 upscale it to whichever is the native resolution
of your display. Of course, if you'd like it to leave the signal alone, you can
select "through" (our preferred setting) which you would think would
send the signal through unaltered (see below). The Aspect Ratio submenu allows you to send a signal through unaltered
or to adjust it using the "Smart Zoom" options (fitting a 4:3 picture
to your screen) or "16:9 Normal"
(black bars on the sides for 4:3 signals). More than likely your display or
your source (or both) already do this. Again, "Through" is probably
your best bet. If you have an HDMI Control-capable display or other component
(such as a Panasonic's with EZ Sync) you can turn on this option from the HDMI Set menu as well. This will allow,
with no additional programming, your YSP-4000 remote to control your device.
Editor's Note - Upconversion for upconversion's sake
The YSP-4000 is not equipped to deal effectively with an interlaced 480 signal. It will not accept 480i over HDMI at all and if you decide to send it over analogue, it upconverts it to 480p (even if you select "Through"). Why is this a problem? Well, if your display "sees" a progressive signal coming in, it won't do anything to it except upscale it to the native resolution of the display. But if it sees an interlaced signal, it attempts to deinterlace the picture before scaling. It is in the deinterlacing where problems can occur and better electronics equate to a better picture. The YSP-4000 doesn't do deinterlacing particularly well and seems to provide little to no 2-3 pull-down correction to compensate for film to TV conversion. As a result, when it converts the signal from 480i to 480p, you will get just about every artifact and visual problem available. Your display will likely do a better job every time. For those of us that have spent our money on sources that have good deinterlacing - this is not a problem. Just set your source to provide a progressive signal and you'll be money. But for those that spent their hard earned cash on a high-powered display with great deinterlacing features, there is virtually no way to get that 480i signal to the display over HDMI. In this case, we recommend bypassing the video connection on the YSP-4000 and go directly to the display.
Remote Control
![]() The
remote for the YSP-4000 is very utilitarian. There are dedicated buttons for
each of the inputs, surround modes, and controls. Honestly, it is like they had
more buttons than they knew what to do with so they just gave everything its
own. I'm all for that. The unit is extremely responsive and the remote worked
well off axis from the YSP-4000. My only strike against the remote is the lack
of backlighting and the fact that most of the buttons are the same shape (or
similar). For instance, the surround modes are all on the numeric key buttons
which are all the same size and evenly spaced. In the dark, you're going to
have to find the Braille dot on the five or do a lot of counting to find the
right button.
The
remote for the YSP-4000 is very utilitarian. There are dedicated buttons for
each of the inputs, surround modes, and controls. Honestly, it is like they had
more buttons than they knew what to do with so they just gave everything its
own. I'm all for that. The unit is extremely responsive and the remote worked
well off axis from the YSP-4000. My only strike against the remote is the lack
of backlighting and the fact that most of the buttons are the same shape (or
similar). For instance, the surround modes are all on the numeric key buttons
which are all the same size and evenly spaced. In the dark, you're going to
have to find the Braille dot on the five or do a lot of counting to find the
right button.
Beam Modes
 You've
got a few different beam mode options (5-Beam, 3-Beam+stereo, 3-Beam, My
Surround, My Beam) and you're going to want to test them out for yourself.
5-Beam uses the walls to bounce the sound around the back of you while the
3-Beam modes bounce it just to the sides of you. The 3-Beam is designed to
expand the "sweet spot" by giving you a direct center channel with
reflected front channels (left and right). The +stereo mode further accentuates
the front channels while still providing the reflected sounds. The My Surround
mode is different in that it provides a surround experience without reflected sound. This is how the
competitors of the YSP-4000 usually present a pseudo-surround experience.
Essentially, you are getting all the advantages of the YSP and the competitor's technology in one box! That's pretty cool. The
advantages of the My Surround mode is that it doesn't reflect sound so it is
not affected (as much) by the shape of the room but the disadvantage is that is
isn't quite as convincing as the 5-Beam set up in a properly shaped room. I
found that in my less-than-optimal room, the My Surround mode actually sounded
better than 5-Beam.
You've
got a few different beam mode options (5-Beam, 3-Beam+stereo, 3-Beam, My
Surround, My Beam) and you're going to want to test them out for yourself.
5-Beam uses the walls to bounce the sound around the back of you while the
3-Beam modes bounce it just to the sides of you. The 3-Beam is designed to
expand the "sweet spot" by giving you a direct center channel with
reflected front channels (left and right). The +stereo mode further accentuates
the front channels while still providing the reflected sounds. The My Surround
mode is different in that it provides a surround experience without reflected sound. This is how the
competitors of the YSP-4000 usually present a pseudo-surround experience.
Essentially, you are getting all the advantages of the YSP and the competitor's technology in one box! That's pretty cool. The
advantages of the My Surround mode is that it doesn't reflect sound so it is
not affected (as much) by the shape of the room but the disadvantage is that is
isn't quite as convincing as the 5-Beam set up in a properly shaped room. I
found that in my less-than-optimal room, the My Surround mode actually sounded
better than 5-Beam.
![]() The My Beam mode is a bit
different than the others. If you are in a loud environment and you are having
trouble hearing the YSP-4000, you can point the remote at the YSP, hold down
the My Beam button for 2 seconds while holding the remote steady, and then
release. The YSP will send out a quick couple of tones to see where you are
sitting. There is a mic in the remote that will register those tones and send
the information back to the unit. The YSP-4000 will then direct the sound to
your location in a single channel setup. You won't experience surround, but you
will be able to hear the game while all your wife's friends are yapping about
scrapbooking or whatever. The problem? For some reason it shuts down the
subwoofer.
The My Beam mode is a bit
different than the others. If you are in a loud environment and you are having
trouble hearing the YSP-4000, you can point the remote at the YSP, hold down
the My Beam button for 2 seconds while holding the remote steady, and then
release. The YSP will send out a quick couple of tones to see where you are
sitting. There is a mic in the remote that will register those tones and send
the information back to the unit. The YSP-4000 will then direct the sound to
your location in a single channel setup. You won't experience surround, but you
will be able to hear the game while all your wife's friends are yapping about
scrapbooking or whatever. The problem? For some reason it shuts down the
subwoofer.
YSP-4000 Listening Evaluation and Conclusion
I connected my Denon DVD-3910 via optical into the YSP-4000 and left the HDMI connection going to my Denon AVR-2307CI (which is powering my RBH TK-5CT tower mains, TK-515C center, and Axiom QS-8 surrounds). I connected the Axiom EP500 directly to the YSP-4000 which gave it a bit of an advantage while doing the direct comparisons - especially for movies. This setup allowed me to switch quickly between the YSP-4000 and my reference system by only hitting the mute button on both remotes at the same time. I used the AVIA center channel test tones and RS SPL meter to level match both speaker sets.
DTS CD: Don
Henley: The End of the Innocence This was one of the oddest DTS
CDs I'd ever reviewed in that it had two flavors of audio quality - Audio
Nirvana and Audio Nervosa. The tracks that are good are REALLY good while the
tracks that aren't… well they REALLY aren't. Needless to say, I will
occasionally stick in this CD just for the Nirvana songs. The first track, "The End Of The Innocence", is probably
one of my favorite songs to show off my system with because people immediately
"get" it. The envelopment is so convincing, so realistic that it
literally makes listening to the song in any other way sort of a travesty. That
is why I choose this track to see how well the YSP-4000 would perform.
This was one of the oddest DTS
CDs I'd ever reviewed in that it had two flavors of audio quality - Audio
Nirvana and Audio Nervosa. The tracks that are good are REALLY good while the
tracks that aren't… well they REALLY aren't. Needless to say, I will
occasionally stick in this CD just for the Nirvana songs. The first track, "The End Of The Innocence", is probably
one of my favorite songs to show off my system with because people immediately
"get" it. The envelopment is so convincing, so realistic that it
literally makes listening to the song in any other way sort of a travesty. That
is why I choose this track to see how well the YSP-4000 would perform.
Honestly, not well. The way I had everything set up, I could literally flip between the two speaker systems with the press of two buttons. But I didn't need it. The difference between the 5.0 speaker system and the YSP-4000 was night an day. While the 5.0 system enveloped me with sound and presented clear vocals and instrumentations, the YSP-4000 seemed thin and lifeless. The highs were muted, the vocals recessed, and even with the addition of the sub (which the 5.0 didn't have), the bass seemed hollow and fake. Even later when I set up the YSP-4000 in a different room, I experienced many of the same problems (though the envelopment was much better). In my experience, the YSP-4000 just doesn't have what it takes for multi-channel music.
CD:
Bang & Olufsen Vol. XIII – The Sound of Perfection
Not wanting to give up
on the YSP-4000 for music all together, I stuck in one of my favorite stereo
CD's. While the differences between the 5.0 system and the YSP-4000 were night
and day on the multi-channel music, with a stereo CD (and playing in stereo),
the YSP-4000 held its own. The soundstage was narrower (as one might expect
from a single speaker solution) but the sound quality was nice. I sound myself
enjoying the stereo experience enough that I didn't want to switch it off. Once
I did, the 5.0 system's extra-wide soundstage impressed me as did the fuller
midrange but not so much that I felt the YSP was lacking. I would have little
problem using the YSP-4000 for stereo music reproduction
DVD: Spiderman
2 The last movie in the
Spiderman series (Spiderman 3 never
happened as far as I'm concerned), I love to use this one for surround sound
testing. The scene where Doc Ock is in the hospital and they are about to cut
off his arms (Chapter 17: Horror
Hospital) is full of
dedicated surround effects that either makes or breaks the scene. As I flipped
between the 5.0 system and the YSP-4000, I was impressed with how well the
YSP-4000 held up. While the dedicated surround effects were muted and a bit
diffused, the overall sensation of surround was presented well. I had such a
good time watching this scene that I just kept it playing and finished off the
movie. That happens a lot to me.
The last movie in the
Spiderman series (Spiderman 3 never
happened as far as I'm concerned), I love to use this one for surround sound
testing. The scene where Doc Ock is in the hospital and they are about to cut
off his arms (Chapter 17: Horror
Hospital) is full of
dedicated surround effects that either makes or breaks the scene. As I flipped
between the 5.0 system and the YSP-4000, I was impressed with how well the
YSP-4000 held up. While the dedicated surround effects were muted and a bit
diffused, the overall sensation of surround was presented well. I had such a
good time watching this scene that I just kept it playing and finished off the
movie. That happens a lot to me.
I also flipped between the surround modes. As expected, the 5-Beam was having a hard time getting the sound all the way around me. The My Surround mode presented a more enveloping experience though the surround effects were much more diffuse. What I knew should be off my left shoulder ended up generally behind me. I imagine in a different room you're going to find that your preference might be different. To test this, I took the YSP-4000 briefly into my bedroom which has all four walls (I didn't move the sub). There isn't a display in there so I just had to listen to the movie. Sure enough, the 5-Beam presented an astonishingly convincing surround experience. While in my normal room the 5-Beam sounded like all the sound was in front of me, here, it was as if I had installed a full fledged surround system. Obviously, the YSP-4000 is really geared toward a room like this.
DVD: Seven
Swords If you are a fan of
those cheesy martial arts movies they used to show after Saturday morning
cartoons, you're probably going to like Seven
Swords. The plot is thin (to the point that you wonder if they just left
something out of the translation), the characters two-dimensional, and the
weapons varied. You spend the whole movie wondering just what is going on other
than the one thing you are sure of - lots and lots of people are dying. In many
different limb-rending ways. You know you've got campy-martial-goodness when
one of the bad guys beheads someone with an umbrella. There ought to be a
drinking game.
If you are a fan of
those cheesy martial arts movies they used to show after Saturday morning
cartoons, you're probably going to like Seven
Swords. The plot is thin (to the point that you wonder if they just left
something out of the translation), the characters two-dimensional, and the
weapons varied. You spend the whole movie wondering just what is going on other
than the one thing you are sure of - lots and lots of people are dying. In many
different limb-rending ways. You know you've got campy-martial-goodness when
one of the bad guys beheads someone with an umbrella. There ought to be a
drinking game.
The real surprise of this movie (which probably indicates that someone is taking this movie WAY too seriously) was the DTS soundtrack. Of course it is only for the Mandarin/Cantonese language track but that's OK. I prefer subtitles anyhow. The YSP-4000 had no problem enveloping me in sound especially during with the music and general background effects. Again, much like Spiderman 2, the dedicated surround effects were diffused using the My Surround mode. As I switched between the 5.0 system and the YSP, it was clear that some of the sounds that were supposed to be directly over my shoulder were just generally behind me. The vocals and front three channels were all presented very convincingly.
Conclusion
![]() The YSP-4000 was placed in an
environment that I would never suggest. To say that it has been pushed to its
limits is probably an understatement. But did the YSP-4000 pass? In my book -
yes… for movies. There are some seriously cool features of the YSP-4000 like
one of the easiest setups I've ever had to do, the super convenient My Beam,
and the single speaker(ish) solution. Are you going to need a DVD player or
other source? Yes. Are you going to need a subwoofer? Definitely. But for
movies, what you'll get is a convincing facsimile of surround from a single
source, undeniable cool factor, and convenience galore. If your room is better
than mine (which wouldn't be hard) you'll probably have a very good surround
experience. Doing the duties of five speakers and a receiver, the YSP-4000's price tag seems a bit steep until
you factor in the convenience factor. For those that can't, won't, or aren't
allowed to run wires, that convenience is worth its weight in gold. It's also a
nice way to set up a minimalist system that perfectly matches a nice flat panel
TV. For those that can and will run wires and like to see their speakers, a
dedicated speaker system is definitely the way to go especially in a
less-than-ideal room.
The YSP-4000 was placed in an
environment that I would never suggest. To say that it has been pushed to its
limits is probably an understatement. But did the YSP-4000 pass? In my book -
yes… for movies. There are some seriously cool features of the YSP-4000 like
one of the easiest setups I've ever had to do, the super convenient My Beam,
and the single speaker(ish) solution. Are you going to need a DVD player or
other source? Yes. Are you going to need a subwoofer? Definitely. But for
movies, what you'll get is a convincing facsimile of surround from a single
source, undeniable cool factor, and convenience galore. If your room is better
than mine (which wouldn't be hard) you'll probably have a very good surround
experience. Doing the duties of five speakers and a receiver, the YSP-4000's price tag seems a bit steep until
you factor in the convenience factor. For those that can't, won't, or aren't
allowed to run wires, that convenience is worth its weight in gold. It's also a
nice way to set up a minimalist system that perfectly matches a nice flat panel
TV. For those that can and will run wires and like to see their speakers, a
dedicated speaker system is definitely the way to go especially in a
less-than-ideal room.
Yamaha YSP-4000
$1799
Yamaha
Electronics Corporation, USA
6660 Orangethorpe Avenue
Buena Park, CA 90620
(714) 522-9105
www.yamaha.com
About Yamaha
Yamaha Electronics Corporation (YEC), USA, based in Buena
Park, California, is a wholly owned subsidiary of Yamaha. YEC offers Home
Theater components and systems, featuring A/V Receivers, Amplifiers, DVD/CD,
Speakers, Mini-Systems, Video Projection, as well as A/V & IT Convergence
Products.
The Score Card
The scoring below is based on each piece of equipment doing the duty it is designed for. The numbers are weighed heavily with respect to the individual cost of each unit, thus giving a rating roughly equal to:
Performance × Price Factor/Value = Rating
Audioholics.com note: The ratings indicated below are based on subjective listening and objective testing of the product in question. The rating scale is based on performance/value ratio. If you notice better performing products in future reviews that have lower numbers in certain areas, be aware that the value factor is most likely the culprit. Other Audioholics reviewers may rate products solely based on performance, and each reviewer has his/her own system for ratings.
Audioholics Rating Scale
 — Excellent
- — Very Good
- — Good
- — Fair
- — Poor
| Metric | Rating |
|---|---|
| Build Quality | |
| Appearance | |
| Treble Extension | |
| Treble Smoothness | |
| Midrange Accuracy | |
| Bass Extension | |
| Bass Accuracy | |
| Imaging | |
| Soundstage | |
| Dynamic Range | |
| Fit and Finish | |
| Performance | |
| Value |
As Associate Editor at Audioholics, Tom promises to the best of his ability to give each review the same amount of attention, consideration, and thoughtfulness as possible and keep his writings free from undue bias and preconceptions. Any indication, either internally or from another, that bias has entered into his review will be immediately investigated. Substantiation of mistakes or bias will be immediately corrected regardless of personal stake, feelings, or ego.
View full profile