
Yamaha YSP-1100 Digital Sound Projector Review
- Product Name: Yamaha YSP-1100 Digital Sound Projector
- Manufacturer: Yamaha Electronics
- Performance Rating:

- Value Rating:
- Review Date: November 12, 2006 19:00
- MSRP: $ 1699
|
Speakers Compatible Decoding Formats: Dolby Digital, DTS, Dolby Pro Logic/II Music/Movie/Game, DTS Neo:6 Music/Cinema Cinema DSP: Concert Hall, Music Video, Jazz Club, Spectacle, Sci-Fi, Adventure, Sports Power: 40 x 2W (main drivers) + 2 x 20W (midrange); 0.1W standby power consumption Dimensions: 40 9/16”W x 7 5/8”H x 4 5/8” D (1030mm x 194mm x 118mm) Weight: 28.7 lbs (13 kg) |
Audio Connections: 2 optical/1 coaxial S/PDIF digital inputs, 2 analogue audio inputs, 1 subwoofer output terminal Video Connections: 3 composite video inputs and 1 composite video output, 2 component video inputs and 1 component video output Misc Connections: Remote in, RS-232C interface, IntelliBeam optimizing microphone input, IR OUT terminal Accessories: Detachable power cord, multi-function programmable remote control (with batteries), optimizer mic with cardboard stand, composite video cable, analogue audio cable, optical S/PDIF cable, cable clamp & fasteners Optional Accessories: SPM-K1 wall hanging bracket, YST-FSW100 Slim Subwoofer (silver or black)
|
Pros
- * Optional wall-hanging bracket
- Comes in silver or black
- Multiple “Beam” modes for easy “on-the-fly” customization
- Wider sweet spot than any other “virtual surround” system we’ve heard
- Improved programmable remote control
- Perfectly sized for 42” flat panel displays
Cons
- No component video upconversion
- No OSD via component video
- Auto setup requires manual tuning in certain room configurations
- Remote control not backlit
YSP-1100 First Impressions and Build Quality
I remember spying the YSP-1 at the 2005 CES Expo in Las Vegas. Audioholics is no stranger to this technology, but I had never personally gotten my hands on a Digital Sound Projector to review. With that about to change I readied a couple of reference rooms and thought about different ways I'd like to test such a progressive product. Many companies have employed dual channel virtual-surround systems using various technologies (and even some gimmicks) but I had never heard any systems that truly worked well enough to satisfy anyone who had previously heard respected discrete surround sound. It's one thing for your Aunt Martha to listen to two speakers with DSP and phase delay and be impressed with the "surround-effects" it's an entirely different thing to impress a seasoned listener. Well, I'm writing this review in real time, so I'll let you know when I'm impressed-right now there's a world of potential given Yamaha's reputation for understanding DSP and I've resolved myself to be "skeptimistic".
First Impressions
The YSP-1100 is a third-generation product, so Yamaha has had plenty of time to refine what was already a pretty impressive looking package. One of the things that attracted me about doing a review of their newest Digital Sound Projector was that Yamaha had added in the ability to automatically set up the IntelliBeam using a YPAO-like configuration process. Mark my words, I'll do both a manual and automated setup, but the presence of this "convenience" feature takes this product and makes it much more user-friendly for the intended consumer and custom installer audience.
The system itself is a combination of 42 drivers and amplifiers along with all of the basic electronics you'd find in a digital AV receiver. This means that the YSP-1100 can take the place of an entire 5.1 surround system. From 6 boxes (5 speakers and a receiver) down to just 1 box is bound to make lots of spouses very happy.
In comparing the YSP-1100 to the original YSP-1 we reviewed in 2005, there are several notable differences and improvements:
|
YSP-1100 (3rd generation) |
YSP-1 (generation 1) |
|
| MSRP: | $1,699 | $1,499 |
| Finish: | Silver or Black |
Silver |
| Auto Setup: | Yes | No |
| Room EQ: | Yes | No |
| Weight: | 28.7 lbs. | 28.6 lbs |
As you can see, the majority of changes with the system occur in software. The addition of more DSP power to handle YPAO-like optimizer setup functionality is the largest improvement and deserves kudos. The original YSP-1 was a bit difficult to setup and became a bit of a hassle for non-installers to configure. Manual configuration is still available, of course, but this is a stellar improvement that should be a "Page 1" notation.
Build Quality
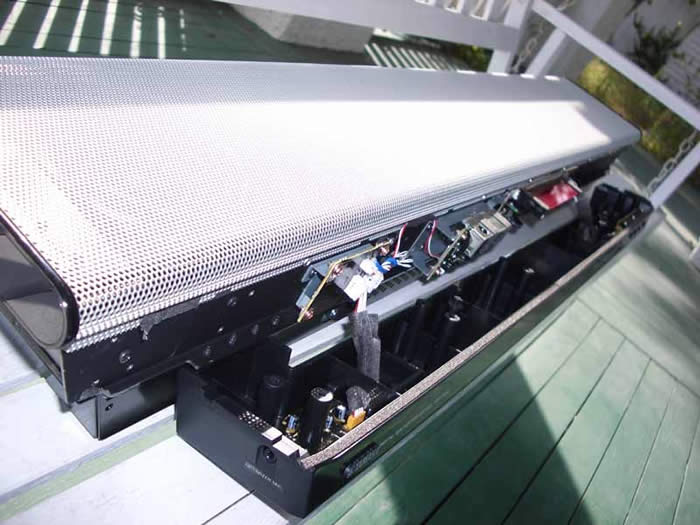
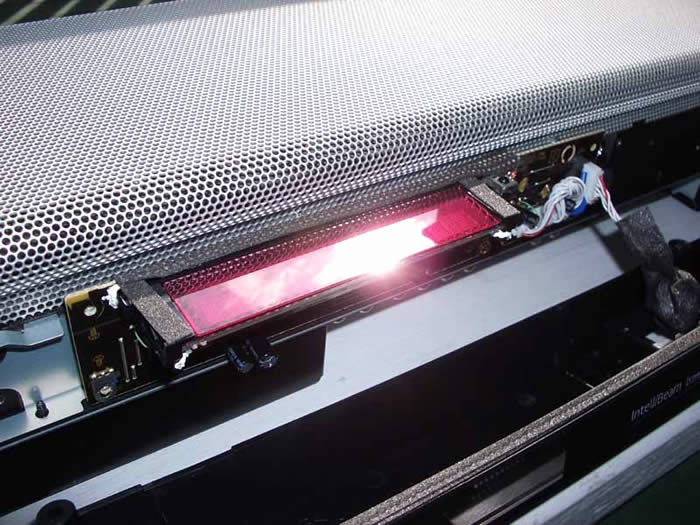
The YSP-1100 is available in either silver or black. The non-removable grill cover is made of steel that is carefully designed not to ring or rattle. It also works well with the design to not disrupt the intended frequency response of the system. The effect of the unit as a whole, with it's almost 29 pounds of mass, is that of a serious piece of equipment. If this unit were designed any sturdier it would be suitable for military use. Let me just explain something- I wanted to get y'all a picture of the actual drivers. Well, after removing about 40 screws and still not coming to the end of what I needed to safely remove the steel grill I gave up and reassembled the unit (and after going though this process I recommend that no one try this). That's what I call build quality!
The gloss black lower portion of the Sound Projector carries a blue LCD screen which delivers valuable information in a way that is easily visible but not overt or intrusive (i.e. you won't be blinded or drawn to it like a moth during movies). As part of my deconstruction mission I did manage to get ahold of the LCD panel for a closer look. The components I saw were all of high quality (most of the real interesting technology is located behind the YSP-1100 front panel and drivers, not below it).
Design Overview
The very nature of this system shows that Yamaha is fully capable of combining form and function into a stylistic box that looks as good as it performs. From the blue LCD display on its piano gloss black finish to the silver or black steel grill which covers the 42 drivers, Yamaha's YSP-1100 is an elegant piece to look at. As we mentioned, it will fit well underneath a 42-inch flat screen and it almost begs to be wall-mounted. With this type of system there is a ton of flexibility in placement but the best rooms are going to want to cater to this box, not use it as a last resort for rooms that cannot support rear speakers. To do that would be a shame.
YSP-1100 Setup and Remote Control
When installing the YSP-1100 (or any other Yamaha Digital Sound Projector product) it's important to note a few things about your room before selecting a location or moving forward with the placement of the system. If you think the YSP-1100 will work in any room under any conditions you'll need to check out a few scenarios where we do NOT recommend placing this type of system:
- In a heavily acoustically-treated room or where reflective surfaces have been minimized
- In a room where furniture obstructs the beam paths (firing at roughly 30 degrees and 60 degrees from the center of the unit if parallel-mounted)
- In a room that is more akin to a football field or warehouse than a listening room (the room has to be within 23" x 23" and preferably less than 12" tall)
- Rooms missing both side walls
- In the middle of a casino (ok, that last one is obvious)
- Seating areas that are very close to or against the back wall (3-Beam mode and Stereo modes will work as will My Beam mode)
- Corner-arranged rooms where one or more side walls include large openings
- Normal listening rooms where one or more side walls include large openings
- Rooms missing an entire wall
- Rooms with high levels of ambient noise (this goes for any speaker system)
OK, you've found your ideal location and eliminated the 4" thick first reflection acoustic materials you had custom designed for your listening room prior to purchasing the YSP-1100. Now what? Well, you can mount the YSP-1100 on top of or below the TV. A 42-inch flat panel is the perfect match, but to be honest it looks fabulous with anything up to 50-inches (I had it under a 47-inch LCD display). I tried a number of configurations, but my favorite was actually placing the unit on top of a StudioTech DP-2 RW flat panel/AV component stand and mounting the LCD display high enough for it to clear the Yamaha. If you have a wall-mounted display, then pick up the optional SPM-K1 wall hanging bracket and put the unit on the wall below (preferred) or above the set. If you are doing a corner mount, consider mounting the speaker above the TV in order to ensure that you get some additional clearance for the beams. In either case take a look around the room and see what might be getting in the way of good "beam steerage" (start throwing that terminology around at the office on Monday morning). Also remember that with a corner mount location the system will operate in Stereo + 3Beam mode with the front three channels coming directly out of the system (5Beam is disabled).
Connecting Your Gear
OK, now that the unit is positioned
you'll want to make your physical connections. Fortunately, the YSP-1100 comes with a plethora
(I still love that word) of inputs for the typical home theater user and certainly well targeted for
a lifestyle product. Let's take a brief look at the back of this device:
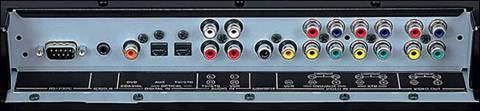
As you should be able to see here, there are dual component inputs as well as three sets of composite inputs. Audio can be either analogue (2 inputs) or digital (3 inputs). The idea is that you would mate digital inputs for each of the component inputs and then mate analogue for each of the two composite inputs. That leaves another digital input and composite input which can either be utilized or retained for an option. A subwoofer output connection is present and should be connected to the mono line level input of your powered subwoofer. You don't necessarily need a subwoofer with the YSP-1100, but your system will sound much better with it. OK, I changed my mind- you do need a subwoofer. A single composite (for OSD or legacy devices) or component video output (best quality) sends video to your display.
Automatic Setup
Automatic setup isn't too difficult and involves a couple of easy steps, depending upon whether you are running a full setup or just applying the Sound Optimization to an existing Beam configuration. To run the Auto setup simply plug in the included optimizer microphone (the input is on the left side of the enclosure), place the mic on the included cardboard stand and position it at the listening position (try to ensure it is at ear height). At this point you can either press and hold the "Auto Setup" button on the remote for 5 seconds or enter the Auto setup using the on-screen menu system.
The Auto setup is not without its potential hang-ups, but as with all room optimizations systems, not every room configuration can be accounted for. For example, in one of my reference rooms I ran the Automatic Setup twice and both times it thought my corner-positioned YSP-1100 was set up for parallel installation. The end result worked, but I got a much better sound when I did a manual configuration and switched to a calibrated Stereo + 3Beam mode. Keep this in mind as you set up your own system and remember that you can set up the Beams manually and simply run the Sound Optimizer portion of the auto setup independently.
The Sound Optimizer portion of the Auto Setup configures the distance delay as well as the volume and EQ settings for each of the beams in order to correctly blend the level and tone of all channels.
Manual Setup
If you're a tweaker you probably won't be using a YSP-1100 in your main room. If, however, you're like me and have a secondary reference system, or you are a custom installer, then the Manual Setup is likely going to occupy some of your time during the setup process- at least if you want the best results. I found the manual setup process to be a very handy tool for fine tuning the settings- and for ensuring that the system doesn't make incorrect assumptions about your room or setup.
The Manual Setup menu is composed of four main areas with corresponding submenus: Sound, Beam, Input, and Display menus mark the top level and, unlike some menu systems I've seen, are well-named for their functions. I'll point out some of the areas I think should be highlighted below.
Sound Menu
The Sound menu is where you have access to Tone controls, Subwoofer settings, Mute level (either full or -20dB), and Audio Delay (0-160ms in 1ms steps). The Room EQ submenu also present here does not, as some will think on initial glance, provide automatic room EQ. Instead, it sets the mounting position of the YSP-1100 (shelf or wall) and whether the room is "Normal" or "High Echo". If you don't have much furniture and have wood floors, you may want to select "Hi Echo".
Editor's Note: Reflective Rooms
Many people aren't aware of whether their rooms are considered "reflective" or not. A quick and easy method for determining this would be to get into the listening position and clap your hands loudly. If it takes longer than 1 second for the decay of that sound to go away, you can pretty much assume that your room is a bit reflective. Items that contribute to this are: sparse furniture, wood floors, high flat ceilings and oversized rooms. If you can read this entire paragraph while the echo of the clap reverberates through your listening room, well then you better go get a throw rug and some drapes!
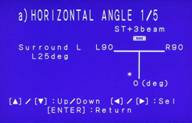
In the Beam Menu you are presented with Settings Parameters (corner or center wall placement and height) and the Beam Adjustment menu. Here you'll have access to horizontal and vertical angle adjustments as well as the beam travel height, focal length and treble gain. But what exactly that means will ultimately determine if any of this info is useful to you. First of all, the system gives you pink noise for Horizontal and Vertical Angle adjustments, as well as for focal length, but not for the other submenu items. This means that the first two can be done from the listening position using your ears (imagine that!) but the last three will need to be a combination of measuring and trial and error. This, of course assumes you weren't satisfied with the Auto Setup which configures all of this for you.
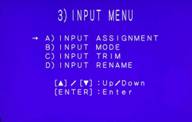
The Input menu gives the user manual control over input assignments, modes, and trims. You can also rename the inputs. I was pleased to see level trims included in this menu. What is not present are any options for upconversion- this unit doesn't even convert composite video to component. This means that you'll need to run both component video to your television as well as composite should you happen to have legacy equipment or use more than two devices with component video outputs. Another thing to note is that the YSP-1100 does not allow the on-screen display to function over component video (the signal paths are completely separate and isolated). While this may actually yield higher quality component video it also serves as a potential hassle for setting up the unit or making adjustments.
The final Display menu controls the front panel dimmer. It actually allows you to have an auto-dim mode and set the brightness. Alternatively you can leave it on full brightness or turn it off. This is also where you select meters or feet for the measurements and settings menus.
Remote Control
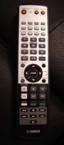 I'm going to keep this brief. It's efficient, easy to program and seems to have
everything one would need to run the system-
including basic functions for controlling a TV,
DVD player or other legacy device. The big thing it lacks is backlighting-
which I think
should definitely be included. Direct input buttons are included-
a plus, and all of the
buttons seem to be well within reach-
at least for my fingers. I liked the easy sliding switch
on the right side which flips the remote from YSP-mode to TV/AV (so that the number buttons can
control auxiliary functions in addition to the IntelliBeam controls.) It's a decent remote that
gets a good rating and could use some minor improvement.
I'm going to keep this brief. It's efficient, easy to program and seems to have
everything one would need to run the system-
including basic functions for controlling a TV,
DVD player or other legacy device. The big thing it lacks is backlighting-
which I think
should definitely be included. Direct input buttons are included-
a plus, and all of the
buttons seem to be well within reach-
at least for my fingers. I liked the easy sliding switch
on the right side which flips the remote from YSP-mode to TV/AV (so that the number buttons can
control auxiliary functions in addition to the IntelliBeam controls.) It's a decent remote that
gets a good rating and could use some minor improvement.
YSP-1100 Listening Tests - Music
As always music is an important part of what we do here at
Audioholics. It was important, to me at least, to see how well the Yamaha YSP-1100 would handle
surround music as well as stereo. With a unique system such as this I was curious and quickly fired
up several different discs and tracks with which I was very familiar.
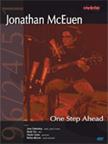
High Resolution 96 kHz/24-bit PCM Stereo: Jonathan McEuen
One
Step Ahead
(corner placement)
On this album (which also has surround sound
tracks) I wanted to see how well high resolution stereo played back on the Digital Sound Projector.
The first track
"Two of Us"
is a beautiful song and I felt that the quality of sound
reproduction was very good. Vocals lacked any boxiness that plagues certain systems. The soundstage
was pretty narrow, but this was a two-piece acoustic session. In any case, engaging Stereo +3Beam
mode widened the stage significantly and recessed the vocals ever so slightly so that they were front
and center, but no longer directionally coming from the exact center of the speakers (actually a nice
effect).
"You Will Always Win" is another acoustic piece (the basic and successful format for this album) that really came though with solid main vocals and well-blended backing harmonies. I flipped this disc into surround mode "I just couldn't resist" and settled back to hear the differences between authentic surround and the Stereo + 3Beam mode. Wow. Immediately I could hear the natural room reverb on my right and left. Jesse Siebenberg's backing vocals too, on a more open and airy sound and the mix suddenly felt "right". I felt as though the sound was now truly in three dimensions instead of two and the Yamaha seemed to really excel at bringing through this new type of "boundary-free" surround sound.
Just a couple more songs- "Lowlands" is tied for my favorite track on this album and I have heard it now on several different loudspeaker systems in several different rooms- numerous times. The YSP-1100 put forth a very different experience, but one that again was convincing and completely without boundaries. Violins were in the room and vocals had good separation. The banjo had that solid fingering sound and the bass wasn't missing the lower midrange tonality that I experienced on other systems. If you want a more defined surround field then direct radiating speakers will deliver that to you, but the immersive feel of the Yamaha was something to behold.
High Resolution 96 kHz/24-bit PCM Stereo: Jonathan McEuen
One Step
Ahead
(parallel placement)
Wow, with an immense soundstage this album really
takes off. There seemed to be a slight mid-bass emphasis that is more noticeable without a sub than
with one (and you really have to have a sub with this system-
have we beaten that into your
head yet?) "Two of Us"
had a realistic guitar sound and vocals, while a tad bit sibilant,
had a natural quality. If McIntosh can use a hundred and ten drivers in a single cabinet and charge
$40k, I suppose it's possible for Yamaha to get $1,600 worth of excellent sound out of 42!
"Ocean" features acoustic bass and a gentle guitar intro with solid, heavily reverberant, vocals. As the reverb is natural and not an effects box, this was a good demonstration of the YSP-1100's best effort to fill my reference system with a nice, smooth and reverberant sound. It accomplished the goal and soundstaging was wide and open. Nothing seemed out pf place or forced by the system. Yamaha seems to have found a very natural method of steering the channel information where it needs to go. As with the other discs, a parallel setup was clearly superior to the corner placement- again due to the wider front soundstage which is hard to reproduce in Stereo + 3Beam mode.
 DVD: Marillion
Marbles on the Road
(corner
placement)
DVD: Marillion
Marbles on the Road
(corner
placement)
Marillion is cool. They just walk out onto stage when they play-
no
fanfare needed, just excellent performances and talented musicians. From the opening number, crowd
noise filled the room- though it didn't quite make it behind me-
likely due to
the corner placement and room/wall issues. The 5.1 Dolby Digital track on this DVD is a "stage
mix"
where you are in the audience, so everything is pretty much up front with ambience and
crowds in the "surrounds."
For this type of music, the Yamaha seemed to do very well.
Steve Hogarth's voice was clear and natural. Drums and cymbals came through with a nice edge
and no audible distortion or lack of upper midrange. Guitars had a good clean and crisp top end and
the synths seemed to exude a gentle reverb that leaked into the listening room along with the watery
vocals of the first track,
"The Invisible Man".
"You're Gone"
is one of my favorite tunes and man did it
sound good on the Yamaha. With the room full of Hogarth's lyrics and the melodic guitar line
following through in crisp detail I thought this was one of the coolest ways I had yet experienced
this disc. When the chorus kicked into its jazzy crescendo I felt the overall presence in the room
step up a notch. The mix took on a fuller feel and the YSP-1100 reacted to the additional surround
info and poured it into the listening environment.
DVD: Marillion
Marbles on the Road
(parallel
placement)
On this disc the surrounds were not changed as much-
crowd noise was
still well-place and evident from the opening of the song through each interlude. The front imaging,
again, was much more convincing and realistic. The 5Beam mode is clearly a winner here and it does
amazing things with music DVDs. As Marillion's Steve Hogarth sings the opening track in his
sultry voice, bass and synthesized guitar effects permeated the room and generated a very full mix.
As I skipped to "You're Gone"
I realized that I hadn't really checked out the
DSP modes of the YSP-1100. I tried out the various Music modes and made some notes (you can switch
back and forth from each mode and "Off"
quite easily):
Concert Hall: Adds more front channel information into the surrounds and also adds a reverberant delay. The front vocal is a bit less "centered" with the DSP on and it seems to get sent, to a greater degree, into the left and right channels.
- Jazz Club: Vocals remained anchored in the front center of the soundstage, though they were pulled a tad into the surrounds. Guitars were more present in the surrounds and the soundstage appeared to be a bit wider overall. It is a good effect and does seem to recreate a more "live" environment without bringing in too mush reverb.
- Music Video: This DSP mode seemed to almost squash the sound a tiny bit. In a sense it decreased the sound stage and the overall fidelity- which I suppose would blend quite well with many of today's pathetically obtuse and poor quality music videos. This mode had the least effect on the original sound.
YSP-1100 Listening Tests - Movies and Conclusion
I utilized the Manual setup since I had a corner placement setup at the start of evaluation (I'll actually be evaluating the system in two reference systems- so take note of my setup details). Auto Setup did not correctly configure the system as being in a corner-oriented installation, so I was unable to use the auto setup.
DVD:
The Incredibles
(corner placement)
I queued up Chapter 23 "100 Mile Dash"
to see how well the corner configuration would work with the
surround-heavy material in this section of the movie. Right off the bat
my observations through the manual setup process were also discerned by
the listening tests. The surround left channel was almost impeccable.
Sounds coming from the rear were not nearly as impressive though the
overall envelopment was excellent. As Dash runs across the water and
enters the cavern the ambience correctly changes and you could almost
"feel"
it in the room (this happened again a short while later when Violet
produces a bubble which saves them from the gunfire. In the ensuing
family battle against the spinning ships, envelopment was almost total,
with only a slight lack of presence on the right side due to my lack of
a full side wall and corner placement. Keep in mind that in this first
pass the system was operating in Stereo + 3Beam mode (the only option
for surround sound with corner placement).
Overall the effect is a bit uncanny. Switching between stereo and Stereo + 3Beam really allows you to hear what the YSP-1100 is doing. It's a feeling of surround envelopment without point sources. Whereas dipole speakers attempt to diffuse surround fields, the Digital Sound Projector completely achieves this goal.
DVD:
The Incredibles
(parallel placement)
During the "100 Mile Dash"
chapter the surrounds were engaged in overdrive. Environments were
summersive and Dash frequently showed up in the surround tracks as did
the flying vehicles. In the ending battle scene against the giant robot
there was a lot of "off-screen"
action which was well represented directionally by the YSP-1100. This
scene in general is excellent testing material for surround effects and
making sure you are correctly configured for 5.1. I would have to say
that parallel placement won this round as well-
the room simply did much better and having the option of 5Beam mode and
Stereo + 3Beam was a plus. The difference in having the 5Beam mode was
amazing. The front left and right channels were separated in a much
wider soundstage-
so much so that the system was able to position these channels at the
extreme edges of my Stewart projector screen- that's about four feet
outside of and the same amount higher than the edges of the YSP-1100.
What's possibly more impressive was that the perception was that the
sound was coming from behind the Yamaha, which was positioned in a
temporary spot 1.5 feet in front of the screen.
DVD:
Hero
(corner placement)
On this DVD I wanted something a bit more epic that could allow me
to hear more of a feature film mix of production audio and sound
design. There are also some excellent scenes where surround sound is
fantastically demonstrated. Chapter 7 "Advance Ten Paces"
has a well-known scene where Jet Li's character takes out an entire
room of bamboo in the blink of an eye. The YSP-1100 recreated this in
an almost eerie manner. With no direct radiating speakers the effect
was of being in the room itself. Instead of surround sound it was more
of a
"real"
sound that literally came from all directions. The right side was still
a bit weak due to my room, but I looked forward to re-evaluating the
setup in the next room with a parallel installation and four solid
walls to utilize the 5Beam system.
The following chapter "Flying Snow" was even more impressive, with falling wooden arrows that literally came down from everywhere. I found that if I leaned forward or back the imaging would change, but that is where configuring the system properly comes into play. Most of the sound was locate in front of the seating position slightly, but the effect was still immersive.
DVD:
Hero
(parallel placement)
This was a night and day difference. With the system set up in parallel
mode in my first reference system (with all acoustical panels removed)
the effects of the YSP-1100 were nothing short of breathtaking. To get
this type of surround sound presence from a single box is absolutely
astonishing. In Chapter 7, Jet Li floats around the room and the sound
of the bamboo breaking is unmistakably
real
. In addition, the height adjustments made by the Auto Setup
rendered the final sequence where he catches the cup on his sword
perfect-
the cup sounded as if it landed directly on the sword-
in the middle of my 100-inch screen. Keep in mind that the Yamaha
Digital Sound Projector is situated about 1.5 feet below the
bottom
of the projector screen.
During "Flying Snow" it sounded again as if the wooden arrows fell all around the room- however this time the soundstage was immense. In addition the sound extended to beyond the seated position, unlike in the other reference room with a corner install. Viewing this allowed me to realize that the system could be optimized in a myriad of rooms, however the more rectangular you can get it, the better your overall results will be (this corresponds to suggestions made within the user manual as well).
Recommendations
Making recommendations to a company like Yamaha is tough- they almost seem clairvoyant in their ability to provide new products with advanced features and bug-free performance. The Auto Setup is acceptable on this system, but users may have trouble with corner placement. It would be cool to have a "lock-down" mode whereby the type of setup (corner or parallel) is selected as part of the setup process. Then the system can calibrate from that fixed position and information.
Lastly, we'd like to see a flagship model with component video upconversion and an on-screen display that doesn't limit itself to the composite video outputs only. HDMI would be nice as well, but I don't see it as a necessity with this style of product- at least not right now. A backlit remote rounds out my suggestions and completes this short "shopping list" of suggestions.
If you're planning on using this in your room for home theater or more than just occasional casual listening, we recommend a subwoofer. The included TruBass feature is nice and it does add some lower frequency perception, but you can't beat a real subwoofer (or two). Adding a sub really completes this system and brings it to the next level- so make sure you add that to your list.
Conclusion
The Yamaha YSP-1100 is NOT a typical pseudo-surround system. This is a sophisticated device that literally does what it says. Taking just one physical box you are able to convincingly recreate a 5-speaker surround environment 舑 but that's not exactly true. While 5 speakers can give you surround sound, and inexpensive system is often localizable and highly directional. The Yamaha YSP-1100 almost envelopes you in a sound "bubble" and is an altogether different experience. If you think you've heard these "one speaker does all" systems before, take another look- the YSP-1100 is NOT like anything else I have ever encountered in the industry. This is breaking new ground and I like where it' s going. Perfect for consumers who are looking for lower profile system, the YSP-1100 replaces an AV receiver as well as a surround sound speaker system. Taking into account that there are a host of manufacturers who charge more for a simply combined flat panel LCR speaker, the YSP-1100 is a veritable steal and has earned its 5-star value rating.
The Score Card
The scoring below is based on each piece of equipment doing the duty it is designed for. The numbers are weighed heavily with respect to the individual cost of each unit, thus giving a rating roughly equal to:
Performance × Price Factor/Value = Rating
Audioholics.com note: The ratings indicated below are based on subjective listening and objective testing of the product in question. The rating scale is based on performance/value ratio. If you notice better performing products in future reviews that have lower numbers in certain areas, be aware that the value factor is most likely the culprit. Other Audioholics reviewers may rate products solely based on performance, and each reviewer has his/her own system for ratings.
Audioholics Rating Scale
 — Excellent
- — Very Good
- — Good
- — Fair
- — Poor
| Metric | Rating |
|---|---|
| Build Quality | |
| Appearance | |
| Treble Extension | |
| Treble Smoothness | |
| Midrange Accuracy | |
| Bass Accuracy | |
| Imaging | |
| Soundstage | |
| Dynamic Range | |
| Performance | |
| Value |
Clint Deboer was terminated from Audioholics for misconduct on April 4th, 2014. He no longer represents Audioholics in any fashion.
View full profile