
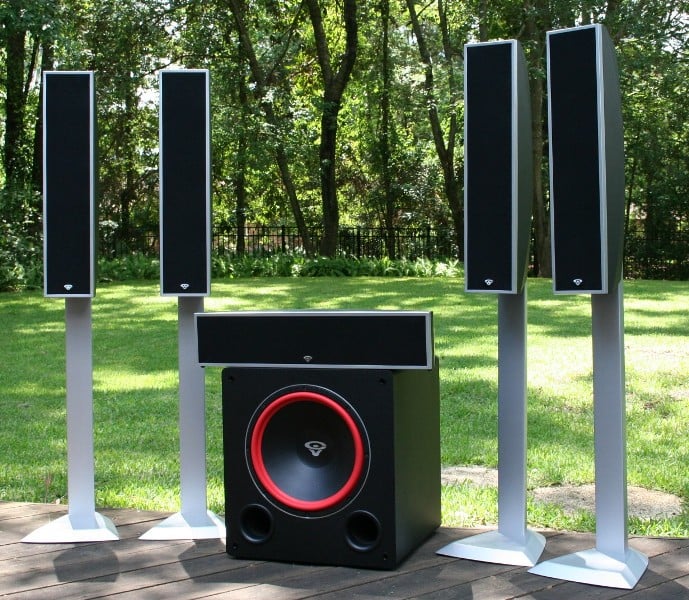
Cerwin-Vega! CVHD 5.1 Review
Cerwin-Vega! CVHD 5.1
- Product Name: CVHD 5.1
- Manufacturer: Cerwin-Vega!
- Performance Rating:

- Value Rating:
- Review Date: August 03, 2007 10:47
- MSRP: $ 999 set +$180 pair floor stands, $75 for center channel stand
CVHD Satellites with Linear Dispersion Speaker Technology™ (LDST )
Frequency Response: System 28 Hz to 22 KHz, Satellite 150 Hz to 22 KHz
Power: 50 to 125 watts continuous
Impedance: 8 Ohm nominal
Sensitivity: 95 db
Filters: 150 Hz high pass filter
Drivers: One 1” [2.54cm] high definition soft dome tweeter and six 3” [7.62 cm] cellulose composite cone woofers
Video Shielding: Yes
Floor Stands: Yes (optional) vertical stands sold in pairs provides 3 adjustable height positions, with wire management
Wall Bracket: Yes Included - Optional Omni-mount brackets for wall and ceiling mounting
Subwoofer: 12" [30.48 cm] powered
Frequency Response: 28 Hz to 150 Khz
Amplifier: 250 Watts (110V and 230V versions available)
Speaker: 12” [30.48 cm] woofer
Cabinet: Bass reflex
Other features: AC and thermal protection Speaker level and line level inputs Auto-on sensing
DIMENSIONS
CVHD Satellites with Linear Dispersion Speaker Technology™ (LDST )
Dimensions
(HxWxD) 22.5 x” 5” x 5”, 57.15 x 12.7 x 12.7 cm
6.32 lbs [2.84 Kgs]
Subwoofer: 12" [30.48 cm] powered
(HxWxD) 17.75” x 16.75” x 16.5”, 45.09 x 42.55 x 41.91 cm
Weight: 48.5 Lbs, [22.05 Kgs]
Pros
- Powerful sub
- Plays LOUD
- Good aesthetics
Cons
- Tweeter fell apart with some material
- Only wall mounts included with set
CVHD 5.1 - Build Quality and Setup
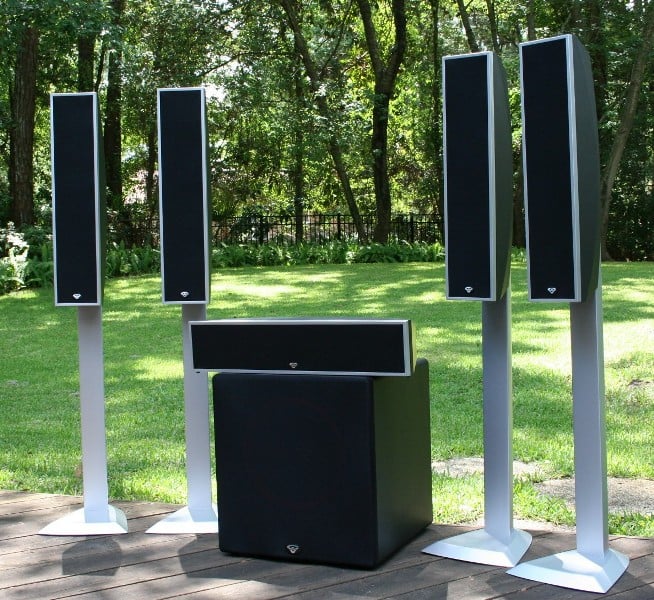
For years, Cerwin-Vega! has been known as a company that produces LOUD speakers (they seem to harbor this thought with their tagline "The LOUD Speaker Company"). Unfortunately, they've mostly fallen out of favor in the home theater market as their efficient speakers have become relegated to the "good for a dorm-room but not the living room" status. CV seeks to turn this all around with the introduction of their CVHD 5.1 (and little sibling CVHD 2.1) system. Geared for living room use, the slim profile and hi-tech looks complement many decors and more importantly the expectations of what home theater speakers should look like in many consumers' minds.
Build Quality and Assembly
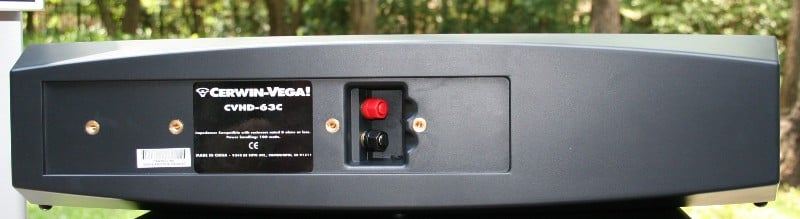
 The
CVHD-63 satellite speakers and CVHD-63c center channel cut an interesting
figure with their flat face and rounded back. Stuffed full of drivers, each
speaker sports six 3" cellulose composite cone woofers and a single soft dome tweeter in its
sealed enclosure. The plastic housing is light and fairly sturdy but I noticed
that the edges tended to scuff pretty easily. According to the manual, the
grills are removable but short of taking a hacksaw to the suckers, I couldn't
get them off. The back of each speaker sports two places for mounting, one near
the bottom of the speaker and the other flanking the binding posts. The red and
black caps for the binding posts were all but impossible to get off the result
being that all but one was completely destroyed in the process. The binding
post just barely accepted the
screw-down type banana plugs; so much so that I didn't even have to screw them
down to keep them in place. I'm not sure how they'd do with the compression
type.
The
CVHD-63 satellite speakers and CVHD-63c center channel cut an interesting
figure with their flat face and rounded back. Stuffed full of drivers, each
speaker sports six 3" cellulose composite cone woofers and a single soft dome tweeter in its
sealed enclosure. The plastic housing is light and fairly sturdy but I noticed
that the edges tended to scuff pretty easily. According to the manual, the
grills are removable but short of taking a hacksaw to the suckers, I couldn't
get them off. The back of each speaker sports two places for mounting, one near
the bottom of the speaker and the other flanking the binding posts. The red and
black caps for the binding posts were all but impossible to get off the result
being that all but one was completely destroyed in the process. The binding
post just barely accepted the
screw-down type banana plugs; so much so that I didn't even have to screw them
down to keep them in place. I'm not sure how they'd do with the compression
type.
 The
12" powered sub is nearly a perfect cube and weighs in at a respectable
48.5 lbs. There are no threaded inserts for feet though sticky rubber pads are
provided. The distinctive red ring that comprises the woofer's surround is mostly invisible with the grill on as
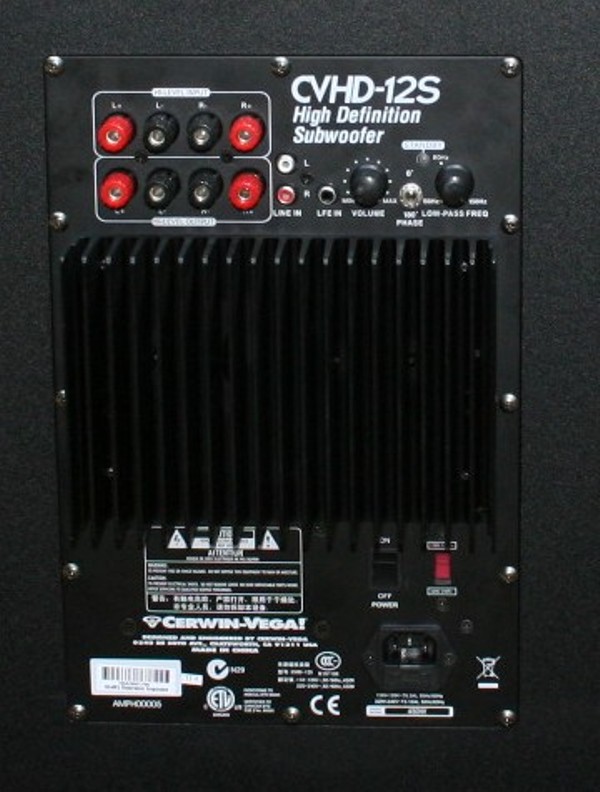
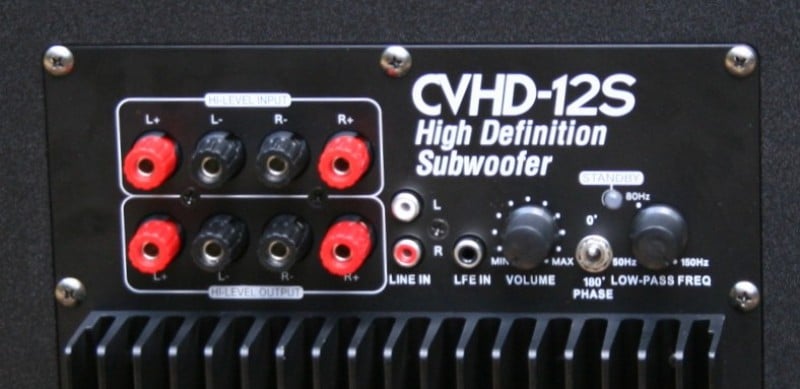
long as there is no front light. The back of the sub has all the usual
connections including an RCA input for LFE, line level ins and outs, 0/180 degree
phase switch, and variable dials for volume and crossover. The finish is your
usual matte black with nicely rounded corners to prevent shin damage. A knock
test revealed an interesting hollow sound indicative of plenty of empty space
within. The unit is front ported with two small ports on the bottom of the
baffle on either side of the woofer.
The
12" powered sub is nearly a perfect cube and weighs in at a respectable
48.5 lbs. There are no threaded inserts for feet though sticky rubber pads are
provided. The distinctive red ring that comprises the woofer's surround is mostly invisible with the grill on as
long as there is no front light. The back of the sub has all the usual
connections including an RCA input for LFE, line level ins and outs, 0/180 degree
phase switch, and variable dials for volume and crossover. The finish is your
usual matte black with nicely rounded corners to prevent shin damage. A knock
test revealed an interesting hollow sound indicative of plenty of empty space
within. The unit is front ported with two small ports on the bottom of the
baffle on either side of the woofer.
The CVHD 5.1 comes with wall mounts or you can
purchase floor stands separately. There are no table stands available for these
speakers at this time. Given the form of the speaker, they are obviously made
with wall mounting flanking a flat panel display in mind. While this may be a
common occurrence (maybe… I'm not so sure as many people as HGTV would have you
believe actually wall mount their displays), not 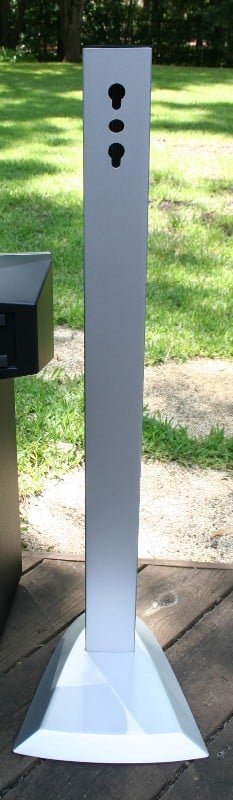 many wall mount their
surrounds so they'll be looking at an additional $180 for a pair of stands. There
are three rubber sticky feel to place on the center channel (I guessed, there
were no mention of it in the manual) if you'd like to shelf mount it (like I
did) or you can purchase a special center stand for $75.
many wall mount their
surrounds so they'll be looking at an additional $180 for a pair of stands. There
are three rubber sticky feel to place on the center channel (I guessed, there
were no mention of it in the manual) if you'd like to shelf mount it (like I
did) or you can purchase a special center stand for $75.
The stands themselves are fairly lightweight except for the base which is extremely heavy and constructed out of cast iron. The center column is hollow to allow you to run wires. The holes at the bottom and top of the stands are NOT large enough for any banana or spade connector I've ever seen so either you're going to want to use a bare wire connection or run the wire first and add the connector afterward (I have no idea why you'd do this but you could). There are little plastic bags provided used to hold sand if you'd like to add weight to the stand (don't puncture the bag during installation). The bottom of the stand has three threaded inserts for provided carpet spikes. There are no provided rubber feet.
 The hardest
part of putting the stands together is attaching the base to the upright. The
base actually has two parts, the heavy, black, cast iron bottom and a silver
vanity metal top. You need to line both these up with the upright triangular
bar. The problem comes because there is really no good way to do this. The top
of the upright is angled so you can't count on that and there is no easy way to
do it by laying it on its side. Aggravating this whole process is the shape of
the threaded inserts which are open on one side making it difficult to get them
started. The Allen wrench provided worked OK but I had a much easier time with
my own especially as I got toward the bottom. The provided wrench either didn't
give me the clearance or the torque depending on how I held it. Personally, I
ended up balancing the upright on its top and inserted the screws that way. It was
awkward, but it worked.
The hardest
part of putting the stands together is attaching the base to the upright. The
base actually has two parts, the heavy, black, cast iron bottom and a silver
vanity metal top. You need to line both these up with the upright triangular
bar. The problem comes because there is really no good way to do this. The top
of the upright is angled so you can't count on that and there is no easy way to
do it by laying it on its side. Aggravating this whole process is the shape of
the threaded inserts which are open on one side making it difficult to get them
started. The Allen wrench provided worked OK but I had a much easier time with
my own especially as I got toward the bottom. The provided wrench either didn't
give me the clearance or the torque depending on how I held it. Personally, I
ended up balancing the upright on its top and inserted the screws that way. It was
awkward, but it worked.
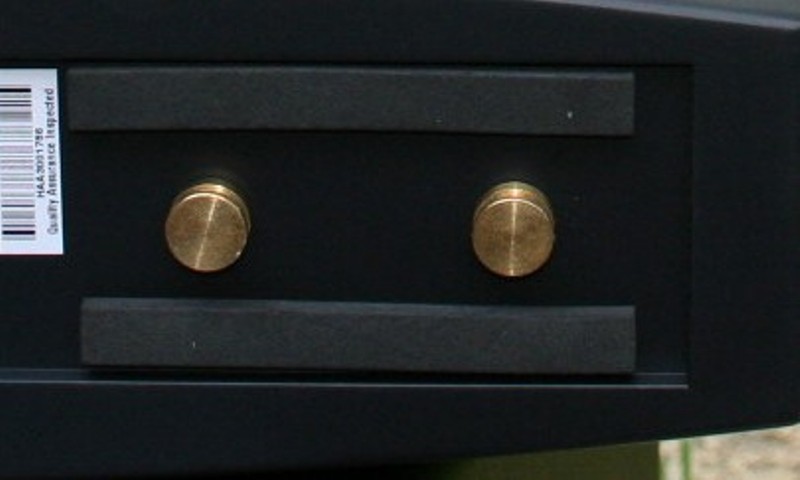
 When connecting the speaker to the stand,
you have three options - Low, Medium, and High. The High setting seemed to be
the best for me as it put the tweeter just about at ear height and (more
importantly in this case) it gave me access to the binding posts. Both the
other settings require that you use the connection points that straddle the
binding posts which makes anything but a bare wire connection impossible. If
you use bare wire in the High position, there is a provided wire hiding
attachment. Don't forget, if you decided to use the Low or Medium to run the
wire first. When using the Low setting, you're supposed to remove and flip the
grills. Good luck with that, I couldn’t do it without risk of damage. You'll need to connect the brass
connection points (included with the 5.1 system not with the stands so make
sure you look in the right box) and slide them into the provided holes in the
stand. The first thing you'll notice is that the speaker kind of flops around
on them. Now, take the speaker off and attached one of the long pieces of the
foam on each side of the connection points. This will give you a nice tight
fit. If you don't have a tight fit, remove the black washer and tighten down
the connection point as much as possible. You should be fine.
When connecting the speaker to the stand,
you have three options - Low, Medium, and High. The High setting seemed to be
the best for me as it put the tweeter just about at ear height and (more
importantly in this case) it gave me access to the binding posts. Both the
other settings require that you use the connection points that straddle the
binding posts which makes anything but a bare wire connection impossible. If
you use bare wire in the High position, there is a provided wire hiding
attachment. Don't forget, if you decided to use the Low or Medium to run the
wire first. When using the Low setting, you're supposed to remove and flip the
grills. Good luck with that, I couldn’t do it without risk of damage. You'll need to connect the brass
connection points (included with the 5.1 system not with the stands so make
sure you look in the right box) and slide them into the provided holes in the
stand. The first thing you'll notice is that the speaker kind of flops around
on them. Now, take the speaker off and attached one of the long pieces of the
foam on each side of the connection points. This will give you a nice tight
fit. If you don't have a tight fit, remove the black washer and tighten down
the connection point as much as possible. You should be fine.
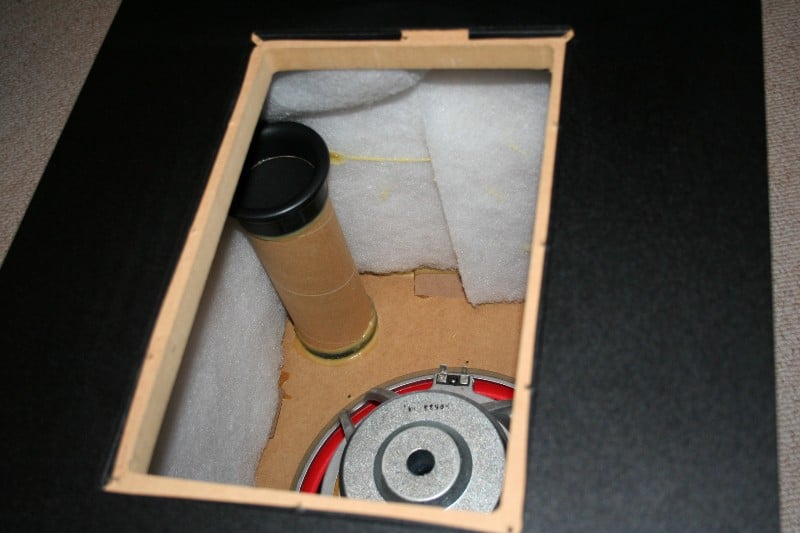
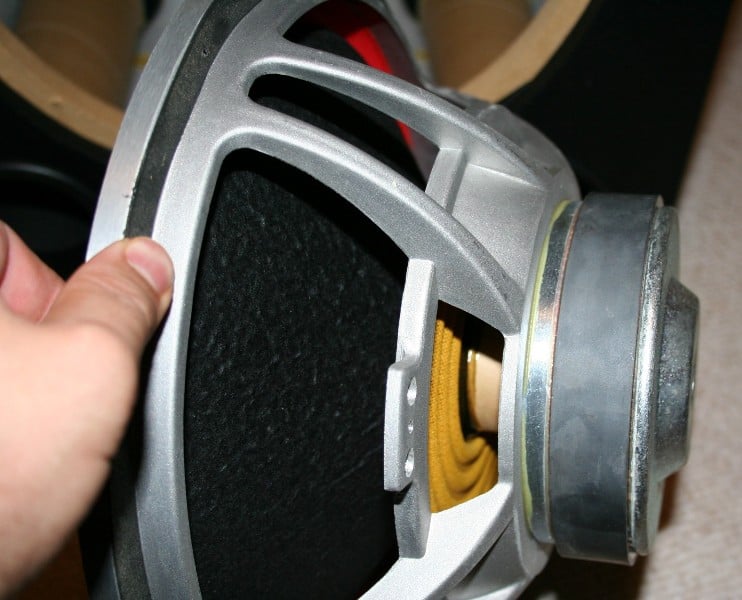
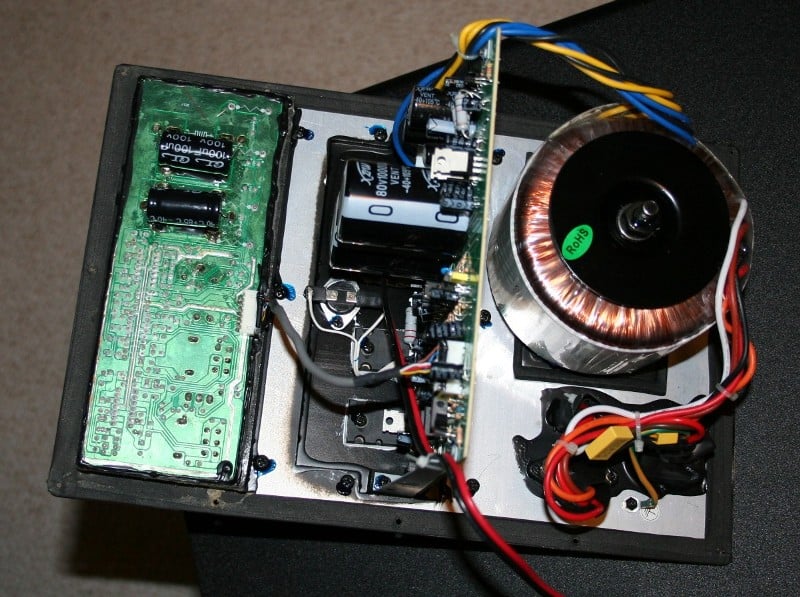
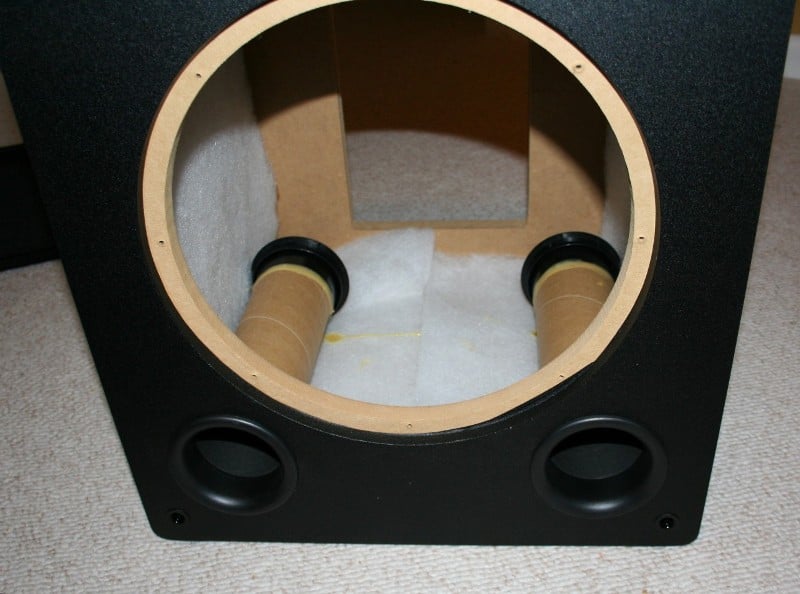 I
wasn't able to break open the satellites but I did get the sub apart. As I
suspected from the knock test, lots of room. Each edge is glued together with
two triangular braces for additional support. The woofer basket is cast (rather
than stamped) but the magnet assembly is fairly light (the entire driver was a
bit lighter than expected). The dual ports are flared at both ends and run
nearly the depth of the sub. There is about an inch of polyfill glued to the
sides, top, and bottom of the enclosure. The amp has a standby light but no way
to override the standby mode (weird) and the highest crossover setting is 150Hz
(the recommended receiver crossover point) without any way to defeat it (unless
the LFE in defeats it but I couldn't find anything on that in the manual). This would mean that you are forced to have
cascading crossovers (not a good thing). Some odd design choices there.
I
wasn't able to break open the satellites but I did get the sub apart. As I
suspected from the knock test, lots of room. Each edge is glued together with
two triangular braces for additional support. The woofer basket is cast (rather
than stamped) but the magnet assembly is fairly light (the entire driver was a
bit lighter than expected). The dual ports are flared at both ends and run
nearly the depth of the sub. There is about an inch of polyfill glued to the
sides, top, and bottom of the enclosure. The amp has a standby light but no way
to override the standby mode (weird) and the highest crossover setting is 150Hz
(the recommended receiver crossover point) without any way to defeat it (unless
the LFE in defeats it but I couldn't find anything on that in the manual). This would mean that you are forced to have
cascading crossovers (not a good thing). Some odd design choices there.
Setup
 I
placed two of the stand mounted satellites on either side of my Diamond
Case plasma stand and the other two on either side of the couch. The center
channel was slim enough that I could place it on the stand right in front of
the display (rather than inside of it). Of course I couldn't use the remote
with the display but that what sons are for right? I'd prefer to keep my center
out of the stand anyhow as it can only be detrimental to the sound but my other
center is just too big. The subwoofer was placed to the right of the front
right speaker closer to the speaker than to the wall (just over a foot off the
side and nearly 2.5 feet off the back). While some of you may be wondering if I
calibrated the sub with the Velodyne SMS-1 for this review, the answer is
"no." Well, shouldn't I since a calibrated sub will sound better and
again the answer is "no." Why? Well, I haven’t been running my sub
calibrated since I moved it to this new position so uncalibrated is what I'm
used to right now. If I were to calibrate it, it would be unfair.
I
placed two of the stand mounted satellites on either side of my Diamond
Case plasma stand and the other two on either side of the couch. The center
channel was slim enough that I could place it on the stand right in front of
the display (rather than inside of it). Of course I couldn't use the remote
with the display but that what sons are for right? I'd prefer to keep my center
out of the stand anyhow as it can only be detrimental to the sound but my other
center is just too big. The subwoofer was placed to the right of the front
right speaker closer to the speaker than to the wall (just over a foot off the
side and nearly 2.5 feet off the back). While some of you may be wondering if I
calibrated the sub with the Velodyne SMS-1 for this review, the answer is
"no." Well, shouldn't I since a calibrated sub will sound better and
again the answer is "no." Why? Well, I haven’t been running my sub
calibrated since I moved it to this new position so uncalibrated is what I'm
used to right now. If I were to calibrate it, it would be unfair.
 The
first really dramatic thing I noticed after I set up these speakers was how
much more room I seemed to have at the front of my home theater. The RBH
TK-5CTs are not a large speaker by any stretch but they cut a much more
imposing figure. The Axiom
EP500 may be a little thinner but it is quite a bit deeper than the Cerwin-Vega!
sub and seems to fill that corner. I was so convinced that something was wrong
that I re-measured the plasma stand distance to the side walls to ensure I
hadn't jacked something up during installation. Setting the levels for these
speakers was a strange experience. At a 95dB efficiency rating, I probably
could have calibrated them to 85dB with the internal test tones if I wanted. I
did run into a slight hum from the sub that was probably a ground loop but it
was so slight I didn't worry about it.
The
first really dramatic thing I noticed after I set up these speakers was how
much more room I seemed to have at the front of my home theater. The RBH
TK-5CTs are not a large speaker by any stretch but they cut a much more
imposing figure. The Axiom
EP500 may be a little thinner but it is quite a bit deeper than the Cerwin-Vega!
sub and seems to fill that corner. I was so convinced that something was wrong
that I re-measured the plasma stand distance to the side walls to ensure I
hadn't jacked something up during installation. Setting the levels for these
speakers was a strange experience. At a 95dB efficiency rating, I probably
could have calibrated them to 85dB with the internal test tones if I wanted. I
did run into a slight hum from the sub that was probably a ground loop but it
was so slight I didn't worry about it.
 It
is most important to remember to check your receiver's crossover frequency
setting when configuring these speakers. While they look Large and seem like
they should be able to play fairly low, Cerwin-Vega! suggests a 120-150Hz
crossover. Believe me, they mean it. While I found 150Hz to be too localizable
and boomy for some settings, the 120Hz wasn't terrible. Localizable, yes, but
not nearly as boomy. I switched it back and forth a few times and decided that
you should do the same. I ran the SMS-1 sweep really quick to see what sort of
usable bass I was getting and it seemed that the specification of 28Hz was just
about right. I'd believe that.
It
is most important to remember to check your receiver's crossover frequency
setting when configuring these speakers. While they look Large and seem like
they should be able to play fairly low, Cerwin-Vega! suggests a 120-150Hz
crossover. Believe me, they mean it. While I found 150Hz to be too localizable
and boomy for some settings, the 120Hz wasn't terrible. Localizable, yes, but
not nearly as boomy. I switched it back and forth a few times and decided that
you should do the same. I ran the SMS-1 sweep really quick to see what sort of
usable bass I was getting and it seemed that the specification of 28Hz was just
about right. I'd believe that.
CVHD 5.1 - Listening Tests and Conclusion
One can't help but love saying to one's wife, "I'm sorry honey, I just have to watch Ghost Rider tonight… it's for a review." But in the long run, movies aren't nearly as taxing (or as easy to use for evaluation purposes) as multi-channel music so I did a bit of both.
DVD: Ghost
Rider Nicolas
Cage and Eva Mendes star is this waste of two hours of my life. Unoriginal
plot, uninspired writing, and a lot of forced "acting" (if you want
to call it that) hamstrung this movie out the gate. While the scenes with Ghost
Rider were cool, lines like, "Keep to the shadows" are so ridiculous
when spoken to a character whose head is on fire even in light of what happens
later in the story that you can't help but wonder who edited the script. Maybe
there were just making it up on the spot… who knows? There are plenty of good
surround effects in this movie (especially the fight with the air demon dude)
and for the most part the CV surrounds did a fairly good job. They had no
ability to blend into the background for general effects but pans were spectacular
and convincing. Volume wise, I pushed these speakers as loud as I dared at that
time of night and they never hiccupped. It did seem, at first, that the center
channel was a little weaker than the surrounds but I never experienced this in
any of the other listening tests so I chocked it up to the movie.
Nicolas
Cage and Eva Mendes star is this waste of two hours of my life. Unoriginal
plot, uninspired writing, and a lot of forced "acting" (if you want
to call it that) hamstrung this movie out the gate. While the scenes with Ghost
Rider were cool, lines like, "Keep to the shadows" are so ridiculous
when spoken to a character whose head is on fire even in light of what happens
later in the story that you can't help but wonder who edited the script. Maybe
there were just making it up on the spot… who knows? There are plenty of good
surround effects in this movie (especially the fight with the air demon dude)
and for the most part the CV surrounds did a fairly good job. They had no
ability to blend into the background for general effects but pans were spectacular
and convincing. Volume wise, I pushed these speakers as loud as I dared at that
time of night and they never hiccupped. It did seem, at first, that the center
channel was a little weaker than the surrounds but I never experienced this in
any of the other listening tests so I chocked it up to the movie.
DVD: War
of the Worlds Tom Cruise and Steve Spielberg team up to
give us this grainy, end of the world tale which, in my opinion, is nothing
more than a thinly veiled excuse for seeing how much LFE you can shove in one
movie. Entertaining? Yes. Fine cinema? Not so much. The heat ray scene, always
a sub killer, sent the poor CVHD-12s sub into convulsions. For the most part it
held up pretty well, but during the lowest LFE the sub was reduced to a
rumbling buzzy mess. The impact and SPL the Cerwin-Vega! sub was able to
deliver was impressive and there was plenty of tactile bass during most of the
scenes, so for the majority of first-time purchasers, this is going to be an enjoyable
experience.
Tom Cruise and Steve Spielberg team up to
give us this grainy, end of the world tale which, in my opinion, is nothing
more than a thinly veiled excuse for seeing how much LFE you can shove in one
movie. Entertaining? Yes. Fine cinema? Not so much. The heat ray scene, always
a sub killer, sent the poor CVHD-12s sub into convulsions. For the most part it
held up pretty well, but during the lowest LFE the sub was reduced to a
rumbling buzzy mess. The impact and SPL the Cerwin-Vega! sub was able to
deliver was impressive and there was plenty of tactile bass during most of the
scenes, so for the majority of first-time purchasers, this is going to be an enjoyable
experience.
DVD-A: Blue
Man Group - The Complex (Read
the Review) If I had to pick a
single multi-channel disc to use for testing, this would be right at the top of
my list. Plenty of low tones, lots of different sounds in different registers, tons
of quick percussion, and a slew of surround pans all serve the make this one of
my favorite test discs. While the CVHD 5.1 set tried its best to keep up with
this demanding music, the surrounds seemed to have a hard time representing
some of the highest notes accurately. While it had no problems getting loud,
cymbals and higher timbre notes seemed flat and lifeless. The bass was good and
strong though.
If I had to pick a
single multi-channel disc to use for testing, this would be right at the top of
my list. Plenty of low tones, lots of different sounds in different registers, tons
of quick percussion, and a slew of surround pans all serve the make this one of
my favorite test discs. While the CVHD 5.1 set tried its best to keep up with
this demanding music, the surrounds seemed to have a hard time representing
some of the highest notes accurately. While it had no problems getting loud,
cymbals and higher timbre notes seemed flat and lifeless. The bass was good and
strong though.
DTS-CD: Don
Henley - The End of Innocence (Read
the Review) For those that have read my review, I wasn't a big fan of
this album - except for the most popular tracks which seemed to be mixed by a
completely different person than the rest of the album. In this vein, I checked
out the three decent tracks finding that, in all but one case, I was pleasantly
surprised by the experience. The near title track ("The End of the Innocence") was actually mixed
in 6.1 and makes me wonder why the rest of the album doesn't sound this good.
The track is so engaging, so immersive, that even if you don't like the song,
you'll find yourself listening to it over and over.
For those that have read my review, I wasn't a big fan of
this album - except for the most popular tracks which seemed to be mixed by a
completely different person than the rest of the album. In this vein, I checked
out the three decent tracks finding that, in all but one case, I was pleasantly
surprised by the experience. The near title track ("The End of the Innocence") was actually mixed
in 6.1 and makes me wonder why the rest of the album doesn't sound this good.
The track is so engaging, so immersive, that even if you don't like the song,
you'll find yourself listening to it over and over.
While this is a fairly bass-heavy track to begin with, the CVHD-12S sub was simply overpowering (not so on the other two decent tracks on the album) so much so it was distracting. I felt I needed to bump the sub down at least 3-5dB just to enjoy the song. The satellites tried their best to keep up but I feel they may be the weak link in this chain. The cymbals and picked guitar notes didn't have the crispness I'm used to while the soundstage seemed a bit flatter than before. This is not to say that the listening experience was unpleasant… not at all. If these were my first speakers I'd probably think they were the bee's knees. The amount of volume they can put out is fairly impressive. There isn't a receiver (or clock radio for that matter) that will have a hard time driving these speakers.
DVD-A: Queen
- The Game (Read
the Review) Yet another disc with
only one good song on it. I'm not sure what was going on here but "Another
One Bites the Dust" is in a
completely different league from the rest of the disc. The surround effects on
this track are some of the best I've heard in a multi-channel recording. I
wanted to see how well the CVHD's did with pans and front to rear speaker
integration and this was just the disc to do it. I was very impressed with some
of the rear pans and how convincing they were. The front to back integration
was pretty good, though I felt the front speakers didn't quite wrap around me
enough resulting in a slight hole to my right and left (at about 10 and 2).
Really, though, they did pretty well.
Yet another disc with
only one good song on it. I'm not sure what was going on here but "Another
One Bites the Dust" is in a
completely different league from the rest of the disc. The surround effects on
this track are some of the best I've heard in a multi-channel recording. I
wanted to see how well the CVHD's did with pans and front to rear speaker
integration and this was just the disc to do it. I was very impressed with some
of the rear pans and how convincing they were. The front to back integration
was pretty good, though I felt the front speakers didn't quite wrap around me
enough resulting in a slight hole to my right and left (at about 10 and 2).
Really, though, they did pretty well.
Unfortunately, the CVHD tweeter had a really hard time with Freddie Mercury's voice. Even at medium volumes the tweeter distorted so horribly that I had a hard time listening to the track. This is, in all the listening tests I did, the only time I experienced this phenomenon so it may be specific to this album but I fear that the soft dome tweeter may not be up the task of keeping up with the output of the CVHD-12S sub.
Recommendations
 The CVHD 5.1 system is a good looking set
with a fairly strong subwoofer. There are a few things I'd change:
The CVHD 5.1 system is a good looking set
with a fairly strong subwoofer. There are a few things I'd change:
-
Including a wall mount is great, but you need to give people a way of setting these speakers up without an additional purchase or drywall anchors. Table stands would be a good addition to the set.
-
Figure out how to make the satellites play lower so the sub isn't quite so localizable.
-
After you do that, make the sub can play low without distortion - it's certainly big enough.
-
Work on that tweeter.
-
If you say the grills can come off, they kinda should without making people worry about breaking the speakers.
-
A better manual that lets the user know about the rubber feet, the crossover on the amp and other tidbits I had to figure out for myself.
Conclusion
![]() Sometimes
life throws you a curve ball, and having Cerwin-Vega! contact me for a review
of their $1000 CVHD 5.1 system was just such a moment. I had mentioned this set
on one of the first episodes of AVRant and
never thought they'd come knocking on my door. For $1000, there are a lot of
speaker sets out there that are better (but probably don't have as good a sub)
but I've seen this set on sale online for as little as $550. For $550, they are
a very good deal. They've got their issues but as an entry level system, they
are a good looking and mostly good sounding set. The sub is going to destroy
any HTiB "bass module" it comes across and you can pump enough sound
through the satellites to fill a large room without frying your amp. While they
have their limitations, for the right person, at the right price, they could be
the right set, maybe.
Sometimes
life throws you a curve ball, and having Cerwin-Vega! contact me for a review
of their $1000 CVHD 5.1 system was just such a moment. I had mentioned this set
on one of the first episodes of AVRant and
never thought they'd come knocking on my door. For $1000, there are a lot of
speaker sets out there that are better (but probably don't have as good a sub)
but I've seen this set on sale online for as little as $550. For $550, they are
a very good deal. They've got their issues but as an entry level system, they
are a good looking and mostly good sounding set. The sub is going to destroy
any HTiB "bass module" it comes across and you can pump enough sound
through the satellites to fill a large room without frying your amp. While they
have their limitations, for the right person, at the right price, they could be
the right set, maybe.
About Cerwin-Vega!
A member of
the Stanton Group of companies, Cerwin-Vega!, Inc. is a leader in the design,
manufacture, and distribution of loudspeakers for the home, mobile, and
professional audio markets. Designed in the pursuit of dynamic, accurate sound
reproduction since 1954, Cerwin-Vega! products are distributed throughout the
world via a network of distributors and dealers in more than 75 countries.
CVHD 5.1 Speaker System
$999 set
CERWIN-VEGA!, Inc.
3000 SW 42nd Street
• Hollywood, FL 33312
Phone: 1-954-316-1501 • Fax:1-954-316-1590
E-mail: Info@Cerwin-Vega.com
The Score Card
The scoring below is based on each piece of equipment doing the duty it is designed for. The numbers are weighed heavily with respect to the individual cost of each unit, thus giving a rating roughly equal to:
Performance × Price Factor/Value = Rating
Audioholics.com note: The ratings indicated below are based on subjective listening and objective testing of the product in question. The rating scale is based on performance/value ratio. If you notice better performing products in future reviews that have lower numbers in certain areas, be aware that the value factor is most likely the culprit. Other Audioholics reviewers may rate products solely based on performance, and each reviewer has his/her own system for ratings.
Audioholics Rating Scale
 — Excellent
- — Very Good
- — Good
- — Fair
- — Poor
| Metric | Rating |
|---|---|
| Build Quality | |
| Appearance | |
| Treble Extension | |
| Treble Smoothness | |
| Midrange Accuracy | |
| Bass Extension | |
| Bass Accuracy | |
| Imaging | |
| Soundstage | |
| Dynamic Range | |
| Fit and Finish | |
| Performance | |
| Value |
As Associate Editor at Audioholics, Tom promises to the best of his ability to give each review the same amount of attention, consideration, and thoughtfulness as possible and keep his writings free from undue bias and preconceptions. Any indication, either internally or from another, that bias has entered into his review will be immediately investigated. Substantiation of mistakes or bias will be immediately corrected regardless of personal stake, feelings, or ego.
View full profile