
PlanterSpeakers Terra Cotta 8.20 by Madison Feilding Inc.
PlanterSpeakers Terra Cotta 8.20
- Product Name: Terra Cotta 8.20
- Manufacturer: PlanterSpeakers by Madison Fielding Inc.
- Performance Rating:

- Value Rating:
- Review Date: May 31, 2007 07:41
- MSRP: $ 1199
Speakers: 8" coaxial driver
Frequency Response: 42HZ to 20KHZ +/- 3DB
Crossover: 12DB - 2 way
Power Handling: 35W/RMS
Recommended Amplifier Power: 50 to 80W/RMS
Sensitivity: 89 DB 1 WATT
OHMS: 8
Dimensions: Height 28.25" Width 20"
Weight: 31 lbs. (each)
Pros
- Great imaging
- Big sound
- Great aesthetics
- Can actually be used as a planter
Cons
- Anemic bass response
- Price
Terra Cotta 8.20 Build Quality and Setup
Outdoor speakers usually take the shape of rocks… and often sound about as good. Well, not all of us HAVE a lot of rocks in their backyards, so sticking a rock-shaped speaker out there would be as bad as installing an all-weather speaker. If you are going for innocuous… well, that’s just not going to fit the bill. Better that a speaker were shaped like something that would look natural in nearly every backyard. The PlanterSpeakers Terra Cotta 8.20 by Madison Fielding looks like a large planter (because it is). Your wife can stick a plant in it, water that plant, and you never have to worry about your speaker. It can rain, snow, salty waves can spritz it… still, no worries. All weather? You bet. Multipurpose? Absolutely. Inexpensive? Well…
Build Quality
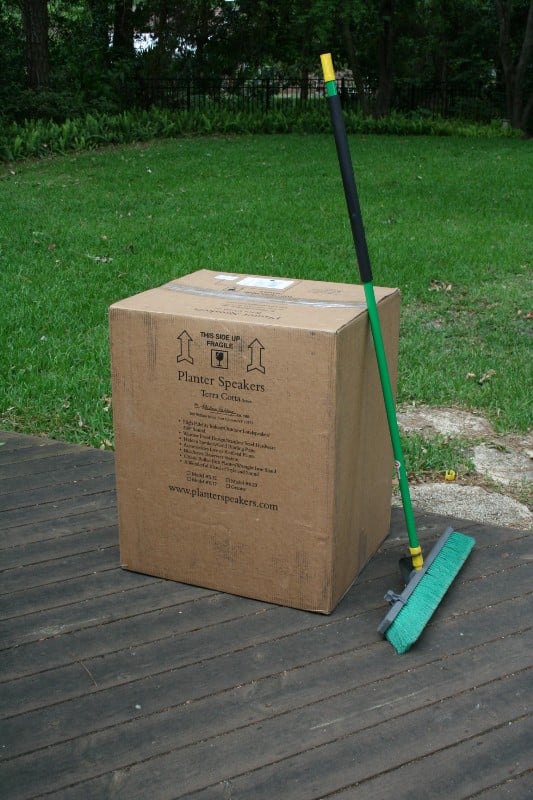 The Terra
Cotta 8.20 arrived in a HUGE box that was deceptively light. I just hope they
were paying shipping by the pound and not the square inch. There are two
pieces, the large plastic “planter” portion and a cast iron stand. At some
point you’ll be tempted to remove the planter from the stand, and that is fine.
But DO NOT set the planter down on the “bottom”. That is where the speaker
lives and it is actually convex. If you have soil and a plant (especially if it
has been watered lately) you could very likely damage the tweeter or worse. The
speaker resides at the bottom of the planter and it is nigh invisible unless
you are lying down on the ground near it. There is a small metal “reflecting”
plate under the speaker that is used to help disperse the sound from the
tweeter in all directions. The metal grill on the bottom is painted a similar
color as the planter, but as I said, you’d have to be lying down to see it.
The Terra
Cotta 8.20 arrived in a HUGE box that was deceptively light. I just hope they
were paying shipping by the pound and not the square inch. There are two
pieces, the large plastic “planter” portion and a cast iron stand. At some
point you’ll be tempted to remove the planter from the stand, and that is fine.
But DO NOT set the planter down on the “bottom”. That is where the speaker
lives and it is actually convex. If you have soil and a plant (especially if it
has been watered lately) you could very likely damage the tweeter or worse. The
speaker resides at the bottom of the planter and it is nigh invisible unless
you are lying down on the ground near it. There is a small metal “reflecting”
plate under the speaker that is used to help disperse the sound from the
tweeter in all directions. The metal grill on the bottom is painted a similar
color as the planter, but as I said, you’d have to be lying down to see it.
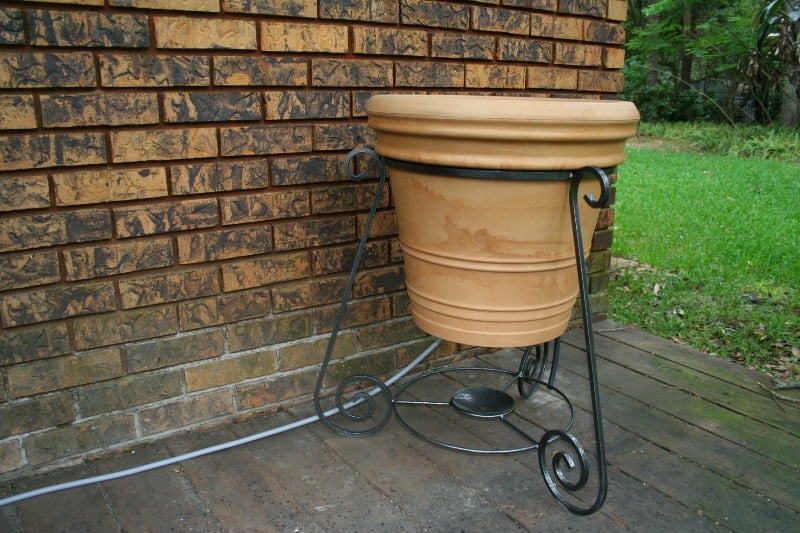
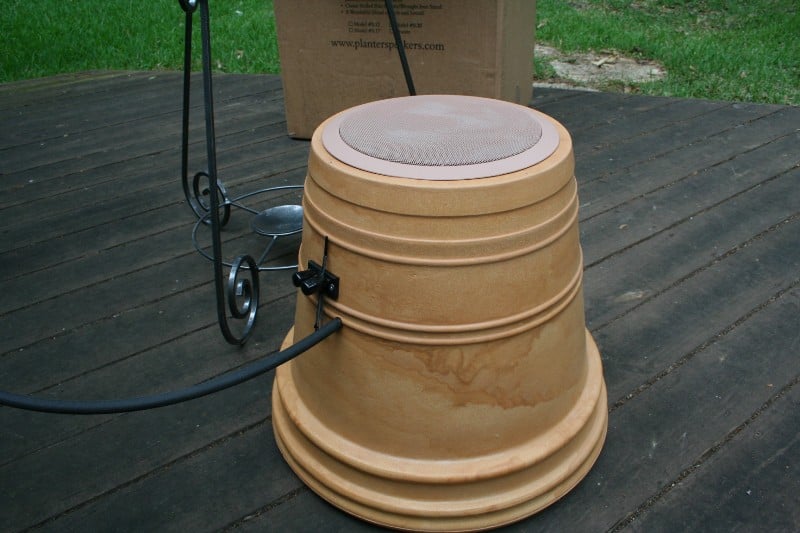 The planter is a good size and looks like it could
hold a small tree if you really wanted it to (it is large enough, though I
don’t think that is a good idea). Most of the pictures show a drooping
fern or ivy of some sort and I imagine it would look fine with some perennials
or decorative grasses.
The planter is a good size and looks like it could
hold a small tree if you really wanted it to (it is large enough, though I
don’t think that is a good idea). Most of the pictures show a drooping
fern or ivy of some sort and I imagine it would look fine with some perennials
or decorative grasses.
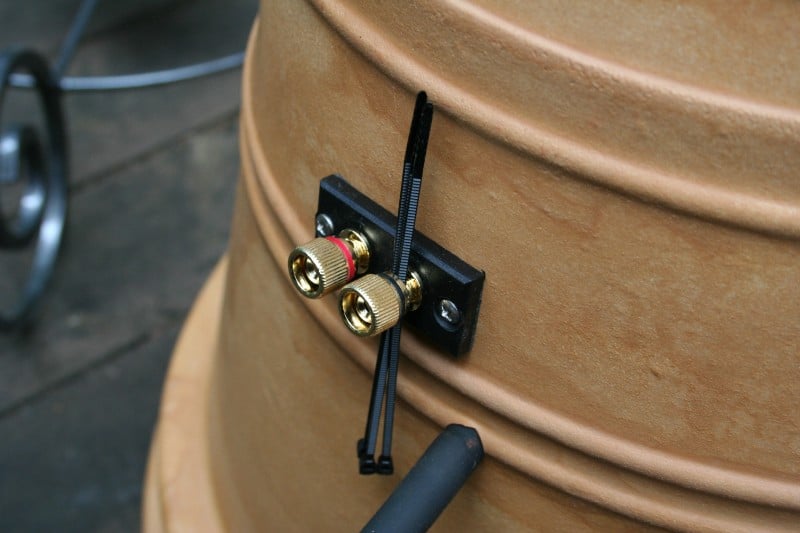
Out of the side of the planter is a long rubber hose for drainage. If you look inside the planter, you’ll see a number of drainage holes that feed a reservoir which feeds that tube. Near the drainage tube are two five-way binding posts that you’ll likely only use one way – bare wire. Each binding post has a rubber cap to keep your connection safe from the elements and three small tie downs for neatly securing your wire and the drainage tube to one of the cast iron legs of the stand.
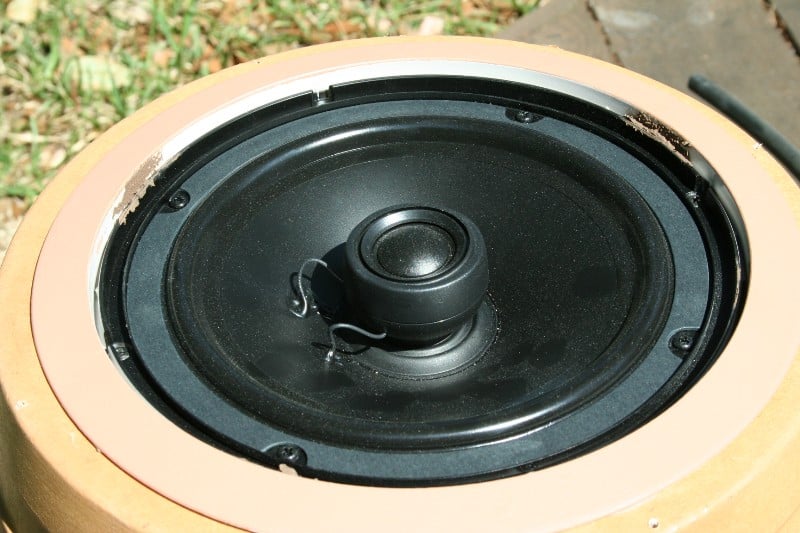 The driver
is a coaxial type with the tweeter assembly sitting quite close to the grill
(another reason not to set these speakers down on their grill). The driver is
completely sealed within the enclosure so I really couldn’t get a look at the
back. There is a rubber surround around the base of the center mounted tweeter.
The metal plate dispersion system we mentioned earlier is very good for a more
open sound, but you may want to either invest in more directional speaker or
place this up against a wall if you are looking for more “traditional” imaging.
If you look inside the planter, you’ll see a small screw. Removing this screw
does NOT give you access to the speaker; it will just open up the drainage
reservoir. Mostly, it is used to keep the drainage tray from vibrating. Good
thinking.
The driver
is a coaxial type with the tweeter assembly sitting quite close to the grill
(another reason not to set these speakers down on their grill). The driver is
completely sealed within the enclosure so I really couldn’t get a look at the
back. There is a rubber surround around the base of the center mounted tweeter.
The metal plate dispersion system we mentioned earlier is very good for a more
open sound, but you may want to either invest in more directional speaker or
place this up against a wall if you are looking for more “traditional” imaging.
If you look inside the planter, you’ll see a small screw. Removing this screw
does NOT give you access to the speaker; it will just open up the drainage
reservoir. Mostly, it is used to keep the drainage tray from vibrating. Good
thinking.
Setup
 In most
backyards, you are going to have two basic setup options: near a wall or out in
the open. Near a wall gives you the advantage of a little boundary
reinforcement that should extend the bass response and provide more
directionality to the sound while the open placement diffuses the sound more
and helps fill a larger area. If you are specifically looking for a more
directed sound (like a conventional loudspeaker), PlanterSpeakers makes
planters to fit the bill, though they look a bit different. You’ll, of course,
need to run wires to your speakers from an amplifier or receiver (typically
located inside). If you are near an exterior wall, you’re in luck. Just drill a
hole, push the wires through, and apply a little caulk to keep out the elements
and bugs. If you aren’t, well, you’re going to have to make some decisions. If
you have a deck, it seems like a no-brainer to run wires underneath. For those
with exterior speakers already installed under eaves and such, you’ll have to
either extend those wires down to the deck, attach them to the wall, and paint
them to match or just re-run altogether. Those who are planning to install
speakers outside for the first time will probably be looking at a trip to the
attic, under the house, or both.
In most
backyards, you are going to have two basic setup options: near a wall or out in
the open. Near a wall gives you the advantage of a little boundary
reinforcement that should extend the bass response and provide more
directionality to the sound while the open placement diffuses the sound more
and helps fill a larger area. If you are specifically looking for a more
directed sound (like a conventional loudspeaker), PlanterSpeakers makes
planters to fit the bill, though they look a bit different. You’ll, of course,
need to run wires to your speakers from an amplifier or receiver (typically
located inside). If you are near an exterior wall, you’re in luck. Just drill a
hole, push the wires through, and apply a little caulk to keep out the elements
and bugs. If you aren’t, well, you’re going to have to make some decisions. If
you have a deck, it seems like a no-brainer to run wires underneath. For those
with exterior speakers already installed under eaves and such, you’ll have to
either extend those wires down to the deck, attach them to the wall, and paint
them to match or just re-run altogether. Those who are planning to install
speakers outside for the first time will probably be looking at a trip to the
attic, under the house, or both.
 You’re
going to need to secure the wires to the cast iron frame (in order to hide
them) so consider a few things. First, you may want to invest in some “darker”
jacketed wire (if you can find it). Another option is to wrap or encase the
speaker wire in a tube or perhaps wrapped with electrical tape. PlanterSpeakers
provides some small tie-downs with instructions to strap the speaker wire and
the drain tube to the same leg. Given their proximity, this is really the only
option you have.
You’re
going to need to secure the wires to the cast iron frame (in order to hide
them) so consider a few things. First, you may want to invest in some “darker”
jacketed wire (if you can find it). Another option is to wrap or encase the
speaker wire in a tube or perhaps wrapped with electrical tape. PlanterSpeakers
provides some small tie-downs with instructions to strap the speaker wire and
the drain tube to the same leg. Given their proximity, this is really the only
option you have.
PlanterSpeakers
recommends investing in some external amplification for their speakers. Most are either 8- or 6-ohms though,
so most mid-priced receivers should be able to handle the load. Of course, if
all you’re ever going to so is provide some soft background music (nothing for
parties) than any receiver with an available powered Zone 2 should work. Just
make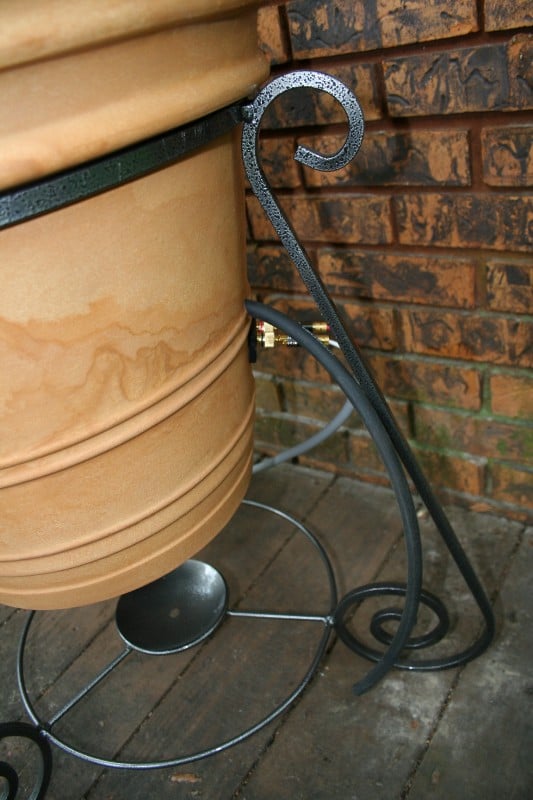 sure to do a little testing at first to ensure that your receiver isn’t
getting too hot. In what can only be called the most egregious overuse of power
in a review, I hooked up Emotiva
Audio’s RPA-1 (their reference two-channel amp) to the Terra Cotta 8.20’s.
Understand, PlanterSpeakers warns that any amp pushing over 150 watts (8-ohms) or 300 watts
(4-ohms) is hazardous and may violate electrical codes (the RPA-1 pushes 200
into 8 and 350 into 4 so I was a bit over
the line) so this is NOT recommended. But it was on hand, so that is what I
used.
sure to do a little testing at first to ensure that your receiver isn’t
getting too hot. In what can only be called the most egregious overuse of power
in a review, I hooked up Emotiva
Audio’s RPA-1 (their reference two-channel amp) to the Terra Cotta 8.20’s.
Understand, PlanterSpeakers warns that any amp pushing over 150 watts (8-ohms) or 300 watts
(4-ohms) is hazardous and may violate electrical codes (the RPA-1 pushes 200
into 8 and 350 into 4 so I was a bit over
the line) so this is NOT recommended. But it was on hand, so that is what I
used.
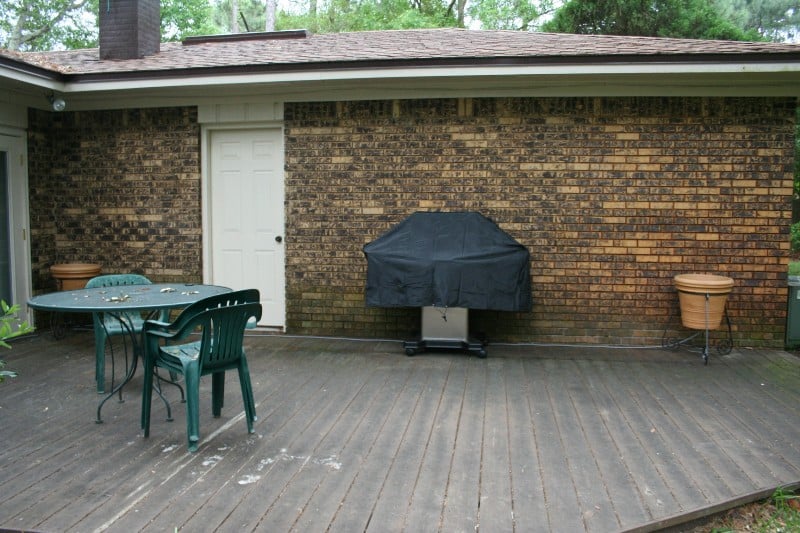
One conducts listening tests of speakers in the environment in which they were intended whenever possible. So I set up the Terra Cotta 8.20’s on my back deck. Both were near a wall with one in a corner. I have other area’s that could use speakers but these planters were so large, they really wouldn’t have fit. I don’t have speaker wire runs out to my deck so I just ran a few wires from inside the back door. I powered the speakers with an Emotiva RPA-1 using my Denon AVR-3805 as a preamp (I have the Emotiva RSP-1 preamplifier but it wasn’t as easily accessible as my Denon at that moment).
Terra Cotta 8.20 Listening Tests and Conclusion
Outdoor speakers are outdoor speakers right? Well, at this price, I’m expecting a bit more than just the ability to grow a couple of flowers in them. Luckily, the PlanterSpeakers Terra Cotta 8.20 gave me a listening experience beyond what I was expecting. I was hoping for a bit more bass, but the imaging and soundstage was quite nice.
CD: Rives Test CD 2 For $20 Rives has given many of us the ability to
quickly get an idea of the output of our speakers. It would be nice if they
provided a test tone for each frequency (rather than 1/3 octave) but honestly,
that is just too much for many of us. We are trying to get a rough idea so that
we can identify problem areas. And with the radio shack SPL corrected tones
that is as easy as possible. For me, I’m constantly looking for the bottom
range of a speaker. In this case the Terra Cotta 8.20 is rated down to 42 Hz.
In my set up, outside and against a wall (the first works against bass, the
second should increase it) I found that I didn’t really get meaningful output
until around 63 Hz and substantial output started around 100 Hz. This was quite
a bit higher than I expected and was hoping for. While not an egregious error,
it certainly meant that you’re going to have to look into an all-weather sub if
you want to get the full range of your music (don't worry, M>adison Fielding Inc sells those too).
For $20 Rives has given many of us the ability to
quickly get an idea of the output of our speakers. It would be nice if they
provided a test tone for each frequency (rather than 1/3 octave) but honestly,
that is just too much for many of us. We are trying to get a rough idea so that
we can identify problem areas. And with the radio shack SPL corrected tones
that is as easy as possible. For me, I’m constantly looking for the bottom
range of a speaker. In this case the Terra Cotta 8.20 is rated down to 42 Hz.
In my set up, outside and against a wall (the first works against bass, the
second should increase it) I found that I didn’t really get meaningful output
until around 63 Hz and substantial output started around 100 Hz. This was quite
a bit higher than I expected and was hoping for. While not an egregious error,
it certainly meant that you’re going to have to look into an all-weather sub if
you want to get the full range of your music (don't worry, M>adison Fielding Inc sells those too).
CD: Blue Man Group Demo CD I’ve never been one to expect much
from outdoor speakers. I’ve heard them, enjoyed them for what they were, and
went on with my little life. Sticking in this demo CD from the Blue Man Group I
thought was an unfair test. I couldn’t really expect outdoor speakers to stand up to this music, could I? Well,
apparently I could. Not only did the Terra Cotta 8.20’s handle the dynamics
well, but they imaged spectacularly! Well, spectacularly for outdoor speakers
with a 360 dispersion pattern. I was amazed at how good they sounded. The drums
were tight and the cymbals crisp. The vocals sounded very lifelike and were
well anchored between the two speakers. As long as I was between the two
speakers (which was pretty much anywhere on the deck) I experienced very decent
imaging. That’s a pretty big area!
I’ve never been one to expect much
from outdoor speakers. I’ve heard them, enjoyed them for what they were, and
went on with my little life. Sticking in this demo CD from the Blue Man Group I
thought was an unfair test. I couldn’t really expect outdoor speakers to stand up to this music, could I? Well,
apparently I could. Not only did the Terra Cotta 8.20’s handle the dynamics
well, but they imaged spectacularly! Well, spectacularly for outdoor speakers
with a 360 dispersion pattern. I was amazed at how good they sounded. The drums
were tight and the cymbals crisp. The vocals sounded very lifelike and were
well anchored between the two speakers. As long as I was between the two
speakers (which was pretty much anywhere on the deck) I experienced very decent
imaging. That’s a pretty big area!
I live on a 150’ by 150’ lot, about a third of which is behind the house. I walked all over my backyard and always had a decent amount of volume. Of course it decreased as I moved away (more so if there was an obstacle between me and the speakers) but that is to be expected. Essentially, these speakers could easily fill my entire backyard with pleasant background music without a problem. That’s a big sound from a fairly small package. There were loud enough that I could set up a small dance area near them but I’d want a few more if I wanted to have one of those rockin’ Columbian parties that Gene is always talking about. These speakers were loud enough to make me feel what bass they could produce in the deck.
CD: Yello
– the eye Track 5 "Junior
B" is my standby for testing
bass in loudspeakers. I usually use it to get an idea of how even the bass
response is of a given speaker or to test the differences before and after
implementing a subwoofer management system. Well, in this case, the bass run in
question was completely missing. Not tapered off, not attenuated… gone. This
supports my initial impression with the Rives CD that the bass response on these
speakers is a little anemic. You’re definitely going to want to boost your low
end for a more full range sound. Other than that, I was again struck by how
good the dynamics were and the solidity of the imaging. Overall, a very
pleasing experience. If I hadn’t known that I was missing some low bass, I
probably wouldn’t have noticed it.
Track 5 "Junior
B" is my standby for testing
bass in loudspeakers. I usually use it to get an idea of how even the bass
response is of a given speaker or to test the differences before and after
implementing a subwoofer management system. Well, in this case, the bass run in
question was completely missing. Not tapered off, not attenuated… gone. This
supports my initial impression with the Rives CD that the bass response on these
speakers is a little anemic. You’re definitely going to want to boost your low
end for a more full range sound. Other than that, I was again struck by how
good the dynamics were and the solidity of the imaging. Overall, a very
pleasing experience. If I hadn’t known that I was missing some low bass, I
probably wouldn’t have noticed it.
Recommendations
It isn’t hard to guess my recommendations here – more bass. But other than that, I’m hard pressed to find any major faults with these speakers. Kudos to PlanterSpeakers!
Conclusion
 I cannot stress enough that the Terra Cotta 8.20
doesn’t just look like a planter, it is a planter. That means you can plant
an actual plant in there. A real live one. Not some fake plastic thing, but a
real live plant. Soil, water, everything. It works just like any other planter
you’d buy at the store (except you have to run speaker wire to it and it makes
noise). This is a feature that I’m afraid too many people are going to
overlook. It is one thing to buy a speaker that looks like rock. It is another
to buy a speaker that is a rock.
While rocks have limited uses, planters do not. My parents are really into
plants (thanks HGTV for sucking up my meager inheritance though Japanese
Maples) and I don’t think I’ve been to their house twice and seen the same
plant in a planter. They are constantly switching them out. If you told my mom
that she could have two extra planters out there instead of outdoor speakers,
she’d jump at it.
I cannot stress enough that the Terra Cotta 8.20
doesn’t just look like a planter, it is a planter. That means you can plant
an actual plant in there. A real live one. Not some fake plastic thing, but a
real live plant. Soil, water, everything. It works just like any other planter
you’d buy at the store (except you have to run speaker wire to it and it makes
noise). This is a feature that I’m afraid too many people are going to
overlook. It is one thing to buy a speaker that looks like rock. It is another
to buy a speaker that is a rock.
While rocks have limited uses, planters do not. My parents are really into
plants (thanks HGTV for sucking up my meager inheritance though Japanese
Maples) and I don’t think I’ve been to their house twice and seen the same
plant in a planter. They are constantly switching them out. If you told my mom
that she could have two extra planters out there instead of outdoor speakers,
she’d jump at it.
The PlanterSpeakers Terra Cotta 8.20 fulfill a need you probably didn’t know you had – outdoor speakers that absolutely blend into almost any outdoor environment. Planters are something that everyone is used to seeing, so much so that they are often overlooked. I’ve seen people spend hundreds of dollars on designer planters just to have them covered by a large plant or simply ignored because people don’t look at them. Well, what better place to hide a speaker? They produce a big sound that easily fills a medium sized backyard, they image surprisingly well for outdoor speakers, and they have a 360 degree dispersion so that they can be placed most anywhere. Not to mention that they can ACTULLY BE USED AS PLANTERS! Pricey? Oh yeah. Worth it? Well, that’s up to you. But if I were looking for outdoor speakers, these would definitely make my short list.
The Score Card
The scoring below is based on each piece of equipment doing the duty it is designed for. The numbers are weighed heavily with respect to the individual cost of each unit, thus giving a rating roughly equal to:
Performance × Price Factor/Value = Rating
Audioholics.com note: The ratings indicated below are based on subjective listening and objective testing of the product in question. The rating scale is based on performance/value ratio. If you notice better performing products in future reviews that have lower numbers in certain areas, be aware that the value factor is most likely the culprit. Other Audioholics reviewers may rate products solely based on performance, and each reviewer has his/her own system for ratings.
Audioholics Rating Scale
 — Excellent
- — Very Good
- — Good
- — Fair
- — Poor
| Metric | Rating |
|---|---|
| Build Quality | |
| Appearance | |
| Treble Extension | |
| Treble Smoothness | |
| Midrange Accuracy | |
| Bass Extension | |
| Bass Accuracy | |
| Imaging | |
| Soundstage | |
| Dynamic Range | |
| Fit and Finish | |
| Performance | |
| Value |
As Associate Editor at Audioholics, Tom promises to the best of his ability to give each review the same amount of attention, consideration, and thoughtfulness as possible and keep his writings free from undue bias and preconceptions. Any indication, either internally or from another, that bias has entered into his review will be immediately investigated. Substantiation of mistakes or bias will be immediately corrected regardless of personal stake, feelings, or ego.
View full profile