
Axiom M60 v2 VaSSallo Series Tower Speaker Review
Axiom m60 v2
- Product Name: m60 v2
- Manufacturer: Axiom Audio
- Performance Rating:

- Value Rating:

- Review Date: January 29, 2007 20:50
- MSRP: $ 960/pair+ (as tested $1725/pair)
|
Enclosure:
|
Triple Vortex / Reflex
|
|
Max Amp Power:
|
250 Watts
|
|
Min Amp Power:
|
10 Watts |
|
Freq Resp +/-3dB (Hz):
|
37 - 22kHz
|
|
Freq Resp +3dB- 9dB (Hz):
|
27 - 22kHz
|
|
Impedance (Ohms):
|
8 Ohms
|
|
SPL in Room1w/1m(dB):
|
93 dB
|
|
SPL Anechoic 1w/1m(dB):
|
89 dB
|
|
X-Over
|
200 Hz & 2 kHz |
|
Tweeter:
|
Single 1"
|
|
Woofer:
|
Single 5.25"
|
|
Sub Woofer:
|
Dual 6.5"
|
|
Dimens. H W D (inches):
|
37.5" x 9.25" x 15"
|
|
Dimens. H W D (mm):
|
953 x 235 x 381
|
|
Weight (lbs) each
|
47.6 lbs
|
|
Weight (kg) each
|
21.591 kg |
Pros
- Beautiful finish
- Tons of finish options
- Detailed sound
Cons
- Flimsy grills
- High end finishes increases price significantly
- Prices have gone up substantially since publication of this review
Axiom M60v2 Introduction
You might think that the staff at Audioholics sit around and have a smorgasbord of speakers, amps, receivers, and accessories parade by as we pick and choose what we want. I’m here to tell you that is just not so (however much we might wish it were). We still contact each other saying, “Hey, you got a 3 meter HDMI to DVI cable? All I’ve got is 2 and 25 meter lengths.” It is, however, nice to have gear constantly flowing through your reference room – it certainly keeps things interesting. When Amie Colquhoun of Axiom Audio and Gene decided that perhaps I might be interested in checking out a pair of m60 v2’s and talk about the new VaSSallo finish options available, I was speechless. Might be interested?! Like I might be interested in a weekend without kids or a bag of gold or Peter Jackson directing The Hobbit. Heck yeah I was interested. The bonus – pick a finish, any finish. :-)
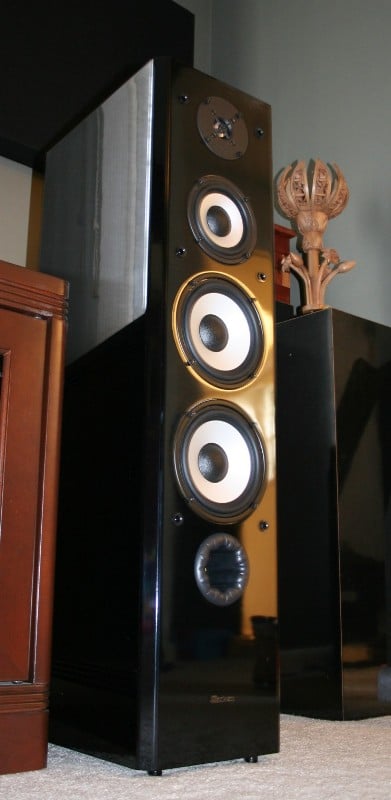
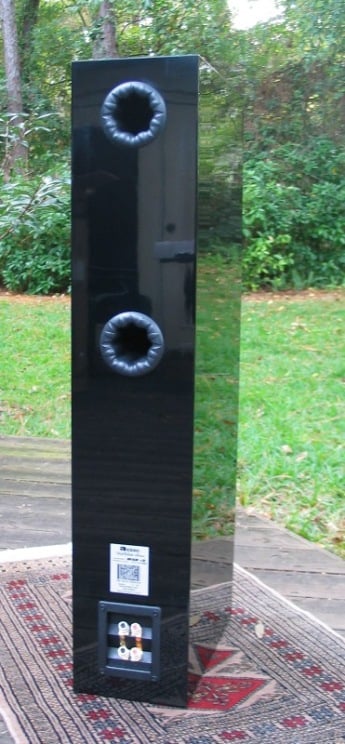
The Axiom M60v2's are a 3-way, 4 driver tower speaker featuring dual 6.5" bass drivers, one 5 1/4" mid driver and a 1" titanium dome tweeter. Standing about 38" tall and weighing almost 48lbs each, they are a medium size tower speaker system. Let's take a closer look at these speakers.
Axiom m60 v2 VaSSallo Series Speakers
For those of you that don’t know, Axiom Audio has started offering real wood finishes with their speakers. They are named in honor of Joe Vassallo who passed away recently. Their vinyl finishes were generally considered high quality… as vinyl goes. Personally, I’ve never seen a better standard vinyl finish on a speaker (they also offer custom vinyl finishes). As I was communicating with Amie, I mentioned that there were, by my count, 19 different finishes. She laughed and sent me a picture of the just some of the available finishes:
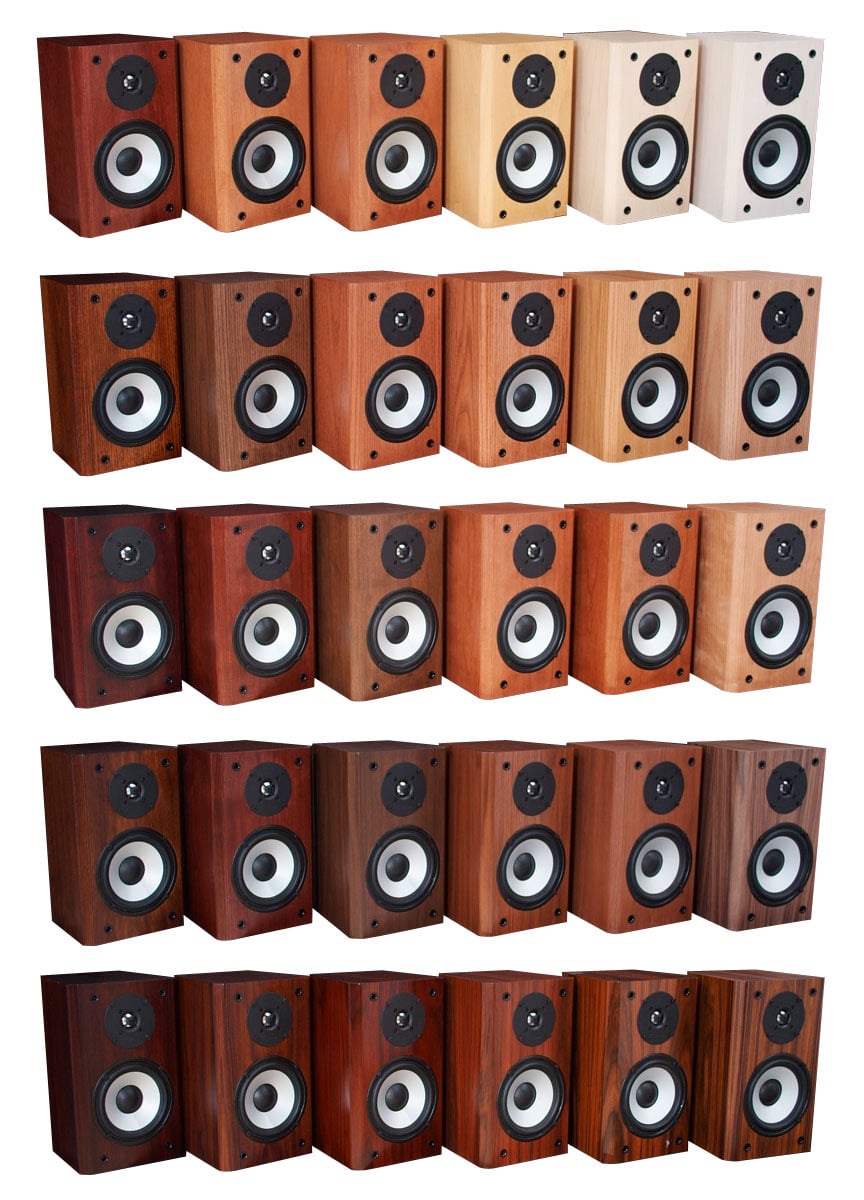
Apparently, my math was off that day. By my new count, I’ve got 110 combinations (6 woods, 6 stains, 3 finishes, plus 2 high gloss only finishes in black and white). Now if you factor in the 6 different grills, the 3 different accessory packages… well, you can see there are a lot of different combinations. While my original speakers were maple, lately we’ve been purchasing pieces of furniture of a number of different wood types. My wife and I took a long time deciding but eventually decided that it would be best to go with piano black, black grill, and black accessory package. It just goes with everything. At first I was worried about the choice to go with the black accessories (which includes the feet and the logo) but in the end, I liked it. I can’t stand gold on just about anything except bars so my only other real option was chrome. The chrome would have looked great but I really like the way the black just blends. The feet aren’t really at issue here as you can barely see them but the logo seems to disappear except when the light catches it just right. A very clean look.
But I didn’t want to short change our loyal readers (and all you interested in some of the other finishes) so I had Amie send me a number of samples. For just $25-$35 a pop (depending on the finish), you can order a 10 ½” by 8” piece of wood with a small grill and Axiom logo. This lets you see how the wood, stain, finish, grill, and logo color work together. The grill is actually removable so that you can have the entire surface area to compare to the rest of your furniture. Overall, it is a very effective method of making sure you are getting the right finish. Sure, $25 dollars isn’t chump change but it could be worth the piece of mind knowing that your new speakers won’t tick the wife off when it doesn’t exactly match that end table she inherited from her great aunt Edna.

Amie went ahead and forwarded me eight of the most popular combinations (aside from the piano black which I already had) and one of each grill color. All in all I got:
| Wood | Stain | Finish | Accessory |
| Maple | White Oak | Semi-Gloss | Chrome |
| Cherry | Natural | Semi-Gloss | Chrome |
| Cherry | Chestnut | High-Gloss | Chrome |
| Rosewood | Natural | High-Gloss | Gold |
| Oak | Nutmeg | Satin | Gold |
| Knotty Pine | Buttercup | Satin | Black |
| Walnut | Cinnamon | Semi-Gloss | Gold |
| Oak | Carmel | Semi-Glass | Gold |
This got me thinking, what exactly are the options… There are three finishes (Satin, Semi-Gloss, and High-Gloss) for all woods (except for the High-Gloss white and black obviously). There are six grill colors - Eggshell White, Warm Tan, Light Gold, Burnt Sienna, Charcoal, and Black. The stains, however, are a little different. All have a Natural option while the others very by wood:
|
Wood |
Stain |
Wood |
Stain |
|
Knotty Pine |
Buttercup |
Oak |
Buttercup |
|
Carmel |
Coffee |
||
|
Cinnamon |
Carmel |
||
|
Nutmeg |
Cinnamon |
||
|
White Oak |
Nutmeg |
||
|
Walnut |
Coffee |
Cherry |
Carmel |
|
Carmel |
Cinnamon |
||
|
Cinnamon |
Nutmeg |
||
|
Nutmeg |
Bordeaux |
||
|
Bordeaux |
Chestnut |
||
|
Rosewood |
Coffee |
Maple |
Buttercup |
|
Nutmeg |
Cinnamon |
||
|
Bordeaux |
Nutmeg |
||
|
Chestnut |
Bordeaux |
||
|
Red |
White Oak |
As you can see, there eight total stains but no one wood has the exact same list. To add to that, if you have a specific finish you want, you can send them a sample and they’ll try their best to match it. That essentially makes the list of available finishes “unlimited.” The price of the finishes depends on the type of wood and whether or not you want High-Gloss. All of the woods will change the price of the $960 pair of m60’s to $1380 (a 40% increase) except for the Rosewood which increases it to $1587 (65% increase). If you want High-Gloss, it will cost you $1725 (a 79% increase) except for Rosewood which will run you $1932 (just over doubles the price). High gloss costs more because it is 12 coats, applied by hand. For that sort of extra labor and attention, one would expect to pay a premium.
 When
looking over the samples, all are impressive in some way (which is not a cop out). The colors are all very
vibrant and just scream tender love and care. Personally, I found that any of
the samples with the High-Gloss immediately drew my attention. There is just
something about that “clear pond in the morning” finish that just demands
attention. The oak with the satin finish still retained some of the texture of
the grain which was the only one with this characteristic. The rest were
smooth. The Cherry with the Chestnut High-Gloss finish was practically purple.
While not my first choice, it was very interesting in a “not my house” kind of
way. I actually know someone where the sentence, “But we can get them in purple,” would be a selling point.
When
looking over the samples, all are impressive in some way (which is not a cop out). The colors are all very
vibrant and just scream tender love and care. Personally, I found that any of
the samples with the High-Gloss immediately drew my attention. There is just
something about that “clear pond in the morning” finish that just demands
attention. The oak with the satin finish still retained some of the texture of
the grain which was the only one with this characteristic. The rest were
smooth. The Cherry with the Chestnut High-Gloss finish was practically purple.
While not my first choice, it was very interesting in a “not my house” kind of
way. I actually know someone where the sentence, “But we can get them in purple,” would be a selling point.
Which is
the point of all this. Sure vinyl can be made to look fairly close but in all
reality, nothing beats the real thing. Wood feels different, it smells
different, and from speaker to speaker, no two are exactly the same. Sonically,
we all know it doesn’t make a difference but that’s not the point. Some people
just like to have nice things while others are fine as long as it works and it
is cheap. Axiom now serves both those needs. With the level of customization, I
can’t imagine that you’ll hear someone say, “Sure, but they didn’t have the
finish I wanted.”
Axiom M60 v2 VaSSallo Series: Unpacking and Setup
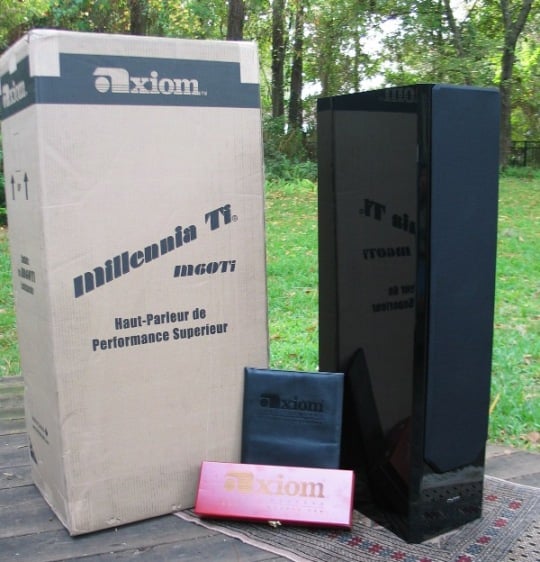 It took about six weeks for the speakers to arrive.
Talk about the longest six weeks of my life! The m60 v2’s came in two separate
boxes (as to be expected with floorstanding speakers. Each speaker was well
packed inside of a black bag with foam all around. Where the foam touched each
the speakers, a strip of rubber insulating tape was added to reduce any chance
of damage. Generally, an edge or two of the tape would come loose and stick to
the bag so in my opinion, the tape was a bit more trouble that it was worth.
Basically, the speakers are packed upside down so that when you open the top,
you can remove the foam, open the bag, and just kind of pour the speaker out. If you’re smart (and I’m not saying that I
was), you’ll open up the small box
first.
It took about six weeks for the speakers to arrive.
Talk about the longest six weeks of my life! The m60 v2’s came in two separate
boxes (as to be expected with floorstanding speakers. Each speaker was well
packed inside of a black bag with foam all around. Where the foam touched each
the speakers, a strip of rubber insulating tape was added to reduce any chance
of damage. Generally, an edge or two of the tape would come loose and stick to
the bag so in my opinion, the tape was a bit more trouble that it was worth.
Basically, the speakers are packed upside down so that when you open the top,
you can remove the foam, open the bag, and just kind of pour the speaker out. If you’re smart (and I’m not saying that I
was), you’ll open up the small box
first.
The small box that came with the two larger speaker boxes contained three things. First there was a leather bound folder than contained a little information about the speakers, setup, and such. Then there were two rectangular wood boxes with the Axiom logo on the top (it looked like they painted the boxes red and removed an Axiom logo sticker from the top so that the wood underneath showed through) and a gold latch. You open the box and encased in black foam are four adjustable spikes, four adjustable rubber feet, a couple of wrenches (in case you ever wanted to open your speakers up), and a black cloth to rub down those gorgeous speakers.
 Now anyone that has read one of my reviews knows that
I’m a sucker for this type of stuff. Fit and finish is one thing, performance
is of course all important, but if I have to dig my new equipment out of a box
of styrofoam peanuts, I’m going to think you skimped and that perhaps I
overpaid. Axiom makes sure that when
you get their premium finishes, you know that
they take it as seriously as you. You can more than double the cost of one of
their speakers with these upgrades so I feel it is appropriate that the
appropriate level of attention to detail is taken. But the REAL icing on the
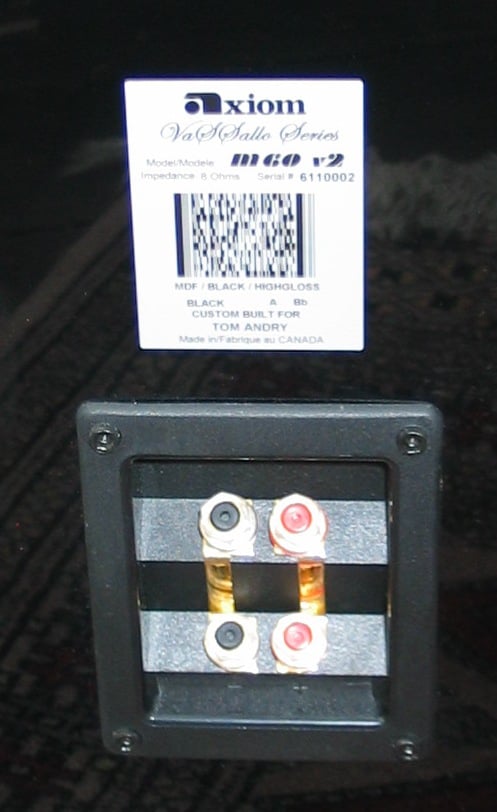
cake was the label on the box and the back of the speakers… “Custom Built for
Tom Andry.” Oh yeah, that’s something
you show your friends!
Now anyone that has read one of my reviews knows that
I’m a sucker for this type of stuff. Fit and finish is one thing, performance
is of course all important, but if I have to dig my new equipment out of a box
of styrofoam peanuts, I’m going to think you skimped and that perhaps I
overpaid. Axiom makes sure that when
you get their premium finishes, you know that
they take it as seriously as you. You can more than double the cost of one of
their speakers with these upgrades so I feel it is appropriate that the
appropriate level of attention to detail is taken. But the REAL icing on the
cake was the label on the box and the back of the speakers… “Custom Built for
Tom Andry.” Oh yeah, that’s something
you show your friends!
Once I took a few pictures, I dragged the speakers into the house. The twin ports on the back and the single port on the front near the bottom give the speakers a much needed handhold. As much as I like the High-Gloss finish, it can be a bit slick at times. As I was moving the Onix Rocket RS450’s away, it was obvious that the m60’s were quite a bit lighter… over 20lbs according to the respective websites! I turned the speakers over and started the process of installing the feet.
Some people like spikes regardless of the surface while others prefer rubber feet. Spikes on wood or tile usually requires some sort of small metal penny sized round with a dimple in the center to ensure that your floors aren’t damaged. As much fun using spikes on carpet is, trying to set them up on hardwood sounds like an exercise in frustration, pierced feet, and ruined floors/marriages. Luckily I don’t have that problem – I’ve got carpet. The problem I do have is that the carpet basically sits on a concrete slab that may or may not (I’m voting the latter) have a level surface. This makes leveling out a speaker and getting them really stable a bit troublesome. But, before I dealt with that, I had to deal with installing the spikes.
Now, I’m not sure exactly what the problem was, but installing these spikes was a lesson in pain. No, I didn’t give myself a stigmata or anything but I did find that the threaded inserts were clogged with some sort of white powder (I assume it has something to do with the finishing process). Whatever it was, it made installing the spikes extremely difficult. I ended up having to screw them in as far as they would go, back them back out, clean out the insert as best as possible, then start again (and yes, I did try to clean them out once I realized the problem – it didn’t help). Out of the eight spikes, one went right in, two went is fairly easily, five were VERY difficult, and one I was never able to actually get all the way in. By the time the whole ordeal was over, I had two blood blisters on my index finger and I couldn’t make a fist for an hour. I’d encourage Axiom to ensure the feet will be installed easily in the future.
 After the spikes were pretty much installed, I set
them up very near the placement of the m22s. Believe it or not, because of the
bizarre configuration of the base of the Full Metal Stands, the m60’s
have a smaller footprint. With my original entertainment center which was
raised off the ground, the stands worked well because I could slip them underneath.
The three foot configuration also made the stands a bit easier to level.
Regardless, the spikes are the same. There is the main body of the spike which
screws into the speaker. Then there is a smaller “washer” that can be locked
down if you need to loosen up the spike in order to level it. What ends up
happening is that you set the speaker down, push on the top and sides to see
where it wobbles, tip it over and adjust the spike, and repeat. Once you get it
stable, you tighten the washer down so that the spike doesn’t move. Or, you can
be like me, and once you get it stable, you walk away and leave it alone.
After the spikes were pretty much installed, I set
them up very near the placement of the m22s. Believe it or not, because of the
bizarre configuration of the base of the Full Metal Stands, the m60’s
have a smaller footprint. With my original entertainment center which was
raised off the ground, the stands worked well because I could slip them underneath.
The three foot configuration also made the stands a bit easier to level.
Regardless, the spikes are the same. There is the main body of the spike which
screws into the speaker. Then there is a smaller “washer” that can be locked
down if you need to loosen up the spike in order to level it. What ends up
happening is that you set the speaker down, push on the top and sides to see
where it wobbles, tip it over and adjust the spike, and repeat. Once you get it
stable, you tighten the washer down so that the spike doesn’t move. Or, you can
be like me, and once you get it stable, you walk away and leave it alone.
This is all fairly standard for any “spiked” application. The Axiom spikes have the advantage of being very well machined to a perfect smoothness. When the washer is locked down to the top of the spike, it is virtually invisible. They become, as one. Other spikes I’ve used have had more texture to them and are usually brass (which I don’t particularly care for). The Axiom spikes definitely look better though the typical spikes have the advantage of the texture for ease of installation. With Axiom’s spikes, they are so smooth (and in my case, some were so torqued) that it was nigh impossible to know if you were actually moving them during an adjustment. In the long run though, they are going to spend a lot more of their lives just sitting there looking good than they are being adjusted (one hopes) so a sacrifice for the sake of form is apropos.
If you’re smart (and I’m not saying that I was) you’ll have played with toe in and such before you level the speakers. As I’ve found with the m22ti’s, the m60’s do a bit better to my ear with a slight toe in. I have a loveseat configuration at the center of my theater seating so I basically point the right speaker over the right arm of the loveseat and the left over the left arm. If you are not sure how well you have your speakers aimed, consider using a laser pointer. Just place it on top perpendicular to the front baffle and you’re good to go. I always start with straight forward, then toed directly at the prime listening position, and adjust from there. Try to find a CD with a lot of pans. This will help you determine if the speakers are properly balanced.
 The speaker
terminals on the m60 v2’s are the same as the ones on the m22ti’s. Many of the
speakers I’ve reviewed recently have the terminals with a clear plastic
covering. The Axioms are all metal 5-way gold plated binding posts. The
speakers are bi-wire/bi-ampable and come equipped with a gold plated strap
connecting each pair of terminals (red to red/black to black). You can leave
that as is (thought you probably want to make sure the posts are locked down to
keep the strap from vibrating) unless you plan on bi-amping. Since we’ve never
seen any convincing evidence that bi-wiring has any positive effect, you can
just rule that one right out. As the m60’s present a fairly easy load, most
mid-fi receivers will have no problem driving them. If you have amps lying
around or you have a terminal case of upgraditis and nothing else to spend it
on, go ahead and remove the straps and connect a separate amp to each of the
pairs of terminals and balance the levels. One will power the tweeter and the
other will power the woofers. I think it’s a waste, but hey, it’s your money.
The speaker
terminals on the m60 v2’s are the same as the ones on the m22ti’s. Many of the
speakers I’ve reviewed recently have the terminals with a clear plastic
covering. The Axioms are all metal 5-way gold plated binding posts. The
speakers are bi-wire/bi-ampable and come equipped with a gold plated strap
connecting each pair of terminals (red to red/black to black). You can leave
that as is (thought you probably want to make sure the posts are locked down to
keep the strap from vibrating) unless you plan on bi-amping. Since we’ve never
seen any convincing evidence that bi-wiring has any positive effect, you can
just rule that one right out. As the m60’s present a fairly easy load, most
mid-fi receivers will have no problem driving them. If you have amps lying
around or you have a terminal case of upgraditis and nothing else to spend it
on, go ahead and remove the straps and connect a separate amp to each of the
pairs of terminals and balance the levels. One will power the tweeter and the
other will power the woofers. I think it’s a waste, but hey, it’s your money.
The only
real concern I had about the High-Gloss finish, other than keeping the kid’s
hands off it, was reflections. My speakers flank my component stand. I was
worried that the speakers would reflect whichever display I was using that
week. And while the speakers are highly reflective, I was never once bothered
by glare. This is probably because I have them toed in but you need to remember
that the Axioms have a trapezoidal shape which further angles the side of the
speaker away from the display. I suppose in a different application there might
be problem but I haven’t experienced any.
Axiom M60 v2 VaSSallo Series: Build Quality
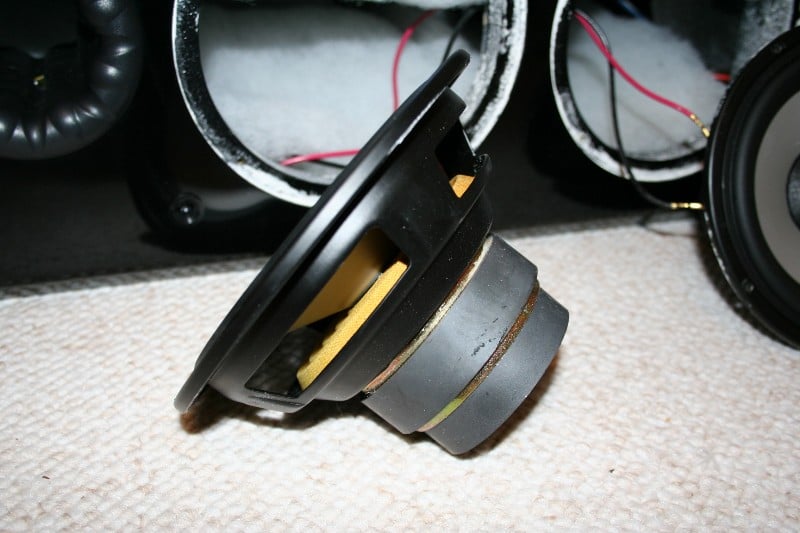
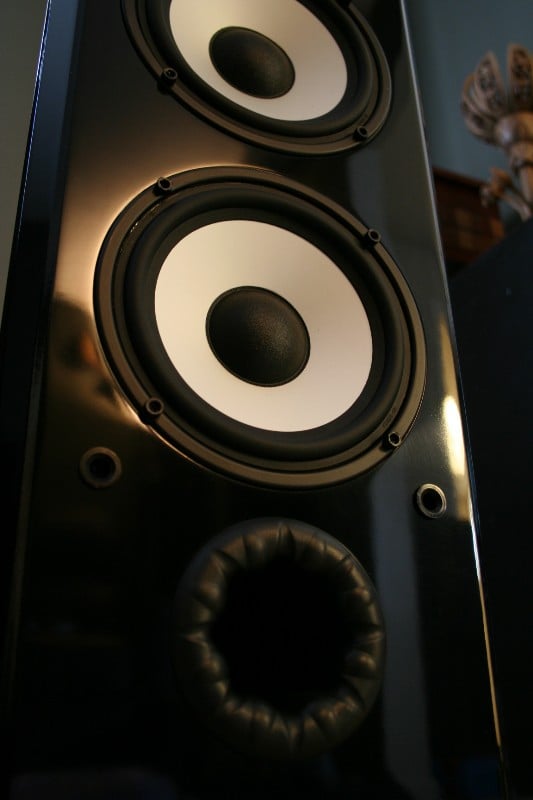
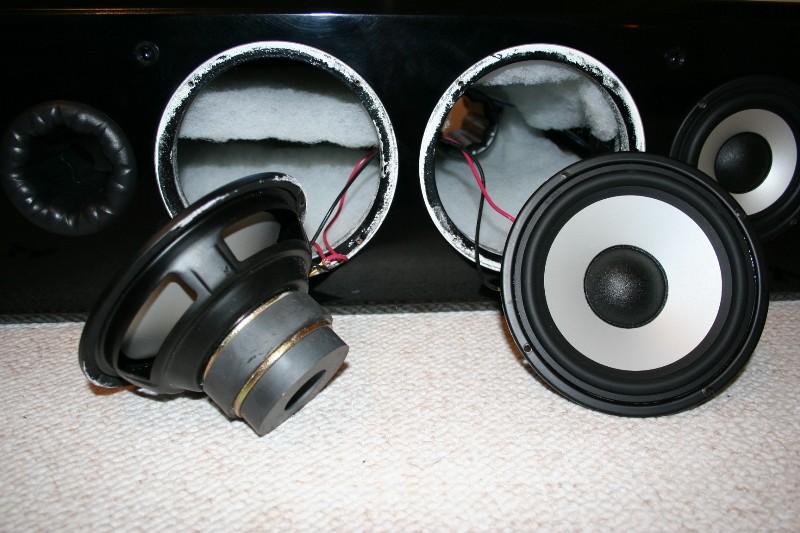 Even though I was hesitant to do so, I was behooved to dissesmble the m60's as best I could. I'm sorry, but one doesn't come that close to a finish that nice with a long pointy object. It's just wrong. Still, it's my job, so I did. Removing the bottom two 6.5" woofers wasn't really a problem, they popped right out. I had a problem when I tried to remove the 5.25” woofer and the tweeter. Once I got the two 6.5 inch woofers off and got my hand in there, I saw the problem. The 5.25” woofer is actually encased in a sealed cylindrical enclosure. This ensures the proper box volume for the midrange to operate and isolation from the rest of the enclosure for optimal performance. The wires are run to the woofer through the bottom of the enclosure and sealed with caulking. The m60's have 3 "vortex" ports: One on the front baffle and two on the back. the two back ports are directly behind the tweeter and the top 6.5" woofer.
The speaker cabinet is lined with a polyfill that is glued to the sides. The wires are mostly run underneath the polyfil and are secured as well. There is a single brace running across the width between the top 6.5” woofer and the 5.25” woofer enclosure. I got my arm all the way up there and tried to push the tweeter out from behind. Apparently, the drivers were installed before the finish was completely dry because I couldn’t get it out. I thought about trying to pry them out with a butter knife but I could feel the god of audio put his finger on the “smite” button. So I didn’t.
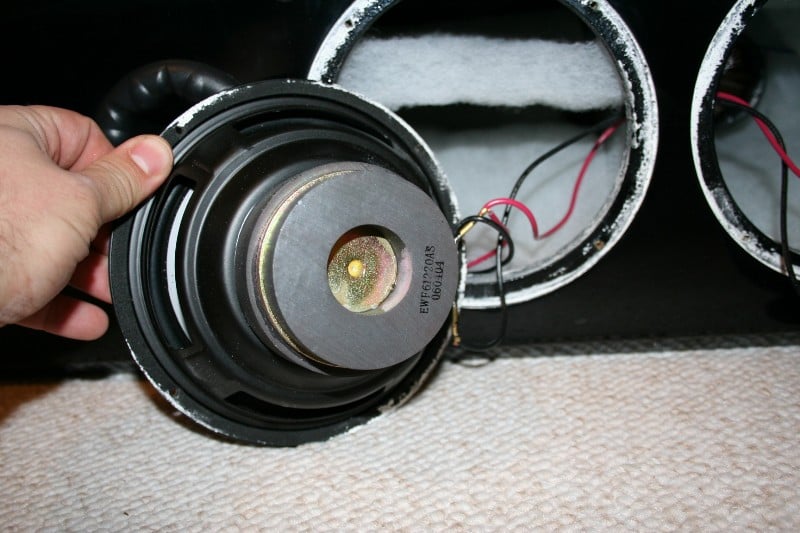
I was able to confirm that the white substance that was stuck in the threaded inserts for the feet was in fact part of the finish. It ringed the drivers. It was very chalky and got everywhere. After I reinstalled the drivers I ended up having to take a toothbrush to clean the chalk out of all the little grooves on and around the drivers.
Axiom M60 v2 VaSSallo: Sound Quality Tests
Before getting into the specifics of the listening sessions, I want to talk about timbre matching. If you’ve spent any time at all on any audio/home theater forum, you’ll be told that it is important to match your front three speakers. Part of me has always had this nagging doubt in the back of my mind. If you level match, the differences should be negligible right? Well, wrong. I have owned Axioms for a while but I reviewed a pair of Onix Rocket RS450s. After the review, the speakers were homeless for a while. So I left them set up. They look nice and people would ogle over the finish. But I found that when playing movies, I would be straining to hear the center channel (even though levels had been matched).
This was especially prevalent on the Pixar movie Cars. The vocals were recessed to the point where I had to bump up the center channel 3-5 dB just to even everything out. You see, I like to keep things as “pure” as possible (within reason) so if the source is two channel – I listen to it in two channel. As I don’t have digital cable, all TV and most of my music is in two channel. Therefore, I didn’t really realize the problems with timbre matching at first. Once I hooked up the m60’s, I found that many of these problems went away. The soundstage during multi-channel music and movies was also much better realized in the space… something that you don’t really know you’re missing until it’s back. Of course, given the option, having three identical speakers across the front would be the ultimate, but for most of us that isn’t really viable. Now with a projection screen and a dedicated room… there is really no excuse.
Often, it is the first few moments of listening to a new set of speakers that are the most revealing. It is one thing to hear a large soundstage at Gene or Clint’s house – they have huge speakers. But they also have different rooms, different acoustics, and frankly, I’m not used to listening in those spaces. The first thing, the VERY first thing I noticed was a considerable increase in the size of the soundstage. I’d say at least 50% larger. I was amazed. With the larger speakers, I expected a difference, but not one that was so noticeable.
 Once again
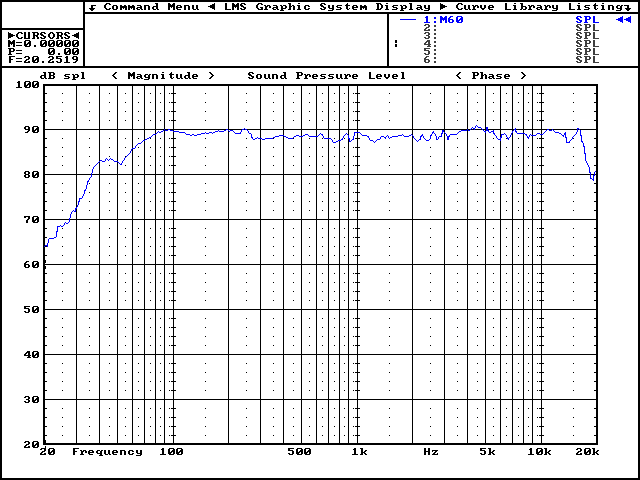
I popped in my Rives Test CD2 to get an idea of the usable bass from these
speakers. According to the website, they are good down to 37Hz (+/- 3dB). In my
room I could hear the speakers attempting output at 20 and 25Hz (a light
flapping as the drivers pumped their little hearts out – completely inaudible
with any other output from the speakers). I definitely had some useable bass at
31.5Hz. At 40Hz, there was a considerable increase in SPL which was comparable
the higher frequencies. While not full range, these speakers should be able to
produce all but the most demanding bass passages. At reference levels, the
m60’s v2 made my couch vibrate. In my book, that’s a winner!
Once again
I popped in my Rives Test CD2 to get an idea of the usable bass from these
speakers. According to the website, they are good down to 37Hz (+/- 3dB). In my
room I could hear the speakers attempting output at 20 and 25Hz (a light
flapping as the drivers pumped their little hearts out – completely inaudible
with any other output from the speakers). I definitely had some useable bass at
31.5Hz. At 40Hz, there was a considerable increase in SPL which was comparable
the higher frequencies. While not full range, these speakers should be able to
produce all but the most demanding bass passages. At reference levels, the
m60’s v2 made my couch vibrate. In my book, that’s a winner!
Finally, after setting the m60’s to “Large” and the subwoofer to “off” on my Denon AVR-3805, I got down to some serious critical listening.
 CD: Jacintha Here’s to Ben, A Vocal Tribute to Ben
Webster
CD: Jacintha Here’s to Ben, A Vocal Tribute to Ben
Webster
This album was made as a tribute to
the famous saxophone player Ben Webster. Jacintha’s soulful vocals are backed
by a piano, a lightly fanned snare, the occasional cymbal, and a standup bass
guitar. The whole album is very well recorded with the utmost care taken to preserve
the quality of the original performance. If you like slow jazz, this is a good
album. Jacintha’s vocals are soulful and beautiful. The musicians on the album
do a stellar job and should be commended. If I have to make a serious criticism
of the album, I’d say that the noise floor is a bit high. It is annoying to
hear the “hiss” cut out between tracks. Best of all, this is a SACD hybrid
meaning you can enjoy this album while you’re waiting for your better half to
OK an SACD player.
The m60
v2’s presented a convincing soundstage and lived up to their “revealing”
reputation. Every breath, every move of the lips was recreated so accurately
and untainted, so that at times I literally felt like the microphone
(especially during Track 3 – Tenderly)
was right in front of me. The m60’s put out a very respectable amount of bass and I felt I was missing very
little if anything by not having a subwoofer engaged. As I turned up the volume
to reference levels, I never felt the m60’s or my Denon straining. While I don’t
think a little more headroom would hurt (the sound quality started to decrease
as we reached and surpassed reference levels), it definitely wasn’t needed. And
I was playing it LOUD.
CD: Sting
Ten Summoner’s Tales
I’ll be honest, I’m not really a
Sting fan. My favorite Sting “performance” was in the David Lynch version of Dune. But recently I found a box of CDs
that was tucked away in a closet since we moved here from Los Angeles (says my
wife, “I knew I had more CDs than
that”). So I spent the better part of a weekend loading them up into the HTPC.
One of those CDs was Ten Summoner’s Tales.
As I was flipping through the menu, looking for albums to use for this review,
I wanted something a little more rock and a little less jazz but with a fairly
high production value. I stopped on this one thinking I’d found it but while I
got the fairly high production value, I got more pop than rock and more country
than jazz. So, in the end, I’m still not
a Sting fan. But I don’t have to be a fan to recognize whether or not the
speakers are distorting the music. In this specific case, I’m looking to see if
all of the guitar, snare, and other “high” instruments become “piercing”. Once
again, if you spend any time on audio forums you learn that Axioms are
“bright”… unless you talk to an actual Axiomite who will tell you that they are
“revealing” or “accurate.” So what’s the truth?
Well that depends. It depends on your room, on your ears, and most of all, your speaker wire. OK, that last one was BS but the first two are true. If I had to use a word to describe Axioms as a whole, I use the word “unforgiving.” These are the type of speakers that say, “Hey, I’m just playing this stuff, I didn’t record it!” That being said, the m60’s seem to be a tiny bit more forgiving than the m22’s. The m22’s are brutal in their dedication to accurate sound reproduction. If I had a recording studio, I’d want m22’s in it. At least then, you’d know what you were recording. The m60’s, while maintaining what I would call an extremely high level of fidelity, don’t seem to be as hard edged as the m22’s. To use an analogy, the m22’s give you the bad news straight; the m60’s at least pat you on the shoulder while they deliver the news.
I flipped between a “Large/Off” (speaker size/subwoofer) and “Small/On” to see how well the m60 v2’s were handling the bass. No problems there. There was a bit more tactile bass with the sub on, but I didn’t miss it when it was off. This reaffirmed my belief that for 90% of the music out there, you just don’t need a sub if you have a decent pair of floorstanding speakers. I will say that at times, at extremely high volumes the m60’s did get a bit fatiguing but less so than the m22’s. Personally, I almost never listen to anything this loud (95+ dB). This seemed to be as much a function of the type of music and how well it was recorded rather than anything else. With all the guitar, snare and keyboards in Ten Summoner’s Tales, not to mention some of the high notes Sting can hit, I really couldn’t listen to it for very long at that volume. At reference levels, the music was so in your face that it felt like Sting (or whoever was singing at the time) was performing behind you.
Recommendations
Of course, I'm not without a few recommendations. As I mentioned, I had a hard time getting the feet on. I'm not sure if it is unique to the High Gloss finish process (with the 12 hand applied layers) or not, but I'd like to be able to seat the feet quickly and easily. One common comment about Axiom speakers is the flimsy grill and I'll echo that here. The material isn't all that tight and the frames tend to bend under pressure. For most people, grills are little more than an aesthetic addition. For someone with young, learning to walk, children I'd prefer something a little more sturdy. Lastly, even once the feet were seated, the speaker still wobbled a bit. It was if the metal inserts were moving inside.
Conclusion
 I’ve got a fairly small room and I’ve always wondered
what a true floorstanding speaker would sound like in here. Would it be too
much? Would I be able to tell the difference between them and a bookshelf with
a sub? Would I ever convince my wife it was a good idea? Well, in order, No,
Yes, Yes. While the m60’s are obviously able to fill a much larger room than
mine, I wouldn’t say that they were too much. If someone was trying to cut a
few corners in their budget would I say that the m22’s (or another
bookshelf/sub combo) would be a considerable step down? Not at all… in my size
room. The m60’s need a sub for movies anyhow. But if you have the money and you
want a significantly larger soundstage and more SPL, the m60’s are a fabulous
choice.
I’ve got a fairly small room and I’ve always wondered
what a true floorstanding speaker would sound like in here. Would it be too
much? Would I be able to tell the difference between them and a bookshelf with
a sub? Would I ever convince my wife it was a good idea? Well, in order, No,
Yes, Yes. While the m60’s are obviously able to fill a much larger room than
mine, I wouldn’t say that they were too much. If someone was trying to cut a
few corners in their budget would I say that the m22’s (or another
bookshelf/sub combo) would be a considerable step down? Not at all… in my size
room. The m60’s need a sub for movies anyhow. But if you have the money and you
want a significantly larger soundstage and more SPL, the m60’s are a fabulous
choice.
To my mind, Axiom’s new VaSSallo series speakers finally gives discriminating buyers a chance to have a reasonably priced high performance speaker wrapped in a high-end package. Sure they cost more and it won’t make it sound any better but now you can match the furniture. You can brag about the real wood veneer. You can point to the custom tag on the back. You can shut up all your friends whose only real complaint they could ever come up with against Axioms was the vinyl finish. While many might not see the extra cost as justified, others will. And that is what is important. Axiom is offering a little something for everyone and they should be commended for it.
The Score Card
The scoring below is based on each piece of equipment doing the duty it is designed for. The numbers are weighed heavily with respect to the individual cost of each unit, thus giving a rating roughly equal to:
Performance × Price Factor/Value = Rating
Audioholics.com note: The ratings indicated below are based on subjective listening and objective testing of the product in question. The rating scale is based on performance/value ratio. If you notice better performing products in future reviews that have lower numbers in certain areas, be aware that the value factor is most likely the culprit. Other Audioholics reviewers may rate products solely based on performance, and each reviewer has his/her own system for ratings.
Audioholics Rating Scale
 — Excellent
- — Very Good
- — Good
- — Fair
- — Poor
| Metric | Rating |
|---|---|
| Build Quality | |
| Appearance | |
| Treble Extension | |
| Treble Smoothness | |
| Midrange Accuracy | |
| Bass Extension | |
| Bass Accuracy | |
| Imaging | |
| Soundstage | |
| Dynamic Range | |
| Fit and Finish | |
| Performance | |
| Value |
As Associate Editor at Audioholics, Tom promises to the best of his ability to give each review the same amount of attention, consideration, and thoughtfulness as possible and keep his writings free from undue bias and preconceptions. Any indication, either internally or from another, that bias has entered into his review will be immediately investigated. Substantiation of mistakes or bias will be immediately corrected regardless of personal stake, feelings, or ego.
View full profile