
Universal Remote Control MX-950 Aurora Review
Universal MX-950 Aurora Remote
- Product Name: MX-950 Aurora Remote Control
- Manufacturer: Universal Remote Control
- Performance Rating:


- Value Rating:
- Review Date: December 19, 2005 19:00
- MSRP: $ 699
|
MX-950 ‘Aurora' IR/RF
Remote Features: |
Includes: MRF-300 Multi-Zone RF Receiver with RFX-150
Antenna Includes: |
Pros
- Sound effects & LCD backlighting options
- Ergonomic feel with "dual grips"
- 1.5" x 2.7" color LCD screen
- Li-ion rechargeable battery with docking cradle
- IR/RF compatibility
- Flagship remote feel & performance
- Fast USB 2.0 updating
Cons
- Database doesn't contain latest hardware
- Somewhat dated programming interface
- Doesn't recharge when plugged in via USB
- Relatively short battery life
MX-950 Aurora Overview & Build Quality
I've found that you can buy the best equipment, have the greatest seats, and the biggest screen. But if you're picking up and dropping various remotes to demo your system in front of your friends, you're only going to succeed in making them wonder why anyone would go through all that trouble. Sure, you may be impressed that you know which remote goes to what and how to get everything to operate as it needs to - but your friends will be focusing on you instead of the room. Run, don't walk, and get thee to a remote control that really works.
My current remote control is Universal Remote's Home Theater Master MX-700 . This is an excellent remote control, but was somewhat less impressive once I moved all of my home theater source components to an equipment room behind the listening position. Suddenly, the coolest IR remote I had ever used lost its edge (as all of you who have ever aimed a remote backwards over your head will sympathize). The Universal Remote MX-950 (and MRF-300 RF receiver) was going to provide a new level of convenience by integrating the ability to use RF (radio frequency) in my home theater. Finally, no more funky aiming to control the system - just click and relax.
The Magic of RF
RF - so what's the big deal? Well, I'll tell you. RF remotes allow you to simply utilize a remote control from virtually any room in the house to control a system - or multiple systems. They work, through walls, around corners, through people, underwater... ok, maybe not underwater. The point is, whereas you are tied to line-of-sight with an IR remote (the most common type of remote control) you are not with an RF based remote.
RF remotes generally work this way: The originating signal is sent from the remote as RF (radio frequency - in this case 418MHz, a very stable and reliable frequency band). This signal is read by an antenna module, the RFX-150 which transfers it to a receiver - the MRF-300. Some receivers have a built in antenna, but the ability to remotely locate the antenna adds another level of usability to the RF system. At this point, the receiver translates the RF signal into standard IR commands which are ready by A/V equipment. These IR commands can be sent via IR blasters (tiny IR emitting diodes that affix to your gear and are connected to the receiver), transmitted over direct IR connection to the rear panel inputs of compatible devices, or emitted directly from the receiver itself as IR signals.
Confused yet? Don't be. The basic idea is that the remote sends a radio signal to a box that translates that signal back to IR (infrared). Because the actual remote uses radio waves, you can walk around, go to the next room, and point the remote any-which-way and you're A/V equipment still responds as if it received a direct line-of-sight IR command. Voila - instant home theater bliss.
Build Quality
My first impression of the remote control was "Oh my, this thing is huge!" After taking a second look, and comparing it to my MX-700, I quickly realized that it is smaller in all but one dimension. While it adds .625" in height, it does so while taking off .7" in width and .3" in depth. The result is a rather trim remote that maximizes its use of ergonomic space. Put next to a Harmony remote it literally dwarfs the smaller activity-based remote. If the Harmony is a convenient tool - the Aurora is a machine .
Universal Remote built the Aurora with ergonomics in mind. If you look you can't help but notice the dual indents on each side of the MX-950. I quickly found that when my middle finger and thumb were in the top indents, the top LCD buttons were in easy reach, as were the channel and volume controls. By allowing my hand to drop down to the lower indents, I was provided with convenient access to the navigation and keypad controls. After only a couple minutes I managed to work out a quick hand motion that would allow the remote to shift up and down as needed to grant me access to the buttons I needed.
 The
remote is divided up into two main areas (noted by the red and blue boxes I added to the photo on this
page). The top area is the dynamic LCD buttons and "Listen"
&
"Watch" activity buttons. You'll
likely use this to initiate your desired activity as well as access higher level functions beyond
volume, channel and navigational controls. The lower area makes up the rest of the remotes hard
buttons, including the above mentioned functions, DVR controls, and full 10-digit keypad.
The
remote is divided up into two main areas (noted by the red and blue boxes I added to the photo on this
page). The top area is the dynamic LCD buttons and "Listen"
&
"Watch" activity buttons. You'll
likely use this to initiate your desired activity as well as access higher level functions beyond
volume, channel and navigational controls. The lower area makes up the rest of the remotes hard
buttons, including the above mentioned functions, DVR controls, and full 10-digit keypad.
Buttons, Buttons, Buttons...
The buttons and controls on the MX-950 Aurora feel, well, rock solid. They have a definite depression point, so you know you've pushed a button successfully. Indeed, they are the first type of button to impress me more than the GemStone style controls found on the MX-700.
The ergonomic layout of the controls is just that - ergonomic - meaning that the thumb (my main "button-pusher") could easily land where it needed. In fact, when looking at the remote I initially felt as if they had left off some important button. There simply didn't seem to be enough of them to handle all of the functions I am used to. After taking some time to look over the layout - I quickly realized that it had more buttons than my reference MX-700. The extra buttons showed up as dual-mode "Back" and "Ahead" buttons and a new "Page Backwards" button (so you don't have to toggle through all of the page to get to one you were just on.) The activity buttons, "Watch" and "Listen" are, of course, also new.
MX-950 Aurora Setup Overview
Universal Remote Control recommends the Aurora be programmed by a professional audio/video installer - and for good reason. First of all, many local dealers will be able to give you advice and recommendations on the optimal configuration of your home theater system in addition to simply selling you the remote control. Secondly, the MX-950 is not the easiest remote control to configure - especially if you are using it in conjunction with an RF receiver like the MRF-300 we utilized in conjunction with this review. The reason it is not easily configured and programmed is because it is infinitely customizable. Over the years I have found a device's simplicity is almost always inversely proportional to its customizability. The easier a system is to use, the less you can do with it.
Here's the basic process for setting up the Universal Remote MX-950 remote to control a typical home theater system:
- Install the software and load batteries into the remote control. Charge if needed on the included charging cradle.
- Open the MX-950 Editor software and start a new file to use for your home theater system
- Follow the program menu steps (1-8):
-
Create
&
Name Devices
- Assign IR data to created devices using the included IR database
- Edit device buttons (rearrange, add, and subtract)
- Learn remote commands not included in the database
- Program Macros (typically to power on/off various components and set correct inputs for the
desired activities)
- Select Punch Through buttons for various activities
- Configure the Backlight On time
- Assign IR/RF control and channels over various devices
- Download the new settings to the remote via the included USB 2.0 cable
- Test and tweak
I know, it sounds simple - right? Well, in theory it isn't too difficult to grasp if you've dealt with remote control programming before. And, if you've programmed Universal Remote's products before you should be in good shape as the Editor software isn't much different from prior versions. For the rest of you, here is some additional detail to guide you and keep you out of trouble. The basic idea is to follow the steps under the Program Menu in order to achieve success.
 1 Creating and Naming Devices
The most basic step involves setting up your remote to include the devices and items you will want it to control. Remember that, in addition to A/V products, your RF remote can also be used to control lighting and home automation products for a truly all-in-one control solution. On my system I began by populating the "Watch" and "Listen" activity menus and then proceeded to the next step. Keep in mind that you can setup different "virtual" products that will have their own behaviors. For example, in addition to the Watch DVD activity (which is for playing DVD-Videos), I configured both SACD and DVD-Audio devices. Even though they are all the same device (the Denon DVD-3910 DVD player) they will be controlled differently in order to optimize each format (different outputs utilized, etc).
 2 Assigning IR data to devices using the included IR database
This is both a critical and time-saving step. It is also the place where you will begin to see some of Universal Remote Control's weaknesses. Their database is up-to-date in some areas, and terribly lacking in others. After dealing with Harmony's database which is almost uncannily maintained, I was surprised to see the MX-950 Editor lacking some newer (and even older) products, including the following components:
- Yamaha RX-V2600
- Yamaha DPX-1200
- Sony VPL-HS51 (or the new VPL-HS51A)
- Optoma H31
- Optoma PD50 or PD50A
- Sony STR-DA7100ES
- PureLink HDMI/DVI Switcher
- DVIGear HDMI/DVI Switcher
- Panasonic TH-50PHD8UK
- Pioneer PDP-42A3HD
For some of these devices, similar or older devices or sufficed to get the buttons and codes needed, however many did not exist at all and needed to be learned. Universal Remote Control mentions in their manuals that you can also try the generic manufacturer codes provided in the database as well. However, that is a time consuming process and should not be inflicted on the consumer unnecessarily (it also almost never results in a satisfactory button layout). I was rather surprised that there was not more attention to detail in the database in keeping it up to speed with new and old products. From a customer service standpoint it seems like a major drawback, especially as the competition in remote controls continues to heat up.
3 Edit Buttons
A continuation of the first step, this involves rearranging the new-found buttons which will now show up in the Button Editor screen. You can click and drag buttons around, set the left/right justification, re-label and rename, and even structure the screen buttons to take up one or two spaces on the screen. This last function is new to the MX-950 and results in the ability for users to create LCD-based soft controls that can be activated by using either the left or right side buttons on the remote. This is excellent for setting up a series of basic commands under the "Watch" and "Listen" activity menus or for making easy "family-friendly" controls that hide more complex macros underneath.
4 Learn Commands
Given the current state of the Universal Remote Control database I am guessing you will end up learning at last some remote control codes into your MX-950, especially if you have newer products or some obscure models. The "Learn" programming menu simply activates the learning function for the currently-selected device. It is the same process used with prior remotes that utilize the Editor software and is a straightforward and uncomplicated process. You can select the "Continue to Next Button" control to facilitate easy automation of the learning process for an entire remote. I would love to see a 'Skip' button added here somewhere as there are invariably some buttons (like empty ones) that you will not wish to learn. As it stands now, when you come to a button you want to skip you need to take the system out of the automated learning mode, select the next button, and then re-engage. It's a small inconvenience that has been around for a while and worth noting.
5 Set up Macros
By now you should be seeing the intelligence of the programming order. Once your remote codes are correctly learned you can proceed to setting up some convenient macros. Through some careful thinking you can likely use macro workarounds to find discreet power up/down methods for products that do not contain discrete on/off codes (incidentally, we feel these products should be avoided in order to wake up manufacturers to how important these features are). One example is your typical digital cable box. In the case of the Scientific Atlantic HD series, you can set the unit to wake on a number key. As a result, you can create a macro to press a number key, followed by the 'Exit' key to assure that the unit is powered on. You can follow this by a 'Power' command to subsequently assure you that you have turned the unit off. These types of tips and tricks are somewhat complicated on the programming end in that they take some thought, but your clients (or family) will appreciate them as they allow for flawless operation at the push of a button.
 6 Punch Through Settings
When you are controlling the digital cable box, you probably want to have the volume buttons activate the receiver/processor, not the cable box volume. To avoid having to learn volume commands for each subsequent device, you can instead utilize the Punch Through function which allows you to configure Punch Through commands for:
- Power On/Off
- Volume/Mute
- Channel
- Navigation (the central arrow keys and Enter button)
- Play, Stop, etc
- Numbers (0-9, +10, Enter)
I make ample use of the Punch Through commands for Volume/Mute as I am almost always controlling the receiver's volume when I am in various modes. It is also handy for setting the basic functions for your "Watch" and "Listen" activity pages.
7 Backlight On Time
This menu is a bit out of place, as it would seem more appropriate in a general 'Settings' menu. Its solitary purpose is to allow you to configure the Color Backlight time to engage for 1-99 seconds. I set mine to 20 seconds to avoid any premature shut-off, but also to conserve a reasonable amount of battery power.
 8 RF Setup
&
Control
8 RF Setup
&
Control
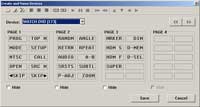
Congratulations! If you made it to step 8, you're ready to really get into the nitty gritty of programming your Universal Remote Control product as a true RF device.
The key to this page is understanding what each item means. The Device menu is self-explanatory and represents each device you setup in Step 1. These may be real or virtual devices as mentioned in Step 1. The Signal menu allows you to determine whether the MX-950 will output IR for that device, RF, or a combination of both. In this way, you can eliminate stray IR commands from being thrown around the room when you are utilizing the RF features of the remote for a particular device. The Receiver menu allows you to select which RF receiver you are assigning the device to. In our case there is just one, however you can daisy chain up to 15 MRF-300 units (each can be set to its own ID, from 1-F in a hex sequence - you set it via a small rotary switch on the bottom of each unit). That's likely enough to wire up the White House. The Flashers menu takes configurability one step further by allowing you to set which of the 6 IR flashers should be utilized by that particular device (including an option for 'All'.) In this way, you are able to control 90 (15 RF receivers x 6 IR blasters) different devices or zones with a single remote. That's a little more than I need in my home theater.
At this point I want to note something that caught me off guard. With the MX-700's RS-232 interface, remote control updates took seemingly forever and it was a rather cumbersome process to test and tweak different configuration options. When I first downloaded an update to the MX-950 I almost fell out of my chair... Gone were the long waits for downloading and updating the device. The MX-950 takes mere seconds to update - even the remote reboot sequence takes longer to complete.
MX-950 Aurora Programming, Support & Conclusion
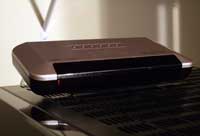 MRF-300 RF Receiver Base Station

In Reference System 2 , I utilized 5 of the 6 IR flashers and connected them to the front of my devices. Locating the RFX-150 antenna on the wall outside of my equipment rack I was able to get a nice clean RF signal with little interference. I located the MRF-300 base station away from my equipment and utilized some of the ample length provided to the IR blasters to accommodate this remote location.
The MRF-300 features adjustable IR output levels for each of the six IR emitters (blasters). You'll need to use these when connecting to most cable or satellite boxes as they require a lower level of IR in order to function properly (their IR receivers tend to get easily oversaturated.) For those who are able to position the MRF-300 in front of their equipment, you can enable the unit to function as an IR blaster, increasing the number of devices you can control beyond the six IR emitters.
Overall, the MRF-300 is a fantastic device to use with any of Universal Remote's RF-capable remote controls. It enables true care-free remote control over your system and is absolutely essential if your equipment is not all located line-of-site.
Programming Tips and Special Features
The first time you use the MX-950 you'll be greeted to something not common on prior URC remotes -
sound.
In addition to the exceptional programming capabilities of the MX-950, now you will be
able to program feedback into the remote for various macros or functions. The remote shipped with a
default button sound and I toyed around with various "completion" sounds to let the user know a macro
was being run or had finished. These are things you can do to help make the client's experience with
the remote control more successful.
 Custom Graphics
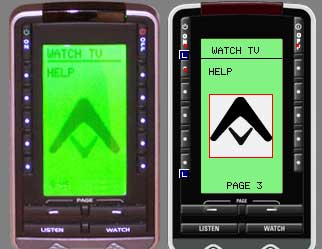
How about some more? The MX-950 also accommodates
basic graphics. You can select from the included library or import your own JPG or BMP files. We
snagged the Audioholics logo and entered it in to see how it looked and were rather pleased with the
results. A practical example of how to use a graphic would include setting up a "waiting" or
"macro-in-progress" screen that you could trigger at the start of a complex macro, then jump to the
destination page at the completion of the macro. It's these types of niceties that spell the difference
between a "nice remote" and a truly functional system controller. The graphic system is drag-and-drop
so you simply pull a file off of the image gallery, and drop it onto the remote screen where you want
it to appear. You may want to create a hidden page to house specific graphics that can be used during
the course of executing macros and commands.
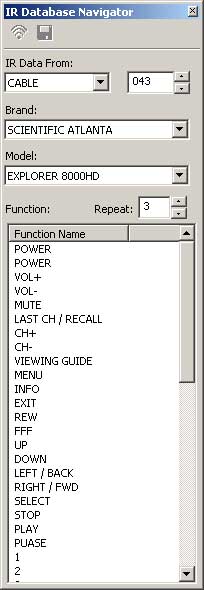
 IR
Database Navigator
IR
Database Navigator
The IR Database Navigator is a very direct way to call up discrete remote codes from any device in the Universal Remote Control library. Using the MX-950 Editor, simply select it from the Tools menu, choose the brand and model of the device control you wish to procure and then drag it to a button on the remote control. This is a very quick and easy way to utilize commands from devices other than the currently selected one without having to learn them (assuming the required codes are in the database).
Universal Browser
The Universal Browser works much like the IR Database Navigator in that it allows dragging and dropping of IR data from one source to another. The difference is that the Universal Browser opens and reads .MXF, .MXA, .MXT, and .CCF files from other remote controls and displays the resulting button layouts in its Panel View window. Flexible? Yes, absolutely.
Technical Support
During the course of this review I contacted technical support regarding some RF issues I was having with a particular piece of electronics. I received a response within 48 hours in the form of a phone call and was able to go over my problems in real time while we both looked over my MX-950 Editor file. Customer service treated me like I had a brain and listened to my feedback regarding what troubleshooting tips I had taken to isolate the problem. It was nice to be talking with a person who was not in a third world country reading off a list of troubleshooting steps from a computer screen.
Whether typical users will get the same customer service as a reviewer is unknown, but my advice is still to have a custom installer purchase and configure your remote for best results. That way you'll get a unit configured in the most optimal manner - and have a phone number to call in case of any difficulties or product additions down the road.
Conclusions
The MX-950 has finally displaced the MX-700 as my all-time favorite remote control. If you're a touch-screen kind of guy, check out the MX-3000 - but I, for one, appreciate the feel of tactile buttons and something I can teach my hand to memorize in the dark. The MRF-300 is a necessary addition to this package if you want true freedom in a remote control. Without it, you're still in "point-and-shoot" mode and you might as well not spend the additional money on RF capability.
We really want to see Universal Remote improve their IR database. With the competition heating up, this is one place you do not want to cause any difficulty. While the global remote codes may suffice for any missing products, there is simply no substitute for well-laid-out buttons and IR codes for the newest, and even the most obscure, devices. If adequate staff cannot be set aside to create the device files, then perhaps they can improve the way these files can be collected and submitted by custom install users.
If you're looking for a Cadillac remote control with all of the trimmings, this is the one. As a custom installer, you simply could not hand your clients a more useable and powerful remote control for the price.
Universal Remote Control, Inc.
500 Mamaroneck Ave.
Harrison, NY 10528
Ph: (914) 835-4484
Fax: (914) 835-4532
http:/www.universalremote.com/
MSRP (MX-950):
$699
MSRP (MRF-300):
$200
Universal Remote Control, Inc.
Universal Remote Control is a world leader in the custom design, engineering, manufacturing and
distribution of high-quality remote controls and home automation products. With more than 20 years of
experience, Universal Remote Control produces a family of innovative IRRF products to meet customer
requirements around the world. Our remote control products range in complexity from a multiple function
universal and learning remote control with DVD tutorial, to a feature-rich, PC-programmable remote
control with color touch screen.
The Score Card
The scoring below is based on each piece of equipment doing the duty it is designed for. The numbers are weighed heavily with respect to the individual cost of each unit, thus giving a rating roughly equal to:
Performance × Price Factor/Value = Rating
Audioholics.com note: The ratings indicated below are based on subjective listening and objective testing of the product in question. The rating scale is based on performance/value ratio. If you notice better performing products in future reviews that have lower numbers in certain areas, be aware that the value factor is most likely the culprit. Other Audioholics reviewers may rate products solely based on performance, and each reviewer has his/her own system for ratings.
Audioholics Rating Scale
 — Excellent
- — Very Good
- — Good
- — Fair
- — Poor
| Metric | Rating |
|---|---|
| Build Quality | |
| Ergonomics & Usability | |
| Ease of Setup/Programming/Integration | |
| Features | |
| Performance | |
| Value |
Clint Deboer was terminated from Audioholics for misconduct on April 4th, 2014. He no longer represents Audioholics in any fashion.
View full profile