
Universal Remote MX-450 Remote Control Review
Universal Remote MX-450
- Product Name: MX-450 RF Remote Control
- Manufacturer: Universal Remote Control
- Performance Rating:

- Value Rating:
- Review Date: February 11, 2009 10:26
- MSRP: $ 249.99
-

- LCD Size: 2" TFT Color LCD (176 x 220 Pixels)
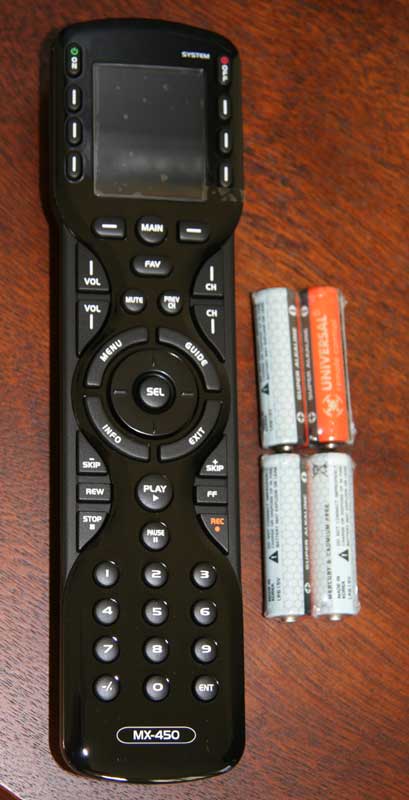
- Size: 8" x 2.25" x 1.25" (H x W x D)
- Weight: 9 ounces (with battery loaded)
- Learning Capabilities: Standard frequencies (15kHz to 460kHz)
- Macro Capabilities: Up to 255 steps each
- Memory: 32 Megabits of Flash Memory.
Total Customization Capability - Up to 18 devices on 3 Main pages with up to 8 pages for each device; plus up to eight pages of favorite channels for a total of 155 pages. - RF Freq: 418 MHz
- Range: RF - Up to 100 feet when used with MRF-260, MRF-350 or
MSC-400 RF Base stations
IR (line of sight) - Up to 50 feet with fresh batteries. - Power Supply: Four AA Alkaline Batteries (included)
- Warranty: 1 year parts & labor when purchased from an authorized dealer
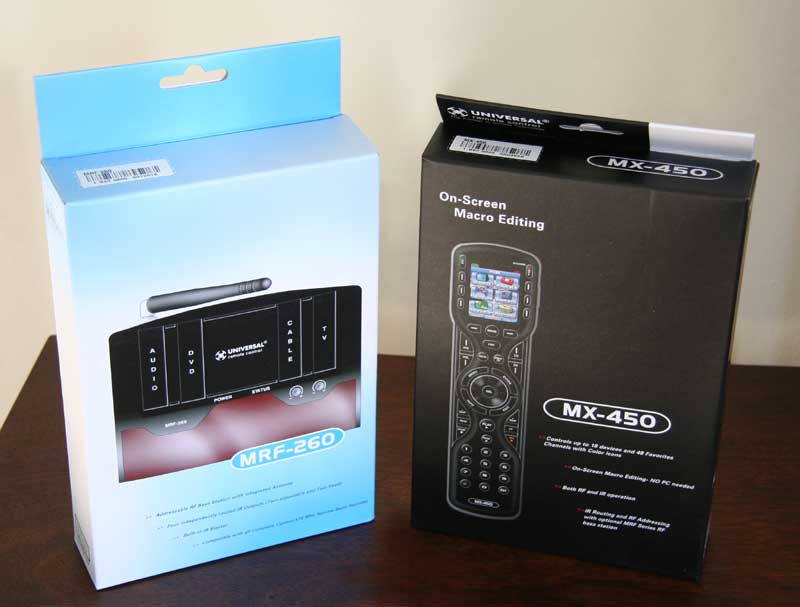
Package Contents
- MX-450 remote control
- Batteries
- Installation guide
- 1-year limited hardware warranty
Pros
- Solid build quality
- Color LCD display
- Quick, PC free set-up
Cons
- Squeaky button(s)
- LCD display is small
- No recharging dock
MX-450 Remote Introduction and Build Quality
 We said that the
MX-450 was something worth having when we gave you our first look, so of course
we had to see if we were right. The
allure of a PC-free install is somewhat intriguing, but it has to be done well
– or we'll just go back to the install protocol we know. The remote did not disappoint, install was
quick and easy. Programming, including
building the macros took less than 10 minutes, without a computer.
We said that the
MX-450 was something worth having when we gave you our first look, so of course
we had to see if we were right. The
allure of a PC-free install is somewhat intriguing, but it has to be done well
– or we'll just go back to the install protocol we know. The remote did not disappoint, install was
quick and easy. Programming, including
building the macros took less than 10 minutes, without a computer.
Build Quality and Ergonomics
 This Universal Remote
comes in a plain, but sleek package. It could even be considered beautiful, especially when compared to most standard
sized remotes. When you open this package
you will find the remote, a small user's manual and the batteries needed to get
the thing running. The build is no
deviation from the norm, but nonetheless looks and feels better than most. The majority of the hard black plastic face
of the remote is finished in a high gloss.
This high gloss face forms a ridge down the center of the remote, as two
curves on each side wave in, out, in and then out again. This forms an attractive double hour-glass
look that adds to the look and the ease of familiarity with the remote. These four curve-ins are recessed a fraction
of a millimeter and are further offset with a matte finish and reserve a
special place for the volume, channel, and six other key buttons. All of the buttons pop just a little, as they
are glossy, but a shade lighter than most of the face.
This Universal Remote
comes in a plain, but sleek package. It could even be considered beautiful, especially when compared to most standard
sized remotes. When you open this package
you will find the remote, a small user's manual and the batteries needed to get
the thing running. The build is no
deviation from the norm, but nonetheless looks and feels better than most. The majority of the hard black plastic face
of the remote is finished in a high gloss.
This high gloss face forms a ridge down the center of the remote, as two
curves on each side wave in, out, in and then out again. This forms an attractive double hour-glass
look that adds to the look and the ease of familiarity with the remote. These four curve-ins are recessed a fraction
of a millimeter and are further offset with a matte finish and reserve a
special place for the volume, channel, and six other key buttons. All of the buttons pop just a little, as they
are glossy, but a shade lighter than most of the face.
As I held the MX-450 the first thing I noticed was the weight. It is substantial – bordering on too heavy, but definitely better than some remotes that get knocked off of the arm of the recliner with the slightest breeze. Along with this substantial weight is a solid build. Nothing about it is loose or flimsy, everything is compacted together and there isn't much gap between face and body mount, button and face, or LCD screen and face.
 The full color LCD is
great, especially given its utility in the programming mode. Like most remotes with an LCD screen, the
screen times out after 10 seconds of no use.
This feature is adjustable from 5 seconds to 60 seconds, but we wouldn't
recommend more than 20 to maintain a decent battery life. This brings us to one downside of the MX-450,
the lack of a recharging/docking feature.
While with the short time-out of 10 seconds we observed great battery
life, that 10 second time-out was just too short to get us through the reading
of the info menu on any given show.
Maybe we're slow readers. Of
course you just hit any button to bring it back up, but which one? Mute and unmute? It just was bothersome.
The full color LCD is
great, especially given its utility in the programming mode. Like most remotes with an LCD screen, the
screen times out after 10 seconds of no use.
This feature is adjustable from 5 seconds to 60 seconds, but we wouldn't
recommend more than 20 to maintain a decent battery life. This brings us to one downside of the MX-450,
the lack of a recharging/docking feature.
While with the short time-out of 10 seconds we observed great battery
life, that 10 second time-out was just too short to get us through the reading
of the info menu on any given show.
Maybe we're slow readers. Of
course you just hit any button to bring it back up, but which one? Mute and unmute? It just was bothersome.
The buttons used most are within a thumb's reach of the standard holding position: Select, Up, Down, L, R, Play, Pause, Volume + and -. This can only be expected. But as with most traditional layout remotes, we still found ourselves stretching to span that great distance between the standard holding position and the A button on at the top left of the LCD screen to cofirm the deletion of last week's episode of The Office after we'd watched it five times. Your setup will vary of course, but a small bit of agravation awaits the user of those top buttons, no mattter what they are assigned to. Which brings up the point that we could have assigned the A button of our DVR to a button closer to our lazy thumb. That is the beauty of this remote, you could do that reassigning on the go, no laptop – but we'll get to that in a second.
MX-450 Remote Setup and Macros
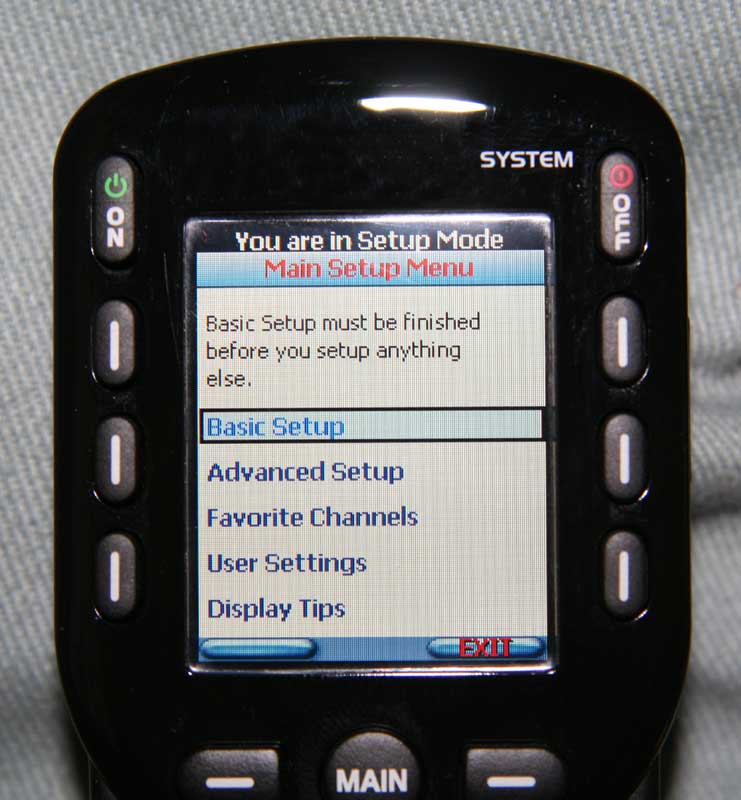
Remember when you got your first TI-82 calculator, and you programmed it to do your math homework for you? Well, programming the MX-450 is a little easier, in full color, and of course the result is better than getting your homework done. By holding down the Main button for 5 seconds, you enter into the remote's on board programming mode. Not only do you enter into the programming mode, but the programming mode for dummies. An instructive tip screen appears, telling you to use the cursor up or down buttons to move through a list. Hit the next button and you get another tip, this time cautioning you that the buttons at the bottom of the screen change meaning from screen to screen. OK, now that we're past those two screens (which we can and will turn off via the main menu) we get to the good stuff. The third screen in to our programming mode, our main menu looks like this:
- Basic Setup
- Advanced Setup
- Favorite Channels
- User Settings
- Display Tips
Basic Setup
Begin with the end in mind, right? This is where we can execute the following options: Search the Database, LEARN, Delete a Device, and Review Code Set.

Advanced Setup
Once all of your devices have been selected from the database or learned, this is where we find the Copy & Paste, Macros, Hide or Display Pages, Edit Labels, Erasing and RF Setup features.

Favorite Channels
Here you can add up to 48 favorite channels, with about 50 high quality stock channel logos and 8 make-your-own templates to choose from.
![]()
User Settings
Here you can adjust the brightness of the LCD screen, adjust the Auto Turn Off from 5 to 60 seconds, do the same for the button lighting, check out the battery life and system memory usage and perform a factory reset.
Tech Note: Display Tips
A favorite, discovered way too late. This turns off all of the helpful, and after a while annoying, tip screens.
The
IR/remote database is huge, and contained all of the devices used in this
review. With that under our belt we'll
move on to the PC-free programming. Upon
selecting "Search the Database" from the Basic Setup Menu, you are
asked to choose the icon position on Page 1 of your main menu. You can either choose new position or an
existing icon (if reprogramming an old icon to a new device). Once you choose the position, you then choose
the type of device you are adding (TV, CABLE, SAT DVD, AUDIO, AUX, etc.). Each device type has a stock icon already
attached, with a few having slight variations to choose from, i.e. a flat panel
TV or what looks like an old school rear projection model. Once you decide from the limited 30 icons,
you lock in the name of the device. If
you're used to texting with a traditional cell phone, you'll fly through
this. If not, type slowly. HINT:
Pushing the cursor button (Circular button around the SEL button) to the
right will create a "space". I
spent 10 minutes trying to figure out where the spacebar was.
Once you've got a name you like and hit Next, there is a "most popular" listing of the most common brand/device manufacturers in that category. The TV set up had a top ten and then about 200 other manufacturers in alphabetic order. Upon choosing a brand, you are presented with a test screen where you are instructed to manually power on the device that you are programming. You then hit test, if you get no results then use the cursor button to scroll through the options within that brand and the remote sends the test signal with each new screen. As soon as the device powers off, you've hit a potential winner and you select the TEST button. This moves you to a screen where you are instructed to test the power, volume up, channel up and number one buttons. This did well for 3 out of 5 devices, but for the Sony Receiver and Scientific Atlanta HD-DVR in our test group, a couple of codes passed that test but were not correct for those units. This entailed taking just a little more testing and time to find the correct code.
Macros
 The
Macro Setup Mode is easily reached via the Advanced Setup Menu. Once here you'll find an intuitive process,
minus the bells and whistles your PC might bring to the setup process. After you have entered the Macro Setup Mode,
actions are recorded as you take them, so you go to the Main menu, scroll to
the page containing the desired device, select it, and choose the command you
want recorded, i.e. once in the TV device menu, press the power ON button to
record this command. Editing options
include moving a command, adding a command, and adding a delay of .5 to 60
seconds.
The
Macro Setup Mode is easily reached via the Advanced Setup Menu. Once here you'll find an intuitive process,
minus the bells and whistles your PC might bring to the setup process. After you have entered the Macro Setup Mode,
actions are recorded as you take them, so you go to the Main menu, scroll to
the page containing the desired device, select it, and choose the command you
want recorded, i.e. once in the TV device menu, press the power ON button to
record this command. Editing options
include moving a command, adding a command, and adding a delay of .5 to 60
seconds.
RF setup is also super easy, starting at the Advanced Setup, RF Setup is selected and the next screen gives a choice of either All Devices Set Same or Each Device Differs. For our purposes, equipment was all located in a closet and an MRF-260 RF base station was used to receive RF from the MX-450 and transmit IR signals to all of the necessary devices.
MX-450 Remote Use and Conclusion
Day to day use of the remote gets a 4 of 5. The ergonomics are great. Play, rewind, pause and so on are all designed well and easily memorized by the user. The shapes, locations, and contours of the buttons are brilliant. The biggest downside is that this remote is in the standard 9 inch long rectangle. Thus, it is ergonomically designed, for the most part. What I mean by that is the slight curves and aforementioned contour, etc. lend themselves to a very comfortable experience, until you want to get to those pesky 8 buttons at the top. Including the ON/OFF buttons, four on each side of the LCD screen, these buttons cause you to have to slide the remote down so that you can reach them. Even then it is a stretch. Once you've accomplished whatever you were doing up there, you then have to slide it back up and reorient your poor overworked thumb/hand (hint of sarcasm). I know, it's not much of a complaint.
 Strike
two may be an anomaly to this particular remote. In this review we've talked of the "cursor
button", the circular button that surrounds the SEL (Select) button at the
center of the remote. Go left, go right,
or go down and your fine. Going up is
the problem. The first month of the
review, when I would push up on the cursor and more than half of the time I
would get this incredibly annoying SQUEAK!
Scrolling through any given evening's offerings, going up through the
menu, sounded like this: squeak, squeak, sque, sque, sque, sque, sque, squeak...
you get the idea. I thought maybe it
needed breaking in. The sound has
intermittently persisted, sometimes on and sometimes off. I know, I know – I must have a fat thumb.
Strike
two may be an anomaly to this particular remote. In this review we've talked of the "cursor
button", the circular button that surrounds the SEL (Select) button at the
center of the remote. Go left, go right,
or go down and your fine. Going up is
the problem. The first month of the
review, when I would push up on the cursor and more than half of the time I
would get this incredibly annoying SQUEAK!
Scrolling through any given evening's offerings, going up through the
menu, sounded like this: squeak, squeak, sque, sque, sque, sque, sque, squeak...
you get the idea. I thought maybe it
needed breaking in. The sound has
intermittently persisted, sometimes on and sometimes off. I know, I know – I must have a fat thumb.
These two strikes are minor at best, so overall this remote is a good value. The length strike is more of an issue of taste and the squeaky button could be a small quality control problem. The on board programming and great ergonomics outweigh the slight imperfections. It is also important to note that we experienced no problems with the basics of this remote. All functions performed as expected, the IR and RF signals were fine and not susceptible to interference. In all, a great RF remote, the setup puts it a step above most. If you're a do-it-yourselfer looking for similar functionality but aren't going through a custom installer, pick up the URC-R50 - Universal Remote Control's consumer-direct remote which can be found online.
About
Universal Remote Control
Universal
Remote Control, Inc. (URC), is The Pioneer in Control Technology. Founded in
1991 and headquartered in Harrison, N.Y., URC has sold more than 50 million
remote controls in the last 10 years alone. A world leader in high-quality
remote control design, engineering, manufacture and distribution, URC is widely
regarded as a category innovator by consumers, retailers, custom installers,
subscription broadcast providers and OEM partners. URC has built its reputation
by delivering exceptional levels of quality, training, reliability and support
to its customers. Visit URC at www.UniversalRemote.com.
Installers can keep up to date with the latest URC news, training and support,
as well as communicate directly with the company and their peers, at www.URCControlRoom.com.
The Score Card
The scoring below is based on each piece of equipment doing the duty it is designed for. The numbers are weighed heavily with respect to the individual cost of each unit, thus giving a rating roughly equal to:
Performance × Price Factor/Value = Rating
Audioholics.com note: The ratings indicated below are based on subjective listening and objective testing of the product in question. The rating scale is based on performance/value ratio. If you notice better performing products in future reviews that have lower numbers in certain areas, be aware that the value factor is most likely the culprit. Other Audioholics reviewers may rate products solely based on performance, and each reviewer has his/her own system for ratings.
Audioholics Rating Scale
 — Excellent
- — Very Good
- — Good
- — Fair
- — Poor
| Metric | Rating |
|---|---|
| Performance | |
| Versatility | |
| Build Quality | |
| Ergonomics & Usability | |
| Ease of Setup/Programming/Integration | |
| Fit and Finish | |
| Performance | |
| Value |