
Harmony 688 Remote Control Review
Harmony H688 Remote Contol
- Product Name: Harmony H688 Remote Control
- Manufacturer: Logitech
- Performance Rating:

- Value Rating:
- Review Date: July 15, 2004 20:00
- MSRP: $ 249
|
Programming Interface: Website application Connectivity: USB Plug n’ Play Backlight: All keys System Requirements:
PC or Mac with USB port, 10MB
free hard disk space Dimensions: 8.1” x 2.3” x 1.3” Weight: 5.8 oz. |
Features: Learning IR capable 2MB non-volatile Flash memory 3 wide-dispersion high-power LEDs (~40’ range), Sending frequency > 60Hz Sensing frequency > 60Hz Includes: Harmony software installation CD, USB cable, 4 AAA batteries, Quick Start Gui |
Pros
- Easily programmed for basic commands
- Very ergonomic feel
- Mac/PC compatible
- Flexible programming for advanced features
- Easy enough for grandma to use
Cons
- Limited advanced programming
- Relatively slow web-based programming interface
- Main activity buttons very hard to read in dark
Harmony 688 Remote Setup
I'd recommend everyone start with a quick setup of your devices and activities and then see what you like about the settings and what you might be missing. You'll want to make a short list of your gripes and anything that doesn't function optimally for you. Here are some things I ran into the first time I setup my remote:
-
The remote didn't turn on/off my Scientific Atlanta 8000HD DVR
-
My PVR settings came with almost no LCD buttons, including the necessary A, B, and C buttons for activating DVR and guide functions
-
I had no quick way to select multi-channel audio inputs on my Integra processor
-
I needed quick access to the television and/or cable aspect ratio controls
Solving Hardware Problems Such As Missing IR Codes
1. The remote didn't turn on/off my Scientific Atlanta 8000HD DVR
This problem was not as difficult as it seemed, partially due to the fact that all I had missing was a power button. To start fixing a remote control function, click on "Troubleshoot" next to the Device that you are troubleshooting. My particular problem was that my DVR was not being turned on or off. Here's what the troubleshooter presented me with:
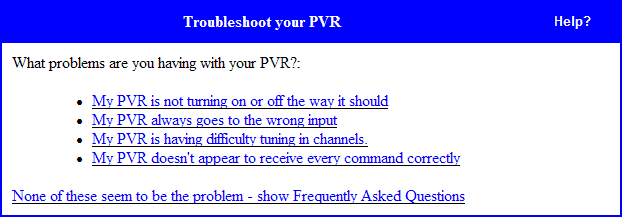
Wow. My problem was first on the list! Sure enough after answering a couple questions and shooting the power command into the back of the H688, my power problem was fixed. In addition, there is always a good chance that if you update your remote IR codes, an updated entry to the database will be found and the command you may have been missing will suddenly appear. OK, let's attack the next problem...
2. My PVR settings came with almost no LCD buttons, including the necessary A, B, and C buttons for activating DVR and guide functions
Well, for this I wanted access to my PVR's A, B, and C buttons... but really what I needed was to do some customization of the LCD screen in the "Watch TV" activity. To accomplish this I had to customize the "Watch TV" activity. Click on "Customize" next to "Watch TV" and you will be able to "Change the behaviour of buttons" . Canadian spelling aside, this allows you to access all of the remote functions for the H688 - including the 6 buttons and labels for the LCD screen.
I skipped over the first half of the screen, which allows you to assign IR codes to the remote control's hard buttons and proceeded to the Custom Button Labels. Take note here that the H688 allows you to adjust IR commands for ALL DEVICES within a given activity. They are organized as Activity, Audio and Video. Basically, the H688 allows for setting up the LCD screen buttons and remote functions for each of the different devices involved in the particular activity selected. This is cool - and here's why: I can set up different LCD screens based on what I'm doing and I can have different device functions that are not linked to the device, but rather the activity I am involved in. There's one exception to this custom programming nirvana - common device LCD buttons are carried across all activities involving that device. More on this later.
So how do we add the A, B, and C buttons I so desperately needed? Select them under the PVR column (don't forget to enter a clear label for the button as well) I'd keep the label to around 7 letters max or you risk clipping the label on the display. Also keep in mind that the system counts across the LCD screen so the left side is 1, 3, and 5 while the right side of the LCD screen is 2, 4, and 6. See picture below:
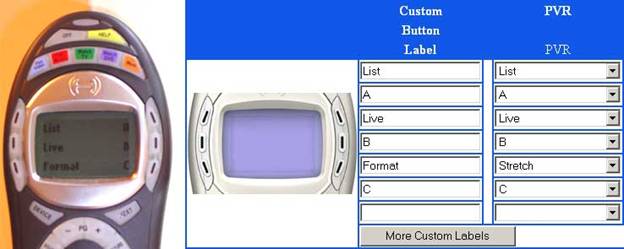
This is how the programming interface (right) shows up on the Harmony H688
(left)
3. I had no quick way to select multi-channel audio inputs on
my Integra processor
This challenge was solved in nearly the
same way as the PVR issue. I customized the "Watch DVD"
activity. Clicking on
"Customize"
next to
"Watch DVD"
brought me to the next screen where I could
select
"Change the
behaviour
of buttons".
Using the same procedure as above, I set the LCD screen to allow me to access the Multi-channel input of the processor, and also programmed easy access to the Setup, A/B Repeat, Audio and Angle functions.
4. I needed quick access to the television and/or cable aspect ratio controls
Is this getting old, yet? Different problem, same solution. You'll find that breaking open the Harmony online remote control applications deeper programming menus will allow you to handle just about any remote function you need in order to control most home theater systems not requiring the intricate and voluminous programming and macros of a Crestron or AMX system. If you do need this level of programming sophistication, simply check out Harmony's 700 series of remote controls, which are designed specifically for custom installers and advanced users.
Harmony 688 Overview Build Quality and Setup
Remote controls are really the steering wheel behind your home theater system. I remember back in the early days when I would try to show off my system to friends (hold on, this'll just take a minute - let me grab the other remote...) only to be slowed up by the process of (just another second while I change the input on the TV to component) manipulating all the devices to function in their (could you hand me the DVD remote - it's the one over there by the coffee table, thanks!) proper modes and configurations. Whew! Once everything was squared away I could begin my demonstration. What failed to be represented in the days of sorting through a bouquet of remotes, was the awe of automation . There is an eloquent and substantive statement made by pressing one button and having your equipment convene for a single purpose - let's say, play a DVD on the big screen television. The accompanying awe factor might just outweigh the subsequent listening and viewing session. After acquiring my first good universal remote control, my home theater experience was never quite the same.
There are several schools of thought on remote controls and I will not rehash them all here in detail. Suffice it to say, there are those who like fully-customizable touch-screen remotes, and those who prefer a more tactile unit. For larger home theater installations, a fully customizable Crestron, AMX or other LCD touch screen system is probably a requirement (though Harmony has some pretty flexible remotes in their 700-series.) For most home users, however, this is not the case. I fall into the camp that enjoys being able to use my remote (at least the more common functions) without having to look at it for reference. A tactile remote has buttons in strategic, even ergonomic areas that allow you to get accustomed to the remote ("I've grown accustomed to your face..." as Rex Harrison would say) My current remote control is Universal Remote's Home Theater Master MX-700 . The Harmony H688 was going to provide a new experience for me in that the application programming interface is online and the remote is arranged by activity, rather than by device.
This review details the Harmony online application system as well as some pitfalls to watch out for when using it to control multiple (and hopefully typical) devices in your home theater system. Let's dive in...
Build Quality
The harmony remote control impressed me the moment I picked it up. Its design is one of the most ergonomic I have ever felt – even better than my Home Theater Master MX-700. The buttons are well laid out and fully one-half of the remote can be reached via thumb from the initial hand position. Need to access the keypad at the bottom? Simply slide your hand down in a fluid motion and it will catch on the hourglass shape of the remote body, allowing your thumb to sweep across the numbered keys. Relax the pressure and the remote slides back to its original centered position – yes, it’s that nice.
The center joystick is a round plastic ring. It feels cheap, but I experienced no problems using it and it does not appear to be susceptible to any kind of damage. Its solid click requirement also renders it free from the “drunken cursor” syndrome that many joysticks have where making the right selection in a DVD menu is a difficult task. The well-placed ‘glow’ button lights up all the buttons on the remote except, comically, the activity buttons since they are covered up with a full-face label. In a dark room you may have difficulty selecting the right activity unless you have these memorized.
The only downside I found to the remote layout was more of a trade-off. The remote is small for what it does and lightweight (6.1 ounces with batteries according to my postal scale) but as a result the buttons are very small and can easily be missed or pressed mistakenly. A couple of times, when trying to select the ‘Info’ button, I would hit ‘Guide’ instead. Not a big deal, but something to watch out for. Overall I think the tradeoff is fair and would probably prefer the current layout to a larger alternative.
Setting Up the Harmony Remote – An Overview
DO NOT put batteries in this remote control until you are ready to go online and start programming it. I made this mistake and drained the complimentary 4 AAA batteries in about a day’s time. When first inserting batteries into the remote, the Harmony will endlessly cycle through a series of startup screens – a process that includes turning on and off the backlight. As you can imagine, this will make short work of any batteries in a relatively quick period of time. It’s easy to turn off this introductory cycle, just go online and set your remote preferences.
Here’s the basic process for setting up the Harmony H688 remote to control your entire home theater system:
-
Install the software (yes, the CD with the svelte brunette that graces Harmony’s marketing materials, remote control packaging, and various website pages)
-
Set up the remote preferences
-
Indicate Your devices by make and model number (the Harmony online system will even help you figure this out if you don’t know, however a cursory examination of your gear is recommended)
-
Set up your activities (again, the harmony system will take an educated stab at this for you if you wish)
-
Transfer settings to the remote via the included USB cable
-
Test and tweak
And it pretty much works as advertised. OK, the review’s over – thanks for stopping by! Actually, there are some details that can be noted to help you along. The process offers some surprising customizations – if you know where to look.
Expanding upon the above process, taking a closer look at the Harmony programming steps reveals a fairly simple interface on the surface. What many people may not recognize is the level of customization and flexibility that is offered under the hood. We’ll address the basic setup process first and then move on to where I had some fun getting the remote to function exactly as I wanted – by hacking into the system, so-to-speak.
Harmony 688 Step by Step Setup
We’ll assume you’ve loaded the software, selected a username and password and saved your battery-munching remote control from its endless startup cycle. The following is an abridged, simplified step-by-step summary and explanation of some of the processes you’ll go through setting up the remote.
Step One: Change Harmony Remote Preferences
I recommend starting with this screen so that you can set some of the functions that I hear talked about in the forums, such as:
-
Turning off the Harmony Assistant (hopefully you’ve done this by now)
-
Setting backlight time (5/10/15/20 seconds)
-
Turning on or off (default) automatic backlight when buttons (any or interactive display) are pressed. I recommend leaving this to the “off” position. The glow button is handy and there’s simply no reason you should sacrifice battery power for every key press.
-
Select menu format to 4-buttons or 6-buttons. Only a truly masochistic person will select 4 buttons instead of 6 (default).
Step Two: Adding Devices
This process is so simple it’s almost criminal. While other remote controls like the Home Theater Master MX-700 make it easy to learn IR commands from any remote, they are embarrassingly lackadaisical at keeping their IR database up-to-date, so nearly every piece of equipment made since 2004 needs to be manually learned into the remote, at least partially. Not so with the Harmony. Their database is up to date and had some of the latest equipment on the market. While I’m certain they don’t have everything, the presence of the brand new Denon AVR-3805 receiver I was reviewing made me sit up and take notice.
Clicking on the “Add a Device” text button brings up a menu of product types. Simply select the product type you would like to add and hit the “Next” button.
Editor's Note: Outdated Terminology or Perhaps Canadian Nomenclature?
I had some minor problems with some of the labeling used for the programming application that I believe may confuse some users, though I believe the labels were chosen for simplicity.
Observation: Why make the main label for receivers “Amplifiers” I don’t know too many amplifiers that use remote controls. This would be better labeled as “AV Receivers” or just “Receivers” with amplifiers listed as an example device.) In addition, on the following screen, the label for receivers is “Stereo Receiver”. This would be much better as “Receiver” since the majority of users (especially those looking to buy a Harmony Remote) will be using an A/V Receiver.
At this point you will be asked to select the manufacturer from the dropdown menu. Everyone I was aware of was on the list. The next screen has you enter the model number. You should try to get this right, but the Harmony system will interpolate if you forget or misplace a hyphen. If the Harmony system does not have your device (for example, if you tried to add the new Anthem Statement D1 processor – at least as of the writing of this review) you will be asked if you have the remote control. If you do, then the Harmony system will allow you to program the functions button by button.
Programming Functions and Commands into the Harmony Remote
This process is actually quite simple. The H688 provides an IR receiver at the bottom of the remote, so when it is plugged in via USB to your computer, simply aim your source remote at the hole in the bottom of the H688 and fire off buttons as requested.
If you do not have the remote control for the device named, the Harmony remote programming interface will allow you to select from some available manufacturer codes/products as a starting point for programming the remote. This is similar to selecting from different preprogrammed remote control codes – you may have to try different models until you find one that meets the majority of your needs.
 Step Three: Programming Activities

Through yet another simple process (is a pattern developing here?) the Harmony system allows you to program and add activities. While the Harmony H688 remote hard-codes the following activities into the buttons at the top of the remote: Play Video, Play Music, Watch TV, and Watch DVD – the “More” button allows access to additional activities that you can access through the LCD menu and buttons. This allows for more than just the basic activities and provides a way to program additional functions into the remote.
You can start by programming the standard activities, which will activate macros for your display, receiver and source components. Clicking on an activity brings up a “Basic” and “Custom” option for the activity. Most people can use the “Basic” method, however if you want to activate or additional devices then the “Custom” mode will allow you to do so. Following is a series of straightforward questions such as which device will provide the source, what device is responsible for controlling volume (receiver or television, for example) and what input on the receiver/processor should be activated in order to receive input from the source device. It also checks what input the television or display should be set to (if applicable).
A neat thing I’ve done here is set up “Watch DVD” to handle my CDs and DVD-Video sources, and set up “Watch CD” to handle my multi-channel SACDs and DVD-Audio discs. This way I didn’t have to change the processor’s inputs from digital to multi-channel each time I listen to a different format. As with all functions on the Harmony programming interface, there are multiple ways to accommodate various configuration needs.
Step Four: Update the Remote
That’s pretty much it for the basic setup. Just click on “Update My Remote” from the main Harmony application screen and the update process will begin. I clocked my average updates at around 3 minutes on the nose.
Harmony 688 Simulator, Tech Support & Conclusion
Harmony Remote Control Simulator
 Most people who use the Harmony Remote will probably not even use
this application. I found it to be an amazingly helpful way to test
your remote control without downloading the contents to the remote and
leaving the application environment. What it's handy for is identifying
that you have correctly mapped the LCD buttons and that the behavior of
the remote control interface is operating as expected. What it won't do
is tell you if your devices are correctly receiving commands.
Most people who use the Harmony Remote will probably not even use
this application. I found it to be an amazingly helpful way to test
your remote control without downloading the contents to the remote and
leaving the application environment. What it's handy for is identifying
that you have correctly mapped the LCD buttons and that the behavior of
the remote control interface is operating as expected. What it won't do
is tell you if your devices are correctly receiving commands.
Programming Difficulties and Room for Improvement
There were some issues with the programming interface. Chief among them is the fact that the programmable LCD screen is set up as a dynamic list that groups similar device functions together. What this means is that regardless of how I want the LCD screen to look, the buttons will be rearranged by the application to always group functions according to device. This is much less convenient than having static LCD screens that can be customized with whatever function you would like. One big example of how this inconvenienced me was when I attempted to add additional DVD player functions to the "Watch DVD" activity. Adding them caused the much-needed "Multi-channel Input" function to drop to the bottom (landing on page 2 of the LCD screen). Well, this isn't a low priority function, and I ended up choosing to not program additional DVD functions simply to keep the multi-channel function on the first screen.
Another thing that happened that was almost comical was a feature I discovered while attempting to add the Multi-channel input function to the "Watch DVD" activity. The Harmony application was apparently so happy that I added this feature that it added it to every other activity! In addition, if I then went back and deleted it, it disappeared from every activity. It turns out that the Harmony programming interface will carry over custom button functions for activities that use the same device. So in my case, the programmed multi-channel input function was showing up everywhere, since all my activities used the Integra DTC-9.4 processor . This feature is meant to simplify the programming process and reduce the redundancy of having to add a device function to all applicable activities. It would have been nice, however to be able to "lift" this function and actually have fully-independent LCD button customization. There are workarounds to this, but they involve a level of device redundancy that we won't go into here.
Now I'll address the application interface itself. While helpful and somewhat user-friendly, the online Harmony remote control programming application has a rather rough feel to it. Its monochrome, bitmap icons and monotone blue interface are indicative of a beta application that hasn't yet received its final look and feel, rather than a live development platform that is supposed to service thousands of users. It would have been great to see Logitech employ a graphic redesign of the online system so that the application would look as cool as it works. At the same time revisiting some of the wording so as to better communicate 21st century terminology instead of resorting to 1980's terms like "stereo receiver" and "amplifier" when most people will recognize terms like "receiver" and "surround processor" would be of great help.
Technical Support
During the course of this review I contacted technical support a couple of times. One time I called at 8:30 PM EST only to be pleasantly surprised when a happy support representative answered my call and informed me that they are open until 10PM EST Monday through Friday. Now that level of service beats just about anybody I can think of including my bank, accountant, and most restaurants around here (off-season).
Technical support for the Harmony fleet of remotes is very advanced. With your login ID they can examine your particular configuration. Having trouble with a remote's functions? They'll check for updated IR codes and replace yours with an updated copy. Since they are looking at your configuration, they are able to walk you through various configuration problems and make suggestions on how to better utilize your remote. The online database of codes is absolutely immense and is constantly being updated daily by users and the Harmony support staff, resulting in the most up-to-the-minute comprehensive IR database I'm aware of.
Conclusions
The end result of the Harmony Remote experience is that when I aim the H688 and hit the "Play DVD" activity button, everything in my system springs to life and the remote is ready to control my DVD player, with the most commonly used advanced functions available via the custom LCD buttons. If ever a component gets out of sync, I simply hit the "Help" button and 9 times out of 10 the problem is solved instantly.
There are a host of features and items that have not been discussed here (purposefully so as to not extend the review to encyclopedic status) including the availability of program guides on the remote, custom macro timing, additional application programming methods, and more. The bottom line is that the Harmony H688 is the remote control you'd give to your grandmother (once you programmed it of course) and she could operate a $25,000 home theater entertainment center. My babysitter will be very pleased.
Founded in 1981, Logitech designs, manufactures and markets personal peripherals that enable people to effectively work, play, and communicate in the digital world. Logitech International is a Swiss public company traded on the Swiss Stock Exchange (LOGN) and in the U.S. on the Nasdaq National Market System (LOGI). The company has manufacturing facilities in Asia and offices in major cities in North America, Europe and Asia Pacific.
The Score Card
The scoring below is based on each piece of equipment doing the duty it is designed for. The numbers are weighed heavily with respect to the individual cost of each unit, thus giving a rating roughly equal to:
Performance × Price Factor/Value = Rating
Audioholics.com note: The ratings indicated below are based on subjective listening and objective testing of the product in question. The rating scale is based on performance/value ratio. If you notice better performing products in future reviews that have lower numbers in certain areas, be aware that the value factor is most likely the culprit. Other Audioholics reviewers may rate products solely based on performance, and each reviewer has his/her own system for ratings.
Audioholics Rating Scale
 — Excellent
- — Very Good
- — Good
- — Fair
- — Poor
| Metric | Rating |
|---|---|
| Build Quality | |
| Ergonomics & Usability | |
| Ease of Setup/Programming/Integration | |
| Features | |
| Performance | |
| Value |
Clint Deboer was terminated from Audioholics for misconduct on April 4th, 2014. He no longer represents Audioholics in any fashion.
View full profile