
Yamaha RX-Z11 11.2 Channel A/V Receiver Review
- Product Name: RX-Z11 11.2 Channel A/V Receiver
- Manufacturer: Yamaha
- Performance Rating:

- Value Rating:
- Review Date: March 06, 2008 22:00
- MSRP: $ 5,499 (price reduced: $2499)
-
140 watts x 7 + 50 watts x 4 into 8 ohms (20-20,000 Hz) at 0.04% THD
-
THX® Ultra2 Plus certification with THX listening modes
-
Dolby® True HD, DTS-HD™ Master Audio, Dolby® Digital Plus, DTS-HD™ High Resolution Audio, Dolby® Digital EX, DTS-ES™, Pro Logic® IIx, and DTS Neo:6 decoding
-
11.2-channel surround sound capability
-
Latest HDMI 1.3a specification supports Deep Color (30/36 bit) transmission, xvYCC color space, 120Hz and 24Hz Refresh Rates and Auto Lip-Sync compensation
-
Analog and HDMI digital video signal upscaling to Full HD 1080p and downscaling to 480p format
-
Analog video to HDMI digital video upconversion capability
-
home PC networking capability
-
YPAO 8-point sound optimization with Quick Start for automatic speaker setup (mic included)
-
Cinema DSP HD3 processing for enhanced surround soundfields
-
XM Satellite Radio Ready and built in HD Radio tuner
-
Neural-THX Surround decoder for XM's HD Surround channels
-
iPod integration (requires optional Yamaha YDS-10)
-
music, video, and photo playback with on-screen menu
-
control your iPod with the receiver's remote
-
Improved Compressed Music Enhancer for MP3s and other digital music files
-
four-room/four-source capability
-
powered and line-level stereo audio output for 2nd, 3rd, and 4th rooms
-
coax digital audio output for 2nd room
-
component video output with HD pass-through and 480i to 480p conversion of composite/S-video signals for 2nd room
-
composite video output for 3rd and 4th room
-
Digital ToP-ART design high-current, low-impedance amplifier construction
-
192kHz/24-bit Burr-Brown DACs for all channels
-
Pure Direct mode for better sound from stereo sources and lossless audio formats transmitted via HDMI
-
Silent Cinema for simulated surround sound via standard stereo headphones
-
on-screen GUI (Graphic User Interface)
-
40 AM/FM/XM presets
-
learning/multibrand remote with illuminated buttons
-
basic remote for 2nd listening room (requires remote control extender system for second room operation, not included)
-
17-1/8"W x 8-5/16"H x 20-5/16"D
-
weight: 73lbs (88lbs shipped)
-
warranty: 2 years
Pros
- Benchmark performance
- Unparalleled multi channel experience for music and movies
- One box solution for whole home audio and video distribution
Cons
- Complex setup
- Erroneous YPAO results
- Mediocre remote
Yamaha RX-Z11 Introduction
Ever wonder why some special events seem to happen once every four years? Every four years we get an extra day, we have a presidential election, we have an Olympic game, and, incidentally, Yamaha seems to release a new flagship receiver. I can’t tell you how thrilling it is to be at the tail end of the 4 year cycle and it’s also pretty cool that Yamaha finally has a replacement to their venerable RX-Z9 which still sounds fabulous but has gotten a bit long in the tooth over the past couple of years.
There are too many changes to note between the RX-Z9 and Z11 but a few key ones include:
-
HDMI 1.3a support and switching including audio and 1080p deep color
-
HDMI upconversion with OSD
-
Dolby Digital Plus / TrueHD and DTS HD Decoding
-
iPod & XM radio connectivity and Network audio support
-
11.2 channel HD^3 DSP processing with amplification on all channels
-
The industries first THX Ultra2 Plus receiver with THX listening modes to optimize sound at low listening levels
The question that now remains: Do all of these features justify the long waiting process for diehard Yamaha and home theater aficionados? Keep reading to find out…
Yamaha RX-Z11 Build Quality
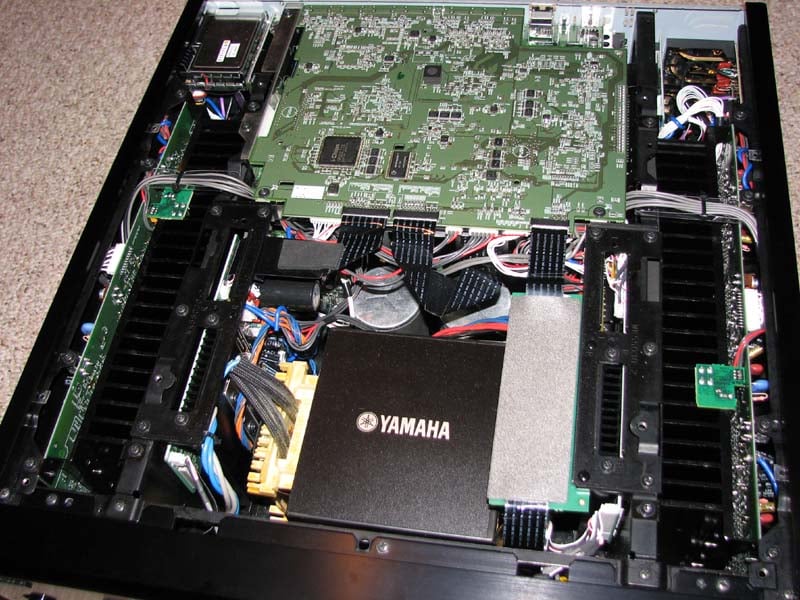 Just as in
the tradition of all past Yamaha flagship products, the RX-Z11 uses state of
the art construction and parts. I was relieved to see the old modular design
and horizontally mounted heat sinks of the RX-Z9 not find its way into this
unit. The RX-Z11 utilizes about the
largest E-core power transformer that I’ve seen, instead of the more space
efficient toroidal found on its predecessor flagship receiver. The RX-Z11 screams
flagship with its hefty and rigid chassis, huge power supply and ample heat sink
area. E-core and Toroid transformer
designs can be equally good provided they are used within their limits but an
E-core typically takes up more real estate which Yamaha managed to cleverly
tuck neatly into this hulking chassis. The
heat sink is tapered to minimize resonance and also provide for optimal heat
dissipation and the bottom of the chassis has two relatively large fans to keep
the unit cool during high sustained output levels. The input fuse to the power transformer is
rated at 15A / 250V and the power supply consists of two 27,000uF/75V capacitors
for the seven main power amplifiers and two 8,200uF/50V caps for the presence
channels. The audio pre-amp section, utilizes a bulk of capacitors that sum to
about 30,000uF. The amplifier is a wide bandwidth
design utilizing current mode feedback with virtually no phase shift to keep phase compensation to a minimum. This
contributes to the RX-Z11's excellent transient response allowing frequency
response to remain unchanged even when the gain changes (as you will see in my
test data), to help create a warmer, texture-rich sound. With such a large power supply, plenty of heat
sink area and ample cooling, and THX Ultra2 Plus certification, the amplifier
section in this receiver is ready to pump out some serious wattage when called upon but also handle the
most delicate musical passages with finesse to appease the heart of a true
audiophile.
Just as in
the tradition of all past Yamaha flagship products, the RX-Z11 uses state of
the art construction and parts. I was relieved to see the old modular design
and horizontally mounted heat sinks of the RX-Z9 not find its way into this
unit. The RX-Z11 utilizes about the
largest E-core power transformer that I’ve seen, instead of the more space
efficient toroidal found on its predecessor flagship receiver. The RX-Z11 screams
flagship with its hefty and rigid chassis, huge power supply and ample heat sink
area. E-core and Toroid transformer
designs can be equally good provided they are used within their limits but an
E-core typically takes up more real estate which Yamaha managed to cleverly
tuck neatly into this hulking chassis. The
heat sink is tapered to minimize resonance and also provide for optimal heat
dissipation and the bottom of the chassis has two relatively large fans to keep
the unit cool during high sustained output levels. The input fuse to the power transformer is
rated at 15A / 250V and the power supply consists of two 27,000uF/75V capacitors
for the seven main power amplifiers and two 8,200uF/50V caps for the presence
channels. The audio pre-amp section, utilizes a bulk of capacitors that sum to
about 30,000uF. The amplifier is a wide bandwidth
design utilizing current mode feedback with virtually no phase shift to keep phase compensation to a minimum. This
contributes to the RX-Z11's excellent transient response allowing frequency
response to remain unchanged even when the gain changes (as you will see in my
test data), to help create a warmer, texture-rich sound. With such a large power supply, plenty of heat
sink area and ample cooling, and THX Ultra2 Plus certification, the amplifier
section in this receiver is ready to pump out some serious wattage when called upon but also handle the
most delicate musical passages with finesse to appease the heart of a true
audiophile.
Yamaha RX-Z11 System Setup and Configuration
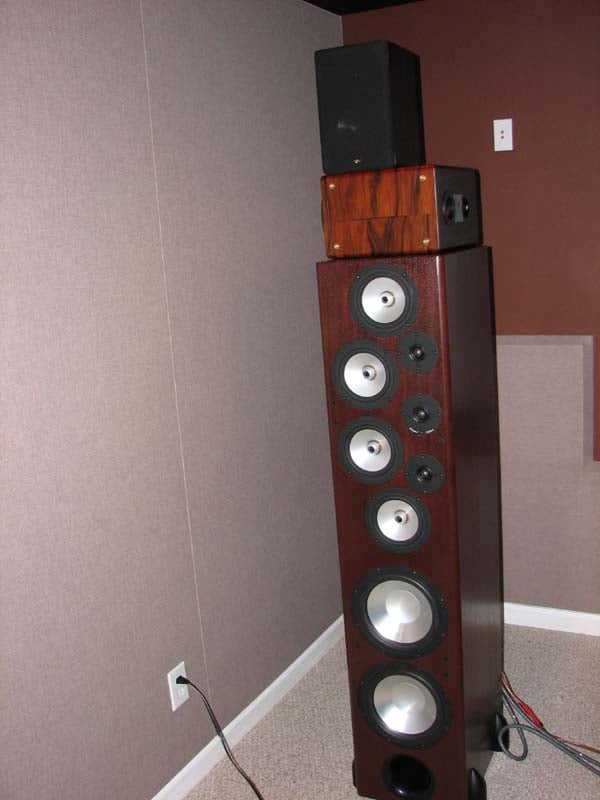
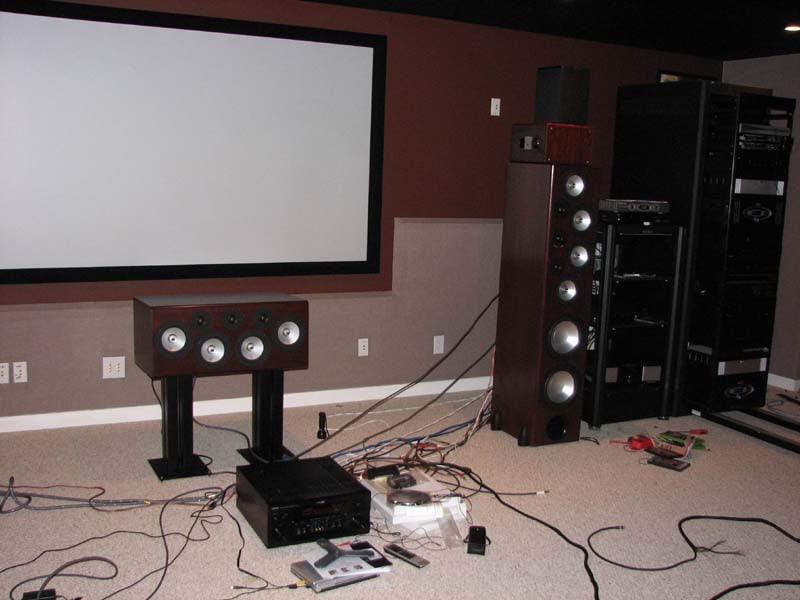

Setting up a full scale 11.2 theater was no easy task and I had to get creative on mounting the front and rear height channels as well as connecting up 4 subwoofers. I used a pair of Onix x-ls as stands on top of my RBH Sound T-30LSE main speakers to place my RBH Sound MC-6C speakers as height channels. I configured my RBH Sound SI-740 SE/R back channels as the rear presence channels and used my Axiom Algonquin speakers on stands for the surround back channels.
I decided to really torture the RX-Z11 by powering the integrated subs of my T-30LSE system off the main channels (speaker B) of the RX-Z11. These speakers dip down to 2 ohms so if the RX-Z11 can deliver enough oomph in my nearly 6,000ft^3 listening space while powering all 11 speakers and 2 of my 4 subs, then it will earn my respect as a “Flagship” product.
Baby Got Back
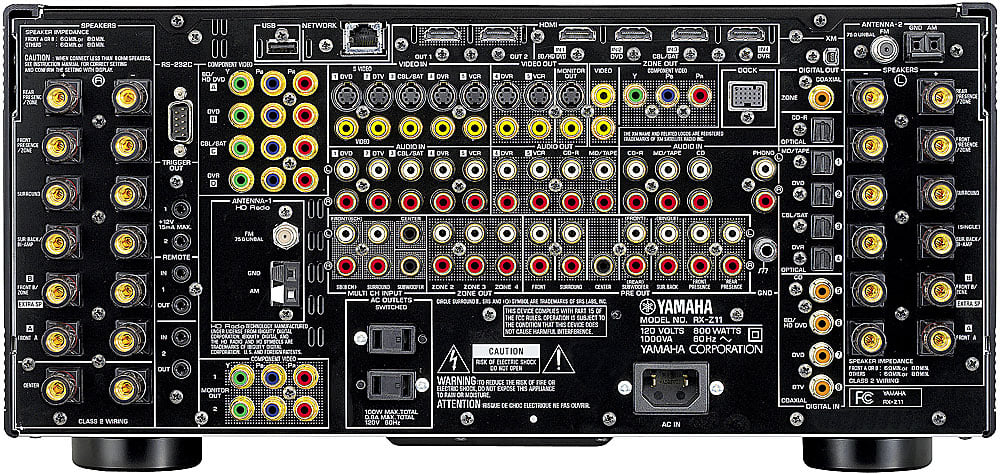
Back Panel View of the Yamaha RX-Z11
The RX-Z11 has a nice rear end for a receiver as far as I am concerned. There are a plethora of connections on the back of this receiver, some of which are unfamiliar to most home theater folk, including the iPod and Ethernet connector. Of course on this receiver HDMI is endowed with 5 inputs and 2 output capable of 1080p resolution with upscaling up to 1080p powered by Anchor Bay Technologies. Four component video inputs and two outputs ensure all of your video needs can be met for even the largest scale installations.
The Yamaha RX-Z11 sports the most speaker level connections I’ve ever seen in a receiver. At any given time, you can connect up to 13 speakers (2 pairs on main channels) to this receiver all powered internally! I was pleased to actually utilize every speaker connection for my installation. With 10 memory settings for this receiver and 4 memory settings for each of the 3 other zones, the sky is the limit with configurability not just for where you assign the speaker groups but how you customize and configure any parameter in the receiver.
Choosing the Speaker Impedance
I tested
the RX-Z11 in the “8 ohm or more” and “6 ohm” settings and for the first time
in my experience of reviewing Yamaha receivers, the setting made NO difference
in output power. It’s almost as if the
option is there to reassure customers that their receiver is safe with speaker
impedances lower than 8 ohms. I was
quite surprised as I usually advise folks to keep it in the “8 ohm or more”
setting regardless of speaker impedance.
Feel free to do what you like here as it doesn’t make a difference
whatsoever.
Auto Setup Via YPAO
 Just like in past Yamaha
receivers, the RX-Z11 incorporates their YPAO auto setup system only this time
around they implemented a multi point (up to 8 positions) calibration scheme. Note that it takes roughly 3 minutes to
calibrate 1 mic position so if you wish to do all 8 points, plan on a good half
hour of nail biting quietness and patience. Note that I had to redo my entire
test suite as I had an interruption from my eldest daughter on the last of the
8 measurements and YPAO doesn’t allow you to redo or pause during the
measurement process.
Just like in past Yamaha
receivers, the RX-Z11 incorporates their YPAO auto setup system only this time
around they implemented a multi point (up to 8 positions) calibration scheme. Note that it takes roughly 3 minutes to
calibrate 1 mic position so if you wish to do all 8 points, plan on a good half
hour of nail biting quietness and patience. Note that I had to redo my entire
test suite as I had an interruption from my eldest daughter on the last of the
8 measurements and YPAO doesn’t allow you to redo or pause during the
measurement process.
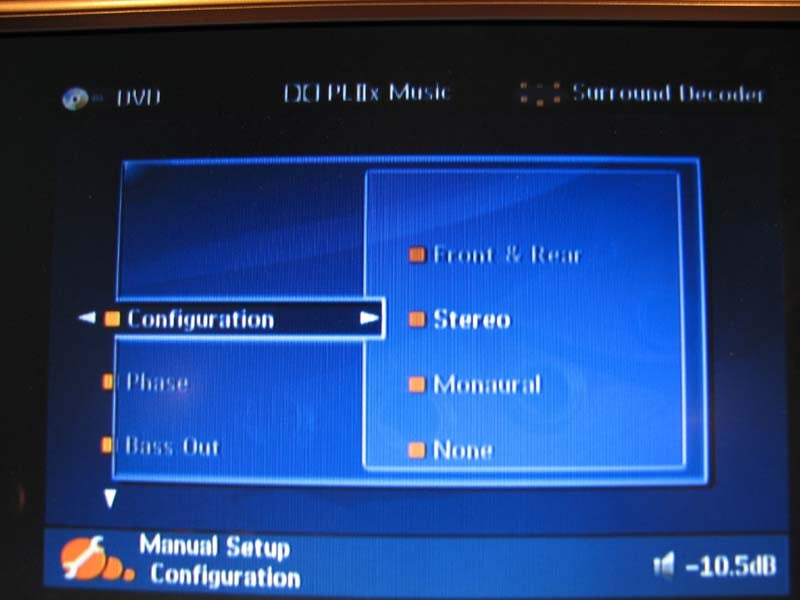
YPAO automatically checks and/or configures:
- Wiring
- Distance
- Size
- Equalization (manual, flat, front, natural, “through” which means bypass)
- Level
- Angle
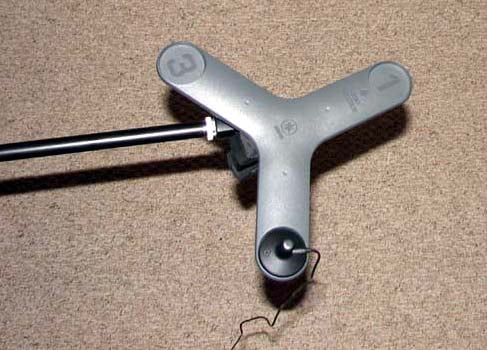 In this
latest iteration of YPAO, Yamaha has incorporated a new feature – called “standing
wave” which uses a three legged boomerang looking object. The boomerang allows
the placemnt of the mic on end point of each leg at the primary listening
position in attempts to do angle calculations for standing wave compensation
for the main, surround and presence channels for multi point calibrations. When not in use, I found the boomerang served
quite well as a frisbee and is an item I am seriously considering to add to my
beach bag.
In this
latest iteration of YPAO, Yamaha has incorporated a new feature – called “standing
wave” which uses a three legged boomerang looking object. The boomerang allows
the placemnt of the mic on end point of each leg at the primary listening
position in attempts to do angle calculations for standing wave compensation
for the main, surround and presence channels for multi point calibrations. When not in use, I found the boomerang served
quite well as a frisbee and is an item I am seriously considering to add to my
beach bag.
YPAO also does some low frequency equalization down to 32 Hz for all channels with roughly 1/6th octave resolution. It offers a manual adjustment mode with a variable Q of .5 to 10.08 and Gain: +6 to -20dB with up to up to 3 bands per channel.
YPAO Calibration Results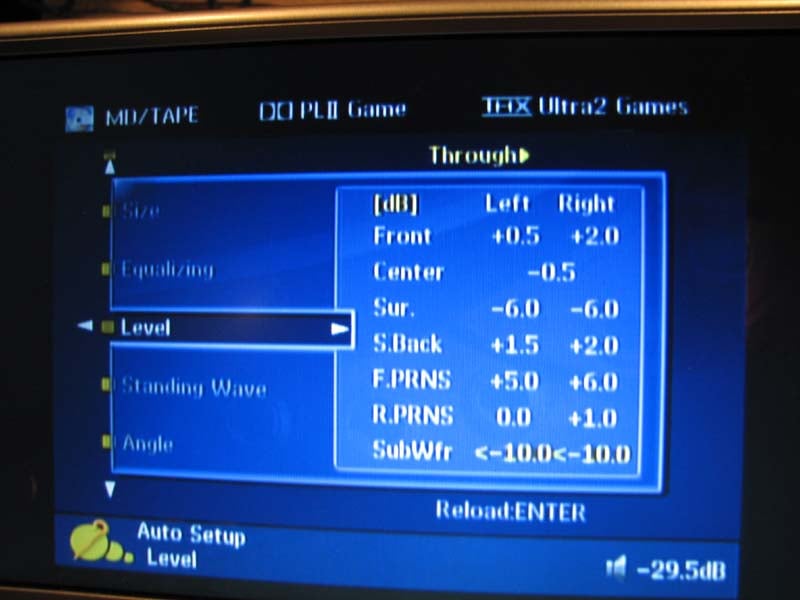 As I found with past generations of Yamaha’s YPAO, it
didn’t setup my system optimally. While
it identified all of my speakers were correctly wired and even chose similar
crossover points for all of my speaker groups each time I ran it, it had some
issues. This includes, incorrectly
identifying my surrounds as large (likely due to their close proximity to back
walls.) Oddly I had more issues with multi
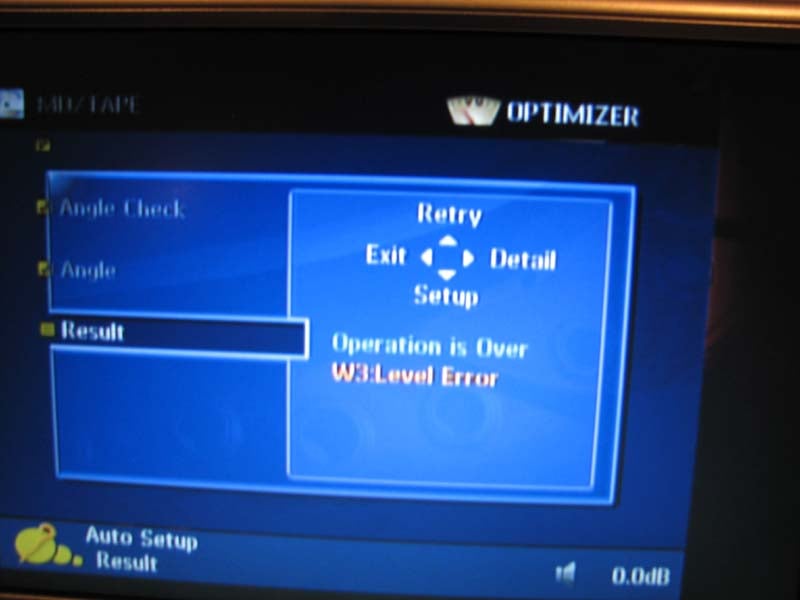
point calibration than I did with the single point calibration in that the
former set my front speaker distances excessively high and produced a subwoofer
level error message. That being said,
when I used YPAO for a single point calibration, it did a pretty good job of
setting speaker size (except for the surrounds), levels (within 1dB) and
speaker distances (except the subwoofers). I stored the calibrations into the memory
banks of the Z11 and after listening to the EQ modes for both
calibrations. Upon directly comparing
them, I found the EQ sound quality was better for single point calibration
though neither calibration resulted in the fidelity improvements I’ve
previously heard through the Audyssey room correction system found in other
receivers. My advice with YPAO is to use
either single point calibration or do multi point measurements with the mic
positions in relatively close proximity to each other centered around the
primary money seat.
As I found with past generations of Yamaha’s YPAO, it
didn’t setup my system optimally. While
it identified all of my speakers were correctly wired and even chose similar
crossover points for all of my speaker groups each time I ran it, it had some
issues. This includes, incorrectly
identifying my surrounds as large (likely due to their close proximity to back
walls.) Oddly I had more issues with multi
point calibration than I did with the single point calibration in that the
former set my front speaker distances excessively high and produced a subwoofer
level error message. That being said,
when I used YPAO for a single point calibration, it did a pretty good job of
setting speaker size (except for the surrounds), levels (within 1dB) and
speaker distances (except the subwoofers). I stored the calibrations into the memory
banks of the Z11 and after listening to the EQ modes for both
calibrations. Upon directly comparing
them, I found the EQ sound quality was better for single point calibration
though neither calibration resulted in the fidelity improvements I’ve
previously heard through the Audyssey room correction system found in other
receivers. My advice with YPAO is to use
either single point calibration or do multi point measurements with the mic
positions in relatively close proximity to each other centered around the
primary money seat.
Editorial Note About Subwoofer Distance
It’s understandable that auto setup systems such as YPAO often struggle with the correct subwoofer distance as it is usually a combination of group delay inherent in subwoofers sporting digital amps and DSP processing such as my Axiom Audio EP500 and the complex structure of small room acoustics below 300Hz. I always recommend using common sense and verify audibly and empirically (if possible) if the distance the auto setup system selected is correct.
Manual Calibration
After YPAO was completed, I manually adjusted speaker size, subwoofer distance, PEQ, and crossover frequency for greater accuracy. I also went into the bass management menu and engaged “Bass Out” for the main channels + the subwoofers. I even used the manual EQ mode to help smooth out the bass response of my system for the sub and main channels. Even though YPAO doesn’t quite have enough resolution, it’s still good enough to fine tune low Q problem areas such as bumps or to a minor extent suckouts.
Editorial Note for PEQ Editing
- Select freq/gain to choose the center frequency
- Select band/gain to set the Q and gain as needed
How to Calculating Q:
To calculate Q, use
fc / BW where fc = center
frequency and BW - bandwidth
YPAO Measured Results
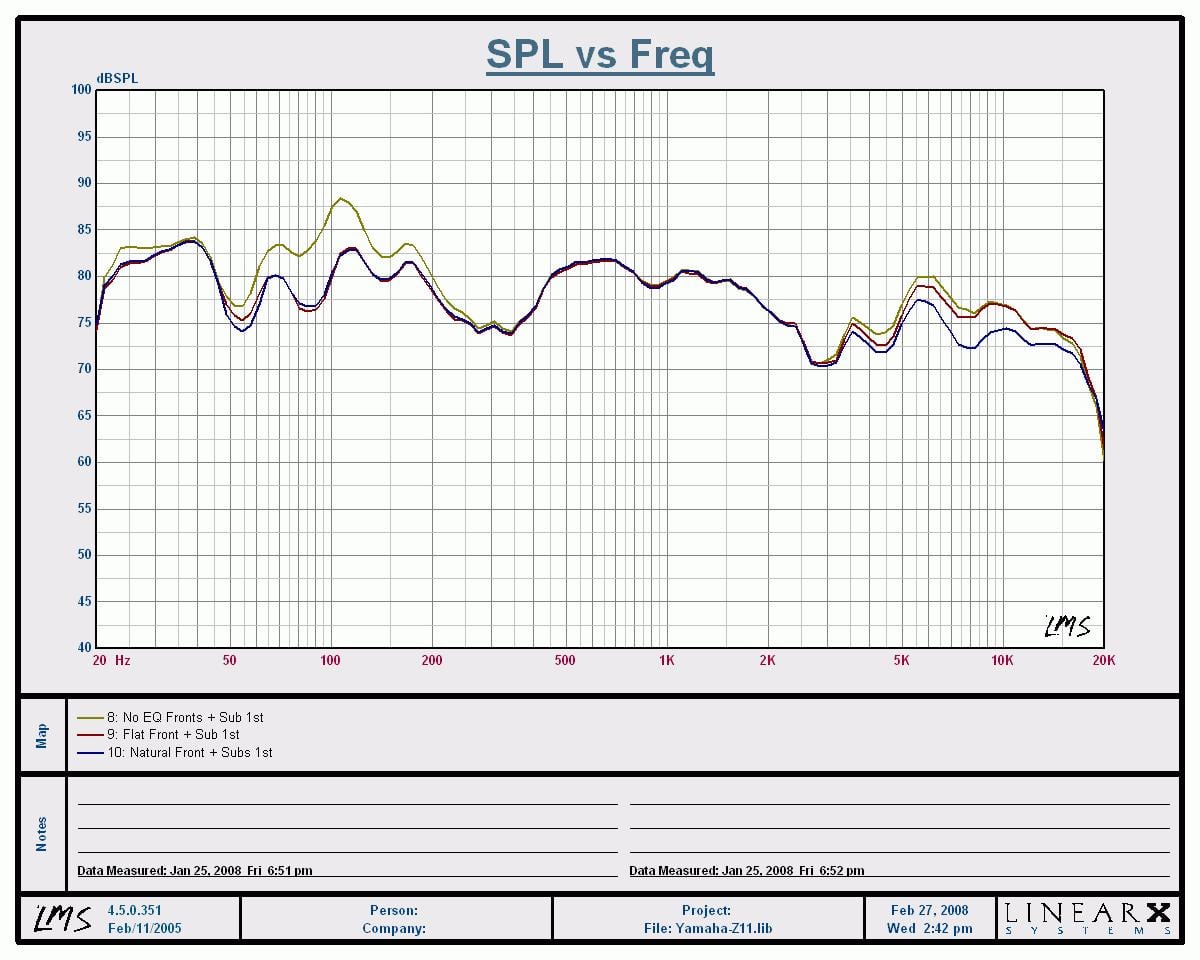
Mains + Sub Frequency
Sweep (1/3rd Octave Smoothed)
Yellow – No EQ, Red –
Flat, Blue – Natural
YPAO definitely smoothed out the frequency response region from 50Hz to 150Hz with a level reduction of about 5dB. The “Flat” setting did almost nothing above the transition region of 300Hz which is a tribute to my speaker systems very linear output and well behaved room acoustics. The “Natural” setting rolled off about 5dB of output above 5kHz which may be an appropriate setting for bright program material or lively rooms.
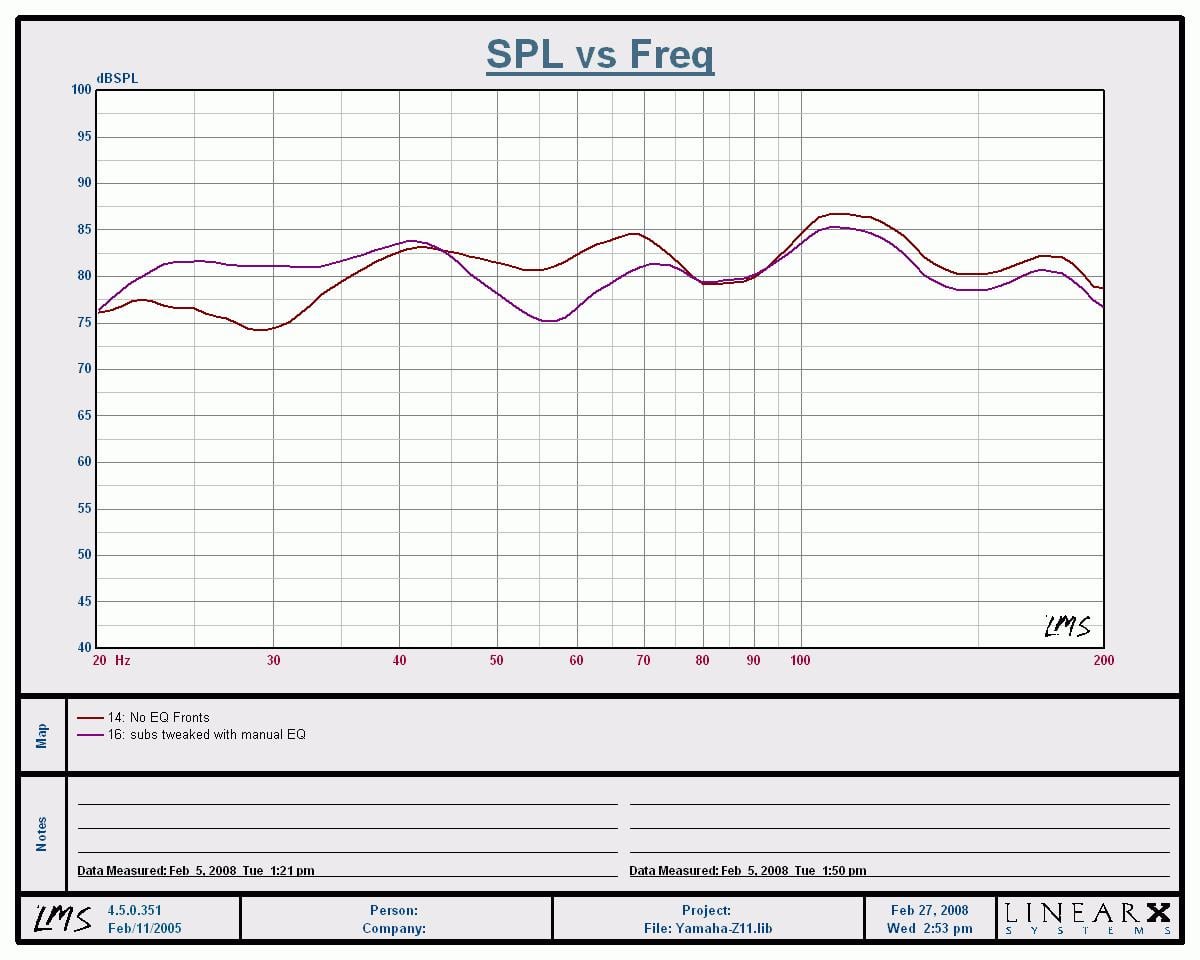
Mains + Subs Tweaked
Frequency Sweep (1/3rd Octave Smoothed)
Red – NO EQ, Purple – manual EQ and phase correction
By tweaking the phase response of 2 of my subwoofers, and by utilizing the Yamaha manual PEQ, I was able to further smooth out bass response for the listening area. As you can see in the purple trace, the low end response below 40Hz was greatly improved with only a slight penalty in the 50-70Hz region which wasn’t as prevalent at the other theater seats.
Yamaha RX-Z11 Bass Management and Advanced Set-Up
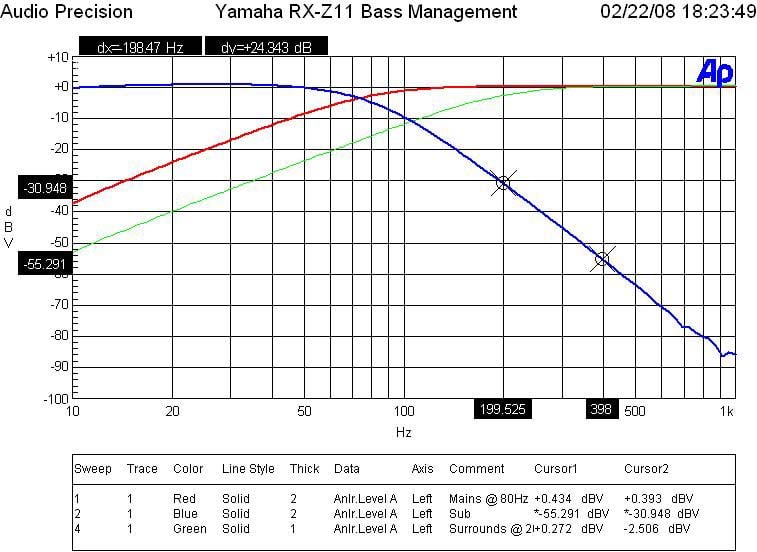
 In the great tradition of excellent bass management,
Yamaha offers a variable crossover point from 40Hz to 200 Hz and +- phase
adjustment for the subwoofer(s) so you can determine the best setting without
having to go behind your subwoofer(s) to change it. Yamaha also provisions for subwoofer output
in 2CH mode if the speakers are set to “Large” via the LFE/Bass Out set to
“Both”. Please note however that “Pure
Direct” and “Stereo Direct” modes bypass the bass management altogether and
will NOT send signal to the subwoofer for 2CH sources regardless of speaker
settings. In this case, either don’t use
“Pure Direct” or disable the “auto” setting for stereo direct mode in the OSD
to engage the DSP and bass management.
In the great tradition of excellent bass management,
Yamaha offers a variable crossover point from 40Hz to 200 Hz and +- phase
adjustment for the subwoofer(s) so you can determine the best setting without
having to go behind your subwoofer(s) to change it. Yamaha also provisions for subwoofer output
in 2CH mode if the speakers are set to “Large” via the LFE/Bass Out set to
“Both”. Please note however that “Pure
Direct” and “Stereo Direct” modes bypass the bass management altogether and
will NOT send signal to the subwoofer for 2CH sources regardless of speaker
settings. In this case, either don’t use
“Pure Direct” or disable the “auto” setting for stereo direct mode in the OSD
to engage the DSP and bass management.
Yamaha took bass management up a notch by allowing variable crossover settings per speaker group (IE. Mains, Center, Surrounds but didn’t give you a choice for the subwoofer crossover which I found through my testing to be dependent on the main channel crossover setting. Thus I highly recommend you keep each speaker groups crossover setting within 20Hz else the bass in the channels crossed over higher than the mains will NOT be recombined into the subwoofer channel.
Yamaha offers dual subwoofer outputs on the RX-Z11 just like they did in previous flagships. This time however, they allow you to assign them as (stereo, mono, or front/back). Do NOT use the “front/back” setting as they made the classic mistake Denon did on the AVR-5805 where the back subwoofer gets LFE info and the front sub gets the bass from all the other channels set to “small”. Ideally in a multi subwoofer system, you want all subs playing identical signals or at least split between Left/Right with LFE going to all subwoofers so you can take full advantage of modal averaging to achieve the smoothest bass response across all of the theater seats.
 If you are connecting only one subwoofer, select
“mono” and be sure to use the “left” sub output since that is the only one with
level control in that particular configuration.
Strangely the RX-Z11 still outputs signal via the “Right” subwoofer
output but its referenced to a 0dB trim setting so you don’t have independent
level control over it other than master volume.
I also noted that if you set the main channels to “small”, the RX-Z11 still
allows you to set the center and surround channels to “large”. I would have preferred Yamaha to
automatically set all speakers to “small” if the mains were set “small”. But, since they didn’t, pay extra attention
to this when configuring your bass management settings.
If you are connecting only one subwoofer, select
“mono” and be sure to use the “left” sub output since that is the only one with
level control in that particular configuration.
Strangely the RX-Z11 still outputs signal via the “Right” subwoofer
output but its referenced to a 0dB trim setting so you don’t have independent
level control over it other than master volume.
I also noted that if you set the main channels to “small”, the RX-Z11 still
allows you to set the center and surround channels to “large”. I would have preferred Yamaha to
automatically set all speakers to “small” if the mains were set “small”. But, since they didn’t, pay extra attention
to this when configuring your bass management settings.
The crossovers worked as expected for a THX Ultra2 certified receiver as indicated by the 12dB/oct High Pass Filter (HPF) slopes on speakers set small and 24dB/oct Low Pass Filter (LPF) slopes on the subwoofer output which I measured with my Audio Precision SYS 2722 Audio Analyzer.
Video Set-Up
Yamaha made some significant upgrades on the video side of the equation with this receiver. For one, the HDMI inputs now accommodate up to 1080p resolution with OSD support. The RX-Z11 is powered by Anchor Bay Technologies' ABT1018 10-bit precision video scaler engine for advanced analog video up-scaling. The scaler engine will take 480i or 480p analog video and scale it up to 720p, 1080i, or 1080p HDMI video (up-scaled video is only available from the HDMI output). The ABT1010 scaler engine independently scales images horizontally and vertically to improve high resolution picture quality. It’s important to note that you cannot convert HDMI signals to any other type of output other than HDMI. The RX-Z11’s i/p converter features a 10-bit processing Motion Adaptive Deinterlacing Engine with Enhanced Motion Detection Filter, Diagonal Processing and 2:2/2: Pull-Down Detection. You can convert 480i analog video signals input as composite video, S-video, and component video to 480p signals output as component video.
For most of
my testing of the RX-Z11, I defaulted HDMI to the “through” setting which
allowed my source components to do the upconversion and scaling as needed. I did however set my Toshiba HD-A2 HD DVD
player to 480i to see just how well the RX-Z11 could do.
Audioholics/HQV Bench Testing Summary of Test Results
Perfect Score is 130
Yamaha RX-Z11 Benchmark Score: 90 (average compared to many displays and source components. In comparison, my Silicon Optix enabled Denon
DVD-5910CI scored a 130.)
| Test | Max Points | RX-Z11 | Pass/Fail | HD-A2 |
| Color Bar | 10 | 10 | Pass | 10 |
| Jaggies #1 | 5 | 5 | Pass | 0 |
| Jaggies #2 | 5 | 5 | Pass | 0 |
| Flag | 10 | 10 | Pass | 5 |
| Detail | 10 | 10 | Pass | 10 |
| Noise | 10 | 0 | Fail | 0 |
| Motion adaptive Noise Reduction | 10 | 0 | Fail | 0 |
| Film Detail | 10 | 5 | Pass | 10 |
| Cadence 2:2 Video | 5 | 0 | Fail | 0 |
| Cadence 2:2:2:4 DV Cam | 5 | 0 | Fail | 0 |
| Cadence 2:3:3:2 DV Cam | 5 | 0 | Fail | 0 |
| Cadence 3:2:3:2:2 Vari-speed | 5 | 5 | Pass | 0 |
| Cadence 5:5 Animation | 5 | 5 | Pass | 5 |
| Cadence 6:4 Animation | 5 | 5 | Pass | 0 |
| Cadence 8:7 animation | 5 | 5 | Pass | 5 |
| Cadence 3:2 24fps film | 5 | 5 | Pass | 5 |
| Scrolling Horizontal | 10 | 10 | Pass | 10 |
| Scrolling Rolling | 10 | 10 | Pass | 10 |
| Total Points | 130 | 90 |
|
70 |
*Source component was the Toshiba HD-A2 upscaled to 720p via
the RX-Z11
and fed to Yamaha LPX-510 LCD Projector. For the HD-A2 tests, the HD-A2 was set to
720p.
Overall I found the scaling features of the RX-Z11 to be better than what’s found in most A/V receivers these days, with the exception of it handling some of the cadences on these specific HQV tests which was a bit puzzling to me. The RX-Z11 bested my Toshiba HD-A2 HD DVD player on standard definition DVD playback, so unless you are using an exceptionally good source component for upconversion (IE. a DVD player or display with a Silicon Optix chipset) you may want to consider using the RX-Z11 for your scaling needs. Of course if you are running a true HD signal such as the output of an HD DVD or Blu-ray player, you would want the player to be set to the native resolution of the disc or the highest supported resolution of your display.
Multi-Zone / Multi-Source Audio & Power Amp Assignability
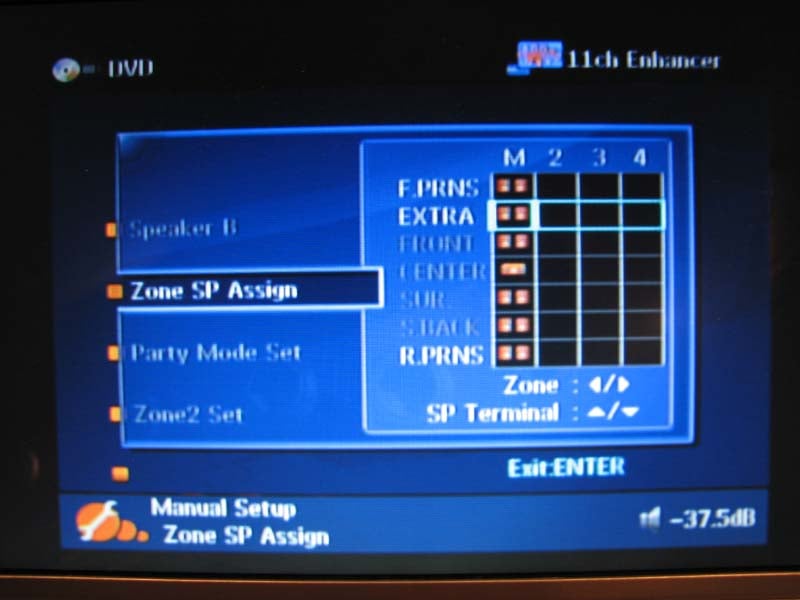 Yamaha has really outdone themselves with all of the
power amplifier options on the RX-Z11. The RX-Z11 comes equipped with a “preamp mode”
which essentially shuts down the amplifiers not being used and will allow you
to reassign all 11 channels to zones 2, 3 and 4. So basically if you desire to add a high
quality 7-channel amplifier for the main zone, this receiver can support simultaneous
4 zones, 4 source audio. Alternatively
you can connect external power amplifiers to each of the additional zones to
power them. This is an extremely
thoughtful and useful feature for those integrating a multi zone distributed
whole house audio solution with their primary home theater room. There is even
a bi-amp mode which takes the surround back channels and duplicates the signal
from the main channels for those wanting to biamp their main speakers. I don’t understand why Yamaha forces you to
enter the advanced setup menu as opposed to provisioning that option on the
main power amp assignability page. Keep
in mind however if you bi-amp you sacrifice the back channels.
Yamaha has really outdone themselves with all of the
power amplifier options on the RX-Z11. The RX-Z11 comes equipped with a “preamp mode”
which essentially shuts down the amplifiers not being used and will allow you
to reassign all 11 channels to zones 2, 3 and 4. So basically if you desire to add a high
quality 7-channel amplifier for the main zone, this receiver can support simultaneous
4 zones, 4 source audio. Alternatively
you can connect external power amplifiers to each of the additional zones to
power them. This is an extremely
thoughtful and useful feature for those integrating a multi zone distributed
whole house audio solution with their primary home theater room. There is even
a bi-amp mode which takes the surround back channels and duplicates the signal
from the main channels for those wanting to biamp their main speakers. I don’t understand why Yamaha forces you to
enter the advanced setup menu as opposed to provisioning that option on the
main power amp assignability page. Keep
in mind however if you bi-amp you sacrifice the back channels.
The RX-Z11 doesn’t just stop with all these cool amplifier assignability options for the additional zones. Zone 2 also features a coaxial digital output so you can play back any of your digital audio sources to remote zones. A prime example here would be someone connecting a YSP-4000 in another room wanting to pass through the audio from their main zone DVD player and Cable box. Please note however that when you connect the external amplifiers in Zone 2, Zone 3, and/or Zone 4 to the ZONE OUT jacks of this unit, the RX-Z11 can only transmit the analog audio signals. In this setting, this unit cannot play back the digital audio sources input at the Digital In jacks and HDMI In jacks in Zone 2, Zone 3, and/or Zone 4. When this unit is in the “Party mode”, it can output the audio signals input at the HDMI In jacks or Digital In jacks at the analog Zone Out jacks. When you connect an external amplifier in Zone 2 to the Zone Digital Out (Coaxial) jack, you can play back the digital and analog audio sources in Zone 2.
The RX-Z11 also comes fully armed with video support allowing component video upconversion in one of the zones and composite video for the additional two zones. So not only can you distribute audio all around the house, but you can do video as well. The DSP “Party” mode is a must have feature for those hosting social events. It allows you to play the same source through all of the speakers in the main zone and any or all of the other zones simultaneously. The RX-Z11 offers some of the most comprehensive multi zone / multi source options in a receiver that I haven’t seen the likes of since the Denon AVR-5805. It truly is a one box solution for distributed whole home audio and video especially when paired with a Yamaha MusicCAST MCX-2000 music server.
Network Streaming, XM Radio, iPod
The Yamaha RX-Z11 is packed with all of the same great features found on the RX-V2700 such as network streaming from MusicCAST, USB devices or internet radio, XM radio, HD radio and iPod connectivity with music enhancer mode that is said to be an enhancement over their prior generation receivers that employed this feature. Rather than rehashing the details, I encourage you to read my Yamaha RX-V2700 Review that discusses the functionality and setup of these features in great detail. I will note however that the RX-Z11 adds web browser control and the ability to use your iPhone as a remote control which is pretty cool. I am surprised Yamaha didn’t arm this receiver with WiFi capability so for now you will have to settle using Ethernet for all of your music streaming needs. Most people installing a sophisticated home theater system have an Ethernet connection near their rack for their gaming system or cable box so it shouldn’t be much of a concern.
Remote Control(s)
 The RX-Z11
comes with two remote controls: one that operates the main zone (RAV380), and
the other (RAV33) for multi zone control.
These remotes score no points with me, especially the main zone remote
which I feel is the poorest design they’ve offered in a flagship product since
the DSP-A3090. It's basically a
glorified version of the remote found on the RX-V2700 only its silver and looks
nicer. The RAV380 isn’t fully backlight
and the buttons are so numerous and so closely spaced together that it makes it
a quite a painful chore figuring out what function you want to control. During my review, I was almost tempted to
spring for a new Apple iPhone just so I could have a better control system to
operate this unit. I suspect (and
strongly encourage) most people will be using a universal type of remote or
their iPhone to operate this complex beast of a receiver. I suppose it’s a good measure on Yamaha’s
part to not offer a more elaborate and hence expensive remote solution to keep
the product cost down but I really wished they would have met half way and
offered a remote that was half push button and half touch screen to simply it
just a bit. The little RAV33 is actually
not a terrible multi zone remote as it allows you to select input, basic source
control, memory settings, and volume level and on/off. Overall it’s a handy little remote but the
experienced installer would likely integrate an RF remote or touch pad at the
zone location(s) where audio is being fed.
The RX-Z11
comes with two remote controls: one that operates the main zone (RAV380), and
the other (RAV33) for multi zone control.
These remotes score no points with me, especially the main zone remote
which I feel is the poorest design they’ve offered in a flagship product since
the DSP-A3090. It's basically a
glorified version of the remote found on the RX-V2700 only its silver and looks
nicer. The RAV380 isn’t fully backlight
and the buttons are so numerous and so closely spaced together that it makes it
a quite a painful chore figuring out what function you want to control. During my review, I was almost tempted to
spring for a new Apple iPhone just so I could have a better control system to
operate this unit. I suspect (and
strongly encourage) most people will be using a universal type of remote or
their iPhone to operate this complex beast of a receiver. I suppose it’s a good measure on Yamaha’s
part to not offer a more elaborate and hence expensive remote solution to keep
the product cost down but I really wished they would have met half way and
offered a remote that was half push button and half touch screen to simply it
just a bit. The little RAV33 is actually
not a terrible multi zone remote as it allows you to select input, basic source
control, memory settings, and volume level and on/off. Overall it’s a handy little remote but the
experienced installer would likely integrate an RF remote or touch pad at the
zone location(s) where audio is being fed.
Yamaha RX-Z11 Listening Tests
We covered a great deal of the feature set on the new Yamaha RX-Z11, but its all worthless if the audio portion of this receiver doesn’t live up to the hype. Thus I decided to do exhaustive listening tests of the RX-Z11 via two channel bi-amp mode and a full scale 11.2 surround spectacle for music and movies. The bi-amp mode really tests the amplifier section of this receiver since I am using full range tower speakers that dip down to two ohms and are not an easy load to drive.
Reference Equipment
I installed
the Yamaha RX-Z11 into the premier theater room of the Audioholics Showcase Home consisting of RBH Sound SE/R Signature and Axiom Audio Algonquin speakers,
dual Velodyne DD-15 subwoofers, Denon DVD-5910CI and Toshiba HD-A2 HD DVD
players and Yamaha’s own LPX-510 LCD projector.
All of the cables were Sonicwave furnished by Impact Acoustics.
Two Channel Music Listening (Bi-amp Mode)
I selected highly dynamic and bass intensive musical content to ensure I was giving the amp section of the Z11 a good workout. I started out with Dianne Reeves Never too Far and ended with The Best of Fourplay CD.
CD: Dianne Reeves Never Too Far
 The bass track in Track #2 “Never Too Far” will sound muddy
on an improperly set up or mediocre system. With the RX-Z11 in bi-amp mode
powering my T-30LSE system, I was pleasantly surprised by how snappy and
articulate the upper bass response was. Overall, I found it well controlled and
retained excellent the decay properties I heard with my reference amp. The tonal balance was warm and inviting and
regardless of how loudly I listened, I never heard the RX-Z11 amps run out of
gas. Stereo separation was about as good
as I’ve ever heard, portraying Dianne’s powerful vocals dead center as they
should be with plenty of width and depth to the soundstage. The drums had a the requisite pop to them
while the saxophones exhibited a nice bite giving you that “live” feeling.
The bass track in Track #2 “Never Too Far” will sound muddy
on an improperly set up or mediocre system. With the RX-Z11 in bi-amp mode
powering my T-30LSE system, I was pleasantly surprised by how snappy and
articulate the upper bass response was. Overall, I found it well controlled and
retained excellent the decay properties I heard with my reference amp. The tonal balance was warm and inviting and
regardless of how loudly I listened, I never heard the RX-Z11 amps run out of
gas. Stereo separation was about as good
as I’ve ever heard, portraying Dianne’s powerful vocals dead center as they
should be with plenty of width and depth to the soundstage. The drums had a the requisite pop to them
while the saxophones exhibited a nice bite giving you that “live” feeling.
Next up was Fourplay’s “Chant” track which is slams with a dynamic kick drum sending wimpy woofers to oblivion and lesser designed amps into hard clipping. As I listened, I found myself cranking the volume up, intoxicated watching the dual 10” aluminum woofers flex in and out as the Yamaha pumped pure unadulterated power into them. Yamaha was convincing me of the flagship status of this receiver as it was able to power my large full range tower speakers without any complaints.
11.2 Multi Channel Music and Movies
I wanted to see just how well the RX-Z11 could handle a full gamut of speakers so I got out of bi-amp mode, connected my T-30LSEs to the main channels and the rest of the speakers for a full 11.2 surround experience using the stereo L/R subwoofer outputs for my dual Velodyne DD-15 subwoofers. Folks, we are talking 11 speakers and 4 subs. This is about as exciting as home theater can get.
CD: Genesis - Live Over Europe 2007
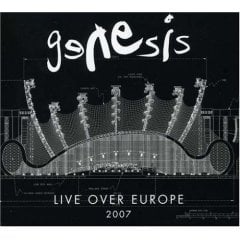 Nothing put a bigger smile on my face when the
legendary progressive rock band Genesis got back together for one last tour to
remind the world of their musical genius.
In two channel stereo, the sound of this double disc concert CD is a bit
flat and sterile, but the experience is far more enjoyable once you engage
Prologic IIx Music Mode. I started out
with track #3 “Land
of Confusion” and
switched through the gamut of Yamaha’s music DSP modes until I settled on what
I thought sounded best “Music Video”.
Doing a direct A/B comparison between this mode and PLIIx, I found the
former to be more open and thus enhancing the surround envelopment. The front soundstage in track #4 “In the
Cage” seemed much larger in “Music Video” mode.
I also tried out the “11 Channel Stereo” mode. After I tweaked it so the
surrounds and center channel were reduced output with respect to the main
channels, I found it to offer a more direct in your face sound to the
music. If you want to really feel the
music, use this mode, but if you want a more natural envelopment that is also
more expansive, I’d highly recommend Yamaha’s excellent “Music Video
Mode”.
Nothing put a bigger smile on my face when the
legendary progressive rock band Genesis got back together for one last tour to
remind the world of their musical genius.
In two channel stereo, the sound of this double disc concert CD is a bit
flat and sterile, but the experience is far more enjoyable once you engage
Prologic IIx Music Mode. I started out
with track #3 “Land
of Confusion” and
switched through the gamut of Yamaha’s music DSP modes until I settled on what
I thought sounded best “Music Video”.
Doing a direct A/B comparison between this mode and PLIIx, I found the
former to be more open and thus enhancing the surround envelopment. The front soundstage in track #4 “In the
Cage” seemed much larger in “Music Video” mode.
I also tried out the “11 Channel Stereo” mode. After I tweaked it so the
surrounds and center channel were reduced output with respect to the main
channels, I found it to offer a more direct in your face sound to the
music. If you want to really feel the
music, use this mode, but if you want a more natural envelopment that is also
more expansive, I’d highly recommend Yamaha’s excellent “Music Video
Mode”.
CD: Dave Matthews Band – Crash
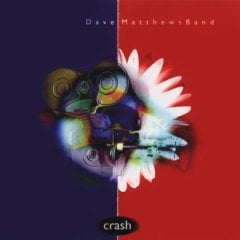 It’s been awhile since I played any Dave Matthews and
I recalled these recordings did exceedingly well with Yamaha DSP processing in my
previous reviews. Yamaha DSP Jazz modes
(namely Village Gate) really shined on this CD.
Track #1 “So Much To Say” exhibited a very natural openness with good
reverb in the guitars and Dave Matthews voice.
I felt as if I was experiencing a live performance in an old brick
constructed NY jazz club. For Track #3
“Crash Into Me” I toggled between the various Jazz DSP modes, “11 Channel
Stereo” and “Music Video”. I discovered
a strong enveloping feeling of the guitars to the left and right sides of me
with very powerful and tight bass response when listening in “11 Channel Stereo” mode. I had to actually trim down the surround and
height channels to 70% and 30%, respectively, as it seemed a bit
overpowering. I didn’t like the way this
CD sounded in “Music Video” mode and ultimately settled on “Jazz Cellar” for
this portion of my listening tests. Its
important to note that many of the DSP modes do NOT utilize the back channels
and “Music Video” mode is one of the few DSP’s that send signal to all 11
speakers.
It’s been awhile since I played any Dave Matthews and
I recalled these recordings did exceedingly well with Yamaha DSP processing in my
previous reviews. Yamaha DSP Jazz modes
(namely Village Gate) really shined on this CD.
Track #1 “So Much To Say” exhibited a very natural openness with good
reverb in the guitars and Dave Matthews voice.
I felt as if I was experiencing a live performance in an old brick
constructed NY jazz club. For Track #3
“Crash Into Me” I toggled between the various Jazz DSP modes, “11 Channel
Stereo” and “Music Video”. I discovered
a strong enveloping feeling of the guitars to the left and right sides of me
with very powerful and tight bass response when listening in “11 Channel Stereo” mode. I had to actually trim down the surround and
height channels to 70% and 30%, respectively, as it seemed a bit
overpowering. I didn’t like the way this
CD sounded in “Music Video” mode and ultimately settled on “Jazz Cellar” for
this portion of my listening tests. Its
important to note that many of the DSP modes do NOT utilize the back channels
and “Music Video” mode is one of the few DSP’s that send signal to all 11
speakers.
CD: Scofield – A Go Go
 John Scofield has got some good skill on jazz guitar
and this CD is a great recording when you’re in the mode for something
funky. I started with “Music Video” DSP
mode for Track #1 “A Go Go” and found the sound to be too concentrated towards
the center channel. Once I switched over
to the Jazz DSP modes, the width or spaciousness greatly increased and I again
felt like I was in a genuine Jazz club sipping a Martini and enjoying a fine
Cuban. “Village Gate” sounded most
open, while “Warehouse” was too lively. “Village Gate” and “Jazz Cellar” were
my favorites with a slight preference towards the latter. Granted you could go in and tweak any of the
DSP modes to your liking but I mostly evaluate the default settings as I figured
if I grew to like the processing features on this receiver too much, it would
be too difficult to part with when I have to send it back. Needless to say, I had a great time listening
to this CD with the variety of DSP music enhance modes and integrated front and
back height channels.
John Scofield has got some good skill on jazz guitar
and this CD is a great recording when you’re in the mode for something
funky. I started with “Music Video” DSP
mode for Track #1 “A Go Go” and found the sound to be too concentrated towards
the center channel. Once I switched over
to the Jazz DSP modes, the width or spaciousness greatly increased and I again
felt like I was in a genuine Jazz club sipping a Martini and enjoying a fine
Cuban. “Village Gate” sounded most
open, while “Warehouse” was too lively. “Village Gate” and “Jazz Cellar” were
my favorites with a slight preference towards the latter. Granted you could go in and tweak any of the
DSP modes to your liking but I mostly evaluate the default settings as I figured
if I grew to like the processing features on this receiver too much, it would
be too difficult to part with when I have to send it back. Needless to say, I had a great time listening
to this CD with the variety of DSP music enhance modes and integrated front and
back height channels.
DVD-Audio: Beatles Love
Track #1 “Because” has become one of my favorite Beatles tunes as it really exemplifies the uncanny melodic nature of the Beatles that few if any bands today can match. I was immersed in their wonderful voices when I engaged “Music Video” DSP mode. The experience was almost surreal and I was literally transported center stage with the Fab4 all around me. Lennon’s voice sounded more “real” in track #5 “I am the Walrus” when engaged in this DSP mode. I found Prologic IIx Music Mode offered a bit more focus to the music but it wasn’t as expansive or bold as I heard it in “Music Video” mode which was clearly evident to me in track #10 “The Benefit of Mr. Kite”. After experimenting with “Music Video” mode with a variety of music I found it to really excel with discrete multi channel music and to be hit or miss with two channel program material.
Concert DVD’s
 This is where I really
enjoy Yamaha receiver products the most.
The ability to transform a concert event into a lifelike experience is
something only Yamaha DSP processing can convey to its fullest realism. I got a kick out of listening to Pat
Metheny’s - The Way Up HD DVD and
Eric Claptons Crossroads DVD in
“Music Video” and “Village Gate” DSP modes.
“Village Gate” really opened up the soundstage for the Pat Metheny
concert and added a sense of dimensional space that was missing in ordinary
PLIIX Music Mode. I was so caught up
listening to the Jeff Beck portion of the Eric Clapton concert in “Music Video”
mode that I almost didn’t notice the super sexy bass player he had in his
band.
This is where I really
enjoy Yamaha receiver products the most.
The ability to transform a concert event into a lifelike experience is
something only Yamaha DSP processing can convey to its fullest realism. I got a kick out of listening to Pat
Metheny’s - The Way Up HD DVD and
Eric Claptons Crossroads DVD in
“Music Video” and “Village Gate” DSP modes.
“Village Gate” really opened up the soundstage for the Pat Metheny
concert and added a sense of dimensional space that was missing in ordinary
PLIIX Music Mode. I was so caught up
listening to the Jeff Beck portion of the Eric Clapton concert in “Music Video”
mode that I almost didn’t notice the super sexy bass player he had in his
band.
I caution NOT to use 11 CH Stereo mode for any discrete multi channel program material as it down mixes the content into two channel before sending it to all of the speakers. I tried this mode for these discs and it sounded terribly compressed and unsatisfying to say the least.
Movie Watching
 The Yamaha RX-Z11 is as
equally armed for music as it is for movie watching. Not only are there specific DSP modes for
movie viewing as Yamaha has always offered in the past, but the RX-Z11 sports
some of the newest technologies from THX, hence the Ultra2 Plus
certification. For those listening below
reference level, the RX-Z11 incorporates THX’s Loudness Plus which is said to maintain the integrity of
soundtracks when listening below Reference Level. THX Loudness Plus
compensates for the tonal and spatial shifts that occur when the volume level
is reduced. I toggled this mode on at
low listening levels and indeed get a fuller sound with an improved surround
envelopment. The benefits seemed less
obvious as the volume level increased and thus it appeared this feature was
working as claimed.
The Yamaha RX-Z11 is as
equally armed for music as it is for movie watching. Not only are there specific DSP modes for
movie viewing as Yamaha has always offered in the past, but the RX-Z11 sports
some of the newest technologies from THX, hence the Ultra2 Plus
certification. For those listening below
reference level, the RX-Z11 incorporates THX’s Loudness Plus which is said to maintain the integrity of
soundtracks when listening below Reference Level. THX Loudness Plus
compensates for the tonal and spatial shifts that occur when the volume level
is reduced. I toggled this mode on at
low listening levels and indeed get a fuller sound with an improved surround
envelopment. The benefits seemed less
obvious as the volume level increased and thus it appeared this feature was
working as claimed.
HD DVD: The Transformers
 Yes I did
get the memo about the death of HD DVD, but I haven’t yet had the opportunity
to pick up a Blu-ray player and make the transition to the “winning” High Def
format. Although I am not overly
impressed with the sound quality of this HD DVD as I found the soundtrack to be
quite compressed, it does have some great rumble effects and is pure eye candy
making it a good demo disc to keep on hand to impress your friends and
family. I started this demo in PLIIX
Movie Mode which of course sounded excellent as usual. I switched over to “Music Video” mode which
collapsed the soundstage and really ruined the experience. Thus I moved on to “Adventure” mode which I
found to be excellent overall. It really
opened up the soundstage vertically while keeping the center channel dialogue
anchored. “Sci Fi” mode was a tad more
expansive but I also heard a bit too much reverb in the vocals. I suppose this could have been turned down
via the edit parameters of the mode but I was so enamored with “Adventure” mode
that I continued watching the movie in that DSP program. The helicopter fly by effect was most
impressive and I felt such a sense of spaciousness that I pretty much forgot I
was listening to speakers and just drowned in the experience. My only complaint was the occasional
compressive artifacts I was hearing during loud explosions which was a function
of the source material and NOT the RX-Z11.
Too bad they used so much compression in this disc.
Yes I did
get the memo about the death of HD DVD, but I haven’t yet had the opportunity
to pick up a Blu-ray player and make the transition to the “winning” High Def
format. Although I am not overly
impressed with the sound quality of this HD DVD as I found the soundtrack to be
quite compressed, it does have some great rumble effects and is pure eye candy
making it a good demo disc to keep on hand to impress your friends and
family. I started this demo in PLIIX
Movie Mode which of course sounded excellent as usual. I switched over to “Music Video” mode which
collapsed the soundstage and really ruined the experience. Thus I moved on to “Adventure” mode which I
found to be excellent overall. It really
opened up the soundstage vertically while keeping the center channel dialogue
anchored. “Sci Fi” mode was a tad more
expansive but I also heard a bit too much reverb in the vocals. I suppose this could have been turned down
via the edit parameters of the mode but I was so enamored with “Adventure” mode
that I continued watching the movie in that DSP program. The helicopter fly by effect was most
impressive and I felt such a sense of spaciousness that I pretty much forgot I
was listening to speakers and just drowned in the experience. My only complaint was the occasional
compressive artifacts I was hearing during loud explosions which was a function
of the source material and NOT the RX-Z11.
Too bad they used so much compression in this disc.
Suggestions for Improvement
Although the RX-Z11 is jam packed with features and has it where it counts sonically, there are some operational things (mostly with YPAO) I’d like to see improvement upon to make the next generation receiver even better:
- Single button toggle ability via remote to engage/disengage PEQ globally for all channels
- More accurate and consistent auto speaker size, crossover configuration and equalization, especially for multi point calibrations
- Full range calibration down to 20Hz with at least 1/12th octave resolution
- YPAO status indicator light (perhaps a different color) if some parameters are changed but the PEQ is still engaged
- Offer the option of pausing and redoing a YPAO test in progress during multi point calibrations
- Fix the Front/Back subwoofer assignment so both subs get LFE content and bass from all speakers set small
Yamaha RX-Z11 Measurements & Analysis
Preamp Section

Yamaha RX-Z11 Preamp
Frequency Response
I measured a ruler flat frequency response with a -3dB point around 173kHz in “Pure Direct” mode. Once the DSP was engaged, I noticed a +1.8dB bump centered around 80Hz in DSP mode which puzzled me for a moment until I realized I was the one that caused that bump when I manual edited the PEQ on the main channels. It’s reassuring that I confirmed Yamaha’s manual PEQ adjustments work exactly as expected.
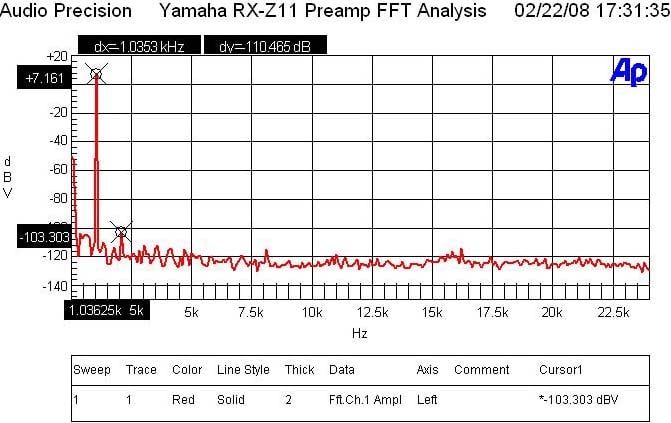
Yamaha RX-Z11 Preamp FFT Distortion Analysis
With 200mVin, I set the master volume until I reached 1Vrms out of the preamp. The output was so pristine that I couldn’t measure any appreciable harmonics. I had to run the preamp up to 2Vrms out and 400Mv in to start measuring something appreciable but beyond the limits of audibility. Low distortion hardly qualifies for what I measured (7.161+103.303)dBv = 110.5dBV or 100*alog^-1(-110.5/20) = .0003% THD + N which is among the lowest distortion I’ve ever measured in a preamp regardless of price.
SNR
With
200mVin and 1Vout, SNR = 87.6dB (unweighted) in pure direct mode. This is an excellent measurement, and with
its ample drive capability proves the RX-Z11 can hold its own with the very
finest home theater preamps on the market.
The RX-Z11 can accept a signal up to 3.6Vrms and output 4.7Vrms under .01% THD +N. This is more than enough gain to drive virtually any power amplifier to maximum gain (THX amps require about 2Vrms). In the past I measured lower end Yamaha receivers that couldn’t output more than 1.5Vrms without the onset of hard clipping. This is NOT one of those receivers.
Power Amp Section
Power Bandwidth & Distortion
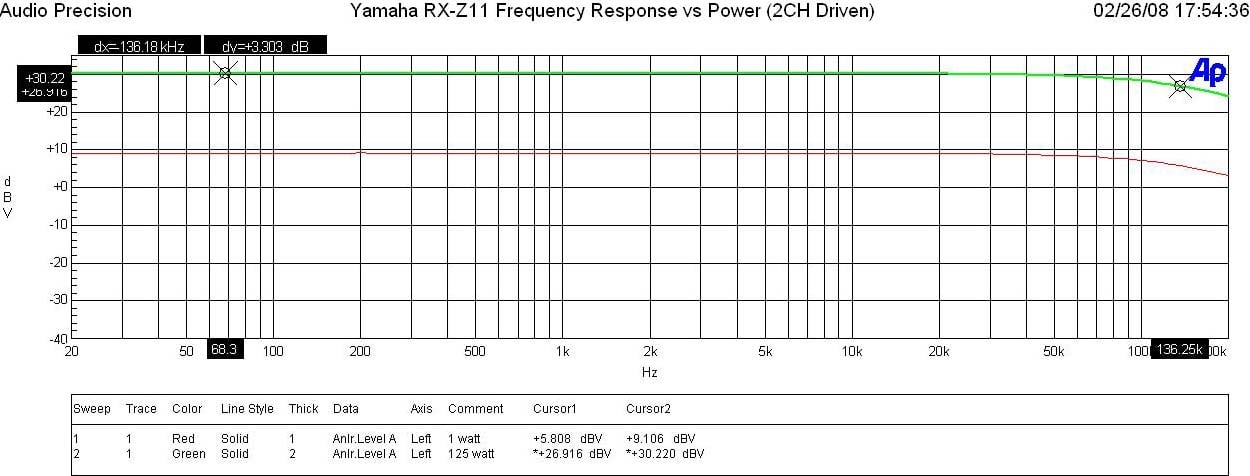
Yamaha RX-Z11 Frequency Response at 1 watt & Full Power
The RX-Z11 displayed excellent frequency response uniformity with a ruler flat response in the audio passband and an unwavering -3dB point of 136kHz at every power level. This is a design tribute that Yamaha boasts and lives up to!
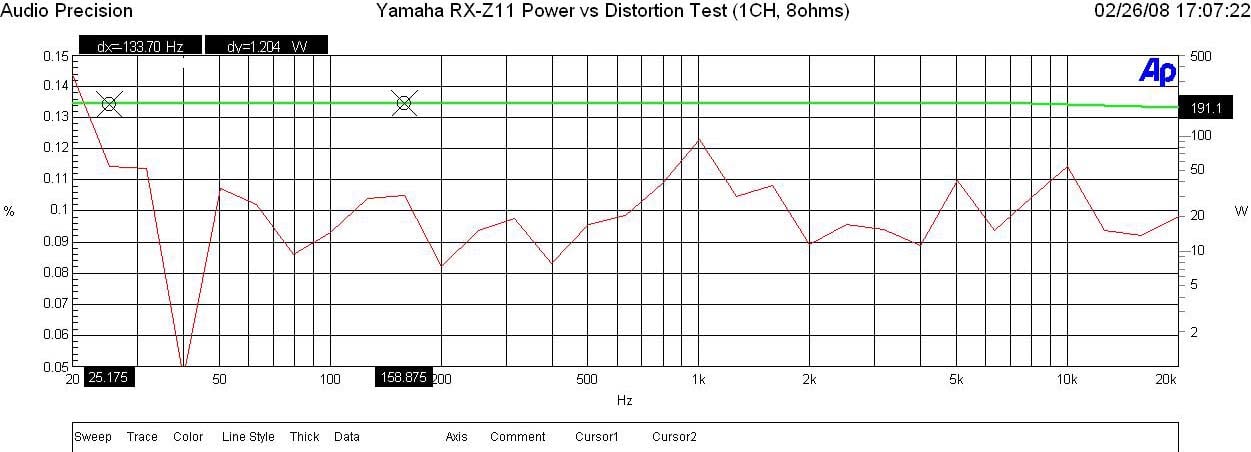
Yamaha RX-Z11 Power vs Distortion
I measured continuous power vs distortion by setting up a regulated sweep in my Audio Precision to automatically adjust input level until the maximum power output is achieved at < 0.1% THD + N. The RX-Z11 was plugged directly into an APC S-15 Power Conditioner with regulation to ensure the line never dropped below 118Vrms.
Power output: <0.1% THD + N
1CH, 8
ohms: 190wpc
2CH, 8
ohms: 172wpc
1CH, 4
ohms: 300wpc
2CH, 4 ohms:
256wpc
Keep in mind most review publications don’t do continuous power measurements and they usually publish power measurements into clipping at 1% THD + N. Our measurements are very conservative and it is clear that the 140wpc power rating of this receiver is greatly understated as Yamaha is delivering MUCH more than specified.
For more info on amplifier measurements, see: The All Channels Driven (ACD) Test
With two channels driven at full load, I measured about 55% efficiency which is quite good for a linear Class A/B amplifier. When the unit was idling with all amplifiers turned on, it consumed about 126 watts. When I engaged “preamp mode” which shuts off the amps in the main zone, the idle power dropped to about 90 watts.
FFT Distortion Analysis
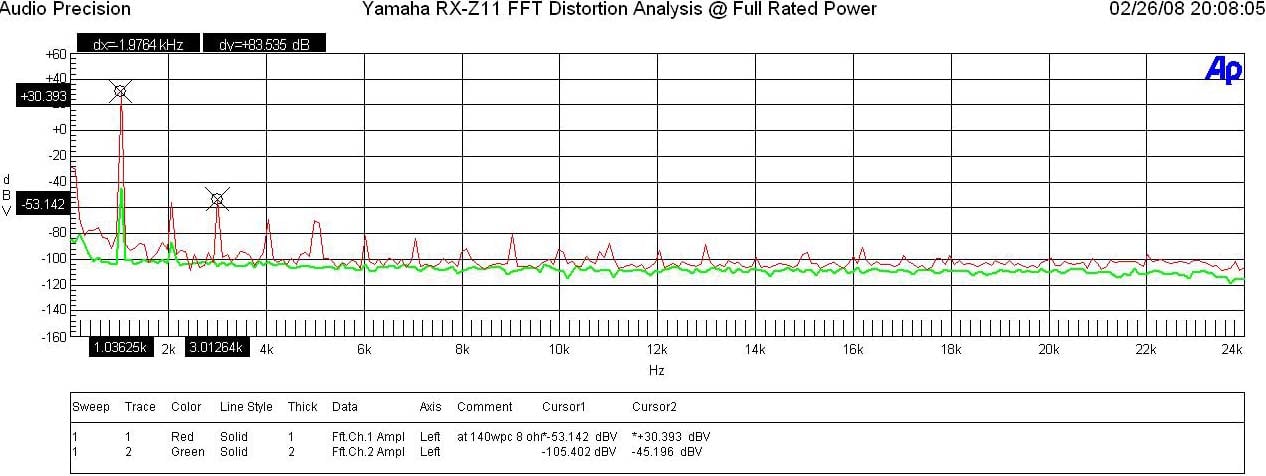
Yamaha RX-Z11 FFT Analysis @ Full Rated Power
At 1 watt into 8 ohms, the RX-Z11 displayed excellent results (+9.056 + 82.271)dBv = 91.3dBv or 100*alog^-1(-91.3/20) = .003% THD + N. At full rated power (140wpc, 8 ohms) the RX-Z11 again exhibited excellent distortion measurements (30.39 + 53.14)dBv =83.5dBv or 100*alog^-1(-83.5 /20) = .007 THD + N. These results weren’t quite as low as I measured on the RX-V2700 but I suspect Yamaha is employing a higher amount of negative feedback in this amplifier design as you will see in the amplifier output impedance measurements to follow.
Amplifier Output Impedance & Damping Factor
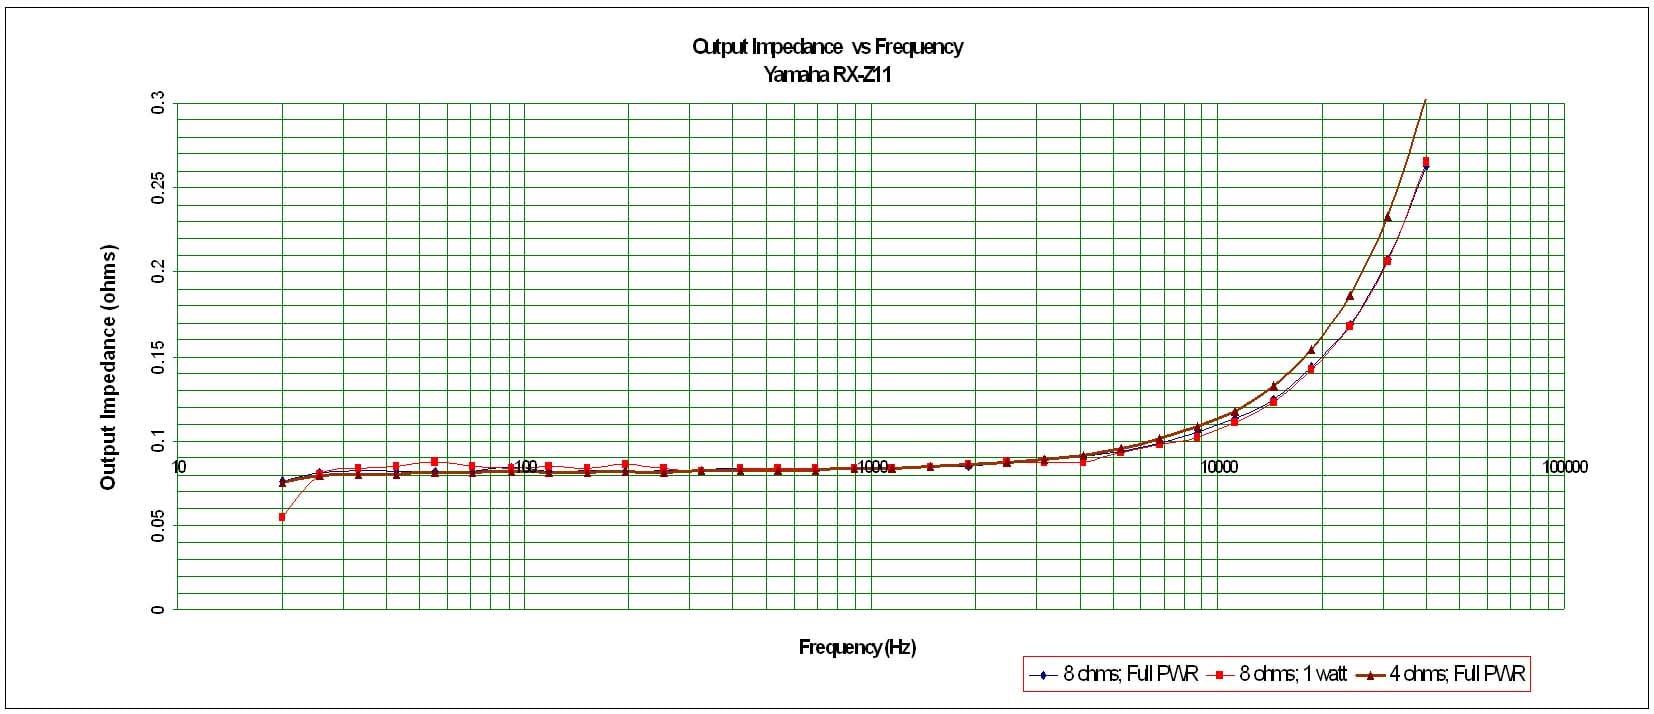
Yamaha RX-Z11 Amplifier Output Impedance under various loading conditions
The RX-Z11 exhibited one of the lowest output impedance profiles I’ve ever measured in an amplifier which indicates to me they are employing a lot of negative feedback but also using quality output devices and a large enough power supply to be stable at full power into 4 ohm loads. It fell well below our desired 100 mohm or less mark for the entire audible bandwidth up to 20kHz and maintained itself even when driving at max sustained power levels into 8 ohm and 4 ohm loads. This proves that the RX-Z11 will sound consistently good no matter what loudspeaker load it is driving.
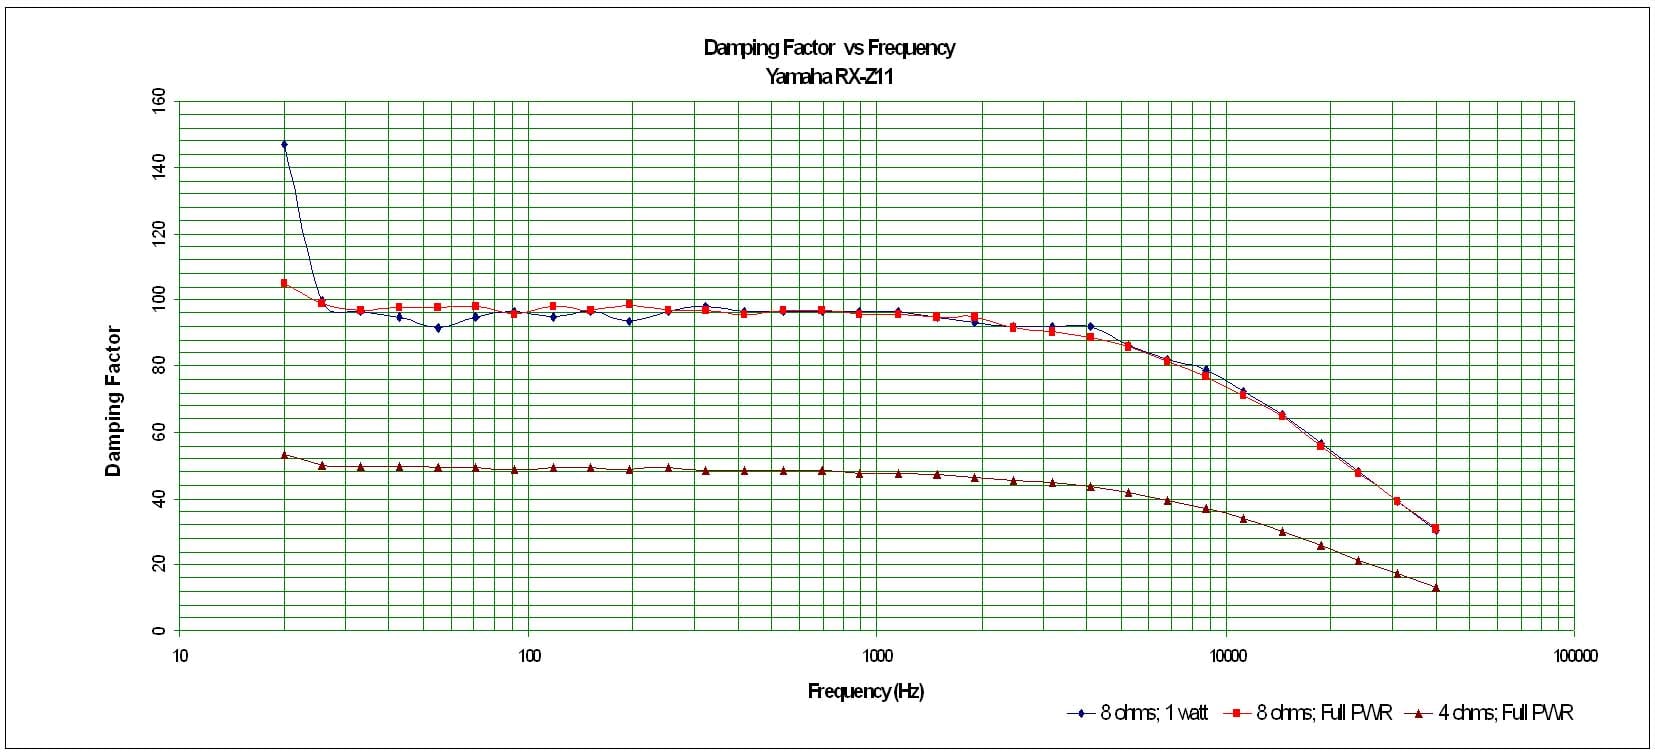
Yamaha RX-Z11 Amplifier Damping Factor under various loading conditions
The amplifier damping factor is about what I expected based on the measured output impedance. It is uniformly good across the entire audio frequency range at around the 100 mark (50 is a minimum we like to see in all amplifiers of uncompromising design) when driving an 8 ohm loads. Into 4 ohm loads the Damping factor is exactly as expected, ½ the 8 ohm value and demonstrates that the Z11 is happy to drive low impedance loads at full power.
Channel to Channel Crosstalk
Yamaha RX-Z11 Crosstalk at Full Rated Power vs Frequency
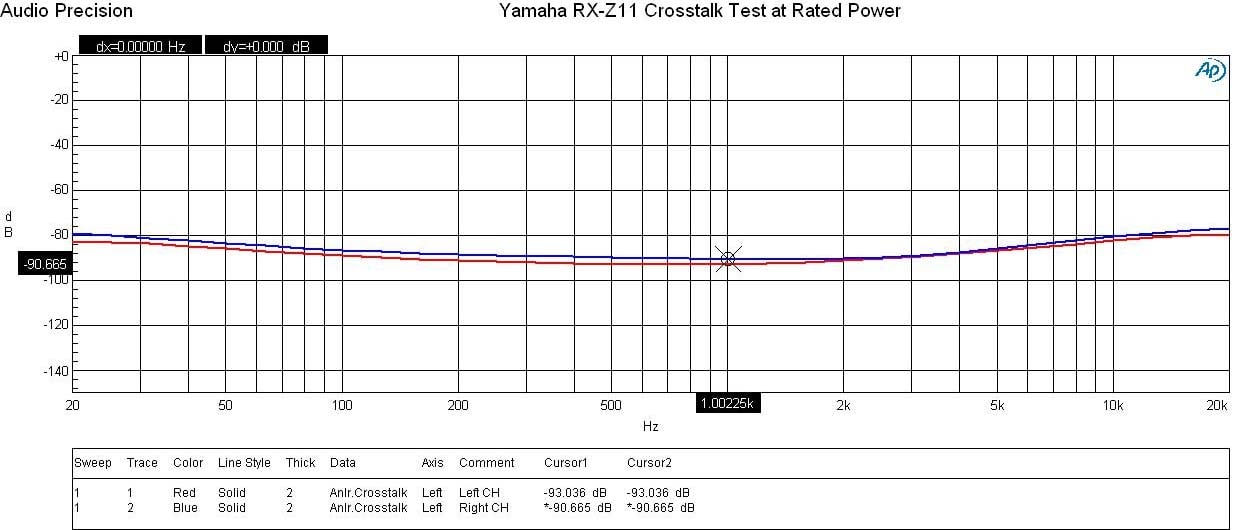
Running a full range frequency sweep from the preamp all the way through the power amp at full rated power (140wpc @ 8 ohms), I measured channel to channel crosstalk on two adjacent channels where one channel was the disturber and the other was the DUT. The Audio Precision plotted crosstalk of both channels over frequency by varying the Distruber/DUT channels. You can see the RX-Z11 produced great crosstalk measurements (90dB at 1kHz) with only a slight increase up at the frequency extremes (low frequency because of magnetic coupling and high frequency because of capacitive coupling). This test really exemplifies the careful board and magnetics layout of this 11 channel receiver.
SNR Measurement
With 200mV in, 8 ohms I measured an SNR of 75.5dB (un-weighted) at 1 watt power level in pure direct and stereo modes which again is a very good measurement. I did note however that once the DSP is engaged or stereo mode set to non-direct to allow sub out, noise jumps up about 10dB. This is audible only if your head is in close proximity to any particular loudspeaker with the volume turned up and no program material is playing.
Yamaha RX-Z11 Conclusion and Score Card
 The
Yamaha RX-Z11 represents the pinnacle of technology in a flagship receiver. It’s ability to transform your listening
space into a concert venue or mega Cineplex is unrivaled thanks to the powerful
arsenal of DSP processing and multi speaker configuration capabilities and
robust well designed amplifier section.
With its very clever power amp assignability and music mode
distribution, it proved to be the ultimate multi channel / multi zone receiver
capable of whole house entertainment.
The
Yamaha RX-Z11 represents the pinnacle of technology in a flagship receiver. It’s ability to transform your listening
space into a concert venue or mega Cineplex is unrivaled thanks to the powerful
arsenal of DSP processing and multi speaker configuration capabilities and
robust well designed amplifier section.
With its very clever power amp assignability and music mode
distribution, it proved to be the ultimate multi channel / multi zone receiver
capable of whole house entertainment.
I found the DSP mode sound quality to vary depending on source material so don’t expect any particular mode to excel all of the time. It’s important to take the time and experiment with your music and movie collection to determine what sounds best to you. To really take full advantage of the RX-Z11’s 11.2 surround sound capability, I highly recommend this product to be installed into a large listening space (at least 500 ft^2 or larger) with a minimum of 10ft ceilings. Unfortunately my theater room is limited to 8 foot ceilings, so I was unable to get the height channels up high enough to reach their full potential. While 11.2 was certainly impressive in my room, the experience wasn’t quite as dramatic as I have heard it in prior demos at Yamaha’s 2007 CEDIA booth which incidentally had higher ceilings.
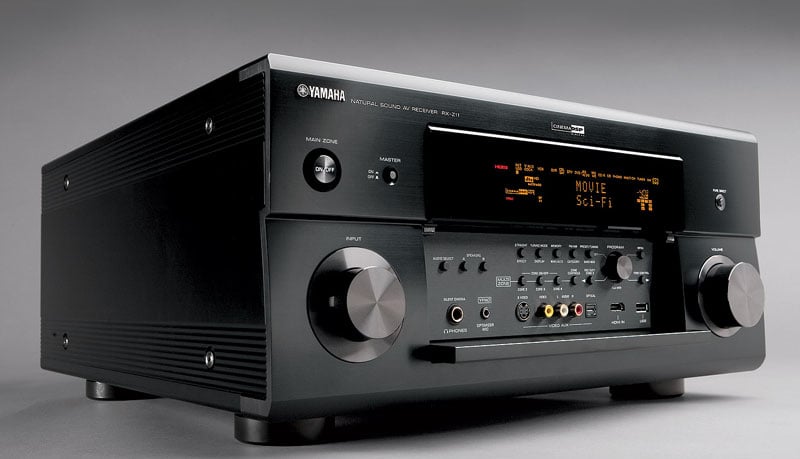
Yamaha RX-Z11 AV Receiver
There seems to be an almost endless array of configurability and usability of this product to the buyer willing to spend the time to learn how to properly use and configure it. The RX-Z11 is a very complex sophisticated piece of A/V hardware and is NOT a product for someone looking for simplicity and ease of setup but instead looking for state of the art performance that does all of the latest in HD audio and video decoding and treats music, multi-channel music and movies with equal measure. The RX-Z11 has earned the crown of flagship status and is a worthy successor to the venerable RX-Z9.
Yamaha Electronics
6660 Orangethorpe
Avenue
Buena Park, CA
90620
(714) 522-9105
Yamaha RX-Z11 MSRP: $5,499
The Score Card
The scoring below is based on each piece of equipment doing the duty it is designed for. The numbers are weighed heavily with respect to the individual cost of each unit, thus giving a rating roughly equal to:
Performance × Price Factor/Value = Rating
Audioholics.com note: The ratings indicated below are based on subjective listening and objective testing of the product in question. The rating scale is based on performance/value ratio. If you notice better performing products in future reviews that have lower numbers in certain areas, be aware that the value factor is most likely the culprit. Other Audioholics reviewers may rate products solely based on performance, and each reviewer has his/her own system for ratings.
Audioholics Rating Scale
 — Excellent
- — Very Good
- — Good
- — Fair
- — Poor
| Metric | Rating |
|---|---|
| Frequency Response Linearity | |
| SNR | |
| Output Impedance | |
| Measured Power (8-ohms) | |
| Measured Power (4-ohms) | |
| Multi-channel Audio Performance | |
| Two-channel Audio Performance | |
| Video Processing | |
| Build Quality | |
| Fit and Finish | |
| Ergonomics & Usability | |
| Features | |
| Remote Control | |
| Performance | |
| Value |
Gene manages this organization, establishes relations with manufacturers and keeps Audioholics a well oiled machine. His goal is to educate about home theater and develop more standards in the industry to eliminate consumer confusion clouded by industry snake oil.
View full profile