
Yamaha RX-V659 Receiver Review
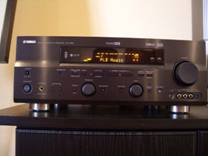
Yamaha RX-V659 Receiver
- Product Name: RX-V659
- Manufacturer: Yamaha
- Performance Rating:


- Value Rating:
- Review Date: September 04, 2006 19:00
- MSRP: $ 399
- 192kHz/ 24bit D/A Conversion
- Component Video Up Conversion (3 In /1 Out)
- S-Video Up Conversion
- Dialogue Lift
- YPAO (w/Optimizer Microphone)
- On-Screen Display
- Assignable Power Amp
- Zone 2 Speaker Terminals
- Zone 2 Output (amplified)
- Zone 3 Output
- Zone Power Switching
- +12V Trigger Output
- IR Ports
- Speaker A, B or A + B
- Selectable Subwoofer Crossover
- Multi-Channel Decoder Inputs
- Pre-Out All Channels
- 100wpc x 7 (20Hz - 20kHz)
- Dolby Digital EX/ Dolby Pro Logic IIx
- DTS-ES Discrete 6.1
- DTS 96/24 / DTS Neo:6
- Pure Direct
- iPod Compatibility
- Compressed Music Enhancer
- Neural Surround
- XM Read
- XM HD Surround
- Dimensions: 17-1/8" (W) x 6-3/4" (H) x 16-9/16" (D)
- Product Weight: 27.1 lbs
Pros
- Exceeds Amplifier Power Ratings
- Uncommon Value
- Awesome Surround Enhancement Features
- iPod and XM Compatibility
Cons
- Channel Trim bar graph readout instead of dB’s
 Yamaha RX-V659 Introduction

It has been awhile since I reviewed a moderately priced piece of home theater gear. Some of my staff often comment on my flare for reviewing only the upper echelon products. I am certainly not one to argue this point, but I figured I would upset the status quo by throwing in a mid-priced receiver into my review lineup to keep them guessing. With that in mind, I requested Yamaha's latest sub $550 receiver - the RX-V659.
Yamaha RX-V659 Overview and Build Quality
This is their first RX-V series of receiver I have taken a hard look at in the under $800 price category. When I took a look at this product, I quickly realized I was behind the evolutionary progress of trickle down technologies as evidenced by some of the most notable features this receiver offers, such as:
- 100wpc x 7
- Component Video Upconversion
- On Screen Display
- iPod Connectivity and Music Enhancement Modes
- DTS 96/24
- PLIIx Music/Movie DTS Neo Modes
- XM Ready with XM HD Surround
- EXT 7.1 Multi Channel Analogue Inputs
- Preamp Outputs for all Channels
- 3 Zone configurability (with powered Zone2)
Some of these features aren't even found on their $4,500 flagship product let alone their newer RX-V2600 receivers. Most of these features weren't found on any receiver brand at this price class only just a couple of years ago. Now that's progress which budget minded consumers could certainly appreciate. This type of increase in purchasing power for each new generation of product is perhaps only rivaled in the computer industry.
Build Quality
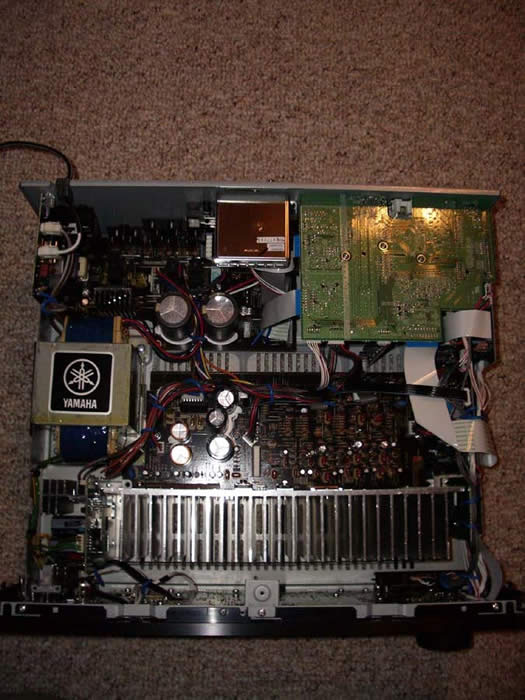 The Yamaha RX-V659 is a receiver cut
from a different cloth from what we are accustomed to in this price class.
It shared many of the
virtues of its bigger brother -
the RX-V2600 such as a large E-core transformer, large capacitor
bank (71V 12,000uF Caps x 2).
50V caps would have been plenty to achieve 100wpc, though using 71V
caps gives Yamaha plenty of design margin and added headroom since the rails can safely been swung much
higher.
There is nothing wimpy about the amp section of this receiver and as you will find in the
Measurements
&
Analysis section of my review, this receiver is an overachiever and delivered MORE
than its rated power.
The Yamaha RX-V659 is a receiver cut
from a different cloth from what we are accustomed to in this price class.
It shared many of the
virtues of its bigger brother -
the RX-V2600 such as a large E-core transformer, large capacitor
bank (71V 12,000uF Caps x 2).
50V caps would have been plenty to achieve 100wpc, though using 71V
caps gives Yamaha plenty of design margin and added headroom since the rails can safely been swung much
higher.
There is nothing wimpy about the amp section of this receiver and as you will find in the
Measurements
&
Analysis section of my review, this receiver is an overachiever and delivered MORE
than its rated power.
The RX-V659 employees all burr brown 192kHz/24bit DACs and Yamaha's Top Art construction found on their more expensive receivers. All in all, I liked what I was seeing under the hood of this new budget Yamaha receiver and looked forward to determining if the sum of the parts equated to good performance and sound quality... a signature hallmark of Yamaha's high end receivers.
Yamaha RX-V659 System Setup & Configuration
Moving the 27lbs Yammie didn't prove to be too much trouble, especially since I am so accustomed to products I review weighing in 2-3 times this. For this price, the product certainly has some heft to it, so don't let your little one plop it up on the shelf for you.
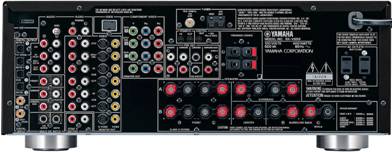
Back Panel View of the Yamaha RX-V659
The RX-V659 sports a wealth of connectivity options including composite, s-video and component video connections, 3 Toslink audio In's (1 Out) and 2 COAX audio inputs. What no HDMI? Are you kidding? Not at this price... Yet! I was pleased to see Yamaha offer binding post contacts on all of the speaker connections except the snap thru hole connections for the Presence or Zone 2 channels. This was much preferred over the typically found lame spring clips that don't accept any lower than dental floss gauge cable connectivity.
Auto Setup Via YPAO
Yamaha incorporated their YPAO PEQ and setup system which we've covered in detail in past receivers such as the RX-Z9, RX-V2400, RX-V2500, RX-V2600 and the RX-V4600.
YPAO automatically checks and/or configures:
- Wiring
- Distance
- Size
- Equalizing
- Level
We've covered YPAO in detail in past receivers such as the RX-Z9, RX-V2400, RX-V2500, RX-V2600 and the RX-V4600 and won't rehash it in this review. Not much as changed with this technology, nor has our impression of the system. Use it with kid gloves and be careful not to take the end results too seriously as YPAO cannot accurately determine speaker size, or crossover point and does a rather crude attempt at equalizing your speakers at only one listening position. I found YPAO useful for determining channel trims and speaker distances only.
Editorial Note on YPAO
It's important to note that the YPAO system does not perform any corrections to frequencies below 62.5Hz, and does no correction whatsoever to the subwoofer channel meaning that it really cannot correct for many bass peaks caused by room modes. The best methods of dealing with room modes are: speakersubwoofer location, listener location, adjustable PEQ. For more speaker calibration tips, please check out our System Set-Up and Configuration Tips.
Choosing the Speaker Impedance
Yamaha still ships their receivers with the dreaded impedance selector switch. Our advice as always is to use the "Minimum 8-ohms" setting regardless of the impedance of your speakers. See our editorial note below for further elaboration.
Editorial Note about the Impedance Selector SwitchI recommend the "Minimum 8-ohms" setting even for 4-ohm speakers of moderate efficiency ( > 89dB SPL). Yamaha includes a" 6-ohm" setting to satisfy UL heat dissipation requirements when driving 4-ohm loads, as well as easing consumer concerns about driving low impedance loads. These switches step down voltage feed to the power sections which can limit dynamics and overall fidelity. My advice is to keep the switch set to "Minimum 8-ohms" regardless of the impedance of your speakers and ensure proper ventilation of the Receiver. Using the 6 ohm setting will reduce power output to your speakers about 15-20% and thus cause higher frequency of amplifier clipping if driven too hard which can damage your speakers.
Manual Calibration
Auto calibration and YPAO can only get you so far. I opted to do things the old fashioned way for more precise tuning and system calibration. Surpisingly, taking into account the price point of this receiver, channel trim accuracy is an impressive +-0.5dB and the delay settings are in 0.5ft increments. This precision is rare in a product of this price class. To put it in another perspective, most so called high end processors and higher cost esoteric receivers still suffer from this lack of precision and only give you +-1dB trims and 1ft incremental delay settings. The only nuisance I found with setting channel trims was the lack of dB calibration display in favor of a sliding bar graph. This is the first I've seen Yamaha do this and I hope they reconsider to go back to conventional dB readouts on future models.
What I was most surprised to find however was a hot key on the remote control and front panel of the receiver for on the fly channel trim adjustments. This is a feature I've been begging Yamaha to add to their receivers for years! They also stunned me with another goodie - independent channel trims on the EXT multi channel inputs. This is yet another feature lacking on many of their newer receivers, such as the RX-V2600. I hope Yamaha incorporates these two much needed features on all future receiver models. Bravo!
In the great tradition of excellent bass management, Yamaha offers a variable crossover point from 40Hz to 200 Hz and also allows subwoofer output in 2CH mode if the speakers are set to LARGE via the LFE/Bass Out set to "Both". They even give you a +- phase adjustment for the subwoofer so you can determine the best setting without having to go behind your subwoofer to change it.
Multi-Zone / Multi-Source Audio
I was quite taken by the full multi zone / source audio features bestowed upon this receiver. Not only did it have the ability to serve 3 independent zones of audio, but it also had power amp assignability for Zone2 so you could divert the unused back or presence channels to this duty. Best of all, you don't even have to power up the main zone to get music going to Zone 2. I loved the fact that you could power up Zone2 independently and adjust level control and input selection all accessible on the front panel of the receiver via Zone 2 on/off and Zone control buttons.
Video Set-Up
 All of the video connections I made to the RX-V659 were component video.
The OSD operated flawlessly on component video and I didn't observe any visible picture
degradation on my cable box even when receiving 1080i HDMI broadcasting.
All of the video connections I made to the RX-V659 were component video.
The OSD operated flawlessly on component video and I didn't observe any visible picture
degradation on my cable box even when receiving 1080i HDMI broadcasting.
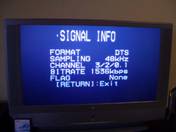
It was cool that Yamaha gives the user the ability to display audio signal information via the OSD. This can be useful when troubleshooting why you aren't properly receiving and decoding a 5.1 discrete audio source as I will discuss later in this review in my listening tests section.
iPod Set-Up
I thought I'd never see the day where I would be reviewing an iPod feature set on a home theater receiver. My position on portable compressed audio devices is quite apparent with the article we wrote on the Dumbing Down of Audio
 However to clarify, I am
not totally down on these devices if they aren't perverted into the only source of audio people
are exposed to as a quality reference.
Its nice to see manufacturers like Yamaha attempt to
improve on the fidelity of these platforms by offering DSP enhancement modes specifically to make them
sound less compressed and lifeless.
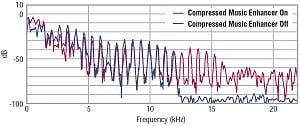
The compressed Music Enhancer feature essentially compensates
for the poor low and high frequency response inherent with compressed music formats like MP3, WMA and
AAC.
It attempts to restore frequency response to give more presence and feel to the music as
illustrated in the frequency response graph to the upper right.
However to clarify, I am
not totally down on these devices if they aren't perverted into the only source of audio people
are exposed to as a quality reference.
Its nice to see manufacturers like Yamaha attempt to
improve on the fidelity of these platforms by offering DSP enhancement modes specifically to make them
sound less compressed and lifeless.
The compressed Music Enhancer feature essentially compensates
for the poor low and high frequency response inherent with compressed music formats like MP3, WMA and
AAC.
It attempts to restore frequency response to give more presence and feel to the music as
illustrated in the frequency response graph to the upper right.
 Connecting your iPod to the RX-V659 requires the purchase of the Yamaha YDS-10 docking
station.
Once you connect the YDS-10 to the back of the RX-V659 via the iPod interface cable, you
must select V-Aux audio input.
Connecting your iPod to the RX-V659 requires the purchase of the Yamaha YDS-10 docking
station.
Once you connect the YDS-10 to the back of the RX-V659 via the iPod interface cable, you
must select V-Aux audio input.
A few words of caution before connecting your iPod:
- Make sure the receiver power is "on" before planting your iPod on the dock station
- Turn off your iPod or disconnect it from the base station before power cycling the receiver
I learned the hard way that not doing this caused my iPod to freeze up. It took some doing to restore the unit and I would advise avoiding this as I have heard it could wipe out the hard drive in your iPod if you don't properly power it down before power cycling the receiver.
XM Radio
The Yamaha RX-V659 doesn't miss a beat in covering all of the latest audio fads. This is the first receiver we've reviewed that offers iPod and XM connectivity. Connecting the XM antenna is a plug and play accessory much like the iPod doc station. Simply plug it in and it works. Of course with XM Radio, you must subscribe to their service which incurs a monthly service fee of about $13 and opens you up to commercial free programming of 100s of channels, pretty much all music genres, sports talk programs and more. The nice thing about having XM integrated into a receiver is that the OSD gives you a full read out of channel, artist and song info. This is something you just don't get with conventional radio and is certainly a great convenience for those who find a song they love playing on the radio, but never until now know who it's from.
 Yamaha is one of the first manufacturers to incorporate
XM HD Surround
technology into a
receiver.
This feature allows the end user to hear participating XM radio stations in true
discrete 5.1 surround sound much like you hear a DD or DTS DVD. Unfortunately we didn't have an
active XM subscription to test this feature.
Yamaha is one of the first manufacturers to incorporate
XM HD Surround
technology into a
receiver.
This feature allows the end user to hear participating XM radio stations in true
discrete 5.1 surround sound much like you hear a DD or DTS DVD. Unfortunately we didn't have an
active XM subscription to test this feature.
Yamaha RX-V659 Measurements & Analysis
Amplifier Efficiency Measurements for linear a/b amps such as the ones employed in this receiver typically range from 40-50% depending on the load the power supply of the amplifier sees. The closer you get to full load, the higher the efficiency usually becomes (assuming you aren't over taxing the power supply and power devices of the amp causing excessive thermal losses). The RX-V659 achieved around 50% efficiency which was quite impressive for a receiver employing a conventional linear amp design.
|
# Ch
|
Power Consumption |
Power Delivered |
Load |
Efficiency |
|---|---|---|---|---|
|
1 |
269 watts |
132 watts |
8 ohms |
49 % |
|
2 |
449 watts |
120 watts |
8 ohms |
53 % |
|
2 |
396 watts |
200 watts |
4 ohms |
51 % |
|
1 |
676 watts |
170 watts |
4 ohms |
50 % |
Power Bandwidth
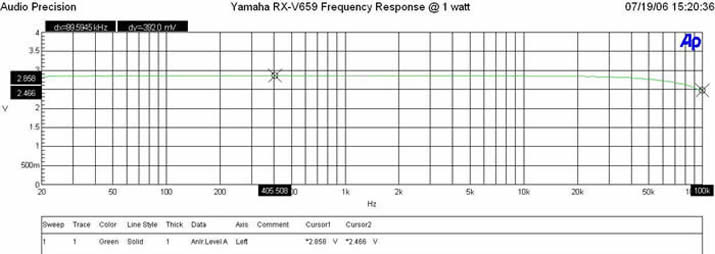
Yamaha RX-V659 Frequency Response at 1 watt
The Yamaha RX-V659 possesses a wide bandwidth amplifier topology with a -3dB point in excess of 100kHz.
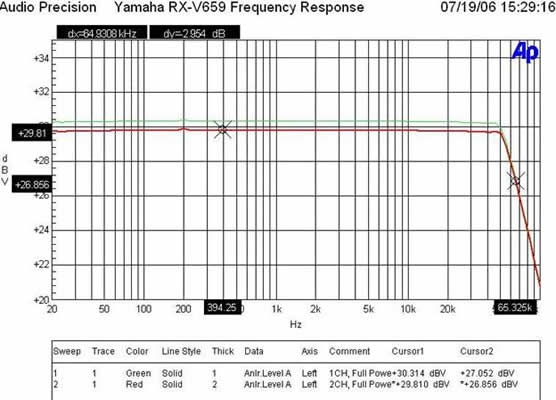
Yamaha RX-V659 Frequency Response at Full Power
At full continuous unclipped power (132wpc x 1; 8 ohms, 120wpc x 2; 8 ohms; full bandwidth with less than 0.1% THD+N), the RX-V659 still maintained excellent bandwidth linearity with a -3dB point of 65kHz despite we were driving the receiver way beyond its rated 100wpc power specification. Into 4 ohms, the RX-V659 was able to deliver continuous power levels at a whopping 200wpc x 1 and 170wpc x 2 with less than 0.1% THD + N. The amplifier section of this receiver is truly underrated. I never encountered a budget A/V surround receiver that could deliver this kind of power before. Truly amazing.
Keep in mind most review publications don't do continuous power measurements and they usually publish power measurements into clipping at 1% THD + N. Our measurements are very conservative and it is clear that this receiver is a true workhorse for its asking price.
For more info on amplifier measurements, see: The All Channels Driven (ACD) Test
FFT Distortion Analysis

FFT Analysis @ 1 watt
At 1 watt into 8 ohms, the RX-V659 exhibited impressively low distortion (9.031+74.521)dBv = 83.56dBV or 100*alog^-1(-83.56/20) = .007% THD + N which is very clean as expected.
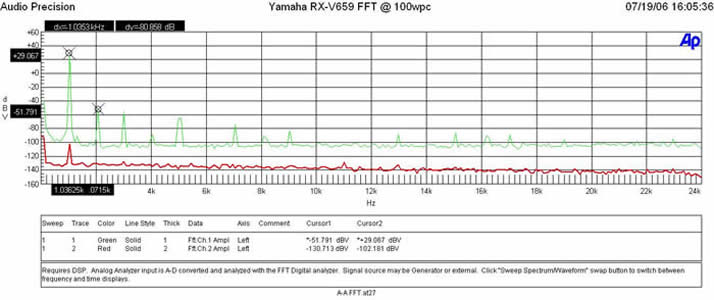
FFT Analysis @ 100 watts
(29.067 + 51.791)dBv = 80.86dBv or 100*alog^-1(-80.86/20) = .009% THD + N which indicates as per my power measurements, the amp section in this receiver is too conservatively rated. Most impressive for a $1000 receiver let alone one that costs roughly half of that!
Amplifier Output Impedance & Damping Factor
Amplifier Output Impedance
The amplifier output impedance fell right within our desired 100 mohm or less mark for the entire audible bandwidth up to 10kHz with just a slight increase above at the upper 20kHz frequency range. This is the type of performance I like to see in an A/V receiver and not expected for a product of this price class.
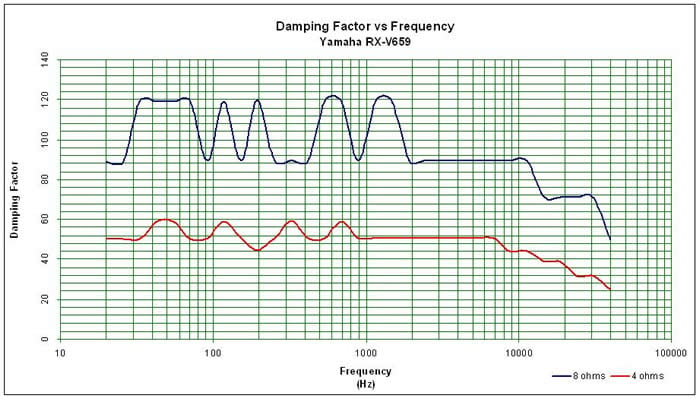
Amplifier Damping Factor
The amplifier damping factor is about what I expected based on the measured output impedance. It is uniformly good across the entire audio frequency range and falls slightly under the 90 mark above 1kHz we like to see on uncompromising designs. All in all, this is quite an impressive result and rivals some of the earlier and more costly Yamaha receivers we have reviewed in the past while also exceeding our minimum 50 value we like to see in amplifiers for 8 ohm loads and even does so with 4 ohm loads as well. We've never seen such stellar results in a receiver of this price class.
Yamaha RX-V659 Remote, Listening Tests and Conclusion
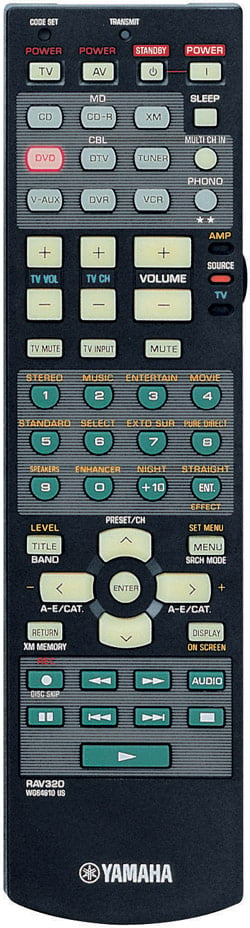 The RAV remote
controls are easy to operate, and have powerful feature sets though this model is somewhat limited in
function compared to some of their higher end units.
Now all we have to do is get Yamaha to fully
backlight the RAV354 and we can retire the clapper.
The RAV remote
controls are easy to operate, and have powerful feature sets though this model is somewhat limited in
function compared to some of their higher end units.
Now all we have to do is get Yamaha to fully
backlight the RAV354 and we can retire the clapper.
Pros
- Fits nicely in the hand, new thinner design
- Dedicated receiver volume
- Source switch for controlling inactive components
Cons
- Seafoam button labels unreadable in dark, even with backlight
- Backlight barely lights up keypad
- Non learning remote - must rely on factory presets to control other products
The RAV320 is a basic functional remote one would come to expect in a product of this price class. It has no LCD display, no learning functions and very limited preprogrammed user codes for other manufacturers. Bottom line if you wish to operate your entire system off one remote, don't try to do it with this one. Very cost effective and excellent universal remotes can easily be had for $100 or less from brands like Harmony and Universal Remote. Leave this function to the companies that focus on nothing else but remote controls. The RAV320 did what it was supposed to do quite well - operate the RX-V659 receiver. Nothing more could really be stated here.
Listening Tests
For the listening tests, I installed this receiver at my neighbor's house who has a 5.1 CT speaker system from RBH Sound with the TS-10 subwoofer upgrade. We displaced his Panasonic XA-SR50 digital receiver and were excited to hear any sonic improvements in his system with the Yamaha receiver.
Music
We started out with a Led Zeppelin classics compilation CD he had on hand. Its been awhile since I listened to the band I so fondly grew up with and attempted to imitate anytime I was fortunate enough to sit down at a drum kit with a couple of friends. I immediately skipped to one of my favorites, track #9 of the first disc "Black Dog". The sound of Jimmy Paige's guitar shimmered through my bones and hearing the bass kick in had my adrenal running. Unfortunately the transfer of these older CDs leaves much to be desired in the fidelity department and the best fix for this deficiency is to use a music enhancement mode such as one of the Rock or Jazz Yamaha DSP mode or PLIIx Music mode if you are running a 7.1 speaker setup. In our setup, we were only running a 5.1 system thus we toggled between PLII Music Mode and Yamaha DSP modes. For this recording, we preferred the Yamaha DSP Mode "Roxy Theater". It really expanded the sound field of this rather sterile transfer and made you feel as if you were in the middle of their concert, though without the usual smoke and smells often experienced in concerts from this band during their era.
For newer, well recorded music CDs such as those from Steely Dan, Pat Metheny and Sting, PLII Music mode was our preference as it enhanced the sound envelope without being overbearing or degrading the front soundstage.
 Porcupine Tree
In Absentia
DTS DVD
was up next on our listening menu.
Track #1 "Blackest Eyes"
was up first.
I am intimately familiar with the sound of
this DVD since its one of my most played surround DVDs in my car which features a 5.1 DVD Audio
system.
What we initially heard was most puzzling.
The track sounded slow and echoey.
I thought at first I was hearing things, but surely enough this was NOT the case.
We found
that stopping the disc and hitting play resolved this speed issue, but never in my 7+ year history of
Audioholics have I run across this problem.
What I later determined was that my neighbor's
Sony combo VHS/DVD player was somehow not correctly reading DTS DVDs that were encoded with a 96kHz
sampling rate.
We didn't experience this problem with his Panasonic receiver since it
automatically re-upconverts audio to 96kHz, the native sampling rate of the problematic DTS DVDs.
We did find a very interesting note in the RX-V659 owners'
manual on page 41 which read as
follows:
Porcupine Tree
In Absentia
DTS DVD
was up next on our listening menu.
Track #1 "Blackest Eyes"
was up first.
I am intimately familiar with the sound of
this DVD since its one of my most played surround DVDs in my car which features a 5.1 DVD Audio
system.
What we initially heard was most puzzling.
The track sounded slow and echoey.
I thought at first I was hearing things, but surely enough this was NOT the case.
We found
that stopping the disc and hitting play resolved this speed issue, but never in my 7+ year history of
Audioholics have I run across this problem.
What I later determined was that my neighbor's
Sony combo VHS/DVD player was somehow not correctly reading DTS DVDs that were encoded with a 96kHz
sampling rate.
We didn't experience this problem with his Panasonic receiver since it
automatically re-upconverts audio to 96kHz, the native sampling rate of the problematic DTS DVDs.
We did find a very interesting note in the RX-V659 owners'
manual on page 41 which read as
follows:
DTS decoding may not be performed correctly depending on the player even if you make a digital connection between this unit and the player.
With some DTS DVDs we were unable to correct the speed even by stopping and restarting the DVD. This was most puzzling and I was unable to reproduce it on any other DVD player on hand. There is a lesson to be learned here. Beware of combo players! If you need VHS capability, Walmart has dedicated units for as little as $50.
After we got through the speed tempo issue of the Porcupine DTS DVD, we had a very enjoyable listening session. The RX-V659 had no problems delivering clean and dynamic sound to fill his living room unlike he ever experienced on his Panasonic receiver. In a non-scientific comparison, the Yamaha sounded cleaner and less strained, especially at loud listening levels. This was not surprising since his particular Panasonic receiver has one of the most poorly designed amplifier sections I've ever measured. I actually bought this unit to use in my reference system for the eventual day I conduct DBT testing of amplifiers.
Home Theater
What good is an A/V receiver if it cannot deliver a spectacular surround sound experience when viewing movies? In my opinion, Yamaha's forte has always been for theater program materials as I have found some of their DSP modes such as "Adventure" mode to be useful, especially if you engage their proprietary front effects / presence channels to preserve the soundstage from the main speakers. For my listening tests here, I focused primarily on conventional surround playback without DSP processing to ensure the RX-V659 had ample power to drive the multi-channel speaker system with composure.
Star Wars Episode III:
Revenge of the Sith While this movie is kind of old hat by now, its still one of my favorites to pop in during reviews
because of the stunning CGI and perhaps because I am a Sci-Fi geek at heart.
Some of the best
scenes are the opening space battles and light saber duels between Mace Windu and the Emperor.
The RX-V659 delivered the goods at reference volume levels with no complaints.
The only issue I
noted was the excessive compression from the recording itself.
It's difficult for me to
listen to a Dolby Digital soundtrack after spending so much time focusing on MUCH less compressed and
higher fidelity music sources in DVD-A, SACD and DTS multi-channel CDs.
While this movie is kind of old hat by now, its still one of my favorites to pop in during reviews
because of the stunning CGI and perhaps because I am a Sci-Fi geek at heart.
Some of the best
scenes are the opening space battles and light saber duels between Mace Windu and the Emperor.
The RX-V659 delivered the goods at reference volume levels with no complaints.
The only issue I
noted was the excessive compression from the recording itself.
It's difficult for me to
listen to a Dolby Digital soundtrack after spending so much time focusing on MUCH less compressed and
higher fidelity music sources in DVD-A, SACD and DTS multi-channel CDs.
Regardless of the less than pristine audio quality (limitation of the recording), the Yamaha RX-V659 did a great job at faithfully reproducing the dynamics and effects. The panning between front and back soundstage was surreal. I found myself watching nearly the entire movie as opposed to a few clips I originally intended upon.
I was happy to hear the silence during quiet scenes - a hallmark Yamaha trait of all of their A/V products I've reviewed in the past. Many so called higher end products simply don't have this low level noise floor which can really be a problem when mating with high efficient loudspeaker designs, especially when the surround speakers are placed in close proximity to the listener. The ear doesn't like to hear hissing and if excessive, it has the ability to mask subtle details in recordings, especially with music.
Suggestions for Improvement
There is slim margin for improvement of the Yamaha RX-V659. I am still floored by its feature set and amplifier performance at its asking price. Of course I am a nitpicker so here is my list of improvements I'd like to see on this models successor:
- Single button toggle ability to engage/disengage PEQ
- More accurate and consistent auto speaker size, crossover configuration and equalization
- Speaker level bar graph replaced with dB readout
- Ability to engage both the Presence channels and Surround Backs via use of an external 2CH amplifier
Conclusions and Overall Perceptions
It's no secret, I thoroughly enjoyed this receiver. This is one of the few times I've found a product that I didn't expect more from. Instead I couldn't help but to be in awe of the intelligent blend of bleeding edge features mixed with excellent performance typically found in the more esoteric brands. Over the past few years, we've seen the amplifier sections in Yamaha receivers continually improving via more robust power reserves, lower amplifier output impedance, better linearity, and lower noise floors. The RX-V659 is truly an overachiever delivering much MORE than rated power and not hiccupping on 4 ohm loads as one would expect of any receiver in this price class. If you have been riding the sea of receiver options for the last couple of months or so, your ship has come in. I can't think of a finer receiver in this price class. Kudos to Yamaha on such a well engineered and well executed product.
The Score Card
The scoring below is based on each piece of equipment doing the duty it is designed for. The numbers are weighed heavily with respect to the individual cost of each unit, thus giving a rating roughly equal to:
Performance × Price Factor/Value = Rating
Audioholics.com note: The ratings indicated below are based on subjective listening and objective testing of the product in question. The rating scale is based on performance/value ratio. If you notice better performing products in future reviews that have lower numbers in certain areas, be aware that the value factor is most likely the culprit. Other Audioholics reviewers may rate products solely based on performance, and each reviewer has his/her own system for ratings.
Audioholics Rating Scale
 — Excellent
- — Very Good
- — Good
- — Fair
- — Poor
| Metric | Rating |
|---|---|
| Frequency Response Linearity | |
| SNR | |
| Output Impedance | |
| Measured Power (8-ohms) | |
| Measured Power (4-ohms) | |
| Multi-channel Audio Performance | |
| Two-channel Audio Performance | |
| Video Processing | |
| Build Quality | |
| Fit and Finish | |
| Ergonomics & Usability | |
| Features | |
| Performance | |
| Value |
Gene manages this organization, establishes relations with manufacturers and keeps Audioholics a well oiled machine. His goal is to educate about home theater and develop more standards in the industry to eliminate consumer confusion clouded by industry snake oil.
View full profile