
Yamaha RX-V2700 Receiver Review
Yamaha RX-V2700 Receiver
- Product Name: RX-V2700
- Manufacturer: Yamaha
- Performance Rating:


- Value Rating:
- Review Date: March 02, 2007 04:45
- MSRP: $ 1,699
|
|
Pros
- Packed with more features than any receiver in its class
- Excellent amplifier performance and fidelity
- HDMI ver. 1.2a for DVD-A/SACD
- PCM audio decoding from re-encoded DD+, TrueHD, dts-HD soundtracks via HDMI
- Scaling up to 1080i and 1080p pass thru
Cons
- Average HDMI Scalar performance
- Erroneous HDMI operation (see notes in review)
- Some minor bass management anomalies (see notes in review)
- YPAO still not at level of some competitor systems
- A bit overwhelming to setup
Yamaha RX-V2700 Introduction
I know what you’re thinking… another new receiver from Yamaha and just less than one year (more like 8 months) after the release of the RX-V2600? Yep. Welcome to the wonderful world of progress where next year's model design is completed right around the same timeframe the current model starts hitting the store shelves – no kidding, folks, this is bleeding edge. Right now it seems Yamaha, Denon and Pioneer are locked into a rat race to see just how much of the proverbial market cheese they can steal. The result? More features, more power, at more competitive prices to the end user with the slight side effect of buyer's remorse for those who love to change out A/V gear more frequently than they change their sheets (well I hope not). Rest assured, however, that even last year's model is likely far ahead of the curve for what most people will and can use in a typical home theater system.
The RX-V2700 builds upon the solid foundation of the RX-V2600 and shares many of its virtues, along with a few distinct differences tabulated below:
|
|
RX-V2600 |
RX-V2700 |
|
XM HD Surround |
No |
Yes |
|
Compressed Music Enhancer |
No |
Yes |
|
Network Capability |
No |
Yes |
|
USB Audio Interface |
No |
Yes |
|
Simplay HD |
No |
Yes |
|
iPod Connectivity |
No |
Yes |
|
Neural Surround |
No |
Yes |
|
THX Select 2 |
Yes |
No |
|
HDMI Ver. |
1.1 |
1.2a |
|
HDMI I/O |
(2/1) |
(3/1) |
|
Max Supported Resolution |
1080i |
1080p |
|
Video Scaler |
Generic |
ABT1010 (DVDO) scalar engine |
|
YPAO for Subwoofer |
No |
Yes |
|
Assignable Amplifiers |
Yes but limited |
Yes, biamp or Zone2/3 |
|
MSRP |
$1399 |
$1699 |
At
first glance, it appears the RX-V2700 is armed to the teeth with
networking-type features allowing it stream music from virtually any
type of source including iPod, USB, wireless, etc. Oddly this 5th
generation YPAO receiver doesn’t sport the THX Select 2 certification
found on the last 4 predecessors, but it does come equipped with very
similar guts of the THX Select 2 RX-V2600 model. I can understand why
Yamaha didn’t go the THX route and instead elected to place the saved
licensing costs towards a much better video scalar from Anchor Bay
Technologies, though I do miss the THX Games mode especially when using
my Xbox 360. Normally I’d scold Yamaha for not having THX
certification at this price point, but considering the design virtues
of this receiver are so similar to its predecessor, I’d take the leap
of faith at saying the RX-V2700 will likely meet THX standards.
Overall the RX-V2700 has a very impressive feature set and, rather than rehashing the basics covered in our exhaustive RX-V2600 review, we will instead focus on the cool new features of this latest does everything receiver.
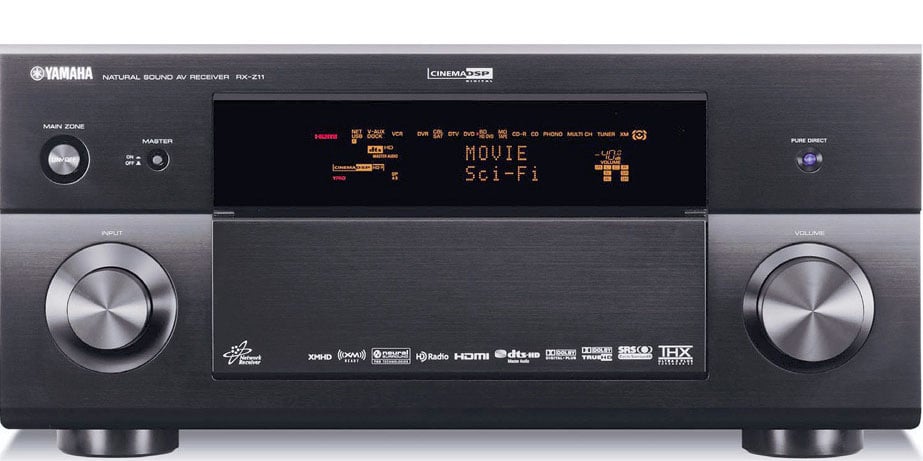
Yamaha RX-V2700 Build Quality
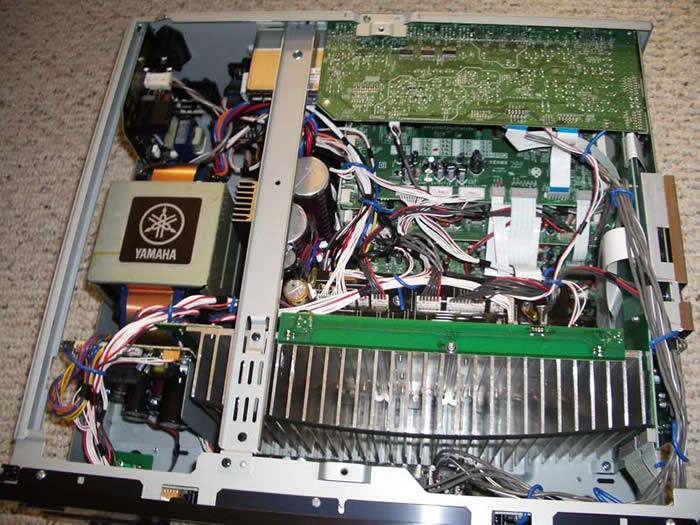 One thing we have come to admire over the years is the good build
quality of Yamaha receivers. They typically give consumers a good
meaty power supply and amplifier section which they seem to be
improving on with each new generation of receivers.
One thing we have come to admire over the years is the good build
quality of Yamaha receivers. They typically give consumers a good
meaty power supply and amplifier section which they seem to be
improving on with each new generation of receivers.
The RX-V2700 is no exception to this rule as evident by the large E-Core transformer and large capacitor bank (71V 18,000uF x 2). The heat sink is tapered to minimize resonance and also provide for optimal heat dissipation.
Editorial Note
In order to hit the rated 140wpc Yamaha is claiming, they would require a rail voltage of sqrt(2)*[(140*8)^1/2 ] = 47V + 5V(margin) = 52V. As you can see their capacitor bank has plenty of overhead to meet this requirement.This receiver means business and, despite the lack of THX rating, it’s pound for pound every bit of the RX-V2600 and perhaps a bit more (see tests reports).
Yamaha RX-V2700 System Setup and Configuration
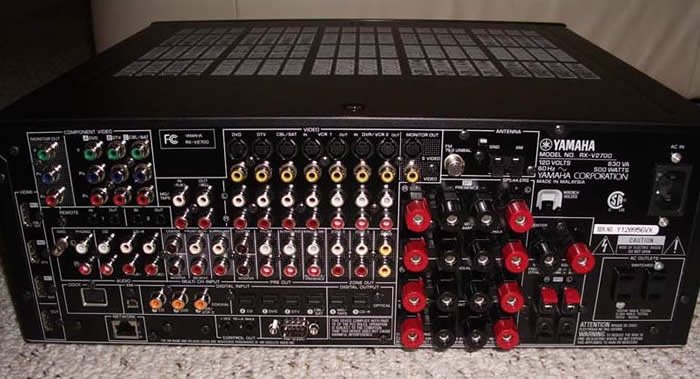
Back Panel View of the Yamaha RX-V2700
There are a plethora of connections on the back of this receiver, some of which are unfamiliar to most home theater folk, including the iPod connector, and Ethernet connector. Of course on this receiver HDMI is endowed with 3 inputs and 1 output capable of 1080p resolution with upscaling up to 1080i powered by Anchor Bay. Three component video inputs and one output are also included for those who haven’t jumped on the HDMI bandwagon yet.
Oddly, Yamaha moved the speaker connectors around a bit placing the “SP1/Presence” speakers at the top of the stack instead of the front channels. It took me awhile to figure out why I wasn’t hearing music from my mains. There is a reason for this madness, and it’s called power amp assignability (more on this later). All of the speaker connectors except SP2 sport binding posts. SP2 still uses fairly good quality locking connectors that can accommodate 12AWG wire with little fuss.
Choosing the Speaker Impedance (IMPORTANT PLEASE READ)
Yamaha
still ships their receivers with the dreaded impedance selector
switch. It’s a bit more involving to switch the default setting “8
ohms or more” and I wont tell you how since this is the optimal setting
regardless of speaker impedance.
Power Test Results
|
|
Continuous Power;8 ohm Load |
Continuous Power;4 ohm load |
|
8 ohm or more setting |
144 wpc |
272 wpc |
|
6 ohm or more setting |
78 wpc |
144 wp |
* 1CH tested, full bandwidth at 0.1% THD + N
Editorial Note about the Impedance Selector Switch
I recommend the "8 ohms or more" setting even for 4-ohm speakers of moderate efficiency (>87dB SPL). Yamaha includes a" 6-ohm" setting to satisfy UL heat dissipation requirements when driving 4-ohm loads, as well as easing consumer concerns about driving low impedance loads. These switches step down voltage feed to the power sections which can limit dynamics and overall fidelity. My advice is to keep the switch set to "8 ohms or more" regardless of the impedance of your speakers and ensure proper ventilation of the Receiver. As you can see in the test results, using the “6 ohm or more” setting reduced the power as much as 45% and caused clipping at lower power levels, which if driven too hard for a sustained period of time can damage your speakers.
Auto Setup Via YPAO
Just like in past Yamaha receivers, the RX-V2700 incorporates their YPAO auto setup system.
YPAO automatically checks and/or configures:
-
Wiring
-
Distance
-
Size
-
Equalization
-
Level
In this latest iteration of YPAO, Yamaha has incorporated a new feature – subwoofer correction. This is a Yamaha first, and although it’s limited to only 32Hz, at least they are attempting to address the speaker in a theater system that could directly benefit the most from active room correction.
I let Yamaha do its magic with auto setup which seems to run much quicker than past generation receivers like the RX-Z9. As with prior receivers with this feature, YPAO got my channel trims and speaker distances (except the sub) pretty much spot on. It was almost a crap shoot how YPAO determined subwoofer distance, crossover point and speaker sizes. It incorrectly set my mains and center to large (which is understandable since they are placed close to the back wall causing excessive boundary gain).
Editorial Note About Subwoofer Distance
It’s understandable that auto setup systems such as YPAO often struggle with the correct subwoofer distance as it is usually a combination of group delay inherent in subwoofers sporting digital amps and DSP processing such as my Axiom Audio EP500 and the complex structure of small room acoustics below 300Hz. I always recommend using common sense and verify audibly and empirically (if possible) if the distance the auto setup system selected is correct.
After YPAO was completed, I manually adjusted speaker size, subwoofer distance, PEQ, and crossover frequency for greater accuracy.
Manual Calibration
Tweaking
the levels for a more balanced response across the listening area was a
breeze thanks to the “on the fly” channel trims Yamaha incorporated
into the RX-V2700. I was pleased to see they started adding this much
needed feature on their newer receivers back in my RX-V659 review.
Oddly however they didn’t offer independent channel trim settings for
the Multi-channel External inputs like they did in the less costly
RX-V659. Yamaha did inform me that independent level trims for the EXT
inputs can be configured via the Receiver Editor feature and NOT the
GUI which I didn’t confirm. This shouldn’t be much of an issue if you
utilize HDMI or the trim settings of your SACD/DVD-A player.
Bass Management
In
the great tradition of excellent bass management, Yamaha offers a
variable crossover point from 40Hz to 200 Hz and +- phase adjustment
for the subwoofer so you can determine the best setting without having
to go behind your subwoofer to change it. Yamaha also provisions for
subwoofer output in 2CH mode if the speakers are set to “Large” via the
LFE/Bass Out set to “Both”. Be warned however if you set the main
speakers to “Small” but have Bass Out set to “Both” the main channels
will still get full range signal. Oddly if you select “2CH Stereo”
mode, the main speakers will get a full range signal regardless of
speaker size setting and the subwoofer will be active if you have one
present. This was not the case however in “7CH Stereo” mode as bass
management was applied to the main speakers if set to “Small”. I
suggest using “straight” mode for 2CH listening if you want your main
speakers bass managed. Also note “Pure Direct” mode bypasses the bass
management altogether and will NOT send signal to the subwoofer for 2CH
sources regardless of speaker settings.
Despite the RX-V2700 lacked THX certification, the bass management stayed true to THX gospel with 12dB/oct High Pass Filter (HPF) slopes and 24dB/oct Low Pass Filter (LPF) slopes as I measured with my Audio Precision SYS 2722 Audio Analyzer.
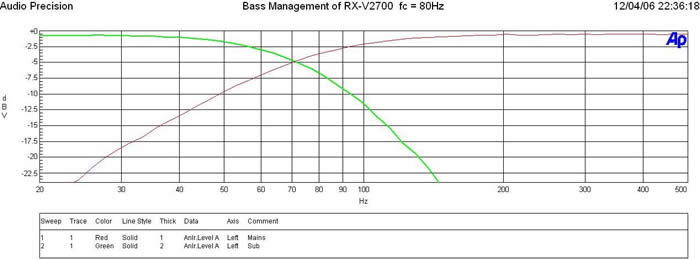
Yamaha RX-V2700 Bass Management Measurement
YPAO incorrectly set my crossover to 110Hz so I adjusted it to 80Hz for more optimal integration of my subwoofer with my speakers.
The PEQ built into YPAO is rather crude in terms of resolution. But I still found it to be a useful tool for final calibration tweaking.
Q : .5 to 10
Gain: -6dB to + 20dB
Freq: 32Hz to 16kHz 1/3 octave increment
To edit PEQ settings of each channel, I suggest the following procedure:
-
Select freq/gain to choose the center frequency
-
Select band/gain to set the Q and gain as needed
Editorial Note on Calculating Q:
To calculate Q, use fc / BW where fc = center frequency and BW - bandwidth
It’s nearly impossible to make a direct comparison of PEQ vs no PEQ since it's such a hassle to defeat and re-engage it. In order to defeat the PEQ, it’s a four step process (manual > sound / PEQ > channel) then manually selecting reset for each channel. If you wish to re-engage PEQ, you must go into Auto setup and reload the data. The only workaround I could see is assigning two receiver settings (Yamaha provides up to 4 accessible in the GUI) via the memory feature (one with PEQ and one without), then toggling between memory settings to do a comparison with the Memory 1 and 2 hot keys on the remote.
I pulled a few measurements at the primary listening position where I also placed the Yamaha mic for YPAO auto setup and calibration.
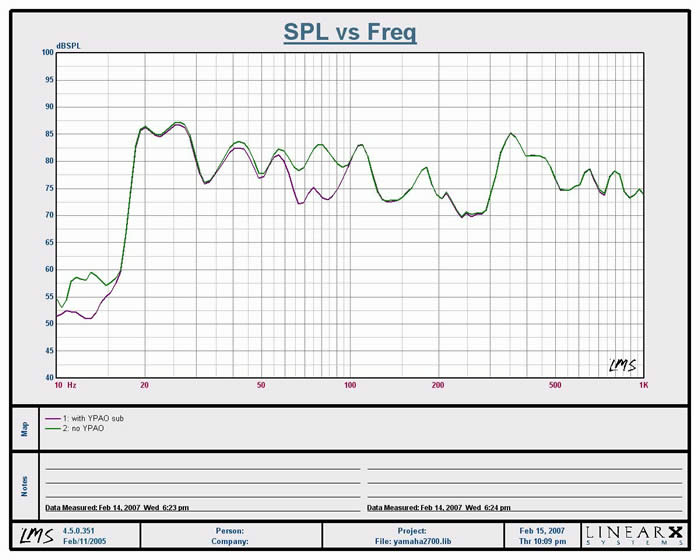
Figure 1. Subwoofer Frequency Response (1/12th oct) with and without YPAO PEQ
As can be seen in the graph, YPAO actually caused a 5dB suckout from 60to 80Hz and did nothing to address the bump below 30Hz.
I defeated YPAO and engaged into manual EQ edit mode where I attempted to tweak in the 30 to 40Hz range by choosing the lowest possible center frequency Yamaha would allow for (fc = 31Hz) and adjusting Q to 3.13 with a slight gain of +2dB.
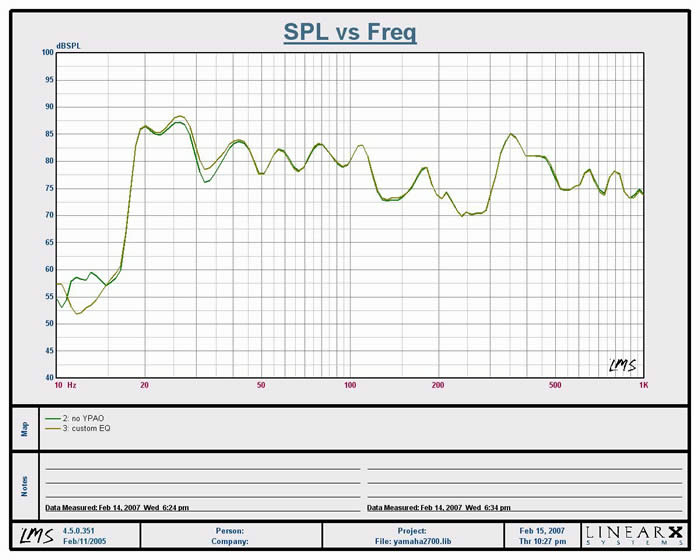
Figure 2. Subwoofer Frequency Response (1/12th oct) with and without Manual PEQ
Editorial Note on Adding Gain
In almost no circumstance do you want to add gain to fix a problem area as the frequency dip is usually result of a room node and will only eat amplifier power while reducing system dynamic range. If you find bumping the gain up a dB or two actually helped even out the problematic area, then it’s ok to use gain sparingly. If it didn’t make a measurable difference, don’t add gain to fix the problem.
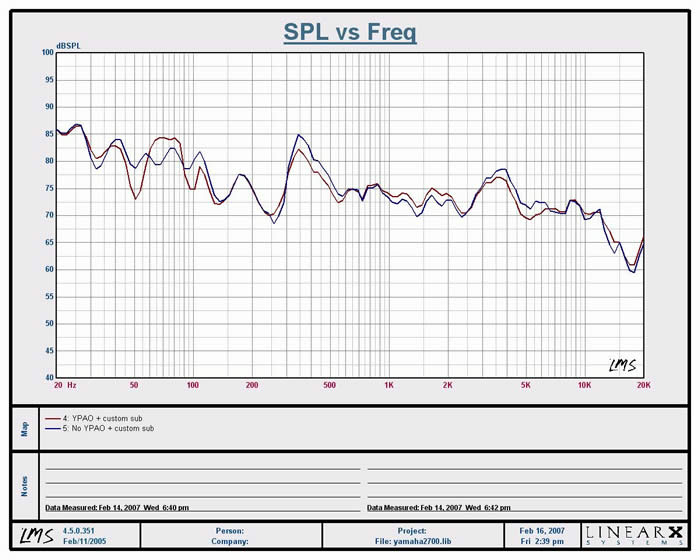
Figure 3. Full Range Frequency Response (1/6th oct) with and without YPAO
YPAO didn’t drastically alter the frequency response of my reference speakers which isn’t surprising considering how linear they are. I did my best to a/b the before and after results and subjectively felt my system sounded better with the PEQ disengaged, especially in the lower frequency range.
Yamaha RX-V2700 Video and Network Setup
Video Set-Up
Yamaha made some significant upgrades on the video side of the equation with this receiver. For one, the HDMI inputs now accommodate up to 1080p resolution. The RX-V2700 also does scaling and upconverting of analog signals (up to 1080i) powered by the Anchor Bay Technologies ABT1010 scalar engine.
I ran into a couple of operational hiccups with HDMI on the RX-V2700. The first sample Yamaha sent me had an issue with image drop out after 20-30 minutes of operation which Yamaha attributed to a faulty part on the HDMI circuit board. The second unit didn’t suffer this fate, but did have issues keeping a stable image on my RSQ NEO-E500 DVD Karaoke player anytime text lyrics displayed on the screen. Yamaha claims it could be in issue with the frame rate of the text. My initial workaround was to route s-video directly to my display on an unused input, bypassing the RX-V2700 altogether. I also had some operational anomalies when upscaling VHS to HDMI. The picture would either be stable for hours, or toggle on/off persistently during a viewing session. My workaround here was to run component video cables from the RX-V2700 to another input on my display. I later decided to route all analog video into the RX-V2700 and out via component video to my display. I strongly suggest users do the same as a backup in case they run into these issues with HDMI.
I experienced a puzzling HDMI setup issue on both RX-V2700 samples that magically resolved itself after a few minutes of operation. Initially when I connected the receiver to my Samsung HL-S5688W 1080p display and Scientific Atlanta 8300HD box, I experienced a loud popping sound from my TV any time I toggled inputs on the RX-V2700. After a few trials of randomly powering down all three devices and reconnecting all of the HDMI cables, the problem went away never to show its ugly self again. I can’t fully explain this, but can only guesstimate a sync issue between this HDMI ver 1.2a receiver and the rest of my gear that is only HDMI 1.0.
Audioholics/HQV Bench Testing Summary of Test Results
Perfect Score is 130
Yamaha RX-V2700 Benchmark Score: 68 (average
compared to many displays and source components. In comparison, my
Realta REON VX-50 HQV-enabled Denon DVD-2930CI scored a 120.)
|
Test |
Max Points |
RX-V2700 |
Pass/Fail |
|
Color Bar |
10 |
10 |
Pass |
|
Jaggies #1 |
5 |
5 |
Pass |
|
Jaggies #2 |
5 |
3 |
Pass |
|
Flag |
10 |
10 |
Pass |
|
Detail |
10 |
10 |
Pass |
|
Noise |
10 |
5 |
Pass |
|
Motion adaptive Noise Reduction |
10 |
5 |
Pass |
|
Film Detail |
10 |
0 |
Fail |
|
Cadence 2:2 Video |
5 |
0 |
Fail |
|
Cadence 2:2:2:4 DV Cam |
5 |
0 |
Fail |
|
Cadence 2:3:3:2 DV Cam |
5 |
0 |
Fail |
|
Cadence 3:2:3:2:2 Vari-speed |
5 |
0 |
Fail |
|
Cadence 5:5 Animation |
5 |
5 |
Pass |
|
Cadence 6:4 Animation |
5 |
0 |
Fail |
|
Cadence 8:7 animation |
5 |
5 |
Pass |
|
Cadence 3:2 24fps film |
5 |
0 |
Fail |
|
Scrolling Horizontal |
10 |
0 |
Fail |
|
Scrolling Rolling |
10 |
10 |
Pass |
|
Total Points |
130 |
68 |
|
Source component was the Denon DVD-2930CI DVD Player (480i - component video) upscaled to 1080i via the RX-V2700 and fed to the Samsung HL-S5688W Display.
Yamaha scored average on these tests, but misses some key ones that we pay close attention too. The fact that Yamaha's receiver doesn't appear to pass the Film Detail and 3:2 Cadence tests tells me that something is still amiss in this 2nd generation HDMI upconverting receiver when trying to handle unflagged content. A good $150 DVD player can pass these tests.
Users may want to continue to pair this unit with a good progressive source component. Overall I found the scaling features of the RX-V2700 to be a cut above what’s found in most A/V receivers these days, with the exception being its inability to handle unflagged film content. Unless you have a really good DVD player, you may still opt to use the internal Yamaha scalar for better results.
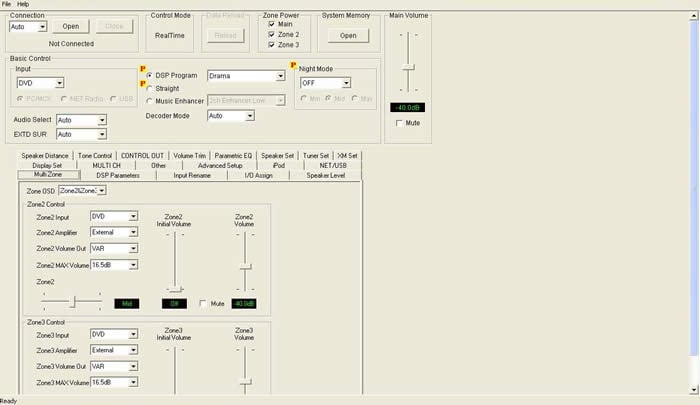
Yamaha RX-V2700 Receiver Editor Display
Receiver Editor
A custom installer’s delight, Yamaha has been offering this feature since the introduction of their flagship the RX-V2400 over four years ago. Using Yamaha’s proprietary software and an RS-232 connection between your computer and the interface on the back of the RX-V2700, you can plug away at configuring the entire receiver without having to use the GUI or your display. Best of all, if you or your customer happens to mess up some of the settings on the receiver after it’s calibrated; you can recall the settings in an instant and restore the receiver to its proper calibration. Of course, I highly recommend engaging the “Memory Guard” feature of this receiver after you complete the setup and calibration to avoid such an occurrence.
Network Set-Up & Functionality
 We
are entering an era where bleeding edge receivers such as the RX-V2700
are starting to take on a more active roll of the typical HTPC and
Media Center. This makes perfect sense since the receiver serves as
the central hub for the home theater system and Media Center PCs have
been traditionally hampered by spurious HD cable support. Why not have
it control all sources, including music streaming and distribution.
We
are entering an era where bleeding edge receivers such as the RX-V2700
are starting to take on a more active roll of the typical HTPC and
Media Center. This makes perfect sense since the receiver serves as
the central hub for the home theater system and Media Center PCs have
been traditionally hampered by spurious HD cable support. Why not have
it control all sources, including music streaming and distribution.
The RX-V2700 is unlike any other receiver previously launched by Yamaha or any other manufacturer in this regard. Within a matter of minutes after I connected my Ethernet cable from my network to the RX-V2700 and the MusicCAST MCX-2000, I was able to accomplish all of the following:
-
stream (Inter)Net radio
-
stream music from a MusicCAST MCX-2000 server as a remote client
-
stream music from a connected USB flash drive
-
stream music from a networked PC
-
receive XM radio (not tested, not subscribed to services)
(Inter)Net Radio
By
selecting the input labeled Net/USB, setting the remote control to
“Net” then sliding the side function mode selector switch to “source”
you enter the Network world of the Yamaha RX-V2700. I found literally
hundreds of Net radio stations categorized by Genre, Location, Popular
Stations, and Podcasts. While this was a super cool feature,
especially since it’s free and opens the doors to an almost limitless
avenue of new music, the poor sound quality on most stations made this
service unpalatable even when engaging Yamaha’s Music Enhancer
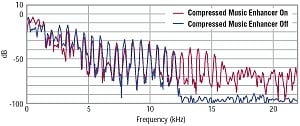
feature. The Music Enhancer feature did manage to extend the high and
low frequency response, but it was unable to combat the excessive
amount of compression and phase issues that made most of the channels
sound about as good as AM radio without the static. Am I being too
picky? Perhaps, but I am not the type to fall for the Dumbing Down of Audio that seems to be the status quo in an era of streaming music and compressed portable audio services.
 Oddly
when I selected the “Holiday Music” genre, I got Nirvana and Stone
Temple Pilots on the North Pole station. I guess Santa must be in a
Rockin’ mood once the holiday season is over.
Oddly
when I selected the “Holiday Music” genre, I got Nirvana and Stone
Temple Pilots on the North Pole station. I guess Santa must be in a
Rockin’ mood once the holiday season is over.
One saving grace to Net Radio is I did manage to find a selection of Jazz stations that didn’t sound half bad, especially when I engaged Yamaha’s Music Enhancer 2CH and 7CH modes. The bottom line is that when you find a higher quality station, make sure you program it in memory for future access.
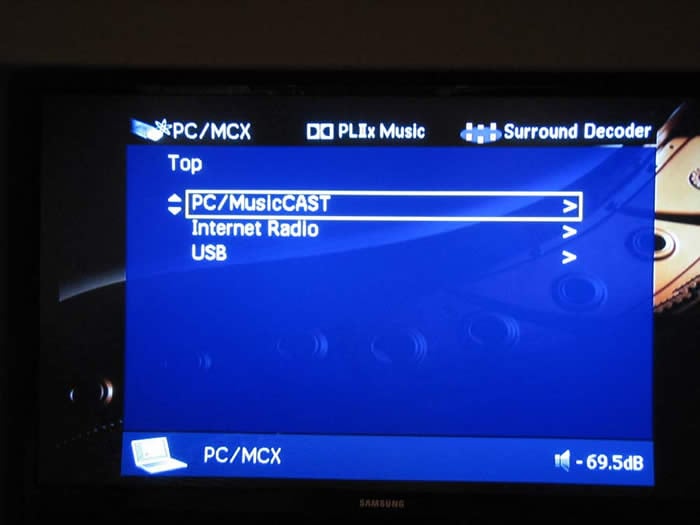
MusicCAST MCX-2000
Networking
the RX-V2700 to my MusicCAST MCX-2000 was easy as pie. All I had to do
was go into the setup of my MCX-2000 and hit Auto Configure. It found
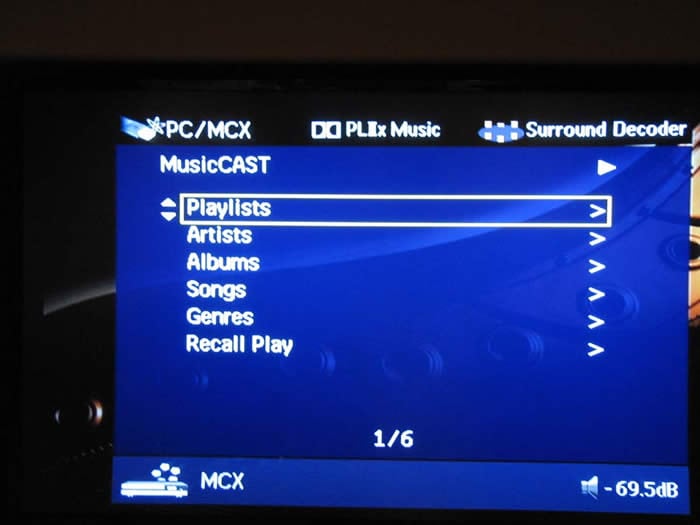
the RX-V2700 and treated it as a remote client. I then selected the
PC/MusicCAST option on the OSD (use “display” button on the remote when
engaged in Net mode).
Editorial Note on Streaming Music from MusicCAST
When streaming music from MusicCAST MCX-2000 to the RX-V2700, it’s important to note that MusicCAST defaults PCM to MP3 conversion of remote clients. MusicCAST does provision for sending one remote client PCM data. If you are already sending PCM data to another remote client,, I would suggest using this feature for zone2/3 audio and using the primary MusicCAST system for the main zone to allow true PCM data to be faithfully produced for the greatest fidelity.
Having
the network feature for MusicCAST is very useful in this receiver. It
provides the ability to stream independent musical sources for all 3
zones (Main, Zone 2, Zone 3) by just having only one additional remote
client for the MusicCAST system. In my setup, I used the MCX-2000 base
unit for the main zone and streamed different music to Zone 2 from RX-V2700 remote client while watching TV in Zone 3 all off one receiver!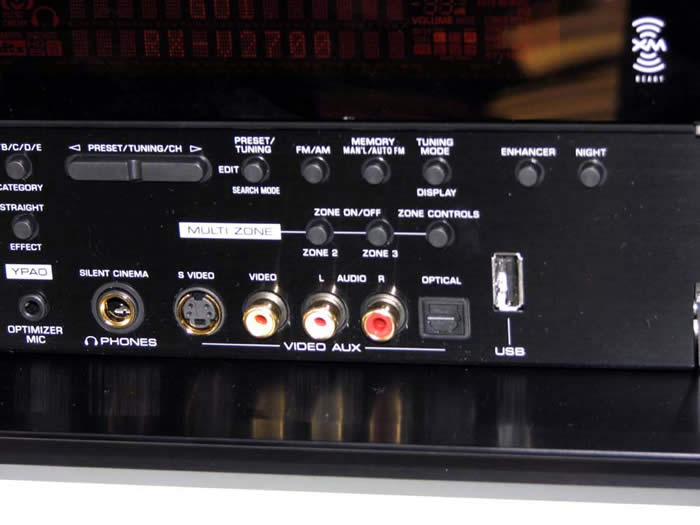
Editorial Note:
You can also have the main MusicCAST server in Standby mode while accessing it from a remote client. Very cool.
Streaming Music off PC and USB Flash Drive
Once
again, The RX-V2700 showed off its Network muscles by allowing users to
stream music directly off a PC connected in the network. Files such as
WAV (PCM format only), MP3 and WMA are supported. I was right at home
with this feature as I have a ton of older progressive rock music on my
PC hard drive that I’d love to hear on my stereo system. As an added
bonus, you could even store some music files on a USB flash drive or
portable hard drive and connect it right to the front panel USB
connector for instant access to your music.
XM Radio
Just like the RX-V659 receiver we’ve previously reviewed, the RX-V2700
leaves no stone unturned by providing XM radio. Connecting the XM
antenna is plug and play much like an iPod docking station. Simply
plug it in and it works. Of course with XM Radio, you must subscribe
to their service which incurs a monthly service fee of about $13 and
opens you up to commercial free programming of 100s of channels, pretty
much all music genres, sports talk programs and more. The nice thing
about having XM integrated into a receiver is that the OSD gives you a
full readout of channel, artist and song info. This is something you
just don’t get with conventional radio and is certainly a great
convenience for those who find a song they love playing on the radio,
but never until now know who it’s from.
Yamaha is one of the first manufacturers to incorporate XM HD Surround technology into a receiver. This feature allows the end user to hear participating XM radio stations in true discrete 5.1 surround sound much like you hear a DD or DTS DVD. Unfortunately we didn’t have an active XM subscription to test this feature.
iPod Connectivity
The iPod port on the back of the RX-V2700 just like it was on the
RX-V659. I didn’t have a chance to test iPod on the RX-V2700 but did
do a full report on this in my RX-V659 review.
Yamaha RX-V2700 Multi-Zone & Listening Tests
Multi-Zone / Multi-Source Audio
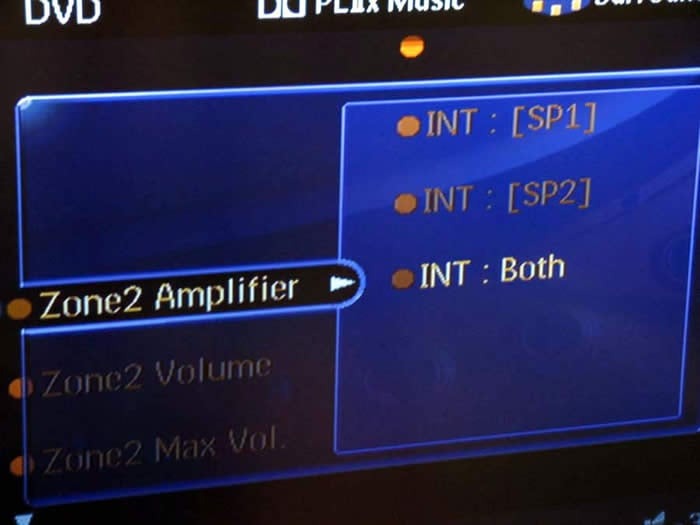 I
was quite taken by the full multi zone / source audio features bestowed
upon this receiver. Not only did it have the ability to serve three
independent zones of audio, but it also had power amp assignability of
four of the internal amps (SP1 and SP2) for either Zone 2 or 3 or two
for both. Best of all, you don’t even have to power up the main zone
to get music going to Zone 2 or Zone 3. I loved the fact that you
could power up Zone 2 or 3 independently and adjust level control and
input selection all accessible on the front panel of the receiver via
Zone on/off and Zone control buttons.
I
was quite taken by the full multi zone / source audio features bestowed
upon this receiver. Not only did it have the ability to serve three
independent zones of audio, but it also had power amp assignability of
four of the internal amps (SP1 and SP2) for either Zone 2 or 3 or two
for both. Best of all, you don’t even have to power up the main zone
to get music going to Zone 2 or Zone 3. I loved the fact that you
could power up Zone 2 or 3 independently and adjust level control and
input selection all accessible on the front panel of the receiver via
Zone on/off and Zone control buttons.
In my setup, I configured all four of the Yamaha internal amps to Zone 2 and used two channels of my Emotiva MPS-1 to driver two sets of outdoor speakers for Zone 3. I then connected four amps from my Emotiva to the surround side and back channels of the RX-V2700. In this configuration, I was severing a total of four indoor speakers on zone 2 (dining room, guest room) and four outdoor speakers on Zone 3 (2 frontyard and 2 backyard). Thanks to the net streaming features of the RX-V2700, each zone had independent source control. The only negative was I was limited to 5.1 in the main zone when either Zone 2 or Zone 3 were engaged, despite I had enough amplifiers to run a full 7.1 theater with all Zones active. Perhaps in future models, Yamaha can open this option up for people having the available amplifier channels.
It’s important to note, I found a rather unusual issue I’ve never encountered before when connecting my Emotiva MPS-1 7CH power amp to the RX-V2700. When I used the “Music Mode” trigger of my Emotiva to auto turn on/off the amplifier upon detection of a music signal, I heard a bizarre momentary sound (a whining alien buzz) emanate from my speakers powered by the Emotiva shortly after I turned off the RX-V2700. It was likely a result of power supply discharge from the Yamaha that seeped through the RX-V2700’s preamp outputs as a result of poor isolation from the muting relays. My work around was to use the 12V trigger which cut power to my amplifier instantaneously after I turned off the RX-V2700. 12V triggers are preferred to music mode types to avoid audio dropouts when your amplifier turn off during quite passages of the movie and tries to instantaneously engage back on. I suggest using the 12V trigger to avoid these issues altogether.
Remote Control(s)
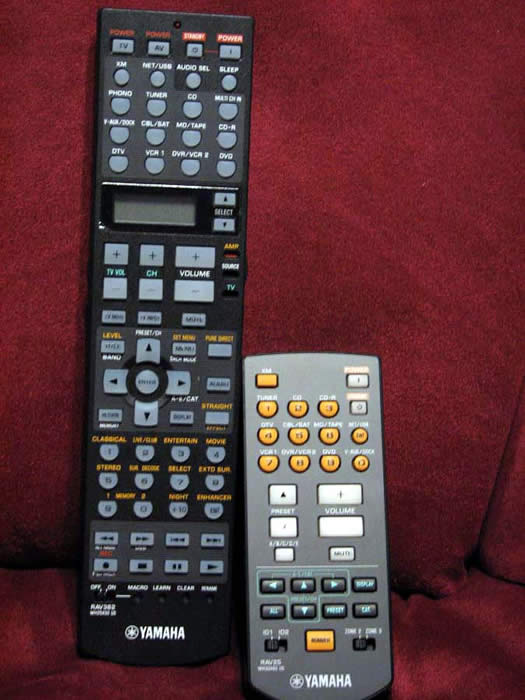 The
RX-V2700 comes with two remote controls: one that operates the main
zone (RAV362), and the other (RAV25) (which I refer to as "MiniMe") for
Zone2/3 control. Not much has changed here since the last couple of
generations. The RAV362 is a universal and learning type remote that
is fairly intuitive to operate and program. All of the keys are
backlit via a button located on the left side of the remote. A switch
on the right side of the remote determines the functionality of buttons
marked in orange while an LCD display window and up/down selection
buttons allows the user to determine the function of the center
navigation and play/stop functionality of the source currently being
used. The remote has discrete keys for each input select and offers a
hot key for channel trim adjustments, and DSP modes but unfortunately
doesn’t do so for PLIIx modes. Overall, the remote has good tactile
response and is easy to hold, but I recommend it as a support for the
RX-V2700 and NOT the primary remote to operate your home theater. For
that I suggest a Logitech Harmony or Universal Remote Control Inc type
of product.
The
RX-V2700 comes with two remote controls: one that operates the main
zone (RAV362), and the other (RAV25) (which I refer to as "MiniMe") for
Zone2/3 control. Not much has changed here since the last couple of
generations. The RAV362 is a universal and learning type remote that
is fairly intuitive to operate and program. All of the keys are
backlit via a button located on the left side of the remote. A switch
on the right side of the remote determines the functionality of buttons
marked in orange while an LCD display window and up/down selection
buttons allows the user to determine the function of the center
navigation and play/stop functionality of the source currently being
used. The remote has discrete keys for each input select and offers a
hot key for channel trim adjustments, and DSP modes but unfortunately
doesn’t do so for PLIIx modes. Overall, the remote has good tactile
response and is easy to hold, but I recommend it as a support for the
RX-V2700 and NOT the primary remote to operate your home theater. For
that I suggest a Logitech Harmony or Universal Remote Control Inc type
of product.
The RAV25 is a basic zone remote that allows you to select input, tuner presets, mute, volume and power on/off for each zone independently. You can toggle remote functions based on the remote ID# switch located at the bottom left of the remote. This is a handy little remote but the experienced installer would likely integrate an RF remote or touch pad at the zone location where audio is being fed.
Listening Tests
Ok, so the RX-V2700 is obviously one of the most feature-intensive receivers we’ve ever tested, but how does it sound? In one word – awesome! It’s clear to me that Yamaha is making progressive strides at improving the fidelity of their receivers, and not losing the focus of audio fidelity despite all the new features being brought on board. This is also perhaps one of the reasons their receivers are also getting progressively more expensive within each successive model.
This is the first time since my RX-V4600 review that I was able to connect high resolution DVD-Audio disc via a digital connection on a Yamaha receiver. This time of course it was done via HDMI and let me say it worked flawlessly. You’ll get a message saying “multi-channel PCM” on the display which essentially means the universal DVD player (in this case the Denon DVD-2930CI) is handling the multi-channel decoding, but the RX-V2700 is taking care of bass management, level control and digital delay compensation. I couldn’t test SACD via HDMI since my Denon DVD-2930CI is only HDMI ver 1.1, so I used analog cables for that function.
Music Listening
Before breaking out the multi-channel recordings, I ran some exhaustive 2CH listening tests in my primary acoustically treated theater room (courtesy of Auralex Acoustics). I connected the RX-V2700 to my reference speakers – the RBH T-30LSE’s and ran them full range. I level-matched and squared off the sonic chops of the RX-V2700 along side the more costly Marantz PM-11S1 integrated amplifier we currently have in for review. This is obviously an unfair comparison since both machines are designed with an emphasis on different functions, but I wanted to gauge just how well the RX-V2700 could hold its own next to an audio reference piece such as the Marantz.
Suffice it to say, the Yamaha sounded excellent. I felt it gave up a notch in stereo separation and low end bass control to the Marantz, but at the same time it subjectively felt like it had a warmer sonic signature. Yes, warmer. The Yamaha had excellent bass extension and a very lush top end. It never sounded metallic or analytical despite the fact I was torturing it with my 4-ohm reference speakers in a nearly 6,000ft^3 room. The decay in wood and bass instruments weren’t quite up to the level of the Marantz, but without doing an A/B real time comparison, you’d likely never notice. Not bad for a does everything multi-channel A/V receiver costing well under $2,000.
DVD-Audio: Beatles Love
The
Beatles Love DVD-A disc has become one of my primary multi-channel
reference recordings for good reasons – it sounds great and it's great
content. “Because” sounded very open when engaged in PLIIx Music Mode,
much like I heard at the Cirque du Soleil show
in Vegas. Switching between 5.1 and 7.1 really showed off the benefit
of PLIIx post processing on a 5.1 audio signal. “Tommorrow Never Dies”
sounded as dynamic and enveloping as I’ve heard in my primary theater
room but the bass wasn’t as well extended since my family room system
only employs a single sub in a large open room. Regardless, the Yammie
was able to belt out LOUD dynamics with no trouble at all. Next to the
RX-Z9, I’d say this is the most powerful amp section currently employed
in a Yamaha A/V receiver.
Movie Listening
Now
it was time to see how the RX-V2700 shined in its most widely used
application among home theater aficionados – movie watching. I began
with some HD content via my new Toshiba HD-A2 HD DVD player
HD DVD: Polar Express
This
was a first for me – getting to experience HD and DD+ in all of its
glory via one HDMI connection. The audio was simply awesome! Gone
were the compressed artifacts during loud dynamic scenes I’ve so
commonly experienced via standard Dolby Digital. This HD DVD sounded
as good as some of the best DTS multi-channel recordings I’ve heard.
The tactile response of the opening scene where the train comes to the boy's house was so real it startled our soon to be born baby in my wife’s belly. The surround envelopment was right on par with some of the best multi-channel recordings I’ve heard. The scene where the conductor played by Tom Hanks was singing the Hot Chocolate song was bold, dynamic and musical more so that I ever recalled when I saw this movie at my local Cineplex. The RX-V2700 engaged in PLIIx Movie Mode filled my room with realism that only the best recordings on a primed playback system can do. There was true magic in this experience and I am pretty sure it wasn’t coming from the North Pole. If DD+ was this good, I could only imagine how a disc authored with TrueHD sounds.
I experimented with Yamaha’s DSP post processing modes and found most of the time they weren’t needed unless I engaged in an older not so pristine recording. The Jazz and Rock modes were useful for such events as old concerts on VHS or mixed in 2.0 on DVD. In fact, I popped in the Fleetwood Mac – The Dance DVD and enjoyed hearing the more expansive effects that the Jazz DSP modes offered while Lindsey Buckingham whaled away in “I’m So Afraid”. For movie playback, I mostly used PLIIx Movie Mode and occasionally used the Adventure DSP mode.
Suggestions for Improvement
Although the RX-V2700 is jam packed with features and has it where it counts sonically, there are some operational things I’d like to see improvement upon to make the next generation receiver even better:
-
Single button toggle ability to engage/disengage PEQ
-
More accurate and consistent auto speaker size, crossover configuration and equalization
-
Ability to engage both the Presence channels and Surround Backs via use of an external 2CH amplifier
-
Ability to engage 7.1 with extra amplifiers while Zone 2 or 3 are engaged
-
Hot key for PLIIx Music and Movie Mode on the remote
-
Ability to scale through component video (currently limited to just I/P)
The biggest operational nuisance to me that plagues each generation of Yamaha receiver is the difficulty of choosing PLIIx Music or Movie mode. The RX-V2700 retains the last setting per source type (ie. 2CH or 5.1) but NOT per input. It’s a three step process available only via the remote control (Sur Decode > Extd Sur > scroll left/right) in order to toggle between them when in fact it should only take a hot key / toggle function to switch between Music/Movie/Game modes.
I would have also liked Yamaha to provision up to 1080i scaling via component video (just like the RX-Z9 does) instead of simple I/P for those instances like I experienced via my Karaoke and VHS players that didn’t maintain a stable image via HDMI upconversion.
Yamaha RX-V2700 Measurements and Analysis
Amplifier Efficiency
Amplifier
Efficiency Measurements for linear a/b amps such as the ones employed
in this receiver typically range from 40-50% depending on the load the
power supply of the amplifier sees. The closer you get to full load,
the higher the efficiency usually becomes (assuming you aren’t
overtaxing the power supply and power devices of the amp causing
excessive thermal losses). The RX-V2700 achieved above 50% efficiency
when driven at near full power into low impedance loads which was quite
impressive for a receiver employing a conventional linear amp design.
This receiver runs warm as it dissipates 72 watts in idle so be sure to
give it plenty of ventilation.
|
# Ch |
Power Consumption |
Power Delivered |
Load |
Efficiency |
|
1 |
288 watts |
144 watts |
8 ohms |
50 % |
|
4 |
765 watts |
90 watts |
8 ohms |
47 % |
|
1 |
513 watts |
272 watts |
4 ohms |
53 % |
|
2 |
774 watts |
230 watts |
4 ohms |
59 % |
|
Idle Power |
72 watts |
|||
Note: All power output figures above were conducted at 1kHz and 0.1% THD + N
Power Bandwidth
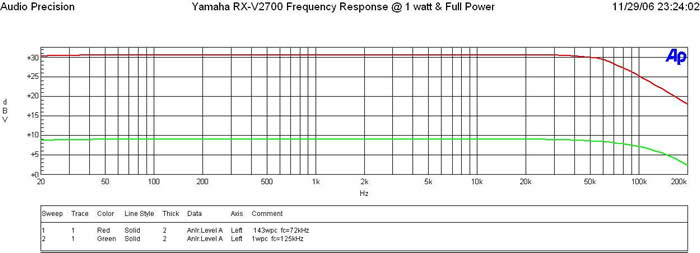
Figure 4. Yamaha RX-V2700 Frequency Response at 1 watt & Full Power
The Yamaha RX-V2700 possesses a wide bandwidth amplifier topology with a -3dB point in excess of 100 kHz at 1 watt. At full power, we start seeing some loss of bandwidth but the -3dB point is still above 70 kHz (well beyond the range of human hearing).
At full continuous unclipped power and bandwidth (> 0.1% THD + N) the RX-V2700 delivered the goods, 144wpc x 1 and 90wpc x 4 (bi-amp mode) into 8 ohm loads, while still maintained excellent bandwidth linearity with a -3dB point of 70kHz.
Into 4 ohms, the RX-V2700 was able to deliver continuous power levels at a whopping 272wpc x 1 and 230wpc x 2 with less than 0.1% THD + N.
Keep in mind most review publications don’t do continuous power measurements and they usually publish power measurements into clipping at 1% THD + N. Our measurements are very conservative and it is clear that this receiver is among the most powerful in its price class.
For more info on amplifier measurements, see: The All Channels Driven (ACD) Test
FFT Distortion Analysis
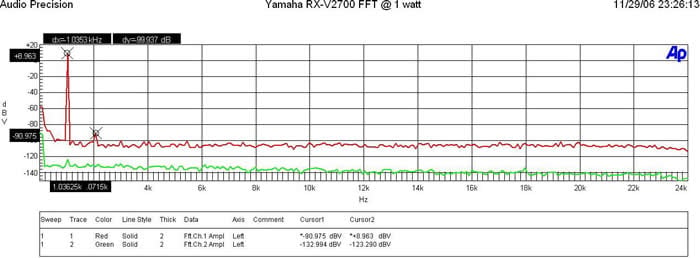
Figure 5. FFT Analysis @ 1 watt
At 1 watt into 8 ohms, the RX-V2700 displayed exemplary results (+8.963 + 90.975)dBv = 99.94dBv or 100*alog^-1(-99.94/20) = .001% THD + N.
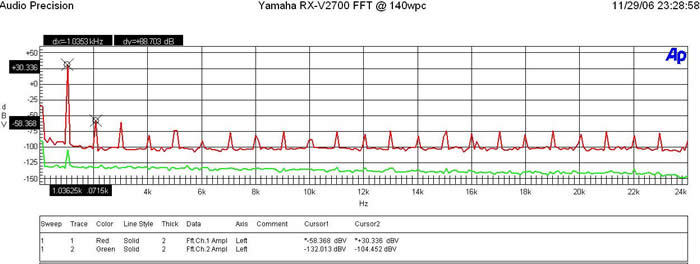
Figure 6. FFT Analysis @ 140 watts
At full rated power (140wpc, 8 ohms) the RX-V2700 again exhibited excellent distortion measurements (30.336 + 58.368)dBv =88.7dBv or 100*alog^-1(-88.7/20) = .0037 THD + N
Amplifier Output Impedance & Damping Factor
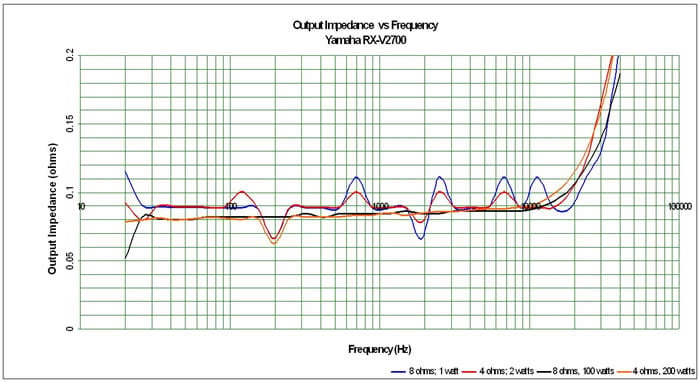
Figure 7. Amplifier Output Impedance under various loading conditions
The amplifier output impedance fell right within our desired 100 mohm or less mark for the entire audible bandwidth up to 20kHz. It was nice to see that even when the RX-V2700 was pumping out 200wpc into a 4 ohm load, the amp maintained good linearity. This is a marked improvement over Yamaha predecessor units in this price class and is among the best compared to its peers.
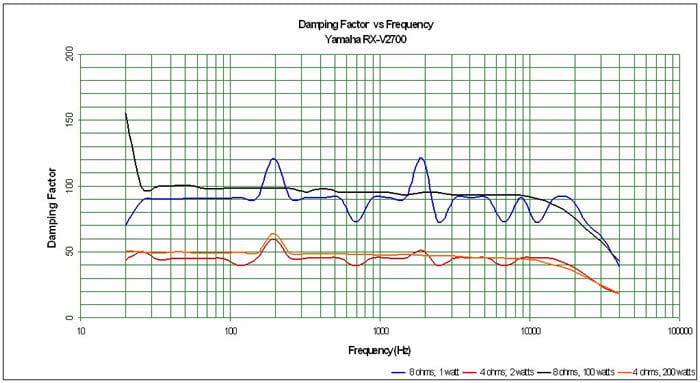
Figure 8. Amplifier Damping Factor under various loading conditions
The amplifier damping factor is about what I expected based on the measured output impedance. It is uniformly good across the entire audio frequency range and falls slightly under the 100 mark (50 is a minimum we like to see in all amplifiers) when driving an 8 ohm load above 1kHz we like to see on uncompromising designs. The amplifier doesn’t fall apart when driving 4 ohm loads like some of Yamaha’s earlier models.
Preamplifier Performance
The RX-V2700 preamp output drive was a bit disappointing and a step backwards from its predecessor
-
The Inputs can handle 2.7Vrms unclipped!
-
Outputs Deliver nearly 3Vrms output before the receiver shut down, but FFT distortion becomes very high once output exceeds 1.25Vrms.
Editorial Note on Preamp Clipping
We would prefer to see Yamaha employ a preamp capable of delivering 2Vrms unclipped to ensure a wider variety of power amplifiers can be mate well. If for example you choose a power amp with the typical 29dB gain structure (THX standard), you would only be able to deliver about 155wpc (1.25 * alog(29/20)) continuously unclipped into an 8 ohm load. A preamp capable of delivering 2Vrms unclipped would allow the amp to deliver over 400wpc into an 8 ohm load!
Signal to Noise Ratio (SNR)
Preamp
200mV Input Signal, I adjusted master volume for 1Vrms out.
Av = 5 or 14dB
SNR: 80.6dB <10 Hz - 22k Hz bandwidth , no option filter. This is
very good performance and will ensure the RX-V2700 wont serve as a
significant noise path to a mating power amplifier.
Power Amp
200mVin; SNR @ 1 watt = 79.6dB <10 Hz - 22k Hz bandwidth , no option filter.
SNR @ full power = 102.68dBrA at 30.7dBv at .98% THD + N (146 watts)
Again this is commendable performance which explains why noise was never a distracting issue when listening to music or movies on this receiver.
Yamaha RX-V2700 Conclusion
The RX-V2700 adds a host of noteworthy features over its predecessor but also eliminates a very popular one in this price class – THX certification. Whether or not it’s a big deal to you depends on how often you use THX modes and/or if you find the PLIIx equivalent modes equally useful.
Yamaha RX-V2700 AV Receiver
From its powerful network features, to its ability to playback all known current source types thanks to HDMI ver.1.2a, this receiver is likely to serve as the centerpiece of a sophisticated home theater for a long time.
Its audio sound quality and amplifier performance are among the best Yamaha has built to date in a sub $2k receiver. The assignable power amps should serve a multi zone system quite well and allow the end user to upgrade to a more powerful amp in the main zone (if needed) while not laying to waste its excellent internal amps.
If you have a MusicCAST MCX-2000 system, then it and the RX-V2700 will go like peas and carrots together. Think of it as getting a remote server thrown into the receiver for free. If you’ve gotta have the ability to stream music off your PC, media server, USB drive or iPod, while still hosting top notch AV duties, I can think of no better solution than the RX-V2700.
Despite some of the minor operational difficulties I had, this was still a very enjoyable receiver for me to review and one I highly recommend to the audiophile and technogeek alike. Keep in mind that most review publications don’t go into this level of detail with products and I have provided work around solutions for all of the issues I have found.
If
you follow my guidelines set forth in this review, you can rest assured
the Yamaha RX-V2700 will arm you with a sophisticated home theater
arsenal at your command to propel you into the 21st century of home
theater enjoyment.
The Score Card
The scoring below is based on each piece of equipment doing the duty it is designed for. The numbers are weighed heavily with respect to the individual cost of each unit, thus giving a rating roughly equal to:
Performance × Price Factor/Value = Rating
Audioholics.com note: The ratings indicated below are based on subjective listening and objective testing of the product in question. The rating scale is based on performance/value ratio. If you notice better performing products in future reviews that have lower numbers in certain areas, be aware that the value factor is most likely the culprit. Other Audioholics reviewers may rate products solely based on performance, and each reviewer has his/her own system for ratings.
Audioholics Rating Scale
 — Excellent
- — Very Good
- — Good
- — Fair
- — Poor
| Metric | Rating |
|---|---|
| Frequency Response Linearity | |
| SNR | |
| Output Impedance | |
| Measured Power (8-ohms) | |
| Measured Power (4-ohms) | |
| Multi-channel Audio Performance | |
| Two-channel Audio Performance | |
| Video Processing | |
| Build Quality | |
| Fit and Finish | |
| Ergonomics & Usability | |
| Features | |
| Remote Control | |
| Performance | |
| Value |
Gene manages this organization, establishes relations with manufacturers and keeps Audioholics a well oiled machine. His goal is to educate about home theater and develop more standards in the industry to eliminate consumer confusion clouded by industry snake oil.
View full profile