
Yamaha RX-V2600 Receiver Review
Yamaha RX-V2600 Receiver
- Product Name: RX-V2600 Receiver
- Manufacturer: Yamaha Electronics
- Performance Rating:


- Value Rating:
- Review Date: February 20, 2006 18:00
- MSRP: $ 1399
- Pure Direct for Higher Fidelity Sound Reproduction
- 7-Channel 910W Powerful Surround Sound (130W x 7)
- Digital ToP-ART and High Current Amplification
- Burr-Brown 192 kHz/24-Bit DACs for All Channels
- Assignable Amplifiers for Bi-Amp Connection
- Superior Audio-Grade Parts and Devices Used Throughout
- Fully Analog Video Up-Conversion to HDMI and Component Video
- Output with TBC
- De-Interlacing (480i to 480p)
- Up-Scaling (480i to 1080i/720p)
- Wide-Range Video Bandwidth (100MHz -3 dB)
- XM Satellite Radio Ready
- 2 In/1 Out HDMI Interface for High Quality Digital Audio and Video Data Handling
- Superior Zone Control with Additional Zone Remote Unit
- RS-232C Terminal for Receiver Manager Control
- On-Screen Display with GUI (5 Languages including Spanish) and Two-Line FL Display
- On-screen display for Zone 2
- Quad-Field/Tri-Field CINEMA DSP and 22 Surround Programs with 5 THX Select2 Programs
- Dolby Pro Logic IIx and DTS 96/24 Compatibility
- Audio Delay for Adjusting Lip-Sync (0–240 ms)
- Analog Mixdown
- Extended Remote Control Codes, Dual Remote Terminals for Zone 2 and Zone 3 and Dual +12V Trigger Outputs
- Dialogue Lift
- Selectable 9-Band Subwoofer Crossover
- Subwoofer Phase Select
- Night Listening Enhancer ensures that all programs (including Dolby Pro Logic IIx)
- SILENT CINEMA and Virtual CINEMA DSP
- Speaker A, B or A+B Selection, with Virtual CINEMA DSP
Capability in Zone B - Two-Line FL Display
- Max Volume Setting
- Initial Volume Setting
- Channel Mute
- 6 System Memories
- Direct-Access (Macro-Command, Learning and Preset Capable) Remote Control Unit with Macro-Command Buttons and Illuminated Buttons
- Dimensions: 17.1" W x 6.7" H x 17.2" D
- Weight: 38.4 lbs.
Pros
- HDMI 1.1 audio support
- Upconversion and scaling of SD analogue inputs to 720p/1080i via HDMI output
- Zone 2/3 remote with source select and XM controls
- Zone 2 with on-screen display (OSD)
Cons
- No parametric EQ bands below 62.5Hz
- Spring clips for Presence/Zone 2/3 speakers
- Menu activity on DVDs causes HDMI dropouts to display
- No on-the-fly speaker level trims
Yamaha RX-V2600 Introduction
In reviewing the new Yamaha RX-V2600 I feel like I 'm swearing in a new justice of the Supreme Court... After all, it's new and exciting, but there's also a lot of discussion and debate surrounding the newcomer. With the RX-V2600, Yamaha has entered that place where the label "AV processor" really starts to emphasize video processing. Let's face it, while there was always plenty of audio processing going on, the "video" part of the AV equation was mostly limited to switching . No longer. The new RX-V2600 breaks new ground and starts anew with a set of updated features that gives notice to the competition:
- 130watts/channel (20Hz - 20kHz, 0.04% THD, 8-ohms) - see our bench test for more on power
- Updated GUI interface
- Burr-Brown 192 kHz/24-bit DACs for all channels
- Assignable amplifiers for bi-amp connection
- 2 in/1 out HDMI interface for high quality digital audio and video data handling
- Fully analogue video up-conversion to HDMI and component video
- Output with TBC (time-base-correction)
- De-interlacing (480i to 480p)
- Up-scaling (480i to 1080i/720p)
- XM Satellite Radio ready
- Additional Zone 2/3 remote control unit
- Zone 2 video monitor outputs displaying Zone 2/3 info
- Improved main remote (fully backlit)
Yamaha RX-V2600 Technology Overview
First Impressions
Being the video-head that I am, it was easy to figure out where to begin. I wanted to examine up close and personal what the RX-V2600 could do in terms of its new video processing capabilities. I mean, this isn't your run-of-the-mill AV receiver - it's an all-inclusive analogue to digital workhorse designed to take everything you feed it and process it into a tasty digital morsel. I was excited but skeptical, to put it mildly. Going over some of the updated items, here are some quick summary notes to chew over before we get into the real nitty gritty of this processor (and whether you should be happy or not to pay the additional $300 over last year's model):
 HDMI
Upconversion, Deinterlacing AND Scaling
HDMI
Upconversion, Deinterlacing AND Scaling
In the spirit of Brothers Grimm , which just came to me on DVD this week - let's put this into perspective through allegory. Once upon a time there was HDMI... HDMI liked to go real fast, but he was also lonely because he had a brand new highway all to himself. One day, someone decided to build an entrance ramp so other formats could play with HDMI - and that made things better. Eventually, however, HDMI got tired of always passing the other formats on the highway (they couldn't keep up) so someone decided to construct little cars that each of the other formats rode on, making them just as fast (sort of) as HDMI. Now HDMI was able to go different speeds, but the other formats could still match him and everyone, of course, used the same exit ramp. You still tracking with me? Ah, bliss in the land of make believe.
Here's how it breaks down in the real world. Send in composite 480i, output 1080i or 720p via HDMI. Send in s-video 480i, output 1080i or 720p via HDMI. Send in component 480i or 480p, output 1080i or 720p... It doesn't matter what you put in, the Yamaha RX-V2600 can take it and output it onto HDMI in the proper format for your display (with the exception of 1080p). The only question we'll answer later is: do you want it to?
Yamaha RX-V2600 Remote Control and System Setup
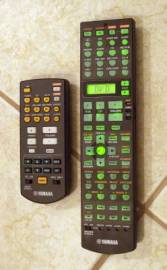 Yamaha is still making
subtle improvements to its remote controls (yes, plural). This latest model shares most of the traits of the prior
model except that they have finally backlit the entire remote and eliminated the lime green on-button
labels that were impossible to read in the dark. In addition they have added in a rather comprehensive
daughter remote for Zone 2/3 use. All you need to use it are standard IR signal receivers placed in
Zones 2 and 3 and an emitter or hardwired emitter cable for sending the resulting signals back to the
Yamaha. Yamaha's remote control concepts are simple: include affordable and practical remote
products, but allow room for custom installers to bring in third party solutions as well. If Yamaha and
these others included top-performing universal RF remotes on their mid-fi products, prices would go up
and the ability of the custom installer to integrate their own solutions would be diminished.
We're pretty fine with the status quo.
Yamaha is still making
subtle improvements to its remote controls (yes, plural). This latest model shares most of the traits of the prior
model except that they have finally backlit the entire remote and eliminated the lime green on-button
labels that were impossible to read in the dark. In addition they have added in a rather comprehensive
daughter remote for Zone 2/3 use. All you need to use it are standard IR signal receivers placed in
Zones 2 and 3 and an emitter or hardwired emitter cable for sending the resulting signals back to the
Yamaha. Yamaha's remote control concepts are simple: include affordable and practical remote
products, but allow room for custom installers to bring in third party solutions as well. If Yamaha and
these others included top-performing universal RF remotes on their mid-fi products, prices would go up
and the ability of the custom installer to integrate their own solutions would be diminished.
We're pretty fine with the status quo.
Zone 2/3 Video Monitor Out
Not only can you route analogue input sources to both Zones 2 and 3, but now you can also output analogue video as well. While this is limited to those signals input via the composite video inputs, Zone 2 can be used, for example to power a child's play room where a DVD player in the main room can be sent to entertain the young ones. You can even pipe out unused Presence amplifiers to drive speakers in the Second Zone. We like multi-zone receivers, and to see these kinds of features making their way into such mid-level products makes for great progress and flexibility for custom installers.
Time Base Correction
The RX-V2600 doesn't just provide archaic conversion of composite and s-video sources to high definition output. It also gives you a TBC, or time base correction circuit. A TBC is an electronic processing device intended for use with a VCR that removes or corrects the jitter generated by the expected mechanical inaccuracies in these types of recorders (helical scan). The TBC does this by automatically delaying the video signal in order to synchronize each line to the same (and correct) starting point. What this means to you: Say "bye bye" to flickering VHS tapes and "hello" to the ability to truly upconvert those tapes to 720p or 1080i output.
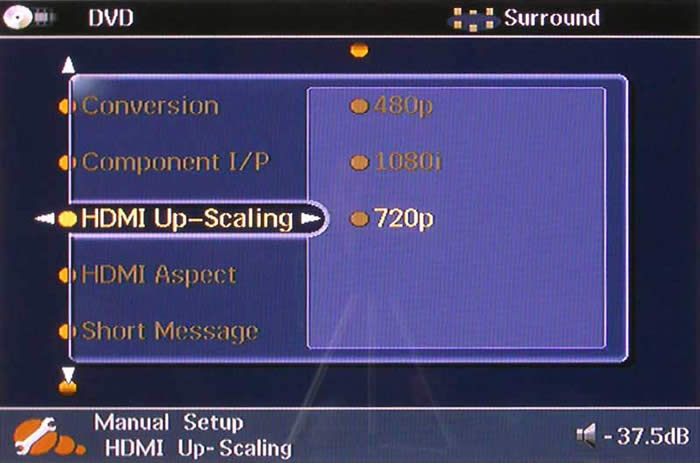
System Setup: Manual
The receiver itself is rather hefty, weighing in at over 38 pounds. There is a wealth of information available on the front panel, including volume, audio decoding/DSP mode, input, active speaker channels, mute status, and active HDMI input. We found the display to be very helpful, but also incredibly difficult to read from more than a few feet away.
We're not going to go through the entire setup, since that is covered in our reviews of the RX-V2500 receiver . What we will do is show you our default configuration so you can be aware of our setup for the multi-channel (movie) listening tests and subsequent comments regarding the system's performance. The system is very easy to configure manually, though we found our fair share of quirks, like having to engage the test tones before continuing to the speaker menu to set the levels. This should really be automatic as I know of no one who would seriously consider setting calibration levels by ear (sans tone). That's what on-the-fly speaker level trims are for (which, unfortunately, the Yamaha doesn't provide).
|
Speaker |
Size |
Level |
Distance |
|---|---|---|---|
|
Front L |
Small |
0.0 |
10.0 |
|
Front R |
-1.0 |
10.0 |
|
|
Center |
Small |
-4.5 |
9.5 |
|
Surround L |
Small |
-1.5 |
9.0 |
|
Surround R |
-3.0 |
9.0 |
|
|
Presence L |
Yes |
-3.0 |
13.5 |
|
Presence R |
-4.0 |
13.5 |
|
|
Subwoofer |
- - |
0.0 |
9.5 |
-
Surround Back:
None
- Crossover frequency:
80Hz
- Bass out:
SWFR
- Subwoofer Phase: Normal
Note: All analogue inputs bypass bass management but allow subwoofer output until you select Straight mode which engages DSP and allows bass management for all analogue inputs.
One thing that really took away from the listening experience was the absence of on-the-fly level trims. In order to change the level of a channel you have to bring up the GUI and engage several remote control functions to get to the place needed to make changes. You can also use the System Memory settings to store LFE level, YPAO, DSP or speaker settings - which is helpful - but only two of these Memory settings can be instantly recalled from the remote.
System Setup: Automatic
We ran the YPAO automatic setup to again gauge how well it performed in comparison to my manual configuration. In prior models, the Yamaha YPAO system did not configure the crossover frequency or loudspeaker sizes to our preference whereby any speaker that does not have full range (20Hz to 20kHz) response would be set to 'Small'.
The YPAO system is capable of configuring and verifying the following parameters:
- Wiring
- Distance
- Size
- Equalizing
- Level
We found it to be excellent for those without SPL meters and who would like an automatic room setup system that handles configuration of your receiver for use with your room and loudspeaker. For a more detailed explanation and blow-by-blow examination of YPAO please read our review of the Yamaha RX-V2500 receiver.
Here is the comparison of the results I achieved manually compared to the Auto Setup system:
|
Manual Setup
Surround Back:
None
|
Auto Setup
Surround Back:
None
|
YPAO took exactly 1 minute and 40 seconds to configure the receiver. Notably, the Auto Setup was pretty accurate in terms of distance to my manually configured settings. I could attribute the differences to rounding or specific mic placement versus my measurements to my ears. The Yamaha YPAO system still does not EQ below 62.5Hz and as such tends to render speakers that play down to 60Hz as Large. This is a problem as it means that full range signal could potentially go to speakers that are not equipped to handle it, causing distortion and unnecessarily using additional power from the receiver. In addition, since the frequency information is being sent to a speaker that cannot reproduce it, instead of being routed to the subwoofer - this information is essentially lost - gone forever and not reproduced in the listening environment.
While I won't go into a full rehash of YPAO, I did A-B the results in several of the modes (particularly 'Flat' and 'Front') to hear if or how the system had progressed since I last heard it. A-B comparisons are difficult, since the parametric EQ does a fair amount of boosting - and as we all know, louder tends to sound better. I was able to discern, however that the YPAO adjustments in both modes that I tested seemed to take the center channel content and brighten it up, but at the cost of also causing it to sound chesty and artificial. Live recordings sounded a bit more like they were coming through a PA system and lost a bit of their intimacy. Does this rule out the use of YPAO? Certainly not. However, your mileage will vary and you may even want to go in manually and back down some of the aggressive frequency gains made by the system. In general we have found that the better the loudspeaker is, the less your system will benefit from EQing.
Yamaha RX-V2600 System Setup and Test Results
The Yamaha has an Advanced Setup menu system that can be engaged by placing the unit into Standby mode and holding the "Straight (Effect)" button while powering the unit up. At this point the Program selector knob will allow access to several very useful parameters which can be modified to help custom installers and home users with unique needs.
Speaker Impedance
This is the place where you can set the
RX-V2600's output impedance to either 6- or 8-ohms. We recommend leaving
this
in the
8-ohm setting regardless of your loudspeakers, unless you are truly looking to overdrive the Yamaha
amplifiers on low impedance speakers.
User Preset
This resets the parameters of the receiver to factory
default with the exception of the System Memory and Auto Setup settings.
Remote Sensor
A great feature for custom installers, this disables
the front panel IR sensor and can allow the unit to function only via hardwired IR inputs or RS-232C
controls.
Wake on RS-232C Access
This self-explanatory function will allow the
RX-V2600 to take in RS-232C commands while in the Standby mode.
Remote Control AMP/Tuner/XM ID
For use with multiple systems, this
allows you to set the various IDs to ID1 or ID2 when using a remote control.
Fan Operation Mode
You can tweak the Yamaha to operate in AUTO mode
(default) whereby the fan comes on automatically based on the temperature of the unit, or CONT
(continuous) to engage the fan permanently (for use in smaller equipment closets, etc).
Note:
After running the RX-V2600 for a while I noticed that it runs quite
hot, so give it plenty of ventilation and consider using the continuous fan mode if you plan on
shutting it up in any sort of entertainment center or enclosed space.
Bi-AMP
This mode allows the Surround Back terminals to be utilized
for passively bi-amping the main speakers. This is new for Yamaha and
now makes at least three major manufacturers who provide this function
to utilize unused amplifiers to passively bi-amp main channel speakers.
Video Reset
There are conditions whereby you can select to DIM the
front panel and make a subsequent video adjustment that renders the
display muted. In this scenario you can use the Video Reset function to
return the display to a visible mode and continue adjustments.
TV Format
This alternates the Yamaha RX-V2600's video system
from NTSC to PAL and vice versa.
GUI Language
You have the option here of setting the GUI language to
Japanese, French, German, Spanish or back to English.
Yamaha RAV358 Universal Remote and RAV21 Zone 2/3 Remote
The Yamaha RAV358 remote control improves upon the RAV352, eliminating nearly all of the
aforementioned "cons"
we listed previously:
Pros
- All keys now backlit
- Very easily programmed
- Fits nicely in the hand, new thinner design
- Dedicated receiver volume control
- LCD allows control over components other than input source
Cons
- Keypad on main remote does not adhere to standard layout
- You cannot turn off receiver power by hitting stand by after you programmed the remote to operate other devices (you must first select all in the LCD screen for the remote to function power toggle on the receiver)
Note: IR repeater/blaster system required for Zone 2/3 remote use
Gone are the seafoam colors which made some of the backlit buttons of the RX-V2500's remote nearly impossible to read. The new and improved RAV358 buttons are all uniformly easy to read and the provided backlighting is now much more effective. Having a separate Zone 2/3 remote included is a handy new trend that is making its way into many more affordably-priced multi-zone receivers these days. In order to maximize its use you'll need to install IR repeaters and blasters which connect back to the RX-V2600. A custom installer will know how to do this in a way that allows you to control your system's discrete Zone 2/3 functions from other rooms in the house.
For more information on RAV358 functions, please see the Yamaha RX-V2500 review .
Audioholics/HQV Bench Testing Summary of Test Results
Perfect Score is 130
Yamaha RX-V2600 Benchmark Score: 28
(send this receiver progressive source material when
possible and enjoy the benefits of convenience for composite and s-video sources)
| Test |
Max
Points |
Results | Pass/Fail |
|---|---|---|---|
| Color Bar | 10 | 0 | Fail |
| Jaggies #1 | 5 | 3 | Pass |
| Jaggies #2 | 5 | 0 | Fail |
| Flag | 10 | 0 | Fail |
| Detail | 10 | 10 | Pass |
| Noise | 10 | 0 | Fail |
| Motion adaptive Noise Reduction | 10 | 0 | Fail |
| Film Detail | 10 | 0 | Fail |
| Cadence 2:2 Video | 5 | 0 | Fail |
| Cadence 2:2:2:4 DV Cam | 5 | 0 | Fail |
| Cadence 2:3:3:2 DV Cam | 5 | 0 | Fail |
| Cadence 3:2:3:2:2 Vari-speed | 5 | 0 | Fail |
| Cadence 5:5 Animation | 5 | 0 | Fail |
| Cadence 6:4 Animation | 5 | 0 | Fail |
| Cadence 8:7 Animation | 5 | 0 | Fail |
| Cadence 3:2 24fps film | 5 | 0 | Fail |
| Scrolling Horizontal | 10 | 5 | Pass |
| Scrolling Rolling | 10 | 10 | Pass |
| Total Points | 130 | 28 |
Comments on HQV Testing
We were a little surprised by the results of the HQV Benchmark scores, but not terribly so. Yamaha is not utilizing a reference quality scaler or deinterlacing chip in the RX-V2600, so it's meager score of 28 shows what happens if you can't have your cake and eat it too (provide upconversion and simultaneous switching, etc). While it's easy to chastise this performance, I do not believe that Yamaha could have done much better and continued to provide their current level of features (upconversion, scaling and deinterlacing with simultaneous outputs) without significantly increasing the cost of this product.
What you'll want to do with the Yamaha RX-V2600 is feed it progressive scan input, or better yet HDMI from a good upconverting DVD player, and allow it to deinterlace and upconvert/scale 480i inputs from sources like VHS players and legacy gaming systems.
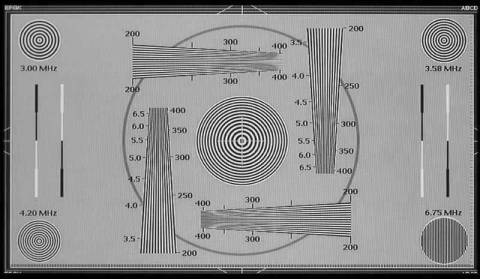
Yamaha RX-V2600 Video Upconversion & Processing Comparisons
We ran a particularly difficult test pattern through the video processing of the RX-V2600 and simultaneously compared it to the direct inputs on a Pioneer PDP-42A3HD plasma display. The test was set up by taking composite, s-video, and component inputs into the RX-V2600 and upconverting them to 720p via HDMI while providing a parallel direct input to the Pioneer. This was accomplished by using a Denon DVD-5900 which has dual parallel connections for each output type we needed. Here is a visual diary of our observations:
Note: the slight darkening effect seen below is a result of the camera exposure and not a result of the Yamaha receiver or video processing. We have also desaturated the images to make it easier to discern differences in resolution.
Composite Video Comparison

Display direct input on left and Yamaha RX-V2600 output on right
As you can see here, the Yamaha provided an almost smoothing effect to the normal scaling artifacts seen on the Pioneer display. As we saw in the HQV Benchmark DVD tests, the Yamaha tended to soften the image a bit, resulting in a slight loss of resolution.
S-Video Comparison
Display direct input on left and Yamaha RX-V2600 output on right
Clearly, the difference between s-video and composite can be seen in terms of source detail, however the Yamaha renders these differences almost null, providing a smooth, even output that is almost indistinguishable from the upconverted composite signal.
Component Video Comparison
Display direct input on left and Yamaha RX-V2600 output on right
Here is where we entered the Twilight Zone. Inputting a 480i signal directly to the Pioneer resulted in a smooth but muted signal, similar to the 720p output of the first two tests. Running the same signal through the Yamaha, however, resulted in a clean delineated output with no obvious scaling artifacts. We're not making this up, folks...
We then decided to run some additional test utilizing 480p inputs (yes, the Yamaha can even upconvert and cross-convert from 720p or 1080i input sources.)
Component Video 480p to 720p Comparison
480p direct input/output on left and 720p upconversion output on right (from same 480p input)
Inputting 480p component video we took that straight through and compared against what happened when upconverting it to 720p output. The left represents the 480p input routed through the Yamaha and output as 480p (conversion 'on' and upscaling set to'480p'). The right is the same input signal upconverted to 720p. The 720p showed the telltale signs of display scaling, present from the Pioneer, but the contrasting edges of the patterns where more evident when run through the Yamaha.
Resolution Comparison
This test pattern was helpful in getting us a look at what was going on with the Yamaha's scaler and upconversion processing, but a resolution test pattern was necessary to draw any conclusions. We knew the Yamaha seemed to be softening the image a bit, but wanted to see how that played out overall and what it looked like in terms of moiré reduction and resolution.
480p input via component, 480p output via HDMI
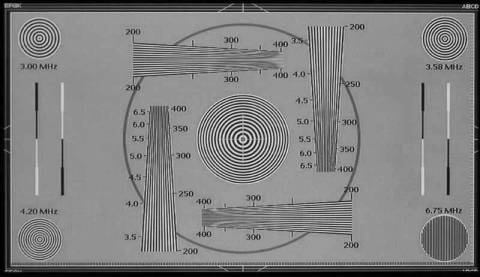
480p input via component, 720p output via HDMI
480p input via component, 1080i output via HDMI
What we found was that the Yamaha did a very good job of upconverting 480p to 720p and 1080i output overall. It reduced the amount of moiré pattern in the high resolution areas of this test pattern. We did notice, however that it did this, in part, by softening the resolution just a bit. I used to do the same thing when editing video for 480i and encountering patterns with less than a scan line of resolution. We're not saying that the video processor is softening the image on purpose, but the result is there nonetheless and is effective at reducing negative scaling effects. It's a good compromise, but I think bypassing the video processing may result in a slightly sharper image except for displays that have inherently bad scaling capabilities. The bottom line: you need to test it on your own system.
Yamaha RX-V2600 Benchmark Performance Tests
We measured the Yamaha RX-V2600's output impedance vs. frequency at 1W. It varies about +/- 0.01 mohms throughout the audible bandpass and then climbs a bit starting around 15kHz. The Yamaha receiver should not have a problem driving a wide range of loudspeakers - even those with an inconsistent impedance profile. It comfortably met our benchmark goal of 100mohms or less through the entire audio band almost twofold!
The damping factor of the receiver hovered for the most part around 250 and went as high as 400 from between 2500Hz and 10kHz. Anything above 50 throughout the audio band is excellent. Kudo's here especially when compare to this receivers predecessor models, the RX-V2400 and RX-V2500, respectively.
Measuring attenuation versus frequency, the Yamaha shows itself to be a pretty smooth player, with only 0.5 dB variance at the low end and 0.25dB variance at the upper limits of human hearing (some of which is attributed to instrumentation error).
We measured CONTINUOUS unclipped power into 4-ohms and showed that the Yamaha could easily drive a single channel from 20Hz to 20kHz at around 185Wrms (20Hz was showing 162wpc). At 8-ohms that measurement fell to around 127wpc (20 Hz was around 113wpc). With two channels driven, the Yamaha only lost a little power, coming in at around 122wpc with two channels at 8-ohms. These tests were conducted unclipped with distortion no greater than 0.5%. So in reality these are not max power figures but real world, clean continuous power measurements.
We tested the preamp section of the Yamaha RX-V2600 and were able to drive over 4V RMS. This is a welcome change for Yamaha as prior models such as the RX-V2400 and RX-V2500 weren't even able to achieve 2V RMS unclipped. Max input voltage before clipping was a whopping 4.550Vrms. This means you can pretty much drive any power amp on the market to full power, without the Yamaha preamp section adding any unwanted harmonic distortion.
All power tests were done with all testing equipment and the receiver plugged into an APC S-15 and S-BATT unit.
Yamaha RX-V2600 Listening Environment and Listening Tests - Two Channel Music
I did all multi-channel home theater listening tests in Reference System 3 and did 2-channel music testing in the RBH Sound CinemaSITE located in Reference System 2 .
Listening Tests - Two-Channel Music
I utilized Yamaha's Pure Direct mode for all 2-channel listening in order to hear what the RX-V2600's amplifiers were capable of putting out. Pure Direct puts the unit in 2-channel bypass mode with no sub output. With my main speakers set to 'Large' the Yamaha's amp was working hard, driving full range frequencies to both of my SI-6100 mains.
CD:
Porcupine Tree
Deadwing
The title track is an exercise in
finding detail. If your speakers cannot produce sufficient midrange and treble clarity and/or if your
low frequency isn't well integrated into the room, you will get "mush". The RBH Sound
SI-6100s, however picked up the detail, especially the guitars in the interlude section which at times
came from well outside and produced a super-wide soundstage. Bass was phenomenal towards the end of
this song, especially considering I wasn't running a subwoofer, but that was just a sign that the
Yamaha wasn't dropping the ball when sending full range signal to the main speakers.
"Lazarus" allowed the Yamaha to show that it could send through soft, sibilant vocals along with gentle guitar strumming and produce excellent finesse in both. Later, as piano, keys and drums came in, the room became nicely filled with a very localizable soundstage. Drums were mixed into a recessed position, while backing vocals hemmed in the soft lead. Piano was just off right of center and a lead guitar rolled in from the left.
A watery guitar effect intro of track 6 "Mellotron Scratch" showed off some gentle and smooth reverb decay. It's easy for reverb to get clipped and crushed out, but the Yamaha was true to the source and gave me an uninhibited performance. As acoustic guitar and percussion samples came in beside a lead vocal that was planted dead center into the mix with doubled effects panned to the sides, I knew I was in for a treat. The song transitioned to an ending with a fantastic piano, played to mimic the gentle guitar intro... and it sounded pristine and transparent.
"Start of Something Beautiful"
is a good bass, drums and vocals tune. It
begins with soft keys reminiscent of the original Star Trek TV synth intro. That similarity dies
quickly once the tightly connected bass-kick pattern enters. While it ends up being a tad busy, I was
able to hear excellent discrete positioning of instruments to precise spots between the RBH CinemaSITE
main speakers. Vocals were exceptionally clean and came across smoothly and without having any
colorization or chestiness added by the Yamaha amplifiers.
CD: Liquid Soul
Liquid Soul
What do you get when you take
acid jazz, add some funk, toss in a DJ for good measure and stir them into a band? You get some pretty
original and enjoyable Liquid Soul music. I was going for pure power and detail here -
and I got
it when my friend Stephan lent me his Liquid Soul CD to listen to. I wanted something I could crank
that had dynamics, detail and a lot of varied material -
and this fit the bill perfectly. The
first real track opens with some biting horns, a driving drum beat, percussion and even some scratching
thrown in for good measure. Needless to say I got what I was after. The mix was deep and well
layered.
Track 3 "Schizophrenia" is full of well-mic'ed brass that has a beautiful decay that extends and fades into a very wide listening field well beyond the left and right speakers of Reference System 2. I noticed no intrusive compression, even on the top of the powerful compound trumpet and sax solo occurring midway through the track. It always confuses me why mixing engineers (or producers) feel the need to add back in the pops and noise associated with vinyl, but I suppose they have as much a right to nostalgic creativity as anyone. Track 4 "Equinox" was again laced with nicely reverberant saxophone and trumpet. Guitars were set back and left within the mix and drums were even more subdued, were that possible, though the cymbals (or overheads) were mixed almost hard right/left which was surprising at times when they were brought in.
The final track I wanted to evaluate for this review was "Afro Loop" which incorporated a rap vocal with a 70's funk groove on guitar and backing brass. Artificial vinyl noise was again present, but it really just gave me one more detail element to observe. Drums were punchy and mixed tighter, but and interlude allowed for some punctuated trumpet and a walking bass line which sailed through the system to my ears unadulterated. This album features an almost surreal mix of contemporary and retro that will push any system's limits and show off dynamics, detail and timbre.
CD: Marillion
Season's End
This CD features some
incredible tracks. Starting right up with Track 1 "The King of Sunset Town"
I was able to
listen to Steve Hogarth's voice come in, growing in power as the song built up, thinking "There's no real audible compression in his peaks."
In addition, guitars and
keys showed lots of detail and avoided becoming crushed into the mix. "Finesse"
was the
term I'd use to describe the gently pervasive decay that manifested itself during the bridge.
"The Uninvited Guest" is a favorite of mine and builds from a simple guitar, drums and vocal intro to a full, encompassing mix during choruses. Drums are panned slightly right and guitars are well separated. Keys take on an almost ethereal sound as they ride nearly on top... overhead of the remaining instrumentation. Strong, clear vocals finish out the song and the Yamaha pushed the RBH Sound SI-6100s to almost uncomfortably loud levels during the final chorus as I cranked the volume looking for the amps to lose control.
"Season's End", the title track, is a song that's really about global warming's effect on the once cold English winters sung as a nostalgic look back through the eyes of a father. The kick is very tight throughout this track and a guitar solo three minutes into it sounded phenomenal throughout the system. Sometimes the low parts and fade outs are the greatest places to hear an amplifier. The finale of this track gets very quiet with cymbal rolls and a subdued passage that serves as a prelude to a "walk-out" section leading to the next track. The RX-V2600 can handle near-silent passages and fades with as much finesse as it does dynamic pieces. There is simply no extraneous noise coming from this receiver.
CD: Trisha Yearwood The Song Remembers When
The title song is
quite possibly one of the most beautiful tracks I've heard. It is also mixed so as to fill the
room of any system with a sufficiently detailed amplifier and loudspeakers. Trisha's vocals
(we're on a first name basis, you know) are anchored dead center along with the snare track.
Drums are panned wide with toms extended almost hard left and right. Listen for the final vocal decay
and fade out and you'll know you have a receiver that is transparent with respect to noise.
"I Don't Fall In Love So Easy" is another track that allows Trisha's strong vocals to push through without compressing. A steel guitar and bass round out the mix; and drums, which as clean and sterile as to sound almost sequenced (they're not), are crisp and precise.
Track 6 "The Nightingale" is a piano/vocal song with some background instrumentation to fill out the mix. It is pure and open, with the lyrics floating through a sea of thick, but not overbearing reverb. The effect, again, is room-filling and sounded as if she was standing 10 feet in front of me on a stage singing in a reverberant night club.
"If I Ain't Got You" is a fun honky-tonk song that shows off piano, fiddle, guitars, and a healthy dose of Trisha doubling her own vocals in the choruses. The stereo image was precise, wide, and authentic - as in "live". This is a great album to have on hand for evaluating using female vocals.
Yamaha RX-V2600 Listening Tests - Movies and Conclusion
For movies I utilized a timbre-matched Aperion Audio loudspeaker system and alternated between various DSP modes (notated in the reviews) to evaluate the system during multi-channel home theater use. Reference System 3 was selected in order to make full use of Yamaha DSP since that room is wired with Presence channels in the proper location.
DVD: Blade Runner The Director's Cut
I wanted to play
something I hadn't utilized in a while, but that provided a full and ambient surround track. I
popped in
Blade Runner: The Director's Cut
which seemed to fit the bill very nicely. One of the things I was
interested in was utilizing the Presence channels of Reference System 3
and comparing between straight Dolby Digital. During some of the intro
scenes there were rain environments and shuttle fly-bys. I found that
engaging the Movie Theater modes (in this case I alternated between
General and Sci-Fi) did create a much larger (taller, really) sound
stage, filling in more of the surrounds and giving a greater sense of
depth to the movie. It also decreased the relative center channel
dialogue level and clarity, though I was still able to hear the
dialogue just fine. You can also go into the GUI system menu and adjust
the sound field parameters in order to restore additional vocal
clarity.
Layering Dolby Digital Pro Logic II over the Dolby Digital 5.1 track was interesting in that it gave a somewhat deeper soundstage though I think that this was somewhat artificial and you may want to reserve this for achieving 7.1 from 5.1 sources using Dolby Pro Logic IIx. The bottom line, after working through all of these modes and trying them out on various effects-laden scenes, is that the Presence speakers really add a lot if you're using 5.1. On this movie in particular it was a nice trick.
Editorial NoteJust like its predecessor, the Yamaha RX-V2600 allows you to select either Presence channels or Back Surround channels, not both. Even if you have an external amp, there is no facility for providing preamp outputs to both Presence and Back Surrounds at the same time. It would be good thing for Yamaha to consider allowing for both (even if one set is not amplified) in future models.
DVD: Star Wars: Clone Wars Volume I
Wanting to test out the Yamaha DSP
further, I took out
Star Wars: Clone Wars Volume I
which is mastered in Dolby Digital 2.0 Surround, and features very
little in the surround channels. This is a great DVD with which to test
DSP as it doesn't possess a discrete Dolby Digital (native) 5.1
soundtrack. With this DVD a key element was getting information into
the surrounds to create a more enveloping environment.
I tried a couple of methods. First, I engaged a movie mode (Sci-Fi) which did enhance the soundstage, but did little to bolster the surrounds. Engaging Dolby Pro Logic II fixed the issue with adding more depth to the listening experience as the surrounds now held a considerable amount of the music score. This was great, but I wanted a bit more. Turning on the 'Enhanced' mode while in Dolby Pro Logic II did the trick. This activated the Presence channels along with some intelligent DSP and resulted in a full soundstage with both vertical expansion and great depth. The Yamaha RX-V2600 offers so much useful DSP that it really gives you the flexibility to enhance the listening experience in a practical and real way - not just muddy the track with reverb and phase effects as some products we've encountered. I feel as if I can truly recommend Yamaha DSP given that it is used appropriately. For example, if you have a high end system with ample midrange and high frequency clarity (perhaps a truncated line array or other high performance system) you will likely find that the DSP doesn't offer nearly as much of a difference. However, with smaller loudspeakers and channel-limited source material it can work wonders.
DVD: Band of Brothers
OK,
we chatted up DSP. Now I just wanted to listen to some good quality
5.1. I selected disc three's episode "Bastogne"
and chose the DTS 51 soundtrack. During the course of this episode
there were incoming mortars that literally flew overhead and landed
throughout the entire listening room. This is possibly the best film I
have ever encountered in terms of the use of surrounds. If you close
your eyes you can localize everything from Jeep-bys, to off-screen
dialogue, to fire and ricochet effects.
There is a scene where the 101st makes contact with the enemy soldiers and have a man down. Wood chips and spent casings leap with the utmost detail from the front speakers and the echoes and distant gunfire provide the realistic forest depth through the surrounds.
At one point the rounds really started to drop and the Germans tried to cross the line into the defended territory. Bullets ripped from front to back or left to right depending upon the shot, sending flying pieces of bark from trees and resulting in a terrifyingly real war scene to rival anything that has come out of Hollywood. Back in the town of Bastogne, the incoming bombs drop all around and explosions, flame, and falling brick littered Reference System 3. The sounds in this episode (and really the whole series) are so lifelike it was simply amazing to close my eyes and take it all in.
Conclusions and Overall Perceptions
The Yamaha RX-V2600 is a paramount achievement in terms of the receiver market. Receivers are finally starting to pay almost as much attention to the second half of "audio-video" as they previously did to the first half. As video becomes as integral in receivers as audio, look for a wide gap to emerge between manufacturers. There will be those who can advance their products' technology, and those who will likely take the stance of saying it's not all that important. The upconversion, deinterlacing and video scaling features that come through in this receiver are truly useful with few limitations. This is the first receiver we've seen that truly takes anything in (save 1080p) and gives you a one-cable solution to a display. For those with a single cable running to a wall-mounted plasma or LCD flat panel this might just be the most intelligent purchase you could make this year.
The Score Card
The scoring below is based on each piece of equipment doing the duty it is designed for. The numbers are weighed heavily with respect to the individual cost of each unit, thus giving a rating roughly equal to:
Performance × Price Factor/Value = Rating
Audioholics.com note: The ratings indicated below are based on subjective listening and objective testing of the product in question. The rating scale is based on performance/value ratio. If you notice better performing products in future reviews that have lower numbers in certain areas, be aware that the value factor is most likely the culprit. Other Audioholics reviewers may rate products solely based on performance, and each reviewer has his/her own system for ratings.
Audioholics Rating Scale
 — Excellent
- — Very Good
- — Good
- — Fair
- — Poor
| Metric | Rating |
|---|---|
| Frequency Response Linearity | |
| SNR | |
| Output Impedance | |
| Measured Power (8-ohms) | |
| Measured Power (4-ohms) | |
| Multi-channel Audio Performance | |
| Two-channel Audio Performance | |
| Build Quality | |
| Fit and Finish | |
| Ergonomics & Usability | |
| Ease of Setup | |
| Features | |
| Remote Control | |
| Performance | |
| Value |
Clint Deboer was terminated from Audioholics for misconduct on April 4th, 2014. He no longer represents Audioholics in any fashion.
View full profile