
Yamaha neoHD YMC-700 Media Controller Review
Yamaha neoHD YMC-700
- Product Name: neoHD YMC-700
- Manufacturer: Yamaha
- Performance Rating:


- Value Rating:
- Review Date: December 17, 2009 03:35
- MSRP: $ 799.95
-
Channels 5.1
-
Decoding: Dolby TrueHD, DTS, Dolby ProLogic II
-
DSP Programs 5
-
Adaptive DRC
-
Air Surround Xtreme
-
Compressed Music Enhancer
-
HDMI Auto Lip Sync
-
Analog Video to HDMI Upconversion
-
HDMI Pass-through
-
Deep Color 30 / 36 Bit
-
x v Color
-
YPAO (w/Optimizer Microphone)
-
On-Screen Display (GUI w/ HDMI Overlay)
-
Simplified Main Remote Control Unit
-
Main unit cablable of Learning IR Commands
-
Firmware Upgradeable (via Network or USB)
-
Wireless Capability (802.11b/g)
-
Ethernet Connection (10/100)
-
1080p Compatible HDMI (In/Out) -3 / 1
-
Component Video Inputs 2
-
Composite Video Inputs 1
-
Digital Inputs (O: Optical, C: Coaxial) - O: 1, C: 1
-
Analog Audio Inputs 1
-
Remote Control IR Ports (In/Out) - 1 / 3
-
Speaker Terminals 5 Ch
-
Dimensions (W x H x D) 11-3/4" x 3-5/8" x 13-1/8"
-
Product Weight 7.9 lbs
Pros
- Easy to use
- Universal remote features intuitive
- Wireless streaming easy to set up and very stable
- A great value for all the functionality
Cons
- Setup a bit more math intensive than it should be
- No renaming function for learned controls
- DSP modes someone locked in
- Remote small and not backlit
- Requires additional purchase for iPod integration
Yamaha neoHD YMC-700 Introduction
If you've caught a recent episode of the AV Rant podcast, you've probably heard me mention the Yamaha neoHD YMC-700 Media Controller. Even before I got a unit in for review, I couldn't help but be intrigued by the premise. Essentially, Yamaha is attempting to take a Home Theater in a Box receiver, a streaming media device, and a universal remote system, and shove them all in the same package. Sounds great to me, a knowledgeable enthusiast, but in order to convince the uninitiated it has to work as good as it sounds.
Yamaha neoHD YMC-700 Build Quality
The neoHD YMC-700 Media Controller arrived in a small well-marked box with adequate foam protection. It arrived in good order with all the accessories you'll need, including the YPAO setup mic, the wireless antenna, a radio antenna, a set of IR flashers, a small remote, and the YMC-700 unit. Right off the bat, I was impressed that the YMC-700 had a detachable power cord. While this may seem like a minor thing, you only have to have one "can't quite reach the outlet" moment to realize that the simple addition of a removable power cord that can be exchanged to realize the importance of this feature.


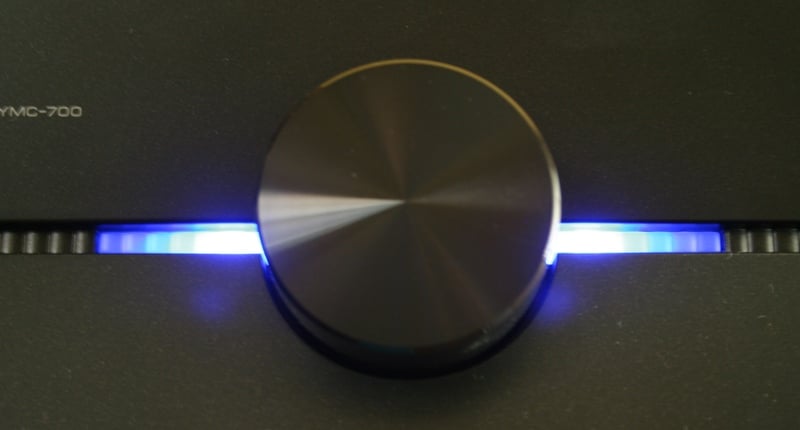
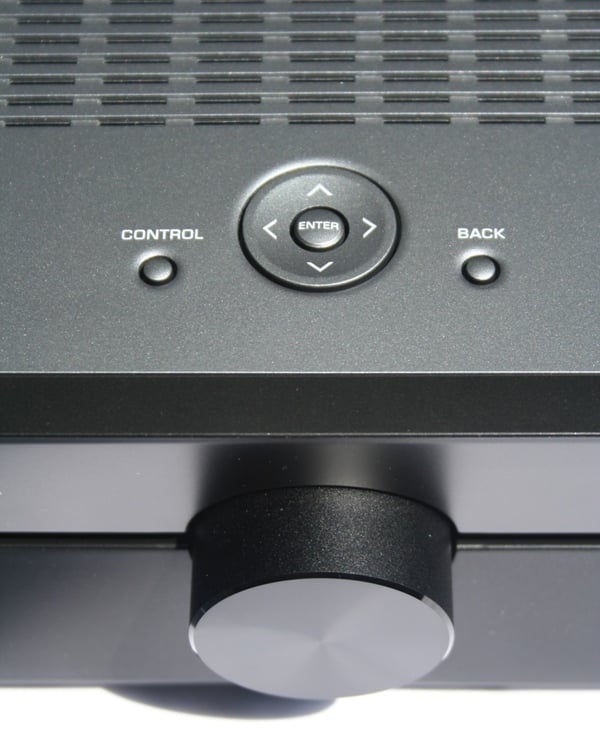
The YMC-700 unit in for review was a black box (there is also a silver version) with slightly indented midpoint in the walls and front. This gives the unit a sort of black window look. There is a large volume knob in the center of the front along with a power button on the bottom left. Around the left side is the port for the YPAO mic. On the top are vents and a few control buttons. When the unit is powered up, blue lights are illuminated near the volume knob. Noticeably absent is any sort of display on the front. If it weren't for the light, you wouldn't know it was on.

On the back you have a very full array of connections and ports including three HDMI inputs. While many receivers will provide more, the YMC-700 does so much on its own that the lower number is well justified. There are two component video, one composite video, and one of each type of digital audio inputs and a single pair of RCA stereo audio inputs. Yamaha has included their docking port for some of their peripherals including the iPod and Bluetooth docs, a LAN connection, a wireless antenna connection, and a terrestrial radio connection. There is also a USB port on the back for streaming media or performing firmware updates. We're not a fan of placing this port on the back as it would get a lot more use on the front or maybe on the side. The only outputs on the back of the YMC-700 are for the IR flashers, and HDMI for video, an RCA output for a sub, and five pairs of speaker outputs. Speaker connections are of my least favorite pull back spring type and are very close together. You'll really need smallish wires for these and preferably dainty fingers. Since you can only get video output via HDMI, you're going to need a newer TV or and HDMI to component video converter.

Overall, the unit feels and looks very solid. The remote is small which is surely by design. The whole idea of the unit is that it is compact and easy to use so a small remote fits into that. Unfortunately, it is so small that it practically begs to be lost in a couch. Add to that the fact that it is not backlit, and you've got a recipe for disaster. If Yamaha really wanted to make this unit totally user friendly, they would have backlit the remote so that you could use it easily during a movie and maybe have even put some sort of audible alarm on it that you could activate from the receiver. Now THAT would be innovative!
Yamaha neoHD YMC-700 Setup and Use
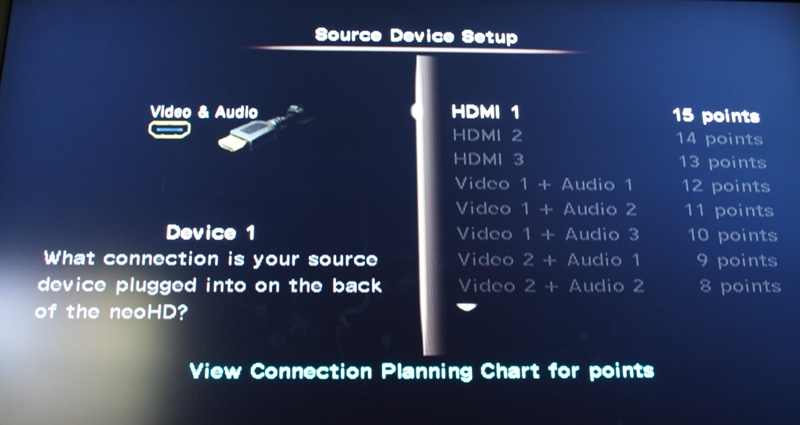
 The first thing you're going to want to do is to start plugging things in - resist that urge. Instead, there is a large piece of paper on the top of the unit when you open the box that says "READ ME FIRST." Generally, I'd say you can skip such nonsense, but in this case you should not. The YMC-700 may be designed to be very user friendly, it is NOT setup friendly. On that large piece of paper there is a setup grid where you list the device name, brand, model number, and connection configuration. This grid will then let you know what number is assigned to that device. Intuitive? Not really. If you are an engineer or mathematician it makes perfect sense but to the rest of us, it's a little silly and an extra step that we could have avoided. But, once you have it filled out, you won't ever have to do it again.
Next, you'll need to make sure you have the wireless antenna, the terrestrial antenna, and the IR flashers connected. The IR flashers are connected to the back of the unit with the emitters stuck to the IR receivers on each piece of gear that will be controlled. Each flasher cable has 2 ends on it so you can connect up to 6 devices to the 3 IR outputs. There is also an IR input that can be used to integrate the YMC-700 into an existing universal remote system but that seems like you are testing the AV gods who might punish you by opening up a black hole in your home theater or transforming all your subwoofers into bass modules. To find where to place the IR flashers on your equipment, take a flashlight and shine it onto the fact of the device. You should be able to see past the frosted glass to view the IR receiver inside. You can usually remove and replace the flashers a few times before they lose their stickiness but try to get it right the first time.
Once you get everything hooked up and turned on, turn on the YMC-700. You'll be taken through the initial setup immediately. You'll notice that the menu system is really quite Spartan and utilitarian at this stage - certainly doesn’t have the "wow" factor you may have been expecting. Hold on kids, that's coming. First you'll be asked if you'd like to have the Yamaha YMC-700 set up your speakers. For this you'll need to plug in the mic to the side of the unit and put it near ear height of the prime listening position. This we set up in a bedroom so I placed the mic on a small stand right about where I'd be sitting in my bed while watching a movie. The YPAO is really only calibrating the speakers and sub, so don't expect any real room correction during this process. If you've experienced an auto calibration system before, it's full of chirps and strange sounds. Rest assured, the YPAO is sufficiently sophisticated so that it will adequately level match and set the crossover of your speakers (though double checking is never a bad idea – especially the distance/delay settings). With the review set of Boston SoundWare XS speakers, the auto settings were spot on.
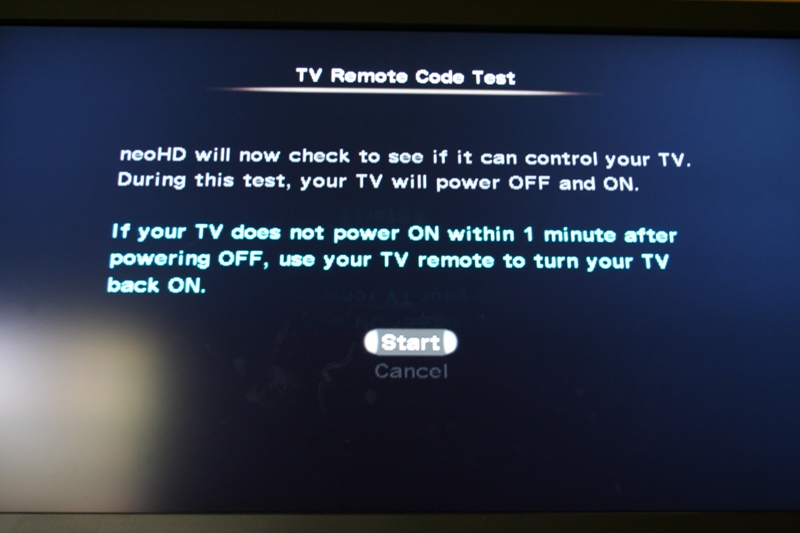

Next, you'll need to configure the YMC-700 to control/identify all your other devices. Basically, you want the YMC-700 to control everything it can. To do this, it needs to be connected by the IR flashers. If it isn't, all you can do is let the YMC-700 know what it is (type) and what it can do (play music, movies, both, etc). First, though, you'll be configuring the TV. If you let the YMC-700 control the TV, it will turn the set on and off. What I was not able to do was get into the menu system of the TV to calibrate it with the YMC-700 remote. While this may, in the long run, be a good thing as it doesn't allow access to your calibration settings to users, it requires you to grab the remote for the display to make any fine tuning adjustments.
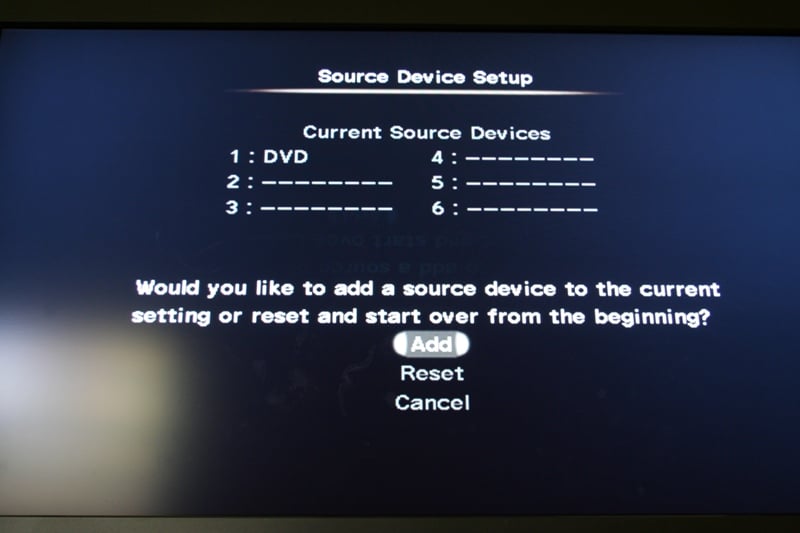
For the rest of your gear you'll need to follow the grid in order to tell the YMC-700 what everything is and where it is plugged in. Each time it will ask you if you want the YMC-700 to control it. If you have the IR flasher attached, you'll want to say yes. Each time you indicate you want the YMC-700 to control a device (source or display), you'll be asked what type of device it is (for sources) and to identify the make. I had an Oppo DV-970HD Universal player and a Westinghouse LVM-42w2 LCD display. In both cases, the Yamaha YMC-700 would give me different IR options labeled Oppo1 or Westinghouse 2. There was no way of knowing what was right. Then, for the display, the YMC-700 would attempt to turn the TV off and then on again (which took forever for some reason) or for the DVD player it would let me try to use the menu to control the player. It would then ask me if it had the right control configuration or not.

While I wished it had more information on the setup screen as far as which remote configuration went with which model numbers, the fact is that once you have completed the setup, you are in for a real treat. Now, you can pretty much put away all your old remotes and use only the YMC-700s. Again, I wish it wasn't as easy to lose or was backlit but that's already been discussed. Once you've played with it for a bit, it becomes really intuitive. There are a grand total of 20 buttons on the remote - Power, TV Power, four directional buttons, Guide, Menu, Prev., Exit, Control, Back, Channel up and down, Volume up and down, Page up and down, Mute, and Enter. These buttons all take on different contexts depending on what screen you are on. The fact is that the volume buttons, the directional buttons, Enter, Control, and Back will probably be the most used.
Use
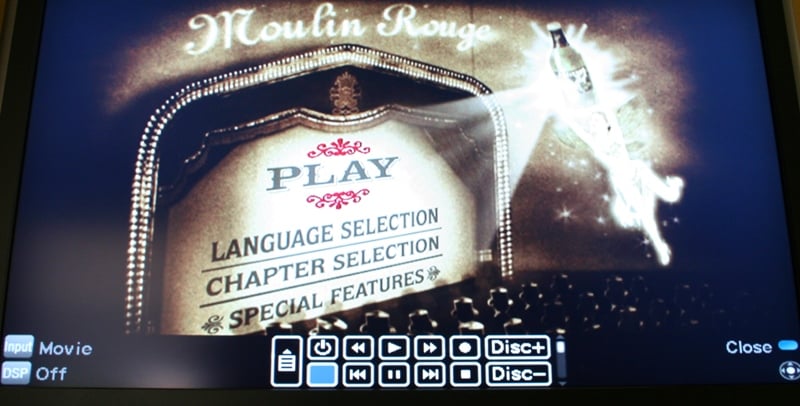
 Pressing Control gets you into the specific controls of each device. So if you are watching a movie on a DVD player, Control will pop up a menu that will give you access to Play, Stop, Pause, etc. Basically, anything that isn't already on the remote. Buttons on the remote switch function to fit the source so Channel up and down becomes Skip forward and back, Menu becomes the setup menu for the player while Guide sends you to the main menu of the DVD. All this is easily grasped and remembered because of the low number of buttons on the remote. Use it once or twice and it all starts to make sense.
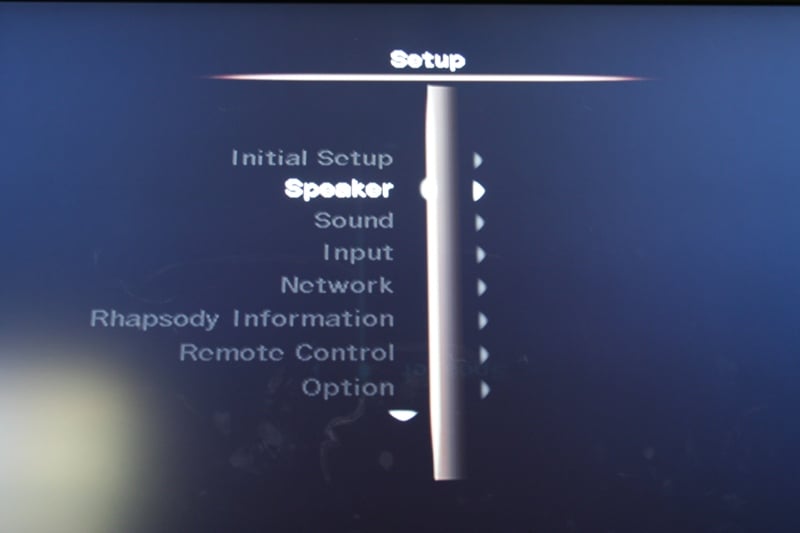
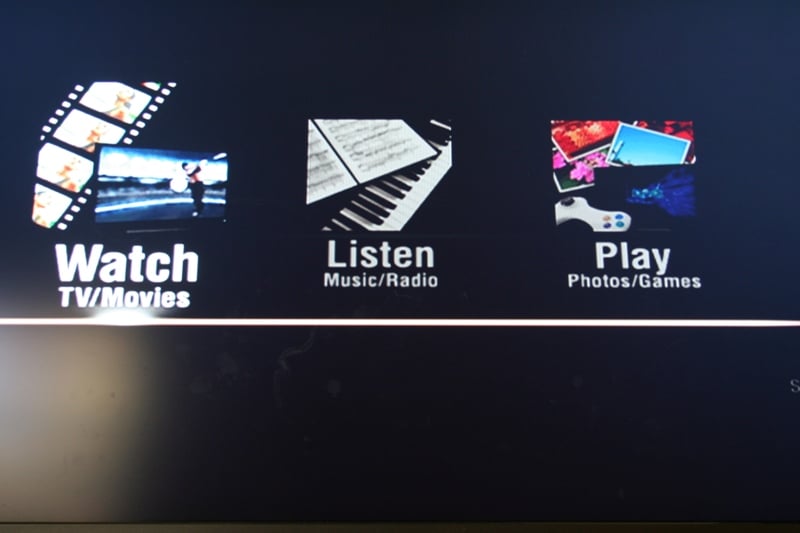
This is really the heart and the soul of the Yamaha YMC-700 Media Controller. Once you get past the setup, it all becomes intuitive. With the wireless (or wired) connection, you can access the Internet for Internet radio and podcasts, if you have a PC with Windows Media Player 11 you can access your content, and if you have a Rhapsody account, you can access that as well. The whole thing becomes very intuitive with very little you can do wrong to "mess it up." Heck, getting to the setup menu is probably one of the harder things to do (it's on the topmost menu in small print on the bottom right. You practically have to know it is there).
I really enjoyed using the YMC-700 once it was set up. The wireless streaming was spot on and you could even check your signal strength from the menu. Analogue performance was adequate for what it was (don't try powering 4-ohm speakers with this unit). The menu system was easy to use and understand even for the neophyte. One of my favorite things was that if you hit the Control or Back button and ended up on one of the main menus, the movie/music didn't stop playing. You needed to select something different in order to change it. This is nice when you're looking for a different station but in the off chance that you are on an annoying station, it can be a bit grating. But overall, I think it is a plus. The remote is simply a joy to use and the interface is really intuitive. I don't think you'll have much of a problem getting anyone, no matter how technologically phobic they are, up to speed on the YMC-700. And isn't that the whole point?

Yamaha neoHD YMC-700 Challenges and Conclusion
All that being said, there are some problem areas with the YMC-700. Something to consider is that every command you press on the remote is transmitted to every device via the IR flashers. While mostly this won't matter, if you have one of those rare devices where an IR code overlaps, you're going to have a problem. The second issue I had was with learned commands. While the YMC-700 is firmware upgradable via USB or over WiFi, there is always the possibility that you'll come across a device that has a button that is not mapped or not working correctly. Of course, you can have the YMC-700 learn that code which can be mapped to one of the physical buttons or a virtual one on the popup menu. Now here is where we run into some confusion. The virtual buttons are only labeled L1, L2, etc. and can't be renamed. Since the physical buttons are very limited in number, I imagine that many times you'd like to use the virtual ones. But without a renaming facility, it really makes it hard for anyone other than the person who programmed it to use the learned function. Other than renaming, I'd love to see a way of reordering the virtual menu as well. While the ordering isn't terrible, I'm betting that users would really appreciate being able to tailor it to their specific usage profiles.
There were, as you'd expect, a number of DSP modes that were specific to each type of source. Unfortunately there really wasn't any way to defeat some of the modes. For example, if I put a CD in my DVD player and selected "Watch Movie" I got surround sound no matter what. Back out to the main menu and select "Listen to CD" (which pulls from the same DVD player) and I get stereo. Not sure what DSP they are using on the Movie mode but there is no way to get non-surround in that mode.
While I can certainly understand why Yamaha included the docking port on the YMC-700, it seems that they have become very attached to the iPod dock being sold separately. With a product that is designed to be a Media Controller, the extra purchase of an iPod dock seems counterintuitive. Instead, either Yamaha should have gave the YMC-700 the ability to access iPod information through the USB port (which really should be on the side or front) or include the dock with the YMC series receivers.
Lastly I want to address the inevitable "why don't I just buy a cheap receiver and a universal remote and use my iPod." Yeah, why don't you? But the target audience of this device isn't going to. They aren't going to try to figure out the universal remote. They want something a little cooler than an iPod on a tether - they want wireless and they aren't going to try to integrate a streaming device like the Squeezebox Duet. While the onscreen virtual control menu may be very retro-80's LCD chic and a bit clunky, it is way cooler than your bargain basement universal remotes. Frankly, for all that the YMC-700 does (wireless streaming, universal remote, receiver) you really are getting a lot of bang for your buck. The higher-end user wants more amp power and more control over their system, but they are also willing to pay for it. While you can surely put together a system that does everything the YMC-700 can do for the same price (or perhaps less), I doubt it would be as user-friendly and elegant as the YMC-700.
Conclusion
 Let's be honest, the Yamaha YMC-700 Wireless Media Controller is probably the coolest new receiver-like device to hit the market in years. While this may not be the receiver you've been waiting for, it is probably the one that you'd love to get your parents for Christmas. What I'd really like to see is an improvement on the universal remote functions including refining the virtual menu and having these functions trickle up to the higher-end Yamaha offerings. Should companies like Harmony and Universal Remote start sweating? Not yet. But if Yamaha does start to integrate media controller functions into their other offerings, companies like Denon and Pioneer won't be far behind. And then, they should start sweating.
Yamaha neoHD YMC-700 Wireless Media Controller
Yamaha Electronics Corporation, USA
6660 Orangethorpe Avenue
Buena Park, CA 90620
(714) 522-9105
www.yamaha.com
About Yamaha
Yamaha Electronics Corporation (YEC), USA, based in Buena Park, California, is a wholly owned subsidiary of Yamaha Corporation of America. YEC offers industry-leading home theater components and systems, featuring A/V receivers, amplifiers, DVD/CD players, speakers, mini-systems, home-theater-in-a-box (HTiB) pre-matched systems and the company's exclusive Digital Sound Projectors (single component surround sound solutions), as well as A/V & IT convergence products.
The Score Card
The scoring below is based on each piece of equipment doing the duty it is designed for. The numbers are weighed heavily with respect to the individual cost of each unit, thus giving a rating roughly equal to:
Performance × Price Factor/Value = Rating
Audioholics.com note: The ratings indicated below are based on subjective listening and objective testing of the product in question. The rating scale is based on performance/value ratio. If you notice better performing products in future reviews that have lower numbers in certain areas, be aware that the value factor is most likely the culprit. Other Audioholics reviewers may rate products solely based on performance, and each reviewer has his/her own system for ratings.
Audioholics Rating Scale
 — Excellent
- — Very Good
- — Good
- — Fair
- — Poor
| Metric | Rating |
|---|---|
| Multi-channel Audio Performance | |
| Network Features | |
| Build Quality | |
| Fit and Finish | |
| Ergonomics & Usability | |
| Ease of Setup | |
| Features | |
| Remote Control | |
| Performance | |
| Value |
As Associate Editor at Audioholics, Tom promises to the best of his ability to give each review the same amount of attention, consideration, and thoughtfulness as possible and keep his writings free from undue bias and preconceptions. Any indication, either internally or from another, that bias has entered into his review will be immediately investigated. Substantiation of mistakes or bias will be immediately corrected regardless of personal stake, feelings, or ego.
View full profile