
Sony STR-DA7100ES Receiver Review
Sony STR-DA7100ES receiver
- Product Name: STR-DA7100ES
- Manufacturer: Sony Electronics
- Performance Rating:

- Value Rating:
- Review Date: January 24, 2006 18:00
- MSRP: $ 2000
|
|
Pros
- ‘Phase Audio/Noise’ functions in Setup menu
- Upconversion of all inputs to HDMI
- Nice aesthetics
- Zone 2/3 remote control included
Cons
- Potential HDMI upconversion issues with 480i input
- HDMI switching limited to 1080i
- Unintuitive menu system & remote control
- No on-the-fly channel trims
- Remote lacks some basic features
- Confusing digital assignment of coax/optical inputs
- Only 2 component inputs
Sony STR-DA7100ES Introduction
Sony's ES line of products has a long heritage of being the best the company has to offer. This is the first official review of a Sony ES receiver by Audioholics so we wanted to see how their latest model, the STR-DA7100ES, compared against some of the newest competition within the market. Our focus was on usability, power handling, and features - the trinity of performance and rating criteria that are expected of any new product review.
Aesthetics & Build Quality
 The Sony STR-DA7100ES is a beautiful
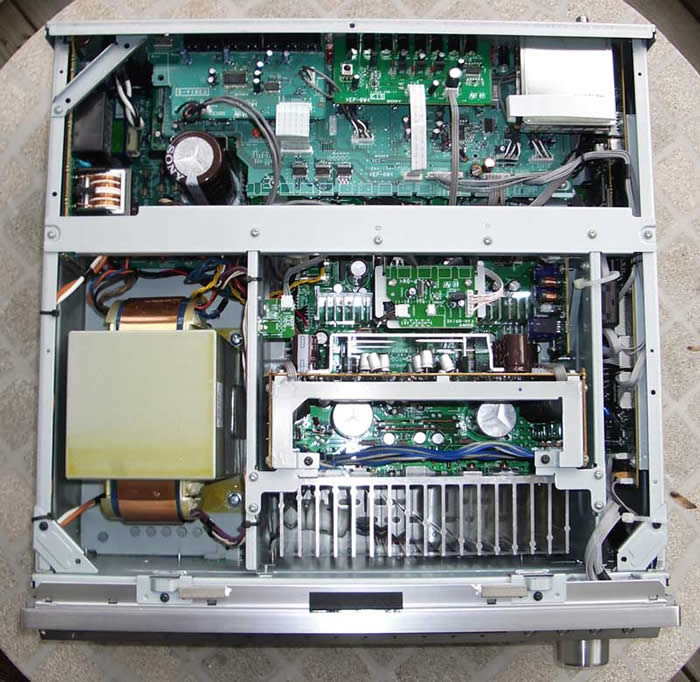
looking receiver in my opinion. This product is as distinctive as it is sturdy looking. We popped the
hood and quickly located the massive transformer which takes up about one-fifth the entire volume of
the chassis. A single 10,000 microfarad 100V filter capacitor is all you can see from the top, but 14
hidden caps underneath combined with 4 MOSFET transistors per channel makes sure that this digital
amplifier has plenty of power where it's needed.
The Sony STR-DA7100ES is a beautiful
looking receiver in my opinion. This product is as distinctive as it is sturdy looking. We popped the
hood and quickly located the massive transformer which takes up about one-fifth the entire volume of
the chassis. A single 10,000 microfarad 100V filter capacitor is all you can see from the top, but 14
hidden caps underneath combined with 4 MOSFET transistors per channel makes sure that this digital
amplifier has plenty of power where it's needed.
The STR-DA7100ES features an 1/8" thick brushed aluminum faceplate that has a nice retro, aggressive stance. This is probably a result of the polished aluminum accents on the volume and input knobs and a graceful concave shape which appears just below the angularly recessed LCD display and input LEDs gracing the top of the unit.
Sony STR-DA7100ES Technology
For a time, Sony had actually led the industry with the introduction of the STR-DAX000 series receivers. However, it appeared there wasn't a ton of market penetration at that time, though the excitement was certainly there. Perhaps, Sony was slightly more than 15 minutes ahead of their time.
With HDMI and Firewire support, the STR-DA7100ES is certainly on par with the industry's shift towards receivers that truly function as the A/V hub within a multi-zone home theater system. The Sony has 2 HDMI inputs and a single output, allowing users to connect a couple of the newer source devices which sport this high definition-capable output. The future should be fun as manufacturers strive to find middle ground in an industry increasingly going digital. As more and more HDMI inputs are expected, something has got to give (we hope it is the composite inputs). Just as you can buy outboard HDMI/DVI switchers (such as the PureLink HDS-41R I'd like to see a product development migration where we see more included digital inputs and legacy users look to analogue outboard switchers.
Why do I even bring this up? Because the rear of the Sony is "jam-packed and jelly tight" with inputs - most of which I'll never use. Let's take a more in-depth peek at what makes this receiver stand apart in a crowd.
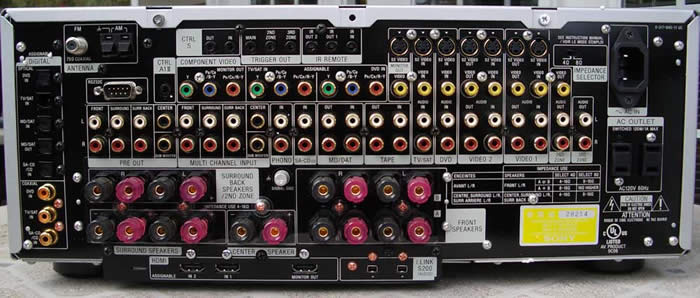
Notables: Only 2 component video inputs, separate amps for surround back speakers, i.Link (IEEE 1394) connections, 5 optical and 3 coax S/PDIF inputs, Surround Back speaker amps re-assignable to Zone 2, IR input and repeater jacks, premium (but still plastic) binding posts, gold plated connections, and support for plenty of DC triggers. The HDMI inputs and output and i.Link connections were awkwardly located below the 5-way binding posts.
Manufacturer's Note: Sony's Take on Their New "anti-resonance" Binding Posts
The engineers of Sony's ES Series try to look at everything that influences the sound quality, however subtle. Their examinations have prompted us to reconstitute the chemical composition of the speaker terminal lugs. We discovered that a resin with reduced fillers and pigments helps suppress resonance, especially when the audio program gets loud. You can actually see the result of this effort on the back panel, where the speaker terminals no longer have their customary bright red and deep black pigment!
Binding post resonance? Hmm, maybe Sony could schedule some of their engineering time working on adding a "revolutionary" new keypad to their remote control. :-)
Sony STR-DA7100ES Features, Setup & Menu System
The Sony STR-DA7100ES is competing against the latest generation of consumer electronics products which incorporate HDMI and IEEE 1394 (Firewire/i.Link) as connectivity options for utilizing the newest products on the market. Here are some of the features of the STR-DA7100ES which seem to stand out:
- Upconversion of all 480i video inputs (composite, s-video, component) to 480p HDMI and/or component (HDMI does not downconvert to component video)
- Video upconversion and processing are defeatable (Note: closed captioning will not work unless video conversion is set to "off")
- HDMI multi-channel audio is supported (DTS, Dolby Digital, DVD-Audio, and LPCM)
-
"9.1" proprietary surround mode support for using additional side surround speakers (wired in parallel on the same amplifiers) Note: There does not appear to any explanation of any associated DSP for use with 9.1 loudspeaker configurations
- i.Link with Dolby Digital, DTS, DVD-Audio, LPCM and DSD support as well as a buffer for reduced jitter.
- 3 User presets for DSP and input settings
There are also several features which are targeted to address the needs of the custom installer:
- 3 Zones with independent source selection (analogue only) and 12VDC trigger settings
- Collapsible Setup menu which hides some advanced setup functions
- "Installer Mode" enables and disables the RS-232C port when the unit is powered down
- Extensive Zone and 12VDC trigger customization (see above)
I'd have to say that overall I was very pleased with the feature set of this receiver. An additional HDMI and component video input would be welcome at this price as would a more compatible IEEE 1394 input (though this will hardly be significant next year as new HDMI 1.3 products are released). I'll also speak a bit about the remote control and Sony's control and menu methodologies later in the review.
Setting Up the STR-DA7100ES Receiver
Setting up the Sony receiver was something new for me. I had set up plenty of entry level Sony receivers before and found them to be particular and organized in an "I'm not from around here" manner that didn't strike me as being all that logical. Sony's ES line seems to have taken this non-standard approach to user menus and functions and made it an art form with much more complexity.
Some will laugh at me, but I actually had to read through the manual to figure out how to bring up the on-screen display. So "set in my ways" was I, that I was intently focused on finding a "Setup" button. Sony's remote calls it "On Screen" which is not at all counterintuitive, except that it appears under a button labeled "Main Menu". Having failed my first Sony test I proceeded into the SPEAKER SET UP menu where I was able to configure what speakers I was using, their size, distance, and whether my surrounds were located at SIDE HIGH/LOW or BEHIND HIGH/LOW positions. I was also able to set the crossover frequency which is adjustable from 40Hz to 200Hz in 10Hz increments. Distance is configurable in 1 foot steps - we like to see at least 0.5 foot increments on higher end/higher cost products.
 Easy
Setup
Easy
Setup
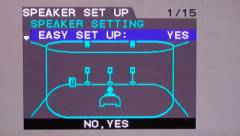
One thing Sony does in their Setup Menu that really struck me as super-convenient was their EASY SET UP sub-menu function. Using the remote control you can simply scroll through a series of visual representations of surround sound speaker configurations from 2.0 all the way to 7.1 setups.
Options include those without center channels and the various surround speaker locations (behind versus side, raised, lowered, etc.)
Setting LEVELS
After configuring your speaker and crossover settings you'll want to proceed with getting the correct levels to the listening position. While we give extra credit to receivers providing automated setup and configuration systems, its absence here wasn't really all that significant. The LEVEL menu features a pink noise test tone which can be set to "Auto" or "Fixed" (which is nice as you can park yourself and get an accurate level reading for one channel at a time.) Here, the non-standard Sony approach to configuration reared its ugly head. There is no "follow what I'm doing" mode, so if you want to adjust the center channel, followed by the surround right channel, you have to scroll all the way back to the top to change the "Fixed" setting from 'Center' to 'Surr R'. (The reason I didn't use left of right as an example is because you adjust levels relative to the main speakers which only have a balance control.) Our preference would be to have "Fixed" automatically jump the test tone to any speaker that is being adjusted. The "Auto" mode puts the tone on the speaker for only 1 second, so it is pretty much useless for calibration purposes.
OK, now the good news. Sony included two features which I think are simply excellent for custom installers in particular. Under the LEVEL menu are two items labeled "Phase Noise" and "Phase Audio". "Phase Noise" allow you to play the pink noise test tone in two adjoining speakers at the same time to double check whether they are in phase. "Phase Audio" goes one step further and allows you to use the 2 front channels - sound for checking phase in this manner. This is helpful in checking whether your surround speakers are in phase with the rest of the system.
SB Decoding/Mode
This simply allows you to predetermine how
your Surround Back speakers will be implemented when a Dolby Digital EX flag is detected (all 6 of them
- lol). Options include Dolby Digital EX, Pro Logic IIx Music, and Pro Logic IIx Movie modes. There are
some caveats regarding 6.1 vs. 7.1 systems (namely 6.1 systems will always play Dolby Digital EX on a
flagged movie by default) but you should be able to get the general idea.
Misc Settings
A/V Sync is provided from 0 -
200ms in
10ms steps.
If you plan to use a 9.1 speaker setup (presumably if you have an extremely long/large room and desire a true surround array) there is an option for indicating this. I am not aware of any particular DSP which results from this setting and your Surround Back speakers must be set to "Dual" for this to become an available option.
"Multi In 5.1 > 7.1" ensures that analogue multi-channel 5.1 sources are made available as 7.1 preamplified signals for use with an external amplifier. This is very handy if you are using analogue inputs for DVD-Audio or SACD.
i.Link can be assigned a video input so that you can use it as a transmission medium with compatible players (Sony only lists the SCD-XA9000ES as being specifically compatible.) We weren't exactly shocked to find that this only potentially works with Sony players.
A Dimmer option allows you to set the front panel gain to 0, 60, or 100 percent brightness. One thing we noticed about the front panel display is that it goes dark after 2 seconds. There does not seem to be a user override for this, nor can you adjust the time for the panel to go black. It was nice to see Sony work to prevent "LED clutter" in the listening room, but it also became quite frustrating when I was looking to get specific information off the display regarding stream info and such. I suspect that under typical use this should end up being a great feature.
A.F.D. 2CH SW
A.F.D. is Sony's acronym for
"Auto
Format Direct". This cryptically-named menu item is similar to a
"Source Direct"
mode, and will take a 2-channel input and apply the crossover to send low frequencies to the subwoofer
(when set to
"Create").
The CUSTOMIZE Menu
This is the
"garbage bagel"
of
settings. Sony took everything else they needed to provide settings for, including some very major
items, and lumped them into a general CUSTOMIZE menu heading. Audio, Video, menu options, analogue and
digital input assignments, and DSP -
all are found here. I, for one, would hope to see, at the
very least, input assignments and video processing pulled out into the main menu in future models. 27
sub-items, most of which are key settings, does not make for a sensible organizational structure. There
are a lot of important items in here so I'll try to cover them as best I can.
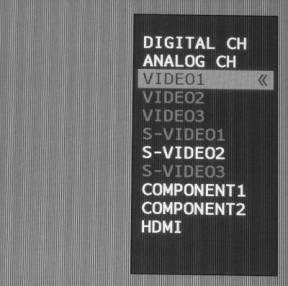
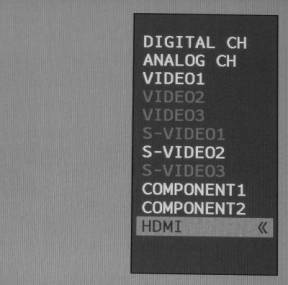
DIGITAL ASSIGN
While the optical and coax inputs are labeled
on the back of the receiver, they can be associated with, or assigned to, one of several video inputs.
It's a tad confusing on several counts, however, as none of the digital inputs are numbered. For
example, I had two DVD players connected at one point and ended up routing
"TV/SAT COAX"
to
"VIDEO 1"
to obtain coax to the Video 1 input for my second player. Your
"available"
inputs are Video 1, Video 2, and Tape in addition to each digital input's
default. A somewhat better system, one I'd love to see Sony implement, would involve simple
numbered inputs with full assignability.
COMPONENT VIDEO ASSIGN
This submenu sets the assignability of
the two available component video inputs. Simply select the input (again labeled as DVD and TV/SAT
instead of simply numbered) and select to which video input you would like it assigned. With only two
inputs this wasn't nearly as odd as the coax and optical audio configuration menu I had just
navigated.
HDMI VIDEO ASSIGN
HDMI Video Assign works in exactly the same
way as Component Video Assign but with numbered, rather than labeled, inputs. You can also set whether
or not the HDMI audio will pass through the receiver to the HDMI-enabled display.
Missing Features
There were some things
we looked for and didn't find. On-the-fly channel trims is a big one. When you are jumping
between SACD, DVD, Dolby Digital and DTS you are simply going to want to be able to make adjustments to
your center channel and subwoofer without having to go into the main Setup menu and permanently alter
your settings. On-the-fly level adjustments are the solution and Sony has yet to implement this in
their ES line. Another feature we look for is input leveling whereby you can adjust the input levels of
all of your sources to avoid volume jumps when going from input the input. It is also nice to have a
feature for limiting maximum volume and setting the default
"turn on"
volume. This is a
great safety feature -
especially with receiver sporting a 170W/channel amplifier!
Sony STR-DA7100ES Setup, Upconversion & Benchmark Tests
The best way to describe how video conversion and the "Progressive Out" settings work is to use a series of charts (kudos to Sony for including a version of these in their user manual):
VIDEO CONVERT: ON PROGRESSIVE OUT: ON
|
Input Signal |
Monitor Out |
||
|
Composite |
S-Video |
Component Video |
|
|
Composite/s-video |
Processing |
Processing |
Processing (480p) |
|
Component video (480i) |
Processing |
Processing |
Processing (480p) |
|
Component video (480p) |
NA |
NA |
NA |
VIDEO CONVERT: ON PROGRESSIVE OUT: OFF
|
Input Signal |
Monitor Out |
||
|
Composite |
S-Video |
Component Video |
|
|
Composite/s-video |
Processing |
Processing |
Processing (480i) |
|
Component video (480i) |
Processing |
Processing |
Pass-through |
|
Component video (480p) |
NA |
NA |
Pass-through |
VIDEO CONVERT: OFF PROGRESSIVE OUT: OFF
|
Input Signal |
Monitor Out |
||
|
Composite |
S-Video |
Component Video |
|
|
Composite |
Pass-through |
NA |
NA |
|
S-video |
NA |
Pass-through |
NA |
|
Component video (480i) |
NA |
NA |
Pass-through |
|
Component video (480p) |
NA |
NA |
Pass-through |
In addition to providing 480p upconversion to all inputs except HDMI, the STR-DA7100ES can also provide basic picture adjustments including Brightness (black level), Color (saturation), and Hue (tint) controls. We really don't recommend using these controls as your display will more than likely offer them in finer adjustment increments.
Video Upconversion & Processing Performance
There are a few objective ways to gauge video processor performance in an AV receiver. One is to compare direct output from a source component to a display with the same output upconverted by the receiver. A second method would be to utilize a third party tool like Silicon Optix' HQV Benchmark DVD and evaluate a 480i input signal which has been upconverted to 480p by the receiver. We did both methods of evaluation using a Denon DVD-5900 which has dual composite and s-video outputs. One set went directly to a Pioneer PDP-42A3HD plasma display, the other set went to the Sony STR-DA7100ES receiver to be upconverted and processed out of the HDMI outputs. Have a look at our findings:
We started with comparisons of composite video to get a worst-case-input, best-possible-output scenario. I desaturated the pictures so it is easier to focus solely on resolution...
Here we see composite video sent directly to the reference Pioneer plasma (left) vs. the Sony STR-DA7100ES'HDMI 480p upconverted and processed output.
While at first glance it appears the Sony has "cleaned up" the picture, what you are seeing is a subtle loss of resolution as the overall image is softened by the upconversion and deinterlacing process. I can't say that it was noticeable on real world moving video, but high resolution test patterns show the net result to be not unlike a gentle half-pixel Gaussian smoothing of the overall picture. On noisy images this may actually serve to improve picture quality.
Again we see s-video signal sent directly to the reference Pioneer plasma (left) vs. the Sony STR-DA7100ES' HDMI 480p upconverted and processed output.
Similar to the composite input, the s-video input is also softened a bit. The original picture detail and scaling artifacts induced by the Pioneer are almost perfectly preserved - just rendered softer than the direct signal
I had consistent problems getting component 480i (non-progressive video) out of the Denon DVD-5900 (our reference DVD player for this review) to show up via the Sony's HDMI outputs. In fact none of the DVD players I had on hand could have their component video outputs (properly configured to output video at 480i) get upconverted by the Sony receiver. This was regardless of the "Progressive Out" setting. There seemed to be an issue with getting the 480i outputs recognized by the video processing circuitry. Switching to any of the other (non-component) inputs resulted in a successful upconversion experience.
Audioholics/HQV Bench Testing Summary of Test Results
Sony STR-DA7100ES Benchmark Score: 53 (room for improvement, but hey, this is a receiver!)
|
Test |
Max
|
Component
|
Component
|
|---|---|---|---|
|
Color Bar |
10 |
5 |
Pass |
|
Jaggies #1 |
5 |
3 |
Pass |
|
Jaggies #2 |
5 |
0 |
Fail |
|
Flag |
10 |
5 |
Pass |
|
Detail |
10 |
10 |
Pass |
|
Noise |
10 |
0 |
Fail |
|
Motion adaptive Noise Reduction |
10 |
0 |
Fail |
|
Film Detail |
10 |
10 |
Pass |
|
Cadence 2:2 Video |
5 |
5 |
Pass |
|
Cadence 2:2:2:4 DV Cam |
5 |
0 |
Fail |
|
Cadence 2:3:3:2 DV Cam |
5 |
0 |
Fail |
|
Cadence 3:2:3:2:2 Vari-speed |
5 |
0 |
Fail |
|
Cadence 5:5 Animation |
5 |
0 |
Fail |
|
Cadence 6:4 Animation |
5 |
0 |
Fail |
|
Cadence 8:7 animation |
5 |
0 |
Fail |
|
Cadence 3:2 24fps film |
5 |
5 |
Pass |
|
Scrolling Horizontal |
10 |
0 |
Fail |
|
Scrolling Rolling |
10 |
10 |
Pass |
Total Points |
130 |
53 |
|
Comments on HQV Testing
The fact that we're even running HQV on a receiver warrants notation. In this changing playing field of A/V components it's getting harder and harder to tell who's doing what. I mean, is it your DVD player, receiver, or display that's scaling that video? With so many redundancies it's getting easier and easier to get lazy and not take the time to see who does the best job at each task. For example, your DVD player may do a better job of deinterlacing than your display, but your display will be able to handle the subtle picture adjustments to tweak your final picture. And do you want to feed it 480i or 1080i? You see? There are lots of choices. With the Sony STR-DA7100ES scoring a 53, it would be my choice to ensure that it is not deinterlacing your video - but at the same time realize that this is a higher score than other receivers I've tested that sport video processing. Send it 480p and disable Progressive Out or pass through 480i and see if your display does a better job. Better yet - test all of your options and then make the call. Sound like a pain? It is - but it's worth it.
Sony STR-DA7100ES Remote Control & Listening Tests
The Sony RM-AAE003 remote control is by far the worst remote control
I
have ever attempted to use. It is embarrassing that it actually ships with this receiver
and is missing even the most basic functions such as a numeric keypad:
Pros
- Easily programmed
- Dedicated TV volume and channel buttons
Cons
- Nonstandard interface that is confusing and awkward
- Limited functions and features
- No numeric keypad
- Bulky
- Missing many standard direct-access buttons
In case my opening statement about this remote was unclear - this is the worst remote control I have ever used in conjunction with a receiver. It is so bad it made me look around inside the Sony box to see if I had the wrong remote control or if some product manager was playing a practical joke on me. The good news? You can buy a nice universal remote control from Logitech, Universal Remote, Philips or another reputable company and you should be all set.
I listed some of the shortcomings of the remote in the Pros/Cons table, but pity stayed my hand from including everything I had to say. There is no numeric keypad. The buttons are not lit. There is no real facility for adding custom controls such as those required to use a complex HD DVR or cable box without relying on the preset available buttons shown on the LCD. In addition, if you are ever controlling a device and select the on-screen display, the remote isn't smart enough to switch over the joystick for use in the menu system - it will still control the source component. To solve this you have to go to the LCD screen and select what the 'CURSOR TYPE' should be controlling. It is this reliance upon the very limited LCD screen (which almost feels like a crutch at times) that makes this remote so awkward to use.
For not having many buttons, the remote is also extremely bulky and heavy. It weighed in at 6.7 ounces loaded, but for some reason (probably its wide stance) felt heavier. What can I say - I love good remotes, but I am equally passionate about those which fail to impress. This is completely 100% subjective and I have learned in the past that the only opinion that counts in the end is the one you have after using the product for yourself.
Listening Tests - Music
Because I'm a glutton for 'setup' punishment, I decided to do some comparisons of the Sony STR-DA7100ES receiver against the new Yamaha RX-V2600 to get a feel for how the Digital Drive amplification in the Sony ES sounded compared to a reasonably powered Class AB receiver. This comparison was not scientific, but purely subjective and my goal was to establish whether or not there was a dramatic or overtly noticeable difference between the two amplifier sections. The methodology included sending toslink coax to the Sony receiver and coax digital to the Yamaha - all from a single source DVD player. Levels were matched beforehand using test signals from the AVIA test DVD. Switching was done manually by altering the speaker cables from one receiver to the other. Let's just say that I will not be submitting these results to AES for peer review.
 DVD-Audio:
R.E.M.
The Best of R.E.M.
DVD-Audio:
R.E.M.
The Best of R.E.M.
I selected
The Best of
R.E.M.
so that I could play back some excellent stereo mixes and really hear what each amplifier
section was doing. First up was
"Man on the Moon". Michael Stipe's vocals were
lifelike, with just a touch of that
"too close to the microphone"
sound that marks many of
R.E.M.'s tracks. I could discern a clean, wide soundstage and the finger noises present on the
acoustical guitar track revealed that the Sony could bring out the most subtle details in any
recording. The decay time on background percussion elements was clean and smooth and I felt the drums
were tight and well represented. When I switched back to the Yamaha I'd love to say that my wife
could hear the difference pulling into the driveway, but then I'd have to work for a different
publication wouldn't I? To be honest I could not put my finger on any specific differences in the
sound and will look forward to doing more scientific ABX comparisons later this year in the Audioholics
Showcase Home.
What this told me was that Sony's Digital amplifiers weren't producing a significant amount of distortion or artifacts in a way that was readily audible in a non-controlled unscientific setting. It certainly didn't affect my enjoyment of the source content or ability to pick out detail and resolution. After playing several more titles and tracks I put away the comparison receiver and focused solely on the Sony.
"E-bow the Letter" contained some tight, low bass and allowed me to have the Sony really push the RBH Sound CinemaSITE system with a full frequency range track. Acoustic guitars were exceptional in their realism. Patti Smith's backing vocals were rich and deep in this track and I really enjoyed the detail and transparency this song afforded me. "Orange Crush", which came next, offered one more opportunity for me to listen for vocal detail and the tightness of electric bass and kick drums. While the instrument performance on this song track had a rather narrow soundstage, the vocals were exceptionally wide and reverb was room-filling from just two channels. The dialogue and effects sequence occurring three quarters of the way into the song was almost mystifying in its 3-D soundstage (in 2-channel mode, mind you). It quite literally came into the room, causing me to visually verify I hadn't somehow enabled Pro Logic II on the receiver.
CD:
Damien Rice
O
This CD has some wonderfully raw
vocals, drums and guitar in some of the nicest two-channel mixes I've heard. Track 1
"delicate"
had Damien's gossamer voice coming through like he was standing in
Reference System 2
with me. Cymbal decays were
smooth, subtle and shimmery while the snare was crisp -
you could easily discern the edges of the
fan brush within the track. The Song didn't appear to miss a lick of detail or ability to control
a pair of speakers like the SI-6100s with control and precision.
Track 2 "Volcano" features a lot of raw guitar, complete with fret and finger noises. The intimate mix with acoustic bass and strings combined with some very tight backing vocal harmonies sounded refined and almost mesmerizing. The round robin style of verse used at the end of the song made for some excellent material with which to gauge the Sony's handling of a very precise mix. The transparency of this amplifier is commendable and the dynamics I heard were both accurate and satisfying. This entire album sounded very lucid and lively and I quickly got lost in the moment, allowing it to almost play through to completion before I remembered I was supposed to be critically evaluating the Sony. Enjoy the music, right? In any case I finally realized that I had to move on and pulled myself away from this disc.
CD: Jack Johnson
Brushfire Fairytales
Track 2 of this album,
"Middle Man"
shows off some smooth, low bass with wide-panned doubled guitars. Later, Adam
Tupol brings in some bongos and the mix gets fuller, but never overbearing (a trait you could ascribe
to almost all tracks on this album). This use of
"stereo"
guitars exhibits a very wide
soundstage that also reveals great depth. Instruments sound controlled, and again reverb such as the
smooth but noisy decay in
"Posters"
have all of their nuances in tact. The STR-DA7100ES was
able to accommodate multiple layers of detail without skipping a beat, such as articulating a cymbal
bell over top of a driving, vocal-rich mix. Additional tracks on this album did much to bolster my
confidence in utilizing the Sony as a clean, powerful amplifier for two-channel music. If you want a
really up close and personal track with intimate male vocals, check out track 6
"Bubble
Toes."
CD: Amos Lee
Amos Lee
This album is a pleasure to listen to -
even more so when you have a nice, articulate system. The Sony kept pace and passed the full
experience from the CD, unmolested, to the RBH Sound speakers in my room. Starting with Track 1
"Keep It Loose, Keep It Tight"
and continuing through the rest of the album Amos'
vocals are raw and authentic. Guitars and bass aren't significantly processed or
"overmixed"
and, in fact, the disc retains some dynamics which I am finding harder and
harder to locate these days. Amos'
vocals were dead center in the mix and up front as if he was
singing from directly between my speakers. Track 4
"Give It Up"
got a bit funkier with the
addition of an organ and a more energetic guitar and vocal style. Even with the additional, and busier,
arrangement I still found the Sony offered a clarity and detail that made the tracks all that much
better.
DVD-Audio: Seal
IV
I wanted to experience some fuller, more compressed
mixes with plenty of low frequency, so I queued up Seal
IV
and settled in for some tunes. The
first track I listened to was
"Waiting for You"
which intros with a bass line and
doesn't let up the entire time. Amidst the rather dense mix I was still permitted to distinguish
individual instruments and detail. Entry level receivers have clipped the top end and resulted in a
more sibilant, less enjoyable rendition of this song in prior listening sessions. Track 10
"Heavenly"
was the second track I listened to find out whether the Sony would do a clean
rendition of vocals amidst a sea of reverb, percussion, and keyboard synth. The results were enjoyable
and I almost became frustrated that I couldn't find a track to trip up the Sony to some audible
degree or another (ok, it was more like I was frustrated that the transparency of the Sony left me
little to write about...)
Listening Tests - Movies
I tossed in several movies through the course of this review and found that the Sony was more than a match for Dolby Digital and DTS theatrical soundtracks. Truthfully, movie reviews are nice to put in a receiver review, but without a focus on DSP (which I'm not prepared to do here) they are a bit difficult to use as gauges of determining product quality - especially after listening to several excellent music discs.
In either case I wanted to give the Sony STR-DA7100ES amplifiers a thorough workout by driving all of its channels at fairly high levels - which is easy to do in Reference System 2's acoustically-treated environment. It didn't seem to have any trouble, as was my initial assumption.
Sony STR-DA7100ES Measurements and Conclusion
Benchmark Measurements and Analysis
We measured the Sony STR-DA7100ES' output impedance vs. frequency at 1W. It stays relatively flat across the bandpass, but does increase dramatically starting around 15Hz and 15kHz. This is a higher than typical output impedance then we are accustomed to seeing, but not surprising given the amplifier topology (a side effect of the LPF of the output stage). Care should be taken however to mate this receiver with a speaker that has a relatively constant impedance profile to avoid frequency response variations or inconsistency in sound.
The damping factor of the receiver was pretty consistent at around 20, dipping down significantly around 50kHz. Again this is lower than typically seen on receivers with linear amps in this price class.
Measuring attenuation versus frequency, we can see the Sony starts to show some gain at just over 20kHz which then drops off as the analog toroidal low pass filters kick in above that point. On the low frequency side we're looking at a really flat response with a gentle roll off below 100Hz (we're talking about 1/4 dB) with a steep fall off below 20Hz.
Wanting to get in a quick power measurement before we had to pack up the unit for Sony, we measured Max unclipped power into 8-ohms and showed that the Sony could easily drive a single channel from 40Hz to 20kHz at around 183 watts (20Hz was showing 162 watts).
At 1Vrms input to the Sony, the output is 2.67Vrms before the receiver limits the output to avoid clipping. This indicated that the Sony STR-DA7100ES' preamplifier outputs can drive most power amplifiers we are aware of to their maximum potential. Max input voltage before clipping was 2.188Vrms at which point Vout at the preamplifier was measured at 5.89V.
All power tests were done with all testing equipment and the receiver plugged into a voltage regulated APC S-15 and S-BATT unit.
Conclusions and Overall Perceptions
Sony is a company with a long and rich history in the electronics market. We were happy to finally take an in-depth look at their new receiver line. It's got plenty of power and enough features to keep most people satisfied. It misses on the finer details like on-the-fly and input level trims, but jumps all over new technologies like HDMI upconversion and video processing. I'd love to see Sony take some additional American input on their user interfaces and remote control design. We also recognize, though, that so often these types of products are integrated into home automation systems (or at the very least incorporated into the functions of a universal remote control) that many of its targeted users may not take much notice in these areas. Overall this is a nice receiver - both in terms of its build quality and looks and well as its ability to satisfy in the performance department.
The Score Card
The scoring below is based on each piece of equipment doing the duty it is designed for. The numbers are weighed heavily with respect to the individual cost of each unit, thus giving a rating roughly equal to:
Performance × Price Factor/Value = Rating
Audioholics.com note: The ratings indicated below are based on subjective listening and objective testing of the product in question. The rating scale is based on performance/value ratio. If you notice better performing products in future reviews that have lower numbers in certain areas, be aware that the value factor is most likely the culprit. Other Audioholics reviewers may rate products solely based on performance, and each reviewer has his/her own system for ratings.
Audioholics Rating Scale
 — Excellent
- — Very Good
- — Good
- — Fair
- — Poor
| Metric | Rating |
|---|---|
| Frequency Response Linearity | |
| SNR | |
| Output Impedance | |
| Measured Power (8-ohms) | |
| Multi-channel Audio Performance | |
| Two-channel Audio Performance | |
| Video Processing | |
| Bass Management | |
| Build Quality | |
| Fit and Finish | |
| Ergonomics & Usability | |
| Ease of Setup | |
| Features | |
| Remote Control | |
| Performance | |
| Value |
Clint Deboer was terminated from Audioholics for misconduct on April 4th, 2014. He no longer represents Audioholics in any fashion.
View full profile