
Yamaha RX-A1010 AVENTAGE 7.1 Channel Networking A/V Receiver Review
- Product Name: RX-A1010 Aventage 7.1 Channel Networking A/V Receiver
- Manufacturer: Yamaha Electronics
- Performance Rating:


- Value Rating:
- Review Date: December 15, 2011 09:00
- MSRP: $ 1099.95
General
Stereo RMS Power (watts) 110wpc
THD in Stereo 0.06 %
Frequency Bandwidth (stereo) 20-20k Hz
Surround Power (watts) 110 x 7
On-Screen Display Yes, Advanced GUI
Multiple Zones 2
HDMI Standby Pass-through Yes
Video Conversion From Composite/S-Video/Component to HDMI
Internet-ready Yes, Ethernet
DLNA Certified Audio
Multibrand Remote Control Yes but not learning
Dimensions (W x H x D) 17-1/8” x 7-1/8” x 16-1/2”
Weight (pounds) 33.3lbs
Warranty 3 Years parts & labor
Surround Processing
Dolby Digital DD, EX, TrueHD, DD+
DTS DTS, ES, HD, HDMA, Neo6, 96/24
Inputs & Outputs
Preamp Outputs 7.2
Phono Input 1
Audio-Video Inputs 8
S-Video Inputs / Outputs 5/1
Component Video Inputs / Outputs 4/1
Optical / Coaxial Digital Inputs 4/3
Optical Digital Outputs 1
HDMI Inputs / Outputs 8/2
Subwoofer Outputs 2
Pros
- Excellent performance for music and movies
- Full Networking functionality for streaming audio
- Slick HDMI control allows you to automatically switch between TV speakers & A/V receiver sound
- Plenty of HDMI inputs and legacy connections
Cons
- Crammed and limited remote control
- Unable to take advantage of front presence & surround back channels simultaneously
Yamaha RX-A1010 Introduction
It’s hard to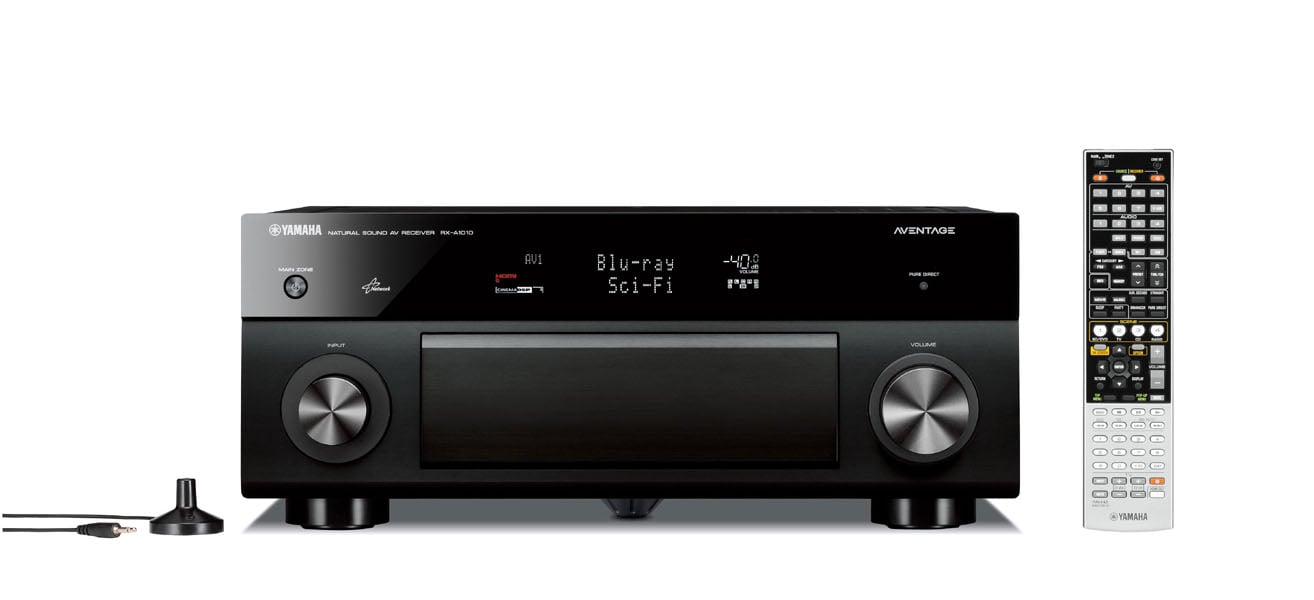 keep up with technology in such a fast paced tech world, but Yamaha doesn’t seem to simply keep up so much as they seem to set trends. Last year, when Yamaha launched their AVENTAGE line of receivers, we knew they meant business. AVENTAGE was designed with the audiophile in mind. Yamaha beefed up the amplifier and analog sections in their entire AVENTAGE line of receivers while still providing a full fledged set of features not found in many of their competitor models. The RX-A1010 represents the middle of their AVENTAGE lineup of A/V receivers. At just under $1,100, the 7.1 channel RX-A1010 has just about every networking feature and streaming service currently available while also supporting all of the latest HD audio and video formats, including full 3D support. Let’s take a tour of this receiver to see why it earns its AVENTAGE badge and see why it’s NOT just a problematic middle child.
Build Quality and Features
I was sitting down to do a tabulated comparison list between the RX-A1000 and RX-A1010 when I realized the feature differences between the two receivers isn’t long enough to tabulate. Basically the RX-A1010 builds upon the already solid foundation the RX-A1000 forged by upping the power to 110wpc x 7 from 105wpc x 7, HDMI CEC scene device control and an upgraded graphical user interface which Yamaha calls “Advanced GUI”. The RX-A1010 also weighs nearly1lb more than the RX-A1000 for those interested in using their new receiver as a curling device.
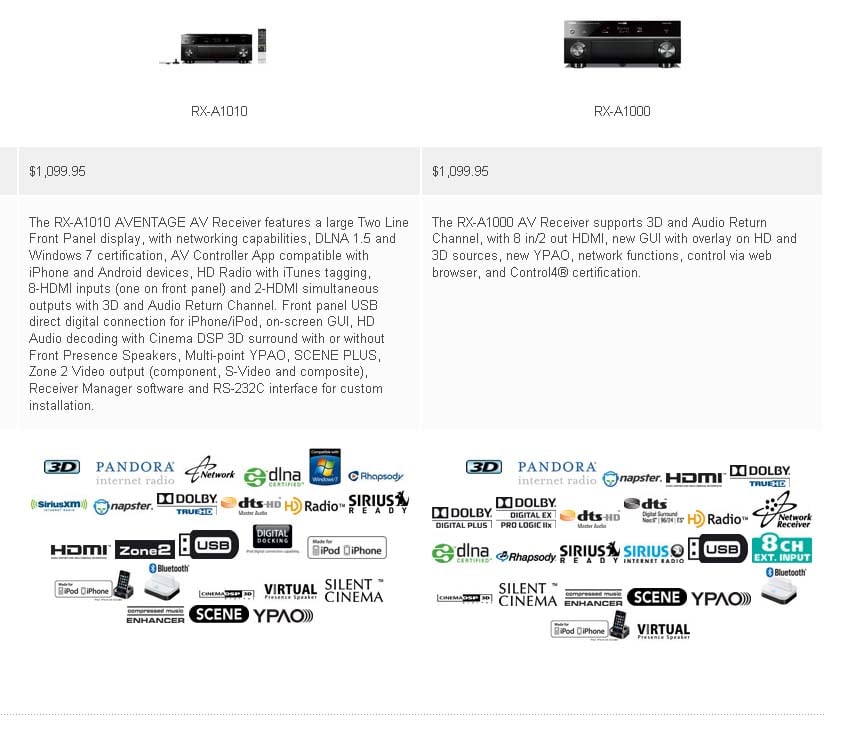
Comparison of Logos of Yamaha RX-A1010 (left pic) to RX-A1000 (right pic)
Yamaha supports every current audio CODEC on the market and most of the major streaming services. If you can connect it, the RX-A1010 will play it and even convert it to 7.1 surround sound or employ a music enhancer mode to increase the perceived fidelity of compressed MP3 audio. I, for one, am tickled pink that this receiver supports Pandora streaming services which I use every day around the house and at the office.
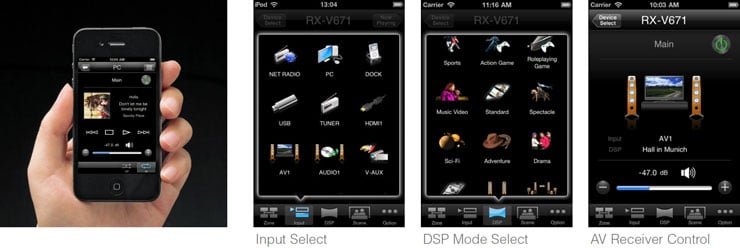
Yamaha has thrown a lot of goodies into the RX-A1010 A/V receiver. We covered many of the similar features in our RX-A3000 review but let’s do a brief recap of RX-A1010 specific ones. For one, you’ve got full control of your RX-A1010 via a FREE downloadable Apple iPhone or Android App. In fact, Yamaha just announced an update to their App ver 2.0 which allows you to stream audio directly from your Smart Phone to the receiver. Want to impress your friends? Just show them how you are controlling your entire home theater system via your smart phone. That is certainly a worthy conversational piece at parties while you are slamming some brews with your buds and switching out the tunes (it's even more impressive if you're standing in the back yard listening to outdoor speakers!) Yamaha’s App gives you a lot more control over your AVENTAGE receiver than it did with its first iteration on the RX-Z7 and the graphical interface is much improved too.
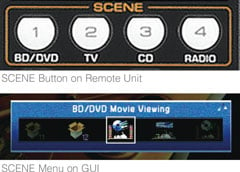
The SCENE PLUS function simplifies operation by providing one touch power-on along with selection of the desired source and the appropriate DSP programs. SCENE PLUS offers a choice of 12 SCENE selections, four of which can be assigned to the second zone in a multi-zone system. SCENE PLUS can be selected from the front panel, remote control, on-screen GUI and even from the AV Controller App for iPhone or Android devices. Your parents or spouse will really appreciate using a feature like this to quickly get a Blu-ray movie running or a TV channel in surround sound without having to flip through a host of remotes and key commands. Take the time to program this as it will pay you back in reduced angst from not too tech savvy loved ones trying to operate your system should you not be home.
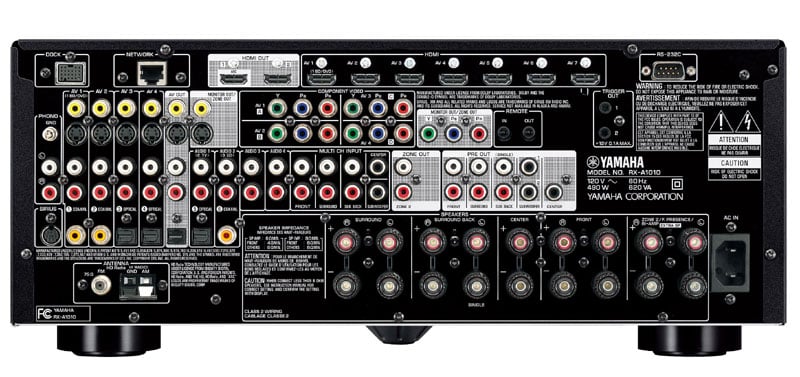
Yamaha RX-A1010 Back Panel View
The RX-A1010 has a lot of goes-intos and goes-outas on the RX-A1010 just like you would expect from a receiver of this caliber. Two HDMI outputs (simultaneous, but not independent) and 8 HDMI inputs ensures you’ve got enough connects for all of your HD devices. The RX-A1010 will upconvert all of your 480i/p digital or analog video signals to 1080p via HDMI which is great for supporting your legacy devices without having to run legacy type cables to your display device. You can connect up to 9 pairs of speakers to the RX-A1010 (seven for the main zone and two for zone 2). The speaker connectors are high quality binding post, no cheesy spring clips here.
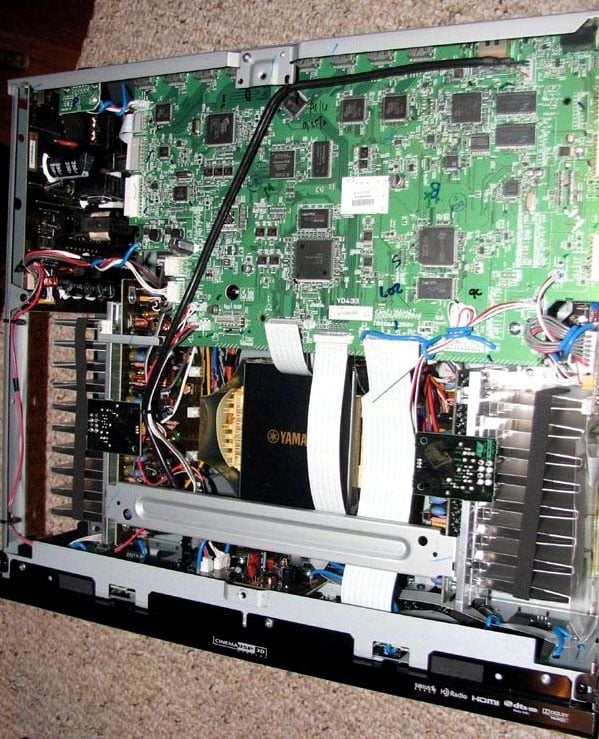
Yamaha RX-A1010 Top View
Yamaha truly lives up to their mantra of "better build quality" with their AVENTAGE lineup of receivers. Pulling the top cover off the RX-A1010 revealed no wasted space and meticulous attention to detail for reducing mechanical vibrations in the product such as felt taped heatsinks, padding for every contact point to the top cover. by the way, what do Quentin Tarantino and Yamaha have in common? Answer: A foot fetish… Anytime I speak to someone at Yamaha about their AVENTAGE line of receivers, they insist on giving me a spiel about the wonders of their 5th foot. I will give them props in the fact that their alleged 5th foot is mounted directly under the centralized E-Core power transformer. At first this appeared to be a marketing gimmick, but there is method to their madness as it's a solid design goal to eliminate mechanical vibrations in a product, especially a transformer that likes to hum.
Unlike prior Yamaha receivers at this price point, which utilizing a single heatsink for their power devices, the RX-A1010 splits this duty off to smaller dual heatsinks mounted on each side of the power transformer in what Yamaha calls a "dual symmetric power amplifier layout". At first glance, these heatsinks appear small but more careful observation reveals extra thick metal plating at the base of the heatsink mounted to a very thick bottom cover to help dissipate heat and increase chassis rigidity. Yamaha also employed brand new thermal control regulated power transistors in this baby to better manage heat.
The power transformer is quite beefy for a receiver of this size. The two power capacitors are each rated at 12,000uF, 71V which are appropriate sized for a receiver of this power and class. Yamaha’s back panel lists 480 watts power consumption which I suspect is based on two channels driven.
It was clear to us that Yamaha proved their masterful craftsmanship with the execution of this compact, well engineered A/V receiver.
HDMI Features Like Never Before!
There 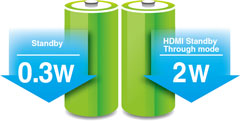 are a lot of HDMI functions that I want to espouse on behalf of the RX-A1010. First off, the receiver can take in anything and output it via HDMI - but we already went into that. Yamaha takes it to the next level by also giving you HDMI Standby which allows your spouse or children to watch TV using the TV speakers without having to power the receiver up. You can even switch HDMI inputs while in standby mode. Previous generation receivers were limited to a preselected input only.
Yamaha ups the ante to the next level by incorporating full HDMI control which automatically switches sound between your TV speakers (when the RX-A1010 is turned off) to your home theater speakers (when the RX-A1010 is turned on). You can even use the remote control from your HDMI compliant TV to control volume level on your RX-A1010! We tested this on a new Samsung LED display and it worked flawlessly. For the first time in my installation history, I was able to install a single cable (HDMI) from the receiver to the TV utilizing just one input on the display to handle all source types (ie. composite, component, HDMI) coming into the A/V receiver without any operational hiccups. Yamaha I thank you for making installations and usability as easy as pie. Neophytes of the world rejoice. You no longer have to go through complicated video switching on your display and A/V receiver if you get this receiver!
Power management and efficiency is another strong point of the new AVENTAGE line. Yamaha makes its receivers eco-friendly with a low standby power consumption of 0.3W (2W in HDMI Standby Through mode). They do this by employing a hybrid power supply which turns off all of the analog circuits when the receiver is powered down and engaged in HDMI Standby. This offers tremendous savings on power and heat dissipation compared to older models. Welcome to the new AV receiver standard. Aside from these great features, the Yamaha RX-A1010 also supports Audio Return Channel (ARC) and the latest audio format support. It also can apply video processing to HDMI signals as well as standard definition sources.
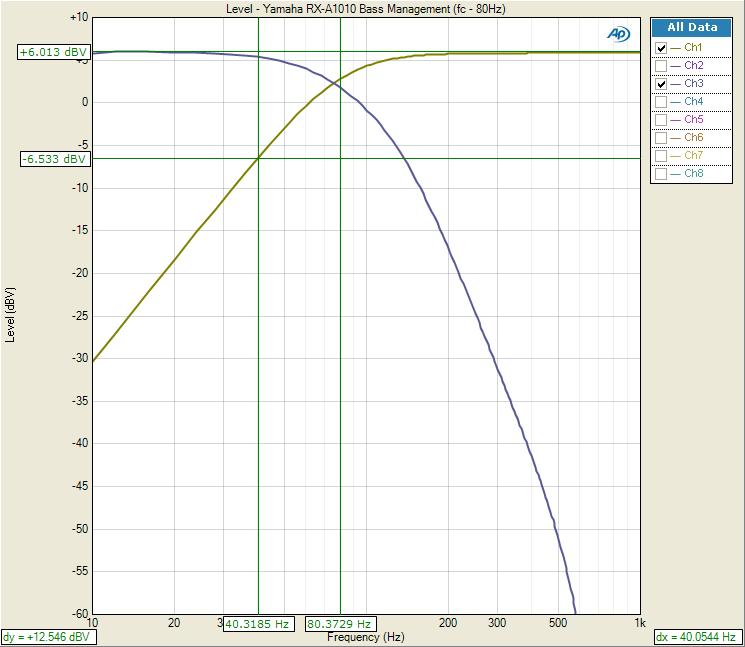
Yamaha RX-A1010 AVENTAGE A/V Receiver Bass Management
Menu System
Most of us like the new GUI Yamaha launched with the first generation AVENTAGE receivers. You can see them in action in our Yamaha RX-A3000 Video Preview. Personally I prefer the GUI of the older RX-Z7 but it may be because that is my reference receiver and I am quite familiar with its operation.
Yamaha has tried to simplify the setup process with their new GUI and most users will certainly appreciate it. Hitting the “On-Screen” button on the remote control takes you to the following options: System, Zone, Audio Signal, Video Signal, HDMI Monitor, Network. Hitting the “Option” button on the remote takes you to DSP setting, Enhancer, DRC, input volume trim, dialogue lift and extended surround”. This split approach is probably better for most users to not overwhelm them with too many options via a centralized GUI screen from a single menu button command like Yamaha used in prior receivers.
An important feature that I initially thought was missing is the “Initial Volume” setting which allows the user to preset a volume level during power up to avoid being blasted off your couch by whomever last cranked up the system to rock concert levels. The feature is located in the “Sound Menu” and I recommend setting it to -30dB as one of the first setup options when configuring your receiver.
Spea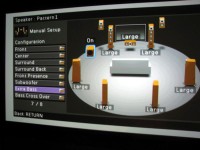 ker Set-Up & Bass Management

This is where you engage the Auto setup using the included multi-point microphone, and also where you configure the speakers with the manual setup function. We’ve covered YPAO to death in the past, so we're not going to waste valuable real estate rehashing that system here. The only thing I felt noting about YPAO was related to their lack of a manual PEQ option for the subwoofer channel on this model. It's an omission I wish Yamaha wouldn't have done because having the ability to EQ the sub channel is arguably the most important and beneficial of any of the speakers in a home theater system.
Like the RX-A3000 previously reviewed, Yamaha gives you a very graphical representation of speaker configurations and sizes via their “advanced” GUI. The on-screen GUI interface literally shows you what your options are, and you can pick and choose how you want to run your speakers though we NEVER recommend a situation where you would want to run the main channels on “small” and other channels on “large”. It makes little sense why this option is even offered and we found using it also affects the slopes of the HPF and LPF of the bass management circuits. In my opinion once the user sets the main channels to “small”, the receiver should automatically default all other channels to “small” too.
Yamaha RX-A1010 Bass Management Response
Using our Audio Precision APx585 8-channel HDMI Audio Analyzer, we confirmed if you set the main channels to “small” and all other channels to” large”, and set the Xover to 80Hz, the LPF -3dB pt is actually 94Hz with a 20dB/Oct rolloff. Only when you set ALL speakers to “small” do you actually get closer to the intended crossover frequency. However, the slope of the LPF is a bit shallow as it should instead be 24dB/Oct like we’ve seen on Yamaha predecessors. The HPF function worked as expected, with the correct -3dB point and 12dB/Oct slope. In practice this likely won’t cause any audible issues but it’s probably a good idea to set all speakers to “small” or only the main channels to “large” to get the most accurate intended bass management response.
Yamaha gives you multiple crossover options between 40Hz to 200Hz but it’s a global crossover affecting all speaker groups instead of independent settings for each speaker group like some of their higher model offerings provision for. I recommend using the 80Hz setting for most installations.
Power Amplifier Assignability
Yamaha really gives you some great assignable amplifier options in the RX-A1010. It doesn’t seem too long ago when we jury-rigged a Denon AVR-3805 into bi-amping the main channels using the two idle amplifiers in a 5.1 installation. This quickly became an Internet sensation resulting in all of the major A/V receiver manufacturers offering it as a standard option on most of their 7.1 A/V receivers shortly thereafter.
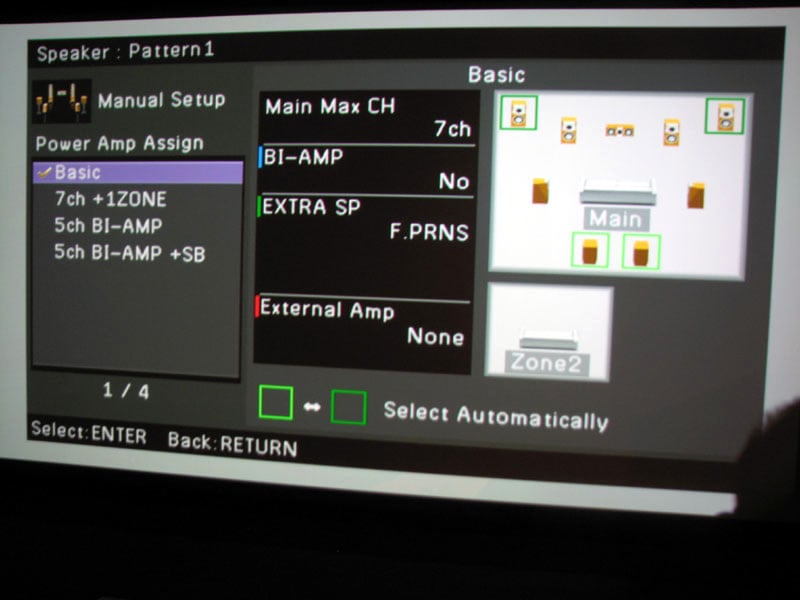
Yamaha RX-A1010 Speaker Assignability Chart
Yamaha makes this really simple by illustrating all of the possible assignable amplifier options in clear diagrams via their GUI interface. The user is offered a basic 5.1 configuration, 7CH + Zone2 which they oddly label as 1Zone, 5CH Bi-amp and 5CH Bi-Amp + SB which allows you to use external amplification for the surround back channels while still bi-amping the front channels.
The Yamaha RX-A1010 isn’t as versatile as some of their higher end models. You cannot use front presence and back surround speakers simultaneously even if you have external amplification. You can however wire up both speaker configurations and the RX-A1010 will automatically switch between the two depending on the DSP mode selected. The Presence speaker terminals can also be configured for Zone 2 or Bi-Amp duties as well.
Yamaha gives you the same precision for setting speaker levels in 0.5dB steps, distances (0.2 ft/.05m increments), and Extra Bass (where the receiver can send full range information to the front speakers and bass from the front speakers to the subwoofer simultaneously). You can also connect two subwoofers, but they are parallel connections and do not have independent level or delay control. This is still handy for installers that don’t have a Y-splitter on hand when doing dual subwoofer installations though.
For more information, read: Home Theater Multiple Subwoofer Set-Up Guide
Remote Control
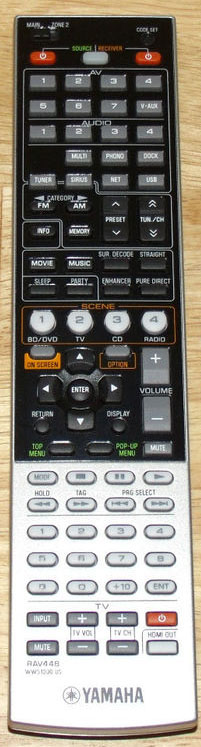 I am a heavy user of the RX-Z7 remote control. I find it very easy to program and navigate between zones, sources, etc. The remote for the RX-A1010 (RAV448) shares many of its virtues but also has some misses. For one, it’s not backlit. The buttons seem more crammed in and I am so NOT a fan of labeling the inputs numerically as opposed to actual names. Who really remembers that their Blu-ray player is on AV #1 input and their Cable box is on AV #2 input? While you can rename the sources on the actual receiver, you obviously cannot do this on the remote so either you need to have a good memory or a cheat sheet on hand. It seems every few year’s manufacturers love to toy with calling labeling the inputs numerically or by name. Everyone I know (myself included) prefer the naming method so I hope Yamaha reverts back for the next generation of this receiver. In all likelihood, most users will purchase a universal remote shortly after setting up their home theater and shelve this one. I don’t blame them and I also don’t want to scold Yamaha too much on this remote given the price of this receiver. I’d rather see them concentrate the bulk of the budget of this receiver on performance and features which, in my opinion, they have done quite nicely.
Yamaha RX-A1010 AVENTAGE A/V Receiver Listening Tests
I took the Yamaha RX-A1010 A/V receiver over to my sister-in-law’s house to test it out with her new EMPtek Speaker line which consists of 2 x E55Ti towers, 1 x E56Ci center, 2 x E55WI wallmount side surrounds, 2 x RBH AC-615 in-wall back surround speakers and 2 x ES1010i subwoofers. All analog and HDMI cables were furnished by Bluejeans Cable. The source device was the Oppo BDP-93 feeding a new 55” Samsung LED display. I was a bit concerned driving all of these speakers on the Yamaha receiver since the front channels and center channel dip down in the 4-ohm region but they are also quite efficient and the towers represent a high impedance at low frequencies which hogs the most amplifier power. The room is roughly 20’ x 25’ and open to a kitchen and den so it’s a rather large and lively space with no passive room treatments other than a throw rug over the tile floor and some heavy couches.
Blu-ray: Steve Wilson – Grace for Drowning
Steve W ilson is mostly known as the lead singer/guitarist of Progressive
Rock/Metal band Porcupine Tree. He has
also been known to collaborate with bands such as Blackfield, and Opeth and
Marillion. His latest solo project
“Grace for Drowning” is his most ambitious effort yet. This album is dedicated to his recently
deceased farther and pays tribute to late 60s early 70s era progressive
rock. It’s the first multi channel
Blu-ray music release of its kind and the sound quality is simply
stunning. Track #1 “Grave for Drowning” starts
off with a beautiful piano medley, the kind rock music used to have in droves
back in the day. It has an almost poppy
showtune kinda feel to it and the EMP speakers did a wonderful job conveying
the realism of the high resolution recording powered by the RX-A1010. Track #2 “Sectarian” has a very King Crimson
feel to it. It starts out acoustic but
goes electric psychedelic quite quickly.
The drum off beats remind me of the stick work of legendary drum man
Bill Bruford. There is a lot going on in
this song instrumentally with tons of dynamics.
The RX-A1010 did commendably well preserving the dynamics and the EMP
speakers simply absorbed its power begging to be played ever louder. The surround envelope effect was excellent
and the background noise was virtually non-existent which really made me
appreciate the contrast between soft and loud.
“Track #3 “Deform to Form a Star” is my favorite track on this entire
album. Wilson pours so much emotion into this song that you feel like you know
him. “Oh once in a while, I learn how to
smile” a memorable excerpt from this
song that had me smiling in sonic bliss listening on the EMP /Yamaha
combo. This entire album is, in my
opinion an instant classic and sonic marvel.
It in a way reboots the music industry giving it back to Audioholics
that crave quality sound and content all wrapped into one neat package with
supportive video. Pop this Blu-ray in
and test the dynamics of your system and reinvent your musical imagination. Yamaha will take you there if you connect a
quality speaker system like the EMP speakers I used during this demo.
ilson is mostly known as the lead singer/guitarist of Progressive
Rock/Metal band Porcupine Tree. He has
also been known to collaborate with bands such as Blackfield, and Opeth and
Marillion. His latest solo project
“Grace for Drowning” is his most ambitious effort yet. This album is dedicated to his recently
deceased farther and pays tribute to late 60s early 70s era progressive
rock. It’s the first multi channel
Blu-ray music release of its kind and the sound quality is simply
stunning. Track #1 “Grave for Drowning” starts
off with a beautiful piano medley, the kind rock music used to have in droves
back in the day. It has an almost poppy
showtune kinda feel to it and the EMP speakers did a wonderful job conveying
the realism of the high resolution recording powered by the RX-A1010. Track #2 “Sectarian” has a very King Crimson
feel to it. It starts out acoustic but
goes electric psychedelic quite quickly.
The drum off beats remind me of the stick work of legendary drum man
Bill Bruford. There is a lot going on in
this song instrumentally with tons of dynamics.
The RX-A1010 did commendably well preserving the dynamics and the EMP
speakers simply absorbed its power begging to be played ever louder. The surround envelope effect was excellent
and the background noise was virtually non-existent which really made me
appreciate the contrast between soft and loud.
“Track #3 “Deform to Form a Star” is my favorite track on this entire
album. Wilson pours so much emotion into this song that you feel like you know
him. “Oh once in a while, I learn how to
smile” a memorable excerpt from this
song that had me smiling in sonic bliss listening on the EMP /Yamaha
combo. This entire album is, in my
opinion an instant classic and sonic marvel.
It in a way reboots the music industry giving it back to Audioholics
that crave quality sound and content all wrapped into one neat package with
supportive video. Pop this Blu-ray in
and test the dynamics of your system and reinvent your musical imagination. Yamaha will take you there if you connect a
quality speaker system like the EMP speakers I used during this demo.
Blu-ray: Transformers III - Dark of the Moon
The acting is sometimes cheesy, the
storyline weak and often unbe lievable, but you gotta love giant metal crunching
robots slugging it peppered with plenty of LFE effects to rattle your spine to
place you in the action. That is just
what the latest Michael Bay Transformers movie did in my experience when
watching it using the Yamaha RX-A1010 and EMP speaker system. Though this setup didn’t quite have the bass
impact and overall slam of my reference system, it did provide a very
satisfying result. Dialogue was always
dynamic and clear thanks to the very potent new E56Ci center channel from
EMP. The Yamaha RX-A1010 never seemed to
sound strained in the vocals even during slug outs between the bots and
cons. The surround channels remained
dead quite until called upon. For fun I
experimented with some of Yamaha’s proprietary DSP modes and felt Movie Theater
Adventure produced the most palatable results after I toned down some of the
parameters such as DSP level, Room size and Liveliness. You will want to experiment here and fine
tune the various parameters to suite your listening tastes and room
conditions. Set the levels too high and
you wind up listening in a simulated acoustical space of a stadium bathroom
rather than a fine concert venue. Any
way you dice it, the Yamaha RX-A1010 was the Allspark of the show providing
plenty of Energon to power the EMP speaker system to reach satisfying listening
levels in a moderately large listening space.
lievable, but you gotta love giant metal crunching
robots slugging it peppered with plenty of LFE effects to rattle your spine to
place you in the action. That is just
what the latest Michael Bay Transformers movie did in my experience when
watching it using the Yamaha RX-A1010 and EMP speaker system. Though this setup didn’t quite have the bass
impact and overall slam of my reference system, it did provide a very
satisfying result. Dialogue was always
dynamic and clear thanks to the very potent new E56Ci center channel from
EMP. The Yamaha RX-A1010 never seemed to
sound strained in the vocals even during slug outs between the bots and
cons. The surround channels remained
dead quite until called upon. For fun I
experimented with some of Yamaha’s proprietary DSP modes and felt Movie Theater
Adventure produced the most palatable results after I toned down some of the
parameters such as DSP level, Room size and Liveliness. You will want to experiment here and fine
tune the various parameters to suite your listening tastes and room
conditions. Set the levels too high and
you wind up listening in a simulated acoustical space of a stadium bathroom
rather than a fine concert venue. Any
way you dice it, the Yamaha RX-A1010 was the Allspark of the show providing
plenty of Energon to power the EMP speaker system to reach satisfying listening
levels in a moderately large listening space.
Yamaha RX-A1010 AVENTAGE A/V Receiver Review Measurements and Analysis
All measurements were conducted using our Audio Precision APx585 8 Channel HDMI Audio Analyzer. The Yamaha RX-A1010 was defaulted to high impedance mode (8-ohms or more) which is the setting we recommend using regardless of your loudspeakers impedance rating if you are concerned about achieving maximum output power and performance from this unit.
See: Setting the A/V Receiver Impedance Switch
For more information about how we measure power amplifiers, please check out:
Basic Amplifier Measurement Techniques
Yamaha RX-A1010 Preamplifier Measurements
I did some quick spot-checking on the RX-A1010 pre-amplifier gain structure to ensure it could be properly drive a wide assortment of power amplifier. My personal criteria for amplifier gain structure is that it should be able to hit full power when driven with 2Vrms. The RX-A1010 was able to deliver 2.8Vrms unclipped out of the analog multi channel outputs. Once I exceeded this output level, the auto protection circuits shut the receiver down. This is more than enough clean output voltage to drive any audio amplifier to clipping.
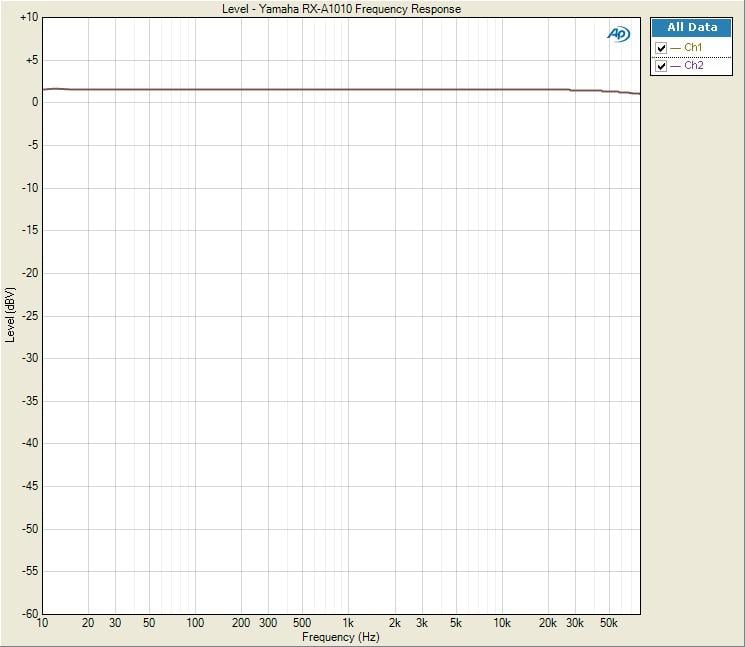
Yamaha RX-A1010 Analog Frequency Response
Frequency Response was ruler flat from 10Hz to 80kHz (the limit of the APx585 test equipment) with +-.025dB variation. The preamp gain (Av) = 13.9dB similar to what I measured on their RX-Z7 and RX-A3000 receivers.
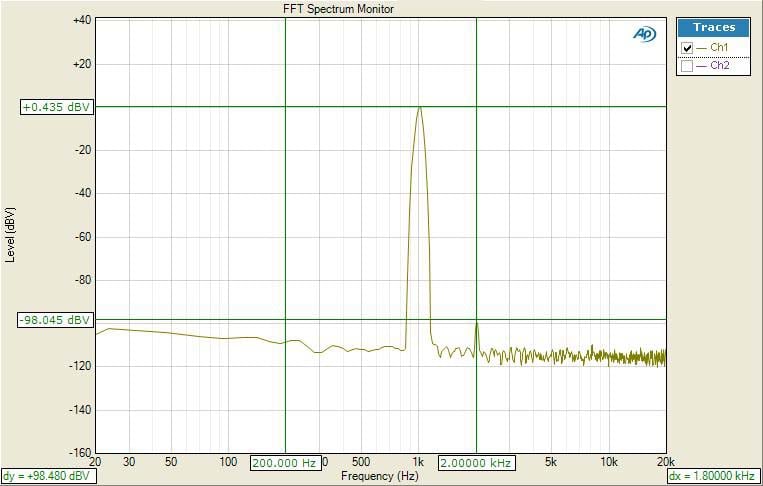
Yamaha RX-A1010 FFT Distortion (HDMI In, -20dBFS, 1Vrms out)
Driving the RX-A1010’s HDMI input with a -20dBFS signal, I adjusted the volume control until I measured 1Vrms via the preamp outputs., The RX-A1010 displayed an excellently clean FFT distortion profile with the magnitude of the 2nd harmonic of (+0.435 +98.045)dBv = 98.48dBv or 100*alog^-1(-98.48/20) = .0012% THD + N. As you can see in the output, residual noise products are virtually nonexistent.
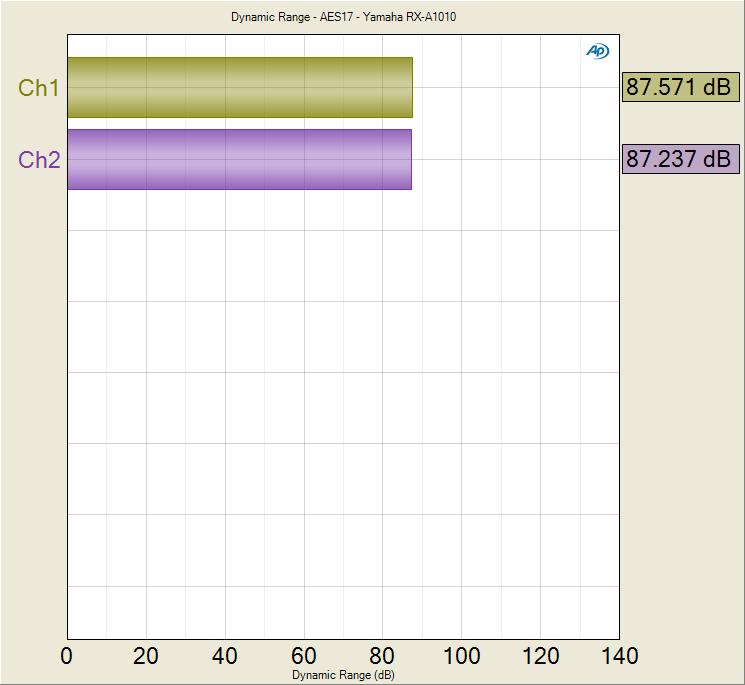
Yamaha RX-A1010 SNR (pre-amp driven via HDMI)
Using the HDMI input driven at -20dBFS with 1Vrms out of the preamp analog outputs, I measured 87.5dB (CCIR-2k filter engaged). This is an excellent measurement indicating the RX-A1010 would make for a clean preamp when connected to external amplification.
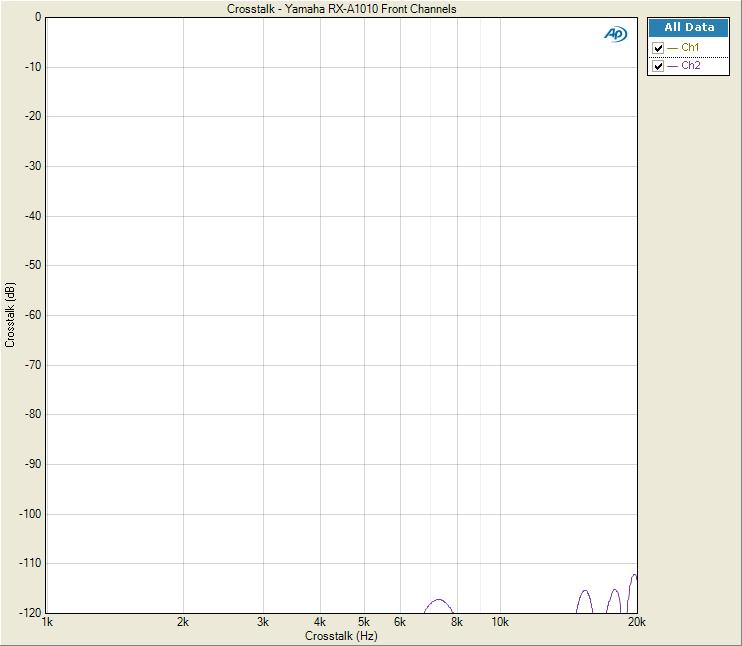
Yamaha RX-A1010 Analog Preamplifier Channel to Channel Crosstalk
I measured analog channel to channel crosstalk of the front main channels using the analog inputs and analog multi channel outputs. In “straight mode” crosstalk measured < 100dB at 20kHz which was outstanding. What was even more impressive was in “pure direct” mode, the channel to channel crosstalk was almost below measurable limit (-120dB) of my $40k AP APx585 Audio Analyzer. Yamaha really did their homework with component and trace routing in this baby. Anyone telling you separates provides better channel to channel isolation, have them look at the measurement graphs above.
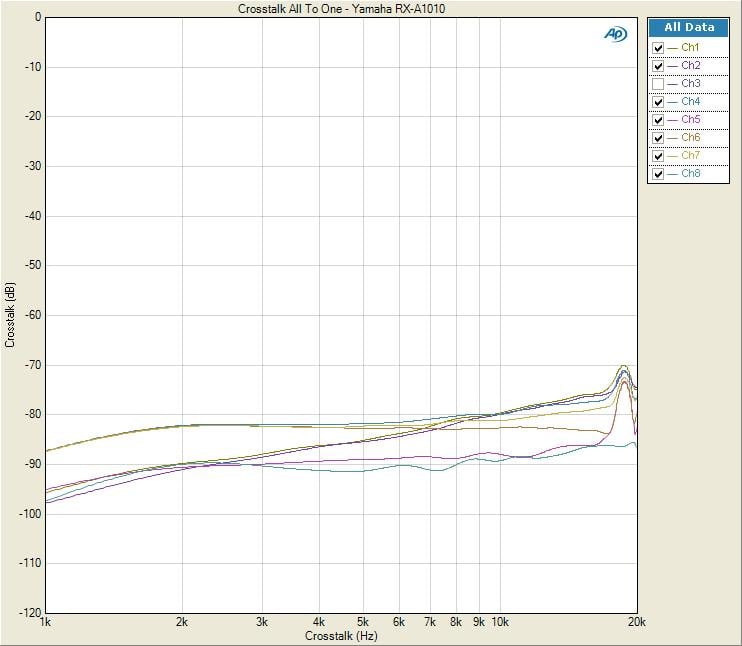
Yamaha RX-A1010 All-to-One Crosstalk (HDMI In, Preamp Out 1Vrms)
The RX-A1010 exhibited commendable channel to channel crosstalk performance engaged in multi channel with all channels driven. With all channels acting as the noise source or disturber driven via the HDMI input, I measured each idle channel one at a time to determine the worst case channel to channel crosstalk. At 1kHz the RX-A1010 yielded about -90dB and -70dB @ 20kHz for its noisiest surround channel. I consider anything less than -40dB @ 10kHz acceptable so the RX-A1010 met that minimum requirement with >30dB to spare!
Yamaha RX-A1010 Power Amplifier Measurements
I had to engage “Pure direct” to get test signal on all channels using HDMI as the source. All levels were matched. In “Straight” mode, only front two channels turned on, until I engaged 7CH stereo mode or PLII but levels weren’t matched.
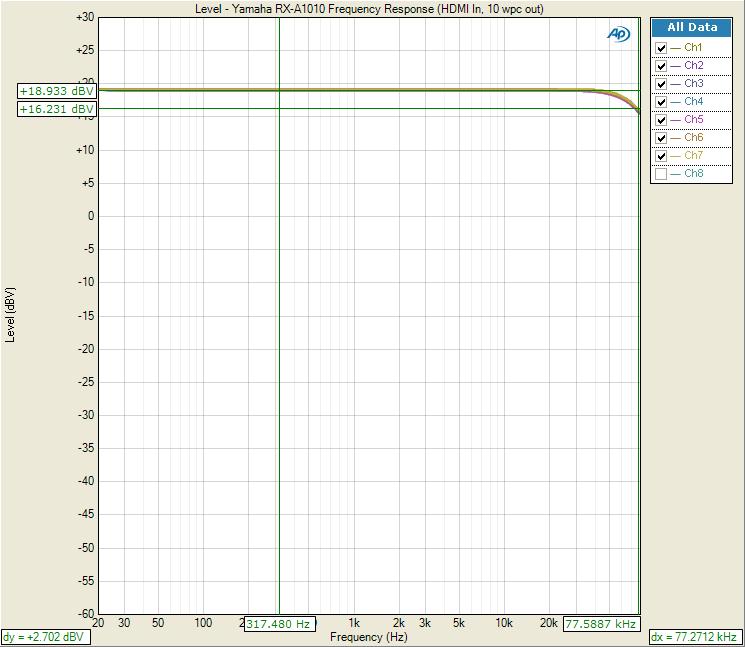
Yamaha RX-A1010 Frequency Response (HDMI In, Speaker Level Outputs)
With the RX-A1010 driven by a -20dBFS input signal via HDMI, I measured all channels driven at 8-ohms via the speaker outputs at 10 watts power level. Frequency response was again ruler flat from 10Hz to 50Khz, with a -3dB point at around 80kHz. Channel to channel variance was +-0.02dB variance which was incredibly tight.
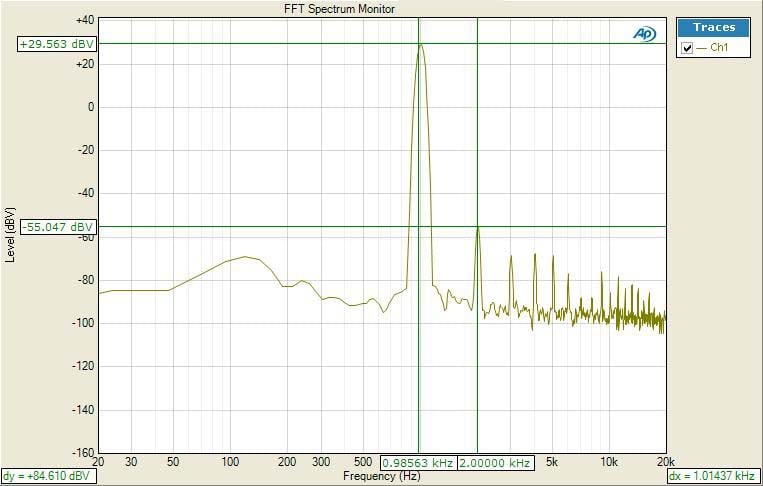
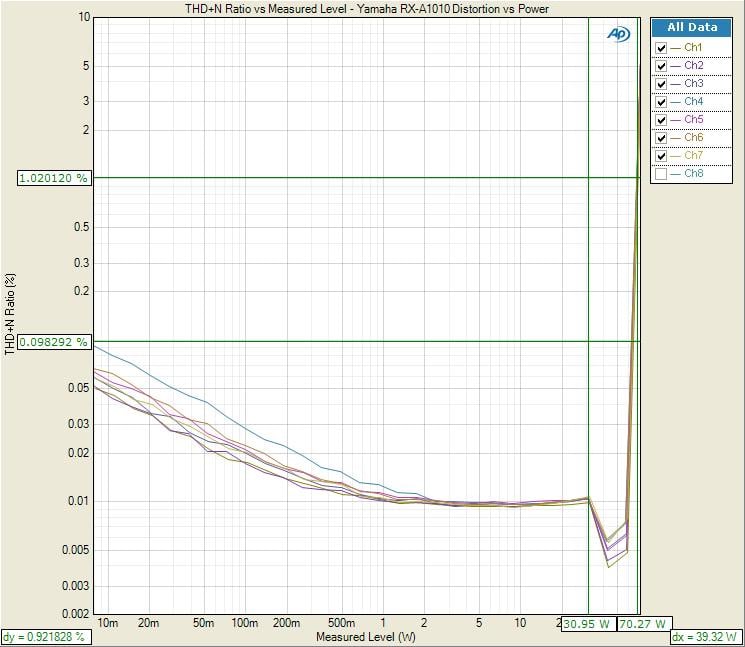
Yamaha RX-A1010 FFT Distortion Analysis at Full Rated Power (110wpc)
The distortion spectra of the RX-A1010 amplifier overall is good. However as the RX-A1010 approached max rated power (110wpc) odd order harmonics started to dominate (29.56 + 55.05))dBv = 84.6dBV or 100*alog^-1(-84.6/20) =.006% THD + N. The 2nd order distortion product dropped 10dB at 1 watt which is quite low.
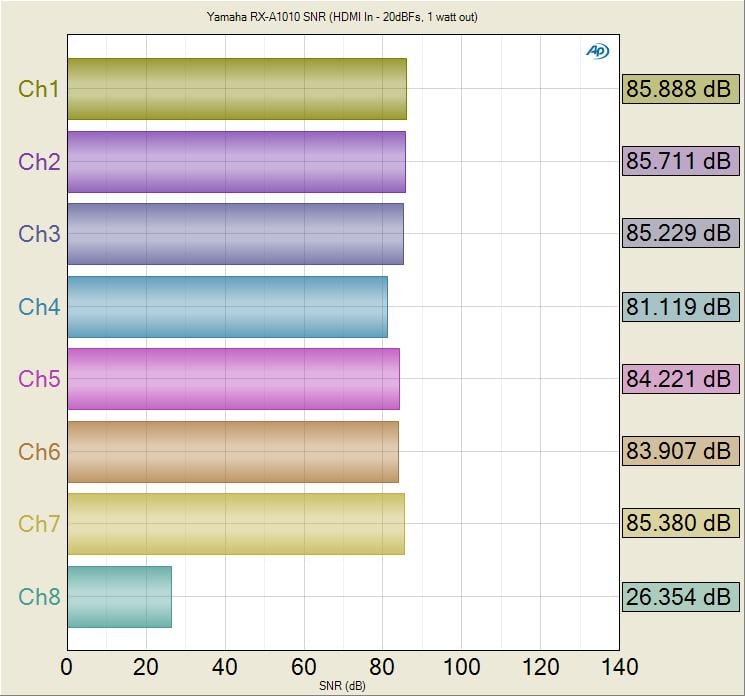
Yamaha RX-A1010 SNR (HDMI In, Speaker Level Outputs)
Driving the RX-A1010 with a -20dBFS input signal via HDMI, I measured 81dB to 85dB SNR at 1 watt with all channels driven. The RX-A1010 noise floor from preamp all the way through its power amp section is commendably low. I measure amplifier SNR at 1 watt to put everyone on equal footing and to also better gauge its low level performance where the amplifier spends most of its time operating at. I consider 80dB @ 1 watt (un-weighted) to be a good measurement which the RX-A1010 comfortably exceeded.
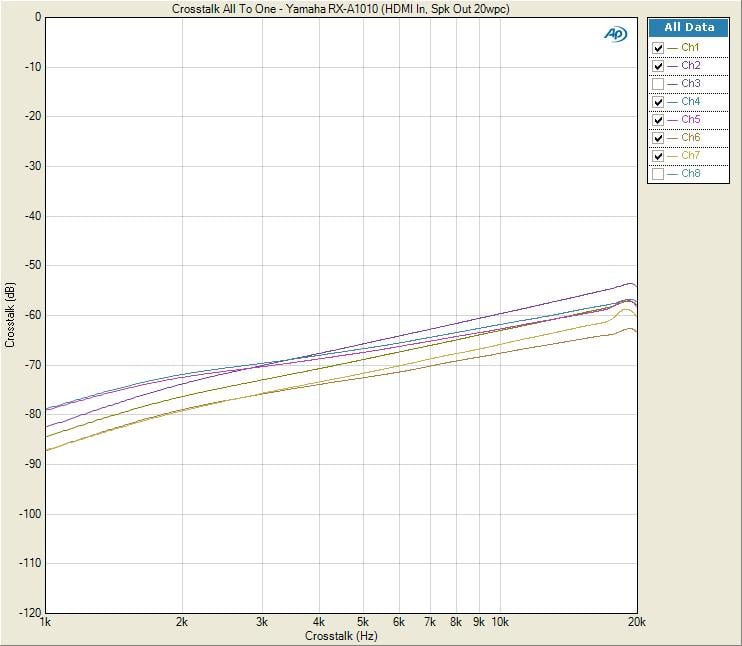
RX-A1010 All-to-One Crosstalk (HDMI In, Speaker Level Outputs 20watts)
I measured all-to-one crosstalk from the preamp input of the RX-A1010 all the way to the speaker outputs with each channel driven at 20 watts (except the channel under test). Channel to channel crosstalk was excellent (80dB @ 1kHz, 55dB @10kHz). Again this is a worst case crosstalk measurement. Simply measuring channel to channel crosstalk with only one channel acting as a disturber produced much better numbers (95dB @ 1kHz and 70dB a@ 10kHz). This is how most publications measure crosstalk but we tend to be harder on the products and test them in the worst case scenarios like these.
Power Measurements
Using our Audio Precision APx585 8-channel HDMI analyzer, we conducted a full barrage of multi-channel amplifier tests on Yamaha RX-A1010 per our Amplifier Measurement Protocol. We tested power using three methods all of which were taken at < 0.1% THD + N:
- Continuous Full Power Bandwidth (CFP-BW) from 20Hz to 20Khz into 8 and 4-ohm loads (up to two-channels)
- 1kHz Power Sweep vs Distortion (1kHz PSweep) - popularized by the print magazines, this is an instantaneous power vs distortion test at 1kHz. The problem with this test is it often masks slew related and or frequency response problems some amplifiers exhibit at the frequency extremes, and thus inflates the measured power results. It does provide an instant gratification # for consumers to argue over on the forums so we are now incorporating this test to please the masses.
- Dynamic PWR - 1kHz CEA-2006 Burst Method testing. This is a dynamic power measurement adopted from the car industry similar to IHF method only a bit more difficult for an amplifier and more representative of real musical content.
Keep in mind most review publications don't do continuous power measurements and they usually publish power measurements into clipping at 1% THD + N. Our measurements are very conservative as we use a dedicated 20A line with no Variac to regulate line voltage. We constantly monitor the line to ensure it never drops more than 2Vrms from nominal which in our case was 120Vrms.
For more info on amplifier measurements, see: The All Channels Driven (ACD) Test
Yamaha RX-A1010
1kHz ACD Power Test
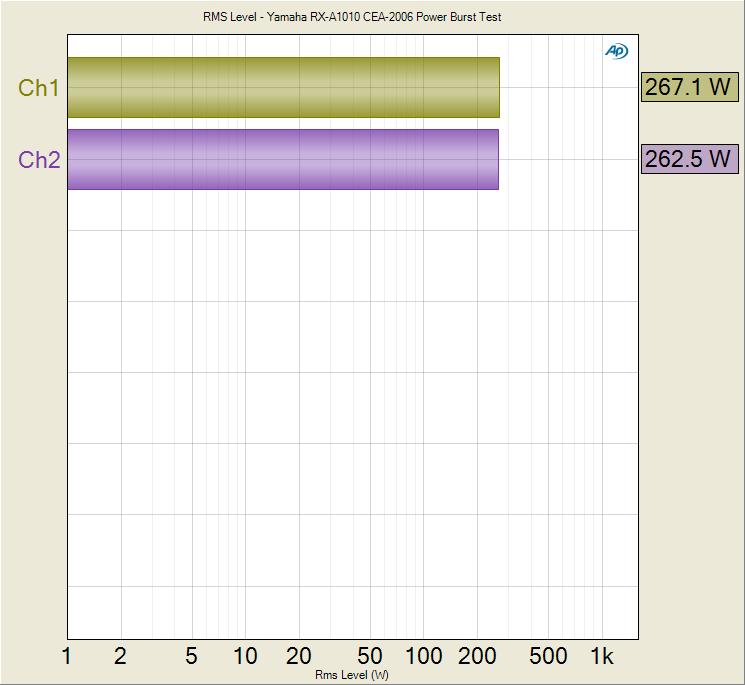
Yamaha RX-A1010 Dynamic Power Test (1kHz) 2CH Driven, 4-ohms
| # of CH | Test Type | Power | Load | THD + N |
| 1 | CFP-BW | 135wpc | 8-ohms | 0.1% |
| 2 | CFP-BW | 120wpc | 8-ohms | 0.1% |
| 1 | CFP-BW | 173wpc | 4-ohms | 0.1% |
| 2 | CFP-BW | 155wpc | 4-ohms | 0.1% |
| 7 | 1kHz Psweep | 70 wpc | 8-ohms | 1% |
| 1 | Dynamic PWR | 170wpc | 8-ohms | 1% |
| 1 | Dynamic PWR | 267wpc | 4-ohms | 1% |
| 2 | Dynamic PWR | 160wpc | 8-ohms | 1% |
| 2 | Dynamic PWR | 262wpc | 4-ohms | 1% |
| 7 | Dynamic PWR | 125 wpc | 8-ohms | 1 |
Yamaha RX-A1010 Power Measurement Table
The Yamaha RX-A1010 handedly exceeded its 110wpc power rating continuously with two channels driven and put out a commendable 155wpc both channels driven into 4-ohms; and that’s a full power bandwidth measurement (20Hz to 20kHz at 0.1% THD + N). You can see the protection circuit kick on during our ACD tests, purposely limiting power to 70wpc for all seven channels driven. This means the RX-A1010 was dissipating nearly 980 watts from the wall outlet to deliver this much power to all seven channels. Not bad for a sub $1k receiver with a 600VA power supply.
In short time, there is no doubt in my mind forum trolls seeing the ACD power numbers for this receiver will pop up on our site or AVS Forum bashing Yamaha, not realizing the design purpose of power limiting a multi channel amplifier in a compact chassis, or the reality that real world program material will never trip this limiter circuitry. Thus we conducted dynamic burst power measurements simulating real world program content.
The RX-A1010 delivered impressive dynamic power results under all loading conditions. Into 8-ohms, 1 channel driven, the RX-A1010 produced 170wpc or about 1.9dB of headroom over its 110wpc rating. Interestingly the RX-A1010 delivered similar results into 1 or 2 channels driven into 4-ohm loads producing in excess of 260wpc. Yamaha specs the RX-A1010 as being able to deliver 210wpc dynamically into a 4-ohm load. I would say that is rather conservative given my measurement results using the CEA 2006 burst test.
Suggestions for Improvements
As good as the Yamaha RX-A1010, I do have some nits to pick with it. Though it’s a minor issue that is likely not audible in most cases, I was a bit perplexed by the bass management issue I found. I have always observed textbook performance from Yamaha receivers here, so I am hoping they can release a future firmware update to address this. While I like the idea of dual subwoofer outputs, it’s really nothing more than a feature bullet point on a spec sheet unless the outputs offer independent level control and delay settings. Yamaha isn’t the only brand guilty of doing this at this price point, however. I would have liked Yamaha to give the ability to run presence and back channels simultaneously with external amplification, but that feature is reserved for their higher end units for now. Video processing was pretty limited on this receiver compared to offerings of Yamaha’s competitors, but the unit did just fine switching and upconverting legacy signals. The remote control was a bit limited in function compared to other units they’ve offered in the past, but I would likely find this fault with any of today’s A/V receivers in this price range. The ability to present volume level during power up is a feature I missed most perhaps and hope Yamaha considers offering this standard on all of their AVENTAGE receiver models. I miss their heritage orange front panel LCD display. I will continue to ding Yamaha on that in future reviews till they bring it back.
Yamaha RX-A1010 AVENTAGE A/V Receiver Conclusion
Yamaha h as once again put forth a solid offering in
the highly competitive $1k price category with their new RX-A1010 AVENTAGE A/V
receiver. The performance and feature
set of the RX-A1010 should make Yamaha and its owners proud of this middle
child A/V receiver. Over the last couple
of years, Yamaha has been paying close attention to reviewer and customer
feedback on their receivers as evident by the improved sound and build quality
that birthed the AVENTAGE lineup. Take
time to set this baby up the right way, feed it a good speaker system, and you
will enjoy the fruits of your labor.
Don’t doubt for a minute that you can’t have a good two-channel and
multi-channel experience with the RX-A1010 because I found it to be quite a
musical receiver too. At this price
point you have a lot of options from competitor products but the Yamaha
RX-A1010 should be at the top of the list for your consideration. Highly recommended!
as once again put forth a solid offering in
the highly competitive $1k price category with their new RX-A1010 AVENTAGE A/V
receiver. The performance and feature
set of the RX-A1010 should make Yamaha and its owners proud of this middle
child A/V receiver. Over the last couple
of years, Yamaha has been paying close attention to reviewer and customer
feedback on their receivers as evident by the improved sound and build quality
that birthed the AVENTAGE lineup. Take
time to set this baby up the right way, feed it a good speaker system, and you
will enjoy the fruits of your labor.
Don’t doubt for a minute that you can’t have a good two-channel and
multi-channel experience with the RX-A1010 because I found it to be quite a
musical receiver too. At this price
point you have a lot of options from competitor products but the Yamaha
RX-A1010 should be at the top of the list for your consideration. Highly recommended!
Yamaha RX-A1010 Review
MSRP: $1099.95
6660 Orangethorpe Avenue
Buena Park, CA 90620
(714) 522-9105
http://usa.yamaha.com/products/audio-visual/aventage/
About
Yamaha
Yamaha Electronics
Corporation (YEC), USA, based in Buena Park, California, is a wholly owned
subsidiary of Yamaha Corporation of America. YEC offers industry-leading home
theater components and systems, featuring A/V receivers, amplifiers, DVD/CD
players, speakers, mini-systems, home-theater-in-a-box (HTiB) pre-matched
systems and the company's exclusive Digital Sound Projectors (single component
surround sound solutions), as well as A/V & IT convergence products.
The Score Card
The scoring below is based on each piece of equipment doing the duty it is designed for. The numbers are weighed heavily with respect to the individual cost of each unit, thus giving a rating roughly equal to:
Performance × Price Factor/Value = Rating
Audioholics.com note: The ratings indicated below are based on subjective listening and objective testing of the product in question. The rating scale is based on performance/value ratio. If you notice better performing products in future reviews that have lower numbers in certain areas, be aware that the value factor is most likely the culprit. Other Audioholics reviewers may rate products solely based on performance, and each reviewer has his/her own system for ratings.
Audioholics Rating Scale
 — Excellent
- — Very Good
- — Good
- — Fair
- — Poor
| Metric | Rating |
|---|---|
| Frequency Response Linearity | |
| SNR | |
| Output Impedance | |
| Measured Power (8-ohms) | |
| Measured Power (4-ohms) | |
| Multi-channel Audio Performance | |
| Two-channel Audio Performance | |
| Video Processing | |
| Build Quality | |
| Fit and Finish | |
| Ergonomics & Usability | |
| Features | |
| Remote Control | |
| Performance | |
| Value |
Gene manages this organization, establishes relations with manufacturers and keeps Audioholics a well oiled machine. His goal is to educate about home theater and develop more standards in the industry to eliminate consumer confusion clouded by industry snake oil.
View full profile