
Pioneer VSX-94TXH 7.1 A/V Receiver with HDMI 1.3a Review
Pioneer VSX-94TXH 7.1 Receiver
- Product Name: VSX-94TXH
- Manufacturer: Pioneer
- Performance Rating:

- Value Rating:

- Review Date: April 28, 2008 01:55
- MSRP: $ 1800
DSP: 3rd Gen.
Analog Devices SHARC + 48-Bit Freescale DSP Power Ratings: 7
x 140 watts per channel (8 ohms, 20 Hz-20 kHz, <.09%THD) HDMI: 1.3a with support
for Deep Color, 24p and SACD/DVD-Audio support Crossover: 50,
80, 100, 150, 200Hz Remote: Programmable/learning
remote (glow keys, not backlit) Video Inputs: 4 x
HDMI (1.3); 3 x Component Video (100MHz); 7 sets composite and S-video inputs Video Outputs:
100MHz Component video output, 3 composite/S-video outputs, Multi-Zone
composite video output Audio Inputs: 7.1
multi-channel inputs, 6 assignable digital inputs (4 optical, 2 coaxial), 8
analog inputs Audio Outputs: 2
optical digital outputs, multi-zone stereo pre-amp level audio outputs, 7.1
preamp outputs Additional
Connections: RS-232C port for third party control Systems, remote I/O
ports, 2 assignable +12V triggers
HD Audio Support: Dolby
TrueHD, Dolby Digital Plus, dts-HD Master Audio
Audio DAC: 192 kHz/24bit DAC x 7
Dimensions: 16 9/16" x 7 3/8"
x 18 1/16"
Pros
- THX Select2 Certification
- 4 x HDMI 1.3a inputs
- Deep Color, xvYCC Support
- RS-232C control & dual 12V triggers
- Home Media Gallery system
Cons
- No Zone 2/3 Remote
- Using S/PDIF source alongside HDMI video requires front panel setting
- Cluttered remote control w/ no backlight
- Non-removable power cord
- Confusing Setup/Menu interface
VSX-94TXH Introduction
The last Pioneer receiver review I personally did was in 2005 on an entry-level product (the VSX-815) which struck me as a good balance between available features and power. It will seem pretty obvious when I say that this flagship Elite AV receiver product trumps my last experience by quite a bit. It also, however brings a certain amount of expectation. Being a top of the line model, the VSX-94TXH has a lot of competition and is going to need to distance itself in some areas before being crowned the leader in any particular department.
Keeping Up with the Joneses?
While I don't recommend it for personal finances, keeping up with the Joneses is a necessity for today's flagship receiver products. If you can't maintain some sort of edge in this market, there are plenty of companies with the infrastructure to deliver a product that can quickly dominate the market. Pioneer has its share of special features, but let's see how they compare in a quick survey of the market:
| Manufacturer | Pioneer | Marantz | Denon | Yamaha | Onkyo |
|---|---|---|---|---|---|
| Model | VSX-94TXH | SR8002 | AVR-4308CI | RX-V3800 | TX-NR905 |
| MSRP | $1800 | $1999 | $2499 | $1699 | $2099 |
| Power | 140Wx7 | 125Wx7 | 140Wx7 | 140Wx7 | 140Wx7 |
| HDMI In/Out |
4/1 | 4/1/1 | 4/2 | 4/1 | 4/2 |
| HDMI Version | 1.3a | 1.3a | 1.3a | 1.3a | 1.3a |
| Deep Color | Yes | Yes | Yes | Yes | Yes |
| xvYCC | Yes | Yes | Yes | Yes | Yes |
| HDMI Upconvert | 1080p | 480p | 1080p | 1080p | 1080p |
| THX Certification | Select2 | Select2 | No | No | Ultra2 |
| Room EQ | MCACC | MultEQ | MultEQ XT |
YPAO | MultEQ XT |
| Video Processing | DCDi | SD-only | DCDi | ABT1010 |
Reon-VX |
When taking a look at the other AV receivers in this price range, the Pioneer has the cards somewhat stacked against it. It's not overpriced and it certainly has a lot of important features, but it isn't exactly rising to the top of the pack. What that said, companies like Harman Kardon don't even have a seat at the table. Some of the notable features of the Pioneer VSX-94TXH include:
- THX Select2 Certified
- Home Media Gallery (Internet radio, Neural Music Direct)
- Support for Dolby TrueHD, Dolby Digital Plus, dts-HD Master Audio
- Deep Color, xvYCC and SACD Support by HDMI
- 1080p Upconversion of SD signals via HDMI
- XM HD Surround by Neural THX Technologies
- RS-232C control, two 12VDC triggers
- 2nd Zone Audio/Video Output
- Faroudja DCDi video processing
Pioneer VSX-94TXH First Impressions & Build Quality
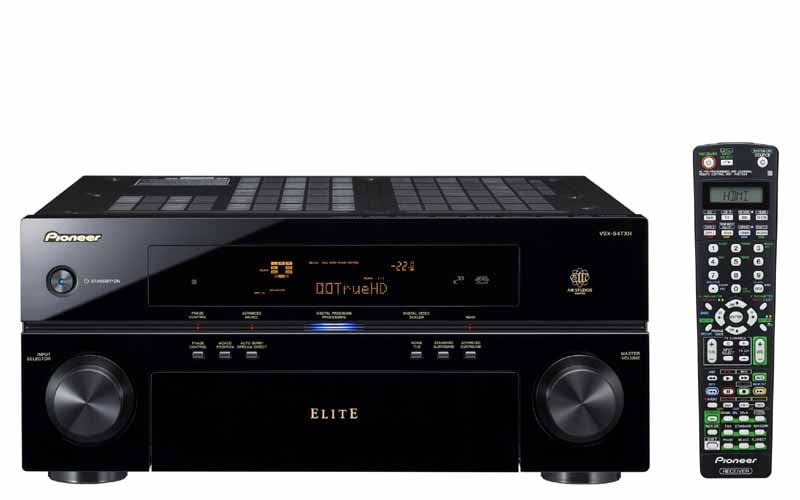 Pioneer's flagship AV receiver
(we're not counting the delayed-but-impending SC-09TX which debuted at the 2007
CEDIA) is simply beautiful. The receiver has a piano gloss finish and, unlike
the competition, places the annoying requisite technology logos across the top
edge of the receiver instead of the front panel. This leaves the receiver clean
and beautiful - definitely a visual step-up from other designs we've seen. Like
most receivers, the input selection knob is on the left and the
heavily-weighted master volume is located on the right. The detents on the
input selector are solid and I really liked the way both knobs felt when
turned. The Master Volume only increases in 1dB increments, however I don't see
this as an issue for most users. With the front panel door closed, there are only
six buttons present in addition to the Standby/on function. There is no hard
Power Off switch on the Pioneer; you'd need to unplug it to take it out of
Standby mode.
Pioneer's flagship AV receiver
(we're not counting the delayed-but-impending SC-09TX which debuted at the 2007
CEDIA) is simply beautiful. The receiver has a piano gloss finish and, unlike
the competition, places the annoying requisite technology logos across the top
edge of the receiver instead of the front panel. This leaves the receiver clean
and beautiful - definitely a visual step-up from other designs we've seen. Like
most receivers, the input selection knob is on the left and the
heavily-weighted master volume is located on the right. The detents on the
input selector are solid and I really liked the way both knobs felt when
turned. The Master Volume only increases in 1dB increments, however I don't see
this as an issue for most users. With the front panel door closed, there are only
six buttons present in addition to the Standby/on function. There is no hard
Power Off switch on the Pioneer; you'd need to unplug it to take it out of
Standby mode.
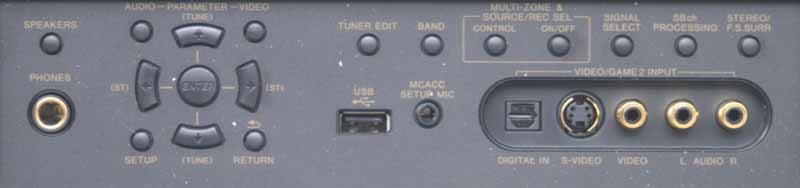
The clean front panel opens smoothly to grant users access to various features such as the Video/Game 2 input and menu controls. You can also control some tuner functions, connect headphones and a USB storage device, and of course the MCACC microphone. Multi-Zones can be activated and deactivated here and you can control the Signal type for each input (important for insuring you route the correct audio to the selected source.)
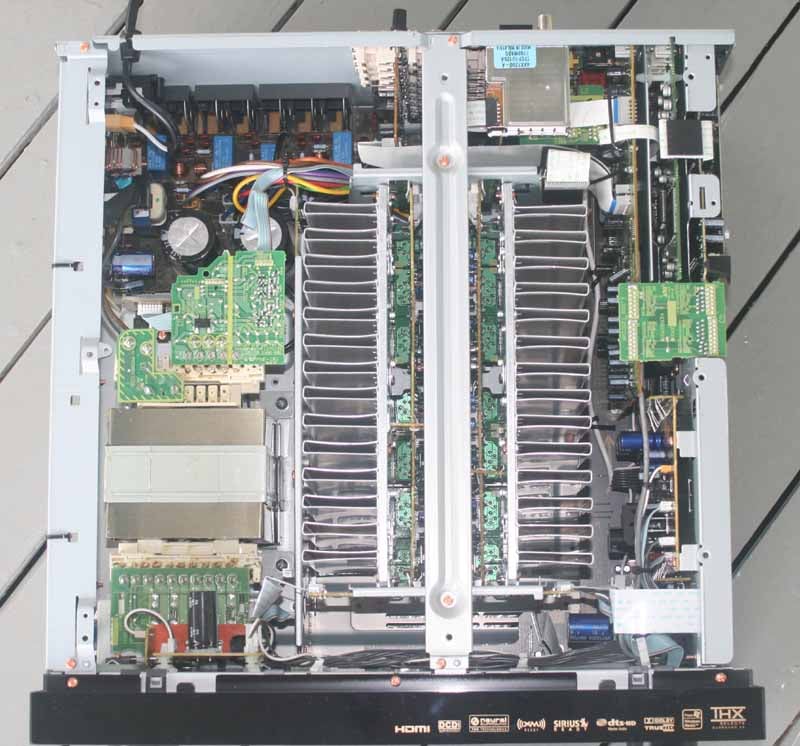 Cracking
open Pioneer's flagship receiver I immediately noticed the gigantic EI Core
transformer that dominated the side of the unit, joined by a couple of 15,000
uF capacitors. The power supply is clearly large enough to drive the amplifier
section of the receiver to its rated specifications. Once I made it past the
robust power supply, I couldn't help but be drawn to the two rather
cheap-looking and thin aluminum heatsinks that ran down the center of the
receiver. While it appeared to do the job, it certainly didn't look like
something I expected to see on a flagship product. Typically, you will see a
thicker aluminum heatsink like that
which I just witnessed on another manufacturer's receiver I reviewed this past
week which costs about $400 less than the VSX-94TXH. This isn't a big deal, but
flagship products like this command a particular aesthetic from users that
needs to be met.
Cracking
open Pioneer's flagship receiver I immediately noticed the gigantic EI Core
transformer that dominated the side of the unit, joined by a couple of 15,000
uF capacitors. The power supply is clearly large enough to drive the amplifier
section of the receiver to its rated specifications. Once I made it past the
robust power supply, I couldn't help but be drawn to the two rather
cheap-looking and thin aluminum heatsinks that ran down the center of the
receiver. While it appeared to do the job, it certainly didn't look like
something I expected to see on a flagship product. Typically, you will see a
thicker aluminum heatsink like that
which I just witnessed on another manufacturer's receiver I reviewed this past
week which costs about $400 less than the VSX-94TXH. This isn't a big deal, but
flagship products like this command a particular aesthetic from users that
needs to be met.
Pioneer VSX-94TXH Setting Up the Receiver
Whenever I review a new receiver I try to get it up and running quickly without using the user manual or doing anything other than pushing my way through a typical setup as I'd expect the system to function. A good starting point is to get into the on-screen menu and select the Manual SP(eaker) setup. Configure your system accordingly and set the crossover point. You can then go back and run Auto MCACC (this could be done before the speaker setup as well if you want the system to configure your speakers for you.) After your system is set correctly for speaker type and distances move on to the Input Setup menu and make sure all of your source components are routed correctly for audio and video. This is where I encountered my first problem.
The Pioneer only threw up one particular difficulty for me which had me stuck for a few minutes until I discovered the solution. In setting up my CableTV box, the video was being fed by a DVI-D output (through a DVI to HDMI cable) and audio was delivered via digital coax. I indicated as much when I set up the inputs, however I could not get audio from the CableTV set-top box. I searched the entire menu system looking for a way to configure the TV input to take its audio from coax (it was obvious that it was either defaulting to the nonexistent HDMI audio or looking somewhere else). Realizing that the audio selection had to be located somewhere other than the OSD, I searched the remote and front panel, finally locating the Signal Sel function. This flips between HDMI, PCM, Auto (which did NOT pick up my coax), Analogue, and Digital. Once I flipped to Digital, the audio came alive and everything fell into place. This audio setting is remembered for the input so you don't need to set it each time you switch to the TV input.
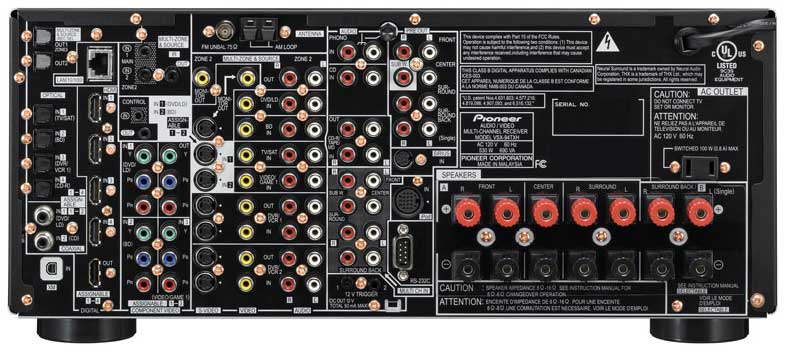
Back Panel of the Pioneer VSX-94TXH 7.1 Home Theater Receiver
I know I began with the software, but you'll also need to make sure your rear-panel connections are made correctly as well. I tend to start in no particular order, however if you're strapped for space you may want to work from the bottom up, or from one side to the other. The layout of the rear panel is about 80% organized with some odd hang-outs here and there like the Zone 2 and Monitor outputs. It would certainly look a lot better if Pioneer dumped about half of the S-video and composite inputs - which should go completely unused in 99.9% of homes. Four HDMI inputs should be plenty for all but the most techno-savvy users, though a second HDMI output would have put this receiver over the top.
The biggest drawback of the VSX-94TXH is the lack of dedicated Zone 2 speaker connections. While the amplifiers of the receiver are assignable for use as B-speakers, Bi-amping the main speakers, Surround Back or Zone 2, you'll actually need to pick one use and stick to it. To switch between Zone 2 and Surround Back, for example, would entail switching cables. We've seen other manufacturers handle this better with additional dedicated 5-way binding posts.
Audio connections seem plentiful, with lots of digital audio connections and, of course, the four HDMI 1.3a inputs which can each handle uncompressed PCM audio and bitstreamed HD audio formats. The VSX-94TXH supports both 7.1 preamplifier outputs as well as 7.1 multi-channel inputs, so it is virtually future-proof - at least until 10.2 becomes the defacto standard!
Setting Up the Receiver – Multi-Room Use
For multi-zone use, we'd only recommend the Pioneer VSX-94THX if you intend to either use an external amplifier, the digital Zone 3 output, or you have a 5.1 primary theater room. Because there are no dedicated Zone2/3 speaker connections, running a powered Zone 2 alongside a 7.1 system simply isn't practical. Zone 2 can be either powered (using the Surround Back speaker connections), line level (using the Zone 2 stereo analogue audio connections) and can support video output via a composite monitor output. Another drawback to Pioneer's multi-zone implementation is that Zone 2 audio will be interrupted any time the main zone audio is changed to a new source.
 As we mentioned, Zone 3
on the Pioneer consists of the ability to send a digital TOSlink connection to
another room (no video). This means that you can fire over any digital source
to another AV receiver located in your Zone 3 area. We tested this and found
that Zone 3 works with Dolby Digital 5.1 surround sources as well as stereo
PCM. Remember, however, that since the Pioneer only has a single XM and AM/FM
tuner you won't be able to use these sources independently in more than one
zone. Tune to a new FM station in the Main zone and your Zone 2 will change as
well if it shares that source. A quick explanation of the possible modes for
the 2 amplifiers that are defaulted to the Surround Back speakers:
As we mentioned, Zone 3
on the Pioneer consists of the ability to send a digital TOSlink connection to
another room (no video). This means that you can fire over any digital source
to another AV receiver located in your Zone 3 area. We tested this and found
that Zone 3 works with Dolby Digital 5.1 surround sources as well as stereo
PCM. Remember, however, that since the Pioneer only has a single XM and AM/FM
tuner you won't be able to use these sources independently in more than one
zone. Tune to a new FM station in the Main zone and your Zone 2 will change as
well if it shares that source. A quick explanation of the possible modes for
the 2 amplifiers that are defaulted to the Surround Back speakers:
- Surround Back System (Normal/Default)
This assigns the two Surround Back amplifiers normally for a 7.1 system.
- Surround Back System (Speaker B)
This utilizes the two Surround Back speakers for a second set of Main speakers which can be placed in another room. If headphones are utilized, the Speaker B can remain active. When this mode is selected, the Surround Back preamp terminals output the same source as the Main Speakers.
- Surround Back System (Front Bi-Amp)
If you'd like to split the high and low frequency drivers and amplify them separately, then engage the Front Bi-Amp mode and let the Pioneer receiver auto-level match. Before doing this, be sure to check if your speakers are capable of being bi-amped and remember to remove the jumpers between the high and low drivers.
- Surround Back System (Zone 2)
Here is where you can use the Surround Back amplifiers to power a set of remote speakers in a second Zone. This is very different from the Speaker B mode in that Zone 2 can receive its own discrete source and has the ability to use a composite video monitor output.
The Pioneer is definitely flexible and has many of the multi-zone features you want in a modern AV receiver, however we would really like to see it kicked up a notch - especially considering that this is currently the best Pioneer has to offer. A set of relays routing signal to a separate set of dedicated Zone 2 speaker outputs would work wonders in terms of enhancing the flexibility of this system - and this is available on several competitor's models in this price class.
Pioneer VSX-94TXH Advanced Setup and Menu
We've gone over the MCACC system in detail previously. The system does a very accurate job of setting levels and distances and we left the crossover at the THX-recommended 80Hz. When we say the MCACC does an accurate job, we mean that none of the auto-setup values were more than 3 inches from our own, save the subwoofer which again was placed farther back than it actually was. Channel levels differed by 0.5dB on two different channels, but given the 1dB Master volume limitation, we may have erred in one direction or another during our manual setup.
Before we take you through the menu system we'd like to note that the on-screen display is about as convoluted and messy as the Technicolor remote control. It's truly one of the worst I've ever seen, and not just because it's monochromatic. At first I thought Pioneer had avoided a logical progression entirely with the Setup Menu, however it appears that they prioritized their Automatic MCACC system - placing any manual settings last. Edit - No, I take it back, the menu is seemingly completely random after the first item.
My instinct is to manually set up my speakers and then immediately configure the AV receiver's inputs. Regardless of which method is more practical, giving items with obscure names like FULL BAND PHASE CTRL (the only menu item in ALL CAPS for no apparent reason) and Data Management and putting them in the top level of the menu system is a bit confusing. I'll attempt to work my way through the Pioneer menu system, but in all fairness, I found myself reaching for the User Manual more times than with any other AV receiver I've reviewed to-date, and not for the right reasons.
Auto MCACC
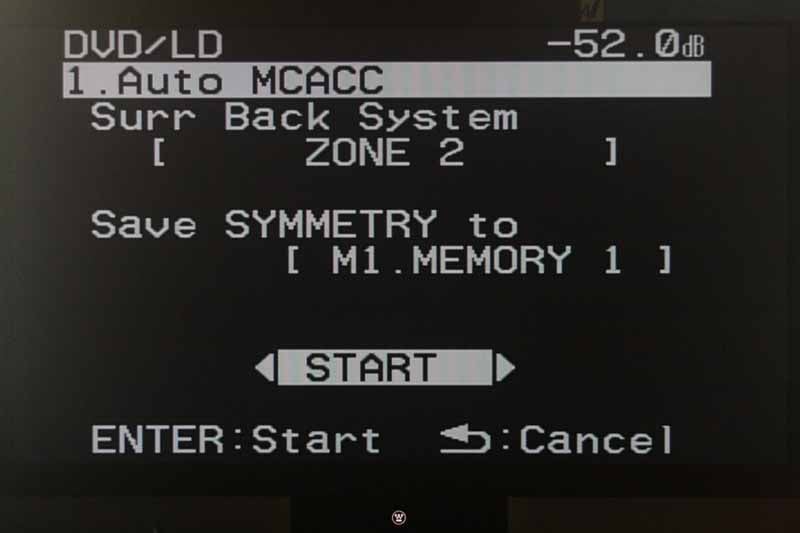 Activating this menu
will stop any audio going to the Main Zone. The Auto MCACC menu allows you to
set the Surr Back system (amplifiers) to either Normal, Speaker B, Front Bi-Amp, or Zone 2.
Keep in mind that this menu will show up automagically when you plug in the
MCACC Setup microphone. If you just want the system to do its thing, set your
Surround Back system to reflect how you'll be using it, and activate the MCACC
system by clicking Enter on the Start button. If you're a tweaker, use the
remote to change the Start button to Custom and select which of the tests you'd
like the system to perform. The MCACC system will adjust your Speaker size and
crossover point, Channel level and Speaker Distance settings, EQ Pro and S-Wave
(standing wave), and even FULL BAND PHASE CTRL (again capitalized for no
apparent reason).
Activating this menu
will stop any audio going to the Main Zone. The Auto MCACC menu allows you to
set the Surr Back system (amplifiers) to either Normal, Speaker B, Front Bi-Amp, or Zone 2.
Keep in mind that this menu will show up automagically when you plug in the
MCACC Setup microphone. If you just want the system to do its thing, set your
Surround Back system to reflect how you'll be using it, and activate the MCACC
system by clicking Enter on the Start button. If you're a tweaker, use the
remote to change the Start button to Custom and select which of the tests you'd
like the system to perform. The MCACC system will adjust your Speaker size and
crossover point, Channel level and Speaker Distance settings, EQ Pro and S-Wave
(standing wave), and even FULL BAND PHASE CTRL (again capitalized for no
apparent reason).
Seriously, the MCACC system has come a long way and, if you are a tweak-head, will provide many, many hours of tinker-rich enjoyment. According to Pioneer, the Full Band Phase Control system is used to essentially flatten the frequency response of the speakers while minimizing group delay between the middle and low frequency ranges. Basically it adjusts bandwidth limited phase to get the lower frequencies to phase-align with the tweeters. This is something everyone is going to have to hear for themselves. In our opinion, the better your room and speakers, the less this will affect you.
Surr Back System
This menu is a duplicate of that which is activated through the use of the Auto
MCACC system. It allows you to configure the Surround Back amplifiers as
specified above.
Manual MCACC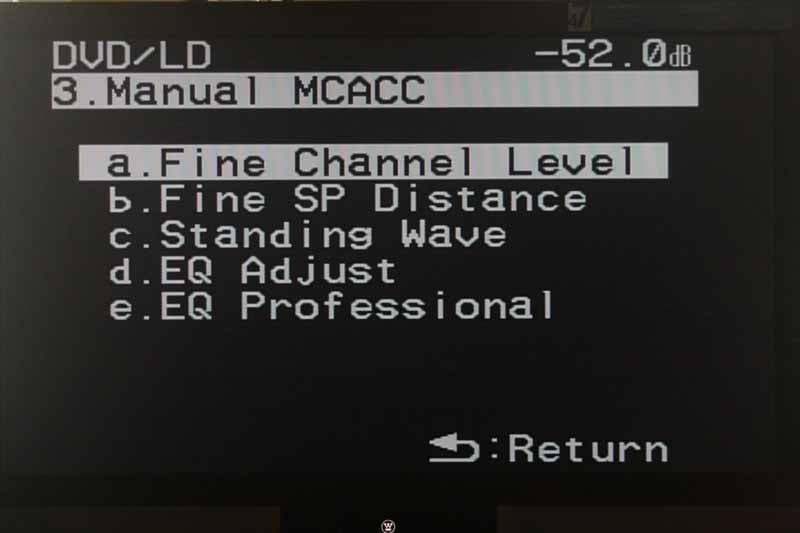 The Manual MCACC menu allows you a way to perform fine
adjustments to your MCACC settings. Before running any of these, be sure to
select an MCACC preset from the remote control first. There are 5 submenus to
this section, including:
The Manual MCACC menu allows you a way to perform fine
adjustments to your MCACC settings. Before running any of these, be sure to
select an MCACC preset from the remote control first. There are 5 submenus to
this section, including:
- Fine Channel Level
This is really no different than the manual speaker level setup in that it allows you to use the internal test tones to measure (preferably with an SPL meter) each channel and set the levels in 0.5dB increments.
- Fine SP Distance
This is a fairly useless mode that assumes you can use your ears to determine speaker distance accurately. We'd recommend avoiding this and simply using a tape measure and the manual settings if you are opposed to having the automatic MCACC perform the calculations.
- Standing Wave
I really liked this system in that you can select three different bands from 63Hz to 260Hz and adjust both Q (the "width" of frequencies adjusted) and attenuation. Basically, Pioneer has given users a three-band parametric EQ for getting rid of bass modes which may be in the room. If bass modes aren't an issue, you can also adjust three bands for your Center channel or the Main system (all speakers except Center and Subwoofer.)
- EQ Adjust
This is a manual EQ adjustment system whereby you can tweak your EQ by ear while listening to a pink noise test tone output from the VSX-94TXH. In general I don't recommend manual EQ adjustments, however if there is an obvious tonal difference between your Center channel and the Main speakers, this might be a good place to visit.
- EQ Professional
This is simply a propeller-head's dream come true. With an RS-232C-compatible PC, you can actually get a graphical representation of what's going on in your room simply by downloading free software from Pioneer and connecting your PC to the AV receiver. I can't get into the entire workings of this system, but it is by far the most extensive EQ adjustment system I've seen included in an AV receiver that doesn't require any additional purchases (the Audyssey Pro kit is equally impressive but requires the purchase of a $325 accessory kit.) With that said, this isn't going to be for everyone, but it does give you some decent tools for dealing with room reverberation and bass mode issues.
FULL BAND PHASE CTRL
(no, we're not shouting)
Broken out from the MCACC system, the Full Band Phase
Control system works to compensate for certain speakers to adjust group delay
between the lower and mid frequencies and align them to the tweeter. There is
no reason to run this if you have already completed the Auto MCACC system. This
menu allows you to run the measurement and view the resulting Group Delay and
target adjustments.
Data Management
This would be better named "Memory Settings" since
it allows to you to view, copy, and clear the various memory settings possible
with the VSX-94TXH. If you downloaded the software and have an RS-232C
connection to a PC, you can also copy the Memory settings to your PC for
storage.
Manual SP Setup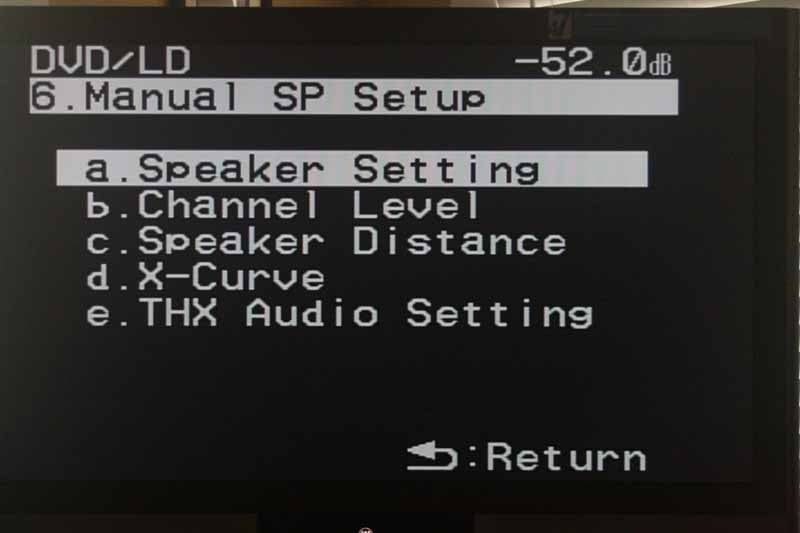 I'm used to hitting this first, but on the Pioneer menu
system it is #6 on the on-screen display list. As you would expect, this menu
allows you to configure everything necessary to make sure your speakers are
properly set up in the theater room. Beyond just Speaker Size, Level and
Distance, you can also adjust the X-Curve and the THX audio setting for your
Surround Back speakers (to take advantage of ASA, or Advanced Speaker Array)
THX DSP. If you're into THX, then their ASA DSP will allow you to get the most
out of THX Games, Music and Movie modes by customizing how the Surround Back
speakers integrate into the soundfield of your listening room.
I'm used to hitting this first, but on the Pioneer menu
system it is #6 on the on-screen display list. As you would expect, this menu
allows you to configure everything necessary to make sure your speakers are
properly set up in the theater room. Beyond just Speaker Size, Level and
Distance, you can also adjust the X-Curve and the THX audio setting for your
Surround Back speakers (to take advantage of ASA, or Advanced Speaker Array)
THX DSP. If you're into THX, then their ASA DSP will allow you to get the most
out of THX Games, Music and Movie modes by customizing how the Surround Back
speakers integrate into the soundfield of your listening room.
Input Setup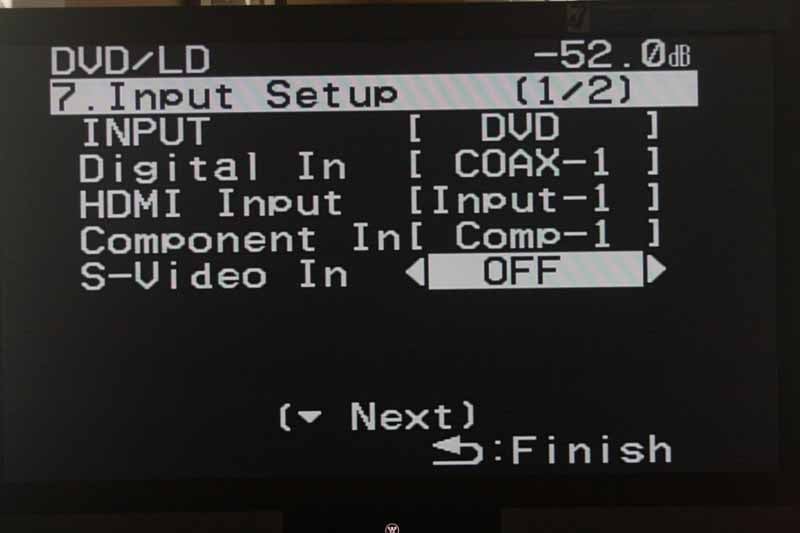 This incredibly important menu item (ranked 7th on the list
of 8) is what will ensure that you route the correct audio and video to the
proper inputs so that when you select "DVD" on the remote control,
you don't hear the iPod or CableTV box. The way this works is that you select
the input at the top - think of this as the device corresponding to the button
on the remote control. Once you select the input to configure, you can then set
the Digital input (coaxial or optical), HDMI input, component video input, and
S-video input. You can also rename the input on the front panel of the receiver
and enable either or both of the two 12V DC triggers. The PDP In (SR+) feature allows
you to connect a Pioneer plasma TV with a special SR+ cable and control which
input the plasma tunes to when the receiver is on a particular source. This is
extremely convenient for those who are using both component and/or multiple
HDMI inputs and allows for individual input video calibration on the plasma
display.
This incredibly important menu item (ranked 7th on the list
of 8) is what will ensure that you route the correct audio and video to the
proper inputs so that when you select "DVD" on the remote control,
you don't hear the iPod or CableTV box. The way this works is that you select
the input at the top - think of this as the device corresponding to the button
on the remote control. Once you select the input to configure, you can then set
the Digital input (coaxial or optical), HDMI input, component video input, and
S-video input. You can also rename the input on the front panel of the receiver
and enable either or both of the two 12V DC triggers. The PDP In (SR+) feature allows
you to connect a Pioneer plasma TV with a special SR+ cable and control which
input the plasma tunes to when the receiver is on a particular source. This is
extremely convenient for those who are using both component and/or multiple
HDMI inputs and allows for individual input video calibration on the plasma
display.
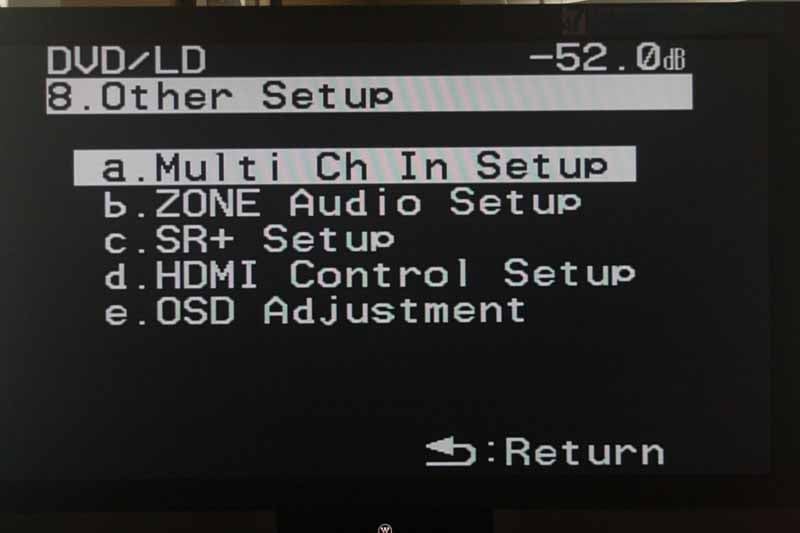 This final menu grants access to the multichannel input's subwoofer gain
control (0dB or +10dB) as well as the assigned video input for that source (if
any.) There are no individual level trims for the multi-channel inputs aside
from the subwoofer and no bass management is provided on these inputs. The Zone
Audio Setup controls whether the Zone two preamp outputs will receive audio or
if the ability to monitor a different source than what is being sent to the
Record outputs is maintained. The VSX-94TXH cannot support the ability to
"blind record" while listening to another source as well as Zone 2. If
you opt for Zone 2 functionality, you can also select Variable or Fixed
("Fixed" is only available of you opt to not utilize the internal
amplifiers for Zone 2). SR+ Setup enables a volume control option on Pioneer
plasma displays when a display-centric input is selected. If you are using SR+
with this receiver then the Monitor Out connect should then be set to the input
which is connected to the receiver's Monitor output. In this way, the system
knows which input to select for on-screen display functions. HDMI Control is
the Pioneer CEC system that enables control of display functions via the
control capabilities built into HDMI. You cannot use both the SR+ system and
the HDMI Control system and compatibility is not guaranteed with non-Pioneer
components.
This final menu grants access to the multichannel input's subwoofer gain
control (0dB or +10dB) as well as the assigned video input for that source (if
any.) There are no individual level trims for the multi-channel inputs aside
from the subwoofer and no bass management is provided on these inputs. The Zone
Audio Setup controls whether the Zone two preamp outputs will receive audio or
if the ability to monitor a different source than what is being sent to the
Record outputs is maintained. The VSX-94TXH cannot support the ability to
"blind record" while listening to another source as well as Zone 2. If
you opt for Zone 2 functionality, you can also select Variable or Fixed
("Fixed" is only available of you opt to not utilize the internal
amplifiers for Zone 2). SR+ Setup enables a volume control option on Pioneer
plasma displays when a display-centric input is selected. If you are using SR+
with this receiver then the Monitor Out connect should then be set to the input
which is connected to the receiver's Monitor output. In this way, the system
knows which input to select for on-screen display functions. HDMI Control is
the Pioneer CEC system that enables control of display functions via the
control capabilities built into HDMI. You cannot use both the SR+ system and
the HDMI Control system and compatibility is not guaranteed with non-Pioneer
components.
Pioneer VSX-94TXH AXD7504 Learning Remote Control
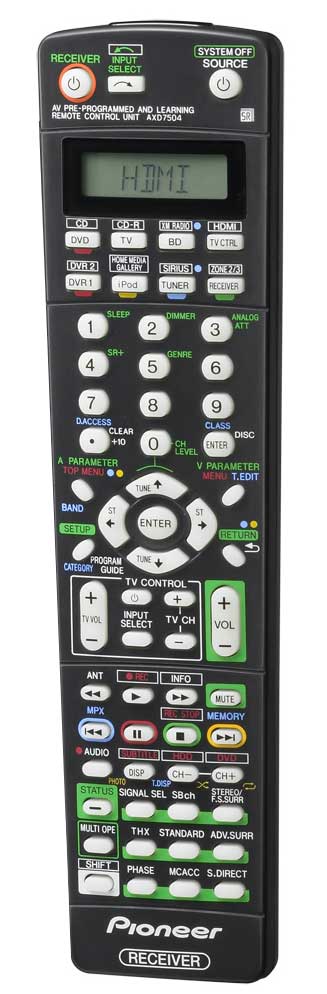 The only way I can describe this remote is to suppose that
somebody was getting paid by the button, while another got paid by the letter,
and still another was paid by the color. I have never seen such a cluttered
remote - this one is the worst I've seen in a long time, possibly in the
history of remotes (except for Sony's remotes, they are indeed worse than this).
The face of the remote looks like it was designed by the guy who works on the
Texas Instruments scientific calculators. At the very least it was someone who
felt that the use of color coordination, 'shift' keys and tightly spaced
buttons is the new wave in controlling a sophisticated remote in the dark. Oh,
and let's do it without any backlighting. While the keys glow in the dark,
their multi-level controls remain unusable without turning on a light source.
Now the good stuff. Nope, I have actually got nothing good to say.
The only way I can describe this remote is to suppose that
somebody was getting paid by the button, while another got paid by the letter,
and still another was paid by the color. I have never seen such a cluttered
remote - this one is the worst I've seen in a long time, possibly in the
history of remotes (except for Sony's remotes, they are indeed worse than this).
The face of the remote looks like it was designed by the guy who works on the
Texas Instruments scientific calculators. At the very least it was someone who
felt that the use of color coordination, 'shift' keys and tightly spaced
buttons is the new wave in controlling a sophisticated remote in the dark. Oh,
and let's do it without any backlighting. While the keys glow in the dark,
their multi-level controls remain unusable without turning on a light source.
Now the good stuff. Nope, I have actually got nothing good to say.
Source Switching
To switch sources you simply select that source on the remote using the top 8 buttons. If you want to use the Home Media Gallery, CD, CD-R, DVR, XM, Sirius or Zone 2/3, you'll need to use the 'Shift' key located at the bottom left of the remote. If you want to get into the Setup menu, you'll need to first select the 'Receiver' button. One thing I found refreshing is that the Tuner could be used straight away, with the remote offering instant tuning of radio station via the central keypad. The negative is that there is no way to "load up" the receiver with automatic search and storage of radio stations. You can also enter stations directly by hitting the period key and then typing in the numeric value. The system is smart enough to not allow you to dial to a station that doesn't exist in the spectrum (like 65.5 for example), but not smart enough to auto-complete after the first decimal position (I've never heard of a station that was 88.35 Hz, nor does the receiver allow you to tune to "hundredths" of MHz.) To tune to 88.5 you have to enter 8-8-5-0.
I programmed the remote using both the preprogrammed method as well as the learning mode. The first item I attempted to program was the TV button - setting it to my very popular Scientific Atlanta Explorer 3250HD set top box. The Pioneer remote couldn't successfully control the box, even after trying all five available codes. I attempted to put the set top box on the DVR1 button as well as the TV CTRL button - all with the same disappointing results. I finally resulted to learning the commands, button by agonizing button. I did manage to program a Denon DVD player into the remote using the preprogrammed codes, however the Source Power control defaulted to the discrete 'Power On' control, making it impossible to turn the DVD player off in a conventional way with the remote.
Programming Tip: If you want the dedicated TV CONTROL area on the remote to control your set top box, TV or DVR, be sure to program the device or learn these commands into the TV CTRL button.
After all was said and done, the Pioneer remote was a pretty big disappointment. It's certainly usable, in a "I love to torture myself" sort of way. If you can't see in the dark, and the thought of using a scientific calculator brings forth terrifying flashbacks to trigonometry class, then we'd recommend a good universal remote control instead.
Pioneer VSX-94TXH Home Media Gallery and Video Bench Testing
The Home Media Gallery is an interesting concept that is implemented about as good as the User interfaces for the first generation high-definition DVD players. That is to say, it's slow and clunky. Navigating around the system to access various areas is slow and tedious, with cursor actions being delayed from actual on-screen responses by around a full second. Even the User Manual is an add-on of sorts, coming as a separate pamphlet about 18 pages in length. In short - it needs some more work.
OK, now the good stuff. Setting up the Home Media Gallery was a snap. If you have a basic home network with a router sending out an IP address via DHCP you'll spend about 20 seconds getting the system ready. The only other thing to note is that the Pioneer HMG uses WMDRM (Windows Media Digital Rights Management). This means that you'll need to add the Pioneer HMG to Windows Media Player's allowed devices (under the Library tab in Options.) Once that's done, just go through the Setup menu of the HMG by selecting Setup and hitting 'Enter' on the remote. From here select Network Setup. If you have DHCP (most common) then select Automatic (DHCP). That's really about all there is. If you use static IPs or anything fancy then you can tweak your own way manually through the Setup - we won't cover that in this review.
Audioholics/HQV Bench Testing
Perfect Score is 130
VSX-94TXH Benchmark Score: 76
| Test | Max Points |
Component Results |
Component Pass/Fail |
| Color Bar | 10 | 5 | Pass |
| Jaggies #1 | 5 | 5 | Pass |
| Jaggies #2 | 5 | 5 | Pass |
| Flag | 10 | 10 | Pass |
| Detail | 10 | 10 | Pass |
| Noise | 10 | 5 | Pass |
| Motion adaptive Noise Reduction | 10 | 0 | Fail |
| Film Detail | 10 | 10 | Pass |
| Cadence 2:2 Video | 5 | 1 | Fail |
| Cadence 2:2:2:4 DV Cam | 5 | 0 | Fail |
| Cadence 2:3:3:2 DV Cam | 5 | 0 | Fail |
| Cadence 3:2:3:2:2 Vari-speed | 5 | 0 | Fail |
| Cadence 5:5 Animation | 5 | 0 | Fail |
| Cadence 6:4 Animation | 5 | 0 | Fail |
| Cadence 8:7 animation | 5 | 0 | Fail |
| Cadence 3:2 24fps film | 5 | 5 | Pass |
| Scrolling Horizontal | 10 | 10 | Pass |
| Scrolling Rolling | 10 | 10 | Pass |
| Total Points | 130 | 76 |
The VSX-94TXH was sent 480i via component from a Denon DVD-1930CI.
Comments on Bench Testing
We wanted to see if the Faroudja DCDi video processing performed as expected when upconverting standard definition video to the HDMI outputs. The only surprise was the slightly blurred Color Bar test results. The EOL vertical pattern just didn't have the punch we're used to seeing, though it didn't seem readily apparent in the Detail test that any resolution was being lost. The final score shows that the DCDi processing is doing its job and you can feel pretty good about sending standard definition video through this AV receiver.
HD Audio Support
Because the Pioneer VSX-94TXH supports HDMI 1.3a and nearly all that the spec entails, you can know that if you feed bitstream Dolby TrueHD or dts-HD Master Audio into the system, it will be decoded correctly and fed to the speakers in pristine high definition. Your toughest job will be finding a high definition Blu-ray player that can send out the audio natively. Fear not, though, as 7.1 channels of uncompressed PCM will sound just as good. Also remember, that no matter what the digital format, all audio sent into the AV receiver via HDMI will be properly bass managed by the system.
Pioneer VSX-94TXH Testing System and Listening Tests
Reference System 2 features an RBH Sound CinemaSITE system complete with a full 5.1 system of Signature SI-760/R speakers, a pair of 66-SE dipole surround speakers, and a pair of SI-1010P powered subwoofers. A 92-inch Masquerade projector screen masking system from Carada shows off the image from a reference Epson Pro Cinema 1080UB LCD projector. The room has been thoroughly treated with acoustical material, including both diffusion and absorption, provided by RPG Diffusors. An APC S15 system with additional SBATT provides power protection and runs the entire system on battery should 'Florida Flicker' power company decide to become lax in executing its duties. For sources I use a Toshiba HD-XA2 HD DVD player and a Denon DVD-3930CI DVD player. I also, on occasion, put up footage from the Xbox 360 to show off high definition gaming footage.
Listening Tests - Two-Channel
We put up a bunch of test discs, but disengaged the MCACC system's EQ in order to get a straight-up, undefiled comparison of the listening material. Focusing on two-channel is crucial in my opinion as it gives the receiver a chance to dump all of its power reserves into just two channels, rather than spreading the power supply thin across all 5 or 7 channels. We utilized some old standby reference material as well as some newer (for us) titles in order to get a clear appreciation of what this receiver could put forth.
CD: Porcupine
Tree - Deadwing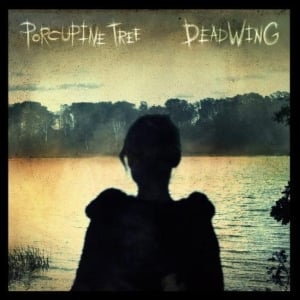 This album has a surreal, nearly ominous tone for much of its duration. The
title track quickly launches into a powerful wash of electric guitar and drums-laden
chords which push both bass and high-end to their limits. After the verse and
chorus a guitar solo really let me hear the articulate midrange that was
otherwise hiding behind the wall of sound which was so pervasive in this track.
Paying attention to cymbal hits and the almost aquatic-sounding synth sounds, I
felt that the Pioneer had a good handle on providing plenty of resolution to
the track. "Shallow" has a more coherent, chorused guitar track while
distorted vocals reveal, after the first verse, a clean midrange tonality. The
lower mid-bass was pushed hard by the cohesive bass-drum combination that drove
the chorus. I played this song LOUD (over 100dB peaks at the listening position
according to my SPL meter) and the VSX-94TXH had a lot more headroom left to
give. Even though I can, I simply
don't have any desire to push an AV receiver that loud for long and risk
damaging my hearing. Even at higher levels, the Pioneer continued to retain its
dynamics. Mated to good speakers, this is a receiver that can deliver truly
clean-sounding and powerful audio to ridiculous levels. Track 5 "Arriving
Somewhere But Not Here" was an obvious exercise in imaging, so present was
the musical content in the room. At times I felt the instruments come right out
of the main speakers towards the surrounds (which were not engaged) - an eerily pleasant effect of depth, but one that
caught me off guard the first time I heard it.
This album has a surreal, nearly ominous tone for much of its duration. The
title track quickly launches into a powerful wash of electric guitar and drums-laden
chords which push both bass and high-end to their limits. After the verse and
chorus a guitar solo really let me hear the articulate midrange that was
otherwise hiding behind the wall of sound which was so pervasive in this track.
Paying attention to cymbal hits and the almost aquatic-sounding synth sounds, I
felt that the Pioneer had a good handle on providing plenty of resolution to
the track. "Shallow" has a more coherent, chorused guitar track while
distorted vocals reveal, after the first verse, a clean midrange tonality. The
lower mid-bass was pushed hard by the cohesive bass-drum combination that drove
the chorus. I played this song LOUD (over 100dB peaks at the listening position
according to my SPL meter) and the VSX-94TXH had a lot more headroom left to
give. Even though I can, I simply
don't have any desire to push an AV receiver that loud for long and risk
damaging my hearing. Even at higher levels, the Pioneer continued to retain its
dynamics. Mated to good speakers, this is a receiver that can deliver truly
clean-sounding and powerful audio to ridiculous levels. Track 5 "Arriving
Somewhere But Not Here" was an obvious exercise in imaging, so present was
the musical content in the room. At times I felt the instruments come right out
of the main speakers towards the surrounds (which were not engaged) - an eerily pleasant effect of depth, but one that
caught me off guard the first time I heard it.
CD: Damien
Rice - O
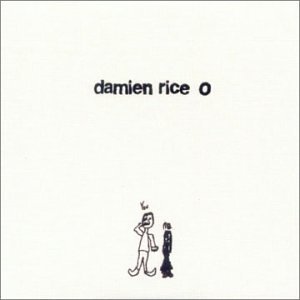 This album has some wide-ranging dynamics, lending itself to be an awesome
reference disc that I like to pull out for most of my reviews (whether or not
it makes it into the final copy). On "Delicate" a good AV receiver
will have Rice's voice positioned well into the room and allow me to hear the
slight crack in his tonality. The VSX-94TXH did just that and the violins,
panned mostly left in the first track, were absolutely raw and beautiful in
their reproduction. "Volcano" has a nice, almost Chinese-styled,
cello intro that gives over to bass and a deliberate working of cymbal bell
hits. Though this track would get lost on a system that didn't have enough
dynamics and control to handle the detail, the VSX-94TXH never once faltered. Finger
noises on the primary guitar are unmistakable and, while they will be picked up
by even the worst AV receiver in the world, the ultra high-end squeaks will not
come off with any clarity. Pioneer's receiver portrayed them authentically,
with all of the proper decay and no compression. Bass in this track was thick
and strong, pushing the speakers to their limits as the full complement of
sounds fill in the other frequency ranges. As the song wrapped up in a sort of
canon-style of vocal presentation, the Pioneer rendered the pleasant cacophony
with finesse, though it seemed that every sound and instrument possible was
firing off at once. Lastly, "Amie" featured twin acoustic guitars
with a mixture of truly 3-dimensional string effects that found their way well
into the room. Powerful strings enter the mix early in the song and filled the
listening room completely, putting me in the middle of a symphony hall. Reverb
was nothing short of perfect and the airiness presented by the Pioneer made me
appreciate the clean sound of this receiver.
This album has some wide-ranging dynamics, lending itself to be an awesome
reference disc that I like to pull out for most of my reviews (whether or not
it makes it into the final copy). On "Delicate" a good AV receiver
will have Rice's voice positioned well into the room and allow me to hear the
slight crack in his tonality. The VSX-94TXH did just that and the violins,
panned mostly left in the first track, were absolutely raw and beautiful in
their reproduction. "Volcano" has a nice, almost Chinese-styled,
cello intro that gives over to bass and a deliberate working of cymbal bell
hits. Though this track would get lost on a system that didn't have enough
dynamics and control to handle the detail, the VSX-94TXH never once faltered. Finger
noises on the primary guitar are unmistakable and, while they will be picked up
by even the worst AV receiver in the world, the ultra high-end squeaks will not
come off with any clarity. Pioneer's receiver portrayed them authentically,
with all of the proper decay and no compression. Bass in this track was thick
and strong, pushing the speakers to their limits as the full complement of
sounds fill in the other frequency ranges. As the song wrapped up in a sort of
canon-style of vocal presentation, the Pioneer rendered the pleasant cacophony
with finesse, though it seemed that every sound and instrument possible was
firing off at once. Lastly, "Amie" featured twin acoustic guitars
with a mixture of truly 3-dimensional string effects that found their way well
into the room. Powerful strings enter the mix early in the song and filled the
listening room completely, putting me in the middle of a symphony hall. Reverb
was nothing short of perfect and the airiness presented by the Pioneer made me
appreciate the clean sound of this receiver.
Listening Tests - Multi-Channel
This go-around I shied away from movies. To be honest, they mostly measure your AV receiver's ability to play loud and send a bass-managed signal to a subwoofer. Since most of you already realize that Transformers will sound awesome on this receiver, I felt it more important to focus on music - a much more difficult medium. To help me out with this task, I enlisted some classics as well as some more current products from our friends at AIX Records, who consistently put out top-quality 5.1 DVD-Audio discs with unique audience and "stage" mixes that audibly put you in the middle of the session as it's being recorded.
dts CD: Eagles - Hell
Freezes Over
 From the very outset, this album took my ears captive and held them until
the disc ended. Short, but sweet, "Tequila Sunrise" came through the
Pioneer VSX-94TXH as if it wasn't really there - so clear was the sound of the
up-front acoustic guitar and percussion which filled the surrounds. "Hotel
California" sounded so clear on the Pioneer, with the opening guitar solo
simply issuing forth from the CinemaSITE as if I were listening to the band
play live right in my living room. As crowd cheers and clapping poured into the
surrounds and the bass started to hit, the VSX-94TXH seemed to do a good job at
bringing out the special nuances in music that lesser receivers might gloss
over. Don Henley's vocals had such a pure, almost raw feel that it didn't sound
as if his lips had ever come in contact with a microphone - so honest was the
presentation. During "I Can't Tell You Why" the keyboard strings
gently floated into the room as Timothy B. Schmidt's falsetto voice carried out
the opening verse. I was close to listening to the entire dts album, but finally
stopped myself - after track 9 "New York Minute". I frequently use
this track to test out a receiver's ability to convey quality, extended reverb
through my system. The verb in this track is particularly smooth and
uncompressed, and the CinemaSITE presents it unrestrained, allowing me to test
an AV receiver's ability to correctly portray the track. The Pioneer didn't let
me down and carried the detail of the piece, unmolested, to my ears.
From the very outset, this album took my ears captive and held them until
the disc ended. Short, but sweet, "Tequila Sunrise" came through the
Pioneer VSX-94TXH as if it wasn't really there - so clear was the sound of the
up-front acoustic guitar and percussion which filled the surrounds. "Hotel
California" sounded so clear on the Pioneer, with the opening guitar solo
simply issuing forth from the CinemaSITE as if I were listening to the band
play live right in my living room. As crowd cheers and clapping poured into the
surrounds and the bass started to hit, the VSX-94TXH seemed to do a good job at
bringing out the special nuances in music that lesser receivers might gloss
over. Don Henley's vocals had such a pure, almost raw feel that it didn't sound
as if his lips had ever come in contact with a microphone - so honest was the
presentation. During "I Can't Tell You Why" the keyboard strings
gently floated into the room as Timothy B. Schmidt's falsetto voice carried out
the opening verse. I was close to listening to the entire dts album, but finally
stopped myself - after track 9 "New York Minute". I frequently use
this track to test out a receiver's ability to convey quality, extended reverb
through my system. The verb in this track is particularly smooth and
uncompressed, and the CinemaSITE presents it unrestrained, allowing me to test
an AV receiver's ability to correctly portray the track. The Pioneer didn't let
me down and carried the detail of the piece, unmolested, to my ears.
DVD-Audio: Laurence
Juber - Guitar Noir Laurence Juber's Guitar
Noir is an incredibly pure music experience, with single guitar, bass and
percussion driving the majority of songs. Juber's style is very authentic and
almost super-acoustic, largely because he doesn't seem to ever use a pick - at
least not in any of the songs I touch upon here. The opening title song put
forth Juber's dynamic solo guitar playing in a truly live way. I was playing
the Stage Mix version of this disc and, between the Pioneer's authentic
rendition of the upright bass and the subtle but clear percussion emanating
from mostly the right surround, it was like sitting on the floor in the midst
of something very grand. What was great about these tracks was how the Pioneer
was being forced to route power to all of the speakers in equal portion -
treating the surrounds as equals. Rather than playing second fiddle, the
surrounds were equally detailed and exquisite, showing me that care was given
by the VSX-94TXH to all channels. "Mosaic" is another solo guitar
exercise, with a shaker and ultra-high chimes that were well-produced by the
tweeters and remained uncompressed as they danced through the room. Both track
5 "Rules of the Road" and track 9 "Stolen Glances" began
with some interesting finger slaps on acoustic guitar that really came through
with exceptional crispness and presented yet another great source for testing
the ability of the Pioneer to handle quick dynamics that didn't sound slurred
and suffered none of the sloppiness a less-equipped receiver might produce.
Laurence Juber's Guitar
Noir is an incredibly pure music experience, with single guitar, bass and
percussion driving the majority of songs. Juber's style is very authentic and
almost super-acoustic, largely because he doesn't seem to ever use a pick - at
least not in any of the songs I touch upon here. The opening title song put
forth Juber's dynamic solo guitar playing in a truly live way. I was playing
the Stage Mix version of this disc and, between the Pioneer's authentic
rendition of the upright bass and the subtle but clear percussion emanating
from mostly the right surround, it was like sitting on the floor in the midst
of something very grand. What was great about these tracks was how the Pioneer
was being forced to route power to all of the speakers in equal portion -
treating the surrounds as equals. Rather than playing second fiddle, the
surrounds were equally detailed and exquisite, showing me that care was given
by the VSX-94TXH to all channels. "Mosaic" is another solo guitar
exercise, with a shaker and ultra-high chimes that were well-produced by the
tweeters and remained uncompressed as they danced through the room. Both track
5 "Rules of the Road" and track 9 "Stolen Glances" began
with some interesting finger slaps on acoustic guitar that really came through
with exceptional crispness and presented yet another great source for testing
the ability of the Pioneer to handle quick dynamics that didn't sound slurred
and suffered none of the sloppiness a less-equipped receiver might produce.
DVD-Audio: The Carl Verheyen
Band - Rumor Mill Guitar fingering and lick'in good, this uncompressed
and effects-free DVD-Audio disc is an exceptional source that will bring any
flaws in your system front and center. Now that I had recently listened to some
acoustics tracks, I wanted to go back and queue up some electric guitar and
drums to give a listen to some "thicker" tracks and hear how the
Pioneer handled a more dynamic piece. The VSX-94TXH handled the cymbal decays
in track 9 "Holly House" without any of the tell-tale muted
compression you can observe in underpowered systems. Pioneer's flagship
receiver dealt with this bluesy rock tune authoritatively and allowed me to
crank it up to over 103dB (measured peaks) at the listening position (albeit I
didn't do this for long) without introducing any noticeable compression, even
on the difficult crashes and Hammond B3 organ which ramps up in the final parts
of the song. Track 10 "Passing Through" introduced Carl's vocals (raw
and unrefined, but passable) and an aggressive 5-string bass and drums that
really broke through the mix and challenged the Pioneer's dynamic capabilities.
This DVD-Audio disc really worked the Pioneer to untold levels, but no matter
how hard I tried (reviewers are sadistic at times when it comes to testing
gear) I couldn't really get it to audibly distort, compress or otherwise give
out and underperform my expectations.
Guitar fingering and lick'in good, this uncompressed
and effects-free DVD-Audio disc is an exceptional source that will bring any
flaws in your system front and center. Now that I had recently listened to some
acoustics tracks, I wanted to go back and queue up some electric guitar and
drums to give a listen to some "thicker" tracks and hear how the
Pioneer handled a more dynamic piece. The VSX-94TXH handled the cymbal decays
in track 9 "Holly House" without any of the tell-tale muted
compression you can observe in underpowered systems. Pioneer's flagship
receiver dealt with this bluesy rock tune authoritatively and allowed me to
crank it up to over 103dB (measured peaks) at the listening position (albeit I
didn't do this for long) without introducing any noticeable compression, even
on the difficult crashes and Hammond B3 organ which ramps up in the final parts
of the song. Track 10 "Passing Through" introduced Carl's vocals (raw
and unrefined, but passable) and an aggressive 5-string bass and drums that
really broke through the mix and challenged the Pioneer's dynamic capabilities.
This DVD-Audio disc really worked the Pioneer to untold levels, but no matter
how hard I tried (reviewers are sadistic at times when it comes to testing
gear) I couldn't really get it to audibly distort, compress or otherwise give
out and underperform my expectations.
Pioneer VSX-94TXH Measurements and Analysis Report
Frequency Response
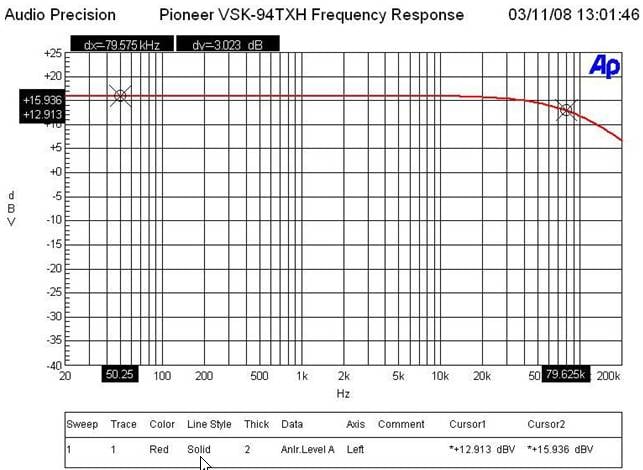
Pioneer VSX-94TXH Frequency Response
The -3dB point for the VSX-94TXH was around 80kHz which is plenty of bandwidth for high resolution audio.
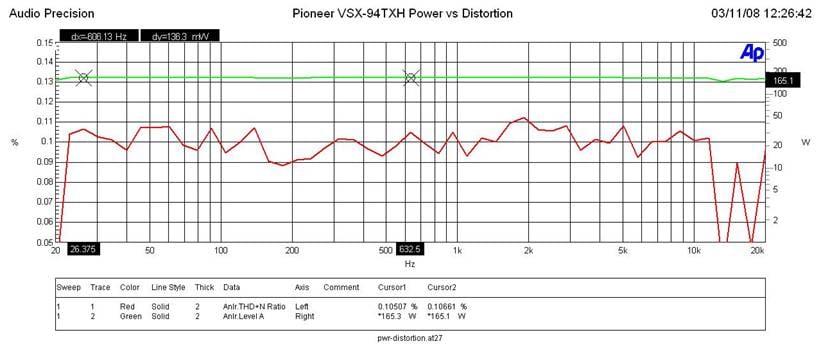
Pioneer VSX-94TXH Power vs Distortion
I measured continuous power vs distortion by setting up a regulated sweep in my Audio Precision to automatically adjust input level until the maximum power output is achieved at < 0.1% THD + N. The VSX-94TXH was plugged directly into an APC S-15 Power Conditioner with regulation to ensure the line never dropped below 118Vrms.
Power output: <0.1% THD + N for Pioneer VSX-94TXH
- 165wpc x 1; 8 ohms
- 155wpc x 2 ; 8 ohms
- 270wpc x 1 ; 4 ohms
- 225wpc x 2 ; 4 ohms
Power output: <0.1% THD + N for the Marantz SR7002
- 144wpc x 1; 8 ohms
- 128wpc x 2 ; 8 ohms
- 180wpc x 1 ; 4 ohms
- 170wpc x 2 ; 4 ohms
The Pioneer VSX-94TXH is definitely more powerful than the similarly priced Marantz SR7002 counterpart, especially into 4 ohm loads. In contrast, the Yamaha RX-V2700 receiver equaled the power into 4 ohm loads of the Pioneer.
Editorial Note on Audioholics Power Measurements
Keep in mind most review publications don’t do continuous power measurements and they usually publish power measurements into clipping at 1% THD + N. Our measurements are very conservative and it is clear that the 140wpc power rating of this receiver is understated as Pioneer is delivering MUCH more than specified for 1 or 2 channels driven. For more info on amplifier measurements, see: The All Channels Driven (ACD) Test
FFT Distortion Analysis
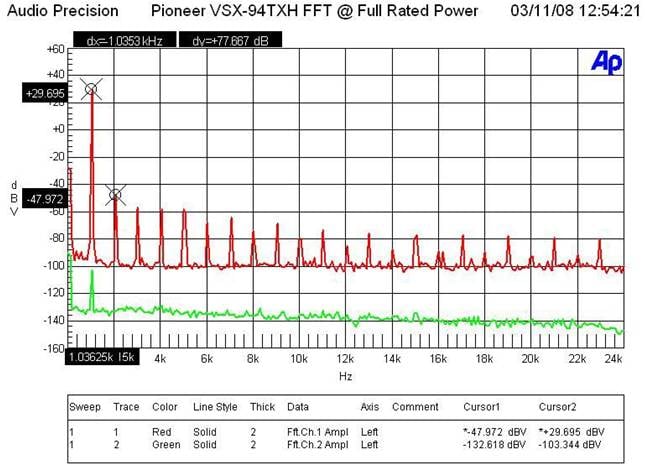
Pioneer VSX-94TXH FFT Distortion Analysis at Full Rated Power
At near full rated power (116wpc, 8 ohms) the VSX-94TXH exhibited average distortion measurements (29.695+47.972)dBv = 77.7dBv or 100*alog^-1(-77.7/20) = .013% THD + N. These results were a tad worse than I measured on the Marantz SR7002 and not nearly as good as I’ve seen on similarly priced units from Yamaha and Denon.
SNR @ 1 watt
With 200mV in and driving the amp to 1 watt at 8 ohms, I measured a good Signal to Noise Ratio of around 75dB (unweighted) which was a bit better than the Marantz counterpart but not quite as good as the Denon and Yamaha units.
Output Impedance vs Frequency
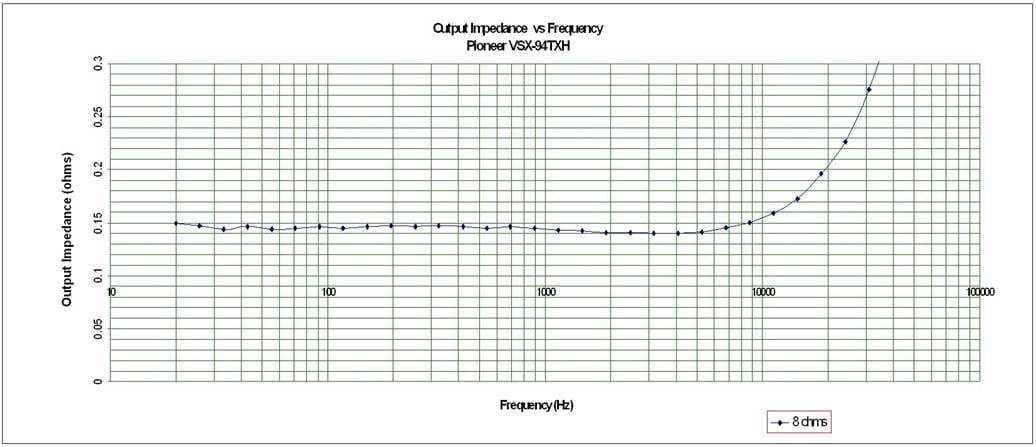
Pioneer VSX-94TXH Output Impedance vs Frequency
The VSX-94TXH exhibited decent but not stellar output impedance maintaining around 150mohms for the audible frequency range of 20Hz to 20kHz when driving 8 ohm loads. This was considerably higher than the 100mohms I measured on the Marantz SR7002 and the under 100mohm measurements I pulled on the Yamaha RX-V2700. While this is still a much better measurement than you’d get with a tube amp, the VSX-94TXH has the potential to sound more “different” when driving a variety of low impedance speaker loads compared to the other receivers mentioned here.
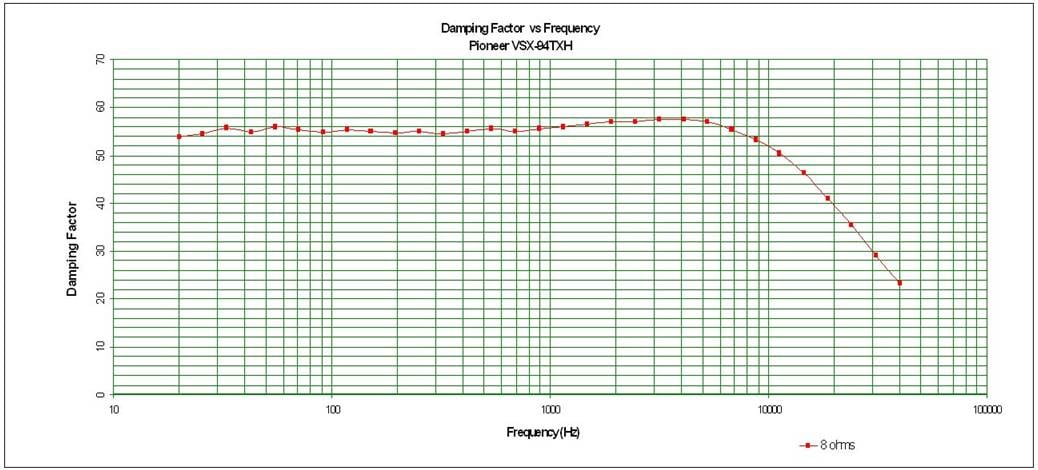
Pioneer VSX-94TXH Damping Factor vs Frequency
The VSX-94TXH, displayed a good damping factor commensurate with the output impedance the amp section exhibited. It just maintained the minimum 50 rating that we like to see when driving an 8 ohm load.
Pioneer VSX-94TXH Conclusions and Overall Perceptions
The Pioneer VSX-94TXH is a solid, well-built 7-channel receiver. The flaws it has are mostly in peripheral areas that certainly don't affect sound quality or its overall audio/video performance. Still, with the amount of competition at this price range, Pioneer has a little ways to go before it is a clear leader. For now, those who love Pioneer can rest assured that this flagship product will deliver power in droves and will receive and decode the latest high definition audio formats, Video processing is above-par and the VSX-94TXH's ability to network with your home PC is a cool feature that gives it all that much more functionality. It's also a very beautiful receiver. For the marketplace in general, I'd probably encourage everyone to take a look at all the available options before plunking down their money on this product. For those who consider power to be king, give the Pioneer a second look - it's got that department nailed.
Pioneer VSX-94TXH
MSRP $1800
Pioneer Electronics
1925 E. Dominguez St.
Long Beach, CA 90810
Call (800) 421-1404
www.pioneerelectronics.com
About Pioneer Electronics
Pioneer’s Home Entertainment and Business Solutions
Group develops high definition home theater equipment for discerning
entertainment junkies. Its flat panel televisions, Blu-ray Disc players, A/V
receivers and speakers bring a new level of emotion to the HD experience. The
company brands include Pioneer and Elite®. When purchased from an authorized retailer,
consumers receive a limited warranty for one year with Pioneer products and two
years with Pioneer Elite products. More details can be located at
www.pioneerelectronics.com.
The Score Card
The scoring below is based on each piece of equipment doing the duty it is designed for. The numbers are weighed heavily with respect to the individual cost of each unit, thus giving a rating roughly equal to:
Performance × Price Factor/Value = Rating
Audioholics.com note: The ratings indicated below are based on subjective listening and objective testing of the product in question. The rating scale is based on performance/value ratio. If you notice better performing products in future reviews that have lower numbers in certain areas, be aware that the value factor is most likely the culprit. Other Audioholics reviewers may rate products solely based on performance, and each reviewer has his/her own system for ratings.
Audioholics Rating Scale
 — Excellent
- — Very Good
- — Good
- — Fair
- — Poor
| Metric | Rating |
|---|---|
| Frequency Response Linearity | |
| SNR | |
| Output Impedance | |
| Measured Power (8-ohms) | |
| Measured Power (4-ohms) | |
| Multi-channel Audio Performance | |
| Two-channel Audio Performance | |
| Network Features | |
| Video Processing | |
| Bass Management | |
| Build Quality | |
| Fit and Finish | |
| Ergonomics & Usability | |
| Ease of Setup | |
| Features | |
| Remote Control | |
| Performance | |
| Value |
Clint Deboer was terminated from Audioholics for misconduct on April 4th, 2014. He no longer represents Audioholics in any fashion.
View full profile