
Pioneer Elite VSX-82TXS Receiver Review
- Product Name: Elite VSX-82TXS Receiver
- Manufacturer: Pioneer
- Performance Rating:

- Value Rating:
- Review Date: October 17, 2006 19:00
- MSRP: $ 1200
Power
Surround Power: 130W x 7 (20Hz-20kHz, 8-ohms, .09% THD FTC)
Stereo Power: 130W x 2 (20Hz-20kHz, 8-ohms, .09% THD FTC)
Digital Decoding & Processing
Digital Engine: New Sharc-EX + 48-bit Freescale DSP
Dolby Digital 5.1, Dolby Digital EX, DTS 5.1, DTS-ES Discrete 6.1, DTS
96/24, DTS NEO: 6, Pro-Logic IIx, Windows Media(R) Audio 9 –
Professional, THX Select2, Air Studios Tuning, Advanced Surround Modes,
Sound Retriever, Virtual Surround Back, Midnight Listening, Dialog
Enhancement, Hi-Bit Sampling, Loudness
Analog to Digital Conversion: 96 Khz / 24-Bit
Digital Analog Conversion (DAC): 192 kHz / 24-Bit
Calibration:
Advanced
MCACC, Speaker Identification, Speaker Size, Speaker Level, Speaker
Distance, Acoustic Equalization (9 Band Adjustable), Phase Control,
Standing Wave Control, X-Curve Compensation, Advanced MCACC 3-D Display
via PC
Convenience
On-Screen Display, Dot Matrix Display
Remote Type (LCD Preset / Learning Remote with Preset Multi-Operation)
- Pre-programmed, Learning, IR Macro Commands
Warranty: Elite 2 Year Warranty
Connectivity
Analog Audio Inputs/Outputs – 4/3 (includes tuner)
Phono Input
Digital Inputs – 7 (5 optical, 2 coax)
Optical Digital Outputs - 1
Multi-Channel Input - 8 Channel
Audio Pre-Output - 8 Channel
Composite Video Input - 7
Composite Video Output - 2
S-Video Input - 5 (includes front)
S-Video Outputs - 2
Component Video Inputs/Outputs – 3/1 (100MHz)
HDMI Inputs/Outputs – 3/1
Video Scaler - Faroudja DCDi - 480P, 720P, 1080i
Video Conversion – HDMI, Component, S-video
Headphone Output
Multi-Room and Source Output - 3 Zone - Main, 1 A/V, 1 Digital Audio
12 Volt Trigger - 2
Front A/V Inputs
RS-232C
System Remote Plus (SR+) Port
IR In/Out
Speaker B - B Speaker or Surround Back Speaker
Assignable Surround Back Speaker - 4 Mode - Normal / 2nd Zone / Front Bi-Amp / MR&MS
Made for iPOD (audio, video, photo. Cable included),
XM Ready, XM HD with Neural Surround
Dimensions (inches) - 16.54 x 7.36 x 18.35 (WxHxD)
Weight: 35.1 lbs.
Pros
- Lots of inputs
- Plenty of power
- Fairly well written manual
- One of the better auto calibration system’s on the market
Cons
- Video conversion adds artifacts
- Limited variability on crossover
- Obfuscating remote
- OSD missing AV Parameter menu
 Pioneer Elite VSX-82TXS Introduction

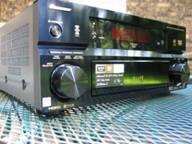
The Pioneer VSX-82TXS is quite a looker. Even though it spends most of its natural life in the dark, the few times it does see the light of day, it never fails to impress. The front plate has a reflective finish that is the bane of the photographer (notice the reflections?) but the boon of the owner. You can get lost in that faceplate. The display is adequate for viewing from a distance though many of the less important readouts are invisible from more than a foot away. What is most important in day to day operation is what mode you are currently in and the volume. The mode is clearly visible at all times though the volume is a bit small at rest. When making changes, the volume takes stage center and is clearly visible. If I had to make a change to the display, I'd make the readout to which speakers are currently receiving input a bit bigger. On my Denon AVR-3805 , you can see a graphical representation of what is coming in and what is going out (2 speakers in, 7.1 out for example). With the 82TXS, there is a graphical representation of what is coming in. I'd like to have both but if they are going to stick with only the inputs, I'd like to make it a bit bigger. It just seems a little too close together and condensed at the top.
Pioneer Elite VSX-82TXS Build Quality and Setup
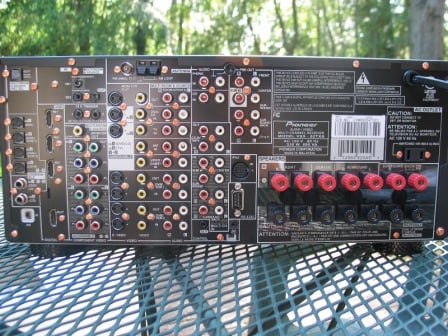 As you can see from the specifications above, there are a ton of inputs on this receiver. Three component, three HDMI, four optical, two coaxial, and a set of 7.1 analogue inputs... the list goes on. The unit is XM-ready and can be connected to your iPod with an included cable. At the time of this review I had what can only be described as an obscene number of products in-house to test with. I had no problem connecting everything I needed with plenty of room to grow. The three HDMI inputs are more than any but the most gear-happy users will ever need. One thing that I really liked is how much room there was between the speaker terminals. If you were going to attach your speakers via bare wire, I felt like you'd have a lot more room to get your hands in there to feed in the wire.
There is an onscreen display of the menu system which is nice. It is a bit rudimentary (white text on a black background) but functional. I would have liked to have seen an onscreen overlay of the volume when making a change. Personally, I find this to be one option I can't do without. Fortunately, the readout on the receiver was easily viewable from all the seating positions in my room but I know that this isn't the case for everyone. As an aside, the readout of the volume on the display shows to one decimal point. But you can only change the volume by a full decibel. So basically, it always reads .0. I scoured the manual looking for a way of enabling volume change at the .5 level but to no avail.
Installation and Setup
The menu system on the 82TSX is surprisingly intuitive and easy to navigate. There are a couple of terms that you won't know without looking at the manual. Once you do, you can promptly forget them because you probably won't use them. The most important of the menus are the Surr Back System , the Manual SP Setup, and the Input Setup. Anyone need me to translate those? The unit is defaulted to a 7.1 setup with all speakers set to small and the crossover set to 80Hz. Beautiful. I didn't have to touch it. And neither should most people.
The Surround Back System menu simply has you scroll between Normal (surround backs on), Second Zone , Front Bi-Amp, Multi Room & Source . If you were going to use this receiver in a 5.1 setup and didn't want to use the extra amps for anything, there isn't a way to just shut them off from this menu. You need to do it from the Manual Speaker Setup menu described below. So, I'm sure you are wondering what the difference is between Second Zone and Multi Room & Source . According to the manual, the Second Zone is just for stereo playback, Multi Room & Source allows video to be sent as well. But what does that mean? I hooked it up to check. You can have a maximum of three zones (including the main listening room). Here's where it gets tricky: the second Multi Room zone will only support analogue audio plus iPod and XM Radio. The third multi-zone (connected to the optical digital audio output of the receiver) will take only digital audio input sources. The second Multi Room zone can use the Surround Back amplifiers if they are assigned to this function in the Surround Back System menu. Confused? Here, the generally well written manual completely failed. It was only through trial and error that I figured out what I did.
The Manual SP(eaker) Setup menu is fairly intuitive but it does have a couple of confusing terms. The Speaker Setting submenu lets you choose the size of your speakers (Small/Large/Off) and your crossover (50, 80, 100, 150, 200Hz). The limited number of crossover points is disappointing. Once again there is a bit of logic behind the speaker settings. If you don't set your mains to Large, nothing else can. You can't set your main speakers to Small if you don't have a subwoofer. You can't turn off the Surrounds and have the Surround Back speakers "On". Yes, it is all very logical. One thing I really liked was the THX recommended settings. Every time you selected a speaker it would tell you what THX recommends (all speakers set to small, crossover at 80Hz). This is also a good reminder of what the defaults are.
Also under Manual SP(eaker) Setup is a couple of more confusing menus. First is Bass Peak Level . It is actually what it sounds like - it limits the Maximum volume your subwoofer will play. When adjusting this setting, the receiver puts out a test tone. You increase the volume of the test tone until it is as loud as you ever want it to go. If you have neighbors that constantly complain, you could have them tell you when they can start hearing/feeling your sub... and then bump it up a few dB.
The last menu that needs describing is the X-Curve . According to the manual, movies can sound too bright in large rooms. In reality, the term describes the standard pink noise target curve used in most motion picture dubbing stages and movie theaters throughout the country. This setting (basically a renamed version of the traditional THX Re-EQ setting) lets you correctly roll off frequencies above 2kHz to compensate for the differences between a movie theater (typically very damped and large) and a smaller, less-damped, home theater room. They even have a little chart in the manual that correlates the setting to the square footage of your room. It is only to a maximum of 3dB so even if it is engaged accidentally (default is "Off"), it shouldn't make too drastic of a difference. This setting is only to be used for movie modes and not music. It is disengaged during THX movie modes as the THX DSPs apply Re-EQ automatically.
The Input Setup menu is nicely laid out with the name of the input across the top with all the available connection types on the bottom. So if your DVD is connected into the HDMI-3 and Optical-1 inputs, you set the digital in to Opt1 and HDMI to 3. Not exactly hard. This is a lot better than having to navigate separate Audio Input and Video Input menus as found on most receivers.
Pioneer Elite VSX-82TXS Video Processing and MCACC
Video processing is really what a lot of people are concerned about at this time. As HDMI becomes more and more common, we are going to see a lot of the web of A/V connections reduced to just a few wires. For now, most of us have a mishmash of components that have different output capabilities. What we want is something that takes all that and transfers it all to component or HDMI so that we are only having to run a single wire to the display. This simplifies our lives as the video is automatically switched when you change sources on your receiver. The VSX-82TXS is supposed to be able to convert any incoming signal to all the different monitor outs.
In the course of reviewing this receiver I noticed some visual artifacts on the display that seemed static - some vertical lines that ran across the screen mostly at the bottom and top of the display. Unfortunately, I had a display in for review the same time I was reviewing the 82TXS so it took me a while to identify the problem. I thought I had a bad monitor until I ran a 6.75 MHz test and the display failed. For those of you that don't know, this is a 480p test. There is no way that display should have failed (it was 720p capable). So, off I went to test the connections and discover the cause. Eventually, I figured out that when I turned the video conversion "Off" so that all the unit was doing was switching, it passed the 6.5 MHz test and the artifacts went away. On a whim, I went back and sent the unit a 480i signal. With a 480i signal, the unit passed the 6.75 MHz test. It seems that sending the unit a progressive signal caused it to fail the test.
But that was not the end of the saga. Buried deep in the AV Parameter menu is an option called Resolution. You can select Pure , 480p , 720p , or 1080i depending on your display capabilities (the default is Pure) . Once I selected 720p , I found that the unit now passed the 6.75 MHz test on both component and HDMI. But I still noticed some visual artifacts on the HDMI output. If I sent a 480i signal, I noticed the visual artifacts on both component and HDMI. I've informed Pioneer of my findings and will report back once they respond.
MCACC Automatic Calibration
I was very excited to use the MCACC automatic calibration system. I wasn't sure exactly what it could do but I could tell from the menus that it seemed to be highly user configurable. While I don't have the equipment on hand to check the accuracy of the system I could compare my manual settings to the MCACC settings. When implementing the MCACC, I set the supplied microphone on a tripod at ear level at the sweet spot. The mic plugged into the front of the unit and had a long enough cord to reach my prime listening area two times over. I did the testing at night when the house was the quietest and turned the AC off (a big sacrifice in Florida during summer). I left the room and only popped in to hit OK when prompted:
Table 1: Speaker Settings
|
Channel |
Size Manual |
Size MCACC |
Level Manual |
Level MCACC |
Distance Manual |
Distance MCACC |
|---|---|---|---|---|---|---|
|
Left |
Small |
Large |
0.0 |
0.0 |
9.5 |
9.5 |
|
Center |
Small |
Large |
0.5 |
-1.0 |
9.0 |
9.5 |
|
Right |
Small |
Large |
0.5 |
-0.5 |
9.5 |
9.5 |
|
SR |
Small |
Large |
-2.0 |
-2.0 |
7.5 |
7.0 |
|
SBR |
Small |
Small |
0.0 |
-0.0 |
7.0 |
6.5 |
|
SBL |
Small |
Small |
0.5 |
0.5 |
7.0 |
6.5 |
|
SL |
Small |
Large |
1.0 |
0.5 |
7.5 |
7.0 |
|
Sub |
Yes |
Yes |
-1.5 |
-1.5 |
8.5 |
25.5 |
It apparently came to the conclusion that my fronts and surrounds were Large. This is a common occurrence on auto calibration systems and is a result of the system factoring in a reasonable low frequency extension for main speakers that isn't 20Hz (typically 50Hz will net you a "Large" setting). When I checked the EQ curve it was trying to boost 63Hz by 8dB or more. Luckily both the distances and the levels were all fairly close save the subwoofer distance. This is very common as the on-board DSP in many receivers cannot correctly capture the information needed to correctly place a subwoofer. In addition, many subs with DSP andor undefeatable crossovers also cause difficulties. Your best bet is to use common sense and reference the subwoofer distance based on your main speakers.
The way to go with the MCACC is to run it at ALL which sets the speaker levels and distances (especially handy if you don't have an SPL meter). Go back and modify the distances and types. Then you can rerun it using only the Acoustical Cal EQ Pro to make sure that the settings aren't too far off because of incorrect speaker size or distance. It won't overwrite your speaker settings but it will overwrite your EQ settings.
Table 2: EQ Settings
|
Frequency |
Left |
Center |
Right |
Surround Right |
Surr Back Right |
Surr Back Left |
Surround Left |
|||||||
|
Me |
Pio |
Me |
Pio |
Me |
Pio |
Me |
Pio |
Me |
Pio |
Me |
Pio |
Me |
Pio |
|
|
125Hz |
-1.5 |
0.5 |
-7.0 |
-8.0 |
1.5 |
3.0 |
-4.5 |
-7.5 |
-1.5 |
-2.5 |
-1.5 |
-2.5 |
-4.5 |
-6.0 |
|
250Hz |
1.5 |
-2.0 |
0.0 |
-2.0 |
1.0 |
-2.5 |
-1.5 |
-4.5 |
-2.5 |
-8.0 |
-6.0 |
-8.5 |
0.0 |
-3.0 |
|
500Hz |
-1.5 |
-1.0 |
0.0 |
0.0 |
-3.0 |
-2.0 |
-4.0 |
-2.5 |
-0.5 |
1.5 |
0.0 |
1.5 |
2.5 |
1.0 |
|
1kHz |
-1.0 |
.0.5 |
-3.5 |
-4.0 |
-0.5 |
-0.5 |
1.5 |
3.0 |
-4.0 |
-2.5 |
-2.5 |
-1.5 |
1.5 |
3.5 |
|
2kHz |
-0.5 |
0.0 |
1.0 |
1.5 |
-0.5 |
-1.0 |
2.0 |
2.5 |
1.5 |
2.0 |
0.0 |
1.0 |
3.0 |
3.5 |
|
4kHz |
-3.5 |
-4.0 |
-3.0 |
-1.5 |
-4.0 |
-3.0 |
-1.0 |
0.5 |
-2.5 |
-2.5 |
-2,5 |
-1.0 |
-1.5 |
0.5 |
|
8kHz |
3.0 |
3.0 |
1.5 |
1.5 |
3.0 |
2.5 |
2.5 |
3.0 |
1.5 |
3.0 |
2.0 |
2.0 |
-2.0 |
-1.0 |
|
16kHz |
-2.5 |
-2.0 |
2.5 |
3.0 |
1.5 |
1.0 |
-3.5 |
-3.5 |
-2.0 |
-1.5 |
0.0 |
.05 |
-8.5 |
-8.5 |
|
TRIM |
1.0 |
0.5 |
1.5 |
2.0 |
1.5 |
1.5 |
-0.5 |
-1.5 |
1.5 |
2.0 |
2.0 |
1.0 |
-2.0 |
-3.0 |
Table 2 shows the EQ setting when I set the speaker levelsdistance (labeled Me) and when the MCACC set the distance/levels (labeled Pio). I did all this to show you what you probably wouldn't have believed if I had just stated it. Even with the wrong speaker sizes the two are pretty close. I noticed that at 125Hz and 250Hz the Pio setting is quite a bit lower than the setting achieved when I set the speaker type, level, and distance. Other than that, though, they are pretty close.
I wanted to see if I could hear the difference between these two and more importantly, compared to a baseline with the EQ off. I listened to some music at first and I definitely heard a difference (described later) but then I got the bright idea of trying out my Avia disc. Under the Audio Calibrations menu I looked at the Verification/Evaluation tones. I went ahead and chose the Wideband Pink, 5 Channel Pan and the 150 HighPass Pink, 5 Channel Pan. I didn't think it was fair to look at any of the low frequency sweeps as the MCACC doesn't really do anything to the sub. As the test tone circled around the room, it quickly became evident that the EQ was doing something. With the EQ off I perceived a much fuller sound with substantially more midrange. The EQ setting based on my speaker settings had reduced midrange but not as much as the MCACC only EQ. Now, is this a bad thing? Not necessarily. If I have a midrange bump based on my room, perhaps it is making it sound better. I won't know until I get to the listening tests.
It should also be noted that the MCACC has six different memory locations so that you can save different settings. If you want to calibrate the system for a different seat based on activity (if you watch movies from the couch and play video games from the recliner for example) you can do that. You can also have the MCACC calibrate for three different seats at once. In our opinion, it will typically be better to utilize this feature and capture more than one location of data, since you may have a particular issue at the listening position that doesn't exist at other seats. The result may be an extreme compensation that would otherwise negatively affect the remaining seats in the theater,
You can also adjust and/or re-measure a number of different aspects including the channel level, speaker distance, standing wave, and reverb time. The one thing that I found had the most bearing on the sound difference I was noticing was the standing wave. If I switched that off, it would almost sound identical to the un-EQed sound. This makes sense as the standing wave setting seeks to filter out overly resonant sounds (it is essentially a 3-band parametric EQ):
Table 3: Results of the Standing Wave adjustment
|
Setting |
Me |
Pio |
||||
|
Freqency |
250Hz |
149Hz |
201Hz |
136Hz |
110Hz |
220Hz |
|
Q (bandwidth) |
2.0 |
3.6 |
3.6 |
5.0 |
3.0 |
9.8 |
|
Attenuation |
-2.5 |
-6.0 |
-5.5 |
-6.0 |
-4.5 |
-4.5 |
Apparently, the Pioneer thinks I have a problem between 150 and 250Hz. This easily explains why I was hearing so much more lower midrange from the unEQed setting.
Pioneer Elite VSX-82TXS DSP Modes and Remote Control
I've covered all the DSP modes used by the VSX-516 in its review and thought I could skip this section. Pioneer has added for the Elite receiver a number of additional DSP effects for almost every conceivably listening experience. Aside from the normal Dolby, DTS, and THX modes for converting a stereo signal to 5 or 7.1, Pioneer has included for movie viewing:
- Action
- Sci-Fi
- Drama
- Musical
- Monofilm - creates a surround field from mono soundtracks
- 7-D Theater - creates a surround field from stereo source
For music:
- Classical
- Chamber
- Jazz
- Rock
- Dance
Other:
- 7ch Stereo - Takes a stereo source and extends it on each side to all speakers
- Adv. Vir. Surr - Virtual surround using just the mains and the sub
- Phonesur - Surround through headphones.
Personally, I prefer to listen to a source the way it was recorded but I did test these out. 7ch Stereo is pretty cool if you want to listen to something loud. I didn't find a whole lot of difference between Action/Sci-Fi/Drama/Musical but I could tell it was doing something. DSP modes are heavily dependant on your personal tastes so expect to spend some time testing these out.
I preferred to use what Pioneer termed Stream Direct. Stream Direct removes as much of the DSP from the signal path as possible. There are three options under Stream Direct to choose from:
- Auto Surround - Selects the appropriate playback typology. So if you send a stereo signal, you get stereo playback. If you send a DTS 5.1 signal, you get DTS (or DTS+Neo:6 if you have surround back speakers) playback.
- Direct - The only change to the signal comes from your settings (speaker size, channel level, distance, acoustic calibration EQ, and X-Curve). If you put in a 5.1 signal and you have a 7.1 system, the surround back channels are unused.
- Pure Direct - There is no change to the input signal (any channel leves/calibration is ignored).
If I had full-ranged front speakers and was listening to a stereo source, I would probably use Pure Direct . In my current setup, I generally used Direct or Auto . Just like the VSX-516, the DSP modes can be modified via the AV Parameter menu. Unfortunately, this menu is only viewable from the front display of the unit. If you are going to provide an onscreen display for the setup menu, I felt like it the AV Parameter menu should have been accessible onscreen as well. Most of the options are just toggles but some have a 20 point range. While I don't mind some of the menu items staying where they are, the display specific options at the very least should make their way to the onscreen display.
Other Functionality
Ok, I don't own an iPod... and not just because certain people at Audioholics seem to be allergic to Macs. I just feel like people that get iPods and MP3 players get them so they can use them when they work out. And frankly, I get enough, "Don't you think you should go to the gym?!" from my wife, I don't need it from a cute music player too. I will say that the iPod interconnectivity of the VSX-82TXS almost makes me want to get one. Almost. Basically, you can plug the iPod into the receiver through a supplied cable and the receiver can control the iPod. It displays your catalog of music on your display and you can browse by playlist, artist, album name, song name, or composer. Then you can listen to your iPodded music in all its compressed glory in your home theater! Bully for you!
A while back I reviewed the dealer-targeted Antex XM-3000 so I've had some experience with the satellite radio provider. The VSX-82TXS is XM-ready meaning all you need is an antenna and a subscription and you are set to go. After that, you can navigate the XM menu using your display. There is even an XM specific DSP to decode XM HD Surround. I'd have liked to have tested that as well but my time with the unit was limited and we had neither an antenna nor a subscription available to us.
Pioneer VSX-82TXS Remote Control
I rarely say I like a remote much less love one. I don't often say I hate a remote either. I'm about to do one of those. Wanna guess which? The VSX-82TXS remote is very reminiscent of every single VCR remote I've ever owned except it is jam packed with itty bitty buttons and it has a small ~8-character LCD near the top. The remote is color coordinated to match the functions of whatever source you are controlling. This has the added advantage of giving the same button multiple functions. Like up to three. Plus, it makes it look like Christmas threw up all over it. For some reason, selecting a source also shifts the remote to control of that source. So if you want to watch a DVD, suddenly your setup menu button doesn't work anymore. To say that I hate this remote is a grand understatement. This is the Sméagol of remotes. Luckily, I don't have to look at it very often because it isn't backlit (not even the LCD screen). Do yourself a favor, get a universal remote and burn this thing in effigy.
Pioneer Elite VSX-82TXS Measurements & Analysis
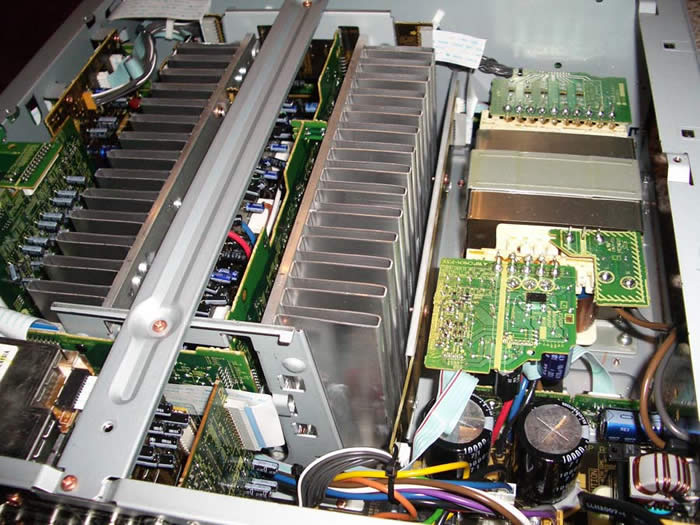
The Pioneer VSX-82TXS houses a 690VA Transformer, two 10,000uF 71V caps which is a fairly robust power supply for a receiver in this price class. 60V caps would have been sufficient to yield 130wpc power figure this receiver boasts, but its nice to see they have some design margin which ensures the caps will never be in an over voltage situation even if the voltage fluctuates dramatically during a high line condition. Taking this receiver apart was a bit of a pain thanks to its 21 chassis screws. I was starting to think this receiver was HEMP hardened to withstand a nuclear pulse.
Preamp
The preamp section was able to accommodate up to 4Vrms in and deliver up to 7Vrms out into a 100 ohm load without clipping or distortion. This is a much higher voltage than will ever be seen in real world audio signals and indicates this receiver will mate well with a variety of power amplifiers if more power is needed.
SNR Tests
I was mildly disappointed with the higher than average SNR measurements I got from this receiver. With 200mV in and 1 watt out, I was able to achieve 76.8dBv (unweighted) which is about 6dB worse than I've seen on similar priced receivers from Yamaha or Denon. With the power section bypassed, the preamp delivered a slightly better SNR (78dBv) as expected. If you mate this receiver with high efficient speakers in close proximity to the listening position, you may detect a slight audible hiss during low passages.
Amplifier Efficiency
Amplifier Efficiency Measurements for linear a/b amps such as the ones employed in this receiver typically range from 40-50% depending on the load the power supply of the amplifier sees. The closer you get to full load, the higher the efficiency usually becomes (assuming you aren't over taxing the power supply and power devices of the amp causing excessive thermal losses). The Pioneer VSX-82TXS achieved around 50% efficiency which was quite impressive for a receiver employing a conventional linear amp design.
|
# Ch |
Power Consumption |
Power Delivered |
Load |
Efficiency |
|---|---|---|---|---|
|
1 |
333 watts |
166 watts |
8 ohms |
50 % |
|
2 |
477 watts |
138 watts |
8 ohms |
57 % |
|
1 |
477 watts |
235 watts |
4 ohms |
49 % |
|
2 |
747 watts |
190 watts |
4 ohms |
51 % |
Note: All power output figures above were conducted at 1kHz and 0.1% THD + N
Power Bandwidth
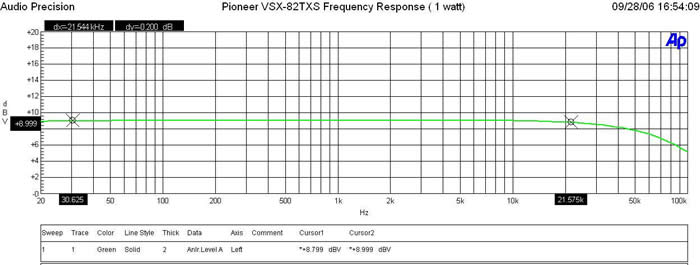
The Pioneer VSX-82TXS possesses a wide bandwidth amplifier topology with a -3dB point in excess of 85kHz.
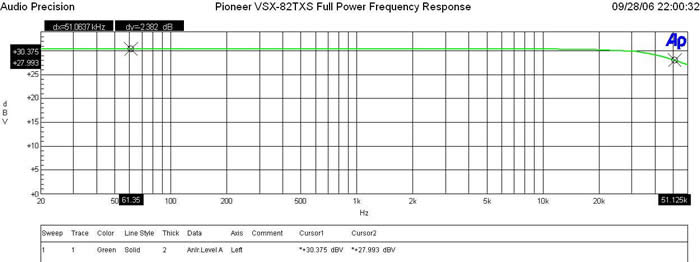
At full continuous unclipped power (166wpc x 1; 8 ohms, 138wpc x 2; 8 ohms - full bandwidth with less than 0.1% THD+N), the Pioneer VSX-82TXS still maintained good bandwidth linearity with a -3dB point of 51kHz despite we were driving the receiver way beyond its rated 130wpc power specification. Into 4 ohms, the VSX-82TXS was able to deliver continuous power levels at a whopping 235wpc x 1 and 190wpc x 2 with less than 0.1% THD + N. The amplifier section of this receiver is conservatively rated. Kudos to Pioneer.
Keep in mind most review publications don't do continuous power measurements and they usually publish power measurements into clipping at 1% THD + N. Our measurements are very conservative and it is clear that this receiver is a true workhorse for its asking price.
For more info on amplifier measurements, see: The All Channels Driven (ACD) Test
FFT Distortion Analysis
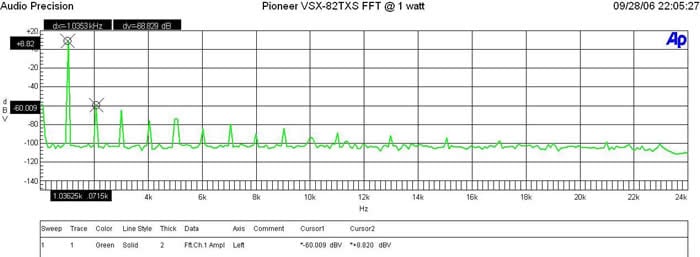
At 1 watt into 8 ohms, the PA350B exhibited impressively low distortion (8.82+ 60.009)dBv = 68.83dBV or 100*alog^-1(-68.83/20) = .04% THD + N which is clean as expected but not as stellar as similarly priced units we've tested in the past including the budget Yamaha RX-V659.
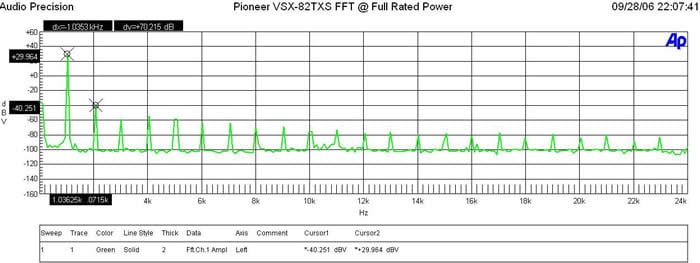
(29.964 + 40.251)dBv = 70.22dBv or 100*alog^-1(-70.22/20) = .03% THD + N which is still quite good and indicative that this receiver can deliver more juice beyond its power rating.
Amplifier Output Impedance & Damping Factor
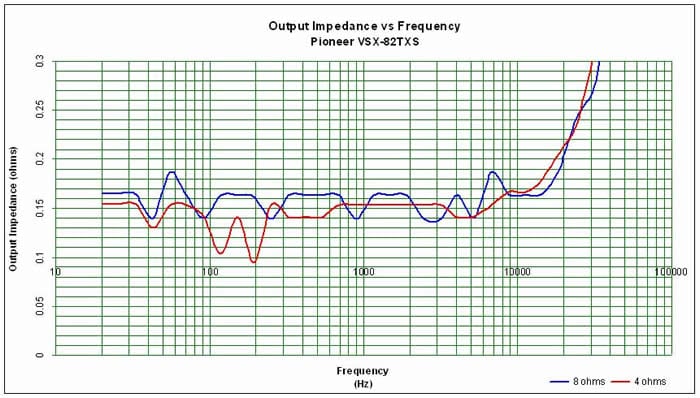
The amplifier output impedance was around 150mohms (a bit higher than our desirable 100mohm or less mark) for the entire audible bandwidth up to 10kHz with sharp increase above at the upper 20kHz frequency range. This is good performance for an A/V receiver though not quite as stellar as we've seen in similarly priced units from the likes of Denon and Yamaha.
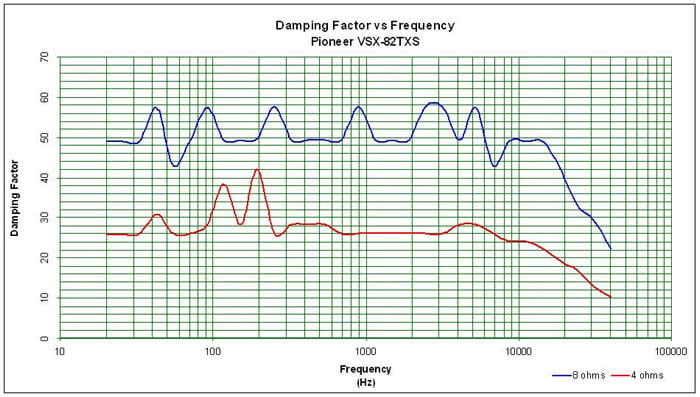
The amplifier damping factor is about what I expected based on the measured output impedance. It is uniformly good across the entire audio frequency range just barely meets our 50 mark for an 8 ohm load we like to see as a minimal requirement for receivers. All in all, it's a good measurement and this receiver will likely be able to consistently drive a wide range of loudspeakers with good results. We do suggest sticking with speakers that don't dip below 3 ohms for best results.
Pioneer Elite VSX-82TXS Listening Tests and Conclusion
I used the music listening tests mostly to evaluate the performance of the receiver overall and the MCACC system specifically. I chose a couple of multi-channel albums mostly because the MCACC works on each speaker individually.
Marillion - Marbles on the Road
I've grown quite fond of this DVD since Gene shoved it down my throat so long ago. I've since picked up a few of Marillion's studio albums but I guess I'll always have a soft spot for this one as it is still my favorite. I spent a lot of time switching between the different MCACC settings and quickly decided that the Pioneer-only settings were not going to work. I focused on the non-EQ and the EQ settings based on my speaker settings. I mostly noticed the differences in some of the vocals and the top end of the bass guitar. Overall, without the MCACC, the sound was fuller but definitely a bit more reverberant. At times I preferred the MCACC setting but at other times I didn't. It sometimes seemed to recess the soundstage or make some of the instruments sound hollow. I definitely preferred the MCACC off, but I can't say if that is because it sounded more familiar to me or if it was because it was better. I decided to move on.
Blue Man Group - The Complex
You know what's great about this album? Nearly everything. It is a great test piece for evaluating equipment, it is a great surround sound demo, and it is frankly a lot of fun to listen to. The first track, Above, builds slowly introducing the listener to the instruments and sounds they are about to experience. This was a great track to use to flip between the two settings as it allowed plenty of time to listen to one and then the other before a new instrument was added. The difference between the two settings was significant. There was no denying that a sound that took center stage was suddenly missing with the MCACC engaged. The more I listened, the more I became convinced that the MCACC was making the music sound less present. Recessed. Sterile. You come up with an adjective. I won't say that it destroyed the music or really harmed it significantly. I would just have the MCACC engaged for a while and think I was enjoying myself. The minute I realized it was still engaged and switched it off, I found myself saying, "Yea, that's better." So far, the MCACC software isn't a rousing success, but it isn't terribly destructive either.
Morcheeba - Charango
Morcheeba is one of my new favorite "background music" artists. The slow driving beat mixed with her sensual vocals is the perfect accompaniment to almost any activity. Of course you have to skip over the track "Women have to lose weight" if you don't want to get backhanded. I decided to give the volume button a bit of a workout during this test. I've driven my Denon AVR-3805 pretty hard in the past but I found the Pioneer to have a bit more oomph than I was expecting. Long before I reached reference levels (0dB on the dial) my speakers started to distort. Usually, I have to push the Denon quite a bit harder. The VSX-82TSX had power reserves I wasn't quite expecting.
Listening Tests - Movies
Blade II
I'm sure I could come up with a number of valid reasons for watching this movie for this review but the real reason is because of the DTS ES 6.1 Surround Sound track. I wanted to give this multi-channel receiver a chance to do what it was made to do. Surround me with sound in an immersive and convincing way. I wanted to feel like I was in the movie. And did the Pioneer disappoint? Not in the least. I switched the MCACC on and off a few times to see if I noticed much of a difference - and I did... occasionally. It was hard to verify though because sounds in movies are so much more fleeting. On movies the effect was much less pronounced. Regardless, Blade II didn't fail to deliver on the surround effects nor the LFE - and the VSX-82TXS didn't even hiccup. Even when I kicked the wife and kids out and blasted it.
Sin City
Frank Miller is a god. OK, I said it. The Dark Knight Returns , Ronin , Hard Boiled... The list of credits goes on and on. I was glad to see his Sin City comic get such a faithful translation to the big screen. After some of the drivel that has come from the "mind" of Robert Rodriguez since Desperado, I was a bit worried. And who would have thought Mickey Rourke had a decent performance left in him? I would have lost that bet if someone had asked. Of course, watching Clive Owen try not to have a British accent was a painful experience. Sure there are lots of special effects and LFE, but that is not why I chose this movie. I wanted to see how the Pioneer would handle some of the more subtle sound effects. People breathing, rain, whispers, a softly played piano... Sin City is full of these more delicate sounds. Again, I was impressed with how adroitly and convincingly all these effects were rendered. The VSX-82TXS had the power reserves to handle the explosion and gunfire without losing control of the sound effects that are so important to the atmosphere that Robert Rodriguez used to convey Frank Miller's stylistic art.
Conclusion
There are a number of functionalities not covered by this review. With a receiver at this level, it is easy to get bogged down in the details. What the masses want is a big picture. And the big picture is that the VSX-82TXS is capable receiver with some caveats. Video conversion is a problem so until Pioneer works that out, you may have to limit yourself to using the same input for all your components. The remote is a disaster but I don't hold that against the unit. There seems to be power to spare and enough features to keep you tweaking for years. The amplifier section measures well and should prove capable for most speakers. I really like that the MCACC takes multiple measurements. This should improve significantly the accuracy of the auto calibration.
For the majority of the people out there, setting up the Pioneer VSX-82TXS will be a breeze. The menus are intuitive, the defaults are all very good, and the MCACC can almost set up your speaker sizes and distances perfectly. With the multiple memory slots of the MCACC, you can have it calibrated in a number of different ways and find out what works best for you or you can just let it set your speaker size and distances and be done with it (don't forget to check the sizes and the subwoofer distance). The short version of this story is that the general user can set up this receiver quickly and be perfectly happy with it. The high end user can set it up quickly and tweak it to their hearts content. Within the MCACC, almost every parameter is adjustable. When you are done with that, you can go through each and every DSP and tweak them as well. After that, you still have the iPod and XM functionalities to play with not to mention... and the list goes on. The balance the Pioneer VSX-82TXS strikes between ease of initial set-up and depth of configuration will please the audiophobic and the audiophile alike!
The Score Card
The scoring below is based on each piece of equipment doing the duty it is designed for. The numbers are weighed heavily with respect to the individual cost of each unit, thus giving a rating roughly equal to:
Performance × Price Factor/Value = Rating
Audioholics.com note: The ratings indicated below are based on subjective listening and objective testing of the product in question. The rating scale is based on performance/value ratio. If you notice better performing products in future reviews that have lower numbers in certain areas, be aware that the value factor is most likely the culprit. Other Audioholics reviewers may rate products solely based on performance, and each reviewer has his/her own system for ratings.
Audioholics Rating Scale
 — Excellent
- — Very Good
- — Good
- — Fair
- — Poor
| Metric | Rating |
|---|---|
| Frequency Response Linearity | |
| SNR | |
| Output Impedance | |
| Measured Power (8-ohms) | |
| Measured Power (4-ohms) | |
| Multi-channel Audio Performance | |
| Two-channel Audio Performance | |
| Video Processing | |
| Bass Management | |
| Build Quality | |
| Fit and Finish | |
| Ergonomics & Usability | |
| Ease of Setup | |
| Features | |
| Remote Control | |
| Performance | |
| Value |
As Associate Editor at Audioholics, Tom promises to the best of his ability to give each review the same amount of attention, consideration, and thoughtfulness as possible and keep his writings free from undue bias and preconceptions. Any indication, either internally or from another, that bias has entered into his review will be immediately investigated. Substantiation of mistakes or bias will be immediately corrected regardless of personal stake, feelings, or ego.
View full profile