
Marantz SR7002 Receiver Review
Marantz SR7002 HDMI Receiver
- Product Name: SR7002 AV Receiver
- Manufacturer: Marantz
- Performance Rating:


- Value Rating:
- Review Date: March 22, 2008 21:35
- MSRP: $ 1399
|
|
Pros
- THX Select2 Certification
- 4 x HDMI 1.3a inputs; 2 x HDMI outputs
- Dual component video outputs
- Deep Color, xvYCC Support
- Dedicated Zone 2 Remote
- RS-232C control & dual 12V triggers
Cons
- Only 480i/p upconversion via HDMI
- Can use only one HDMI output at a time (not parallel)
- Remote has quirky pre-programmable functions
Marantz SR7002 Introduction
Internally, we are dubbing 2008 "The Year of the Receiver." Ever since CES we've been excited about getting our hands on some of the year's newest products which boast so much in terms of features and value. If you travel back 8-9 years ago most flagship receivers, for around $1700, offered 5 channels of amplification, Dolby Digital and a fixed 90Hz subwoofer crossover. Component video inputs weren't yet available (and just forget about video conversion) and digital video certainly wasn't even in anyone's thoughts.
Fast forward to 2008 and the playing field is awash with multiple manufacturers throwing in their weight behind products that contain more features than we would have ever thought possible at these prices. HDMI switching is now available at less than $400, but the Marantz SR7002 hits home at that critical flagship-but-not-priced-as-one level. At just under $1400, the SR7002 provides those features that really make an AV receiver sing - features that aren't available at lower prices. Features a true Audioholics craves.
A New Breed of Marantz Receiver?
There are so many features being added to AV receivers these days, it's hard to keep up - but that's what I like to call a quality problem. The real problem is discerning which of the features really matter. For those of you familiar with past Marantz products, you may be surprised to note that the company is alive and well and competing head-on with other manufacturers in the home theater market. In fact, I was as stunned as anyone when I realized the incredible potential of the x002 series. A quick market comparison yields the following models for analysis. We realize not every manufacturer is listed here, but you'll get at least a good partial view of the marketplace:
| Manufacturer | Marantz | Denon | Yamaha | Onkyo | HK | Pioneer |
|---|---|---|---|---|---|---|
| Model | SR7002 | AVR-3808CI | RX-V1800 | TX-SR805 | AVR347 | VSX-92TXH |
| MSRP | $1399 |
$1599 |
$1299 |
$1099 |
$899 |
$1300 |
| HDMI In/Out |
4/1/1* |
4/1 |
4/1 | 3/1 | 2/1 | 3/1 |
| HDMI version |
1.3a |
1.3a | 1.3a | 1.3a | 1.1 | 1.3a |
| Deep Color |
Yes |
Yes | Yes | Yes | No |
Yes |
| xvYCC | Yes | Yes | Yes |
Yes |
No |
Yes |
| HDMI Upconversion |
480p |
1080p |
1080p | 1080p | 720p |
1080p |
| THX Certification |
Select2 |
No |
No | Ultra2 |
No | Select2 |
*The Marantz is spec'd as having 4 HDMI inputs and 2 outputs, however it can only utilize 1 HDMI output at a time. In our opinion, this deserves a designation of 4/1/1 rather than 4/2.
Compared to the competition, the Marantz has a lot going for it. That's not to say it's the clear leader in every way, but there are several features that may be very tempting to those shopping for a future-ready product:
- THX Select2 Certified
- Support for Dolby TrueHD, Dolby Digital Plus, dts-HD Master Audio
- Deep Color, xvYCC and SACD Support by HDMI
- Up-Conversion (w/TBC) to HDMI with 480i/480p Converter
- Dual Component Outputs
- XM HD Surround by Neural THX Technologies
- M-DAX (Marantz Dynamic Audio eXxpander) for Compressed Audio
- Audyssey MultEQ
- RS-232C control, IR Flasher Input and two 12VDC triggers
- 2nd Zone Audio/Video Output
- RC8001SR Main-Room & RC101M Multi-Room Remotes Included
First Impressions & Build Quality
I hadn't played with a Marantz receiver in many years - certainly not since they brought their products into the realm of modern-day receivers with all the technologies consumers expect. The difference is, Marantz did it at a surprising value and seems to be one of the manufacturers currently dominating the sub-flagship market. I say this because of the THX certification, dual HDMI and component video outputs, and their integration of such technologies as XM, Audyssey MultEQ and powered Zone 2 with video. Upon unpacking the receiver I first recognized that it was a serious piece of equipment, weighing in at just over 33 lbs and standing 7-1/4 inches tall. I lugged it into Reference System 2's equipment rack and configured it for use with my RBH Sound CinemaSITE 5.2 system. The Marantz is a pretty receiver, with an oil-damped mechanism hiding the majority of front controls. This leaves the Aux inputs, Volume and Source selection knobs plus a headphone output in plain view along with the detail-rich fluorescent (FL) display. Speaking of front controls, there are enough to just about run the entire AV receiver should you ever lose the all-important remote control.
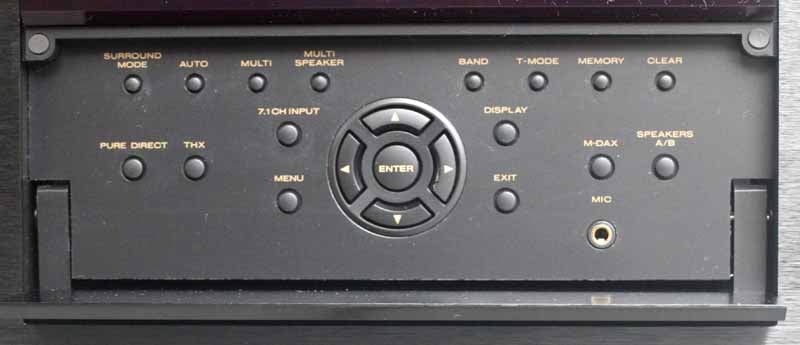
The front panel allows you to access Surround modes, Multi-room and Multi-speaker settings, radio functions and other features. Note that the Mic input is here for running the on-board Audyssey MultEQ system and you have direct access over the Setup menu and enabling A-B speakers. Marantz' M-DAX (Marantz Dynamic Audio eXpander) can also be turned on here, allowing you to expand MP3 and AAC-encoded files for a fuller sound and a recapturing of higher-frequency content.
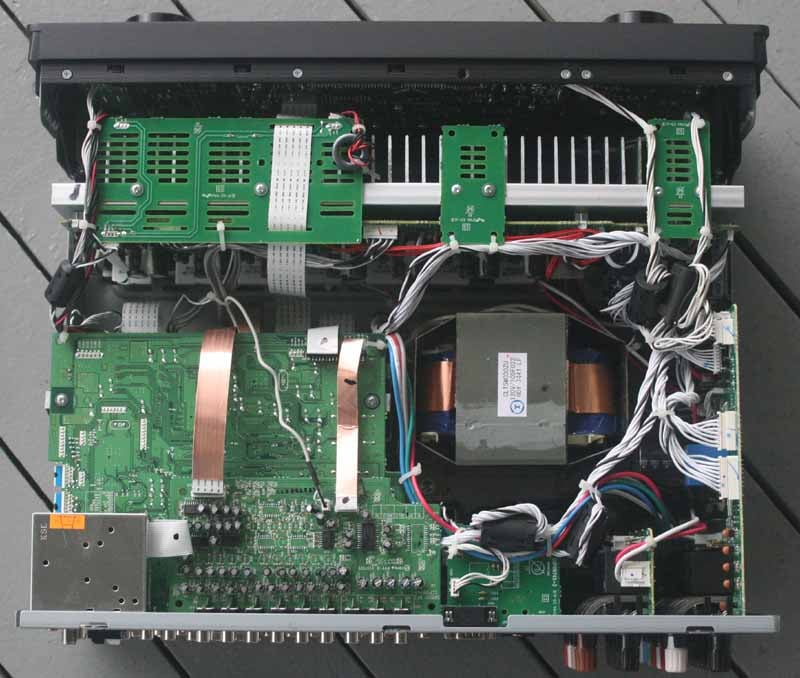 Inside
(I couldn't help but crack open the unit to see what made up the internals) the
Marantz SR7002 is packed solid. I mention this because I have opened up
products in the past only to find a "box of air" with a scant few
circuit boards littered around a small power supply. Mind you, this hasn't been
the case with many receivers, but so-called "high-end" processors are
notorious for their simplification. The SR7002 is so packed with boards,
capacitors, and other components that I could hardly believe enough air
circulated to keep the unit from overheating. Peer straight down into the box
and you'll note the giant EI transformer positioned near the middle of the
chassis (incidentally, the more expensive flagship SR8002 model utilizes a
toroidal transformer). Surrounding it are a myriad of power supply components which
presented enough specs to reassure me it would get the job done. The
transformer and power supply seemed sufficiently isolated from the audio
components which led me to believe Marantz paid attention to the needs of its
audiophile base. In addition, the receiver features independent power supply
components for the FL display, so you won't get any of the telltale RF interference
which can transfer if it isn't sufficiently isolated.
Inside
(I couldn't help but crack open the unit to see what made up the internals) the
Marantz SR7002 is packed solid. I mention this because I have opened up
products in the past only to find a "box of air" with a scant few
circuit boards littered around a small power supply. Mind you, this hasn't been
the case with many receivers, but so-called "high-end" processors are
notorious for their simplification. The SR7002 is so packed with boards,
capacitors, and other components that I could hardly believe enough air
circulated to keep the unit from overheating. Peer straight down into the box
and you'll note the giant EI transformer positioned near the middle of the
chassis (incidentally, the more expensive flagship SR8002 model utilizes a
toroidal transformer). Surrounding it are a myriad of power supply components which
presented enough specs to reassure me it would get the job done. The
transformer and power supply seemed sufficiently isolated from the audio
components which led me to believe Marantz paid attention to the needs of its
audiophile base. In addition, the receiver features independent power supply
components for the FL display, so you won't get any of the telltale RF interference
which can transfer if it isn't sufficiently isolated.
Marantz SR7002 Basic Setup and Multi-Room Use
Setting up the SR7002 is not exactly brain surgery, but let's go through some of the steps to make sure the process is covered in its entirety. If you're new to modern receivers or having an on-screen display, the key is simply making your way through the system in order and knowing what's important and what should be left alone. In the case of the SR7002, Marantz has made their OSD simple and as intuitive as can be expected. Those who are used to some more complex systems will call it very simplified. Some manufacturers are moving to a GUI interface, which is nice except when it interferes with the usability of the system (common). Marantz has employed the KISS method where simplicity and straightforwardness rules the day.
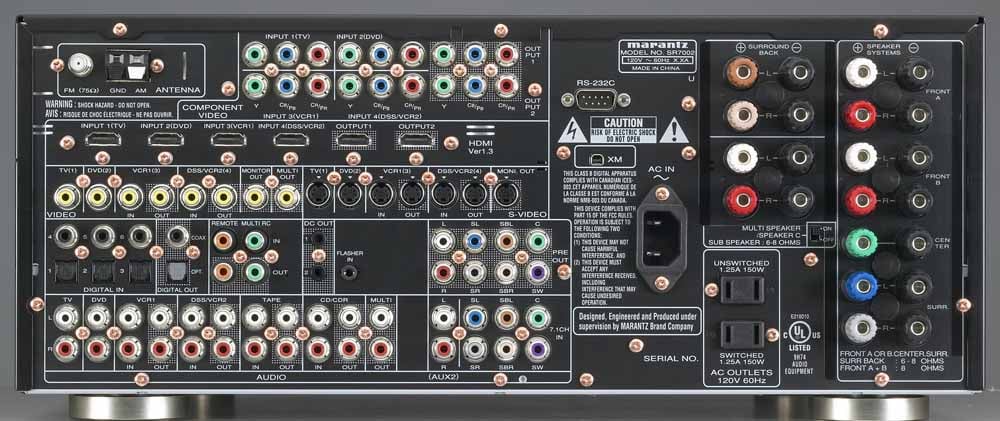
Back
Panel of the Marantz SR7002 7.1 Home Theater Receiver
Physically, you'll want to start by connecting your inputs and outputs. Yes, that sounds obvious, but this is how you can keep from getting overwhelmed when hooking up such an advanced AV product. Taking a look at the rear of the SR7002, note that the connections do indeed have default designations for TV, DVD, VCR, etc. I'd recommend attempting to connect your products to the corresponding inputs whenever possible. Apparently, Marantz believes that no one uses CableTV, so use either TV, DSS or VCR1 for any set-top cable boxes you may be connecting. The rear panel in general is organized by connector type, rather than numbered or labeled input - making it a tad difficult if you're used to other receiver manufacturers like Yamaha or Denon.
You'll have no choice but to note the colorful speaker binding posts on the rear of the unit. Marantz is utilizing the new CEA-863-A connector color standards for surround sound. Some will find this helpful, some confusing, and others will simply feel like it makes the rear of the receiver look like an advertisement for a new round of colored M&Ms. Hook up your speaker cables by connecting them to the rear 5-way binding posts as indicated. If you have a 5.1 room, you won't be utilizing the brown and beige Surround Back connections. If you have a second Zone, you'll want to connect those speakers to the Red and White Multi Speaker binding posts (we'll cover more on this later).
Audio connectivity is also flexible and straightforward. If you have a Blu-ray or HD DVD high definition disc player, you can send high resolution audio via either HDMI or 7.1 analogue inputs. These inputs could alternatively be used for legacy DVD-Audio or SACD players that don't support HDMI output. The SR7002 also has 7.1 analogue preamp outputs for use with an external 7-channel amplifier. This means that you can upgrade this receiver down the road to add more power and still enjoy all 8 channels of the new HD audio formats.
Setting Up the Receiver – Multi-Room Use
 One
major feature that will be (hopefully) utilized by owners of the SR7002 is its
Multi Room feature. The way the Marantz SR7002 works, you can have both Surround
Back speakers and a separate Multi Zone configured. Using the OSD you can
switch between using the Surround Back or the Second Zone. What this means is
that you never have to switch the cabling behind the AV receiver and can
hard-wire your second zone permanently. The thing to understand about these
connections is that they can be used in two different ways:
One
major feature that will be (hopefully) utilized by owners of the SR7002 is its
Multi Room feature. The way the Marantz SR7002 works, you can have both Surround
Back speakers and a separate Multi Zone configured. Using the OSD you can
switch between using the Surround Back or the Second Zone. What this means is
that you never have to switch the cabling behind the AV receiver and can
hard-wire your second zone permanently. The thing to understand about these
connections is that they can be used in two different ways:
- Speaker
C (Bi-amp Mode)
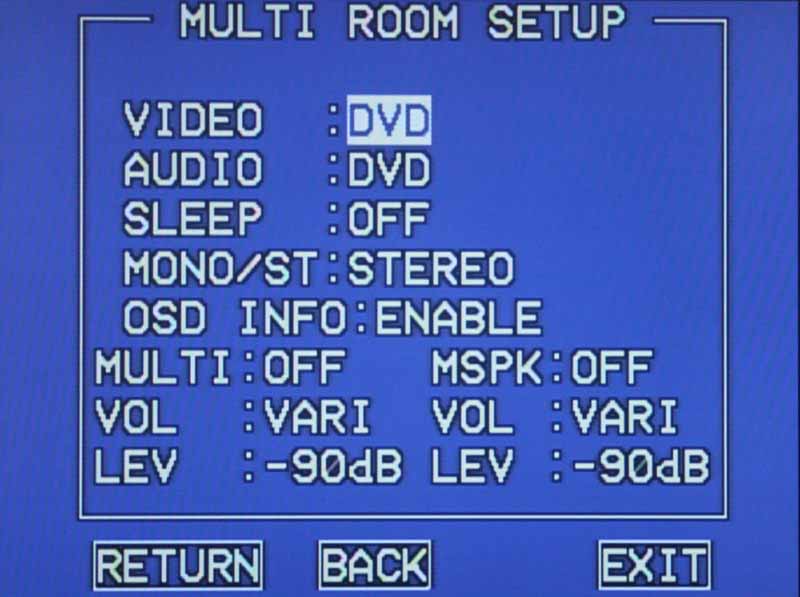
With the rear switch sent to 'On' the Brown and Beige speaker connector pairs can be used to bi-amp your front speakers, sending the additional amps (typically used for the Surround Back speakers) to deliver power to the high and low inputs of your speakers separately. Make sure that in the Multi Room setup menu of the OSD you have MSPK (Multi Speaker) set to OFF. The correct level for bi-amp mode is set automatically by the receiver.
- Multi
Speaker (Zone 2 Mode)
With the rear switch sent to 'Off' the Brown and Beige speaker connector pairs can be used to send a discrete audio (and corresponding video) source to a second zone in another room. To enable this you'll need to go into the OSD's Multi Room Setup and set MSPK (Multi Speaker) to ON. Controlling the volume for this second Zone can be done via the main remote (for the Multi Speaker outputs) and the Zone 2 remote (for the Multi preamp outputs)
The other thing that may come in handy when setting up a Second Zone is that the SR7002 can send out the signal as a mono source. This means you can look at the Multi Speaker outputs as two mono 110W amplifiers which can be routed to several areas of the home. My second zone goes to my back yard and supplies audio for parties and get-togethers which we throw from time to time. No matter how you use it, the SR7002 seems ready to put your music where, and how, you want it.
Marantz SR7002 Advanced Setup and Menu System
Advanced setup begins with the Audyssey MultEQ system. Since we've gone over this system in excruciating detail a number of times before, I'll simply detail my settings and observations here. The results of the distances derived by the auto setup were nearly dead on with my manual measurements for main speakers (performed using the Speaker Setup menu), but the subwoofer was off as expected. You can see here that the system also pushed my speakers to a higher level all around, which we felt was odd given the ability to simply reset the master volume with the volume control during SPL measurements. Typically you would see this only if the subwoofer had exceeded its maximum adjustable levels. In this case, we have no idea why Audyssey wanted to see higher Setup levels:
|
Manual Setup |
Auto Setup |
||||||
|
Speaker |
Size |
dB SPL |
Distance |
Speaker |
Size |
dB SPL |
Distance |
|
Front Left |
Large |
0 |
9 ft |
Front Left |
Large |
+5.0 |
9.0 ft |
|
Front Right |
-0.5 |
9 ft |
Front Right |
+4.0 |
8.8 ft |
||
|
Center |
Small |
+0.5 |
8.5 ft |
Center |
Small |
+4.5 |
6.4 ft |
|
Surround Left |
Small |
+1 |
8.5 ft |
Surround Left |
Small |
+4.5 |
8.6 ft |
|
Surround Right |
+0.5 |
8.5 ft |
Surround Right |
+4.5 |
8.5 ft |
||
|
Subwoofer |
Yes |
-8.0 |
11.5 ft |
Subwoofer |
Yes |
-9.0 |
16.2 ft |
The Crossover Setting was placed at 80 Hz since this was a THX-based system (when in Rome…). Manual setup was done with a Radio Shack SPL meter (C-weighted) and the receiver's internal test tones calibrated to 80 dB SPL. Distances were measured to my seated position in the same location as the eventual microphone placement (at ear level). Regarding MultEQ, we recommend it and have noted that those with better rooms will see diminishing returns.
If you have an advanced configuration, you'll likely need to get into the Setup menus and alter the default audio and video inputs and settings. We'll take you through some of the key menus to make sure you know where to go to get things tweaked to fit your needs.
Input Setup
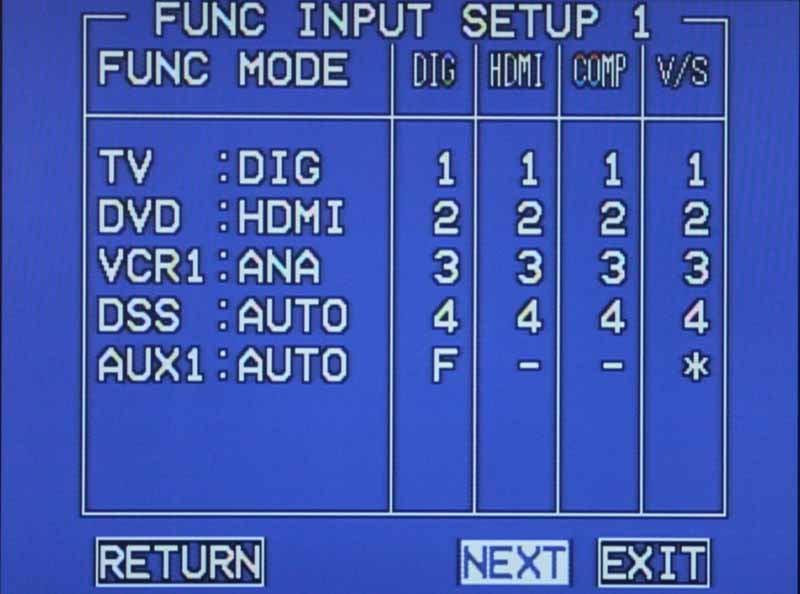 Here you'll be able to adjust how
audio will be received for the 8 primary inputs. You can select from HDMI,
digital (DIG), analogue (ANA), or AUTO. AUTO will sense the active digital
connection. If no digital input is detected for that input, the analogue input
will be used. Once you set the type, you can assign the number of the input
using the grid shown. This is a perfectly easy way to navigate the input
assignments and the OSD automatically prevents you from assigning any input to
more than one source.
Here you'll be able to adjust how
audio will be received for the 8 primary inputs. You can select from HDMI,
digital (DIG), analogue (ANA), or AUTO. AUTO will sense the active digital
connection. If no digital input is detected for that input, the analogue input
will be used. Once you set the type, you can assign the number of the input
using the grid shown. This is a perfectly easy way to navigate the input
assignments and the OSD automatically prevents you from assigning any input to
more than one source.
The 7.1 multi-channel input gives you the ability to adjust the level of each channel from -12dB to +12dB. The video assigned to this input can be assigned by the OSD or set to LAST which maintains the last used video input before the 7.1 inputs were selected.
The last thing you can do with the Input menu is rename each of the inputs as you see fit. This is a handy feature, but remember that you cannot rename the buttons on the remote control - so choose wisely. The names can be upper or lowercase and all of the primary symbols are available for use as well.
Speaker Setup
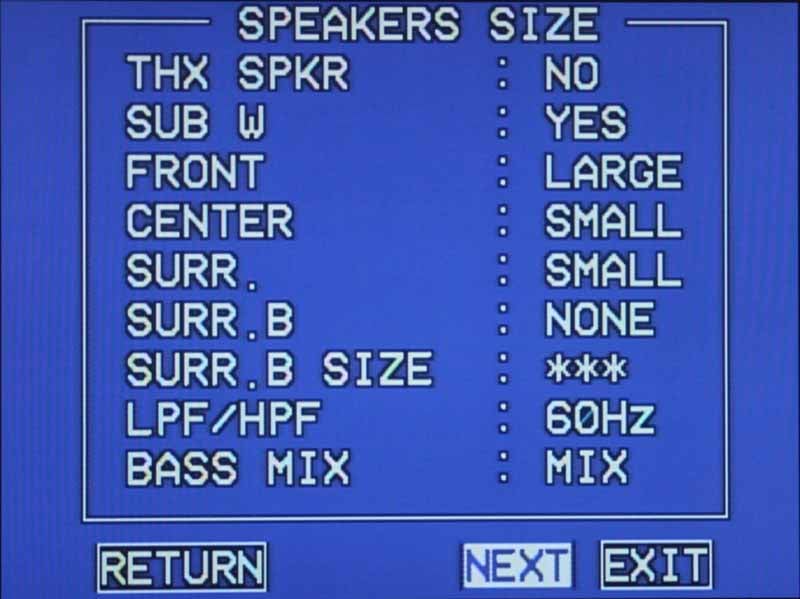 Since we addressed the Speaker Setup
above, we'll merely mention that this section allows you to specify levels and
the presence of a THX-certified speaker. If you are using Large front speakers,
you'll want to set the Bass Mix to indicate whether your Large speakers will
exclusively receive crossover frequencies (MIX), or if the subwoofer will also
receiver this material (BOTH). Anyone using a 5.1 system should take note that
you'll want to ensure the Surround Back (SURR. B) is set to NONE. This also
frees you up to use the additional 2 amplifier channels with a second Zone.
Since we addressed the Speaker Setup
above, we'll merely mention that this section allows you to specify levels and
the presence of a THX-certified speaker. If you are using Large front speakers,
you'll want to set the Bass Mix to indicate whether your Large speakers will
exclusively receive crossover frequencies (MIX), or if the subwoofer will also
receiver this material (BOTH). Anyone using a 5.1 system should take note that
you'll want to ensure the Surround Back (SURR. B) is set to NONE. This also
frees you up to use the additional 2 amplifier channels with a second Zone.
The THX Audio Setup will let you choose whether your ASA (Advanced Speaker Array) speakers are positioned TOGETHER (recommended), CLOSE, or APART. ASA is the recommended way to place Surround Back speakers per THX and allows their proprietary DSP to switch between Music, Movie and Gaming modes for more accurate surround listening.
Surround Setup
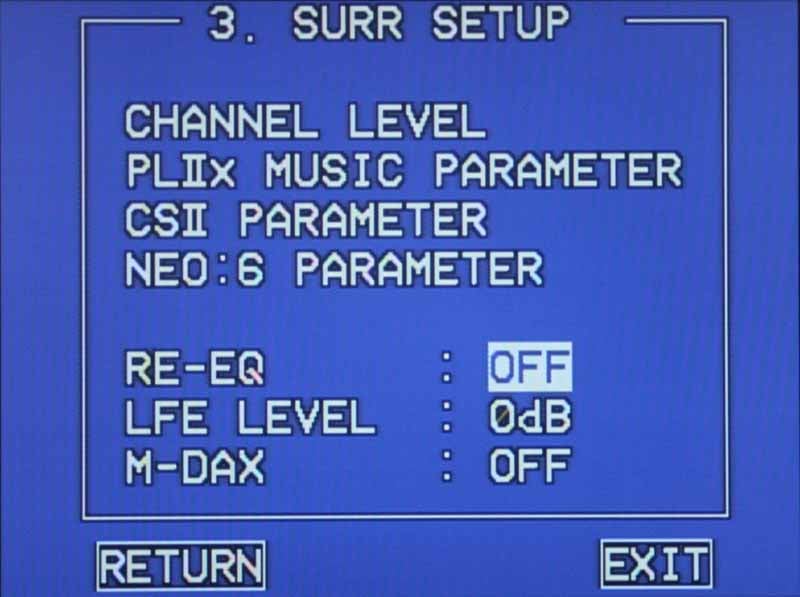 When you want to truly customize all
of the surround modes - for example the subwoofer level difference between
Dolby PLII Game and Movie modes - this is the place to go. You'll be able to
add up to 12dB of gain or reduce the volume by -18dB. You can adjust Pro Logic
IIx Music parameters including Panorama, Dimension, or Center Width. DTS Neo:6
allows Center Gain to be adjusted from 0.0 - 1.0 in 0.1 increments. SRS doesn't
leave you hanging either, providing for a little tweakability to its Circle
Surround II (CSII) DSP in the form of TruBass and SRS Dialogue adjustments
(both 0-6). In the main Surround Setup screen you can lastly adjust Re-EQ and
M-DAX (On/Off) as well as the Master LFE Level (0dB, Off or -10dB).
When you want to truly customize all
of the surround modes - for example the subwoofer level difference between
Dolby PLII Game and Movie modes - this is the place to go. You'll be able to
add up to 12dB of gain or reduce the volume by -18dB. You can adjust Pro Logic
IIx Music parameters including Panorama, Dimension, or Center Width. DTS Neo:6
allows Center Gain to be adjusted from 0.0 - 1.0 in 0.1 increments. SRS doesn't
leave you hanging either, providing for a little tweakability to its Circle
Surround II (CSII) DSP in the form of TruBass and SRS Dialogue adjustments
(both 0-6). In the main Surround Setup screen you can lastly adjust Re-EQ and
M-DAX (On/Off) as well as the Master LFE Level (0dB, Off or -10dB).
Video Setup
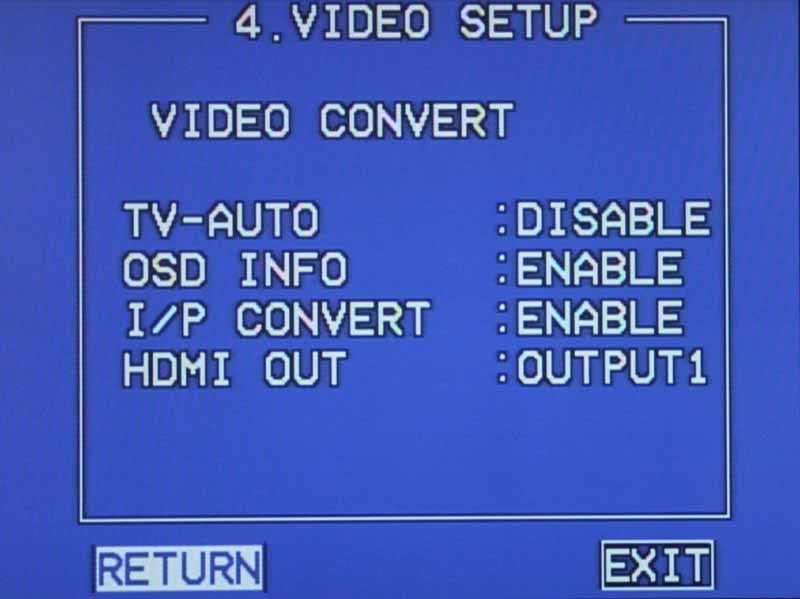 This menu does several things for you.
First and foremost it allows you to "protect" any digital or analogue
channels that you don't want to mix by using the analogue-to-HDMI upconversion
features. That's right, rather than enabling and disabling this globally, the
Marantz SR7002 allows you to do it on an input-by-input basis. This is more
than cool - it again shows Marantz' commitment to maintaining clean video. The
way this system works is that each input source can select either analogue only
(ANA ONLY), analogue-to-HDMI upconversion (ANA&HDMI) or no conversion
(OFF). If you select OFF, then you'll need to connect an output to your display
which matches the input type (component in to component out, S-video in to
S-video out, etc)
This menu does several things for you.
First and foremost it allows you to "protect" any digital or analogue
channels that you don't want to mix by using the analogue-to-HDMI upconversion
features. That's right, rather than enabling and disabling this globally, the
Marantz SR7002 allows you to do it on an input-by-input basis. This is more
than cool - it again shows Marantz' commitment to maintaining clean video. The
way this system works is that each input source can select either analogue only
(ANA ONLY), analogue-to-HDMI upconversion (ANA&HDMI) or no conversion
(OFF). If you select OFF, then you'll need to connect an output to your display
which matches the input type (component in to component out, S-video in to
S-video out, etc)
Technical Note: We could not get the receiver to pass 1080p sources input via component video to the HDMI outputs. Currently the only boxes that do this are gaming systems like the Xbox 360 and some set top units, but it’s something to note when configuring your receiver and video sources.
The TV-AUTO function is very cool in that it lets you control the Power On/Off to the receiver simply by monitoring the signal present on the TV (composite) input. In theory, you could connect the composite video output of your television to the TV-in and have it turn on the system when powered up. Upon turning off the TV, after 5 minutes of inactivity, the receiver will then shut down automatically into standby mode. While the turn-on will work regardless of the last input used, this feature will only bring the receiver to standby if the SR7002 is set to the TV input during the 5 minutes of inactivity. In addition to this, I was unable to get the 'Off' part of this feature to work on the SR7002, possibly due to having an HDMI component connected to the TV input as well.
OSD Info allows you to see volume and input selection on-screen as they are adjusted. This won't output via component or HDMI, however, unless the Video Convert settings for the current input is set to ANA&HDMI. I/P Convert takes any 480i signals input via the analogue inputs and outputs it as 480p via component and HDMI. Marantz' take on progressive conversion to 480p-only is that your display will do the better job of scaling the signal to its native resolution - and they're probably correct. Many AV receivers that provide upconversion do so at up to 720p/1080p and we've found that it's actually quite redundant since the display almost always has a solid scaler built in to handle those functions. Deinterlacing is another matter entirely - and we ran some quick HQV tests to see exactly how well the Marantz performed its duties. What we (quickly) found was that the SR7002's video processor simply didn't handle unflagged content such as that used by the Silicon Optix DVD. To see how this translated to real-word results, I popped in my DVD copy of The Fifth Element and dialed in the pyramid scene. After several visual scrolls overtop of hieroglyphics, exterior pans past angled tents, and interior shots of the chest, priestly robes and hoods, I was convinced. The deinterlacing was occurring and seemed to be happening with reliable accuracy. Should you come across some unflagged broadcast content, however, it's likely that the SR7002 will plow through it as best it can (which is to say not very well).
The last thing we found on the SR7002's Video Setup menu was the HDMI Out option. To say that this menu selection surprised us was an understatement. It downright angered me. The Marantz receiver has two HDMI outputs but, in the infinite wisdom of the engineers who designed it, it can only use one at a time. Yes, that is correct. You can select, via the OSD, which HDMI output you would like the current signal to be output from but you cannot route one or more sources to both at the same time. To me, this was like giving a child a lollipop with a permanently-affixed wrapper. It makes the 4x2 feature more of a less-than-helpful 4x1-or-2 feature. There's no reasonable excuse for this and we have no idea why Marantz would choose to have this ridiculous functionality other than to deliberately cripple it. Someone at parent company D&M Holdings must have wanted to drive more sales to Denon.
Preference Menu
The last two menus are mainly for custom install use and tweakers. The Preference menu is a place where you can set up your Multi Room (discussed earlier) as well as establish the way the 12VDC trigger outputs will be utilized. A perplexing (at first) Bilingual mode allows you to select from the Main or Sub channels of a bilingual AAC (MPEG2) HDTV broadcast when recognized by the receiver. The most important aspect of this menu is the HDMI audio function. Enabled by default, this is what tells the SR7002 to pull audio from any HDMI cables fed into it. HDMI Lip Sync is also available in the form of a fixed EDID-based video processing compensation delay. We've found that lip sync is such a varying problem that even if the source, receiver and display all have this function with HDMI 1.3a, it's likely you'll still need to use the delay functionality in the receiver to tweak the audio from time to time. Here's the problem - Marantz has no manual audio delay, so if you run into sync issues and have no HDMI 1.3a equipment with this system you may be out of luck.
Marantz SR7002 RC8001SR Remote and HD Audio Support
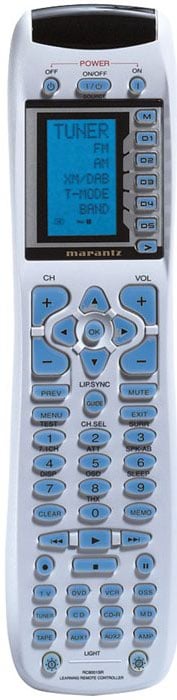 The RC8001SR is a nice overall
learning remote. It features a backlit LCD screen with 5 soft keys that control
additional features (up to 4 pages per device). These soft pages can support up
to 5 additional soft functions which can be learned in addition to whatever
functions show up from the pre-programmed codes. The soft keys are fully
editable and configurable to ensure that the features you need are available
and accessible. For a standard remote this is extremely flexible and one of the
best and most usable remotes I've seen included with an AV receiver. It will
take you some time to wade through the setup steps, but it's all spelled out
very clearly in the User Manual.
The RC8001SR is a nice overall
learning remote. It features a backlit LCD screen with 5 soft keys that control
additional features (up to 4 pages per device). These soft pages can support up
to 5 additional soft functions which can be learned in addition to whatever
functions show up from the pre-programmed codes. The soft keys are fully
editable and configurable to ensure that the features you need are available
and accessible. For a standard remote this is extremely flexible and one of the
best and most usable remotes I've seen included with an AV receiver. It will
take you some time to wade through the setup steps, but it's all spelled out
very clearly in the User Manual.
The remote can handle up to 20 macros, each of which can issue 20 IR commands. The 20 macros are accessed by pressing the M button at the top of the remote's LCD screen and you can rename all 20 macros as desired (up to 7 characters).
The RC8001SR has no CableTV button. In addition, the input buttons do not allow you to assign any 4-digit pre-programmed code from the list. This means that, for example, the DSS and TV buttons won't allow themselves to be configured for cable set-top box codes. During programming the remote will simply give you a WRONG CODE error. If you have a Scientific Atlanta or Pioneer CableTV box you'll need to assign this to Aux1 and that's the source you'll need to select for CableTV. Apparently, the folks at Marantz think that CD-Rs, MiniDiscs and VCRs are far more popular than CableTV. We politely disagree and hope they will reconsider both labels and pre-programmable code functionality in their next model. Additionally, we found that the slight delay from hitting a button to getting the desired action was a bit frustrating at times.
Backlighting is effective on this remote in that everything is adequately lit. The backlight time can be set using the Setup menu of the remote control and is activated by pressing either of the dedicated light buttons at the bottom of the remote. The only downside is that there is no way to have the backlight come on automatically when any control is pressed on the remote.
Source Switching
When you first select a Source button you are then able to control functions for that device. If you double click the source, you cause the receiver to switch inputs to that source. I really liked the way this worked. It makes sense and seemed a practical way to ensure you could still gain easy access to your components without always switching inputs. What isn't always intuitive is that, without dedicated AV receiver buttons, you'll always need to remember to hit the "Amp" button before controlling any receiver -specific functions.
Noteworthy is the fact that activating the Main Menu via HDMI will disrupt any audio being sent to the system for approximately 3-4 seconds.
RC101 Zone 2 Remote
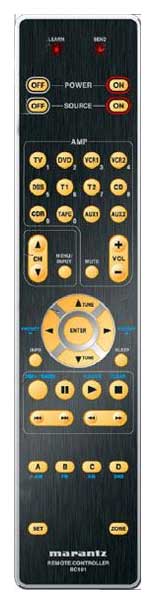 The supplied Zone 2
remote works very well in its general use. In fact I really liked the automatic
backlight, easy key layout, source selection and size. If you are utilizing the
amplifiers in the SR7002 you will not initially be able to control the output
volume as the remote comes configured to control the level of the Multi Zone
preamp outputs. To switch the remote to control the volume of the Multi Speaker
outputs (the amplifiers of the SR7002) you need to simultaneously press the 'Set'
and 'Power On' buttons, then press the #2 button (also labeled 'DVD'), and then
push the Enter button. Doing this will lock in the new volume control mode. The
other thing that is very nice about the Zone 2 remote is the discrete On/Off
controls for both the Multi Speaker Zone and the selected source. This is
something even the main RC8001SR remote lacks (for Sources).
The supplied Zone 2
remote works very well in its general use. In fact I really liked the automatic
backlight, easy key layout, source selection and size. If you are utilizing the
amplifiers in the SR7002 you will not initially be able to control the output
volume as the remote comes configured to control the level of the Multi Zone
preamp outputs. To switch the remote to control the volume of the Multi Speaker
outputs (the amplifiers of the SR7002) you need to simultaneously press the 'Set'
and 'Power On' buttons, then press the #2 button (also labeled 'DVD'), and then
push the Enter button. Doing this will lock in the new volume control mode. The
other thing that is very nice about the Zone 2 remote is the discrete On/Off
controls for both the Multi Speaker Zone and the selected source. This is
something even the main RC8001SR remote lacks (for Sources).
HD Audio Support
Not only does the SR7002 support Dolby TrueHD, Dolby Digital Plus and dts-HD formats via HDMI, it has dedicated 7.1 analogue inputs for legacy DVD-Audio and SACD players that may not be able to send those formats via HDMI. This means that if you are an audiophile with a very nice SACD player you're not left out in the dust - and you don't have to upgrade to a newer HDMI-enabled universal player to retain the quality of your recordings. No matter what format you're looking to send to the Marantz SR7002, it's going to have a way to handle it.
The Testing System
We updated Reference System 2 a few weeks ago to introduce higher quality speakers into the RBH Sound CinemaSITE system. It now contains updated Signature SI-760/R speakers which have an updated driver design which really brings out the detail and clarity in music. The always difficult-to-get-right midrange is particularly impressive. As it is configured now, the system contains three SI-760/R speakers across the front, a pair of 66-SE dipole surround speakers and a pair of SI-1010P powered subwoofers. With the exception of the dipole surrounds, the Signature in-wall speakers reside within the CinemaSITE structure, which also supports the 92-inch Masquerade projector screen masking system from Carada. I am able to utilize the Audyssey MultEQ system to aid in smoothing out the subwoofer response in this room and have treated the room with acoustical material provided by RPG Diffusors. All audio electronics are conditioned and protected by an APC S15 system with additional SBATT. When the power goes out in Central Florida, this home theater can continue to play a movie all the way through the credits. As far as audio goes, that just about sums it all up.
Marantz SR7002 Listening Tests
Two-Channel Performance
I chose to review the system with Audyssey disengaged. If you enjoy the EQ results and choose to utilize it then you can only make it better. I utilized a series of discs to test the system, including some staples of mine along with some different titles. I focused a bit on stereo sound because I was very interested to see how much power could emanate from the SR7002 in terms of how well it controlled the minutia of classical and other detailed musical pieces. When reviewing in stereo, I connected up several speakers and really paid attention to how well the SR7002 could control the music through the system.
CD: The
Man From Snowy River Soundtrack
 I particularly love track 3 "The Chase" which
goes from a deep, full, driving orchestral movement to detailed guitar work
that simply floats in the air before the listener. Strings quickly join this
break and the entire piece launches back briefly until it drops into a cello
and bass-driven intermezzo. The lower midrange during this brief section was presented
by the SR7002 as absolutely "controlled thunder" as if the system
were containing all the power of the piece and biding its time. The track
launches back into its roots after 2 minutes and the underlying brass and
strings really popped. The brass was nice and edgy (real "blatty" the
way it should be) and the strings, including the interspersed fingering and
strumming of guitar, were vivid and clean.
I particularly love track 3 "The Chase" which
goes from a deep, full, driving orchestral movement to detailed guitar work
that simply floats in the air before the listener. Strings quickly join this
break and the entire piece launches back briefly until it drops into a cello
and bass-driven intermezzo. The lower midrange during this brief section was presented
by the SR7002 as absolutely "controlled thunder" as if the system
were containing all the power of the piece and biding its time. The track
launches back into its roots after 2 minutes and the underlying brass and
strings really popped. The brass was nice and edgy (real "blatty" the
way it should be) and the strings, including the interspersed fingering and
strumming of guitar, were vivid and clean.
CD: The Music of Apollo/Saturn V Center
 I happen to have a
connection to this particular CD, having worked on other aspects of the Kennedy Space Center
for which it was composed. My job included storyboarding and editing the
content for the 9-panel video walls of the Visitor's Center, however my boss at
the time could always be heard in a neighboring room composing away at what
would eventually become one of the finest pieces of music I've ever heard in a
themed attraction. Recorded at L.A. East Studios in Salt Lake City, Utah
and mixed at Signet Sound, I'd call this CD "barely mastered" in that
it has so much dynamic range it's wonderfully raw. The first track contains a
sort of leitmotif for the entire CD, recurring again and again in various forms
throughout the piece. Track 5 is dark, with sound effects mixed into the
gently, but ominously pulsating piece which allowed the Marantz to
really help my speakers show off their ability to image. As the main theme came
back in, bringing with it the hope associated with astronauts venturing into
space, a percussive break and introduction of wind instruments into the mix
gave my reference system plenty to chew on. The dynamics of this entire CD constantly pushed the SR7002 to insane levels and back again, causing it to
really jump back and forth between sheer power and finesse. It never once
seemed to have difficulty with either and I felt the clarity, control and
consistency of the music was truly impressive.
I happen to have a
connection to this particular CD, having worked on other aspects of the Kennedy Space Center
for which it was composed. My job included storyboarding and editing the
content for the 9-panel video walls of the Visitor's Center, however my boss at
the time could always be heard in a neighboring room composing away at what
would eventually become one of the finest pieces of music I've ever heard in a
themed attraction. Recorded at L.A. East Studios in Salt Lake City, Utah
and mixed at Signet Sound, I'd call this CD "barely mastered" in that
it has so much dynamic range it's wonderfully raw. The first track contains a
sort of leitmotif for the entire CD, recurring again and again in various forms
throughout the piece. Track 5 is dark, with sound effects mixed into the
gently, but ominously pulsating piece which allowed the Marantz to
really help my speakers show off their ability to image. As the main theme came
back in, bringing with it the hope associated with astronauts venturing into
space, a percussive break and introduction of wind instruments into the mix
gave my reference system plenty to chew on. The dynamics of this entire CD constantly pushed the SR7002 to insane levels and back again, causing it to
really jump back and forth between sheer power and finesse. It never once
seemed to have difficulty with either and I felt the clarity, control and
consistency of the music was truly impressive.
Listening Tests: Multi-Channel Performance
For multi-channel performance, I'm "loaded for bear," as they say in those places where bear meat makes for a yummy dinner. AIX Records has been kind enough to send us some of their extraordinary recordings, all of which are made without the use of compression or outboard effects processors. The resulting tracks have an immense dynamic range and suffer none of the symptoms common with today's compressed iPod-destined tracks. In addition to this, some of the high resolution audio tracks on the new high definition movies makes for additional opportunities to test out a new AV receiver. This is truly the "fun" part of the review and I was looking forward to it.
DVD-Audio: Jonathan McEuen -
One Step Ahead
 Jonathan McEuen is fast becoming one of my favorite
artists. He's got an incredible family history and his music is filled with
some of the most heartfelt, raw music you will hear. In track 1, "Two of
Us," the 12-string guitar making up the thick body of the track and the
subwoofer - which is pumped through the Right Surround speaker was thick and
had a nice upper mid bite to it thanks to the Marantz' seemingly endless supply
of peak amplifier reserves. At the very beginning of the song there is a subtle
but present percussion element that I have no description for, but which
Chester Cooley interjects to open the piece. McEuen's vocals were simply smooth
and clean with no hint of distortion from the speakers, even with the slide
form falsetto to normal voice during the chorus. The second track begins with a
strong lyric from Jonathan that is accompanied by a more melodic bass line. The
12-string, which mimics the lead acoustic, provides a truly thick bed for the
vocals. Harmonies sounded clean and open. The more popular fifth track titled
"Ocean" gave me a pristine vocal track. I cranked it and pushed the
envelop of the system to see if I could get the Marantz SR7002 to break up at
higher output levels. It took everything I could give it, including the opening
harmonics which announced the verse. I quickly wanted to listen to some tracks
which took position on either side of this style - some with even cleaner
tracks and less instrumentation, and some with a more electric feel. I found
the former with track 6 "Seven Shades of Blue" which brought out a
stronger lyric in addition to electric guitar, electric bass and a more
pronounced drum and percussion track. It really brought the life out of my
speakers and I enjoyed hearing the SR7002 do such a fantastic job with these
tracks.
Jonathan McEuen is fast becoming one of my favorite
artists. He's got an incredible family history and his music is filled with
some of the most heartfelt, raw music you will hear. In track 1, "Two of
Us," the 12-string guitar making up the thick body of the track and the
subwoofer - which is pumped through the Right Surround speaker was thick and
had a nice upper mid bite to it thanks to the Marantz' seemingly endless supply
of peak amplifier reserves. At the very beginning of the song there is a subtle
but present percussion element that I have no description for, but which
Chester Cooley interjects to open the piece. McEuen's vocals were simply smooth
and clean with no hint of distortion from the speakers, even with the slide
form falsetto to normal voice during the chorus. The second track begins with a
strong lyric from Jonathan that is accompanied by a more melodic bass line. The
12-string, which mimics the lead acoustic, provides a truly thick bed for the
vocals. Harmonies sounded clean and open. The more popular fifth track titled
"Ocean" gave me a pristine vocal track. I cranked it and pushed the
envelop of the system to see if I could get the Marantz SR7002 to break up at
higher output levels. It took everything I could give it, including the opening
harmonics which announced the verse. I quickly wanted to listen to some tracks
which took position on either side of this style - some with even cleaner
tracks and less instrumentation, and some with a more electric feel. I found
the former with track 6 "Seven Shades of Blue" which brought out a
stronger lyric in addition to electric guitar, electric bass and a more
pronounced drum and percussion track. It really brought the life out of my
speakers and I enjoyed hearing the SR7002 do such a fantastic job with these
tracks.
DVD-Audio: Lowen & Navarro
Carry On Together Lowen & Navarro are kind of like the Barry Manilow of
folksy pop music - they simply can't write anything that isn't catchy. It's not
exactly a curse, but it does make for a difficult time turning off the disc
until it plays all the way through. It's equally hard to pick a song for a
review. I decided, as I frequently do, to start at the top - with track 1.
"Compass Point," the title track, features a great beat, perfect (and
I mean perfect) harmonies, as well as
an REM-style guitar sound that had me tapping my foot as I listened intently to
the intricacies of the music. The SR7002 had the stereo-miked mandolin poking
through the mix like no other stringed instrument can and really made the upper
midrange sing. The drums were mixed to the right side of the room and that
brushed snare was tight and thick while the poignant guitar belted from the
front left of the multi-channel "in-the-mix" soundstage. An accordion
played a subtle accompanying part until it was brought well into the mix during
choruses, then it became a nice full-bodied partner that really contributed
well to the tune. Of course, my favorite track "Cold Outside"
demonstrated beautiful vocal harmonies along with a smooth acoustic bass that
slipped underneath the melody and provided a nice lower-mid flavor that
seasoned the entire track. The drums once again proved to be well-miked,
delivering a tight snare snare kick combo that drove the track forward. Cymbals
were subtle and not compressed while a lead acoustic guitar solo displayed
unmistakable finger noises and slides that came through like it was in the
room.
Lowen & Navarro are kind of like the Barry Manilow of
folksy pop music - they simply can't write anything that isn't catchy. It's not
exactly a curse, but it does make for a difficult time turning off the disc
until it plays all the way through. It's equally hard to pick a song for a
review. I decided, as I frequently do, to start at the top - with track 1.
"Compass Point," the title track, features a great beat, perfect (and
I mean perfect) harmonies, as well as
an REM-style guitar sound that had me tapping my foot as I listened intently to
the intricacies of the music. The SR7002 had the stereo-miked mandolin poking
through the mix like no other stringed instrument can and really made the upper
midrange sing. The drums were mixed to the right side of the room and that
brushed snare was tight and thick while the poignant guitar belted from the
front left of the multi-channel "in-the-mix" soundstage. An accordion
played a subtle accompanying part until it was brought well into the mix during
choruses, then it became a nice full-bodied partner that really contributed
well to the tune. Of course, my favorite track "Cold Outside"
demonstrated beautiful vocal harmonies along with a smooth acoustic bass that
slipped underneath the melody and provided a nice lower-mid flavor that
seasoned the entire track. The drums once again proved to be well-miked,
delivering a tight snare snare kick combo that drove the track forward. Cymbals
were subtle and not compressed while a lead acoustic guitar solo displayed
unmistakable finger noises and slides that came through like it was in the
room.
DVD-Audio: The
Beatles' Love (from the Vegas Cirque de Soleil show) Having actually heard this show in Vegas, it's nice to
realize how it's supposed to be presented. The 3D soundstage presented by the
opening track "Because" is awe-inspiring, especially to those who
haven't heard this type of mix before. The album flows from one track to
another smoothly for the most part, so my listening test was a bit linear.
"Get Back" put McCartney right where I wanted him - in the front of
my living room, along with exceptional bass and a killer lead guitar.
"Eleanor Rigby" being a transitional track, needed to be longer, but
the exceptional strings (violins, violas and cellos) were simply perfect. The
positioning of instruments went from low to high, across the soundstage from
the left to right - an impressive effect. George Harrison nailed the backing
vocals and the song put forth an ethereal, powerful place in the room. "Something"
really showed off Harrison's vocals and gave a
full song that included poignant guitar, bass and drums which challenged (but
couldn't overcome) the Marantz SR7002's ability to take a thicker, complex song
and push it hard to the speakers with out muddying it up in the process.
Having actually heard this show in Vegas, it's nice to
realize how it's supposed to be presented. The 3D soundstage presented by the
opening track "Because" is awe-inspiring, especially to those who
haven't heard this type of mix before. The album flows from one track to
another smoothly for the most part, so my listening test was a bit linear.
"Get Back" put McCartney right where I wanted him - in the front of
my living room, along with exceptional bass and a killer lead guitar.
"Eleanor Rigby" being a transitional track, needed to be longer, but
the exceptional strings (violins, violas and cellos) were simply perfect. The
positioning of instruments went from low to high, across the soundstage from
the left to right - an impressive effect. George Harrison nailed the backing
vocals and the song put forth an ethereal, powerful place in the room. "Something"
really showed off Harrison's vocals and gave a
full song that included poignant guitar, bass and drums which challenged (but
couldn't overcome) the Marantz SR7002's ability to take a thicker, complex song
and push it hard to the speakers with out muddying it up in the process.
HD DVD: 300 The most
subtle things in this movie are rendered as over-the-top sound effects. A spear
dropping to the ground. A spray of dirt from the hooves of a horse. The jingle
of arrows filling the quiver of a Persian soldier. The doors of the King of
Sparta's home. Every single sound is pushed to its limits - and it makes for an
incredibly thriving soundtrack. There is some excellent rainfall in the scene
following the first sighting of the Persians. The queen speaks to an ally and
droplets pitter patter in the surrounds, crickets chirping all around. In the
first major battle sequence, the clash of metal on bone and metal spread across
the front soundstage, while an ambient track filled in the surrounds. Sounds of
children and blacksmith work dominated the intermittent scenes of Sparta which broke up the
incessant sounds of battlefield blood spray and metal. When the Persian Warrior
elite "immortals" attack the Spartans, the ring of metal and swipe of
spears grew more pronounced and deliberate, and the score truly filled all of
the speakers in a symphony of sound. Later, a rhinoceros attacks the Spartans,
the resulting subwoofer hit when the beast is felled rocked the listening room.
The most
subtle things in this movie are rendered as over-the-top sound effects. A spear
dropping to the ground. A spray of dirt from the hooves of a horse. The jingle
of arrows filling the quiver of a Persian soldier. The doors of the King of
Sparta's home. Every single sound is pushed to its limits - and it makes for an
incredibly thriving soundtrack. There is some excellent rainfall in the scene
following the first sighting of the Persians. The queen speaks to an ally and
droplets pitter patter in the surrounds, crickets chirping all around. In the
first major battle sequence, the clash of metal on bone and metal spread across
the front soundstage, while an ambient track filled in the surrounds. Sounds of
children and blacksmith work dominated the intermittent scenes of Sparta which broke up the
incessant sounds of battlefield blood spray and metal. When the Persian Warrior
elite "immortals" attack the Spartans, the ring of metal and swipe of
spears grew more pronounced and deliberate, and the score truly filled all of
the speakers in a symphony of sound. Later, a rhinoceros attacks the Spartans,
the resulting subwoofer hit when the beast is felled rocked the listening room.
HD DVD: Batman
Begins I began this disc during the ninja training sequence.
The foley leather creaks were so realistically textured it was like you could
reach out and touch the screen. The bat-flashbacks hit the subwoofer and bass
drivers with a strong thump that set me back in my chair, while their
high-frequency of the fluttering bat wings pushed the tweeters, yet held
together. The dialogue which jumped around the room was very realistic and
moved from the front to the surrounds seamlessly. I loved the subtleties this
receiver was capable of producing. Dynamics were not a problem and, as the
soundtrack went from dense to subtle, I listened for the SR7002 to fail to gracefully
travel from one extreme to the other. It never faltered and seemed to enjoy the
nonlinear surround audio track. In a later track, as Batman races through Gotham City
in the Tumbler, helicopter blades fly through the surrounds as vehicle
destruction comes through all speakers - mimicking the position of the carnage
on the screen. The bird-like tweets of the helicopter rotors rang through the
dipole surrounds and the enveloping sound field filled the theater room while
the camera followed the action. At one point, out of control police cruisers,
run off the road, launch into the air and crash back into the street. This
entire scene was like being inside of a food processor after someone inserted a
coat hanger. The finale explosion of the elevated train into the parking garage
was awesome and activated the entire 5.1 system in a frenzy of low-end and mid-bass
energy.
I began this disc during the ninja training sequence.
The foley leather creaks were so realistically textured it was like you could
reach out and touch the screen. The bat-flashbacks hit the subwoofer and bass
drivers with a strong thump that set me back in my chair, while their
high-frequency of the fluttering bat wings pushed the tweeters, yet held
together. The dialogue which jumped around the room was very realistic and
moved from the front to the surrounds seamlessly. I loved the subtleties this
receiver was capable of producing. Dynamics were not a problem and, as the
soundtrack went from dense to subtle, I listened for the SR7002 to fail to gracefully
travel from one extreme to the other. It never faltered and seemed to enjoy the
nonlinear surround audio track. In a later track, as Batman races through Gotham City
in the Tumbler, helicopter blades fly through the surrounds as vehicle
destruction comes through all speakers - mimicking the position of the carnage
on the screen. The bird-like tweets of the helicopter rotors rang through the
dipole surrounds and the enveloping sound field filled the theater room while
the camera followed the action. At one point, out of control police cruisers,
run off the road, launch into the air and crash back into the street. This
entire scene was like being inside of a food processor after someone inserted a
coat hanger. The finale explosion of the elevated train into the parking garage
was awesome and activated the entire 5.1 system in a frenzy of low-end and mid-bass
energy.
Measurements and Commentary by Gene DellaSala
Frequency Response
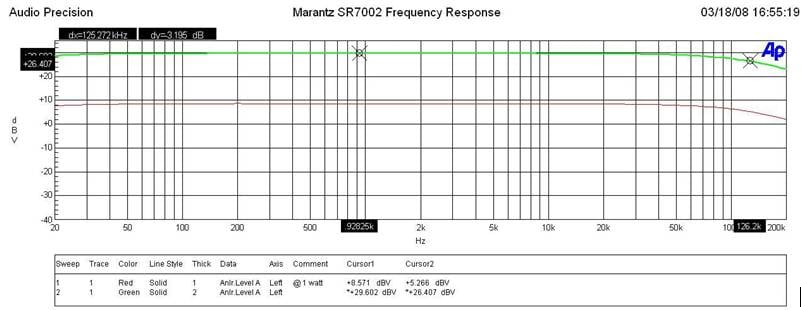
Marantz
SR7002 Frequency Response
The -3dB point for the SR7002 was around 125kHz at 1 watt and full power illustrating a very uniform power response which is to be expected with a receiver of this caliber.
Marantz
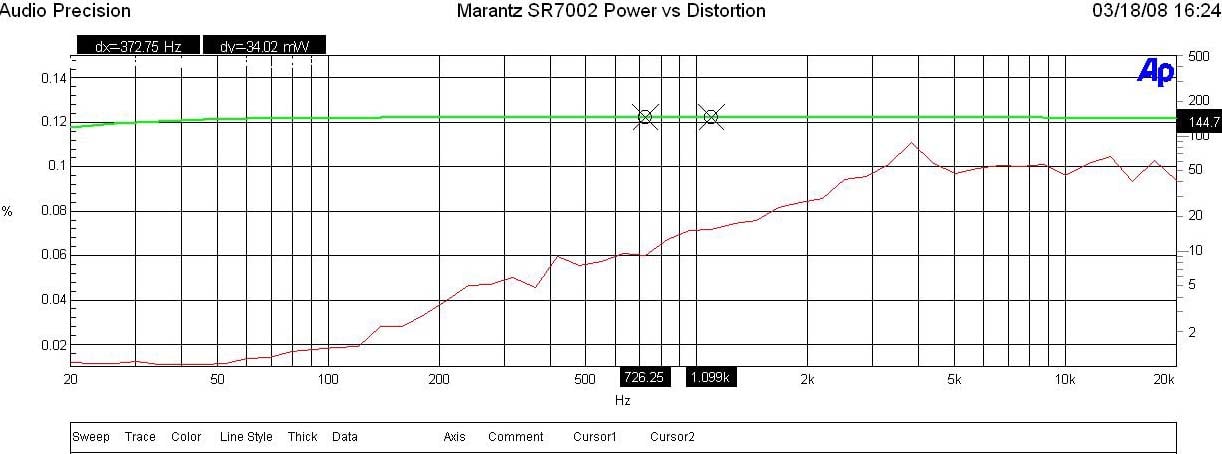
SR7002 Power vs Distortion
I measured continuous power vs distortion by setting up a regulated sweep in my Audio Precision to automatically adjust input level until the maximum power output is achieved at < 0.1% THD + N. The SR7002 was plugged directly into an APC S-15 Power Conditioner with regulation to ensure the line never dropped below 118Vrms.
Power output: <0.1% THD + N
- 144wpc x 1 @ 8-ohms
- 128wpc x 2 @ 8-ohms
- 180wpc x 1 @ 4-ohms
- 170wpc x 2 @ 4-ohms
Keep in mind most review publications don’t do continuous power measurements and they usually publish power measurements into clipping at 1% THD + N. Our measurements are very conservative and it is clear that the 110wpc power rating of this receiver is greatly understated as Marantz is delivering MUCH more than specified.
For more info on amplifier measurements, see: The All Channels Driven (ACD) Test
FFT Distortion Analysis

Marantz
SR7002 FFT Distortion Analysis at Full Rated Power
At full rated power (110wpc, 8 ohms) the SR7002 exhibited very good distortion measurements (28.75+ 47.33)dBv =83.5dBv or 100*alog^-1(-76.1 /20) = .002 THD + N. These results (especially odd order harmonics) weren’t quite as low as I measured on similar priced Yamaha and Denon receivers but still good nonetheless.
SNR @ 1 watt
With 200mV in and driving the amp to 1 watt at 8-ohms, I measured a good Signal to Noise Ratio of around 70dB (unweighted).
Output Impedance vs Frequency
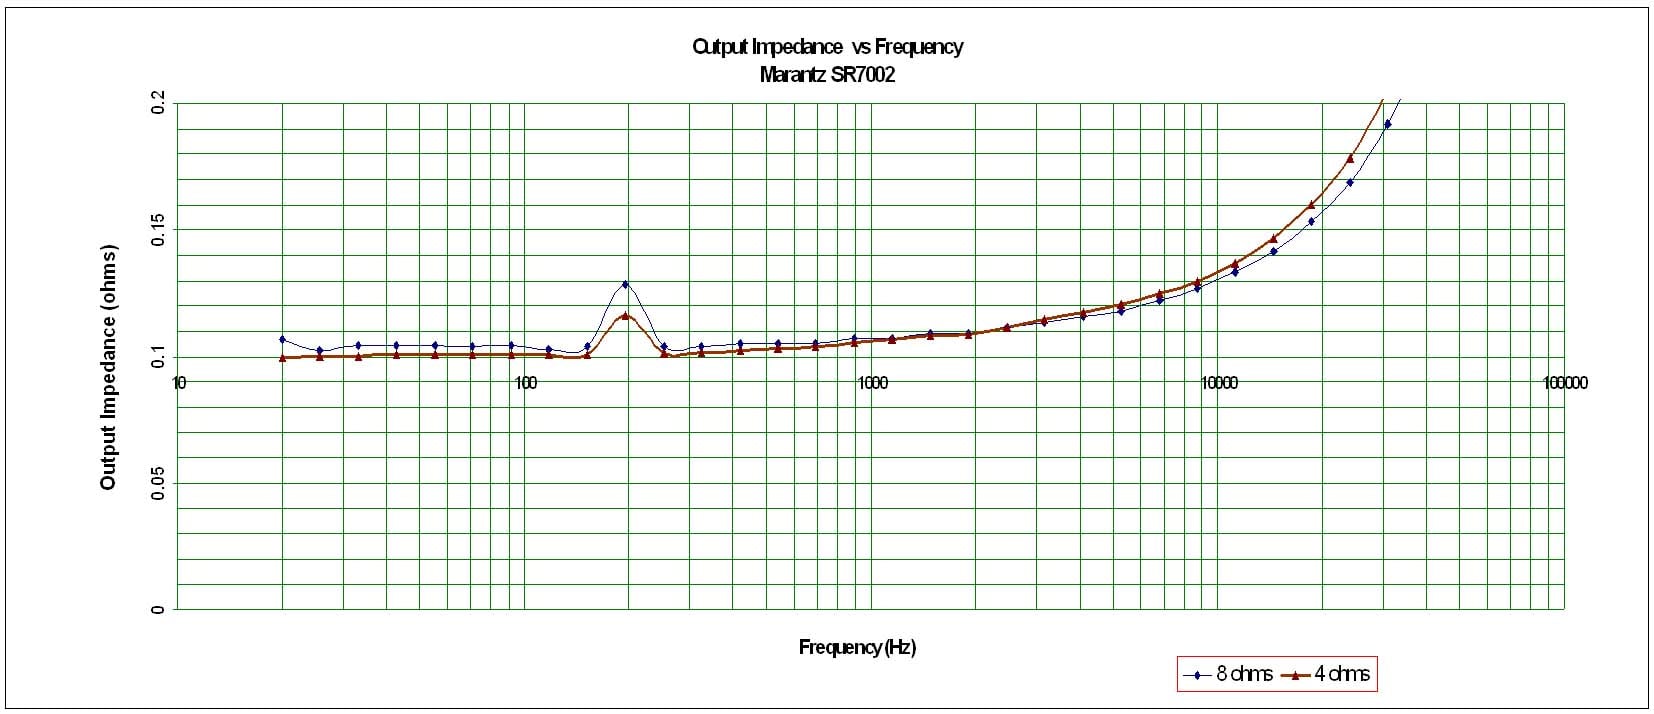
Marantz
SR7002 Output Impedance vs Frequency
The SR7002 exhibited respectably low output impedance maintaining around 100mohms for the audible frequency range of 20Hz to 20kHz when driving 8-ohm and 4-ohm loads. This ensures that the amp will perform consistently under a wide variety of speaker loads.
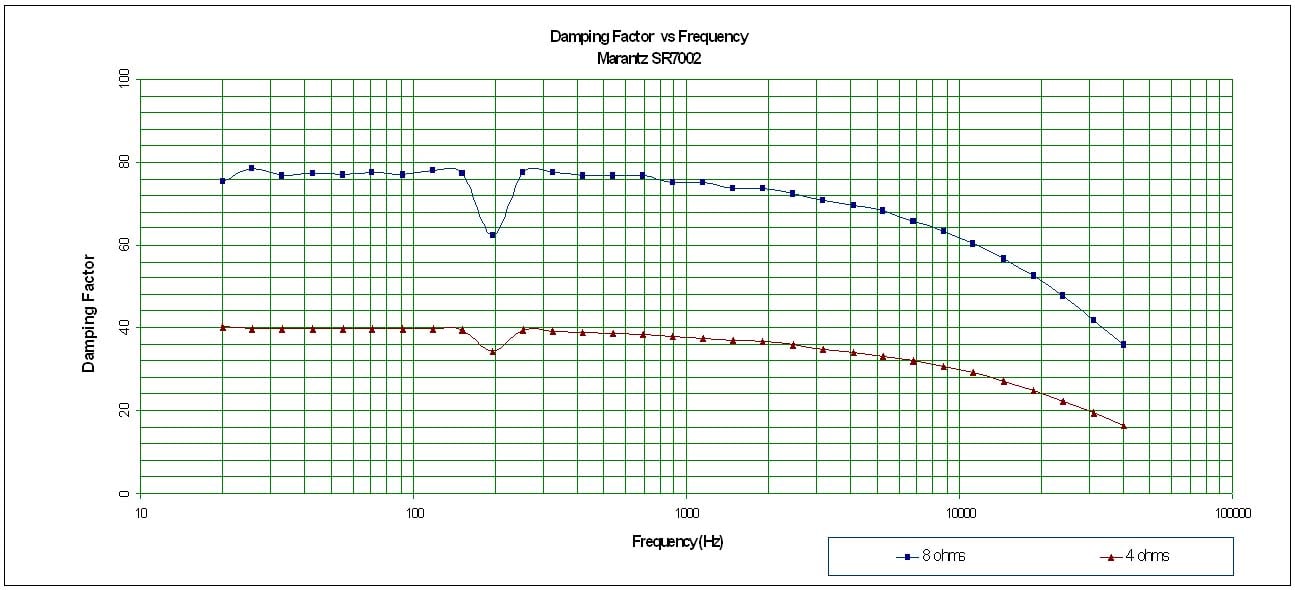
Marantz
SR7002 Damping Factor vs Frequency
The SR7002, displayed a good damping factor which was not surprising based on the low output impedance the amp section exhibited. The damping factor for the SR7002 maintained above the minimum of 50 we like to see when driving an 8-ohm load and roughly 1/2 that (as it should) when driving 4 ohm loads.
Marantz SR7002 Review Conclusions and Recomendations
Marantz has a winner in the SR7002 AV receiver. This product is power, yet simple - something not easily accomplished in today's era of endless configurability. Some of the more advanced features and configurations may be pulled aside for D&M's higher-end Denon receivers, but the Marantz is clearly taking shape as the "bang for the buck" product line. With the addition of HDMI 1.3 to the mix and providing 4 of these high definition inputs, the SR7002 distances itself from much of the competition. We only wish they had made the dual HDMI outputs simultaneously parallel rather than switchable - which quite frankly renders the feature a lot less relevant. Musically, I found the SR7002 to be solid - music sounded excellent and feature films were more than enjoyable. I was unable to make the system hiccup or mess up any material and it was neither bright nor nonlinear in any way I could discern, the measurements bearing this out as well. At the price Marantz has brought this receiver to market, I'd say the SR7002 is a bargain and Marantz-lovers everywhere should rejoice that the company is more than back in the game - they are leading several innings.
Marantz SR7002
MSRP $1399 | Buy It Now
Marantz America, Inc.
100 Corporate Drive
Mahwah, N.J. 07430-2041
us.marantz.com
About Marantz America
Marantz America is committed to upholding the tradition of technological superiority initiated by founder Saul Marantz. In keeping with this emphasis on quality, Marantz audio and video components are carried only by the nation’s premier independent audio/video specialty retailers. Additional information is available at www.marantz.com. Marantz America is a wholly owned subsidiary of D&M Holdings Inc.
The Score Card
The scoring below is based on each piece of equipment doing the duty it is designed for. The numbers are weighed heavily with respect to the individual cost of each unit, thus giving a rating roughly equal to:
Performance × Price Factor/Value = Rating
Audioholics.com note: The ratings indicated below are based on subjective listening and objective testing of the product in question. The rating scale is based on performance/value ratio. If you notice better performing products in future reviews that have lower numbers in certain areas, be aware that the value factor is most likely the culprit. Other Audioholics reviewers may rate products solely based on performance, and each reviewer has his/her own system for ratings.
Audioholics Rating Scale
 — Excellent
- — Very Good
- — Good
- — Fair
- — Poor
| Metric | Rating |
|---|---|
| Frequency Response Linearity | |
| SNR | |
| Output Impedance | |
| Measured Power (8-ohms) | |
| Measured Power (4-ohms) | |
| Multi-channel Audio Performance | |
| Two-channel Audio Performance | |
| Video Processing | |
| Bass Management | |
| Build Quality | |
| Fit and Finish | |
| Ergonomics & Usability | |
| Ease of Setup | |
| Features | |
| Remote Control | |
| Performance | |
| Value |
Clint Deboer was terminated from Audioholics for misconduct on April 4th, 2014. He no longer represents Audioholics in any fashion.
View full profile