
Denon AVR-4306 Receiver Review
Denon AVR-4306 Receiver
- Product Name: AVR-4306
- Manufacturer: Denon
- Performance Rating:


- Value Rating:
- Review Date: May 28, 2006 19:00
- MSRP: $ 1999
DSP: Analog Devices HammerHead SHARC 32 bit floating point DSP processor
Power Ratings
130 watts per channel (8 ohms, 20 Hz-20 kHz, <.05%THD)
Audio DACs: Burr-Brown PCM-1791 24-bit/192 kHz on all eight channels, in differential configuration
Audio ADCs: 24-bit/192 kHz Burr-Brown PCM-1804 on all Stereo analog inputs (Not EXT. Inputs)
Crossover: 40, 60, 80, 100, 120, 150, 200, 250Hz (12/24dB)
Remote: Updated EL backlighting pre-programmed/learning remote with tactile buttons
Video Inputs: 3 HDMI-HDCP inputs, 3 (assignable) 100MHz component video, 7 sets composite and s-video inputs
Video Outputs: Dual 100MHz component video outputs, 3 composite and s-video outputs, Multi-Zone composite video output; HDMI-HDCP
Audio Inputs: 7.1 external wide bandwidth (100 kHz) multi-channel inputs, 5/7 Channel Stereo, DENON Link 3rd (SACD & DVD-Audio compatible), 7 assignable digital inputs (5 optical, 2 coaxial), 10 analogue inputs
Audio Outputs: 2 optical digital outputs, 2 multi-zone stereo pre-amp level audio outputs, fixed or variable level
Additional Connections: RS-232C port for third party control Systems, remote I/O ports, 2 assignable +12V triggers, detachable power cord
Dimensions: 17.1" W x 6.7" H x 16.9" D
Pros
- Upconversion to HDMI and component video
- Scaling to 720p or 1080i from 480/576i/p sources
- Redesigned remote control with more tactile buttons
- XM radio support
- iPod and USB connectivity
- Internet radio and network support
- Excellent detail and fidelity
Cons
- No IEEE 1394/Firewire interface
- No subwoofer parametric EQ in Audyssey MultEQxt
- EL remote lacks many essential controls
- Inaccurate Audyssey equalization results
Denon AVR-4306 Introduction
Denon's AVR-4306 was one of the most anticipated products of the year. With the AVR-4806 being out of reach for some and the AVR-3806 being perceived as a mid-fi product, the Audiophile community had expectations of where they could find an affordable, truly powerhouse 7.1 receiver. The AVR-4306 hits what I think of as an upper-mid-fi price point desired by so many of these quality and feature-conscious consumers. I wanted to get a good look at this receiver, play around with it, and find out exactly how well it would perform (and whether or not it was worth the extra money over its best-selling nephew, the AVR-3806.)
Denon AVR-4306 Receiver Overview
To start off, here is a brief feature comparison (things we thought would be of particular interest):
|
AVR-3806 |
AVR-4306 |
AVR-4806 |
|---|---|---|
|
120wpc rating |
130wpc rating |
140wpc rating |
|
- - |
- - |
THX Ultra-2 Certified |
|
EI core transformer |
EI core transformer |
toroidal power transformer |
|
- - |
- - |
Dolby headphone |
|
- - |
- - |
IEEE 1394 (Firewire) |
|
2 digital outs |
2 digital outs |
3 digital outs (incl. Zone 2) |
|
2 HDMI inputs |
3 HDMI inputs |
1 DVI input, 3 HDMI inputs |
|
2 component video outputs |
2 component video outputs |
2 component video outputs |
|
time base correction (TBC) |
time base correction (TBC) |
time base correction (TBC) |
|
analogue to HDMI upconversion
|
analogue to HDMI upconversion
|
analogue to HDMI upconversion
|
|
- - |
video upscaling to 720p/1080i |
- - |
|
Denon Link III |
Denon Link III |
Denon Link III |
|
Assignable 12V triggers |
Assignable 12V triggers |
Assignable 12V triggers |
|
Fixed Zone3 preamp out |
Zone2/Zone3 preamp outs |
Zone2/Zone3 preamp outs |
|
38.6 lbs. |
40.8 lbs. |
50.8 lbs. |
|
17.1" W x 6.7" H x 16.9" D |
17.1" W x 6.7" H x 16.9" D |
17.1" W x 6.9" H x 20.5" D |
Right off the bat we see that one of the things the AVR-4306 has going for it is that it is the only receiver in Denon's lineup that features video upscaling to 720p/1080i. It also offers two component video outputs and 3 HDMI inputs, making it a truly useful audio-video processing machine. It offers an additional third HDMI input over the AVR-3806 as well as a second component video output, variable Zone 2/3 preamp outputs, and 12V triggers.
Upgrades, Upgrades, Upgrades -
The Game is
Afoot
The AVR-4306 sets a new price point for Denon... at least of late. It kind of replaces the AVR-4802 series but that's also like saying the 2005 Mustang "replaced" the 2004 Mustang... It's really a completely different car, people - hotter and with much more appeal. The AVR-4802, for example, had no digital video inputs (they simply weren't popular then), only 1 (50MHz) component output, no DenonLink, and no 12V DC trigger (just RS-232C control). Dolby Pro Logic IIx had not been integrated as of then and about the only feature it had over the current AVR-4306 was THX Ultra2 certification and post processing.
Stacking Up Against the Competition -
Let's Examine the
Marketplace
At the risk of offending just about everyone, let's get a quick
snapshot of the AV receiver market as it stands today (May 2006) to see where the AVR-4306 sits amongst
the competition. The Denon AVR-4306 now competes directly with the Yamaha RX-V4600 ($1999) and the
Pioneer VSX-74TXVi ($1500), though it has far more capabilities and features then either of those
receivers. I would say that its closest market competitor is the Yamaha RX-V2600 ($1400) which has
nearly identical video processing capability, but differs in configurability, power and features.
Harman Kardon is just getting into HDMI upconversion after a year sabbatical - but at a somewhat lofty
$3500 price point. Marantz is doing sophisticated video upconversion, but only with their flagship
model. Their SR8500 receiver is priced lower at $1300 but provides only DVI switching, similar to what
you can find from Outlaw Audio, lacking upconversion or scaling. JVC, Onkyo, Rotel, and Sony have also
begun their forays into digital video with simple HDMI conversion (no scaling). Other manufacturers
like NAD, Sherwood Newcastle, and B&K aren't even going after the feature-craving market. OK,
there it is. I'm sure I missed a few manufacturers and that people will read this review online
six months from now and yell at me for not including "Company XYZ". For those readers,
please forward your eagerly-awaited suggestions and comments to
complaints@bitbucket.com.
Denon AVR-4306 Listening Environment, Build Quality, and Set Up
Reference System 2 is a dedicated theater room with acoustical treatments supplied by RPG Diffusor Systems. The main listening system is the RBH Sound CinemaSITE, which features a truncated line array for fronts and centers (SI-6100) and hybrid dipole/bipole speakers (66-SE) for the surrounds. The surround back speakers are direct radiating 2-way speakers (41-SE). The listening position is about 11' back from the system and the display utilized was a Yamaha LPX-510 LCD projector in conjunction with a Studiotek 130 screen from Stewart. The room has good low frequency balance which is helped a tiny bit by a Velodyne SMS-1 EQ system (disabled when testing the Audyssey MultEQxt system. I think it is important to describe the listening room so readers have an understanding of what the reviewer is listening to and in what kind of environment. If we don't then you are left to wonder about the basis for any drawn conclusions or opinions.
First Impressions
Heavy. At almost 41 pounds, the AVR-4306 is no slouch. It's not as much of a boat anchor as most monoblock or dedicated multi-channel amplifiers, but it's a respectable weight for an AV receiver costing less than $2000. I've always liked the user interface for Denon receivers. It's not as polished as a GUI interface, but seems infinitely more flexible than most of the competition we've experienced. The presence of three (3) HDMI inputs made me smile, as many other units think that two is plenty (and for people who don't review products for a living they may just be right.) The new remote looked good, and I welcomed the additional hard buttons that gave access to such things as volume control, menu navigation, channel controls and a keypad. This is much improved over the 2004 Denon EL remote.
The receiver had the same great options I expected from Denon, including extensive bass management controls, Dolby Pro Logic IIx overlay, PCM-1791 Burr-Brown DACs, 24-bit/192kHz digital input capability, Denon Link III(supports DVD-Audio and SACD), and a wealth of analogue and digital inputs (fully assignable.) There are even 8 analogue multi-channel inputs for full 7.1 support (which will come in handy for handling the new uncompressed audio formats present on present and upcoming high definition DVD players). But the things that really got my focus were the really new features and digital video section.
Here's the summary on those:
- HDMI upconversion and scaling to 720p/1080i (3 HDMI inputs, 1 output)
- XM satellite radio support
- Internet radio support
- USB device support for audio playback
- Network audio support for playing back files from a PC, this is HUGE and very welcomed
- Denon Link III (supports all currently-shipping digital audio formats)
- 3 source, 3 zone control
One other thing to note is that the Zone 2/3 outputs WILL benefit from a digital to analogue conversion of PCM digital sources input to the coaxial and optical inputs. This is a big deal as most other products we've reviewed will only pass analogue audio to these outputs, causing the user to connect redundant analogue connections when desiring to use
Build Quality
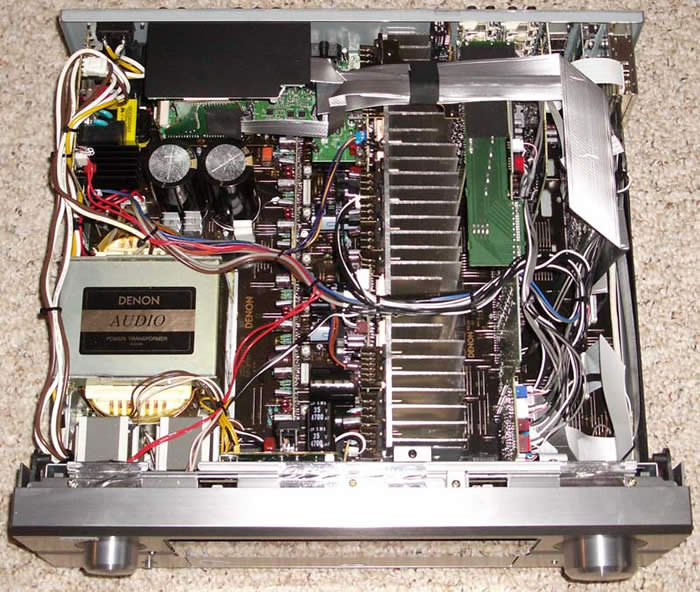 The Denon
AVR-4306 has a notably good build quality. Based on the fuse rating of 8.0 amps, we can surmise that
the power transformer is around 960VA (8.0A x 120V). Taking into account amplifier and power supply
efficiency and processor overhead, true output power into 8 ohm loads should be well within its rated
limit and there should be plenty of reserve for it to pump out additional juice into 4 ohm loads...
This pretty much correlates with our actual bench tests (shown further along in the review.)
The Denon
AVR-4306 has a notably good build quality. Based on the fuse rating of 8.0 amps, we can surmise that
the power transformer is around 960VA (8.0A x 120V). Taking into account amplifier and power supply
efficiency and processor overhead, true output power into 8 ohm loads should be well within its rated
limit and there should be plenty of reserve for it to pump out additional juice into 4 ohm loads...
This pretty much correlates with our actual bench tests (shown further along in the review.)
Note: If you are looking for an All Channels Driven measurement, we don't do those since they aren't very representative of real world listening conditions and most publications create very special test conditions (preconditioned 20A or greater line, short power supply fuse, etc) so they can take this instantaneous 1kHz power vs distortion test and pawn it off as a continuous power rating.
The AVR-4306 features a very hefty equal power amplifier section, with discrete output devices on all seven channels. It has a large power supply that took up a rather large chunk of the interior of the receiver and is coupled with a rectifier diode and oversized power supply capacitors to stabilize the power at high output levels.
 The heat sink for the amplification section runs along the middle of the receiver and
interior design of the unit looked well laid out with adept cabling choices and good separation of the
power supply and more sensitive components.
The heat sink for the amplification section runs along the middle of the receiver and
interior design of the unit looked well laid out with adept cabling choices and good separation of the
power supply and more sensitive components.
Setting Up the Receiver -
Overview
Setting up any receiver can be a pain, but it doesn't have to if you understand the basics and mind your goals. I start by connecting the equipment to the logical inputs, taking notes as I go, because depending upon how many source components you have it can be hard to remember where everything is sometimes. OK, so maybe I have a few more devices than most... In either case, the next step is to correctly set up and route your inputs so that the source selection controls on the receiver engage the correct audio and video sources out to the monitor outputs and speakers. We'll go into more detail below as there are a myriad of choices given the flexibility and features of the AVR-4306. After this you will want to set up your system in terms of speaker levels and distance so that the sound is properly balanced in the room. Whether you enlist the help of the Audyssey MultEQxt system is up to you - I would heartily suggest at least trying it out.

Back Panel of the Denon AVR-4306 Receiver
Of Particular Note:
-
3 HDMI inputs, 2 component outputs
-
iPod (front/rear), USB (front) and XM satellite connections
-
Ethernet port for Internet radio & streaming music from PC
-
Zone 2 video monitor output
-
Zone 3 audio preamp outputs
-
Surround Back speaker amplifiers configurable for powering Zone 2 or 3)
-
Surround A or B speakers
-
7.1 multi-channel preamp inputs/outputs
-
Dual assignable 12V triggers
Denon AVR-4306 Setup and Configuration
Denon's manual setup is, to date, unmatched in the industry. It is so sophisticated, that even the most "battle-hardened" Audiophiles will stare, agape, at the many configuration options and controls available to the consumer within the Setup menu system. If you are planning to give this receiver to your Dad for Christmas, better make sure you can set it up for him or it is likely that your gift will eventually come sailing out the second story window in a fit of rage. With endless options and configurability comes complexity and, so far, the two are inseparable.
Here's a quick overview of a manual setup process so you can have a fighting chance of "surviving" the AVR-4306's menu system. We'll start with the Main Setup Menu and work downward. I won't go over everything here, but will touch upon each of the main sections you'll need to be concerned about as you move through the system performing the basics needed to get up and running:
Speaker Setup
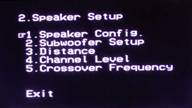 When beginning, it's always good to start at
the top and work down. The Denon's Setup Menu is arranged in a logical manner and I never found
myself having to jump up and down or back and forth between menus due to a poor design layout of the
required steps. The
Speaker Setup
menu is where you configure your channel levels, speaker distance
(delay), crossover, subwoofer and bass management settings. It's a
one-stop shop for all things loudspeaker. Using an SPL meter and a
measuring tape, I manually set up the Reference System 2 as follows:
When beginning, it's always good to start at
the top and work down. The Denon's Setup Menu is arranged in a logical manner and I never found
myself having to jump up and down or back and forth between menus due to a poor design layout of the
required steps. The
Speaker Setup
menu is where you configure your channel levels, speaker distance
(delay), crossover, subwoofer and bass management settings. It's a
one-stop shop for all things loudspeaker. Using an SPL meter and a
measuring tape, I manually set up the Reference System 2 as follows:
|
Speaker |
Size |
dB SPL |
Distance |
|---|---|---|---|
|
Front Left |
Small |
0.0 |
10.5 ft |
|
Front Right |
+1.0 |
10.5 ft |
|
|
Center |
Small |
+0.5 |
10.0 ft |
|
Surround Right |
Small |
+1.0 |
7.5 ft |
|
Surround Back Right |
Small |
+3.5 |
6.5 ft |
|
Surround Back Left |
Small |
+4.0 |
6.5 ft |
|
Surround Left |
Small |
-1.5 |
7.5 ft |
|
Subwoofer |
Yes |
-12.0 |
10.0 ft |
|
Crossover Setting 80 Hz ; Subwoofer = LFE |
|||
|
Reference Level Calibration to 80 dB SPL |
|||
Once again I was blown away by the level of detail the Denon is able to provide to the user (in fact the tenth-inch increments are so detailed as to make one wonder if the delay is real at those levels or if they simply provided that resolution in the Setup menu to placate obnoxious reviewers like myself!) In either case, adjustments can be made in .1 ft or .01 meter (finer) increments.
Under Subwoofer Setup you can select whether the subwoofer will get just the LFE + bass managed channels, or the LFE and Main + bass managed channels subwoofer information. The LFE + Main setting is a good setting to try if you have truly Large main speakers (which go down to 20-40Hz) and want to double up the low frequency information to the subwoofer in an effort to smooth out the overall room response. Though I caution you may find too much gain at common frequencies between the subwoofer and main speakers. Only accurate measurements and careful listening will determine which setting will work best for your speakers and room.
The crossover frequency can be set to just about anything and has a range of 40 - 250Hz in various step sizes. You can be sure of one thing... there will be an optimal setting for your system.
 For those of you who can afford to have and extra set of surround speakers and have a
real affinity for multi-channel music, you may choose to make use of the Surround A
&
B modes of
the AVR-4306. Simply assign Surround A as your movie speakers (side-mounted dipoles for example) and
Surround B as your ITU 5.1 (or equivalent) direct-radiating music surround speakers. Now, you can go
into the
Surround Sp Setup
submenu and select which speakers should be utilized with each
surround mode. Folks, this is a POWERFUL tool for getting a
very
customized sound that puts you in the driver's seat regarding what
kind of loudspeaker configuration you want to have in various listening
situations. This submenu option only appears if you have indicated that
you have both A
&
B surround speakers connected. Keep in mind, this isn't simply a
reconfiguration of your 7.1 Surround Back speakers. This is a dedicated
system whereby you can connect an additional pair of surround speakers
and have them powered and automatically selected by the Denon based on
the input signal or surround mode. Denon even gives you separate level
and distance adjustments so you are not just copying the information
over from your other Surround speakers.
For those of you who can afford to have and extra set of surround speakers and have a
real affinity for multi-channel music, you may choose to make use of the Surround A
&
B modes of
the AVR-4306. Simply assign Surround A as your movie speakers (side-mounted dipoles for example) and
Surround B as your ITU 5.1 (or equivalent) direct-radiating music surround speakers. Now, you can go
into the
Surround Sp Setup
submenu and select which speakers should be utilized with each
surround mode. Folks, this is a POWERFUL tool for getting a
very
customized sound that puts you in the driver's seat regarding what
kind of loudspeaker configuration you want to have in various listening
situations. This submenu option only appears if you have indicated that
you have both A
&
B surround speakers connected. Keep in mind, this isn't simply a
reconfiguration of your 7.1 Surround Back speakers. This is a dedicated
system whereby you can connect an additional pair of surround speakers
and have them powered and automatically selected by the Denon based on
the input signal or surround mode. Denon even gives you separate level
and distance adjustments so you are not just copying the information
over from your other Surround speakers.
If you're not interested in utilizing dual Surround speakers, Denon also allows you to reassign the Surround Back channels for bi-amping the main channels or powering a second Zone. Flexibility is the bottom line and Denon presents user with enough options to satisfy just about anyone's needs.
Audio Input Setup
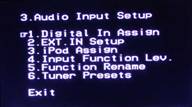 This
area of the Setup menu is very important as it will enable you to set
the DLINK, HDMI, optical and coaxial digital input assignments for your
DVD players, cable/satellite boxes, video game systems, etc...
This is where you tell the audio which input source it will be
associated with. If you don't accurately set up this area you may be
watching your cable TV while listening to your DVD player! If you are
using HDMI or Denon Link II/III to send audio to the receiver, this is
a "must-visit"
section for proper receiver operation.
This
area of the Setup menu is very important as it will enable you to set
the DLINK, HDMI, optical and coaxial digital input assignments for your
DVD players, cable/satellite boxes, video game systems, etc...
This is where you tell the audio which input source it will be
associated with. If you don't accurately set up this area you may be
watching your cable TV while listening to your DVD player! If you are
using HDMI or Denon Link II/III to send audio to the receiver, this is
a "must-visit"
section for proper receiver operation.
If you are using the multi-channel inputs on the receiver, the EXT. IN SETUP section will allow you to optionally boost the subwoofer level by 5-15dB. If you plan on connecting an iPod to the AVR-4306, the iPod Assign function allows you to select which inputs the iPod's audio and video will be sourced to. One of my all-time favorite functions, input level trim, is available on the Denon through the Input Function Lev. Menu item. Use this to lower or raise the preamp volume of any devices which may be connected to your AVR-4306 that are excessively loud or soft compared to other input sources. There are a couple other goodies in here, such as the ability to rename sources inputs, and automatically configure (and then manually name) preset stations for the tuner.
Video Setup
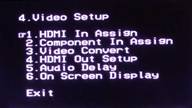 The Video Setup submenu sets the HDMI and component video sources
as well as the higher processing features of the AVR-4306 -
like upconversion and scaling. While the Denon can upconvert all
standard definition video input as 480/576p, 720p, or 1080i, there is
also a "Through"
option which should be utilized if your display device has a better
scaler than the AVR-4306 (see HQV results below). HDMI upconversion is
a compelling feature and can, for some, really simplify the process of
connecting multiple source components to a single display.
The Video Setup submenu sets the HDMI and component video sources
as well as the higher processing features of the AVR-4306 -
like upconversion and scaling. While the Denon can upconvert all
standard definition video input as 480/576p, 720p, or 1080i, there is
also a "Through"
option which should be utilized if your display device has a better
scaler than the AVR-4306 (see HQV results below). HDMI upconversion is
a compelling feature and can, for some, really simplify the process of
connecting multiple source components to a single display.
Audio delay is present here. At first glance this seems like it would be better placed in the Audio Input Setup menu, however audio delay is primarily a tool for syncing the dialogue to the video, so it does make sense in that context. For the most part, audio delay has not made itself a large or consistent issue in the AV world, with most display manufacturers correcting for it or utilizing fast enough processing so as to render it a "non-issue". I utilized audio delay for the 2006 Superbowl XL Party as it helped me eliminate a distinct slap-back echo between two of the main theater rooms. I'm sure the product managers didn't quite have that in mind when they added the feature, but I was sure glad it was available at the time!
Advanced Setup Options
You've done it - the receiver basics are setup! Before you put down your remote and celebrate with a nice surround sound selection, however, realize that the Denon AVR-4306 has some rather advanced setup options for those willing to endure a few more submenus...
Advanced Playback
 The
Advanced Playback
menu grants you
access to a special section which can set unique bass management options for
2ch Direct/Stereo
modes. While you may want tighter bass management for multi-channel
surround sound and movies, some of you with full range speakers may opt
to set them Large and disengage the subwoofer (or not) for stereo
listening. The
2ch Direct/Stereo
submenu allows you to do precisely that AND even configure a
different crossover and distance delay setting. Couple this with the Surround A
&
B options in the
Speaker Config
and
Surround Sp Setup
submenus and you have yourself a VERY flexible
receiver.
The
Advanced Playback
menu grants you
access to a special section which can set unique bass management options for
2ch Direct/Stereo
modes. While you may want tighter bass management for multi-channel
surround sound and movies, some of you with full range speakers may opt
to set them Large and disengage the subwoofer (or not) for stereo
listening. The
2ch Direct/Stereo
submenu allows you to do precisely that AND even configure a
different crossover and distance delay setting. Couple this with the Surround A
&
B options in the
Speaker Config
and
Surround Sp Setup
submenus and you have yourself a VERY flexible
receiver.
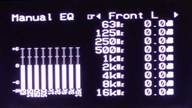 In this setup menu you may also enable a manual graphical EQ (not parametric, oddly
enough) for each channel and you can engage
Auto Surround Mode
which remembers the last surround mode used for analogue
&
PCM 2-channel signals, Dolby Digital/DTS 2-channel signals, Dolby/DTS
multi-channel signals, and DVD-Audio (PCM) and DSD multi-channel
signals [not DD or DTS]. I would recommend leaving this enabled so that
your surround formats change to your preference each time you begin in
a new track for playback.
In this setup menu you may also enable a manual graphical EQ (not parametric, oddly
enough) for each channel and you can engage
Auto Surround Mode
which remembers the last surround mode used for analogue
&
PCM 2-channel signals, Dolby Digital/DTS 2-channel signals, Dolby/DTS
multi-channel signals, and DVD-Audio (PCM) and DSD multi-channel
signals [not DD or DTS]. I would recommend leaving this enabled so that
your surround formats change to your preference each time you begin in
a new track for playback.
Option Setup
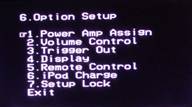 The Option Setup menu handles the "leftover"
settings that don't really fit nicely into the other categories. There
are some important features here, such as Power Amp Assign which lets
you dedicate two channels of amplification to your choice of the "S.
Back"
speakers, "Zone 2"
, "Zone 3", "Front"
(for bi-amping the main speakers), or "Front B".
"Front"
and "Front B"
are essentially the same, and the correct matching level is set
automatically. This is a giant leap forward in simplicity from the last
time we used an extra stereo pair of amplifiers on a Denon receiver to
bi-amp the mains!
The Option Setup menu handles the "leftover"
settings that don't really fit nicely into the other categories. There
are some important features here, such as Power Amp Assign which lets
you dedicate two channels of amplification to your choice of the "S.
Back"
speakers, "Zone 2"
, "Zone 3", "Front"
(for bi-amping the main speakers), or "Front B".
"Front"
and "Front B"
are essentially the same, and the correct matching level is set
automatically. This is a giant leap forward in simplicity from the last
time we used an extra stereo pair of amplifiers on a Denon receiver to
bi-amp the mains!
Trigger outputs can not only be activated in this submenu but also assigned to a Zone. After this, each device/source can determine whether the 12V trigger is activated upon selection of that device/input. If you have an iPod, this is where you will set whether the receiver will charge the battery while powered on or in standby modes.
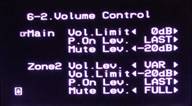 There are more areas in this menu that will prove to be useful, but the Volume Control submenu is the
last I'll discuss. This allows a default "power on"
and "volume limit"
level for all three Zones (Main, Zone 2, Zone 3). To be honest, with a 3 year old in the house I set
this up almost immediately once I get a bearing on how loud I want to have the sound in the room. I
also like the -20dB Mute option as I prefer this to a complete cut off of all sound.
There are more areas in this menu that will prove to be useful, but the Volume Control submenu is the
last I'll discuss. This allows a default "power on"
and "volume limit"
level for all three Zones (Main, Zone 2, Zone 3). To be honest, with a 3 year old in the house I set
this up almost immediately once I get a bearing on how loud I want to have the sound in the room. I
also like the -20dB Mute option as I prefer this to a complete cut off of all sound.
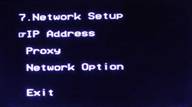 This setup area will likely not be touched by many, unless you have
an internal network with a fancy non-DHCP configuration...
hey, it happens. The bottom line is that the AVR-4306 works well with a
standard network and we found that this section was merely to verify
that the receiver was properly assigned an IP address. You can grab the
Mac address (helpful for some security network configurations) and set
up the receiver to utilize a proxy as well.
This setup area will likely not be touched by many, unless you have
an internal network with a fancy non-DHCP configuration...
hey, it happens. The bottom line is that the AVR-4306 works well with a
standard network and we found that this section was merely to verify
that the receiver was properly assigned an IP address. You can grab the
Mac address (helpful for some security network configurations) and set
up the receiver to utilize a proxy as well.
Denon AVR-4306 Auto Setup and Internet Radio
Running the Audyssey Auto Setup was an experience in careful microphone positioning and patience. The goal, according to Audyssey, is to allow the system to combine enough points so as to best implement its "fuzzy logic" to determine the best results for the multiple listening positions. I opted to measure all of the main (4) seating positions along with a couple of elevated positions along the same area and distance. The entire process took a good 15 minutes or so, with the final Calculation period lasting about 4-5 minutes.
Auto Setup rendered my system settings in the following manner (significant differences marked in bold ):
|
Speaker |
Size |
dB SPL |
Distance |
|---|---|---|---|
|
Front Left |
Large |
+1.0 |
10.5 ft |
|
Front Right |
+1.5 |
10.5 ft |
|
|
Center |
Large |
-1.0 |
10.5 ft |
|
Surround Right |
Large |
-1.5 |
7.5 ft |
|
Surround Back Right |
Small |
+5.0 |
6.7 ft |
|
Surround Back Left |
Small |
+4.0 |
6.6 ft |
|
Surround Left |
Large |
-0.5 |
7.5 ft |
|
Subwoofer |
Yes |
-9.0 |
15.1 ft |
|
Crossover Setting 90 Hz ; Subwoofer = LFE |
|||
Obviously there are some differences. The level differences I cannot account for except that I like my subwoofer a bit more recessed than Audyssey and the surrounds got more juice with the auto setup. A 90Hz crossover was assigned, but was only valid for the Surround Back speakers since the rest were configured as Large. I can understand this setting for the SI-6100s, but with the 66-SE surround speakers 3dB point is around 45Hz. It seems like there would be some amount of "throw-away" soundtrack elements which would not be reproduced by the speakers or sent to the sub(s). In either case, the Denon settings are certainly acceptable as a starting point, and the resulting sound was pleasing and not in the least out of place.
The subwoofer distance discrepancy was not surprising since NO auto setup scheme we've tested to date can consistently calculate the correct distance of the subwoofer. Of course manual tweaking is always advised if the desire is to get the absolute best bass response in the room. I tweaked the phase of the output of one of the SA-400s which powers one of my subs in order to get a smoother bass response in the room at the primary listening area. This is something Audyssey cannot do, especially in a multiple subwoofer installation like I have.
Audyssey Room EQ Evaluation
I listened to several discs with the Audyssey EQ engaged and disengaged. To make comparisons I utilized the remote's navigation controls while in the Room EQ Setup menu. It's certainly not an instantaneous switch (about 2 seconds in fact) but it did give me a clean way to compare the "Off" and "Audyssey" modes to see what the DSP EQ system was doing to the sound (and it's far better than toggling the EQ button on the remote control). There are four EQ modes (besides OFF):
- Audyssey: Structures the automatic EQ so that room acoustics issues are negated and the room is EQ'd to the target EQ curve that they have established.
- Front: Front speakers are evaluated, but not adjusted and the rest of the system is EQ'd to match the timbre and characteristic frequency response of the mains.
- Manual: This selects the graphical EQ setup as configured in the Manual EQ section of the Setup menu.
- Flat: This mode attempts to implement EQ to flatten out the frequency response of all of speakers.
When comparing tracks (for example, "Get It Together" from Seal IV ) I noticed a couple of things. First off, the overall high frequencies were dampened a bit with Audyssey engaged. Secondly, the surrounds became a lot more discernable and mixes blended less randomly into the room. The front soundstage always remained constant and the Audyssey mode never seemed to exhibit any effects that disturbed imaging.
I restricted most of my A-B'ing between "Off" and "Audyssey" EQ modes since that was where I would find the most difference and that gave me a good baseline with which to evaluate the system. From what I experienced I preferred to leave the system OFF. There was simply too much loss of the detail associated with the many recordings I heard to allow the Audyssey system to take control. Reference System 2 isn't particularly bright or reflective, so why the system rolled back so many of the highs to meet Audyssey's target curve is a mystery. It seems ever since we discovered the lack of bass correction below 100Hz in our AVR-5805 review, the Audyssey fix has tapered off the high end response while still NOT addressing bass frequencies below 100Hz adequately. A full report of the latest Audyssey firmware will be coming in our supplementary AVR-5805 review soon. While Audyssey did appear to "clean up" some of the mixes and make surround sound music sound more "discrete" there was no way I was going to lose the "airiness" that makes the CinemaSITE system sound so lifelike. After listening for an extended period of time I took a look at the Audyssey EQ settings - and it correlated perfectly with what I was hearing:
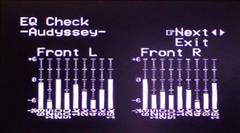
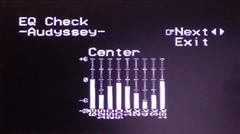
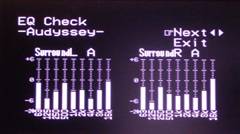
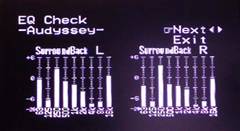
Whoa...
where did all my high frequencies go???
The Audyssey does a great job of not going crazy over boosting frequencies. Most EQ systems simply take a measurement and then push the system to that curve, regardless of what it really means to the consumer or equipment. Where the Audyssey disappointed me, however, was its tendency to pull out the high frequency information. For example, there are places where the system takes out 12dB at ~4kHz in the surround channels... That's taking EQ a bit too far, considering the resulting audio I heard in the system. Indeed, most of the top end of the Surround Back channels was removed by Audyssey. Correlating all of the EQ graphs, you could definitely see that the EQ system was attempting to compensate for the room, not for loudspeaker deficiencies. This can be seen by the consistency of the results: ~2kHz to ~4kHz were reduced across the board as was ~125Hz. Keep in mind that Audyssey has stated that the EQ Check graphs, due to limitations in the Denon Setup software, are not accurate and are only representative of the actual adjustments being made, but they give you a rough idea of the areas in which level adjustments are being made. Bottom line here, be careful when utilizing this system and use your ears to judge whether or not the results were a true improvement in system fidelity.
Internet Radio, USB Audio, iPod, XM and More...
Internet radio on the Denon is almost flawless. You simply call up AUX (on the remote) or AUX/NET (on the receiver itself) and you have access to favorites, Internet Radio, or USB audio. I found the process to be "stupid" easy. Simply plug in a network cable to the back of the receiver and it will automatically pull an IP address from your DHCP server. If you aren't running a DHCP server then you probably had your "network savvy" uncle set up your system and I suggest you call him so he can geek his way into getting your system to work like it should. For the rest of us, setup is a breeze.
Internet Radio
Once you call up the AUX input, you can sort stations by Genre, Countries, New Stations, or Popular Stations. There is even - and this is simply amazing - a HELP system available that TALKS you through several FAQs and answers most of the common questions. It even routes you to a website online to get more info and help should you need it. My favorite station was the popular Radio Yabiladi for its excellent Moroccan chants and grooves... ok, I'm kidding.
Once you're in, you simply browse to what you want (or what you think might be slightly interesting) and the system connects you (it typically took about 3 seconds to cache a new station). The radio station is ID'd on the screen as is the track running time. For some reason, the artist and song titles were not displayed on many of the stations I dialed in, but some stations did show this information, so it's certainly not a Denon issue. The only negative about this system I could think of was that for some reason, the stream would stop whenever you "backed out" of a section. I would have preferred for it to maintain the lock until I either a) selected another station, or b) switched to a different input on the receiver. Sometimes it's nice to just call up some music and then continue to browse around for additional choices. Pausing music is easy as you simply press "Enter" while on a station. The system also automatically updates the Internet radio station listings every couple of days and you can force a manual update through the menu system.
USB Audio
Another easy-as-pie feature is the USB audio function whereby you can hook up a USB device to the front connection on the receiver and stream music from that device. I utilized a simple 2GB USB key drive and it worked flawlessly, allowing navigation of subfolders and playback of my eclectic mix of MP3 and WMA files (Denon supports MPEG-1/2/2.5 files encoded from 32 - 320kbps at 32, 44.1, or 48kHz sample rates and WMA files from 48 - 192kbps). You can use the up and down navigation arrows to skip forward and back through the tracks on the USB drive. Pausing works the same as Internet Radio and the USB function suffers the same "no soup for you" track pausing whenever you back out to navigate to another location or file.
Track name and Artist are displayed as is the running time of the track. Random and Repeat modes are made available through any Internet browser connected to the AVR-4306 via its IP address. If you want to queue up a specific list of songs for a party, this is about the easiest way I can think of doing it without having to purchase any additional equipment.
iPod Control
We did not have an iPod to test with the Denon receiver (I know, I'm one of only three people in America that do not have an iPod) but the usability seems pretty direct. Plug it into either the front or rear iPod connectors (you can only use one iPod with the receiver at a time, so the redundancy is for convenience, not so you can use two iPods). The iPod will now show up in the AUX source list (same place where you'll find USB audio and Internet radio.) At this point the iPod will display Denon on its screen and the receiver can now control the iPod - including playing back the audio through your home theater system. The receiver's Setup menu can also route the audio and video of the iPod to any available source. The Denon takes it a step further than most, however, and even allows video iPods to display still pictures on the monitor output as well. Depending upon what model iPod you have, and whether you have the latest software update, your mileage may vary, so check with Apple's website for the latest information.
XM Radio
While we didn't spend a lot of time testing the XM Radio features the AVR-4306 made sure to add satellite radio to its already impressive array of features and capabilities. The XM Radio feature of the AVR-4306 allows you to verify and optimize the XM Radio signal to the receiver as well as view channel name and song title/artist information (when provided). The tuning buttons work as normal to call up the desired channels. You can also do category searches and enter in the desired station by number using the keypad.
Can I Get Some Fries With That?
Yes you can. It slices, it dices, it Juliennes... But wait, there's more (I've always wanted to say that in a review... OK, really anywhere). As if the above weren't enough, the Denon AVR-4306 allows users to stream files from a local networked PC. This means that for the price of a mid-fi receiver you also get a streaming media server tossed in for free. Hey, that's not too bad - and it sure beats a free steak knife. To get this part of the receiver's functionality you must first install Windows Media Connect , a free application that is only a pain to install if you are not using a licensed version of Windows XP (there is a validation process and the initial download involves three steps.)
After downloading Windows Media Connect the process of turning your Denon
receiver into a media server is simple. Launch WMC and select/authorize the Denon AVR-4306 to access
files on your computer. We found that you could quite easily call up files and folders from a locally
networked PC and play back WMA, MP3 and WAV format files (all accessed through the same AUX/Net
submenu). This is one COOL function that you should absolutely take advantage of. Incidentally, the
AVR-4306 is the first receiver to attain Windows PlaysForSure certification (note the logo/sticker on
the box). That means that it is guaranteed not to give you the blue screen of death when mated with
other products bearing the same logo (or something like that). Now if only Windows XP would get
certified...
Actually it's a way to ensure that music you purchase online will play on these
compatible devices (or, as we like to paraphrase, avoid iTunes if you don't want to isolate your
music to your iPod).
Denon AVR-4306 Web Browser Control
One surprising advantage of adding the new network features is that the Denon AVR-4306 can now be "remote controlled" via any web browser located within the same network as the receiver. This offers more than just a little control over functions such as Main Zone, Channel Volume, Surround Parameters, Tuner, Network Audio, iPod, Multi Zone Control, System Setup and Panel/Remote Lock. Here are a few screen captures to let you know what this interface looks like:
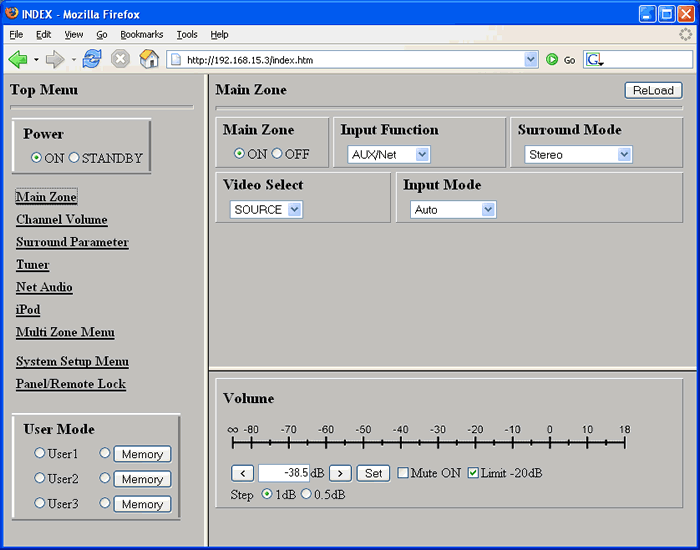
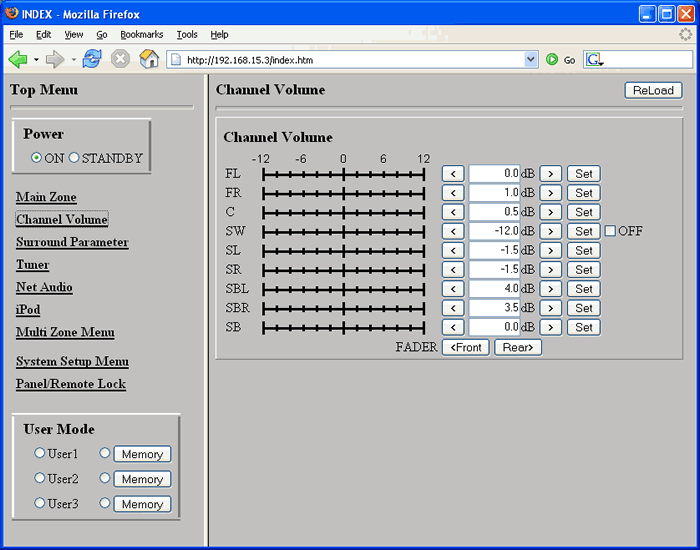
The Main Zone and Channel Volume adjustments are present in the web interface
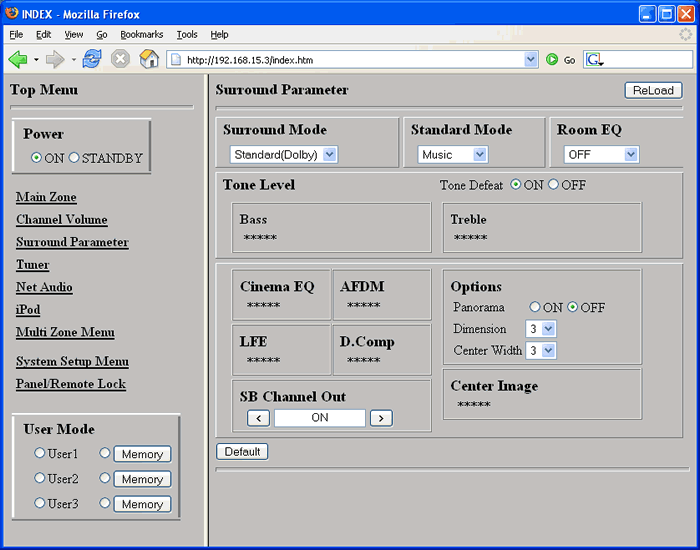
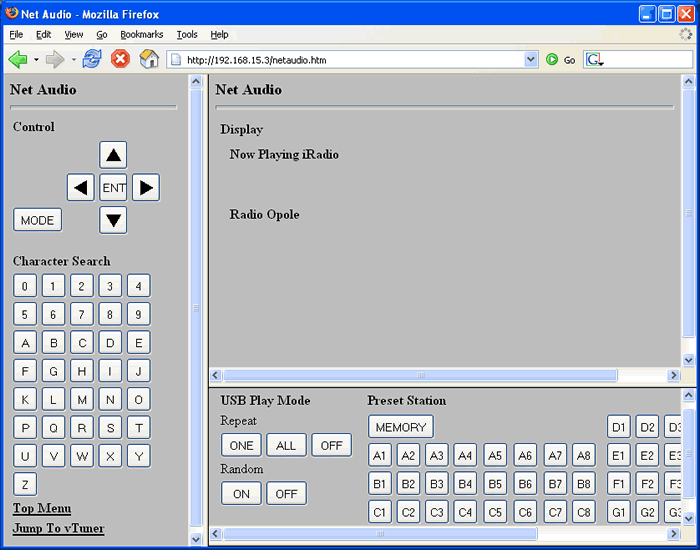
Here the Surround Parameters and Net Audio functions are shown
All you need to do to call up this browser interface is type in the IP address of the receiver (which you can find under the Network Setup submenu item.) The receiver will require an Ethernet cable connection to your local network of course and, if you are running a DHCP server, it will pick up an IP address automatically. At this point it will be accessible from any web browser for remote control and configuration of the unit.
Denon Link III
Now that SACD has been made available via Denon Link III, we can all rest easy with just a single cable connecting our compatible Denon DVD players and receivers. I have to tell you, if this isn't a reason to want to buy a companion Denon DVD player I don't know what is. I THOROUGHLY enjoyed the simplicity of connecting the single shielded Denon Link cable and putting up the analogue cables... at least until I need to pull them out again for Dolby TrueHD and DTS-HD Master Audio...
 Denon RC-1024 Electroluminescent Universal Remote
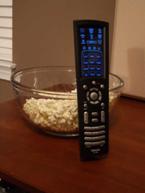
The Denon RC-1024 remote control has its share of ups and downs. This redesigned remote control features a lot more real buttons than the debut EL model and seems easier to use and handle. Overall I enjoyed it, but found some of the controls awkward and confusing (or just plain missing).
Pros
- Additional tactile buttons for more common controls
- Hybrid EL remote exceeds ease of use of prior model
- Easy to program
Cons
- Tactile buttons are not backlit
- Difficult & limited macros
Source Switching
The remote control switches sources, once under the "AMP" function, by selecting them from the numeric keypad at the bottom. You'll need to ensure that you toggle the "AMP" control so that you aren't on Zone 2 or 3 before selecting a new source. I found this a simple process and a bit better than that offered by the original EL remote. One thing that gets a bit confusing is that when you select a Device from the top (EL) portion of the remote, it does not automatically switch to that source/input. In this way Denon makes it possible to control devices other than the currently-selected source, but at the same time takes away a potentially intuitive control feature.
Learning
&
Additional Thoughts
Denon made the learning function and calling up preset remote codes very easy on this remote. Learning is activated by holding down the SETUP button for 3 seconds and hitting 9 - 7 - 5 on the remote. At this point you simply select the mode (device) to be programmed and bounce back and forth between the function and source remote control IR commands. Programming stored preset codes is even easier. You simply select the correct function to be programmed, hold the SETUP button for 3 seconds and enter the corresponding 5-digit preset code from the Denon user manual. The new remote even handles punch through commands which are handy for navigation controls while in different modes.
For $2000, the remote control included with the AVR-4306 is no slouch, and comes with some very advanced and sophisticated features. I liked it overall, and in general I tended to feel that it looked as cool as it worked. Gone is the automatic "wake up" whereby the remote turned itself on when picked up. Now you need to press a button or touch the EL remote's screen to get it ready for use - this will likely reduce the cool factor but result in extended battery life and a more practical device. The display has a default time out after about 10 seconds (adjustable up to 25 seconds or down to 5 seconds) so you have a variable time to make up your mind when selecting a function. The remote also has an "auto-brightness" function which varies the EL backlight according to the ambient light - pretty sophisticated if you ask me (and it can be disabled and the brightness fixed). Flexibility seemed to be key in the development of this product... and it shows.
Audioholics/HQV Bench Testing Summary of Test Results
Perfect Score is 130
Denon AVR-4306
Benchmark Score: 65
(the best of the video upconverting/scaling receivers we've tested
to date)
|
Test |
Max
|
HDMI
|
Pass/
|
|---|---|---|---|
|
Color Bar |
10 |
10** |
Pass |
|
Jaggies #1 |
5 |
5 |
Pass |
|
Jaggies #2 |
5 |
5 |
Pass |
|
Flag |
10 |
10 |
Pass |
|
Detail |
10 |
10 |
Pass |
|
Noise |
10 |
0 |
Fail |
|
Motion Adaptive NR |
10 |
0 |
Fail |
|
Film Detail |
10 |
0 |
Fail |
|
Cadence 2:2 Video |
5 |
0 |
Fail |
|
Cadence 2:2:2:4 DV Cam |
5 |
0 |
Fail |
|
Cadence 2:3:3:2 DV Cam |
5 |
0 |
Fail |
|
Cadence 3:2:3:2:2 |
5 |
0 |
Fail |
|
Cadence 5:5 Animation |
5 |
0 |
Fail |
|
Cadence 6:4 Animation |
5 |
0 |
Fail |
|
Cadence 8:7 animation |
5 |
0 |
Fail |
|
Cadence 3:2 24fps film |
5 |
5 |
Pass |
|
Scrolling Horizontal |
10 |
10 |
Pass |
|
Scrolling Rolling |
10 |
10 |
Pass |
|
Total Points |
130 |
65 |
|
HDMI outputs were tested at 480p and 720p to verify that there were no significant differing test results. **Failed when receiver was set to 480p output.
Comments on HQV Testing
The Denon AVR-4306 does not offer 480p upconversion on its component video outputs, so HDMI would be the preferred connection whenever possible in order to benefit from the upconversion and scaling capabilities of this receiver. The Film Detail (race track stands) test fell out of lock repeatedly during the video loop which was surprising and showed that the AVR-4306 has some difficulty with bad edits during unflagged 2:3 pull down. It also failed all but the 3:2 film cadence test, but that won't make you want to go home crying to your mama. Jaggies were absolutely smooth, as was the real-world flag test. Detail did NOT seem to suffer one bit from source, through the upconversion process to HDMI. Overall, we were quite pleased with the video processing and scaling performance of this receiver.
Additional Video Performance Tests
Using the AVIA Pro test disc, we ran a series of motion tests to ascertain the video processing ability of the AVR-4306 when hit with several aggressive conditions. It fared poorly on all of the Moving Zone Plate tests, including 2/3 and 2/2 tests. Moiré pattern was immediately visible as soon as the pattern began moving. A-B comparisons using the Sharpness test pattern showed us very clearly that the Denon receiver wasn't losing any resolution from an original 480i source. Lines remained perfectly clean and there was no ghosting or loss of edge detail visible.
Denon AVR-4306 Measurements and Analysis
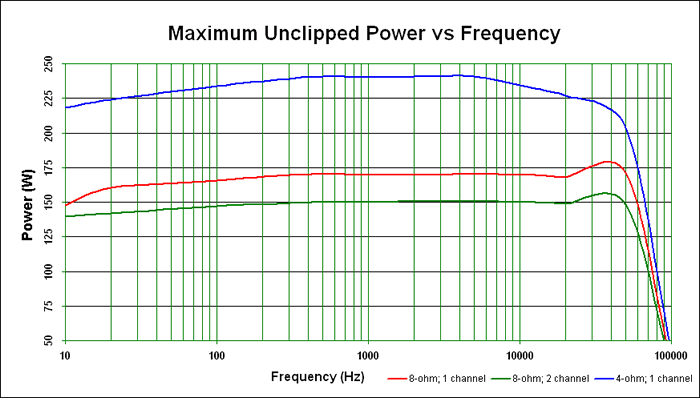
The Denon AVR-4306 scored impressively on our maximum unclipped continuous power tests.
As is typical, we measured CONTINUOUS unclipped power in these tests. Estimated THD at these measurements was between 0.5 - 1% (max) and tests were done with an 8-ohm test load for one and two-channels as well as a 1 channel test with a 4-ohm load. The results were above average to say the least. This 130wpc amplifier scored well above that value (around an average of 150W) when driving 2 channels into an 8-ohm test load. When pushing a 4-ohm load the power jumped to around 240watts. One thing that became abundantly clear (and showed through in our listening tests) was that the AVR-4306 has a healthy power reserve to be used wherever it was needed during multi-channel playback.
We tested the preamp section of the Denon AVR-4306 and were able to drive over 6.25Vrms before the receiver capped the output - this is an exorbitant amount of preamplifier output and will drive ANY power amplifier we are aware of to its maximum potential without introducing any distortion or clipping - even at maximum volume settings on the receiver (we had it up to +18 in our tests). Of course if you send that much voltage to an amplifier - we don't want to hear about the internal fuses you blew in your amp, how many drivers you blew in your speakers or breakers you tripped...
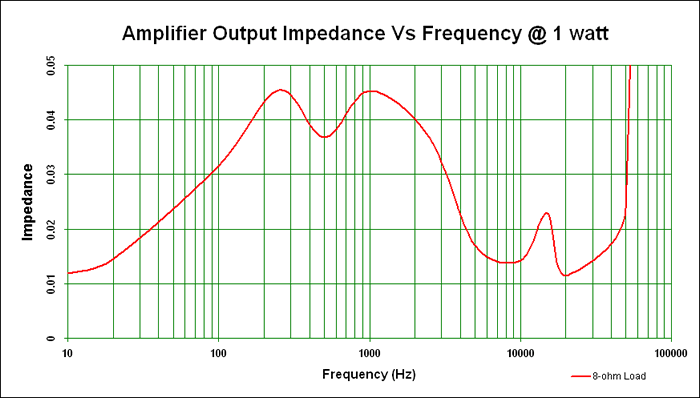
Amplifier output impedance vs. frequency at 1 watt power
We measured the AVR-4306's output impedance vs. frequency at 1W. It varies about +/- 0.035 mohms throughout the audible range. The Denon receiver should not have a problem driving a wide range of loudspeakers - even those with an inconsistent impedance profile. It comfortably met our benchmark goal of 100mohms or less through the entire audio band - an excellent achievement for a receiver in this price class.
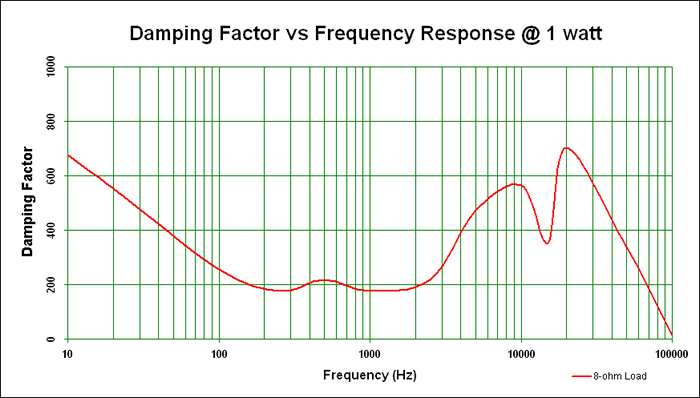
Damping factor vs. frequency response at 1 watt power
The damping factor of the receiver hovered for the most part around 220 and went as high as 550 around 20Hz and above 5kHz. Anything above 50 throughout the audio band is excellent. This is simply a strength of this product and is consistent with what we have come to expect from mid-fi and up Denon receivers.
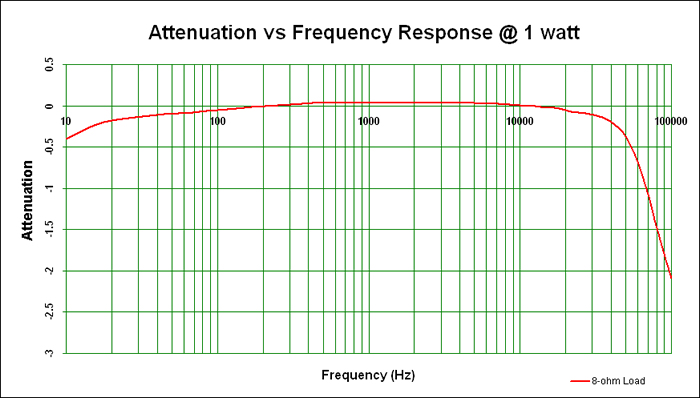
Attenuation (in dB) over the total frequency bandwidth at 1 watt power
Measuring attenuation versus frequency, the Denon demonstrated only a 0.07 dB variance at the high end and 0.19dB variance at the lower limits of human hearing (some of which we can likely attribute to instrumentation error). The AVR-4306 exhibited very linear frequency response just like our listening experiences confirmed.
Denon AVR-4306 Listening Tests: Music
I separated my listening sessions into two channel, multi-channel music and multi-channel movies so that I could experience everything there was to hear about the AVR-4306 and it's rather robust amplifier section. The results are noted below and, though subjective, they represent my best attempts at conveying this receiver's performance capabilities and strengths. For two-channel listening I disabled the subwoofer (we're not evaluating subs here and it has nothing to do with the performance of the receiver's amplifier section). The SI-6100 loudspeakers in Reference 2's CinemaSITE go down to 40Hz and put out plenty of low frequency, so I was able to evaluate the AVR-4306 on this basis.
 CD:
David Sanborn
Love Songs
CD:
David Sanborn
Love Songs
One of my favorite saxophone albums,
Love Songs
presents a compelling mid-band torture test that really defined the smoothness and
control present in the Denon receiver. The opening track, for example, showed an incredible ability to
throw reverb into the room. The chorus vocals just about
leapt
to the surrounds...
only
the surrounds weren't on -
talk about room-filling sound! In track #2, "Straight to
the Heart"
, Sanborn's sax covered just about all of the potential 150Hz -
800Hz range
offered by this instrument and the result was undistorted, pristine and well-balanced. Coupled with a
tight kick and a subtle but consistent high hat, there was plenty going on that could have been blurred
by a lesser amplifier. A full piano quickly joined the mix and offered a peek into how a very busy
ensemble of closely-miked instruments can still come through with a very high degree of intelligibility
and finesse.
Track #7 "You Don't Know Me" was a softer piece, characterized by a washing reverb and overlying synthesizer track. A rolling, but firm acoustic bass rounded out the low end and created a truly wide extension of frequencies - maximizing the potential of the CinemaSITE's main speakers and ensuring that the Denon could handle a tough load while both ends of the spectrum were being hit hard by a solid arrangement.
A more popular (commercial) song, "You Are Everything" filled the room with alto sax, guitar, and drums. An electric piano comes in just over top of the mix and mimics/echoes the main sax melody during the solo and through out the song. The effect is very rich and full and I couldn't help but realize that I didn't miss my dedicated amplifier at all while listening to this album.
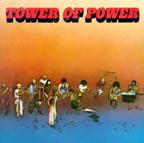 CD:
Tower
of
Power
Tower
of
Power
CD:
Tower
of
Power
Tower
of
Power
This
album is one of my favorites for listening to a jam-packed mix with a band that's tighter than
just about anything I've heard since. "What is Hip?"
is just a great song with a
driving bass that doesn't let up from beginning to end. Vocals are set back in the mix and
guitars and brass flanks the soundstage while drums hold down the fort and accentuate each build up to
the chorus. You will be hard-pressed to find a more integrated group of five horn players in any
commercial music today. Track #5 "Get Yo'
Feet Back on the Ground"
opened up the
soundstage and brought in a funkier guitar sound along with a drier vocal and more distinctive
instrument placement within the mix. The AVR-4306 took everything in stride and put out a convincingly
realistic soundstage. The mixes are definitely studio, but the effect is of hearing the band spread out
on the stage in front of the listening position.The effect transfixed me for quite some time as I
closed my eyes and allowed my ears to enjoy the presentation.
"Soul Vaccination" is another of their more popular tracks and featured one of the fuller and wider soundstage mixes. Backing vocals really pop out into the room and are deceptively placed so as to appear to come from well within the room. Drums sounded tight and controlled and vocals had no audible compression and were absolutely pristine. The horns were incredible, with a realistic sound, and none of that "kazoo" buzzing that can occur with an underpowered amplifier or loudspeakers with a limited mid-band frequency response.
Listening Tests: Multi-Channel Music
Moving on to multi-channel music we queued up some of our favorites and settled back in for a listen. Again, we disabled the subwoofer channel so that we could listen only to the Denon receiver's amplifiers. It is an almost certainty that the addition of a subwoofer is going to give you that extra "oomph" for kicks, bass and low frequency harmonics present in many of these tracks. My comments do not reflect the sounds below the 40Hz response capabilities of the CinemaSITE system.
SACD: Jeff Wayne's Musical Version of the War of the Worlds
I put in this album since I am intimately familiar with it and it
features a stunning SACD mix with some incredibly rich vocal and instrument performances. The opening
music number "The Eve of the War"
begins with synthesized brass and a steady percussion
which ebbs and flows, eventually building into a crescendo of bass and lead electric guitar. The
soundstage is
completely
active -
with sound coming in, appropriately, from all
directions. Never does it appear forced or artificial, but rather the mix sounds cohesive and, though
busy, everything seems to have its place. There is so much going on that, except for brief periods of
solace in the intro, all 7 channels (PLIIx Music Mode) get a tremendous workout (which is one of the
reasons I selected this particular album). Near the end of the first piece, the Martian vocal chorus
sent chills as the crescendo of sound rose to a peak and then became temporarily subdued for the
continuing voice over.
Track #2, aside from some creative use of synthesizers and sound effects, presented a more exceptional demonstration of soundstage and the AVR-4306's ability to correctly portray content so that it supports the intended soundstage and imaging of the source track. Reverb and effects filled the surrounds while a lead keyboard was anchored to the fronts. As the track progressed I noticed a well-articulated low end, especially considering I didn't have my subwoofers active. The Denon pushed the RBH Sound CinemaSITE's SI-6100s down to their lowest octaves and controlled them without any difficulty and without losing control over the high frequency detail. While the bass notes were thumping hard, the shimmering reverberation off the guitars and synthesizers were crisp and detailed.
"Forever Autumn" presented an excellent male vocal track by Justin Hayward of Moody Blues fame. The soft decay off his vocals rolled gently into the room as his smooth voice sounded controlled and perfectly rendered by the Denon receiver. Drums were tight and synthesized flutes came though smoothly and concurrent with a solid driving drum track and guitars. This album was solid and sounded absolutely fantastic with the AVR-4306 providing exclusive power to the CinemaSITE system.
AIX Records
High Resolution Audio Experience
AIX Records,
headed by Dr. Mark Waldrep, uses no dynamic or effects processing in making its recordings. Mastered in
24/96 PCM (DVD-Audio) the tracks are about the cleanest mixes you will ever hear and are untouched by
the typical compression and reverb and delay effects that dominate (and often corrupt) most commercial
recordings. We demoed several tracks from this disc. In particular, track #4 "Moonlight
Acoustica"
presented a wonderfully tight mix of drums, solo guitar, bass, and percussion. Each
instrument had its place, as the mix was from "within the room"
or "on stage"
surrounded by the performance. I prefer these to stage mixes as they give a more intimate feel, though
it takes some getting used to.
"Ocean" by Jonathan McEuen gave a real intimate and crystal clear mix of male vocals and acoustic guitar. The reverb which filled the room was captured by the microphones during the recording process and was absolutely lifelike and gentle, without any of the edginess or harsh roll-off that can occur when an amplifier doesn't have enough finesse to carry through the full sound.
Mozart's Symphony 41, 1st Movement presented a densely packed assault of sound from all sides. The result was remarkably controlled and smooth. I felt that the Denon AVR-4306 barely scratched the surface of its potential, even though the track tested the limits of what I could handle in Reference System 2 in terms of volume level. This is one track everyone should run through their systems to see how well their room can reproduce the effect of a grand symphony hall. I was quite pleased with the results.
"The Hag at the Churn" is just a song with a cool title. Its funky bass licks, guitar and drums are intoxicating and hard to not appreciate. Throw in dueling bag pipes and, well, you just have to hear it to understand... The sound was awesome and the mix (which eventually included harmonizing vocals in the surrounds) let me know that the AVR-4306 was taking my music as seriously as I was.
Denon AVR-4306 Listening Tests: Movies and Conclusion
We re-enabled the subwoofers for the movie soundtrack evaluations. I watched well over a dozen films on the AVR-4306 during my evaluation period and was absolutely impressed by its power delivery and ability to pu sh out a ridiculous amount of clean, coherent sound. Specific experiences with a couple of my favorite films are outlined below.
DVD: Serenity
From the very opening scene, low frequency effects seem to dominate
this movie. In the scene where the crew of the FireFly are fleeing the
Reavers, the surrounds are used a tremendous amount. The effect was
awesome, with pans and vehicle-bys the likes of which I hadn't
experienced since the Pod Race Scene in
Star Wars Episode I: The Phantom Menace
.
Later, as they investigate the interior of an "abandoned"
world, the ambience which fills
the soundstage was incredibly effective at establishing the desired mood.
Later, as there is a "firefight" in space, the purposefully muted sounds of the vacuum-inhibited explosions and gunfire gave birth to a "leaf on the wind" dogfight scene with over the top flybys and metallic crunches as enemy ships collided and the Firefly ship ran the gauntlet to get through an enemy blockade. The conclusion of this scene was phenomenal as the ship "glides" to a landing on the planet below.
DVD: Star Wars: The Clone Wars Volume Two
In this animated prequel to
Star Wars Episode III: Revenge of the Sith
, a rich musical score combines with sound effects worthy of Benn Burtt
to make a dynamic front stage and surround presentation. Unlike the
Volume One animated series, this volume comes in 5.1 Dolby Digital
surround. The outer space battle sequences were filled with dramatic
vehicle-bys and laser turrets which ripped from the center channel to
the surround back speakers (using Dolby Pro Logic IIx: Cinema overlay).
When Coruscant is attacked by the separatists, the gut-rupturing sounds of large carrier ships filled the screen and a low-height chase sequence brought back memories of the original Star Wars Death Star sequence as ships raced through the city, dodging in and out of buildings.
Subtleties were also appreciated. In the scene where General Grievous kidnaps Senator Palpatine, there is a period of time where the guardian Jedi are waiting for an elevator. There is a significant amount of blaster fire and lightsaber action down the hall. The ambience in the room and the off-screen action are perfectly placed and the lack of audible noise is almost uncanny. A lesser receiver with less dynamic range would not be able to effect such a dramatic difference in dynamics and I appreciated the low noise floor of the Denon.
Conclusions and Overall Perceptions
The Denon AVR-4306 is jaw-dropping. This is the type of receiver you can put into your system and keep for a long, long time. With the introduction of USB and Internet radio support it is like getting a streaming media device for free - allowing for an almost endless source of free music for parties and casual listening. On the high-end, its underrated power capabilities and noise-free performance is sure to satisfy even the most discriminating audiophile. Try the Audyssey room EQ system, but don't count on it being the magic bullet for every room, especially with their latest round of changes which seemed to dull the low and high frequency system response. We left it off for most of our listening tests and were a bit disappointed that they haven't yet ironed out these issues.
Denon has scored several goal-winning points in the last several years, and the AVR-4306 may actually be a product that hits the mark for many consumers looking for an affordable high end product to control their home theater system. I would highly HIGHLY recommend this receiver to anyone looking for the best performance and feature set available for a receiver under $2000. This is a true benchmark, trend setting product!
The Score Card
The scoring below is based on each piece of equipment doing the duty it is designed for. The numbers are weighed heavily with respect to the individual cost of each unit, thus giving a rating roughly equal to:
Performance × Price Factor/Value = Rating
Audioholics.com note: The ratings indicated below are based on subjective listening and objective testing of the product in question. The rating scale is based on performance/value ratio. If you notice better performing products in future reviews that have lower numbers in certain areas, be aware that the value factor is most likely the culprit. Other Audioholics reviewers may rate products solely based on performance, and each reviewer has his/her own system for ratings.
Audioholics Rating Scale
 — Excellent
- — Very Good
- — Good
- — Fair
- — Poor
| Metric | Rating |
|---|---|
| Frequency Response Linearity | |
| SNR | |
| Output Impedance | |
| Measured Power (8-ohms) | |
| Measured Power (4-ohms) | |
| Multi-channel Audio Performance | |
| Two-channel Audio Performance | |
| Build Quality | |
| Fit and Finish | |
| Ergonomics & Usability | |
| Ease of Setup | |
| Features | |
| Remote Control | |
| Performance | |
| Value |
Clint Deboer was terminated from Audioholics for misconduct on April 4th, 2014. He no longer represents Audioholics in any fashion.
View full profile