
Denon AVR-2308CI A/V Receiver Review
Denon AVR-2308CI
- Product Name: AVR-2308CI
- Manufacturer: Denon
- Performance Rating:


- Value Rating:
- Review Date: December 28, 2007 19:00
- MSRP: $ 849
-
100 watts x 7 into 8 ohms (20-20,000 Hz) at 0.05% THD
-
Dolby® Digital EX, DTS-ES™, DTS 96/24, Pro Logic® IIx, and DTS Neo:6 decoding
-
Audyssey MultEQ 6 point auto setup and room calibration system (microphone included)
-
XM Satellite Radio Ready (requires XM subscription and optional XM Mini-Tuner package)
Neural Surround decoder for XM's HD Surround channels
-
iPod® integration (requires optional Denon ASD-1R)
-
Compressed Audio Restorer for better sound with compressed music sources
-
Two-room/two-source output with powered and line-level stereo audio output for 2nd room (using powered 2nd room stereo output allows 5.1 home theater in main room)
-
Pure Direct modes switch off all unused circuitry for the cleanest possible sound
-
192kHz/24-bit DACs for all channels
-
Multibrand remote and second zone remote
-
1080p-compatible HDMI digital video switching (2 in, 1 out)
-
Analog-to-HDMI video upconversion (up to 1080p) with Faroudja DCDi™ video processing and scaling
-
HDMI version 1.3a with deep color support
-
Component video switching (3 in, 1 out)
-
Component video conversion (composite to S-video, or composite and S-video to component)
-
Digital inputs: 4 optical (including 1 front panel), 2 coaxial
-
Digital outputs: 1 optical
-
5 audio/video inputs
-
3 audio-only inputs (including phono)
-
7.1-channel analog audio preamp input
-
RS-232C port for automated control systems
-
2 sets of main speaker outputs
-
Back surround speaker channels re-assignable for bi-amping front left and right speakers
-
17-1/8"W x 6-3/4"H x 17-3/16"D
- Weight: 29.5lbs
-
Warranty: 2 years
Pros
- Great processing and amplification at this price
- HDMI 1.3a Deep Color and Multi Channel PCM Support
- Audyssey MultEQ
- Superb bass management flexibility
Cons
- No preamp outputs
- Lame remote control
- Long auto setup process
- Lacks TrueHD and DTS-HD Decoding
Denon AVR-2308CI Introduction
It’s cool to have hip and trendy parents. After all it was their support as a child that eventually led me to turn my audio obsession into the Internet's premier home theater publication you read today. With that my parents felt it was time to upgrade (with a little nudge from me of course) their 7+ year old 5.1 surround receiver into something more up to date for easier connectivity with their new HD display. What they didn’t expect was a quantum leap in sound quality which quite frankly surprised me as well. Enter the AVR-2308CI – Denon’s newest $850 heavy hitter in their arsenal of HDMI 1.3a capable receivers. This unit is armed to the teeth in all of the latest features including HDMI 1.3a audio and deep color support, XM HD radio and Audyssey MultEQ room correction. Top that off with 100wpc x 7 of respectable amplification – a heritage Denon is known for - and you’ve got a well rounded product capable of serving as the brains and brawn for today’s sophisticated home theater installation requirements.
Denon AVR-2308CI Build Quality
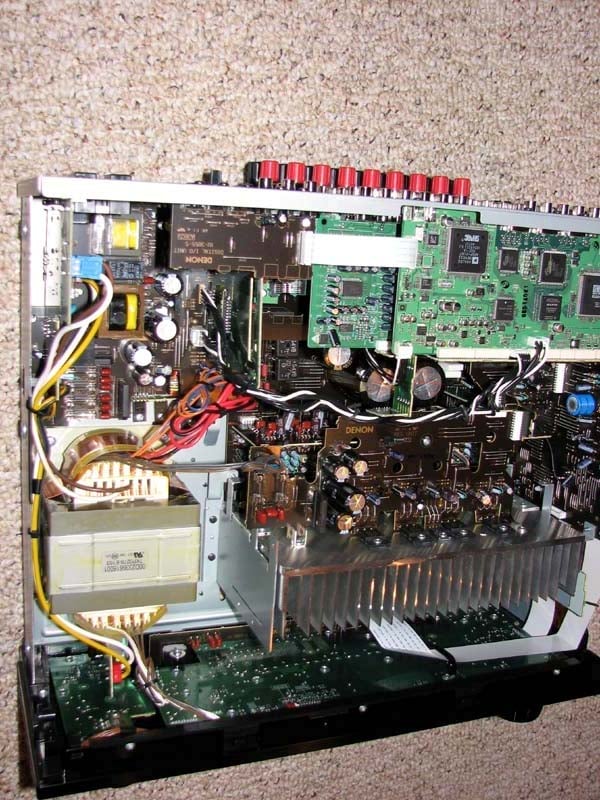 The Denon AVR-2308CI’s build quality is what I’d expect from Denon at this price point. Sturdy construction, with a brushed aluminum faceplate, detachable power cord and binding posts for all speaker connectors come standard on this unit. The chassis is certainly well secured as I had to remove 11 screws just to get the top cover off to take this picture. The power supply is about average from what I’ve seen in this price class, sporting a decent sized power transformer and two 85 deg C rated 12,000uF 71V power supply capacitors. Denon didn’t skimp on putting a nice solid aluminum finned heat sink in this receiver as so many other companies tend to do at this price class. It’s an indication to me that this baby’s got more juice than the spec sheet shows as we will soon find out on my test bench.
Editorial Note
In order to hit the rated 100wpc Denon is claiming, they would require a rail voltage of sqrt(2)*[(100*8)^1/2 ] = 40V + 5V(margin) = 45V. As you can see their capacitor bank has plenty of overhead to meet this requirement.
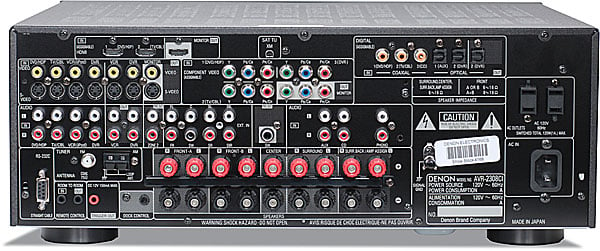
Back Panel View of the Denon AVR-2308CI
The AVR-2308CI certainly has an impressive backside but it is lacking one feature I am mildly disappointed in – preamp outputs to connect external amplification. I understand however at this price, Denon is banking on most people not pairing this receiver with other amplifiers, but as I found when reviewing this receiver, it’s got a heck of a good processor section that would serve quite well as an inexpensive pre/pro for someone to pair with their more powerful stack of amplifiers. Well, it would have if Denon included preamp outputs. Since they didn't on this model, you will have to settle with using its internal amplifiers to power all of your speakers.
The AVR-2308CI has two HDMI 1.3a inputs and 1 monitor output, 3 coax and two toslink digital inputs, and one toslink digital output. The detachable power cord and 150mA high current 12V trigger was a nice touch at this price point. I can think of many products at 4 times this price that still utilize wimpy 10 or 15mA triggered outputs which wont work with most motorized screen systems and power conditioners. Kudo’s for Denon on using an extra current amplifier stage to make this port more useful to the integrator and end user.
Denon AVR-2308CI System Setup and Configuration
As with any Denon receiver I’ve setup in the past, the AVR-2308CI is fairly straight forward. It gives you the option to assign connection types to each input for both video and audio which I found handy while I was trying to customize the system which consisted of an assortment of HDMI, component video and s-video equipment. You can also assign inputs to play other sources should you for example want your music server to play on the CD input but also require a simultaneous video feed from another input. There is an option to bi-amp your main speakers or route the extra two channels to a second zone should you only be setting up a 5.1 system in the primary theater room. You can even assign power up volume level as well as an absolute maximum volume setting which is useful for those with children or people around the house that think the solution to not hearing audio playing is to continually crank the volume up until they hit the correct button to make sound and blow out all of your speakers in the process. Trust me, I speak from experience.
Have some poor quality MP3 or compressed music sources you want to listen to? No problem, Denon offers several options via their “Audio Restorer” feature which attempts to restore the lost resolution of such poor quality sources. I tested it and found it did in fact improve rather poor quality MP3 or sterile CD recordings much like the system Yamaha developed for their receiver line. This is a nice tool to ad to your proverbial audio bag of tricks.
A really cool feature in this receiver which up until a year ago was unheard of at this price is its analog to HDMI upconversion and Faroudja video processing. This allows all video sources (digital or analog) to be upconverted to your display as well as simplify the video connection to your display down to one HDMI cable. I tested this exhaustively via component video and s-video sources and it worked flawlessly. The only thing to note is it takes a second or two for the video conversion to happen so you may briefly hear audio before the video comes up when you switch sources.
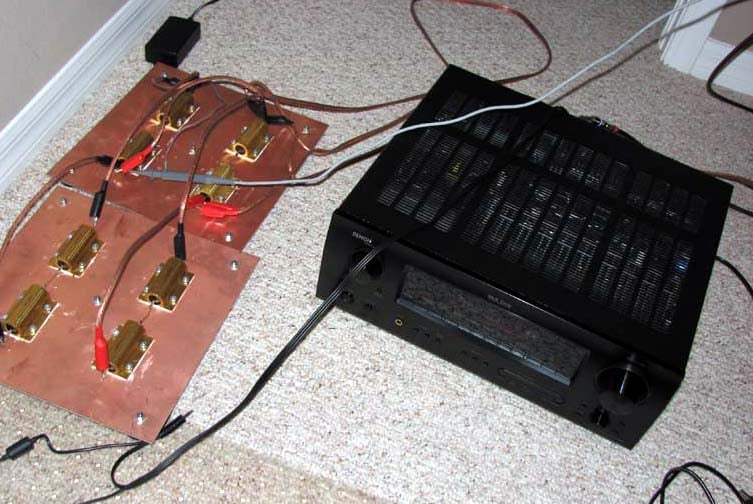
I connected the AVR-2308CI to an entire RBH MC in-wall speaker package consisting of 4 MC-6s, 1 MC-414 center channel, 2 MC-615 in-ceiling speakers and 1 TS-10A subwoofer. The source is the Denon DVD-2900 (an oldie but great universal DVD player) connected to a Sony 1080i RPTV. All of the cables were Sonicwave from Impact Acoustics.
Auto Setup Via Audyssey
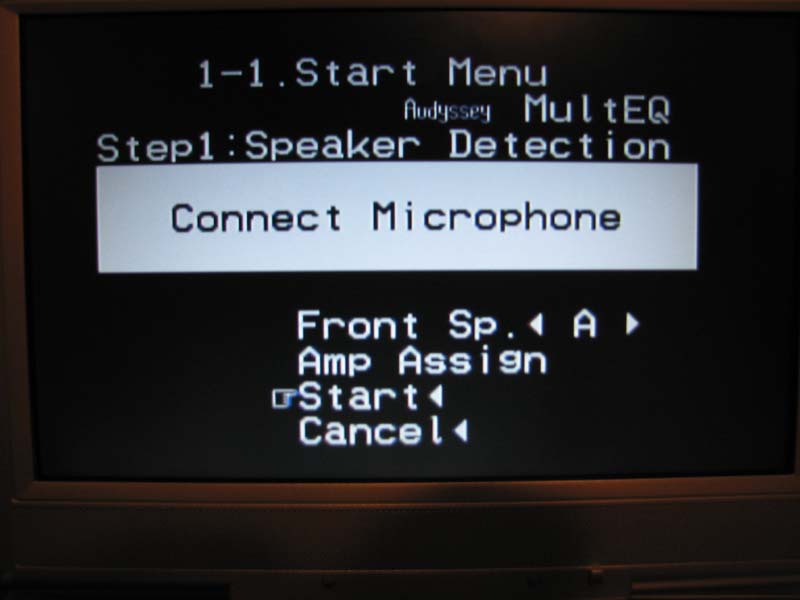
The AVR-2308CI is armed with Audyssey’s MULTEQ automatic room correction system which checks and configures:
- Wiring
- Distance
- Speaker Size
- Equalization
- Level
Although this version only does 6 point calibration compared to 8 point on some of Denon’s higher end receivers, I found it worked just as well, and perhaps a bit better than the system on my older AVR-5805. I went through the setup process only once and Audyssey did quite a bang up job configuring the system despite all of the speakers were in-wall type which can cause auto correction systems to overcompensate for speaker correction due to boundary gain.
I was pleasantly surprised to find Audyssey pretty much nailed the distance, channel trims, speaker size and crossovers correctly. I did however make a few tweaks in level and distance (.5dB, 1/2ft, respectively) and also had to adjust the rear channel crossover from 60Hz to 80Hz which I found to be a better crossover point with the system. I was happy to see such promising results and was looking forward to the listening tests to see if Audyssey could help tame my parent's rather lively room which has high vaulted ceilings and wood floors.
There are a few quirks that trouble me with the implementation of Audyssey on the AVR-2308CI. One of them is the fact that it takes around 20 seconds for Audyssey to advance to the next speaker after it takes a measurement. Without counting the actual time taking the measurements, re-positioning the mic or accepting the final results, you are forced to wait nearly 15 minutes if you calibrating a 7.1 system. I am not sure why there was such a long delay here as I haven’t experienced that on my AVR-5805 but it can be a rather painful process if you're inpatient like I tend to be. You better be sure to have a quiet room for at least ½ hour to complete the auto setup as you don’t want to be repeating measurements caused by noise interruptions. Once you go though this long calibration process, one would think they’d be done and ready to enjoy the sonic delight of room equalization, but they would be wrong. Instead, you now have to engage Audyssey which is harder than it sounds. Instead of having a hot key on the remote or front panel of the receiver, you must go through 3 layers of the OSD to get to it (Menu > Parameter > Room EQ > Audyssey). To make matters worse, there isn’t even an LED on the front of the receiver to let you know it’s engaged. Instead you have to look for a little “MultEQ’ text message on the front panel of the receiver to be assured it’s on or verify via the OSD that you selected either “Audyssey, or Audyssey Flat”. I would really have liked to see a hot key implemented on the remote so you could easily test the benefits of Audyssey, but in the end, I was able to manage via the OSD.
Editorial Note on Choosing the Correct Audyssey EQ Mode
When enabling the EQ it’s important to select the proper type for your system. The “Audyssey” EQ mode introduces a slight high frequency roll-off to restore the balance between direct and reflected sound while the “Flat” setting still uses the MultEQ filters in the same way as the “Audyssey” curve, but it does not apply a high frequency roll-off. The “Flat” setting is more appropriate for small or highly treated rooms in which the listener is seated in close proximity to the loudspeakers while the “Audyssey” mode is more appropriate for lively large open rooms. It is recommended for all rooms when the receiver is in “Cinema” THX processing mode to use the “Flat” setting as it allows THX re-equalization to operate exactly as it was intended. If you instead use “Audyssey” in conjuncture with THX re-EQ, than you will essentially be rolling off the high frequencies twice causing too much attenuation and potentially compromising sound quality.
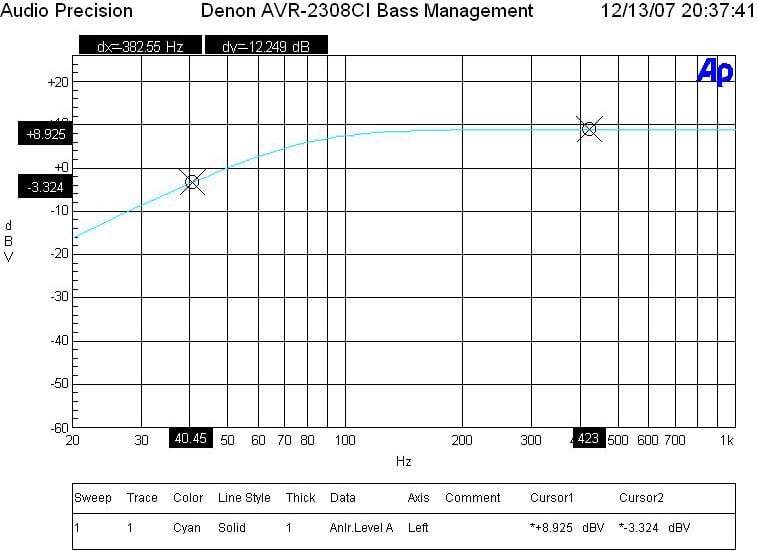
Bass Management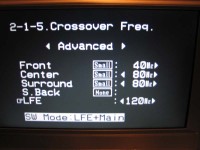
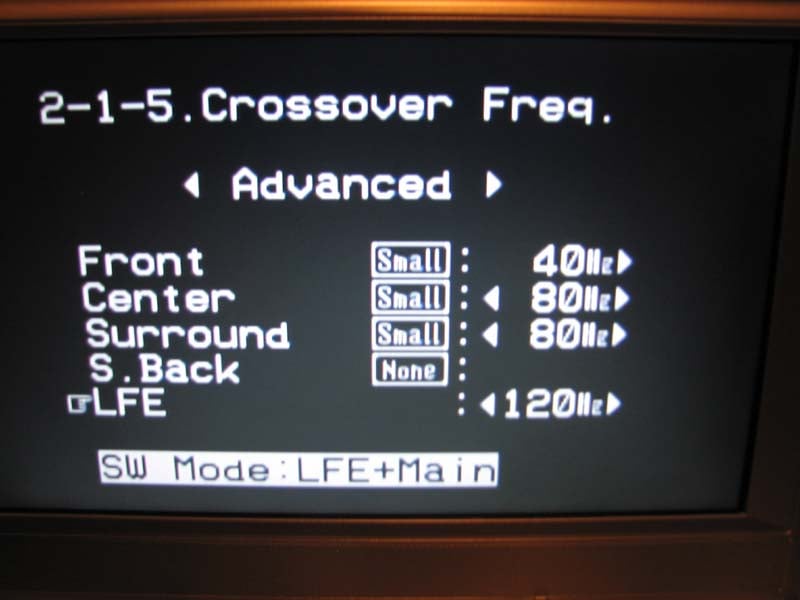
I’ve come to find one of Denon’s hallmarks is their excellent bass management and speaker setup options found on their flagship receivers. It’s nice to see some of these great features are carried down to even their sub $1k receivers like the AVR-2308CI.
Such stand out features include:
- .5dB channel trims
- .1ft delay adjustability
- independent channel trims per mode and input
- independent crossover settings per speaker pair and 2CH vs multi channel mode
- ability to combine bass from large main speakers to the subwoofer channel
 I was quite surprised to find such a level of
sophistication here. Custom installers
and audiophiles rejoice as you can pretty much configure any type of speaker
system or scenario via this receiver until your heart is content. Best of all,
the filter slopes are per THX of 12dB/octave for the high pass filters to the
speakers and 24dB/octave for the lowpass filter to the sub. I also verified the
sub out has plenty of distortion free gain as I was able to achieve about 4Vrms
into a 100 ohm load at less than 0.1% THD + N which is more than enough drive
to gang multiple subs to this output.
I was quite surprised to find such a level of
sophistication here. Custom installers
and audiophiles rejoice as you can pretty much configure any type of speaker
system or scenario via this receiver until your heart is content. Best of all,
the filter slopes are per THX of 12dB/octave for the high pass filters to the
speakers and 24dB/octave for the lowpass filter to the sub. I also verified the
sub out has plenty of distortion free gain as I was able to achieve about 4Vrms
into a 100 ohm load at less than 0.1% THD + N which is more than enough drive
to gang multiple subs to this output.
Remote Control(s)
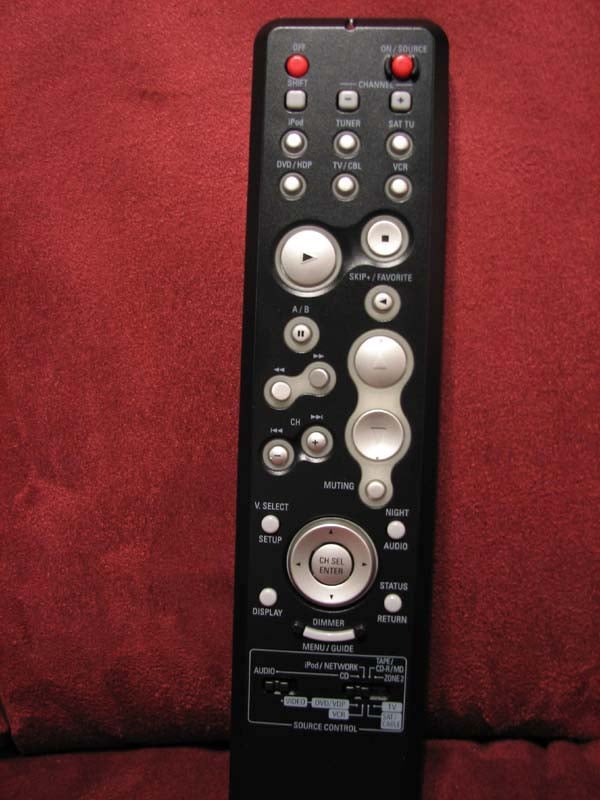
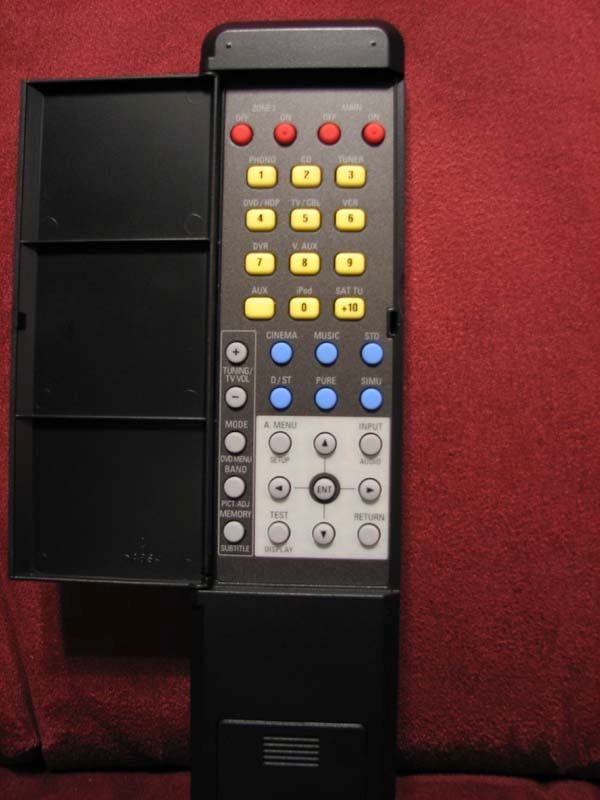
Perhaps the weakest link in this receiver is the supplied remote controls it comes with. This is to be expected at this price point as most decent remote systems typically cost half the retail of this product alone. There isn’t much to say here other than the remote is rather archaic looking, is all push button, has no backlighting and quite annoyingly has many of its useful functions via the star trek style flip panel on the back of the remote. It took me a good 2-3 minutes to figure out how to engage the OSD of this receiver before I realized the menu button was on the hidden backside of the remote. In order to operate other Denon equipment such as a DVD player, you must flip a tiny switch at the bottom left corner of the remote which toggles it between “Audio” and “Video” modes of operation. I found this little button to be annoying and wished for an easy slider button on the side of the remote to do the same function. The Zone 2 remote is even more basic but it does allow you input selection, volume control and limited control of an iPod system. All in all, I would suggest investing in a good universal remote system and save these for reference when you need to do specific setup and configuration in the receiver that you cannot program into a universal type remote control.
Denon AVR-2308CI Listening Tests
I sat with anticipation of what Audyssey MultEQ could do for an untreated room with all in-wall speakers and vaulted ceilings. I wasn’t expecting much to be honest, but I figured I’d give it a shot anyways as it was a bonus feature not a defining one when I selected this receiver for the install.
SACD” Patrica Barber Modern Cool

Track #7 “Company” can really give your system quite a workout with all of the percussion work and explosive drum soloing halfway into the song. I was quite amazed at how much more focused the snare drum sounded with Audyssey engaged. Stereo separation was also much improved while the instruments all seemed to convey better articulation. The trumpet was more centered with Audyssey engaged, and the vocals were warmer and richer. During the trumpet solo, I felt as if the speakers literally popped off the front walls giving them a much more spacious and 3-D effect. I had to remind myself that this was just a two channel listening session and I was already hearing a huge benefit of the room correction system. In track #1 “Post Modern Blues”, the bongos took on a higher level of realism with Audyssey engaged. With Audyssey engaged, didn’t feel like I was listening to the speakers as much as I was enjoying the musical experience.
DVD-Audio: Beatles Love

Track #1 “Because” is one of my favorites as it really exemplifies the uncanny melodic nature of the Beatles that few if any bands today can match. With Audyssey engaged, I found the surround envelop to widen while the vocals from the front 3 speakers were more upfront and in your face. The snare drum in Track #5 “I am the Walrus” really popped into the musical landscape once I engaged Audyssey. I briefly compared “Audyssey” to “Audyssey Flat” and while initially I thought I preferred the latter, I found it wore on my over time. “Audyssey” sounded more tonally balanced to me, especially at loud listening levels. The snapping sound emanating from the left front speaker in track #12 “Blackbird/Yesterday” sounded more realistic with Audyssey engaged. Track #14 “Tomorrow Never Knows” really showed off Audyssey’s prowess. With Audyssey engaged, the cymbals took on a much wider and dynamic presence to them as they also were better articulated. In comparison, once I turned off Audyssey, the cymbal crashes sounded dull and more blended into the vocals. Audyssey also appeared to tighten up the bass response a bit but not as dramatically as what it did for the mid and high frequencies as well as increasing the enveloping effect and improving the overall multi channel experience. What really impressed me was the sonic improvement carried to all of the listening seats in the living room. This allowed for a much broader sweet spot just like Audyssey claimed it would do.
Suggestions for Improvement
From a performance standpoint, I have little to criticize about this receiver, especially at this price. I would however like to see some operational hiccups fixed with the Auto setup such as less time between speaker measurements and a hot key on the remote to engage and disengage Audyssey. I don’t like the fact that when you engage the “setup lock” feature to prevent people from messing with the receiver settings, it won’t let you choose different surround modes. I also found it puzzling that the “Pure Direct” feature seemed to only work for analog sources. When I tried to engage it for a digital source, I heard no output. Because of the setup flexibility of this receiver, I strongly encourage you to run through all of the bass management configuration options at least once. During my initial setup, I found that 2CH direct mode set the crossover to 40Hz and thus I had to select the custom configuration mode to set it correctly back to 80Hz.
Perhaps in the next iteration of this receiver, Denon would consider going back to a remote control unit that has all of the buttons on one side all with backlighting. Until that happens, look elsewhere for an all in one remote to better serve this purpose.
The lack of preamp outputs on this receiver was a bit disappointing but understandable at this price point. I really feel the AVR-2308CI would have served as a bargain based processor for someone looking to utilize their more powerful external amps. But, you will have to step up to the next model (AVR-2808CI) for an extra $350 or so which also includes TrueHD and DTS-HD decoding to afford such a luxury.
Denon AVR-2308CI Measurements & Analysis
Amplifier Efficiency & Power Output
 Amplifier
Efficiency Measurements for linear a/b amps such as the ones employed in this
receiver typically range from 40-50% depending on the load the power supply of
the amplifier sees. The closer you get to full load, the higher the efficiency
usually becomes (assuming you aren’t overtaxing the power supply and power
devices of the amp causing excessive thermal losses). The AVR-2308CI achieved above
50% efficiency when driven at near full power into low impedance loads which
was quite impressive for a receiver employing a conventional linear amp design.
This receiver runs relatively cool dissipating around 54 watts in idle but be
sure to give it plenty of ventilation for situations of heavy usage.
Amplifier
Efficiency Measurements for linear a/b amps such as the ones employed in this
receiver typically range from 40-50% depending on the load the power supply of
the amplifier sees. The closer you get to full load, the higher the efficiency
usually becomes (assuming you aren’t overtaxing the power supply and power
devices of the amp causing excessive thermal losses). The AVR-2308CI achieved above
50% efficiency when driven at near full power into low impedance loads which
was quite impressive for a receiver employing a conventional linear amp design.
This receiver runs relatively cool dissipating around 54 watts in idle but be
sure to give it plenty of ventilation for situations of heavy usage.
|
# Ch |
Power Consumption |
Continuous Power Output |
Load |
Efficiency |
|
1 |
270 watts |
150 watts |
8 ohms |
55 % |
|
2 |
441 watts |
130 watts |
8 ohms |
59 % |
|
1 |
405 watts |
211 watts |
4 ohms |
52 % |
|
2 |
690 watts |
190 watts |
4 ohms |
55 % |
|
Idle Power |
54 watts |
|||
Note: All power output figures in this table are continuous and referenced to 1kHz but were also checked at full bandwidth to ensure the power figures reported were within 10% reported and at or below 0.1% THD + N.
The AVR-2308CI delivered a whopping 150wpc into 8-ohms and 211 watts into 4-ohms at 0.1% THD + N using my APC S-15 and SBATT to ensure the line stayed at 120V +- 2V. With 2 channels driven, it measured around 130wpc into 8 ohms and 190wpc into 5 ohms. Keep in mind most review publications test at clipping and don’t do continuous power measurements so our power numbers are usually a lot more conservative than what you typically find from other reviewers yet this receiver was delivering FAR more power than its rated specification of 100wpc.
For more info, see: The All Channels Driven (ACD) Test
Power Bandwidth
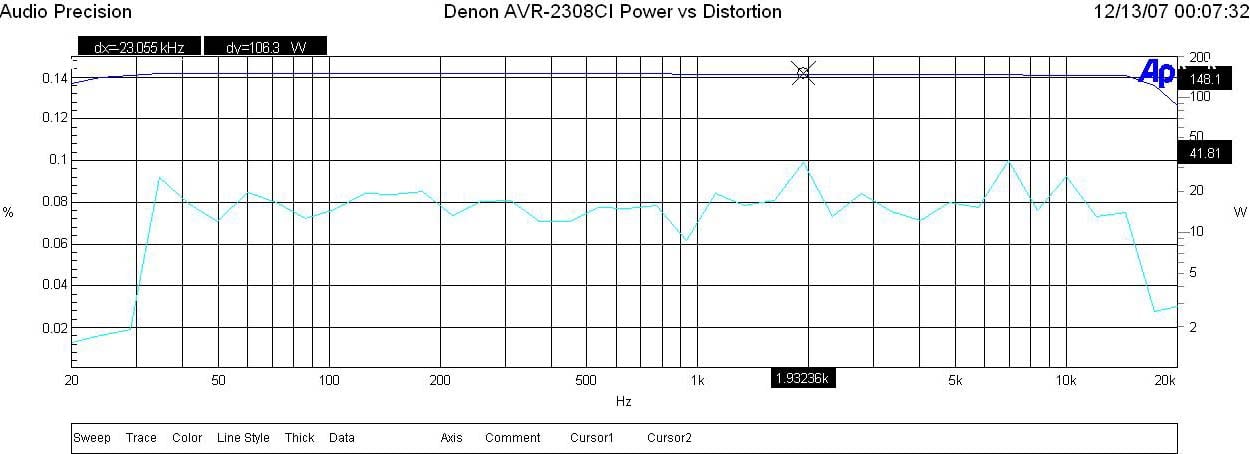
Figure 1. Denon AVR-2308CI Frequency Response vs Regulated Power
Using input regulation where I set the Audio Precision SYS 2722 to regulate the output distortion to less than 0.1% THD + N, the AVR-2308CI belted out around 150wpc across the entire audio spectrum (20Hz to 20kHz).
Frequency Response Uniformity
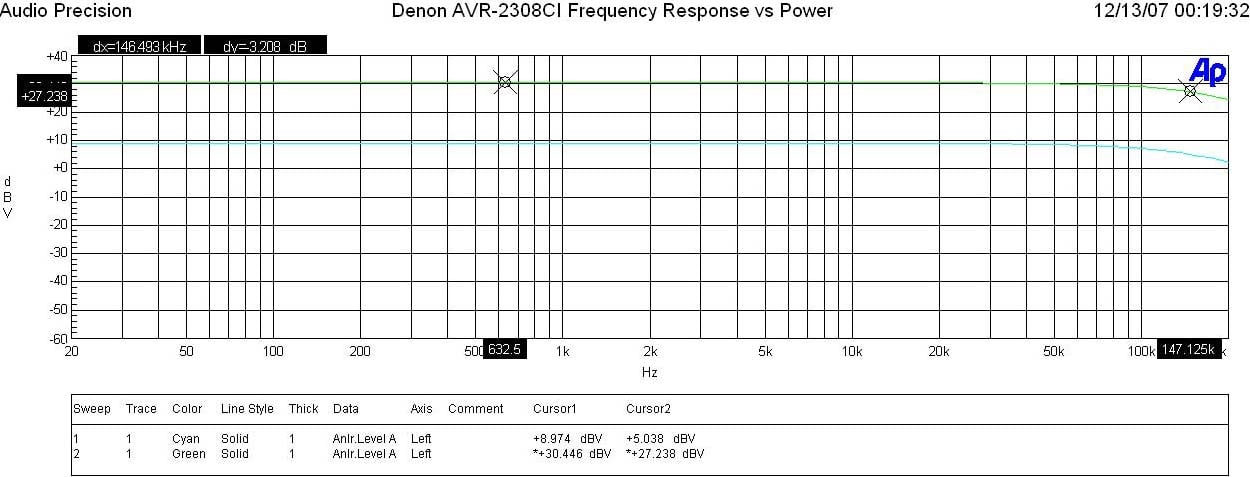
Figure 2. Denon AVR-2308CI Frequency Response vs Power
Whether I was driving the AVR-2308CI at 1 watt or full power, the amplifier section exhibited excellent frequency response uniformity with a -3dB point of around 147kHz.
FFT Distortion Analysis
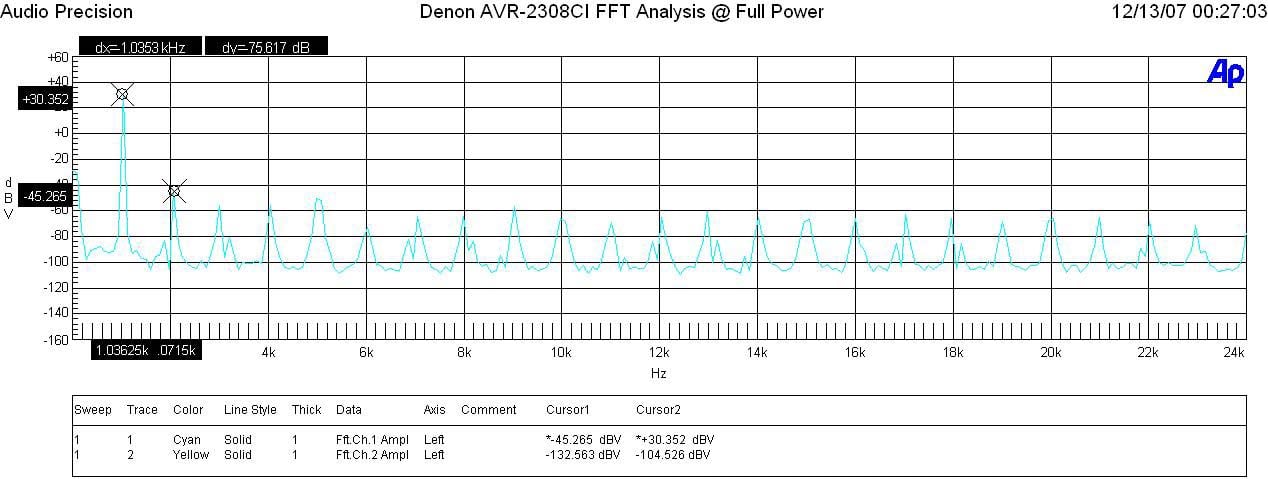
Figure 3. Denon AVR-2308CI FFT Analysis @ Full Power
At full measured power AVR-2308CI again exhibited excellent distortion measurements (30.352 + 45.265)dBv =75.6dBv or 100*alog^-1(-75.6/20) = .0166 THD + N which is a respectable measurement.
Amplifier Output Impedance & Damping Factor
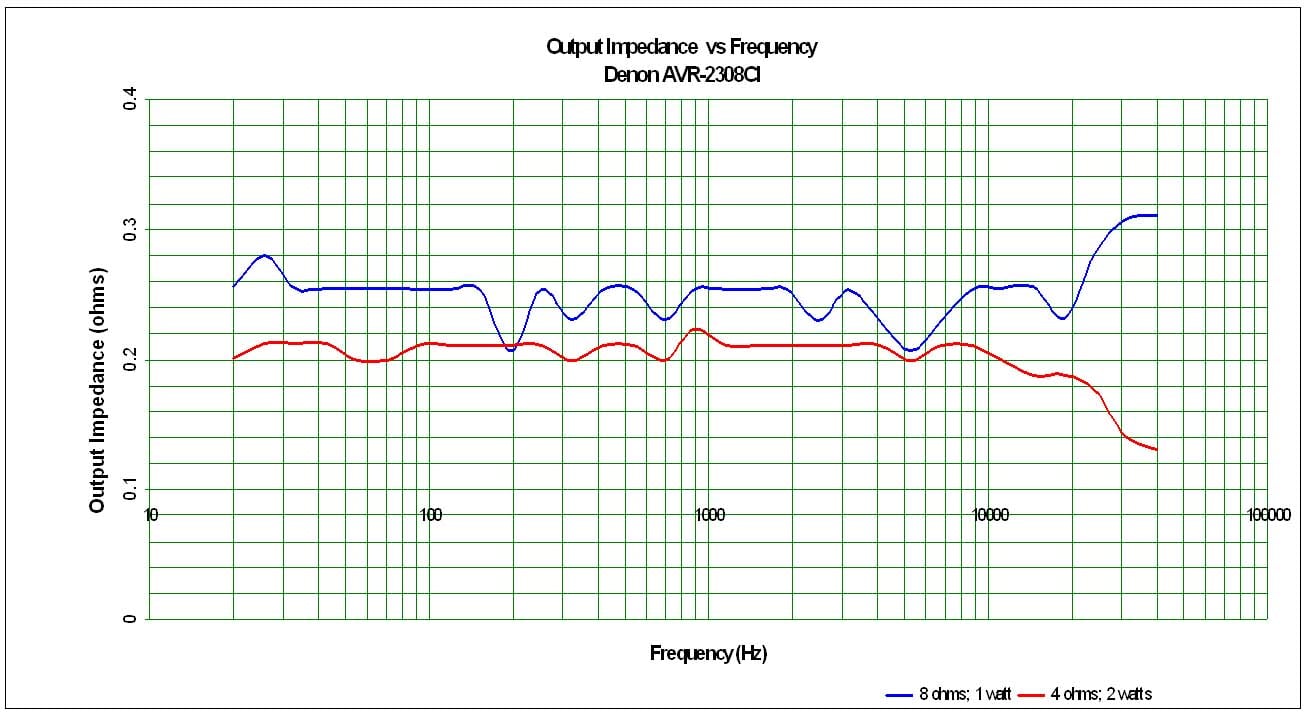
Figure 4. Denon AVR-2308CI Amplifier Output Impedance vs Frequency
The amplifier output impedance was a good margin higher than our 100 mohm or less mark I’d like to see on uncompromising designs, but it was still very linear and under a few hundred milliohms which would make it quite capable of driving a wide diversity of loudspeakers with consistently good performance.
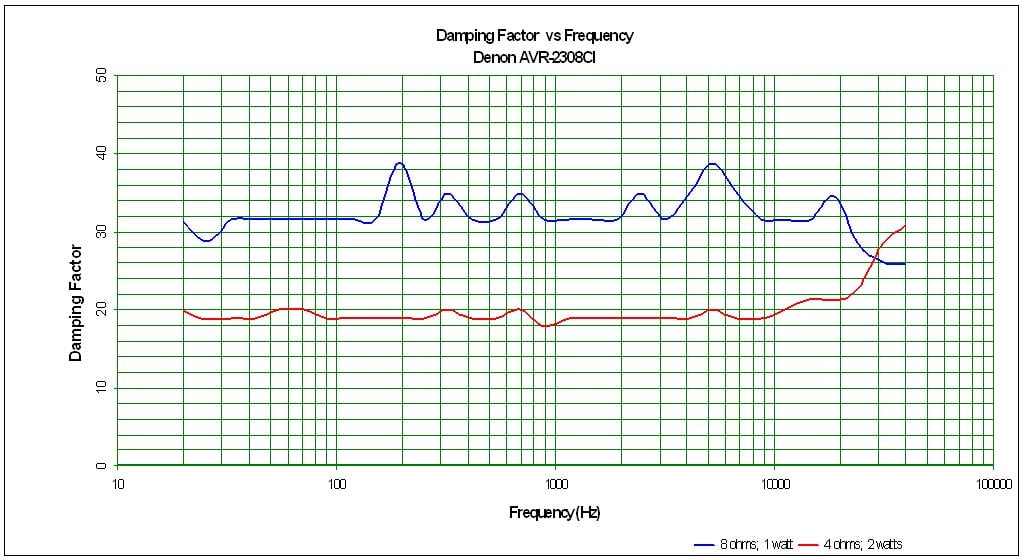
Figure 5. Denon AVR-2308CI Damping Factor vs Frequency
The amplifier damping factor is about what I expected based on the measured output impedance. It is uniformly good across the entire audio frequency range but does fall shy of our 100 mark for uncompromised designs. The good news however is the amplifier doesn’t fall apart when driving low impedance loads like I’ve seen on some models in this price range in the past.
Signal to Noise Ratio (SNR)
With 200mV input and driving an 8 ohm load at 1 watt, I measured a 77dB SNR un-weighted which is quite excellent and explains why I found this receiver to exhibit a very low noise floor.
Denon AVR-2308CI Conclusion
 Denon once again proved they know
how to build a better receiver by staying true to their roots and delivering
more than advertised power and performance, unparalleled bass management
flexibility and an overall solid, time tested platform. The AVR-2308CI is
certainly one of the most versatile receivers I have tested at this price range
carrying over many of the great features (independent channel trims per mode,
independent crossover settings per speaker group, Audyssey MultEQ, HDMI
upconversion with OSD support, etc) that until only recently, were found only
on their flagship products. Had it not
been for the new line up of Onkyo receivers that recently hit the market
offering most of the great features of the AVR-2308CI with the addition of
True-HD and DTS-HD decoding for roughly the same price, I’d declare the Denon
the absolute winner in this price class. While the Denon does lack some of the
Onkyo high definition audio decoding features, it also makes up for it with
wider bandwidth component video inputs (100MHz vs 50MHz), analog to HDMI up conversion
to 1080p, Audio Restorer featured for compressed music sources, and arguably
more solid construction. The bottom line is there are no free lunches but the
price per performance ratio of the AVR-2308CI allows the end user to save some
significant coin to splurge on a few steak dinners.
Denon once again proved they know
how to build a better receiver by staying true to their roots and delivering
more than advertised power and performance, unparalleled bass management
flexibility and an overall solid, time tested platform. The AVR-2308CI is
certainly one of the most versatile receivers I have tested at this price range
carrying over many of the great features (independent channel trims per mode,
independent crossover settings per speaker group, Audyssey MultEQ, HDMI
upconversion with OSD support, etc) that until only recently, were found only
on their flagship products. Had it not
been for the new line up of Onkyo receivers that recently hit the market
offering most of the great features of the AVR-2308CI with the addition of
True-HD and DTS-HD decoding for roughly the same price, I’d declare the Denon
the absolute winner in this price class. While the Denon does lack some of the
Onkyo high definition audio decoding features, it also makes up for it with
wider bandwidth component video inputs (100MHz vs 50MHz), analog to HDMI up conversion
to 1080p, Audio Restorer featured for compressed music sources, and arguably
more solid construction. The bottom line is there are no free lunches but the
price per performance ratio of the AVR-2308CI allows the end user to save some
significant coin to splurge on a few steak dinners.
I walked away from this installation amazed at the fidelity improvement of my parents system thanks to the Audyssey room correction and solid amplification section. While my parents are as far removed from what one could consider “technically inclined” people, they were nonetheless still quite pleased with the end result and the bragging rights that they had the latest A/V gear which is smart enough to give you that great movie theater sound experience for all the seats in their room.
100 Corporate Drive
Mahwah, N.J. 07430-2041
Denon AVR-2308CI MSRP: $849
The Score Card
The scoring below is based on each piece of equipment doing the duty it is designed for. The numbers are weighed heavily with respect to the individual cost of each unit, thus giving a rating roughly equal to:
Performance × Price Factor/Value = Rating
Audioholics.com note: The ratings indicated below are based on subjective listening and objective testing of the product in question. The rating scale is based on performance/value ratio. If you notice better performing products in future reviews that have lower numbers in certain areas, be aware that the value factor is most likely the culprit. Other Audioholics reviewers may rate products solely based on performance, and each reviewer has his/her own system for ratings.
Audioholics Rating Scale
 — Excellent
- — Very Good
- — Good
- — Fair
- — Poor
| Metric | Rating |
|---|---|
| Frequency Response Linearity | |
| SNR | |
| Output Impedance | |
| Measured Power (8-ohms) | |
| Measured Power (4-ohms) | |
| Multi-channel Audio Performance | |
| Two-channel Audio Performance | |
| Video Processing | |
| Bass Management | |
| Build Quality | |
| Fit and Finish | |
| Ergonomics & Usability | |
| Features | |
| Remote Control | |
| Performance | |
| Value |
Gene manages this organization, establishes relations with manufacturers and keeps Audioholics a well oiled machine. His goal is to educate about home theater and develop more standards in the industry to eliminate consumer confusion clouded by industry snake oil.
View full profile