
ViewSonic Precision Pro8100 LCD Projector Review
ViewSonic Precision Pro8100 LCD
- Product Name: Precision Pro8100 LCD Projector
- Manufacturer: ViewSonic
- Performance Rating:

- Value Rating:
- Review Date: July 08, 2008 14:27
- MSRP: $ 4995
|
|
Pros
- Motorized Zoom/Focus
- Motorized Lens Shift
- Beautiful enclosure
- Super Quiet
- Excellent backlit remote
Cons
- Slow Auto Iris (no Manual mode)
- Minimal Horizontal Lens Shift (10%)
- No HD Noise Reduction
- Convoluted Menu System
Pro8100 Features and Build Quality
It strikes me as odd any time I see a projector of any significant price lacking features such as power Zoom & Focus and Lens Shift. With higher cost projectors I've become an unfortunate victim of the establishment. I've come to expect less in the way of features. Now along comes ViewSonic with its Precision Series Pro8100 LCD projector. It has powered Zoom & Focus, in addition to powered Lens Shift. It also features Silicon Optix Reon-VX video processing. Oh, and it's priced at just $4,995. I have a feeling some other manufacturers are going to have to get off their laurels and start bringing their 'A' game very quickly.
What I Like About You
In a giddy display of feature-envy, I poured over the many functions and systems present on the Pro8100 projector. It was almost ridiculous what this product was offering for the price. I could only hope that its performance lived up to the vast array of goodies this projector offered to consumers:
- Power Everything
Older users of this projector will experience the same feeling they did when they bought their first vehicle with power windows. It's like coming home. When you set up a higher priced projector you really don't want to go climbing around and bumping into it as you set the Zoom, Focus, and align the image using its Lens Shift function. With the Pro8100 you don't have to. - Silicon Optix Reon-VX Video Processing
Good video processing means that both standard definition content (like your DVD player or CableTV analogue channels) and HD content (like Blu-ray and your HD cable channels) will look flawless - or at least as flawless as the source content allows. Silicon Optix' HQV technology has proven to be a straight shooter and one of the better video processing systems available on the market. - Quiet Fan
The Precision Pro8100's 23dB fan gets high marks, but its Economy mode, which puts the fan down to around 18dB is absolutely amazing. We never once heard this fan, apart from the high speed cool-down cycle once it was powered off. - 2.35:1
Anamorphic Mode
If you want to use every available pixel in your Epson C2Fine LCD panel you can engage anamorphic mode and use an external lens to capture the best this projector has to offer. Anamorphic squeezing, for whatever reason, isn't available on most projectors without an external scaling device - ViewSonic has it built in. - Side
Access for Lamp Replacement
One of my pet peeves has been assuaged by the presence of a side access door for lamp replacement. This means that users won't need to remove their projectors from a ceiling mount when replacing the bulb. Four screws (two in the cover, and two in the lamp assembly) are all that it takes to replace the bulb and get your projector back to perfect working order. In Economy mode (highly recommended for home theater use) the lamp is expected to last around 5000 hours - another bonus.
Out of the Box and Into My Theater
 I have never seen such care taken with regard to
projector packaging in my entire professional reviewing career. The ViewSonic
Pro8100 came in not one, not two, but three different "wrappers" to
protect it from harm - not including the boxes and foam surrounds. Upon
removing the projector from its box I found the unit wrapped snugly in plastic.
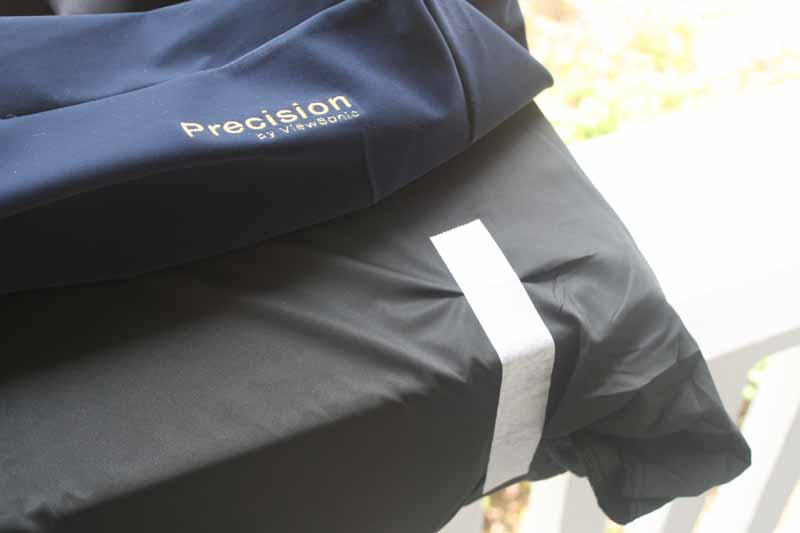
Removing the plastic I saw a dark blue velvety sheath which laid atop a soft
black cloth (complete with stitched Viewsonic Precision logo) that was taped
tight and securely covered the projector. I stuck my head back in the box to
double check for a t-shirt or cap that I might have missed. Maybe I got some
sort of deluxe model intended for the President of the company? Turns out, this
kind of care is given to all Pro8100 units that ship out from ViewSonic. I like
the red carpet treatment - and the unit didn't have a fingerprint on it, let alone
any scratches. After a few moments of gazing at the beauty of the thing - for
it really does look nice - I proceeded to get it installed into my system
I have never seen such care taken with regard to
projector packaging in my entire professional reviewing career. The ViewSonic
Pro8100 came in not one, not two, but three different "wrappers" to
protect it from harm - not including the boxes and foam surrounds. Upon
removing the projector from its box I found the unit wrapped snugly in plastic.
Removing the plastic I saw a dark blue velvety sheath which laid atop a soft
black cloth (complete with stitched Viewsonic Precision logo) that was taped
tight and securely covered the projector. I stuck my head back in the box to
double check for a t-shirt or cap that I might have missed. Maybe I got some
sort of deluxe model intended for the President of the company? Turns out, this
kind of care is given to all Pro8100 units that ship out from ViewSonic. I like
the red carpet treatment - and the unit didn't have a fingerprint on it, let alone
any scratches. After a few moments of gazing at the beauty of the thing - for
it really does look nice - I proceeded to get it installed into my system
In setting up this projector it's good to view a 16:9 throw chart to see how your particular room stacks up in filling your screen and ensuring you don't place the projector too far away (or too near) the screen:
Throw Chart for Distancing the Projector from a 16:9 Projection Screen
|
Screen Size |
Size (Inches) |
Distance (Feet) |
||
|
|
width |
height |
wide |
tele |
|
80 |
69.7 |
39.2 |
8' 2" |
13' 3" |
|
90 |
78.4 |
44.1 |
9' 3" |
14' 11" |
|
100 |
87.2 |
49.0 |
10' 3" |
16' 7" |
|
110 |
95.9 |
53.9 |
11' 3" |
18' 3" |
|
120 |
104.6 |
58.8 |
12' 3" |
19' 10" |
|
130 |
113.3 |
63.7 |
13' 4" |
21' 6" |
|
150 |
130.7 |
73.5 |
15' 4" |
24' 10" |
|
170 |
148.2 |
83.3 |
17' 5" |
28' 2" |
|
200 |
174.3 |
98.1 |
20' 6" |
30' 9" |
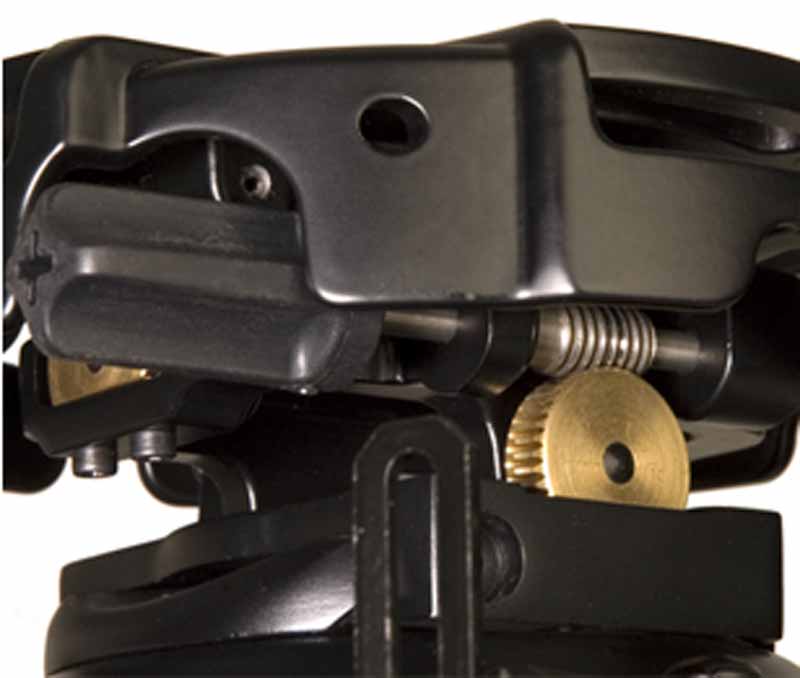
 precision-gear.jpgI love my projector mount. It's tough, universal and has
tons of controls - allowing me to tilt, pan and twist the projector to my
heart's delight. It's a PRG-UNV
Precision Gear mount from Peerless and it features a gear system that
allows me to perfectly align any projector to the screen without much hassle.
Within minutes I had my mount's spider off the base and was screwing it into
the Pro8100's three mounting points. Three? Yeah, that's what I said. So far
some of the heaviest and largest projectors I've installed have three mounting
points vs. four - which makes absolutely no sense to me. I understand that they
likely expect you to use one of their custom plates, but a four point system
just seems so much more secure to me. After I connected the spider I re-mounted
the projector to the PRG-UNV base and made my connections.
precision-gear.jpgI love my projector mount. It's tough, universal and has
tons of controls - allowing me to tilt, pan and twist the projector to my
heart's delight. It's a PRG-UNV
Precision Gear mount from Peerless and it features a gear system that
allows me to perfectly align any projector to the screen without much hassle.
Within minutes I had my mount's spider off the base and was screwing it into
the Pro8100's three mounting points. Three? Yeah, that's what I said. So far
some of the heaviest and largest projectors I've installed have three mounting
points vs. four - which makes absolutely no sense to me. I understand that they
likely expect you to use one of their custom plates, but a four point system
just seems so much more secure to me. After I connected the spider I re-mounted
the projector to the PRG-UNV base and made my connections.
Connections
The Pro8100 has plenty of inputs. Dual HDMI and a pair of component video inputs take care of any potential HD sources you might encounter, while a single composite and S-video input are present for people who like to spend $5,000 on a projector but are too cheap to buy new versions of their VHS movies... yes, those people.
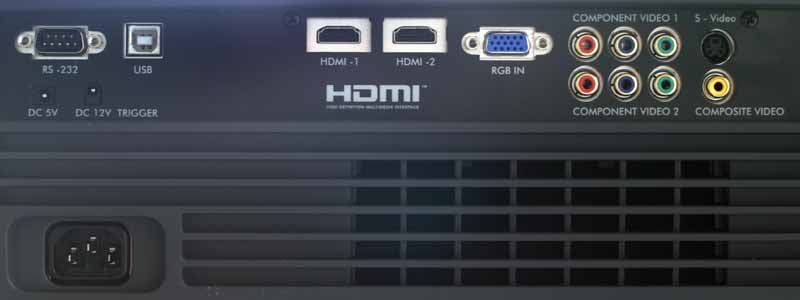
The system has RS-232C control as well as a 12V trigger output. There is also a largely undocumented 5VDC terminal, presumably for powering an active HDMI cable/device or some other 5V source. A USB port is present on the rear panel, however it is designated for service use only (for firmware updates.) Finally, an RGB input takes care of any legacy or PC-generated sources you may require.
Pro8100 Remote Control and Menu System
I like the remote. It's simple, completely backlit, and the labels, or icons, are on the face of each button - making it easy to use in the dark. At top are buttons for direct access to Picture Mode, Aspect Ratio, Color Temp, Lens Shift, Zoom/Focus and Keystone. The Navigation, Menu and Exit buttons are ergonomically placed - far more convenient than the Klingon-inspired menu system they control which is among the worst I've ever encountered. At bottom are the direct input buttons and direct access controls for Black Level, PCS control, Daylight Sensor, Overscan, HQV controls and Image Freeze.
The remote does not feature discrete on and off buttons for power, and in fact you must hit the power button twice in order to bring it back to standby mode. This is a bit of a pain for those looking to easily program projector On/Off functions into an IR-based remote system, but given the specialty retail outlets where the Pro8100 will be sold, I don't really see this as much of an issue, practically speaking. It’s just as likely that anyone getting the Pro8100 will also be having the unit configured by a custom installer - possibly as part of an RS-232C-based home control environment.
Getting Under the
Hood - The Menu System
The menu system on the Pro8100 is just awful. There are simple guidelines for user interfaces that should be followed in order to deliver ergonomic "best practices." ViewSonic adhered to none of these and has a system that is painful, lethargic and inconvenient to utilize. For any custom installers putting this projector into a home, you'll likely want to simply remember the best settings so you can save yourself the trouble of having to navigate the menu system as a user would in getting the best performance out of the projector.
To access the menu you simply press the menu button on the remote, or the hard menu button on the side of the projector itself. This brings up the main screen. From here you can arrow left and get the "Status", or overview of current settings, or arrow right and enter the Picture, Config, Advanced, Memory, or PCS (Precision Color System) menus.

The reason the menu is so bad is due to the disjointed nature of where submenu items exist, and also due to the difficulty in knowing when you are on a submenu, or accessing that menu's sub-choices. All you have to go by is a green highlighted "bullet" next to the item you are accessing. Add to this the fact that in order to get a custom Color Temperature you have to select the "User" setting under Picture/Colro Temperature and then configure the RGB Gain/Offset under the "Custom Color Temperature" submenu of the Memory menu (what?)! Why it is this difficult is beyond me - and what Color Temperature has to do with a Memory setting - and not the Picture settings - is anyone's guess. Add to that steps of +/-512 and you've got a ridiculously tedious system for getting grayscale/color temperature configured. The menu system is by far the worst I've ever used - but at least you can set the timeout function (too short by default) and access most of the features you'd expect. And lucky for ViewSonic I was able to get really nice results... it almost made up for the hassle... almost.
Picture Menu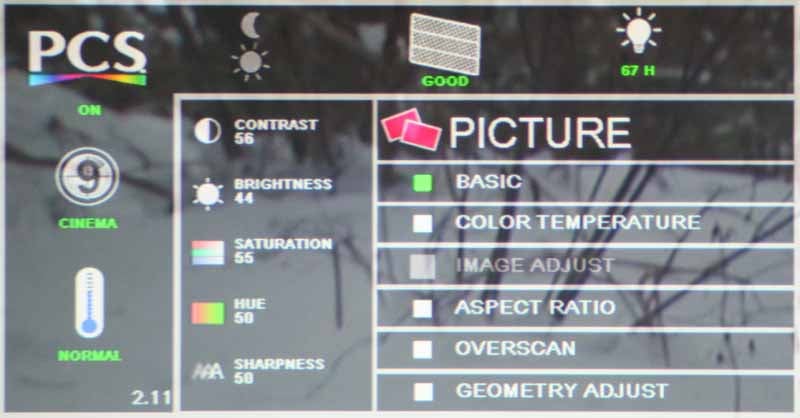 This menu provides
your basic picture adjustments and is your first stop in setting Black and
White levels. Of note, I found that my Brightness setting ended up around 44 -
close to the default setting. The White Level, however dropped to 56, lower
than the Default. The Pro8100 had no problem passing Blacker-than-Black signals
from my reference Denon
DVD-3930CI. I left Sharpness at the default of 50 and turned Overscan to
0%. Those with cableTV may want to store a setting with 5% enabled to get rid
of those occasional flickering "data" lines you see at the top of the
screen. If you somehow managed to rotate the projector mount so that it was
crooked to the screen (assuming you couldn't physically adjust it) you can make
digital rotation and vertical/horizontal keystone adjustments. The Pro8100 also
has a holdover typically found on more business-centric units - automatic
vertical keystone. I can't image this being used much in home theater, and as
always we recommend any software-based keystone functions be disabled to avoid
unnecessary blurring.
This menu provides
your basic picture adjustments and is your first stop in setting Black and
White levels. Of note, I found that my Brightness setting ended up around 44 -
close to the default setting. The White Level, however dropped to 56, lower
than the Default. The Pro8100 had no problem passing Blacker-than-Black signals
from my reference Denon
DVD-3930CI. I left Sharpness at the default of 50 and turned Overscan to
0%. Those with cableTV may want to store a setting with 5% enabled to get rid
of those occasional flickering "data" lines you see at the top of the
screen. If you somehow managed to rotate the projector mount so that it was
crooked to the screen (assuming you couldn't physically adjust it) you can make
digital rotation and vertical/horizontal keystone adjustments. The Pro8100 also
has a holdover typically found on more business-centric units - automatic
vertical keystone. I can't image this being used much in home theater, and as
always we recommend any software-based keystone functions be disabled to avoid
unnecessary blurring.
Config
Menu
This is the place to set your basic configuration for things
like the On-Screen Display (OSD), Auto Shutdown, Automatic Source Select, Lamp
Mode (Eco or Normal),
High Altitude mode and the Iris system. Unfortunately, the Auto Iris can only
be set to On or Off. This means that you can't crank down the Iris and accept
lower light while sacrificing brighter whites. You must either accept the
Automatic Iris system or suffer through higher black levels should you decide
to turn it off (Blacks are noticeably
darker with the Iris engaged). This wouldn’t be such a bad thing if the Iris
system were quicker. In my time viewing the picture on this projector I found
the Auto Iris to be very noticeably delayed whenever the on-screen image would
change significantly. It also had a tendency to "bounce" jumping up
and down and then finally settling in where it wanted to be. In my opinion it
simply needs more work. In the meantime, the ability to dial it in at a fixed
position would be much preferable to simply turning it off.
Within the Config menu is a Daylight Sensor function. This can be set to Off, Auto, or Manual. Manual gives you the options of Low, Mid, or High. I found this function to be extremely subtle, but functional. It was off during my calibration and testing, however for typical use I switched it on since it only engaged when the ambient room light changed significantly.
Advanced
Menu
The Advanced Menu isn't
particularly advanced, save for the inclusion of some HQV-specific settings and
a 5-setting Black Level control (we used Normal).
The Picture Mode is where you'll select your default color mode for viewing
images on the projector. We tried several of them to determine which would be
the best initial setting. Here are our color temperature and luminosity
results:
- Normal = 16.5 fL @ 6500K
- Vivid = 21 fL @ 6300K
- Cinema = 21 fL @ 6300K
- Professional = 18 fL @ 6400K
We forced the lamp into Eco mode and re-checked Normal and Cinema modes, which yielded
- Normal (Eco) = 13 fL @ 6850K
- Cinema (Eco) = 16 fL @ 6600K
For us it was obvious that the best initial setting is to use Cinema mode in Eco lamp mode and set the color temperature to Warm 1. A setting of Warm 2 measured 5200K - almost perfect for Black and White film viewing. Now this was out of the box - not bad, though I'd wager than any custom installer worth his salt will insist on doing a professional ISF calibration. And they should since we got even better results afterwards (see our Calibration section).
Tech Note: Do not engage the Blacker-than-Black mode unless this is the only way to get below black signal to the projector. We received below black info just fine with the Normal setting and the Blacker Than Black mode simply maps 0 IRE to black, artificially brightening the image and resulting in an incorrect default black level.
Under the HQV settings you have access to Detail Enhancement, Film Mode (auto is default), LTI (a luminance level "enhancer" and CTI (a chrominance level "enhancer"). I left both LTI and CTI off, nor could I seem to ever get any significant (ie perceivable) change in picture quality when using them. Regardless, anything thing that automatically adjusts color should be 'Off' in my book. Detail Enhancement is a nice feature, but the default setting of '5' is WAY too high. In fact, it introduces large amounts of noise into the picture. I'd recommend leaving this on, but set it to '2', you'll get a much nicer presentation overall and you won't miss any true detail in the process.
There is no noise reduction for HD sources on the Pro8100. This is unfortunate, however with any HD source the Noise Reduction submenu remains grayed out, eliminating both the Mosquito Noise Reduction (MNR) and the Block Artifact Removal (BAR) functions of the projector. Our suggestion would be to run anything that isn't HD as 480i to take advantage of these excellent features.
Memory
Menu
I was able to (painstakingly) set the color
temperature from within the Custom Color Temperature submenu. Obvious to anyone
but the menu designers, this is a silly place to put this function. You can
store only two memory functions. I'd love to see a whole lot more of these. I
can think of three settings I like for each projector I use: Day time, Night
time, and Black & White film mode. With the Pro8100 you only have two
Memory slots which will override any input or current mode selection.
Pro8100 Calibration and Benchmark Video Testing
 I would classify the
"out of the box" performance of the ViewSonic Precision Pro8100 as good,
but not excellent. We were, however, able to get an excellent result after
calibrating the system with our datacolor ColorFacts
software.
I would classify the
"out of the box" performance of the ViewSonic Precision Pro8100 as good,
but not excellent. We were, however, able to get an excellent result after
calibrating the system with our datacolor ColorFacts
software.
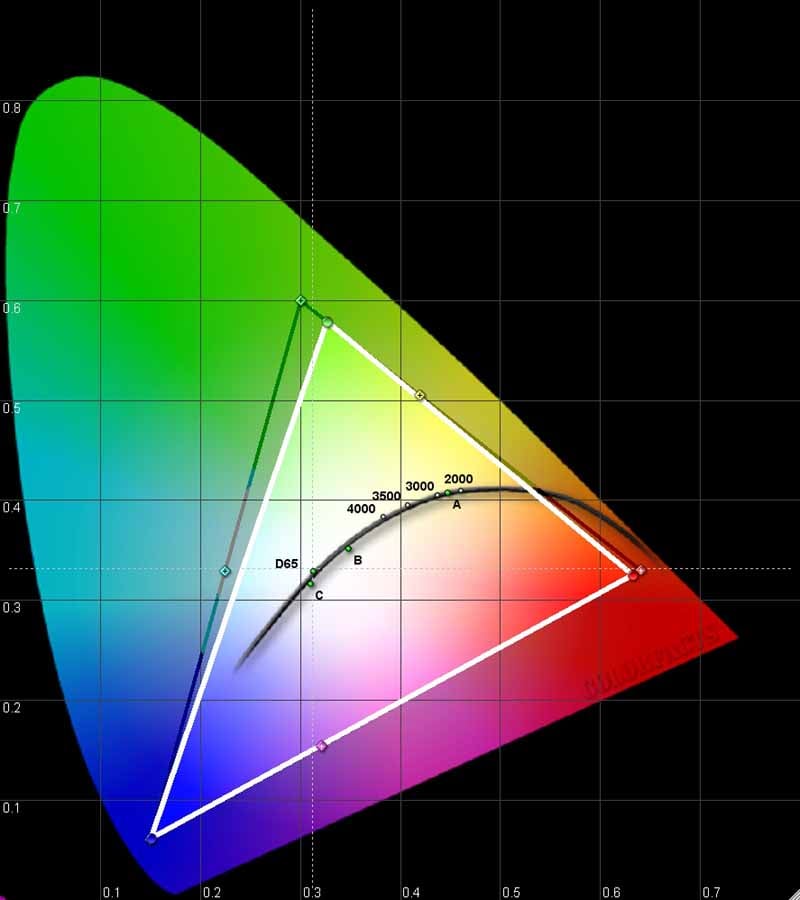
Of first note, the CIE chart looked very good on this projector, with solid performance on red and blue and only a slight deviation (towards yellow) on green. This is a better color response than I've seen from many competing products in this price range and above.
Comparing Calibrations Results Before and After
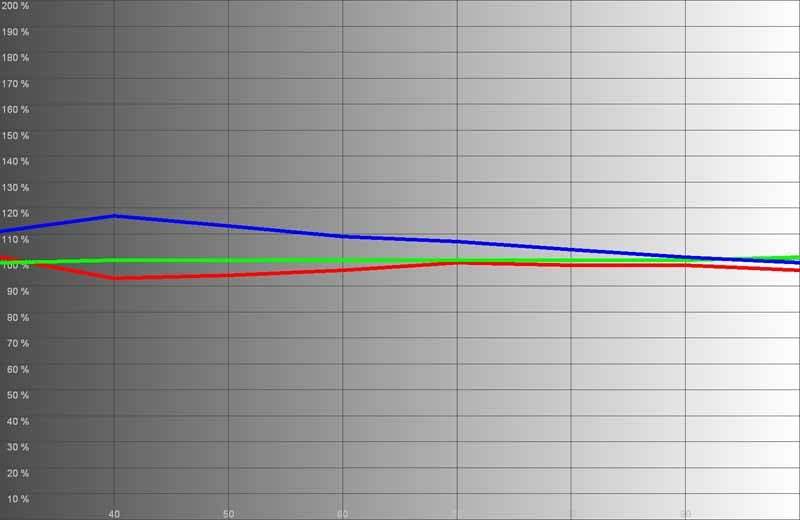
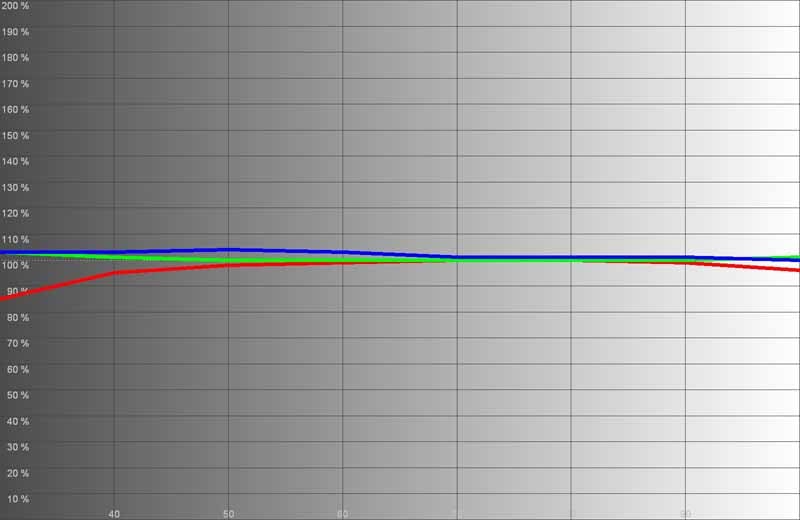
When performing calibration it's important to turn off any Auto Iris functions. The results will not be consistent, nor correct if you leave it on and what will invariably occur is a resulting S-type gamma curve. Looking below we see the before and after gamma measurements.
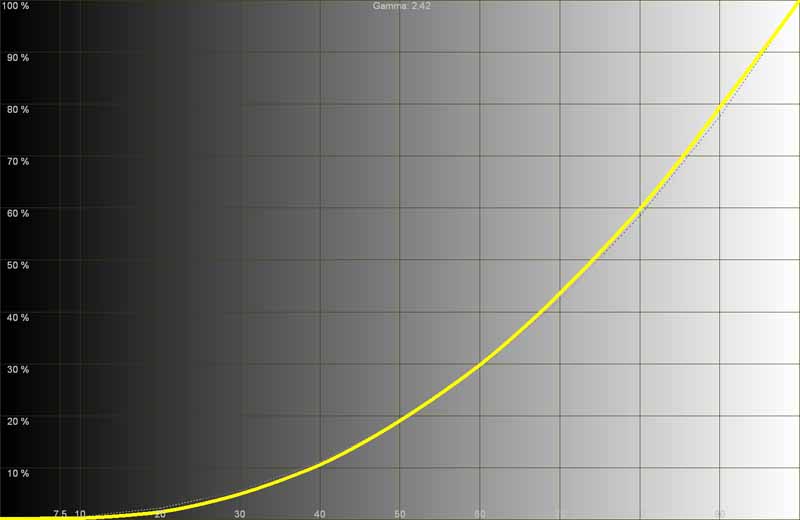
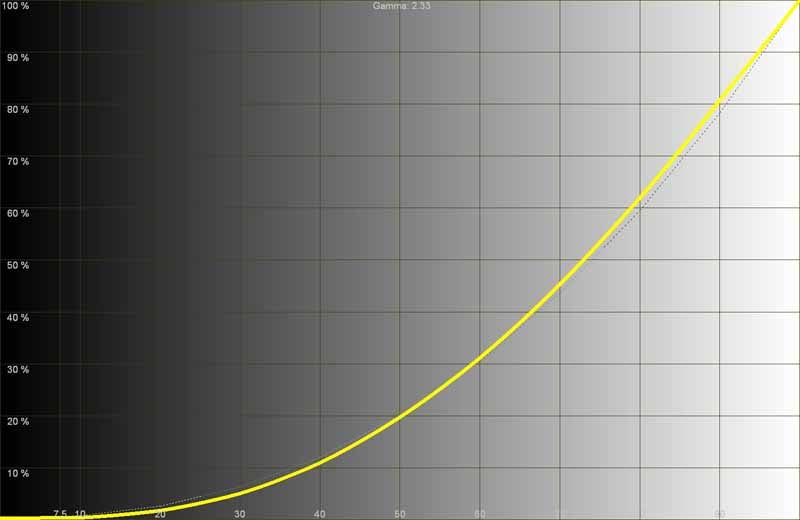
Before we measured a Gamma of 2.42 (left); After calibration yielded a Gamma of 2.33 (right)
If you leave the Auto Iris on (don't do this), this is what you will end up with following calibration:

Holy
wiggly line, Batman!
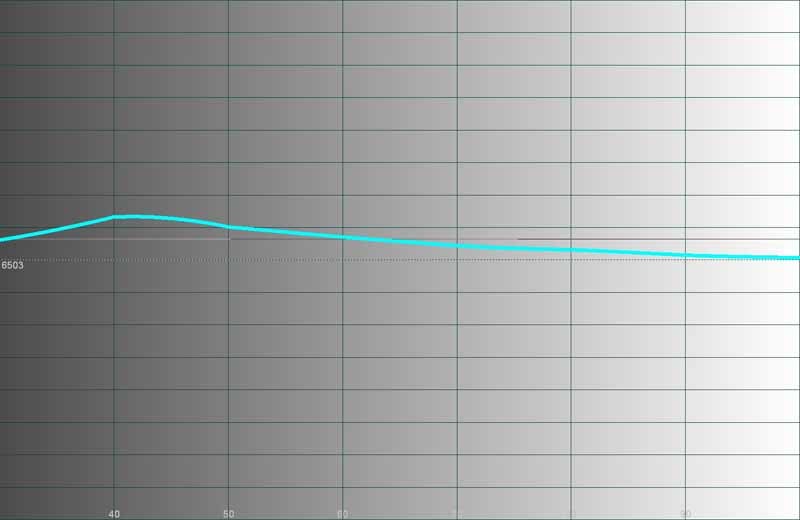
Color temperature wasn't awful before calibration, but got much better with a custom RGB calibration:
Before calibration (left); After calibration (right)
Color temperature dialed in nicely as well:
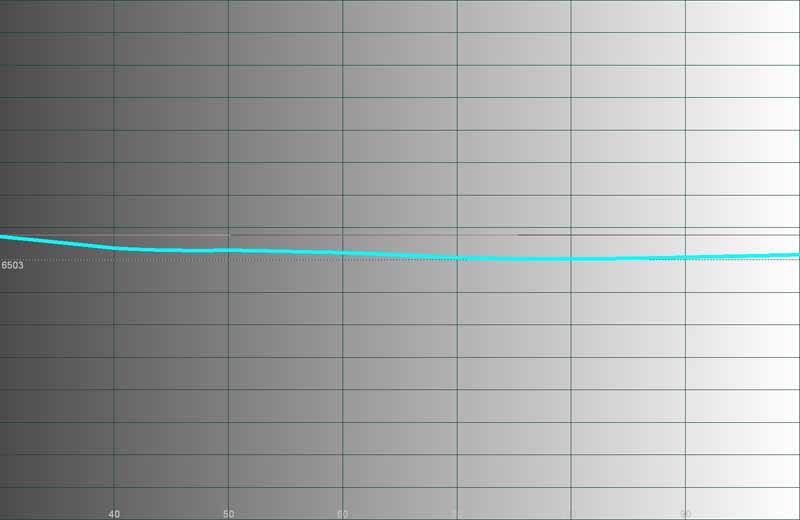
After calibration we dialed in the color temperature much closer to our 6500K
target.
Audioholics/HQV Bench Testing Summary of Test Results
SD Perfect Score: 130
HD Perfect Score: 100
ViewSonic Pro8100 SD Score: 105 (Excellent
performance on SD content)
ViewSonic Pro8100 HD Score: 75 (Excellent
performance on most HD content)
|
SD Tests |
Max |
Results |
Pass/Fail |
|
Color Bar |
10 |
10 |
Pass |
|
Jaggies #1 |
5 |
5 |
Pass |
|
Jaggies #2 |
5 |
5 |
Pass |
|
Flag |
10 |
10 |
Pass |
|
Detail |
10 |
10 |
Pass |
|
Noise |
10 |
10 |
Pass |
|
Motion adaptive Noise Reduction |
10 |
10 |
Pass |
|
Film Detail |
10 |
10 |
Pass |
|
Cadence 2:2 Video |
5 |
5 |
Fail |
|
Cadence 2:2:2:4 DV Cam |
5 |
0 |
Fail |
|
Cadence 2:3:3:2 DV Cam |
5 |
0 |
Fail |
|
Cadence 3:2:3:2:2 Vari-speed |
5 |
5 |
Fail |
|
Cadence 5:5 Animation |
5 |
0 |
Fail |
|
Cadence 6:4 Animation |
5 |
0 |
Fail |
|
Cadence 8:7 animation |
5 |
0 |
Fail |
|
Cadence 3:2 24fps film |
5 |
5 |
Pass |
|
Scrolling Horizontal |
10 |
10 |
Pass |
|
Scrolling Rolling |
10 |
10 |
Pass |
|
Total Points |
130 |
105 |
|
|
HD Tests (via Blu-ray @1080i) |
Max |
Results |
Pass/Fail |
|
HD noise |
25 |
0 |
Pass |
|
Video Resolution Loss |
20 |
20 |
Pass |
|
Video Reconstruction |
20 |
20 |
Pass |
|
Film Resolution Loss |
25 |
25 |
Pass |
|
Film Resolution Loss Stadium |
10 |
10 |
Pass |
|
Total Points |
100 |
75 |
|
We didn't have much to say about the results, but the on-board HQV Reon-VX system did what we would have expected it to. We were happy to see noise reduction that worked, though if you overuse it you're clearly going to run into some potential issues. What nice about a decent score in this area is that you can safely feed it interlaced standard definition television/cableTV content and know that it will do its best to render it efficiently.
Pro8100 Subjective Viewing Tests and Conclusion
Measurements are cool, but to see this projector in action was, as always, the real test. I was anxious to compare this model with our reference Marantz VP-15S1 DLP projector, a model we keep on hand to compare other products to and help us more easily determine differences and capabilities.To get a good all-around feel for what the Pro8100 would do, we grabbed an assortment of viewing material and sat back for an extended period of use. While I go back (after calibration) and capture my images at one time, our viewing sessions take place over a course of 10-15 days to allow us to get accustomed to any potential idiosyncrasies or issues with the projector.
Before we began (officially) we noticed that HD images seemed to have a rather high level of noise on the screen. Finding this odd, I searched the menu system to see if I could locate the culprit. It turns out that lowering the HQV Detail Enhancement to '2' (which we're recommending they set as their default) helped the HD picture overall and reduced lots of noise which was initially present on the screen. Who knew? We discovered this early and so our viewing sessions featured the most pristine images possible for the source content.
DVD: Star
Wars - The Clone Wars Volume I
 Color seemed to be a
real stand-out feature of this projector, so I wanted to pop up some real
colorful imagery. Clone Wars seemed to do the trick and netted us some very
excellent material to see how well the Pro8100 would do with this type of
material. I was also interested to see how well it would handle large swaths of
color and gradients - which it seemed to have zero difficulty with. I was truly
surprised at how much material there was to test with on this disc. Running it
through in 480i I was able to really challenge the HQV processing and take
careful note of the enhancements provided by the PCS system (which I liked
overall). The results were excellent, though I doubt my photography will do it
justice:
Color seemed to be a
real stand-out feature of this projector, so I wanted to pop up some real
colorful imagery. Clone Wars seemed to do the trick and netted us some very
excellent material to see how well the Pro8100 would do with this type of
material. I was also interested to see how well it would handle large swaths of
color and gradients - which it seemed to have zero difficulty with. I was truly
surprised at how much material there was to test with on this disc. Running it
through in 480i I was able to really challenge the HQV processing and take
careful note of the enhancements provided by the PCS system (which I liked
overall). The results were excellent, though I doubt my photography will do it
justice:

I noticed no banding in any areas of either light or dark gradients.

Who knew that animation would have
dark areas with which to test Black levels and contrast?
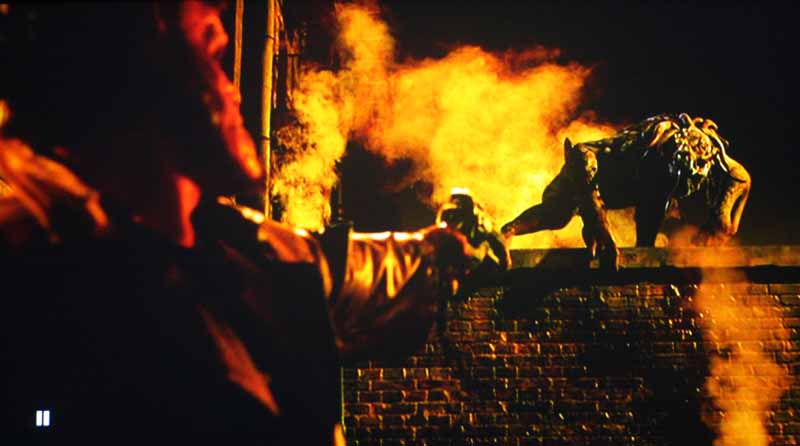
DVD: Hellboy
 There's something
enamoring about a sarcastic superhero who knows he can't die... That's Hellboy in a nutshell and it makes for a
decent comic-book style film. It's not as edgy as the new breed of films, but
it's not hokey either (at least nobody dances down the street to a Bee Gees
tune). I love the dark scenes which prove to be a challenge for all projectors,
though it truly taxes LCD to its limits. The ViewSonic did well overall, but my
DLP reference projector, a Marantz VP-15S1, definitely handled the dark scenes
with deeper blacks and a somewhat richer experience overall. Here are some scenes
which I certainly felt were pleasing, but benefitted from a darker light
engine:
There's something
enamoring about a sarcastic superhero who knows he can't die... That's Hellboy in a nutshell and it makes for a
decent comic-book style film. It's not as edgy as the new breed of films, but
it's not hokey either (at least nobody dances down the street to a Bee Gees
tune). I love the dark scenes which prove to be a challenge for all projectors,
though it truly taxes LCD to its limits. The ViewSonic did well overall, but my
DLP reference projector, a Marantz VP-15S1, definitely handled the dark scenes
with deeper blacks and a somewhat richer experience overall. Here are some scenes
which I certainly felt were pleasing, but benefitted from a darker light
engine:

Ron's shadow detail came through just fine here.
The detail was there, it just wasn't quite as dark as it could be.
Blu-ray: The
Golden Compass This had been
the first time I had seen this film, and it was OK, though not stellar. What I
did like was the amount of natural detail they integrated into the film. It
seemed that there was a constant flow of intensely detailed backdrops against
exquisitely costumed foreground characters. And of course the fully-CG elements
were, for the most part, exceptional and made the film take on a very
convincing look and feel. I was surprised at how well this projector jumped
between the vastly different sets and scenes, though I was able to perceive the
Auto Iris at times, especially if a scene contained a large area of a single
tone of color (complex imagery hid the iris adjustments quite well):
This had been
the first time I had seen this film, and it was OK, though not stellar. What I
did like was the amount of natural detail they integrated into the film. It
seemed that there was a constant flow of intensely detailed backdrops against
exquisitely costumed foreground characters. And of course the fully-CG elements
were, for the most part, exceptional and made the film take on a very
convincing look and feel. I was surprised at how well this projector jumped
between the vastly different sets and scenes, though I was able to perceive the
Auto Iris at times, especially if a scene contained a large area of a single
tone of color (complex imagery hid the iris adjustments quite well):
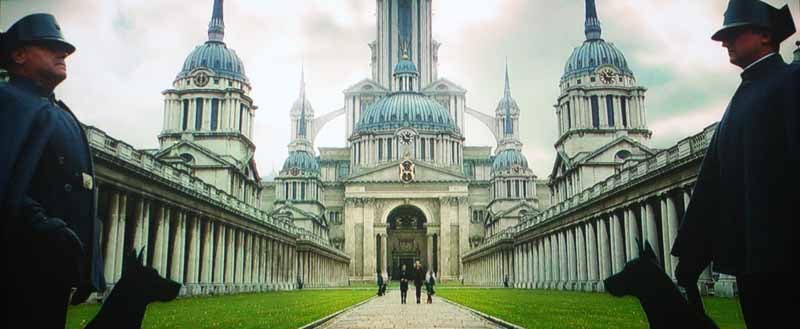
The detail in the guard uniforms was
easily distinguishable, even against the bright backdrop of the building behind
them.
Did Chewbacca and Elmo had some kind of encounter we need to know about?
HDTV: Euro 2008 Championship - Spain vs. Germany
I don't know
that I would call this a "great" soccer (football) game, but it
certainly meant a lot to Spain,
who killed a 44-year losing streak. With a score of 1-0, I'll let the real fans
determine if that was worth the 90-minutes of grown men throwing themselves to
the ground in mock agony. Soccer reminds me of football - if all the calls were
akin to pass interference. Of course they will trip each other... they are all
running after a ball on the ground - just let them play the freaking game!
Well, the game looked great, even if my cableTV provider did their best to
interject as much block noise as possible into the feed. Overall, the color was
vibrant and the replays, which used more close-up HD camera shots, looked
pretty darn good (though the occasional birds-eye overhead shots looked
absolutely horrendous and compressed).

The winning (also the only) goal.
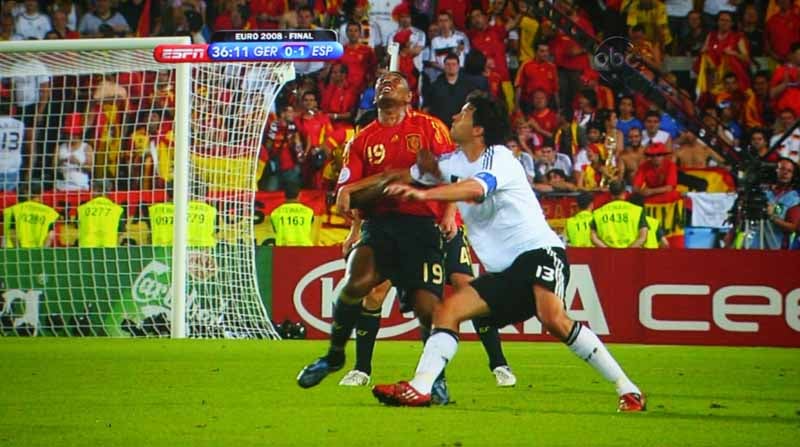
This guy's about to get his eyebrow
busted with a nice headbutt.
Conclusion
ViewSonic Pro8100
MSRP: $4995
ViewSonic
(888) 881-8781
www.viewsonic.com
About ViewSonic
ViewSonic Corporation
is a leading global provider of visual display products. They develop, market
and support a broad range of innovative products including liquid crystal
display, or LCD, monitors, LCD TVs, projectors, digital signage displays and
other display products. They were founded in 1987 and have a 20 year history of
providing innovative products with market leading technologies. They sell
products to businesses and consumers through a variety of channels, including
distributors and resellers such as solution providers, value added resellers,
traditional retailers and Internet retailers. ViewSonic is a Fortune 1000
company, and their products are sold in over 100 countries.
The Score Card
The scoring below is based on each piece of equipment doing the duty it is designed for. The numbers are weighed heavily with respect to the individual cost of each unit, thus giving a rating roughly equal to:
Performance × Price Factor/Value = Rating
Audioholics.com note: The ratings indicated below are based on subjective listening and objective testing of the product in question. The rating scale is based on performance/value ratio. If you notice better performing products in future reviews that have lower numbers in certain areas, be aware that the value factor is most likely the culprit. Other Audioholics reviewers may rate products solely based on performance, and each reviewer has his/her own system for ratings.
Audioholics Rating Scale
 — Excellent
- — Very Good
- — Good
- — Fair
- — Poor
| Metric | Rating |
|---|---|
| Detail and Resolution | |
| Deinterlacing & Scaling | |
| Contrast and Black Levels | |
| Color Reproduction | |
| Noise Reduction | |
| Calibration Options | |
| Build Quality | |
| Ergonomics & Usability | |
| Ease of Setup | |
| Features | |
| Remote Control | |
| Fit and Finish | |
| Performance | |
| Value |
Clint Deboer was terminated from Audioholics for misconduct on April 4th, 2014. He no longer represents Audioholics in any fashion.
View full profile