
Sanyo PLV-Z5 LCD Projector Review
- Product Name: Sanyo PLV-Z5 LCD Projector Review
- Manufacturer: Sanyo
- Performance Rating:


- Value Rating:
- Review Date: January 27, 2007 12:45
- MSRP: $ 1995
| Brightness: 1100 ANSI lumens (max) Contrast: Up to 10,000:1 (stated full on/off in vivid mode) Resolution: 1280 x 720 native HD resolution Aspect Ratio: Widescreen native 16:9 aspect ratio (4:3 compatible) Supported Screen Size: 40-300 inches diagonal LCD Panel: D5 (Epson); 3 x 0.7” TFT Active Matrix LCD Iris: Variable twin iris system (powered lens and lamp iris) Accepted Video Formats: 480i/575i/1080i and 480p/575p/720p/1080p Accepted Computer Formats: From VGA up to 1152 x 900 + 720p/1080i/1080p Video Inputs: HDMI-HDCP (x2), component (x2), composite, S-video, and PC/RGB (HD15) Color System: NTSC, PAL, SECAM, NTSC 4.43, PAL-M, PAL-N Fan Noise: 22 dBa |
Projection Lens: 2.0x optical zoom; f = 21.3 – 42.6 mm/F2.0 – 3.0, manual focus & zoom |
Pros
- Very detailed image with reduced screen door effect
- Excellent calibration out of the box
- Quiet cooling system
- 3000 hour bulb life (max)
- Excellent LCD panel adjustment and maintenance options
Cons
- No 12VDC trigger
- Only a minor upgrade from the PLV-Z4
Introduction
Sometimes a product comes out that is so revolutionary, so intriguing, and so extraordinary that you almost catch your breath when observing it. This is not that product. The PLV-Z4 was that product…. And still is. The Sanyo PLV-Z5 makes a few improvements on the Z4 platform, but essentially it is the exact same projector under a new name. This happens a lot in the industry, and I think it’s a good opportunity for our readers to snatch up older models for a great price – or to at least realize the great bargains they may get on close-out deals. Call me practical – I just love to save people money whenever I can. The new PLV-Z5 is a GREAT chance to save some money and, if anything, reinforces just how good the PLV-Z4 was (and still is). With that said, the debut price of the PLV-Z5 is a full $1000 less than the PLV-Z4. Sanyo recognizes that prices have come down and, like other manufacturers, they are eager to position their products as a value option. Add to this typical street pricing and rebates which knock off up to $650 more – and you’ve got a good deal no matter which way you go.
Differences Between the PLV-Z5 and its Predecessor
When I said there were scant differences I wasn’t kidding. The new model ups the lumen output by 10% to 1100. It also tweaks the output capabilities to garner a 10,000:1 stated contrast ratio (in Vivid mode, full on/off). The lens throw ratio is slightly adjusted from 1.5 ~ 3.0:1 to 1.35 ~ 2.7:1. There are also two HDMI inputs on the back of the PLV-Z5, giving users an additional option for hooking up that new gaming system or cable box. Case color has also changed slightly form a two-tone gray to a brushed silver look in the new PLV-Z5. This year’s model also supports downconversion of 1080p/60 content – a very nice addition and something that shows it is ready to handle any HD format up to the maximum resolution (though 1080p/24 isn’t specified). The new Sanyo carries the same 3-year warranty and 90-day lamp warranty as the older model so nothing is lost there. All in all it’s an excellent value – just not a revolutionary update. I guess if it ain’t broke, don’t fix it, right? We did find some significant differences that will come up later during the calibration portion of the review.
Out of the Box and Build Quality
The Sanyo remains one of the best built consumer projectors
on the market at this price. The automatic lamp cover is a feature that is
much-appreciated by consumers and installers alike – plus it’s really cool. Weighing
in at over 10 pounds, this isn’t a lightweight unit and its stability helps
keep the picture locked onto the screen and ensure that your money is going
towards some quality components.
The PLV-Z5 comes with bottom access for the lamp, which is
incidentally rated to 3000 hours if you don’t intend on using Vivid mode for
viewing. Replacement lamps cost around $350, which about average for a
projector in this price range (and a bargain compared to the $999 Xenon
replacement for the Sony “Ruby”). In terms of maintenance, the Sanyo PLV-Z5
offers the same cool “squeeze blower” which users can use in conjunction with
the Cleaning mode to blow dust off of the LCD panels. With this system you
don’t have to worry about getting permanent dust blobs on your picture – wish
everyone had this so well figured out.
Though not new to the PLV-Z5, one of the pleasant surprises
you’ll find on the Sanyo (as opposed to most other models) is a set of RGB
panel cleaning holes which are located on the bottom of the projector and
protected by a removable cover. After a period of time, some LCD projectors can
accumulate dust on the LCD panels which can show up on the screen as smudges or
colored blotches. Detailed cleaning instructions are included in the manual but
basically you put the projector into Cleaning mode, flip it over and insert the
blower (the supplied blower only) and tilt back and forth until any dust blobs
are gone (you can view them in real time on your screen or a wall). That’s it.
Inputs, Controls and Connections
On the back of the new Sanyo PLV-Z5 you’ll see an almost identical clone of the Z4, with the addition of another HDMI input. Absent again (grrrr) is a 12VDC trigger that could have been used to activate an electric screen.

Sanyo PLV-Z4 inputs

Sanyo PLV-Z5 inputs
While the addition of another HDMI input is nice, I think
that this product still eludes custom installers who prefer to control units
with RS-232C. It appears to be something that Sanyo has purposely decided not
to pursue in its positioning of this product in the consumer marketplace. At
its sub-$1500 street price it’s understandable – but I still want my two-way
serial control!
This time around, the Sanyo takes a 1080p/60 input – it merely
scales it back down to its native 720p format. After trying several patterns I
have to say that it does the scaling quite well indeed. What you’ll want to do
is send it both 1080p and 720p from any HD sources you may have and see which
looks better to you – every source component is different and you’ll need to
compare the scaling of the source versus the PLV-Z5. The HD15 input still
handles PC resolutions up to 1152x900, plus the popular 1024x768 and HDTV
resolutions.
Setup and Menu System – Changes from PLV –Z4
We went through the entire menu system in our review of the
PLV-Z4 projector, so we’ll stick to changes in this review. There are scant
few, but since the old system worked so well that’s really not a negative.
Working from top to bottom we see that the PLV-Z5 adds
another Cinema mode, called “Brilliant Cinema” which cranks up the Color
control and provides a richer image with higher overall contrast. Gone is the
Powerful mode which opened up the projector completely. Vivid now holds that
duty and it does it quite well. The Image adj., Picture adj., and Screen menus
are identical in all respects to the PLV-Z4. The Input menu changes only in
that it offers the second HDMI input option.
In the Setting menu, “Blue back” has been replaced by a more
intuitive “Background” option that can be set to either Blue or Black. For you
Scottish fans a new “Highland” option is added on Page 3. OK, it’s actually
there to present an option to those living at altitudes of 4000 feet or more
above sea level (hello, Denver readers).
This engages the fan at higher speeds. From what I could hear, however,
Sanyo put in a long ramp up and down time for the fan speed, so the increase
isn’t readily noticeable. With most other projectors I’ve used, engaging Bright
mode or the high altitude option kicks the fan into overdrive like a
badly-tuned turbo charger. Not so with the Sanyo. The only other difference I
noted was that more data is provided in the Information menu. You can now get
info on the Input, Lamp status, Screen mode and Image mode in addition to the
Signal type, Sync frequencies and Lamp time.
Throw Distance – What Are Your Screen Options?
| 16:9 Screen Size Diagonal (inches) |
Distance (Feet) | |
| wide | tele | |
| 70 | 7.0 | 14.0 |
| 80 | 8.0 | 16.1 |
| 90 | 9.1 | 18.1 |
| 100 | 10.1 | 20.1 |
| 110 | 11.1 | 22.1 |
| 120 | 12.1 | 24.2 |
| 130 | 13.1 | 26.2 |
| 150 | 15.1 | 30.2 |
Ambient Light Control and Screen Recommendations
The Sanyo projector, like its predecessor, works best in Pure Cinema mode within a light-controlled environment. We recommend either a white screen or negative gain screen depending on what the ambient light conditions are in your viewing room. Vivid mode is excellent for daytime viewing when you can’t control the light entering the room, but be aware that you still won’t get crisp color performance- this is only a 1,100 lumens projector and not made to handle daytime projection as its primary function.
Remote Control (CXVT)
The only differences between this remote and the one belonging to the PLV-Z4 is the presence of toggling HDMI and component video buttons. The second Component video button’s space is now occupied by a direct-access VGA button, leaving the final position available for an “Info” button which activates the on-screen menu showing the projector’s status and input source. The downside to this is that you no longer have direct control over each input and programming universal remote controls may take some additional thought or workarounds.
Pros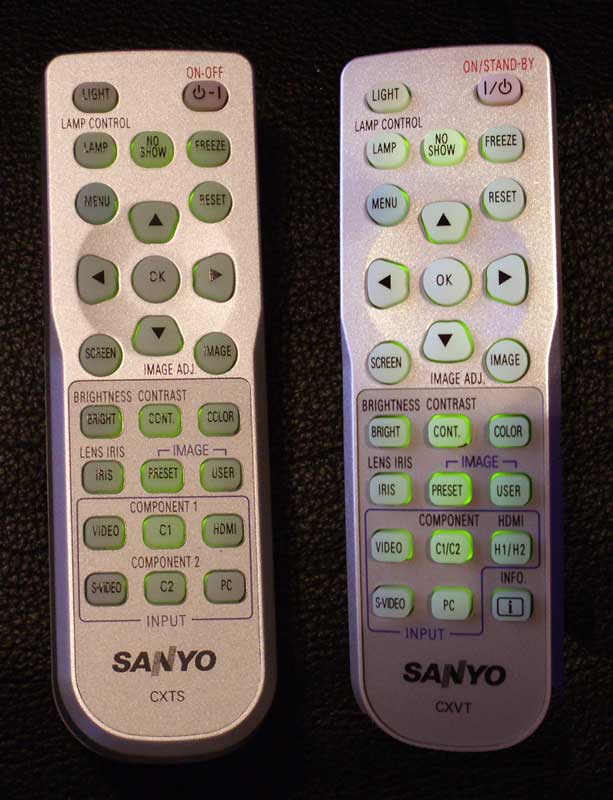
- Fully backlit
- “Light” button on the remote glows in the dark
- Extensive Image Controls
- “Freeze” control
Cons
- Lost discrete inputs in favor of space-saving toggles for HDMI and component
- No
automatic backlight with first button push
Projector Calibration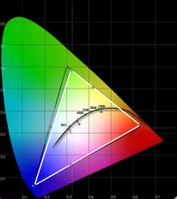

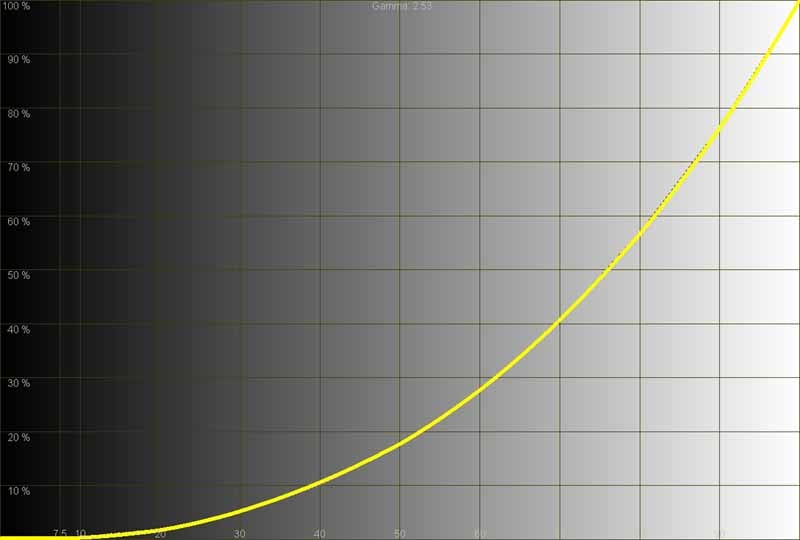
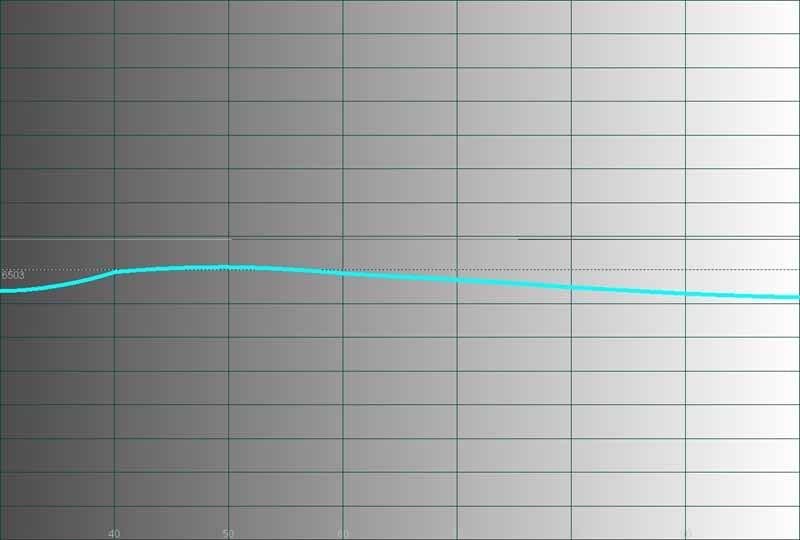
The Sanyo PLV-Z5 did exceptionally well out of the box. I was given an “off-the-shelf” unit, so there’s little chance that anything was pre-tweaked before arrival. When I put this projector up for calibration I found that it was in really great shape without any tweaking. Even black and white levels were almost spot on in my room (a huge improvement over the PLV-Z4). The CIE chart showed that color capability was exceptional with only green coming in just below the REC-709 HDTV target levels.
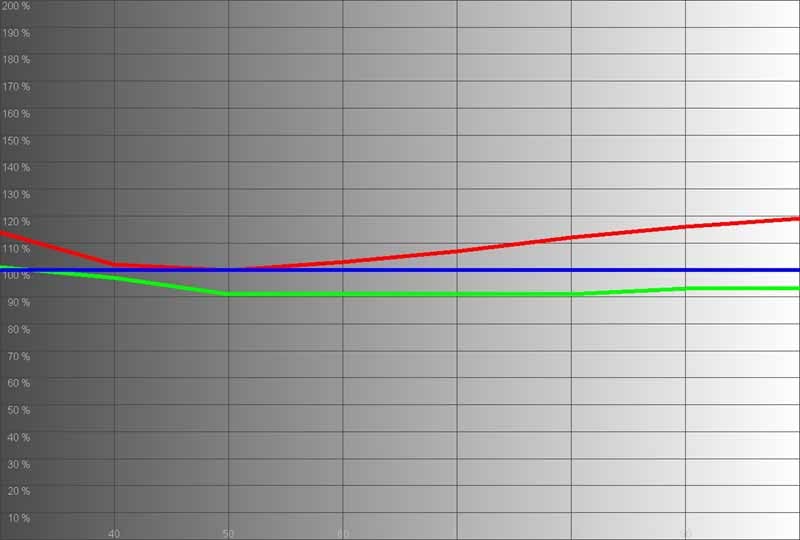
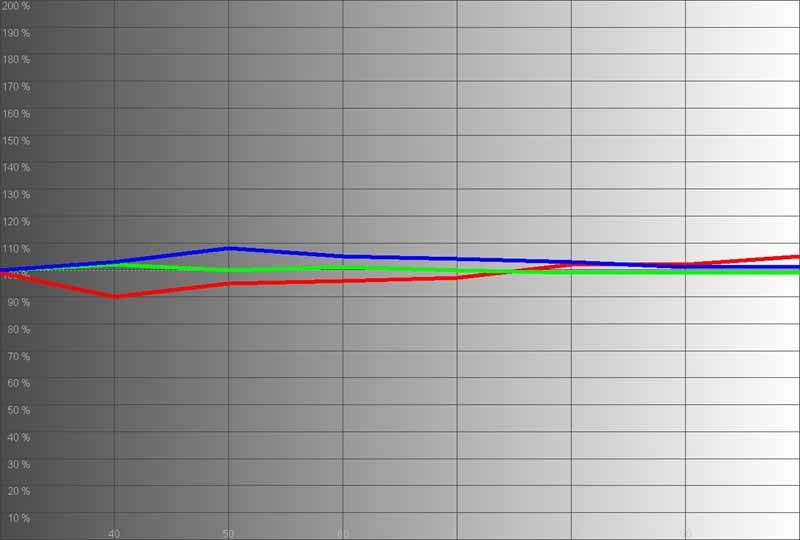
Here are some of the before and after measurements as shown by the Datacolor ColorFacts Professional 6.0 software:
|
Before Calibration |
After Calibration |
|
|
|
|
This is not bad at all. You can see why the Pure Cinema’s default image is a bit on the warm side. Blue and green track very well, with green staying below red and blue – preferred over it being the hottest color. |
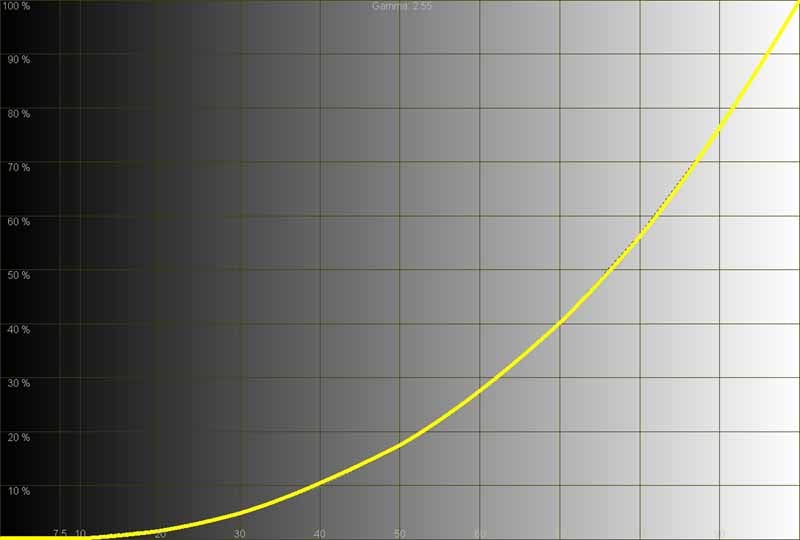
After calibration the results look even better. This projector dialed in very quickly – which is a welcome change from the endless back and forth we typically work with in menu systems. |
|
|
|
|
This won’t be very exciting, but the luminance graph is nearly dead on. |
After calibration there is only a minimum change in the luminance graph. I’m not complaining. |
|
|
|
|
Here we were very surprised and pleased. There is a bump that gradually brings the color temperature back down to near-D65 around 80IRE. And this is without any calibration – not bad. |
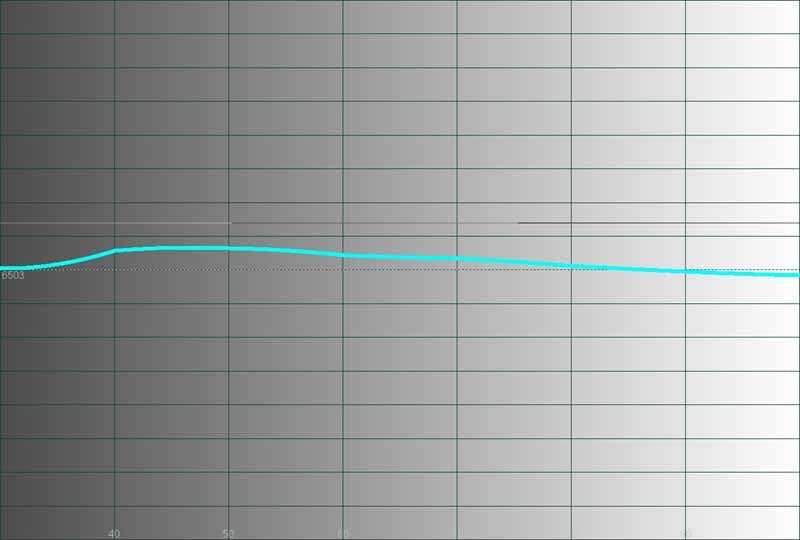
After our adjustments, the color temperature jumped almost uniformly across the board, but this brought the overall levels closer to what we were looking for. |
Calibration Notes
I have to say that calibration is almost not needed on this projector – and that’s refreshing. We experienced one of the quickest calibration sessions ever, taking just a few back and forth adjustments of red and green to dial in the image to acceptable levels. I especially liked how the menu system remembered where we were throughout the process, so had merely to “right-arrow” our way back through the menu to make additional tweaks to the RGB gain and offset levels.
Just for Fun – Color Temperature and Output Levels
We put up our datacolor Spyder2 colorimeter and cycled through all of the PLV-Z5’s modes in order to see how this affected light output and color temperature. Here are the results:
- Brilliant Cinema: 62.5 cd/m2 at 6550K
- Creative Cinema: 48 cd/m2 at 6700K
- Pure Cinema: 30 cd/m2 at 6250K
- Natural: 54 cd/m2 at 7000K
- Living: 63 cd/m2 at 6800K
- Dynamic: 134 cd/m2 at 9050K
- Vivid: 134 cd/m2 at 9050K
What did I learn from this experiment? Well, Dynamic and
Vivid not only looked the same on our
screen, they measured the same as
well. Pure Cinema, while more accurate, can certainly be supplanted by Creative
Cinema if you’re looking to eek out more light from the Sanyo. The other modes
were not particularly useful to me since I was either looking for the brightest
possible image, or one that was accurate to film.
Audioholics/HQV Bench Testing Summary of Test Results
Perfect Score is 130
Sanyo PLV-Z5 Benchmark Score: 79 (not bad, and better than many displays and source components)
|
Test |
Max |
Film |
Pass/Fail |
|
Color Bar |
10 |
10 |
Pass |
|
Jaggies #1 |
5 |
3 |
Pass |
|
Jaggies #2 |
5 |
1 |
Pass |
|
Flag |
10 |
10 |
Pass |
|
Detail |
10 |
10 |
Pass |
|
Noise |
10 |
10 |
Pass |
|
Motion adaptive Noise Reduction |
10 |
5 |
Pass |
|
Film Detail |
10 |
10 |
Pass |
|
Cadence 2:2 Video |
5 |
0 |
Fail |
|
Cadence 2:2:2:4 DV Cam |
5 |
0 |
Fail |
|
Cadence 2:3:3:2 DV Cam |
5 |
0 |
Fail |
|
Cadence 3:2:3:2:2 Vari-speed |
5 |
0 |
Fail |
|
Cadence 5:5 Animation |
5 |
0 |
Fail |
|
Cadence 6:4 Animation |
5 |
0 |
Fail |
|
Cadence 8:7 animation |
5 |
0 |
Fail |
|
Cadence 3:2 24fps film |
5 |
5 |
Pass |
|
Scrolling Horizontal |
10 |
5 |
Pass |
|
Scrolling Rolling |
10 |
10 |
Pass |
|
Total Points |
130 |
79 |
|
Source component was the Denon
DVD-3930CI DVD Player.
Comments on Benchmark Testing
Set that progressive mode to ‘Film’ if you are sending an
interlaced signal to the Sanyo (the default is ‘L1’ which doesn’t do very well
on DVDs or 480i [interlaced] sources). I found that for users of older DVD
players, this projector does excellent work at deinterlacing and scaling, so
send it 480i, unless you have a high-performance DVD player. The Sharpness
control seemed best when set at 0.
The Moving Zone plate 2-3 tests passed with flying colors this time around. I’m not sure what Sanyo did with the new model, but it seemed to fare a lot better in terms of handling rapid deinterlacing during horizontal, vertical and diagonal movement.
Sanyo PLV-Z5 LCD Projector- Viewing Evaluation
If I was a fan of the Sanyo PLV-Z4 then I am an avid devotee
of the PLV-Z5 as well. In terms of practical viewing – with a progressive
source component – the differences are minimal. Calibration is closer to
accurate out of the box – and that is something we’ve been bugging
manufacturers about for some time. If you want to grab a projector that can be
set up and used without calling a calibrator to tweak it, then this may be your
box. Colors absolutely popped off the screen and black levels were very
respectable with the lamp and iris modes set correctly.
HDTV: DiscoveryHD Equator
Anyone who reads my reviews knows that I am a sucker for the
DiscoveryHD channel. It’s excellent footage and finely detailed source material
makes for some very interesting photos. In a show called Equator, I found excellent shots of wildlife that were both
colorful and filled with deep black levels and gradients of every kind. If this
doesn’t test the merits of a projector I’m not sure what will. The results were
stunning – as even my limited digital photos will reveal. Even images in motion
maintained a crisp look and jaggies were nowhere to be found, though the source
was 1080i and likely preprocessed for a more accurate rendering on HD displays.

HDTV: ER
ER isn’t a show I watch anymore, but it happened to be on in high
definition so I grabbed a few photos. This show isn’t particularly crisp or
colorful – certainly not like CSI: Miami
or the content found on DiscoveryHD, but it does reveal what the projector had
to “say” about the common TV show. There were plenty of deep, black areas on
the screen – as is the case with most indoor-set shows. Facial features came
through well and hair – a place where detail is easily lost – was quite
discernable.

HDTV: Shark
CBS’ Shark is a recent favorite of mine, though I’ve been a big fan of
James Woods’ acting and voice acting for some time. The show is more colorful
than most indoor, fixed-set shows and features a lot of detail and movement.
It’s a pleasure to watch on the Sanyo and I was quickly pulled into the show
when all I was really trying to do (at the time) was snap off some example
photos – hey, what if a great shot came at the end!

Conclusion
The Sanyo PLV-Z5 is a great projector – and so was the PLV-Z4. Improvements are subtle but nice. I would not recommend anyone with last year’s model go out and purchase an upgrade, but if you’ve been holding out, the low cost of entry almost makes it a no-brainer. Typically, I’d recommend scooping up last year’s model if you can find any, but at a street price of $1500 or less (as of the time of this writing) it’s hard to find a significant enough discount on the PLV-Z4. Excellent color out of the box, vivid pictures with incredible detail, and minimized interpixel spacing make this 3LCD projector a leading choice in a sea of possibilities. Is it revolutionary? No, but that just attests to how far ahead of the curve Sanyo was in it’s initial introduction of this platform.
About Sanyo North America
SANYO Group's
corporate philosophy is the guiding principle in accomplishing the key
management policy of ensuring products and services that are indispensable in
creating harmony between people and the environment. SANYO's priorities are:
Customer Satisfaction and Harmonizing with the Environment. SANYO's digital
technology and core competence (the source of our competitiveness) supply the
products and services that generate joy, excitement, and impact.
The Score Card
The scoring below is based on each piece of equipment doing the duty it is designed for. The numbers are weighed heavily with respect to the individual cost of each unit, thus giving a rating roughly equal to:
Performance × Price Factor/Value = Rating
Audioholics.com note: The ratings indicated below are based on subjective listening and objective testing of the product in question. The rating scale is based on performance/value ratio. If you notice better performing products in future reviews that have lower numbers in certain areas, be aware that the value factor is most likely the culprit. Other Audioholics reviewers may rate products solely based on performance, and each reviewer has his/her own system for ratings.
Audioholics Rating Scale
 — Excellent
- — Very Good
- — Good
- — Fair
- — Poor
| Metric | Rating |
|---|---|
| Detail and Resolution | |
| Deinterlacing & Scaling | |
| Contrast and Black Levels | |
| Color Reproduction | |
| Calibration Options | |
| Build Quality | |
| Ergonomics & Usability | |
| Ease of Setup | |
| Features | |
| Remote Control | |
| Fit and Finish | |
| Performance | |
| Value |
Clint Deboer was terminated from Audioholics for misconduct on April 4th, 2014. He no longer represents Audioholics in any fashion.
View full profile