
Carada Masquerade Masking System Review
Masquerade Screen Masking System
- Product Name: Masquerade Screen Masking System
- Manufacturer: Carada, Inc
- Performance Rating:

- Value Rating:
- Review Date: November 15, 2007 11:21
- MSRP: $ 2499
Supported screen sizes: 80-142 inches
Native aspect ratio: 1.78:1
Depth: 3.75-inches
Fixed masking ratios: 1.75:1 and 2.35:1
Optional masking ratios: variable via remote
Remote: Infrared (integrated electronics and IR sensor on screen)
Trim: Black Hole fabric
Pros
- Possibly the most economical masking system on the planet
- Integrated IR sensor and remote
- Black Hole trim
Cons
- No 12VDC trigger control
Masquerade: First Impressions and Installation
 Carada unveiled, for the first
time, its new Masquerade automated masking system at the Audioholics 2007 State
of the CE Union Event. To say that this is an industry-changing product (at
least in terms of price to market) would be an understatement. Sold for the
price of some competitors' fixed wall screen systems (just $2499 for a 110”
diagonal) the Masquerade offers full horizontal masking up to 2.70:1, meaning
that all of your widescreen movies can now be watched without those often
annoying black bars.
Carada unveiled, for the first
time, its new Masquerade automated masking system at the Audioholics 2007 State
of the CE Union Event. To say that this is an industry-changing product (at
least in terms of price to market) would be an understatement. Sold for the
price of some competitors' fixed wall screen systems (just $2499 for a 110”
diagonal) the Masquerade offers full horizontal masking up to 2.70:1, meaning
that all of your widescreen movies can now be watched without those often
annoying black bars.
Editor's Note: Why Use a Masking System?
When watching most theatrical movies on a 16:9 screen you will notice, if your system is configured correctly, that there are black bars on the top and bottom of the screen. This is due to the fact that the movie is in a wider aspect ratio than your 16:9 screen. These black bars are rarely ever truly black and can have the effect of making the overall picture appear recessed and less realistic. Adding a masking system provides light-absorbing material which takes these black bars and effectively removes them. All that is left is the true aspect ratio of the movie - making for a truly immersive experience.
There are several things which set apart the Masquerade from competitors. For one, the system is made to work with virtually ANY 16:9 screen, even a do-it-yourself model. This is the first I've heard of a masking system that is made to retrofit anyone's screen - this despite the fact that Carada also makes its own excellent screen products. The system comes shipped in four (4) pieces which arrive in a single custom shipping container. This shipping method allows the Masquerade to make its way through entries and other tight spaces without much difficulty at all - and get this: for screen sizes under 115-inches, the Masquerade system can actually ship via FedEx Ground. You then assemble it one piece at a time over the top of your existing screen.
 We saw the system close up and witnessed much of the installation process and, while it can certainly be done by one person, two are recommended for best results (especially when mounting the top and bottom structures which contain most of the motorized and mechanical parts.) The top piece is installed first by mounting a single wall bracket and then hanging the top piece on it. You then anchor the top of the masking system to your wall at each corner. The key is making certain the initial bracket is perfectly level. Also, when ordering, remember to take into account the full width of the Masquerade which encompasses your entire screen. Once the top is mounted correctly, you can unbox and prep the bottom piece.
 Simply flip up the left and right vertical guide rails from the bottom piece (like a Swiss Army knife as Carada's David Giles likes to say) which guide the smooth action of the masking material and allows you to "hang" the bottom piece in place. You really can't miss on the bottom piece as the top of each shaft has an eye bolt which slips over a 5/16-inch bolt in the top assembly. How's that for accuracy? A nut then goes over the top two bolts, securing the vertical positioning for good. At this point the bottom assembly is free-swinging. You just square it and anchor both corners. The next thing you do is raise the lower masking bar, loop the straps around each end, and screw it securely into the machined slides. The motor wire then gets connected into the PC board. You can order the system with a standard AC plug or without (so you can hard-wire it with Romex for a truly professional installation.) The power entry point is on the back of the screen, about 4 inches up and 2 inches in from the bottom right. Finally, the side panels mount into guides which provide a very small tolerance - making for nice clean corners. As long as this description may have sounded, installation was quick and, for the most part, quite painless.
Masquerade: Build Quality and Summary
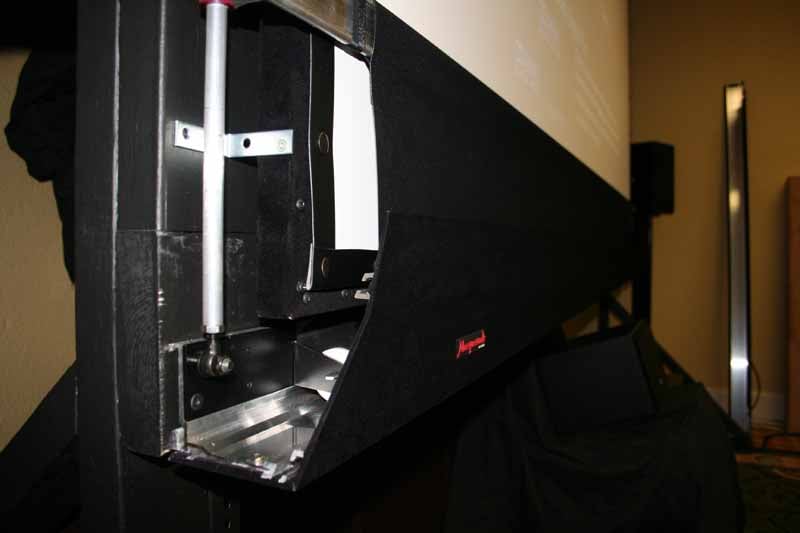
 The attention to detail that this system provides is nothing short of amazing. Unlike several other masking systems we've seen, the Masquerade hides all brackets, bolts and screws from view, leaving only a smooth, uninterrupted surface. In addition, Carada's Black Hole Trim is included at no extra cost and the screen system comes with the same nicely beveled, symmetrical edges you'd expect in a pro masking system. This masking system looks just as good with the lights on as it does with the lights out, which says a lot. This, of course, didn't stop us from taking it apart again once it was installed to get a better look at the insides... Removing the side pieces revealed the incredible build quality of the internal components. From the thick aluminum framing and 5/16-inch bolts to the well-built motor structure and ably secured electronics, the Masquerade is a professional-grade masking system that just great looks no matter how you slice it.

The Masquerade "unmasked"
Physically, the screen has a 6.25-inch wide frame that is 3.75-inches deep. In our demo we mounted it overtop a simple Carada Precision series screen which we inverted so as to get the screen as close to the masking material as possible. While you certainly don't need to do anything special to make the Masquerade work with your screen, we were trying to really tweak this system for the ultimate effect. The result was minimized shadowing and a smooth, clean mask that left many people initially thinking that the room contained a simple 2.35:1 screen... until we flipped the switch and converted it into 16:9. The mask is that good, it simply absorbed all available light from the black bars overshooting the main image. The effect left more than few jaws on the floor. The screen was also under heavy-duty use during the weekend event and we never once witnessed it stick or lose calibration during the course of demoing hours and hours of great high definition video material. I'd say reliability looks very good so far.
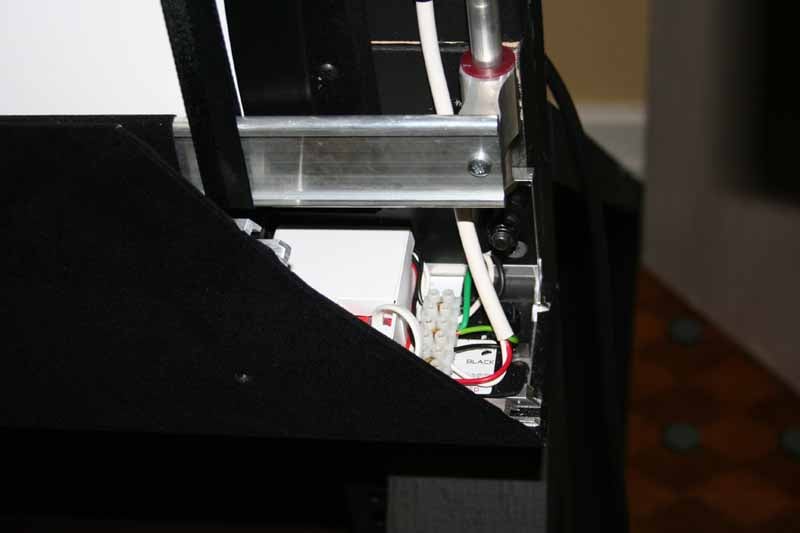
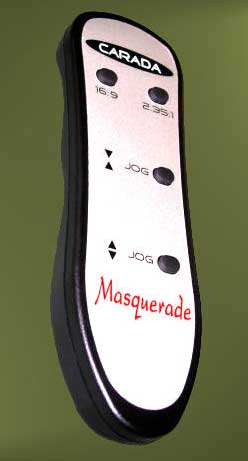
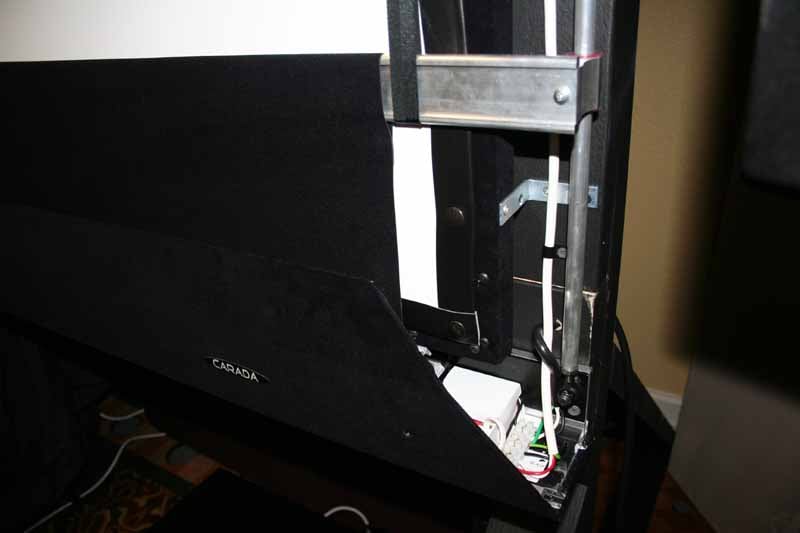 A single Somfy Sonesse tubular motor provides all of the power required to mask and unmask the screen and it was quiet as a mouse. Although the motors were audible when in motion, the sound was smooth and not distracting. That's exactly what we'd want (and what we'd expect) from a quality masking system. An infrared sensor is built right into the bottom-right corner of the frame and a remote control provides two factory-calibrated presets for 16:9 and 2.35:1 as well as manual jog controls to raise and lower the mask.
Overall, the Masquerade projector screen masking system is a steller product. While it doesn't support a 12VDC trigger input, its attention to detail, budget price and easy of installation make it a stand-out performer that cannot help but be recognized for changing the industry. The Masquerade not only costs much less than the competition, it actually looks better than many other systems I've seen and includes, as standard, many options that typically come at an additional cost. If you need more advanced features like a hard-wired remote you may need to go elsewhere (and pay a lot more) but if you can benefit from a constant-width screen masking system Carada is making it all but impossible to say 'No' to their new Masquerade.
Carada, Inc.
Chilton Industrial Park
108 Bama Lane
Clanton, AL 35045
www.carada.com
info@carada.com
The Score Card
The scoring below is based on each piece of equipment doing the duty it is designed for. The numbers are weighed heavily with respect to the individual cost of each unit, thus giving a rating roughly equal to:
Performance × Price Factor/Value = Rating
Audioholics.com note: The ratings indicated below are based on subjective listening and objective testing of the product in question. The rating scale is based on performance/value ratio. If you notice better performing products in future reviews that have lower numbers in certain areas, be aware that the value factor is most likely the culprit. Other Audioholics reviewers may rate products solely based on performance, and each reviewer has his/her own system for ratings.
Audioholics Rating Scale
 — Excellent
- — Very Good
- — Good
- — Fair
- — Poor
| Metric | Rating |
|---|---|
| Build Quality | |
| Ergonomics & Usability | |
| Ease of Setup/Programming/Integration | |
| Features | |
| Fit and Finish | |
| Performance | |
| Value |
Clint Deboer was terminated from Audioholics for misconduct on April 4th, 2014. He no longer represents Audioholics in any fashion.
View full profile