
Panasonic PT-F200U LCD Projector Review
Panasonic PT-F200U Projector
- Product Name: PT-F200U LCD Projector
- Manufacturer: Panasonic
- Performance Rating:

- Value Rating:
- Review Date: June 06, 2008 14:18
- MSRP: $ 3,999
|
Brightness: 3500 ANSI lumens |
Mounting: ceiling, desk, front/rear
(menu configurable) Power Supply: 100-240 volts, 50-60Hz Power Consumption: 330 watts (maximum), 4.5 watts (standby mode with fan stopped) Operating Temperature: 32 – 104 degrees F (0 – 40 degrees C); 20-80% humidity (no condensation) Audio: 3W output via onboard speaker Projection Method: Front/rear/ceiling mount/table-top Remote Control: Standard
(non-backlit) remote with laser pointer, AA x 2 batteries |
Pros
- Lens shift
- High lumen output
- Daylight View 4 works well
Cons
- Not good for dedicated home theater use
- No noise reduction
- Poor deinterlacing
Build Quality and Features
There aren't many changes in the build quality department. The PT-F200U still maintains the Auto Rolling Filter (ARF) system whereby a dust-collecting filter auto-winds into a casing as it electrostatically pulls particles out of the path of the light engine. Panasonic specifically designed the airflow path to allow for particles to collect on the filter. This is a very cool system and since the ARF is a user-replaceable part it makes a lot of sense. The menu system even has a running "Filter Remaining" bar under the Options menu that shows how much is remaining.
They also maintained the same rear-entry lamp compartment, meaning that you'll be able to replace the lamp without removing the projector from a ceiling mount. The projector is housed in an aluminum enclosure that is very sleek. The lens is positioned about 1/3 the way into the unit and the entire front panel swings up on a hinge to reveal the lens shift, zoom, and focus controls. You can also access the menu system, input selection and soft power button. What's nice about this is that with the front panel closed, the projector takes on a very clean look while simultaneously protecting the lens and user controls from any dirt or interference. You can simply dust the front glass with traditional cleaning materials with no worries about ruining the lens coating or scratching any sensitive optical glass.
Inputs
Next to the user-replaceable lamp
compartment lie the inputs. Rear-mounted inputs seem to be standard now and
typically make for a more convenient and flexible connection method.
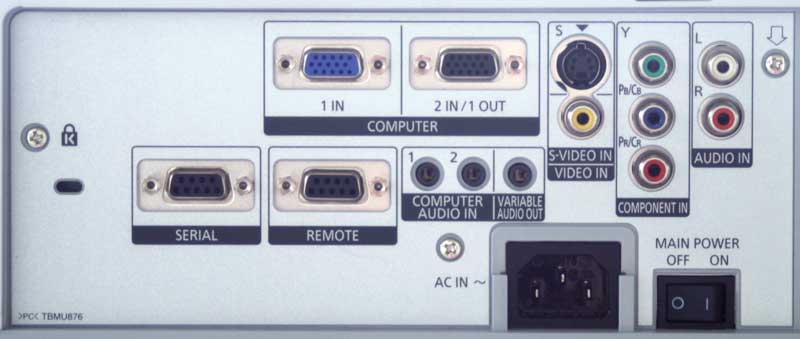
Like its predecessor, the PT-F200U has two RGB/PC (HD15) inputs, one of which can be configured via software to be a pass-through output (HD15 male-male adapter or cable required). There are two audio inputs (1/8-inch mini jacks) which are permanently assigned to the HD15/PC inputs. A single 1/8-inch variable audio output lets the projector control the output levels for a presentation via the remote's volume button. Component video, S-video, and composite video are also present, along with a stereo RCA input which can be configured to any of the analogue video inputs. You may ask where the HDMI input is and the answer would be: not present. This projector is analogue only and you will not be able to use digital video sources without first converting to analogue. Most sources contain at least one analogue output so we don't think this is a big issue, especially given the target market for this projector.
Features
Panasonic's didn't lose any of the great features present in the PT-F100U. In fact it provided some upgrades. The new unit still possesses the Auto-Rolling Filter (ARF) which, as we mentioned above, removes a lot of dust away from the optical system, reducing the chances of getting any visible "dust blobs" on the LCD panels. The ARF is inexpensive to replace (about $85 retail) and can be coordinated with lamp replacement periods. It resembles a fax roller system that automatically feeds new material which collects dust via electrostatic principles. Everyone seems to attack this problem differently, from blower vents, to self-cleaning fan systems. In defense of Panasonic, this method at least seems to be one that focuses on "removal" rather than the simple displacement of particles.
Panasonic kept the RS-232C serial control port on the PT-F200U and, though not the easiest file to locate on the Panasonic website, provides the actual programming codes to integrate this projector with complete home control systems. The projector continues to be AMX compatible and comes with a Certified Crestron Integrated Partner label. Installers should not have any trouble making this work with their custom installation, despite the odd lack of a 12V trigger output.
The 2x zoom lens on this projector makes for an almost unlimited throw distance - within reason. Add to that a 50% vertical and 32% horizontal lens shift (or "optical axis shift" as Panasonic refers to it) and you've got a VERY flexible system. I especially liked seeing lens shift in a business projector as it meant that presentations will be much clearer due to the ability to place the unit on a tabletop and not have to angle it up to the screen with digital keystone adjustment. We found that if the projector was just about anywhere within the screen top or bottom and reasonably centered, the image was beautiful.
Panasonic upped the output of the new PT-F200U projector to 3500 ANSI lumens, which is considerably bright and very usable indoors without having to throw your clients or parishioners into complete darkness. In addition to the lumen output, Panasonic uses a brand new Daylight View 4 technology which I found to be very efficient and practical. Using the ambient luminance sensor (ALS) located on the top center of the projector, the PT-F200U can automatically adjust gamma and edge enhancement to allow images to adjust with changing ambient light conditions. While you can turn the function On or Off, I located at least 4 individual steps when using the Auto feature - and I'd recommend that setting for any conceivable business or house of worship use of the system.

Daylight View OFF

Daylight View ON
A 3-year/3000 hour limited warranty accompanies the PT-F200U, along with a 90-day/500 hour bulb warranty. That's a solid warranty for commercial use and one that will put many minds at ease when deciding on a sound business expenditure.
Setup, Installation and Remote Control
Physically, the Panasonic is among the easiest business-class projectors to set up. With a 2x zoom lens and the ability to lens shift up to 50% vertically and 32% horizontally, the projector fits in well with any desk, shelf or ceiling installation. If you get the projector reasonably centered and within the top or bottom of the screen (horizontally) you'll be able to get a squared up image without the use of digital keystoning.
In terms of connectivity, simply hook up any analogue video source and select it by using the Input Select buttons on the remote or the projector itself. If you are connecting a PC, you can use the "Computer" input button to toggle between the two HD15 inputs. The screen also shows a helpful image with the common laptop commands (Panasonic/NEC, Dell/Epson, HP/Sharp/Toshiba, Fujitsu, Apple & IBM/Sony are included) for activating the external display. I noted with some humor that the Apple command was only F7 while the others involved a combination of an F-key with the Function button. Hopefully no Apple users will accidentally turn off their displays while reaching for the number 7… There is no auto-input search function but the projector remembers the last-used input when powered up - for most applications that's all anyone will need. In addition, it also remembers the last used input on each of the buttons: Computer (HD15 1 and 2) or Video (composite, S-video, component).
If you are using this with a 4:3 aspect ratio screen you'll want to set the projector's Position > Aspect menu setting to 4:3. This will use all of the available (native) pixels for projection of the image. The S4:3 mode is a squeezed mode that reduces the size of the image by 25% and makes 4:3 images more easily projected onto 16:9 screens without having to adjust the physical zoom lens. And of course, 16:9 mode squeezes the signal down for use with 16:9 screens. This is the setting you'll want to use with DVD video sources. Position > Resizing will also need to be configured to On, though this is the default.
Throw Chart for 16:9 applications
| Screen Size Diagonal (inches) |
Size (Inches) | Distance (Feet) | ||
| width | height | wide | tele | |
| 70 | 61.0 | 34.3 | 7' 6” | 15' 1” |
| 80 | 69.7 | 39.2 | 8' 6” | 17' |
| 90 | 78.4 | 44.1 | 9' 6” | 19' 4” |
| 100 | 87.2 | 49.0 | 10' 9” | 21' 3” |
| 120 | 104.6 | 58.8 | 12' 9” | 25' 11” |
| 150 | 130.7 | 73.5 | 16' | 21' 1” |
| 200 | 174 | 98 | 21' 7” | 42' 11” |
| 250 | 217 | 122 | 27' 2” | 53' 9” |
| 300 | 261 | 147 | 32' 5” | 64' 7” |
Remote Control
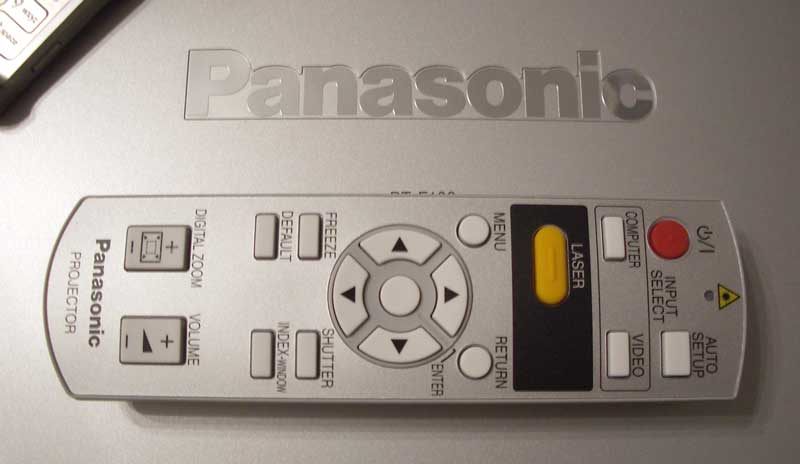 The
remote control is very average except for a couple of noticeable points of
interest. First, the Digital Zoom function is bound to come in handy and it
works very well. In fact, the Zoom amount is recalled on the first press of the
Zoom button, and you can hit the Return button to go back to normal mode. Using
this method you can quickly jump in and out of Zoom to emphasize the center of
the image. Digital Zoom does not, however, remember the horizontal or vertical
repositioning which is possible through the use of the cursor buttons while in
Zoom mode. There are no direct input buttons on the remote, though COMPUTER
does cycle directly between the two HD15 inputs as opposed to the VIDEO button
which cycles all inputs. The two buttons also remember the last selected input
for each, so if you are jumping between a laptop and a DVD, for example, you
can do so with relative ease. There is also a laser pointer on the remote, so
you can use it to point to interesting items on the screen, or just use it to
temporarily blind inattentive students (PS. That was a JOKE). The intriguing
AUTO SETUP button on the remote merely allows the system to set the dot clock
and clock phase for PC inputs sent to the projector. It doesn't automatically
perform an ISF level calibration to your screen or get you a cup of coffee.
The
remote control is very average except for a couple of noticeable points of
interest. First, the Digital Zoom function is bound to come in handy and it
works very well. In fact, the Zoom amount is recalled on the first press of the
Zoom button, and you can hit the Return button to go back to normal mode. Using
this method you can quickly jump in and out of Zoom to emphasize the center of
the image. Digital Zoom does not, however, remember the horizontal or vertical
repositioning which is possible through the use of the cursor buttons while in
Zoom mode. There are no direct input buttons on the remote, though COMPUTER
does cycle directly between the two HD15 inputs as opposed to the VIDEO button
which cycles all inputs. The two buttons also remember the last selected input
for each, so if you are jumping between a laptop and a DVD, for example, you
can do so with relative ease. There is also a laser pointer on the remote, so
you can use it to point to interesting items on the screen, or just use it to
temporarily blind inattentive students (PS. That was a JOKE). The intriguing
AUTO SETUP button on the remote merely allows the system to set the dot clock
and clock phase for PC inputs sent to the projector. It doesn't automatically
perform an ISF level calibration to your screen or get you a cup of coffee.
Viewing Tests and Conclusion
Using the PT-F200U as a Theater Projector
I heartily recommend this unit for dual use if your idea of dual use is taking home this projector from the office (with permission of course) for the occasional movie event. I do not recommend the opposite - using this as a home theater projector that can occasionally double as a business unit. The reason is simple: black detail is non-existent regardless of ambient light conditions or projector settings. It's simply too bright (without supporting the accompanying black levels) for home theater use. If you do use it for home theater, remember to place the Aspect Ratio in 16:9 and set both the Color Mode and Picture Mode to STANDARD. Daylight view can be set to Auto for best results.
Viewing Tests
We actually brought the projector along to a local Men's Retreat and it worked wonders in a room with massive amounts of ambient light - even when playing a movie that had several dark scenes. For that particular event we were using a portable Da-Lite Deluxe Insta-Theater 90" Screen, which gave us a nice big picture. This system featured a 2.2 gain "Wide Power" screen that further increased the gain from the projector. During this time we viewed material ranging from PowerPoint presentations to a DVD (Big Fish). I would say that the movie gave us several moments where blacks ran together and definition was completely lost, especially during some of the forest scenes. What that told me, as confirmed by our more controlled viewing tests below, is that the PT-F200U, while a super bright and competent performer, can't do everything well. If you think you can show a horror film in a room with lots of ambient light and see tons of dark detail you'll need to re-adjust your expectations.
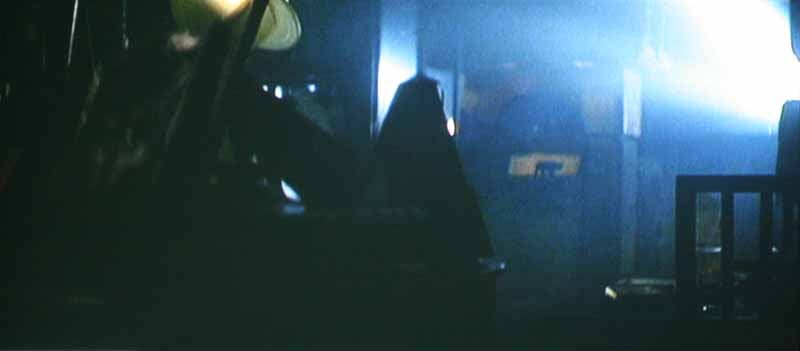
This is what a movie like Bladerunner
will look like during any of its many dark scenes. Notice the absence of black
level detail. Stick to brighter content overall for best results.

During bright scenes, like this shot from Star
Wars Episode I: The Phantom Menace, the picture looks excellent, though a
little soft due to the resizing of the image to the LCD panel's native pixels.

These guys are actually fat, not stretched. Colorful, bright images look
incredible on the PT-F200U.
Conclusion
This projector got a lot of use during its stay with Audioholics. We used it during a presentation meeting, church event, and of course watched several films on it. Overall, it is an excellent performer when used within its limits. Play to the strengths of this projector (bright output, excellent installation flexibility, automatic gamma control, etc) and you'll more extremely happy. If you're looking for a unit that will allow you to watch movies during the day - you found it. While you certainly can't watch with the sun pouring in on your screen, the Daylight View system does an impeccable job of varying the gamma to increase picture viewability and color. If you want a winner in the light-controlled home theater department as well as the office, keep looking. The PT-F200U gets our hearty recommendation for commercial and business use - it's an amazing value and a solid product that should provide more than enough power and features.
Panasonic PT-F200U LCD Projector

MSRP: $3,999 | Buy It Now from VisualApex
Panasonic Corporation of North
America
One Panasonic Way
Secaucus, NJ 07094
http://www.panasonic.com/
About
Panasonic
Best known by its
Panasonic brand name, Matsushita Electric Industrial Co., Ltd. is a worldwide
leader in the development and manufacture of electronic products for a wide
range of consumer, business, and industrial needs. Based in Osaka, Japan,
the company recorded consolidated net sales of US$81.44 billion for the year
ended March 31, 2005. The company's shares are listed on the Tokyo,
Osaka, Nagoya, New York (NYSE:MC), Euronext Amsterdam and Frankfurt stock exchanges. For more information on the
company and the Panasonic brand, visit the company's website at http://panasonic.co.jp/global/index.html.
The Score Card
The scoring below is based on each piece of equipment doing the duty it is designed for. The numbers are weighed heavily with respect to the individual cost of each unit, thus giving a rating roughly equal to:
Performance × Price Factor/Value = Rating
Audioholics.com note: The ratings indicated below are based on subjective listening and objective testing of the product in question. The rating scale is based on performance/value ratio. If you notice better performing products in future reviews that have lower numbers in certain areas, be aware that the value factor is most likely the culprit. Other Audioholics reviewers may rate products solely based on performance, and each reviewer has his/her own system for ratings.
Audioholics Rating Scale
 — Excellent
- — Very Good
- — Good
- — Fair
- — Poor
| Metric | Rating |
|---|---|
| Detail and Resolution | |
| Deinterlacing & Scaling | |
| Contrast and Black Levels | |
| Color Reproduction | |
| Noise Reduction | |
| Calibration Options | |
| Build Quality | |
| Ergonomics & Usability | |
| Ease of Setup | |
| Features | |
| Remote Control | |
| Fit and Finish | |
| Performance | |
| Value |
Clint Deboer was terminated from Audioholics for misconduct on April 4th, 2014. He no longer represents Audioholics in any fashion.
View full profile