
Optoma MovieTime DV11 Projector Review
Optoma MovieTime DV11 Projector
- Product Name: MovieTime DV11 Projector
- Manufacturer: Optoma
- Performance Rating:


- Value Rating:
- Review Date: July 12, 2007 17:14
- MSRP: $ 999
|
Brightness: 1600 ANSI lumens (high power mode) |
Mounting: ceiling, desk, front/rear (menu configurable) Remote Control: IR remote Control with source
selection, AAA x 2 batteries Optional Accessories: Panoview GrayWolfII™ Portable-Lift Screens, Dolcen Kreiling™ 50-Watt Subwoofer, BERING Mount and Gold Service Warranty Dimensions: 15” x 5.5” x 10.9” in (381 x 140 x 277 mm) Weight: 8.5 lbs (3.9 kg) |
Pros
- Portable and easy to use
- Nifty all-in-one system
- Excellent graphics-laden User manual
- Bright 1600 lumens
- Decent color reproduction
- Blazing fast DVD navigation & control
Cons
- Poor deinterlacing and black levels
- Remote not backlit
- Weak zoom lens (yields smaller screen or puts people in front of the projector)
- Native 4:3 resolution (with 16:9 support)
Optoma DV11 Setup and Installation
We encounter a lot of dedicated home theater owners looking for a ceiling-mounted projector that will be a product they will set and forget. But what about those without dedicated rooms. What about the people who want the fun of home theater but who can't permanently convert their living area to a theater? Optoma's DV11 seems to be targeted to this crowd. It is a sort of Lifestyle product that combines ease of use with some nifty features that are sure to enable loads of fun for a family who wants to have "movie nights" without breaking the bank and tearing up the house.
Setup and Installation
The simplicity of the DV11 is its primary strength. We operated the projector just like anyone else would, and received good results. The setup involved grabbing a coffee or end table (or any elevated flat surface) and positioning the projector far enough away from the screen to allow the image to focus properly and fill the desired area. While you can certainly project the DV11 successfully onto a white wall or sheet, we utilized an Elite Screens ez-Cinema F80NWH. This is a super-affordable ($165 street price) screen that pulls up from the ground into a 16:9 screen. It even comes with its own case so it can be put away almost as easily as the DV11. Regarding the image sizing and distance, here is the throw chart:
Throw Chart for Distancing the Projector from the 16:9 Projection Screen*
|
Screen
Size |
Size (Inches) |
Distance (Feet) |
||
|
|
width |
height |
wide |
tele |
|
70 |
61.0 |
34.3 |
7.0 |
7.7 |
|
80 |
69.7 |
39.2 |
8.0 |
8.8 |
|
90 |
78.4 |
44.1 |
9.0 |
9.9 |
|
100 |
87.2 |
49.0 |
10 |
11.0 |
If you go much higher than a 100-inch screen you may run into trouble for the intended use of this projector. At that size you really have to have some very good light control and possibly a higher gain screen to make sure there is enough light output - or you'll be putting the system into torch mode and losing the details that would otherwise be available to you in Cinema mode. I would think the most common use for this type of system is going to fall into the <100-inches category. Many rooms aren't very long, and it's nice to be behind the Optoma DV11 due to the positioning of the speakers and to minimize screen door effects. With the 1.1 zoom lens you have to be at least 8 feet away to hit 80-inches. For most people, this means they'll need to stay with smaller (<100-inch) screen sizes, or their family may be sitting around the projector rather than behind it.
Since the system is pretty much self-contained, setup was complete is about 5 minutes. Unzip the bag, plug in the projector and pull up the screen. We were ready to watch movies in no time flat and I knew that "tear down" would be just as simple. If you want to bypass the internal DVD player and use the DV11 as a display, however, you do have additional options.
Connections
On the back of the DV11 you will find a few different AV inputs and some audio outputs. Composite and S-video connections are present for feeding an external standard definition source to the projector with stereo analogue audio inputs for sound. Though on initial glance there seems to be no component video inputs, the VGA connection can support YPbPr and an adapter is included in the packaging. HDMI is not supported, so you won't have a direct digital AV connection to the player. There is a digital audio S/PDIF output - something you don't see on many projectors. This is simply to ensure that you can get audio out from the on-board DVD player and route it into an existing home theater system. Most AV receivers manufactured in the past 5 years will support Dolby Digital output via this coax digital (S/PDIF) connection. As part of your quick set-up tear-down you can grab a 12-foot coax cable and have it ready to pull out for use with this system. For anyone using an HTPC (home theater PC) an 1/8-inch mini audio output is also provided.

Taking a look above the inputs and outputs you'll see the new slot-loading integrated DVD player. This is a pretty nice feature and gives the DV11 a much slicker look and feel over the DV10. A USB "Service" port is not usable by consumers and is apparently for updates and diagnostics at a dealer repair facility or the manufacturer.
Optoma DV11 Remote Control and Menu System
Remote Control
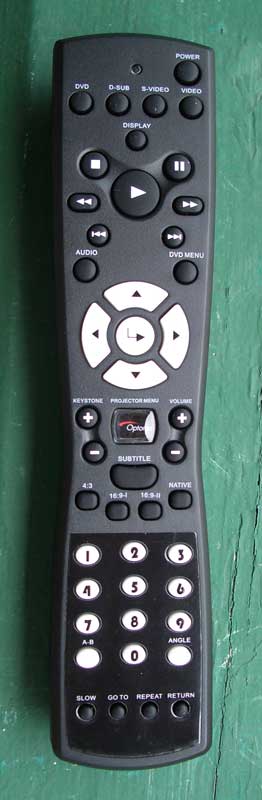 The included remote is good enough to allow you to control the product
as required, but I constantly found myself holding it upside-down for some
reason (possibly due to the fact that it is naturally top-heavy in its design.)
It's also a bit unwieldy overall, and there is no backlighting or even
glow-in-the-dark buttons. Using it in the dark proved to be an exercise in
trial and error or waiting for those bright movie scenes and explosions to hit the
screen. The required buttons are all present and accounted for and the system
obviously allows you to control DVD functions as well as projector features
without requiring separate remotes. Remotes are cheap, and overall I found the
remote to be very disappointing and bland - I'd expect a little better from a
product designed to be a Lifestyle system for family use.
The included remote is good enough to allow you to control the product
as required, but I constantly found myself holding it upside-down for some
reason (possibly due to the fact that it is naturally top-heavy in its design.)
It's also a bit unwieldy overall, and there is no backlighting or even
glow-in-the-dark buttons. Using it in the dark proved to be an exercise in
trial and error or waiting for those bright movie scenes and explosions to hit the
screen. The required buttons are all present and accounted for and the system
obviously allows you to control DVD functions as well as projector features
without requiring separate remotes. Remotes are cheap, and overall I found the
remote to be very disappointing and bland - I'd expect a little better from a
product designed to be a Lifestyle system for family use.
A nice thing to point out is that controlling DVDs with the remote is lightning quick. I was able to navigate DVD menus faster than I can ever remember controlling any DVD player. Whether it was selecting chapters, jumping through special features or just clicking the 'Next' or 'Skip' function the response on this system is amazing.
The Menu System
The menu system on the Optoma DV11 is simple and effective. I'd like a way to more easily back out of it than have to repeatedly hit the Menu button, but it worked well enough for setting up the system. There is also a submenu that controls the DVD player and has basic functions, most of which are set perfectly without any adjustments.
Image-I Menu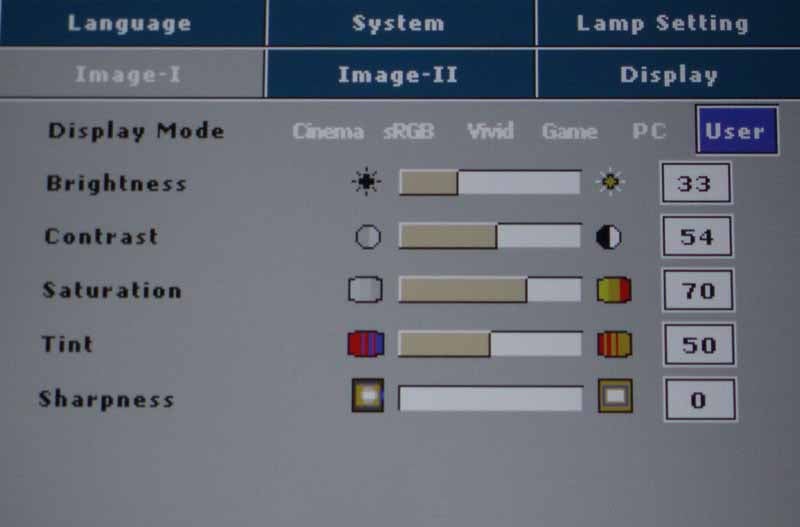 This menu system is where
most people will start and it's where you'll select the Display Mode for the
projector. If you are looking to crank out as much light as possible, engage
"Vivid" or "PC" mode. For home theater use we recommend the
Cinema mode. Once you make any adjustments in the Image-I or Image-II menus,
the Mode will change to User. After selecting the proper mode, you'll want to
use a setup disc Like Avia or Digital Video Essentials to calibrate the white
and black levels. If you don't have one of these discs, look for a DVD with the
THX logo on it and run the DVD Optimizer program that is always accessible from
the DVD menu.
This menu system is where
most people will start and it's where you'll select the Display Mode for the
projector. If you are looking to crank out as much light as possible, engage
"Vivid" or "PC" mode. For home theater use we recommend the
Cinema mode. Once you make any adjustments in the Image-I or Image-II menus,
the Mode will change to User. After selecting the proper mode, you'll want to
use a setup disc Like Avia or Digital Video Essentials to calibrate the white
and black levels. If you don't have one of these discs, look for a DVD with the
THX logo on it and run the DVD Optimizer program that is always accessible from
the DVD menu.
Image-II Menu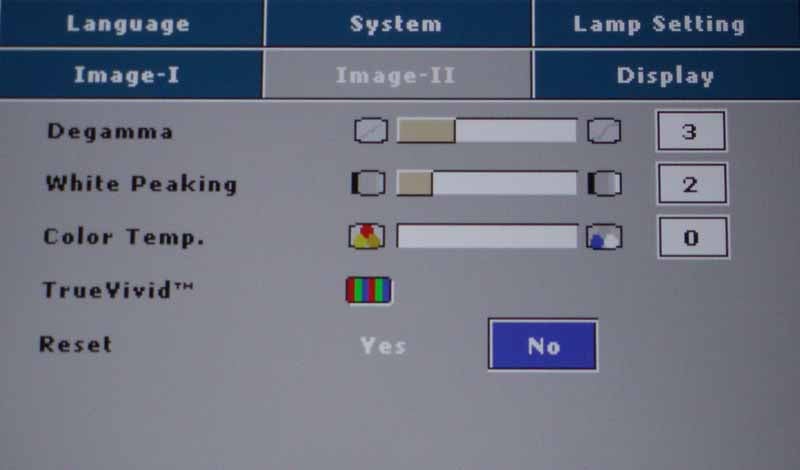 In the Image-II menu you have access to the more advanced image settings
such as Degamma ("Gamma" is an adjustment to compensate for the
non-linear nature of CRT displays, so in linear digital displays we refer to
the controls as Degamma), white-peaking, Color temperature, and RGB Gain &
Green cut (under the "TrueVivid" moniker). We found that white
peaking offered a way to enhance the apparent contrast of the image, though if
set too high it created and artificial look and crushed the white levels. Color
temperature results using an 80IRE field at default settings were as follows:
In the Image-II menu you have access to the more advanced image settings
such as Degamma ("Gamma" is an adjustment to compensate for the
non-linear nature of CRT displays, so in linear digital displays we refer to
the controls as Degamma), white-peaking, Color temperature, and RGB Gain &
Green cut (under the "TrueVivid" moniker). We found that white
peaking offered a way to enhance the apparent contrast of the image, though if
set too high it created and artificial look and crushed the white levels. Color
temperature results using an 80IRE field at default settings were as follows:
- Cinema - 7600K
- sRGB - 6500K
- Vivid - 7500K
- Game - 7300K
- PC - 7100K
We quickly found that setting the Color Temp to '0' ('1' is the Default) allowed us to achieve a color temperature of close to 6500K in the Cinema mode. This is what we based our measurements on in the Calibration section of the review. White Peaking is a setting that I found I liked. You could still get a relatively smooth gradient with the setting as high as 7 and it was almost impossible to get the maximum contrast potential out of the projector without having this function enabled. Make sure to re-adjust the Contrast after making any change to this setting. Sharpness should be set to the absolute minimum as it artificially sharpens the image on screen and creates harsher edges.
Display Menu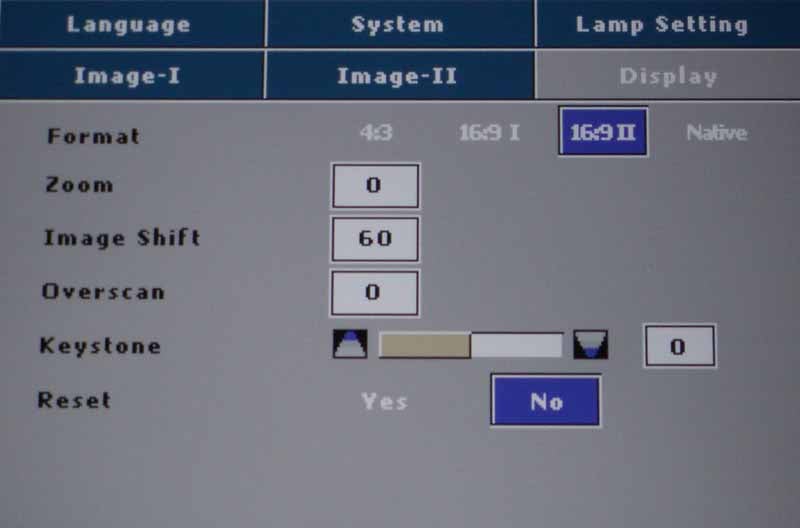 Playing with the picture
Format in the Display menu was our next stop. There are four options:
Playing with the picture
Format in the Display menu was our next stop. There are four options:
- 4:3 - uses the full 800x600 resolution of the projector
- 16:9 I - Scales the image to 800 wide by 450 tall
- 16:9 II - Scales the image up to 854x480, centering the image and cropping off 27 pixels from each side
- Native - delivers a 1:1 pixel representation of the inputs up to 576p, scales 720p signals to 800x720 centered and 1080i signals to 960x540 centered.
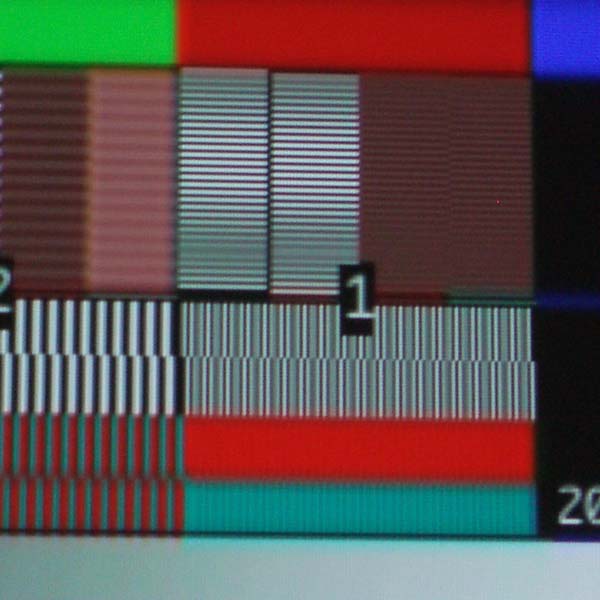
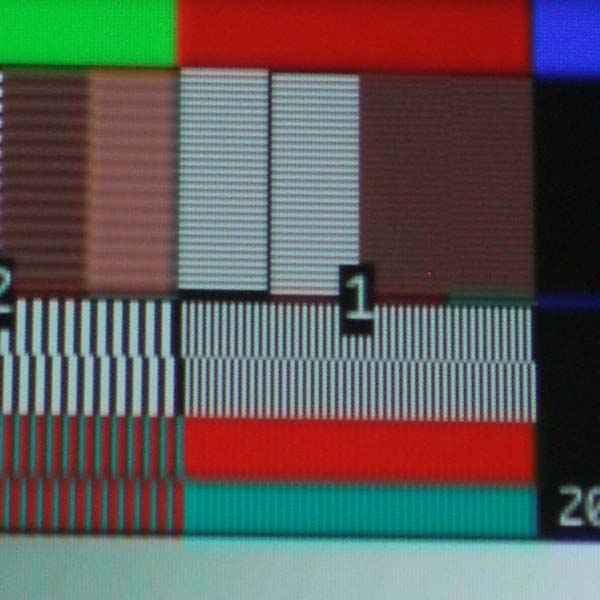
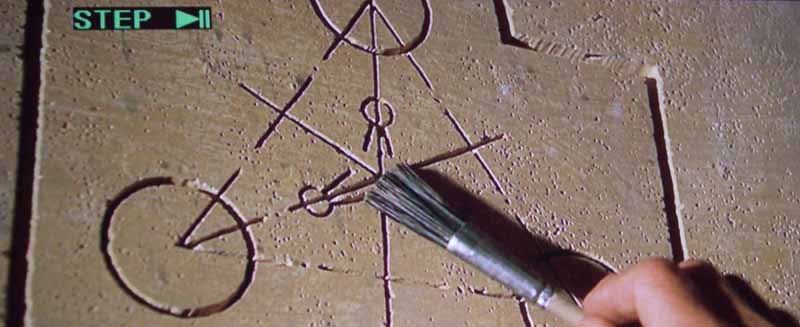
The bottom line here is that the DMD chip in the DV11 is 4:3 native, not 16:9 native as some reviewers have erroneously reported. It is a step up from the DV10 (854x480) if you plan to watch a lot of 4:3 content, but is actually a slight decrease in resolution if you're focused primarily on 480p material (widescreen or anamorphic DVDs). We found that the deinterlacing and scaling ability of the player was only marginal (more is mentioned about this below in the Benchmark Testing section) and based on what we saw with real-world material and test patterns, our recommendation is to utilize 16:9 I mode for most anamorphic DVD viewing. Native mode looked the cleanest, but also reduced the image size considerably and defaulted anamorphic DVDs out of their proper aspect ratio. Here are some screen captures using the different modes:
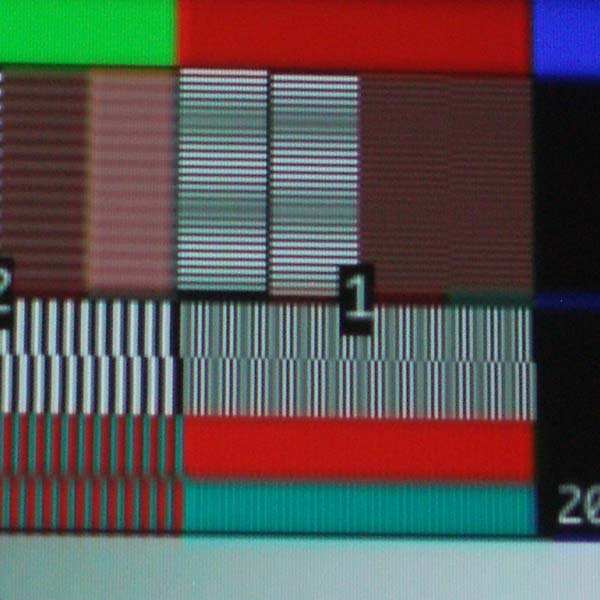
16:9 I mode (left); 16:9 II mode (right)
Native mode
Language, System and Lamp Setting Menus
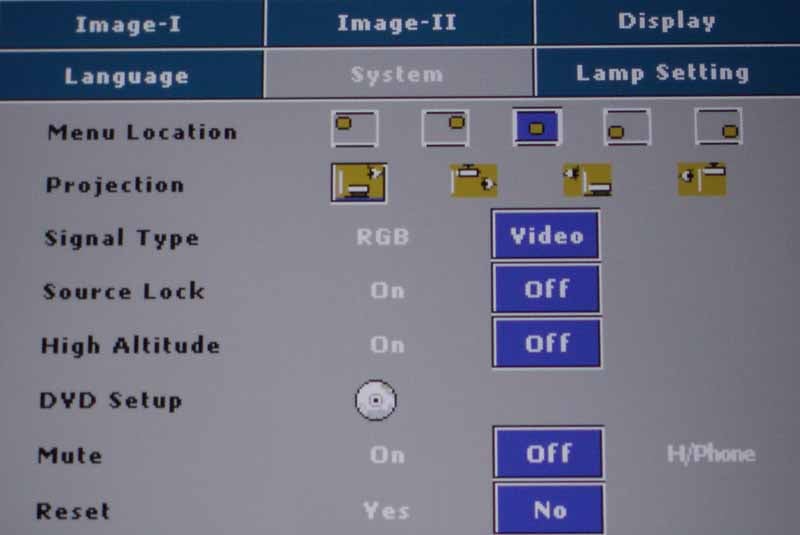 These remaining menus allowed configurations having to do with the
projector lamp, menu system and fan settings. Users can activate high altitude
mode to spin up the fan a bit more to compensate for thinner atmospheres. There
is also a mute function that either turns the speakers on, off, or routes the
volume control to the built-in 1/8-inch mini jack located on the back of the
unit (while simultaneously muting the speaker output). This is a really nifty
feature and makes the system perfect for watching movies when you don't want to
disturb the rest of the household. The only deficiency we found with using headphones
was that the system also picked up the noise induced by the DVD transport, so the
occasional track and layer changes were heard along with the main content. The
System menu also houses the DVD Setup submenu system.
These remaining menus allowed configurations having to do with the
projector lamp, menu system and fan settings. Users can activate high altitude
mode to spin up the fan a bit more to compensate for thinner atmospheres. There
is also a mute function that either turns the speakers on, off, or routes the
volume control to the built-in 1/8-inch mini jack located on the back of the
unit (while simultaneously muting the speaker output). This is a really nifty
feature and makes the system perfect for watching movies when you don't want to
disturb the rest of the household. The only deficiency we found with using headphones
was that the system also picked up the noise induced by the DVD transport, so the
occasional track and layer changes were heard along with the main content. The
System menu also houses the DVD Setup submenu system.
DVD Setup Submenu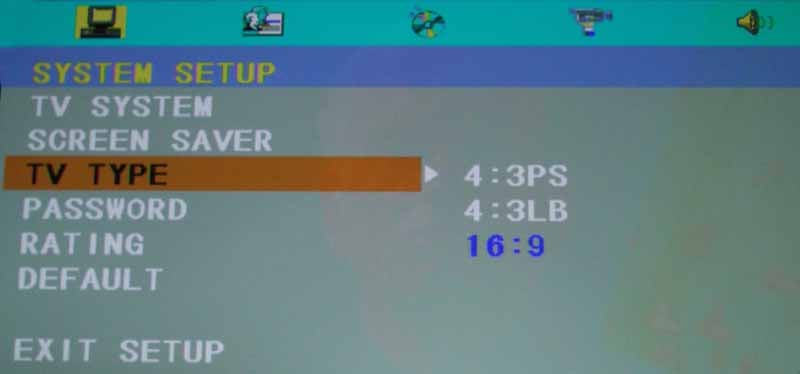 The DVD Setup submenu allows control over the audio output and aspect
ratio settings for the player (16:9, and 4:3 letterbox or pan & scan as
expected). You can set the S/PDIF output to RAW or PCM depending upon the type
of AV receiver you have (whether it supports Dolby Digital/dts or not). You can
also set ratings and password-protect the system so that you can create a
family-friendly system for viewing only the content you deem appropriate.
Brightness, Contrast and Saturation are configurable in the player, however
we'd avoid this unless you have some kind of special needs or deficiency that
needs to be compensated for specifically form the player.
The DVD Setup submenu allows control over the audio output and aspect
ratio settings for the player (16:9, and 4:3 letterbox or pan & scan as
expected). You can set the S/PDIF output to RAW or PCM depending upon the type
of AV receiver you have (whether it supports Dolby Digital/dts or not). You can
also set ratings and password-protect the system so that you can create a
family-friendly system for viewing only the content you deem appropriate.
Brightness, Contrast and Saturation are configurable in the player, however
we'd avoid this unless you have some kind of special needs or deficiency that
needs to be compensated for specifically form the player.
Optoma DV11 Calibration & Benchmark Testing
Calibration – Getting Those Black Levels Right!
 I do not recommend
calibrating this projector. Frankly, it didn't seem to need it. With the
measurements we took, once we selected the correct settings, the performance
was on par with what we'd want to see in our particular viewing room. If there
was a deficiency it would have to be that it had a slight saturation loss for
both green and red. We have seen a LOT
worse, so it didn't particularly bother us.
I do not recommend
calibrating this projector. Frankly, it didn't seem to need it. With the
measurements we took, once we selected the correct settings, the performance
was on par with what we'd want to see in our particular viewing room. If there
was a deficiency it would have to be that it had a slight saturation loss for
both green and red. We have seen a LOT
worse, so it didn't particularly bother us.
We utilized datacolor’s ColorFacts Professional 6.0 software to calibrate and measure the grayscale response of the DV11. What we found was that the initial Color Temp settings were not perfect, but once we selected '0' (instead of the default '1') everything snapped into place.
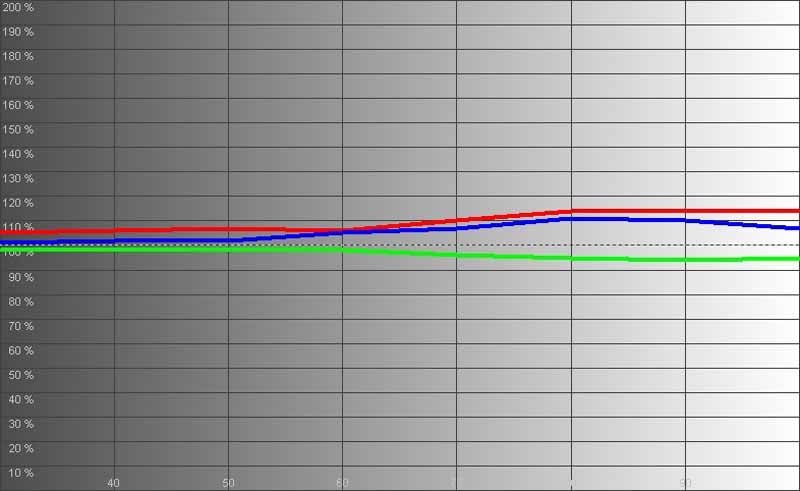
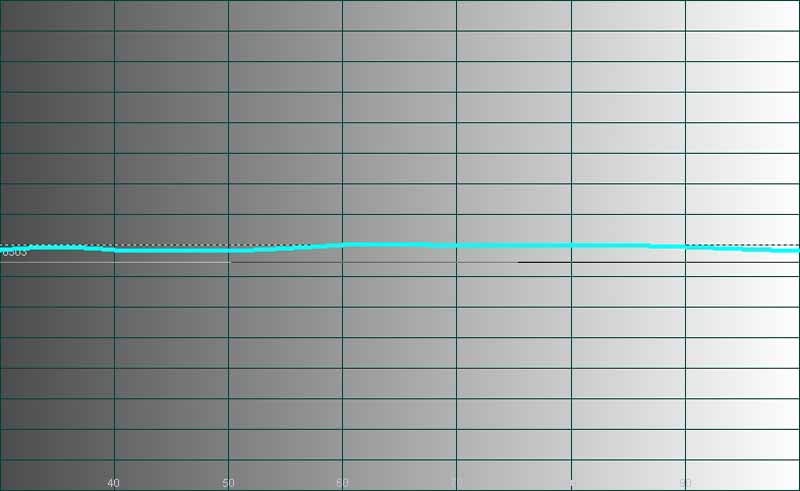
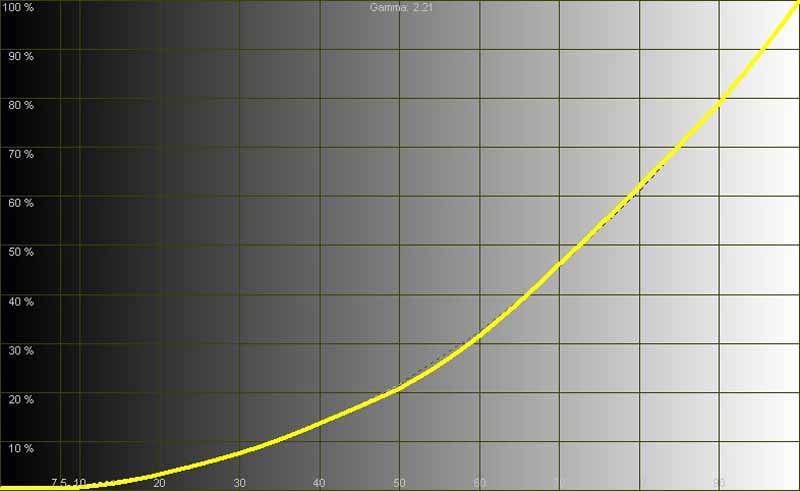
Here you see that we measured a not-bad-at-all grayscale from 30 to 80 IRE. Color temperature was excellent once we adjusted the setting and was more linear than many more expensive displays I've encountered this year. The Gamma measurement came in at 2.21 - which is about perfect, unless you prefer a slightly brighter picture.
We pulled in a little under 19 fL in Cinema mode and over 48 fL in PC mode! To say that this projector can be bright is an understatement. My notes above indicated that we were able to watch movies in significant ambient light and you will too.
Contrast was good in a general sense but the DV11 didn't break any records for deep blacks. Performance was more akin to an average LCD projector and light leakage from the casing didn't help when trying to make the room as black as possible. None of this seemed to affect the enjoyment factor when playing titles like Star Wars Episode III: Revenge of the Sith or animated films like The Incredibles.
Daytime Viewing Experiences
The system did very well during the day. In fact, I was able to engage PC and Vivid modes to view a movie in plenty of ambient light. A darkened room is still going to deliver the best picture, but it's good to know that you can still eat a meal "picnic-style" and enjoy a family movie without having to black out the room.
Audioholics/HQV Bench Testing Summary of Test Results
Perfect Score is 130
Optoma DV11 Benchmark Score: 40 (Average performer)
|
Test |
Max |
Results |
Pass/Fail |
|
Color Bar |
10 |
5* |
Pass |
|
Jaggies #1 |
5 |
0 |
Fail |
|
Jaggies #2 |
5 |
0 |
Fail |
|
Flag |
10 |
0 |
Fail |
|
Detail |
10 |
0 |
Fail |
|
Noise |
0 |
0 |
Fail |
|
Motion adaptive Noise Reduction |
10 |
0 |
Fail |
|
Film Detail |
10 |
10 |
Pass |
|
Cadence 2:2 Video |
5 |
0 |
Fail |
|
Cadence 2:2:2:4 DV Cam |
5 |
0 |
Fail |
|
Cadence 2:3:3:2 DV Cam |
5 |
0 |
Fail |
|
Cadence 3:2:3:2:2 Vari-speed |
5 |
0 |
Fail |
|
Cadence 5:5 Animation |
5 |
0 |
Fail |
|
Cadence 6:4 Animation |
5 |
0 |
Fail |
|
Cadence 8:7 animation |
5 |
0 |
Fail |
|
Cadence 3:2 24fps film |
5 |
5 |
Pass |
|
Scrolling Horizontal |
10 |
10 |
Pass |
|
Scrolling Rolling |
10 |
10 |
Pass |
|
Total Points |
130 |
40 |
|
* Passes fully in native 1:1 pixel mode but blurs images when scaling 16:9 images to the screen.
Comments on HQV Testing
Obviously we tested the DV11 with its on-board DVD player. The results were somewhat disappointing, but there is a difference between benchmarking and real-world. While I did indeed see jaggies on the test patterns, I didn't observe much of this in full-motion video during DVD viewing except when there were very slow movements of angled lines that had just the right amount of contrast. Another good item to note was that I really didn't have a problem with RBE (rainbow effect) when watching films or even when specifically attempting to encourage the anomaly through test patterns. This surprised me because the system uses a basic 2x 4-segment color wheel - perhaps simple is best sometimes. Layer changes on the integrated DVD player were fast like the menu navigation - a speedy .45 seconds.
Optoma DV11 Viewing Evaluation and Conclusion
Viewing Evaluation – HDTV and Movies
I found that when sitting the appropriate distance from the screen (about 2x the screen width) the picture was typically vibrant, lifelike and enjoyable. This is a nice system, despite all the tech talk of deinterlacing, pixel resolution and scaling. The bottom line is how does it look with movies, and I felt that, overall, it did very well indeed.
DVD: The Fifth
Element (Superbit)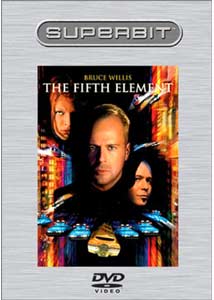 I pulled up my favorite
movie and loaded it into the slotted drive of the DV11. The first thing I noted
was that resolution and detail were a tad lacking due to the scaling of the
system and its 800x600 resolution. Screen door effect (seeing the pixels on the
projector screen) was very evident on the 80-inch screen unless you were about
11-12 feet away. At that distance, the picture looked much better and any
resolution issues seemed to disappear. The goal with this system is to get behind it. If you can put the projector
in front of you, it is likely that you will be much more pleased with the
picture quality. Plus, if you utilize the on-board speakers, you'll be in a
better position to hear them in the proper frame of reference. Once I had
myself positioned properly I noticed that the colors really popped off the
screen and the image had a very nice depth to it. Black levels were good, but
not great - with a little ambient light in the room being a likely scenario for
this system it probably won't be an issue.
I pulled up my favorite
movie and loaded it into the slotted drive of the DV11. The first thing I noted
was that resolution and detail were a tad lacking due to the scaling of the
system and its 800x600 resolution. Screen door effect (seeing the pixels on the
projector screen) was very evident on the 80-inch screen unless you were about
11-12 feet away. At that distance, the picture looked much better and any
resolution issues seemed to disappear. The goal with this system is to get behind it. If you can put the projector
in front of you, it is likely that you will be much more pleased with the
picture quality. Plus, if you utilize the on-board speakers, you'll be in a
better position to hear them in the proper frame of reference. Once I had
myself positioned properly I noticed that the colors really popped off the
screen and the image had a very nice depth to it. Black levels were good, but
not great - with a little ambient light in the room being a likely scenario for
this system it probably won't be an issue.

DVD: The
Incredibles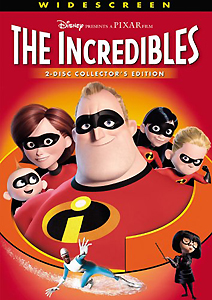 It's hard to make The Incredibles look anything other than
stellar, and the DV11 did as we'd expect. Colors were vivid and the animation
looked wonderful on our 80-inch Elite Screens system. If you look at the battle
robot scene below, you'll note that there is a lot of detail in the black
levels. This is because I was able to get a consistent value from 0-40 IRE
which brought out the details in the shadows and made sure they were visible to
the viewer. There are a lot of intricate textures in this film and it was nice
to see them pop out with the MovieTime DV11.
It's hard to make The Incredibles look anything other than
stellar, and the DV11 did as we'd expect. Colors were vivid and the animation
looked wonderful on our 80-inch Elite Screens system. If you look at the battle
robot scene below, you'll note that there is a lot of detail in the black
levels. This is because I was able to get a consistent value from 0-40 IRE
which brought out the details in the shadows and made sure they were visible to
the viewer. There are a lot of intricate textures in this film and it was nice
to see them pop out with the MovieTime DV11.

Conclusion
The DV11 is a successful lifestyle product. It makes for about the simplest portable entertainment system available on the market today. You pop it out, pull up (or down) a screen - and go. Nothing could be simpler and nothing could be more family-friendly. For that reason alone I'd recommend this product. If you are looking for benchmark performance in a projector or would like a dual-use system for office presentations and home use there are other choices that may fare better in our benchmark testing. Though I'd like to see solid 16:9 chips in any future models (the main and perplexing downside of this unit) I was pleased overall with the performance of the DV11 given its intended use.
The Score Card
The scoring below is based on each piece of equipment doing the duty it is designed for. The numbers are weighed heavily with respect to the individual cost of each unit, thus giving a rating roughly equal to:
Performance × Price Factor/Value = Rating
Audioholics.com note: The ratings indicated below are based on subjective listening and objective testing of the product in question. The rating scale is based on performance/value ratio. If you notice better performing products in future reviews that have lower numbers in certain areas, be aware that the value factor is most likely the culprit. Other Audioholics reviewers may rate products solely based on performance, and each reviewer has his/her own system for ratings.
Audioholics Rating Scale
 — Excellent
- — Very Good
- — Good
- — Fair
- — Poor
| Metric | Rating |
|---|---|
| Detail and Resolution | |
| Deinterlacing & Scaling | |
| Contrast and Black Levels | |
| Color Reproduction | |
| Noise Reduction | |
| Calibration Options | |
| Build Quality | |
| Ergonomics & Usability | |
| Ease of Setup | |
| Features | |
| Remote Control | |
| Fit and Finish | |
| Performance | |
| Value |
Clint Deboer was terminated from Audioholics for misconduct on April 4th, 2014. He no longer represents Audioholics in any fashion.
View full profile