
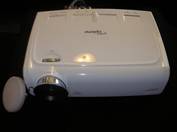
Optoma HD72 DLP Projector Review
Optoma HD72 DLP Projector
- Product Name: HD72 DLP Projector
- Manufacturer: Optoma
- Distributor: ProjectorPeople
- Performance Rating:


- Value Rating:
- Review Date: March 08, 2006 19:00
- MSRP: $ 1999
|
Display Technology: Single 0.65-inch DarkChip2™ DLP™ technology from Texas Instruments Resolution: 1280x768 Brightness: 1300 Lumens Contrast Ratio: 3500:1 Full On/Off (5000:1 In AI Mode) Noise Level: 27dB typical Lamp Life: 3000 Hours standard Horizontal Scan Rate: 15-75 kHz Vertical Scan Rate: 43-85 Hz Image Size: 28-inches to 304-inches Throw Ratio: 1.5 to 1.9 (Distance/Width) Uniformity: 90% Or Better Keystone Correction: Horizontal and Vertical |
Video Compatibility: NTSC, PAL, SEACAM, EDTV, HDTV Computer Compatibility: UXGA, SXGA, WXGA, XGA, SVGA, VGA Input Connectors: HDMI, HDCP-DVI, Component Video, S-Video, Composite Video, RS-232 I/R Pickup Receivers: Front and Rear 12-Volt Trigger Dimensions: 13.56” W x 3.65” H x 9.67” D (344 x 94 x 246 mm) Weight: 7 Pounds (3.2kg) Power Supply: 100-240 Volts 50-60Hz Projection Methods: Front, Rear, Ceiling Mount, Table Top Warranty: 2-Year
Limited With Zero Dead Pixel Policy |
Pros
- Price
- Excellent detail, black level and color
- Very good internal video processor
- Every input you would need
- Quiet
- Modern styling
- Excellent warranty including a no dead pixel policy
Cons
- Remote has sporadic operation
- Standby light blinks on/off until hard shut down
- Excessive offset may not be suitable for some installations
- Small amount of light leakage from side of projector
Optoma HD72 Features
We were first introduced to the new Optoma HD72 in January at the 2006 Consumer Electronic Show . We were very interested in conducting a review of this projector based on what we viewed at the Optoma booth.
The new Optoma HD72 breaks the price barrier for 1280x768p DLP projectors, selling at just $1999 MSRP. Our friends at Projector People were kind enough to lend us a demo unit for the purpose of this review.
Features
The Optoma HD72 incorporates many key features generally not found on projectors at this price point. The most notable features of this projector are:
-
Optoma has included a 2 year limited warranty with a
ZERO dead pixel
policy
. Purchasing a projector only to get it home and discover it has one or two dead pixels can
be very annoying. Having to live with dead pixels for several years can be down right depressing. We
applaud Optoma for putting their customers first in this regard and hope other manufactures will follow
their example.
That's why we decided to place this at the top of the features list because
it's so important
- Advertised 3500:1 Full On/Off contrast ratio (5000:1 with AI activated).
- Advertised 1300:1 ANSI lumen output.
- 7 Segment 4x speed color wheel (GRBWGRB).
- The Optoma HD72 boasts a 3000-hour lamp life. That's a long specification for a projector in the $2000 price class. Obviously, we cannot verify this claim in a review and will take Optoma at its word on the longevity specification for the HD72. Realize that using higher brightness levels and picture modes will reduce bulb life expectancy.
- Brilliant Color: This new technology introduced by Texas Instruments is designed to deliver higher vibrancy and overall brightness and claims to provide truer colors to the image.
- Image AI: This feature is designed to automatically adjust the light output of the projector, to deliver better contrast ratios while marinating high ANSI lumen output. This is the first projector in or near this price class to offer this feature. Many projectors priced above the HD72 offer dynamic iris selection of either high lumen output or high contrast but not both at the same time.
- True Vivid: This color enhancement processor claims to add a deeper more 3-D looking image.
- TrueVision: Is a video processor that eliminates jaggies and smoothes the image for a more film like look.
- The Optoma HD72 has a specified fan noise level of just 27 dB in normal operation. While fan noise is not really a feature, it is an important consideration when contemplating your next projector purchase and we decided to place the information in the feature set.
- The HD72 has dual digital inputs HDMI and HDCP compliant DVI connections. This may be a very important consideration if your system has no video switching or you prefer to route video sources directly to the projector instead of through a video-switching device that could possibly degrade the signal performance.
Optoma HD72 Build Quality, Remote & Setup
What's inside the box?
The Optoma HD72 is well packed from the manufacturer to prevent shipping damage. The projector includes the following accessories: one set of 6-foot component video cables, one composite video cable, one s-video cable, one RS-232 cable, a backlit remote control, a lens cap, a user manual, a quick start guide and a power cord.
Physical Characteristics
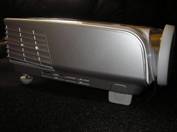
The Optoma HD72 is a very handsome looking projector. The white gloss painted top, metallic silver sides, chrome zoom, and focus bezel make it look more like a fine Italian sports car than a home theater projector.
Remote Control
The backlit remote supplied with the HD72 is very ergonomic and the buttons are well laid out. We liked the inclusion of brightness, contrast, and aspect ratio buttons, on the remote. This provided easy to make adjustments on the fly.
While we give Optoma high marks for the design of the remote. The functionality of the remote was abysmal. The remote was almost useless at any distance beyond 8 feet and the operation was very sporadic. We found it very difficult to make calibration changes and enter the user menu using the remote. This may be a result of the remote, IR receiver pickups, or IR receiver placement on the projector housing.
Ceiling Mount Note
Be very careful when selecting a mount for this projector, not all universal ceiling mounts will work because of the unusual mounting hole pattern. We have learned (the hard way) that trying to get universal mounts to install correctly on projectors with strange mounting bolt patterns, does not always work.
Projector Mount or Prototype D-7 Klingon Battle Cruiser?
Set-Up
You Want Connectability?
Having this many inputs on a projector builds instant flexibility into your system. If your processor does not have HDMI or DVI switching or you don't like to run video signal through your processor, you can simply use DVI, HDMI, and component cables run directly to the projector. This is a great feature of having multiple digital inputs on a projector. In this configuration, you can manually select the input on the HD72 or let it search for the active input. Is that flexible enough for you?
Installation Consideration
Throw distance is the amount of distance you will need between the screen and the projector's front lens to fill the screen with the projected image. The HD72 has a zoom factor of about 1.2x, meaning that on a 92-inch diagonal screen (45 舡 x 80 舡 ), the projector would need to be installed at a minimum of about 10.6 feet and a maximum of about 12.7 feet. If you don't feel like doing the math, Optoma provides a distance calculator on their website.
Another very important consideration when contemplating a front projection installation is the projector offset. The HD72 is a fixed lens projector, which means it has no mechanical lens shift and it must be installed at a predetermined height for proper installation geometry. The Optoma HD72 does include vertical and horizontal image shift that moves the image up, down or side-to-side within the panel, but this should not be confused with a mechanical lens shift function.
The fixed projector offset for this projector is about 27%-32%, which is a pretty large offset. The use of this projector and a 92-inch diagonal screen should not be a problem in rooms that have standard ceiling heights of 8-feet when the projector is mounted on the ceiling. Using this projector in rooms with standard ceiling heights of 8-feet and 106-inch screens may be a problem due to the offset.
Optoma HD72 Menu System & Calibration
Image Menu
The HD72's menu system is easy to operate and comprehend. The user controls are expansive and should enable the user to get good calibration results without entering service menus. The user menu contains four headings labeled Image , Display , Setup and Options .
Under the Image menu you will find Mode, Contrast, Brightness, Color, Tint, and Sharpness adjustments. Selecting 'Mode' brings up a sub menu that has four different preset but adjustable video settings of: Cinema, Bright, TV, RGB and User.
We selected the 'Cinema' mode because it was the most suitable for home theater applications. Choosing 'Bright' increased the light output tremendously and also made the fan spin up to a much more audible level.
Selecting 'Advanced' from the Image menu brought up the next page of advanced adjustments: Degamma, Brilliant Color, True Vivid, Color, Temperature, Image AI, RGB Gain and Bias, Input Sources and Color Space.
Selecting 'Degamma' brings up a sub-menu with the following choices: Film, Video, Graphics and PC. Selecting 'Film' would be the best choice for home theater applications.
Brilliant Color is defined as a color processor that enables higher brightness while maintaining more vibrant colors. We found that setting Brilliant Color between 0 to +3 to be the best setting for our HD72. Anything more than +3 made the image look unnatural.
True Vivid is defined (cryptically) as a color processor that increases picture vividness. We chose to leave TrueVivid at 0.
Color Temperature adjusts the color of the image increments from
'0'
to
'2'. The higher settings raise Kelvin thus producing a cooler looking image. We left the
color temperature in the default
'1'
position.
Image AI is defined as an image processor that improves contrast by optimizing the brightness of the lamp. We found that the process must modulate the lamp output because we experienced flickering at times when AI was activated.
Image AI did improve the overall brightness and contrast of the image but we felt leaving it off was the best position for our review. One other thing to consider about AI is that, when activated, the fans in the projector speed up and the noise level becomes much more apparent.
Selecting RGB Gain and Bias brings up page 3 of the image menu and
it contains all the settings for adjusting the Red, Green, and Blue
gain and bias for achieving proper color temperature and grayscale
tracking. An input must be active before this menu will appear.
Display Menu
Selecting the heading Display reveals options for: Format, Zoom, Overscan, Horizontal Image Shift, Vertical Image Shift, Horizontal Keystone, Vertical Keystone, and PC Mode.
'Format' allows you to select different aspect ratios including 4:3, 16:9, Native, and Letterbox.
'Zoom' is self-explanatory. It magnifies the image. Leaving Zoom in the off position is best for normal use.
'Overscan' allows adjustment of the size of the image that is cropped around the border of the image. Using the Avia DVD overscan test pattern, the user can check for overscan and adjust if necessary.
Horizontal and Vertical image shift moves the image up and down, this is not to be confused with mechanical lens shift. The image shift moves the image up and down within the 16:9 frame.
Horizontal and Vertical keystone can be used to square up an image when the projector is tilted up or down .We do not advise the use of digital keystone because it will degrade the image and create uniformity issues. If you install the projector in the geometrically correct position you will not need to use keystone.
Setup Menu
Under the heading 'Setup' you wil see options for Language, Projection, Display Type, and Signal.
Under 'Language' the user can select a language to read the menus
'Projection' allows the user to select the type of projection install. Front, desktop, rear desktop, front ceiling, or rear ceiling.
'Display Type' lets you choose the pixel type/aspect ratio: 16:9 (1280x720) or 16:10 (1280x768). So, what exactly is 16:10? This mode allows the user to display computer resolutions of 1280x768 or 1024x768 in a full frame with no cropping.
The use of the 16:9 mode would be the best choice for standard DVD and HDTV.
Selecting 'Signal' brings up a sub utility menu with the following adjustments for computer inputs: Phase, Tracking, Horizontal position, and Vertical position
'Phase' allows the user to change the display data frequency to match the frequency of your computer graphics card. This is very useful if the projector displays flicker or vertical noise bar.
'Tracking' enables adjustment of synchronization of the signal timing to correct flickering or an unstable image.
'Horizontal Position' adjusts the image on the screen horizontally.
'Vertical Position' adjusts the image on the screen vertically.
Options Menu
The last menu heading is labeled 'Options'. Here, the user will find Menu Location, Source Lock, High Altitude, Auto Power Off, Reset, Lamp Hour, Lamp Reminding, Bright Mode and Lamp Reset.
'Menu Location' allows the user to place the menu at various locations on the screen.
'Source Lock' prevents the projector from searching for other signals if the current signal on the input is lost. When this is turned on, the projector will search for a signal on the user specified input port.
'High Altitude'is a very handy setting if the user is located in a
mountain area. The projector will operate the fans at a higher speed to compensate for the thinner
atmosphere. This mode is LOUD.
'Auto Power Off' allows the projector to turn itself off at the user-selected time in minutes if there is no signal detected on the input.
'Reset' restores the projector back to the factory default values.
Selecting 'Lamp Settings' brings up a utility sub-menu with the following options: Lamp Hour, Lamp Reminder, Bright Mode, and Lamp reset.
'Lamp Hour' displays the time the lamp has been used.
'Lamp Reminder' displays a warning message to replace the bulb 30 hours before the suggested lamp replacement time.
'Bright Mode' can be set to ON to increase the brightness or OFF for normal viewing. The correct setting for home theater applications would be OFF. This will also lower the noise level of the fan.
'Lamp Reset' resets the lamp timer after lamp replacement.
Calibration
Out of the box, our review sample HD72 color temperature and gray scale tracked consistently from 30 IRE to 100 IRE but was on the cool side, tracking at about 8000K. Chances are, with a good calibration DVD and some calibration experience; you would obtain good calibration results using the HD72's expansive calibration menu. Using the Sencore 5000 color analyzer, we were able to achieve some pretty consistent color temperature readings (+ or - 2%) at D-6500K by adjusting the user controls in the set up menu.
We found that turning AI on and off had very little effect of the post calibration numbers, this indicates that if you calibrate your projector with AI turned off and then decide to activate it later your calibration will remain consistent. As indicated earlier in the review we found that the Brilliant color position of +3, True Vivid 0, and Color Temperature 1 gave us the best calibration and image results.
Audioholics/HQV Bench Testing Summary of Test
Results
Perfect Score is 130
|
Test |
Max
|
Component
|
Component
|
|---|---|---|---|
|
Color Bar |
10 |
10 |
Pass |
|
Jaggies #1 |
5 |
5 |
Pass |
|
Jaggies #2 |
5 |
5 |
Pass |
|
Flag |
10 |
10 |
Pass |
|
Detail |
10 |
5 |
Pass |
|
Noise |
10 |
0 |
Fail |
|
Motion adaptive Noise Reduction |
10 |
0 |
Fail |
|
Film Detail |
10 |
10 |
Pass |
|
Cadence 2:2 Video |
5 |
0 |
Fail |
|
Cadence 2:2:2:4 DV Cam |
5 |
0 |
Fail |
|
Cadence 2:3:3:2 DV Cam |
5 |
0 |
Fail |
|
Cadence 3:2:3:2:2 Vari-speed |
5 |
0 |
Fail |
|
Cadence 5:5 Animation |
5 |
5 |
Pass |
|
Cadence 6:4 Animation |
5 |
5 |
Pass |
|
Cadence 8:7 animation |
5 |
0 |
Fail |
|
Cadence 3:2 24fps film |
5 |
5 |
Pass |
|
Scrolling Horizontal |
10 |
10 |
Pass |
|
Scrolling Rolling |
10 |
10 |
Pass |
|
Total Points |
130 | 80 |
|
480i Component Video Connection
Comments on HQV Testing
We were very surprised to see such a capable video processor in such a low cost projector. The scaling and de-interlacing performance of the HD72 surpassed many of the DVD players we have reviewed recently. The Jaggies tests and Flag test were darn near perfect. The HD72 did, however, struggle with noise reduction. We found that lowering the sharpness control to its lowest level of '16' did help, but a considerable amount of noise still remained.
We were very surprised that the processor handled with ease the Film Detail test - locking on and staying locked throughout the sequence with no moiré detected. The HD72 passed the most important Cadence test of 3:2 - 24fps and also had no trouble with the Scrolling Horizontal or Rolling Credits test. This indicated that the processor onboard the HD72 can faithfully detect un-flagged film material and bad edits. The video processor/de-interlacer used in the HD72 is the new DDP-3020.
Optoma HD72 Viewing Tests and Conclusion
Using the Denon DVD-2910 DVD player, set for HDMI and 720p output, we began our viewing evaluation in a totally dark room. Powering up the projector, the HD72 automatically searched for the active input and locked onto the signal. As the projector began to warm up in the dark room, we did note a small amount of light leakage emanating from the side fan discharge vent. This would not be a problem if the projector is ceiling mounted but may be a distraction for individuals that install the projector on a table top in front of the viewing position.
 DVD: Final Fantasy: The Spirits Within
We selected the older but near-flawless DVD
Final Fantasy
. The opening passage with Dr. Aki Ross standing and looking toward
the horizon is an excellent passage for evaluation. The Optoma HD72 did
a wonderful job of showing the near perfect detail in her face. The
background full of pastel color was near perfect with smooth, vibrant,
deep color. As the passage progresses, Aki covers her eyes as an atomic
blast occurs in the distance.
With this particular scene, as the sky becomes increasingly brighter the HD72 exhibited some minor solarization and posterization. At first, we thought this may have been a result of calibration error on the Denon DVD-2910. But, checking the exact same scene on one of our reference projectors, the Sharp DT-400, the scene was artifact-free. The artifact was very brief and only the pickiest videoholic would even detect the brief occurrence. The level of detail achieved by the Optoma HD72 was incredible and far exceeded our expectations given the price point of the projector.
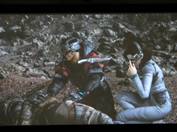 As the movie progressed, there was a passage where Aki and Captain
Gray were leaning down over the corpse of a soldier to retrieve a
spirit (Hey, it's an Asian-sourced film, so roll with it!) The HD72 did a wonderful job of showing all the detail in the
clip. And when we say detail, simply take a quick look at this scene - you can see that they took great pains to make the environments seem highly detailed and three-dimensional.
As the movie progressed, there was a passage where Aki and Captain
Gray were leaning down over the corpse of a soldier to retrieve a
spirit (Hey, it's an Asian-sourced film, so roll with it!) The HD72 did a wonderful job of showing all the detail in the
clip. And when we say detail, simply take a quick look at this scene - you can see that they took great pains to make the environments seem highly detailed and three-dimensional.
The blacks and dark grays of the rocky background looked absolutely wonderful. The
detail and contrasting color in Captain Gray's environment suit were outstanding and the image was
very smooth and artifact free.
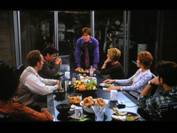 DVD: Hollow Man
With the excellent results achieved with the
HD72 viewing Final Fantasy, we decided to try the near-reference quality DVD,
Hollow Man
. This
DVD is loaded with videophile quality material to evaluate video components. In this passage, the HD72
displayed the inky black table perfectly. The color of the fruit in the bowl looked natural, dynamic,
vibrant, and yummy. The flesh tones and hair color of the actors looked accurate, as well.
Looking at the darker portions of the scene, we did detect a very small amount of noise. Once again, we checked and compared this scene with our Sharp DT-400 reference projector, and it displayed no noise with the same set up. Regardless of the minor issue with noise, the HD72 excels in color rendition and black level.
 We decided we would like to get a better look at how the HD72 would
perform on a close up with flesh tones. The HD72 did not disappoint.
Flesh tones, once again looked accurate and natural. The actors'
contrasting hair and lip color was on the money. The objects in the
background had definition, and there was no noise detected in the
scene. Throughout the DVD evaluation process, we tried to detect
rainbows (RBE).
We decided we would like to get a better look at how the HD72 would
perform on a close up with flesh tones. The HD72 did not disappoint.
Flesh tones, once again looked accurate and natural. The actors'
contrasting hair and lip color was on the money. The objects in the
background had definition, and there was no noise detected in the
scene. Throughout the DVD evaluation process, we tried to detect
rainbows (RBE).
There were only a few brief times that we detected the effect; this is when we forced our eyes to dart around looking for them. Under normal viewing conditions we were unable to detect the phenomenon.
 From our seated viewing position of 12.5 feet back, observing the
92-inch diagonal screen we were unable to see any significant screen
door effect. The only brief instance that we viewed SDE was on a total
white background. SDE should not be considered a problem with the HD72
at normal viewing distances because the projector has excellent fill
factor and pixel structure is not noticeable from a normal viewing
distance of about 1.5x the screen width.
From our seated viewing position of 12.5 feet back, observing the
92-inch diagonal screen we were unable to see any significant screen
door effect. The only brief instance that we viewed SDE was on a total
white background. SDE should not be considered a problem with the HD72
at normal viewing distances because the projector has excellent fill
factor and pixel structure is not noticeable from a normal viewing
distance of about 1.5x the screen width.
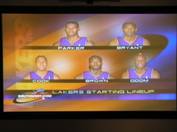
With the very impressive performance the Optoma HD72 exhibited with DVD material, we wanted to see how it would handle standard definition and HDTV broadcasts. Many individuals watch TV with the lights on. We decided that's the way we wanted to evaluate the HD72. We were astonished that the HD72 did such good job of lighting up our Carada Brilliant White screen with all the light in the room in the low lamp Cinema mode. We set the HD72 up just in time for the tip off of the Lakers vs. Kings basketball game in standard definition.
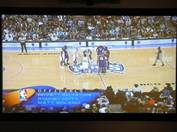
The projected image was slightly washed out with the lights on and did suffer from some artifacting but we could have happily watched the entire game with the lights on with this projector and screen combination. Switching over to High Definition was like looking through an open window. The HD72 produced extremely high levels of detail and definition when displaying High Definition content. Every whisker, strand of fir, and blade of grass was there to view in all its high definition glory.
Operation report
Throughout the entire evaluation period, the Optoma HD72 never failed to recognize an active signal. There were many times we simply pulled the signal cable and connected another source. The Optoma always detected the new signal and locked on regardless of the input or resolution. The projector operated flawlessly the entire time we had it for the review and in no instance did the Optoma fail to operate or shut down.Shutting down the HD72 places the projector in a cool down cycle that spins the fans at a faster rate. When the projector is shut down in standby mode the power indicator light remains flashing green. The user must physically toggle the hard power On/Off button to stop this action. This may be distracting to some people.
Conclusion
The Optoma HD72 projector produced incredibly sharp, well-defined images. It also has some of the best colors and black levels we have seen in a projector under $3500. The projector's input flexibility, impressive feature set, and styling are things normally found on projectors at much higher price points. Optoma's impressive two-year warranty and no dead pixel policy make this an easy recommendation. The lack of lens shift may be a consideration for those who cannot mount the projector precisely within a home theater environment.
For those of you with budgets fixed below $2500 looking for a DLP or LCD projector, the Optoma HD72 should be placed at the top of your shopping list. The HD72 is not without faults as outlined in the review but if you can accommodate the projector in your room you should seriously consider this new low priced DLP. It simply blows our mind that the consumer can now purchase this level of performance for $2000. If this isn't the videoholic's hay day, then we don't know what it is. But we do know it is highly recommended.
Get a SPECIAL Audioholics Price from ProjectorPeople.com
MSRP: $1999
(888) 289-6786
http://www.optomausa.com
Get the Best Price Online from ProjectorPeople.com
The Score Card
The scoring below is based on each piece of equipment doing the duty it is designed for. The numbers are weighed heavily with respect to the individual cost of each unit, thus giving a rating roughly equal to:
Performance × Price Factor/Value = Rating
Audioholics.com note: The ratings indicated below are based on subjective listening and objective testing of the product in question. The rating scale is based on performance/value ratio. If you notice better performing products in future reviews that have lower numbers in certain areas, be aware that the value factor is most likely the culprit. Other Audioholics reviewers may rate products solely based on performance, and each reviewer has his/her own system for ratings.
Audioholics Rating Scale
 — Excellent
- — Very Good
- — Good
- — Fair
- — Poor
| Metric | Rating |
|---|---|
| Detail and Resolution | |
| Deinterlacing & Scaling | |
| Contrast and Black Levels | |
| Color Reproduction | |
| Noise Reduction | |
| Calibration Options | |
| Build Quality | |
| Ergonomics & Usability | |
| Ease of Setup | |
| Features | |
| Remote Control | |
| Performance | |
| Value |