
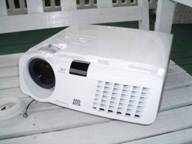
Optoma HD70 Projector Review
Optoma HD70 DLP Projector
- Product Name: HD70 Projector
- Manufacturer: Optoma
- Performance Rating:

- Value Rating:
- Review Date: October 18, 2006 20:00
- MSRP: $ 1399
|
Brightness: 1000 ANSI lumens (high power mode) |
Keystone Correction: horizontal/vertical (digital) Uniformity Ratio: 95% (center-to-corner) Remote Control: Backlit IR remote Control with source selection, AAA x 2 batteries Optional Accessories: Ceiling mount, carrying case and GrayWolf II series screens Dimensions: 15.5” x 4.4” x 11.8” in (395 x 112 x 300 mm) Weight: 5.6 lbs (2.5 kg) |
Pros
- First sub-$1000 720p DLP projector! (street price)
- Deep blacks, rich colors
- Consumer adjustment of RGB gain, cut and gamma
- Backlit remote
- 1080p support (downconverted)
Cons
- Weak 1.2x Zoom Lens
- Requires some calibration out of the box
- IR sensor on front only
- No RS-232 Support
HD70 Features & Comparisons
Features and Favorites
There's not much to pick on with a $999 720p DLP projector, but I can always find at least a few things to praise in particular when looking at a new model:
-
Quiet Fan System
At full blast (Bright Mode 'on'), the fan measures 52dB from 6-inches away. With Bright Mode 'off' the noise dropped down another few dB - just below the threshold of being measurable on the Radio Shack SPL meter. I'm not sure what the standards are for measuring the 28dB of noise claimed in the literature but you'd need to be several feet away to hit that number. Overall the noise is rather low compared to other models I've heard.
-
Image AI
This feature improves contrast by varying the lamp output according to the amount of luminance being measured at the input source at any given time. Functioning as a sort of "dynamic iris" the effect is similar in that the lamp will output less when the scene is darker and more when the scene calls for it.
-
BrilliantColor Color Processing
The description for this feature makes it appear to be "magic", but as near as we can figure it adjusts the gamma settings of the unit to pop out colors in various lighting and brightness situations. For a truly accurate Cinema setting you'll want to keep it at 0 or 1 and configure the projector for your particular needs. If you're looking at using the unit during the day (Sunday football, for example) then by all means configure the Brightness setting to its maximum setting of 9. Images and color will pop - even with considerable amounts of ambient light.
With the included feature set, the low cost of entry and the resolution capability of this projector, the HD780 is sure to be a winner in the race for front projector market share.
Comparing the Optoma H31 and the HD70
Since the H31 debuted as a great budget projector for those looking to get into the game, it seemed only natural to take a look at what the same price of entry gets you today. The differences are staggering with a lot of "give" and almost no "take". Optoma's HD70 truly offers a whole host of new and updated features without removing too much in the process to cut costs:
|
H31 (480p) |
HD70 (720p) |
|---|---|
|
850 ANSI lumens |
1000 ANSI lumens |
|
Resolution: 854x480 |
Resolution: 1280x720 |
|
3000:1 (on/off) contrast ratio |
4000:1 (on/off) contrast ratio |
|
4x 6-segment color wheel |
4x 7-segment color wheel |
|
200W P-VIP lamp |
200W UHP lamp |
|
DarkChip2 DLP |
DarkChip2 DLP |
|
DVI-I (w/HDCP) input |
HDMI (w/HDCP) input;
|
|
Backlit remote |
Backlit remote |
|
Front and Rear IR receiver |
Front IR Receiver |
|
480p support (720p/1080i downconversion) |
720p support (1080p downconversion) |
|
RS-232 Support |
No RS-232 Support |
|
5.0lbs |
5.6lbs |
|
10.7"
x 3.4"
x
8.3" |
10.4"
x 3.7"
x 10.1" |
|
Starting MSRP: $999 |
Starting MSRP: $999 |
HD70 Projector Setup and Installation
Mounting the HD70, like any entry level DLP system, is going to take some research and planning. You'll want to mount it so that you don't have to engage the vertical or horizontal keystone function. Keystoning is great for presentations and office use, but if you're shooting for the best clarity possible, leave it off for home theater use. The Optoma user manual gives a horrendously underwhelming formula for calculating the correct mounting position, but since they do deliver the required projection angle information, doing your own basic trigonometry shouldn't be too difficult.
Throw Chart for Distancing the Projector from the Projection Screen*
|
16:9 Screen |
||||
|---|---|---|---|---|
|
Screen Size
|
Size (Inches) |
Distance (Feet) |
||
|
|
width |
height |
wide |
tele |
|
70 |
61.0 |
34.3 |
8.4 |
10.2 |
|
80 |
69.7 |
39.2 |
9.6 |
11.6 |
|
90 |
78.4 |
44.1 |
10.8 |
13.1 |
|
100 |
87.2 |
49.0 |
12 |
14.5 |
|
110 |
95.9 |
53.9 |
13.2 |
16.0 |
|
120 |
104.6 |
58.8 |
14.4 |
17.4 |
|
130 |
113.3 |
63.7 |
15.6 |
18.9 |
|
150 |
130.7 |
73.5 |
18 |
21.8 |
|
170 |
148.2 |
83.3 |
20.4 |
24.7 |
|
200 |
174.3 |
98.1 |
24 |
29.1 |
Note: The calculator at ProjectorPeople.com does not (as of this writing) appear to have the correct formula for the HD70, For example, it claims the throw distance for a 100" screen is 11.5' to 13.8' but at that minimum distance the max screen size is about 84" (diagonal). The numbers above are from the closely-related H31 which shares the same 1.2x zoom lens.
As is typical, we did all testing and evaluation on a 100" (diagonal) Stewart Studiotek 130 screen. This is a very bright projector that almost seemed brighter than the 2000 lumen Panasonic PT-AX100U we just completed reviewing a short time ago. Again utilizing datacolor's ColorFacts Professional software, we were able to take some basic measurements in preparation for our final calibration and viewing sessions on the HD70 projector.
To get the unit into position for our review we utilized our multi-configurable projector stand and set it to about 7' tall so that the unit was centered and able to function as a ceiling-mounted unit to better align the image to our screen. As mentioned above, our 100" screen could only be partially filled from 11.5 feet away (the maximum distance we could achieve in this room with the custom rig). Regardless, we lined up the top of the image to the screen and moved on with the review.
We utilized HDMI cables (from DVIGear ) for the majority of our testing and also sent 480i signal to the Optoma via component video (courtesy of Impact Acoustics ) from our reference Denon DVD-3930CI DVD player. I noted that the Optoma correctly handled and identified the incoming 480i signal via HDMI with no problems.
We did all of our final testing with the projector set to the Cinema mode and post-calibration. Daytime viewing was performed in Bright Mode with the unit running "full out" in high brightness and max lamp mode.
Keystoning, Part Deux
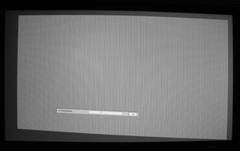
Still not convinced that keystoning is bad for home theater? Let's take a look at some quick "before" and "after" shots of a medium-case scenario and see if we can't convince the "hold-outs" that the keystone function should really be avoided if at all possible:
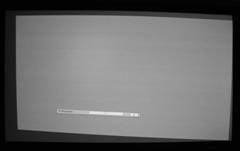
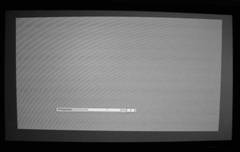
The first example above is a dramatic, off-center, projected image showing an EOL (every other line) Horizontal pattern. With only a slightly diuscernable camera artifact, the image is clean and clear. Now let's add in some Horizontal keystone and watch what happens. In the immortal words of Keanu Reeves (oh, just pick any movie he's in): Whoa! Moire has crept in significantly as soon as ANY level of Horizontal keystone was enabled. It's so obvious, you can even see it on the small image pictured here (click to enlarge it in all of its glory).
OK, ok, so no Horizontal keystone - but Vertical isn't that bad, right? Well, yes and no. It certainly doesn't tend to moiré as badly, but the effects are deleterious nevertheless. Let's take a look at that as well:
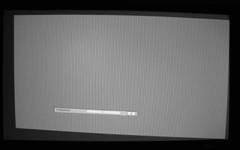
The left image is clean, while the right image (with Vertical keystone engaged) shows a distinct artifact throughout the image. Keep these functions off, folks, if you're looking for the best possible picture.
Connections
Optoma went all out and included composite, s-video and component cables with the HD70. That's pretty cool, and the projector certainly has the inputs to make use of all those free cables. In addition to the connections found on the H31 (what I consider the 舠 predecessor 舡 to this model) the HD70 splits off the secondary component/SCART/VGA connector into an HD15 input (the HD70 had a DVI-I connector that served all of these needs along with HDCP-enabled digital video). Present is a +12V relay, but absent is the RS-232 serial port that the H31 possessed. Essentially, you won't see too many people installing this unit if they demand serial control, but I think Optoma provides plenty of other solutions for higher end budgets.

Connections are laid out in a completely horizontal path. It's unique and I think it works very well, though I'd like to see the HDMI connector centered since it will be the most-often used in a modern system and you'll want to run it straight up the mounting pole if you're doing a ceiling installation.
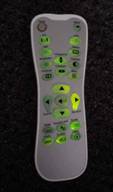
Remote Control
 I love the remote. It's like suddenly everyone is
'getting it'
and producing backlit remotes that function well and have the necessary
functions to make them very useful. Present are direct-access input buttons for HDMI, D-sub, YPbPr,
s-video and composite as well as a "Source Lock"
button that will keep the unit from moving
to search for active inputs when the projector loses signal (very handy if you have a single HDMI or
component video run going to the unit). The backlight (now a very visible green) is cool in that it
slowly fades away. The effect is transfixing and you'll want to watch it dim over and over
again -
OK, not really, but your friends will think it's nifty. There's no "Light"
button so the first button you hit will simultaneously light up the remote and
activate the function -
as a tip, hit the
'Enter'
button to light up the remote without
doing anything.
I love the remote. It's like suddenly everyone is
'getting it'
and producing backlit remotes that function well and have the necessary
functions to make them very useful. Present are direct-access input buttons for HDMI, D-sub, YPbPr,
s-video and composite as well as a "Source Lock"
button that will keep the unit from moving
to search for active inputs when the projector loses signal (very handy if you have a single HDMI or
component video run going to the unit). The backlight (now a very visible green) is cool in that it
slowly fades away. The effect is transfixing and you'll want to watch it dim over and over
again -
OK, not really, but your friends will think it's nifty. There's no "Light"
button so the first button you hit will simultaneously light up the remote and
activate the function -
as a tip, hit the
'Enter'
button to light up the remote without
doing anything.
Rounding out the inputs and menu functions on the remote are the Format buttons (4 of them covering 16:9, 4:3, Letterbox and Native) as well as a 'Mode' button that rotates you between the 4 presets and User setting. Overscan will eliminate any cable TV or satellite service edge artifacts that may be present and Brightness and Contrast controls will allow your significant other or children to completely mess up your calibrated settings (oops, did I say that out loud?) Overall this is an excellent remote and I liked the feel of it in the hand as well as the layout of the buttons. Based on my strict calculations and formulas I can give it 4.6897542 stars out of 5 - no wait. I'll tell you what, I'll let you pick the number of stars just this once - go ahead, it's OK.
The Menu System
The HD70's menu system is immensely better than the oddly-configured H31. Instead, it closely resembles the menu system of the HD72 (OK, it's basically identical) and has four main areas: Image , Display , Setup and Options . Navigation is easy, except that it is sometimes cryptic as to how to exit a submenu. On some there is an 'Exit' button which needs to be pressed, and on others you simply cursor up or down until you are back at the top menu navigation. These eccentricities are quickly mastered and overcome with just a small amount of continued use - but then again, I utilize a LOT of menu and navigation systems. We've covered all of this in our HD72 review, so I'll gloss over the functions here just to make sure they are at least covered. See the Optoma HD72 review for more in-depth info.
IMAGE
Menu
The first three items in the
Image
menu are
present on the remote control: Mode (Cinema, Bright, TV, Photo, User), Contrast, and Brightness.
Other options include Color Tint and Sharpness. An Advanced menu gets into the
'nuts and
bolts'
of the unit with access to Degamma settings (Film, Video, Graphics, PC) as well as
BrilliantColor, TrueVivid and Color Temperature. This is also where you'll find the configurable
RGB Gain/Bias settings and where you can enable/disable input sources for the auto source lock
feature.
DISPLAY
Menu
This covers all of the image- or dimension-sensitive functions such as Overscan, Edgemask, Keystoning and
Image shift (both horizontal and vertical). You can also select the format mode (4:3, 16:9. Letterbox or
Native).
SETUP
Menu
This menu merely configures the language and projection type (desk, ceiling, frontrear). It also shows
the Firmware version (which was C.0.4 for this review in case you were interested).
OPTIONS
Menu
The final menu sets the Menu Location, Source Lock
(whether the projector will
'autosearch'
for inputs), altitude (prepare for turbo fan speed
and increased noise), Lamp Settings (submenu with options for Bright Mode, timer reset, reminders, etc)
and Auto Off mode. You can also Reset the projector from here (handy when doing reviews and wanting to
start from a clean slate.
Hey, I Can Even Watch TV During the Day!
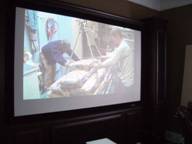 Between the Bright Mode, Brilliant Color, and 1000 lumen output, this projector is more
than able to provide some very excellent images in moderately ambient rooms. I snapped a picture here
that of course doesn't do it justice, but you can get the idea that I certainly do not have the
room completely darkened (in fact I only have a sheer curtain over one of the room's windows and
the side doors leading to the fully lit living area are wide open.) This is a Sunday afternoon
NFL-fan's dream rig. Set it up, dial up a tweaked
'Bright'
mode and you'll be set
for hours and hours of fun.
Between the Bright Mode, Brilliant Color, and 1000 lumen output, this projector is more
than able to provide some very excellent images in moderately ambient rooms. I snapped a picture here
that of course doesn't do it justice, but you can get the idea that I certainly do not have the
room completely darkened (in fact I only have a sheer curtain over one of the room's windows and
the side doors leading to the fully lit living area are wide open.) This is a Sunday afternoon
NFL-fan's dream rig. Set it up, dial up a tweaked
'Bright'
mode and you'll be set
for hours and hours of fun.
If you're hoping to watch horror movies at 9am with an open window facing East then I think you may need to reconsider some light control options - but for a theater projector this system has a pretty good torch mode.
HD70 Projector Calibration
Calibration - Getting Those Black Levels Right!
Optoma's entry level high definition DLP projector was able to be calibrated to very acceptable levels. Initial Cinema mode settings were acceptable, but as you'll see they are far from perfect and we were much more pleased with the after-calibration settings.
Initial "real world" contrast was measured at 538:1 and final post-calibration contrast was 282:1. We measured over 60cd/m2 at the screen at 100 IRE - and that was in Cinema mode!
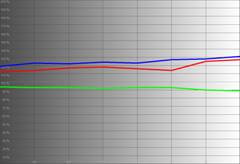
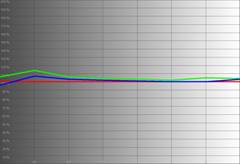
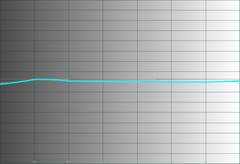
We again utilized datacolor's ColorFacts Professional 6.0 software to calibrate and measure the grayscale response of the HD70. The results proved the old adage that "all's well that ends well". The HD70 can peform - as you'll be able to see below.
|
Before Calibration |
After Calibration |
 |
 |
|
In Cinema mode this is pretty much what the stock HD70 will deliver. Color temp has the appearance of being a bit warm and we see a 20-25% overaccentuation of red and blue. |
After calibration, which was pretty smooth and painless, we get a much better grayscale tracking result with red, green and blue lining up nicely from 50-100 IRE. Further calibration and use of the Service menu would potentially allow for an even closer calibration, but we were pleased with the results. |
|
|
|
|
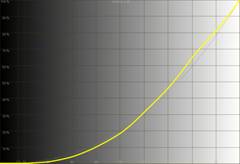
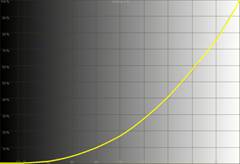
On first blush, the luminance histogram doesn't look too shabby but you can see that it's not entirely smooth and black is somewhat crushed up to 15 IRE. |
Wow, this histogram is nearly picture-perfect with clean blacks down to 7.5 IRE. Smooth as a baby's bottom舰 |
|
|
|
|
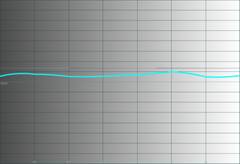
Color temperature was about 7300 (set to '0') with settings of 8650 (1) and 10,800 (2) possible through the use of the Color Temp control. |
When we were done, color temperature measured almost ruler flat at 6500K from 50-100IRE (and only slightly deviating from that below 50 IRE) |
While the initial picture looked fine, the final calibrated image was outstanding. This projector does a nice job of allowing user control of the important functions, though we'd prefer more precise control over color temperature (0, 1, and 2 are hardly a reference or standards-friendly scale).
Video and/or Audio Measurements
Audioholics/HQV Bench Testing Summary of Test
Results
Perfect Score is 130
Optoma HD70 Benchmark Score:
50
(While excelling in detail and a decent deinterlacer,
the Optoma is a bit
"slow on the uptake"
so be sure to match it with good progressive scan
source components)
|
Test |
M
ax |
480i |
Pass/Fail |
|---|---|---|---|
|
Color Bar |
10 |
10 |
Pass |
|
Jaggies #1 |
5 |
3 |
Pass |
|
Jaggies #2 |
5 |
3 |
Pass |
|
Flag |
10 |
3 |
Pass |
|
Detail |
10 |
10 |
Pass |
|
Noise |
10 |
0 |
Fail |
|
Motion adaptive Noise Reduction |
10 |
0 |
Fail |
|
Film Detail |
10 |
3* |
Pass |
|
Cadence 2:2 Video |
5 |
0 |
Fail |
|
Cadence 2:2:2:4 DV Cam |
5 |
0 |
Fail |
|
Cadence 2:3:3:2 DV Cam |
5 |
0 |
Fail |
|
Cadence 3:2:3:2:2 Vari-speed |
5 |
0 |
Fail |
|
Cadence 5:5 Animation |
5 |
0 |
Fail |
|
Cadence 6:4 Animation |
5 |
0 |
Fail |
|
Cadence 8:7 animation |
5 |
0 |
Fail |
|
Cadence 3:2 24fps film |
5 |
3* |
Pass |
|
Scrolling Horizontal |
10 |
5 |
Pass |
|
Scrolling Rolling |
10 |
10 |
Pass |
|
Total Points |
130 |
50 |
|
* While the HD70 locked on to 2-3 pulldown sequences like the Film detail test, its initial cadence detection was very slow, followed by the processor apparently "learning" the edit and navigating future edits quickly and accurately.
Comments on HQV Testing
HQV scoring was average and you'll want to pair this projector with good source components like a decent Media Center PC or a higher scoring DVD player. The HD70 didn't do too hot on the AVIA Pro Moving Zone Plate tests, failing all of them (except 2-3 horizontal) and demonstrating that holding a finely detailed pattern while in motion is not something the video processing on the HD70 excels at. Feed the unit a clean progressive signal, say from a Denon DVD-3930CI, and it's smooth sailing.
HD70 Viewing Evaluation & Conclusion
HDTV: DiscoveryHD -
Artic
Mission
DiscoveryHD is
"like a box of chocolates" -
and I enjoy just about everything they put on there. Visually-speaking there isn't a better
source for HDTV content in my opinion (though well-shot sporting events are a close second). In their
recent show
"Artic Mission"
they take viewers through a journey that spans multiple locations
and people groups in a very beautiful series that brings the viewer closer to a part of nature most will
never have the pleasure of seeing for themselves.
advertisement
The Optoma HD70 did a fantastic job of rendering vibrant colors (check out the blue ice behind the polar bears) and incredible detail (the ship and polar bear fur). Black levels were even tested at times as was the sheer ability of the projector to handle great amounts of detail.


HDTV:
Alias
If you want to check out black levels, watch this show.
Alias
sometimes feels
like it was shot in a basement with about half the lighting crew on break. Overall it's a tough job
for front projectors to handle and will illustrate the need for total light control in a room -
including minimization of any reflective materials that may spill light back into the room. The dark
areas in this episode really gave the HD70 a workout -
but I felt that this little DLP projector
did the show justice -
much more so than my tiny camera shows here. Check out the area to the right
of Jennifer Garner's face -
that is a tough nut to crack in terms of bringing out detail in a
scene such as this. The Optoma took the ball and ran with it. In the rare and precious outdoor scenes I
was able to discern lots of detail and colors were as vibrant as the muted
Alias
palette
allowed.


HDTV: Late Night with
Conan
O'Brien
I always like to put up some late night shows
to see what they look like on whatever front projector I happen to be reviewing at the time -
Actually, I just like to watch Conan's show -
but hey, let's look at some pics, shall
we?


While for the most part it's difficult to capture detailed images on late night TV, occasionally you get the rare gem. I managed to grab four and you can really see the detail in Conan's (over made-up) face as well with the shots of Max Weinberg and Brian Williams. NBC tends to oversaturate its late night show colors, but this really just allows the projector to show you how well colors can "pop" - even if they're a bit overdriven.
DVD:
Brick
Talk about
dark.
At times I wondered if I was watching a horror flick.
Brick
is a classic film noir set in a contemporary high school environment -
and very well
executed in my opinion. Aside from the main character being in a perpetual state of getting attacked or
talking on the phone, the film has a lot to offer and is truly
"original"
in the sense that
at least it's not another retooled horror flick or misdirected (literally) remake of some 80s TV
show. Dark scenes abound, even if the particular scene details in the film aren't exactly top notch
(due to the camera selection budget would be my guess). Color was vibrant during daytime scenes and
subdued (again, on purpose) during the many interior (and consequently darker) scenes. The digital camera
we utilized had a fit on most of the low light scenes of this movie so we weren't able to show you
the level of detail present in the film, but it was there.


DVD:
The
Wild
Disney movies of late have been hit or miss, but
for a projector review it doesn't really matter -
3D animation almost
always
looks
awesome on-screen. This was the case with Disney's The Wild which had plenty of color and detail to
show off
- as well as some very impressive darker scenes involving the interior of a volcano.
Animation comes across very well on DLP and the Optoma HD70 seemed to portray every nuance and fine
element without a hitch. RBE (rainbow effect) wasn't an issue -
and with animation it's
often easy to pick out, especially with fast moving subject matter like a crazy koala
bear.


Review Conclusion
OK, let's review: $999 street price, 720p DLP, quiet fan and 1000 ANSI lumens - Buy, rinse, repeat. This isn't a decision so much as a point at which you have to ask yourself how happy you'll be with your current 32" CRT display and how much time it will take you to rustle up the funds to fit this projector and a screen into your budget. Speaking of the screen, we'd recommend a 'gray' screen with ~0.8 gain or similar unless you are in a completely light-controlled room and can do a white screen with ~1.3 gain. There are certainly better projectors out there, but you probably won't find them at this price point - and definitely not with 720p DLP technology. If you're looking to get into a front projection system but haven't been able to justify the costs - you no longer have an excuse. Be sure to pair it with a good progressive scan DVD player for movies. Highly recommended.
Optoma Technology, Inc.
715 Sycamore
Drive
Milpitas, CA 95035 USA
Tel : 408-383-3700
www.optomausa.com
About Optoma
Optoma Technology, Inc. is a leading manufacturer
of award-winning digital display products and home entertainment projectors for consumers, businesses,
education, professional audiovideo (Pro AV) and CEDIA (Custom Electronic Design and Installation
Association) channels.
The Score Card
The scoring below is based on each piece of equipment doing the duty it is designed for. The numbers are weighed heavily with respect to the individual cost of each unit, thus giving a rating roughly equal to:
Performance × Price Factor/Value = Rating
Audioholics.com note: The ratings indicated below are based on subjective listening and objective testing of the product in question. The rating scale is based on performance/value ratio. If you notice better performing products in future reviews that have lower numbers in certain areas, be aware that the value factor is most likely the culprit. Other Audioholics reviewers may rate products solely based on performance, and each reviewer has his/her own system for ratings.
Audioholics Rating Scale
 — Excellent
- — Very Good
- — Good
- — Fair
- — Poor
| Metric | Rating |
|---|---|
| Detail and Resolution | |
| Deinterlacing & Scaling | |
| Contrast and Black Levels | |
| Color Reproduction | |
| Noise Reduction | |
| Calibration Options | |
| Build Quality | |
| Ergonomics & Usability | |
| Ease of Setup | |
| Features | |
| Remote Control | |
| Performance | |
| Value |
Clint Deboer was terminated from Audioholics for misconduct on April 4th, 2014. He no longer represents Audioholics in any fashion.
View full profile