
Optoma EP749 DLP Projector Review
Optoma EP749 DLP Projector
- Product Name: EP749 DLP Projector
- Manufacturer: Optoma
- Performance Rating:

- Value Rating:
- Review Date: September 27, 2007 15:31
- MSRP: $ 999
|
Display Technology: Single 0.55” DDR DMD™ DLP Technology by Texas Instruments Resolution: XGA (1024 x 768), Maximum interpolated resolution SXGA+ (1400 x 1050) Brightness (Typical): 2500 Lumens Contrast Ratio: 2200:1 (Full On/Full Off) Lamp Life: Estimated at 2000/3000 Hours (standard/economy) Lamp Type: 230W SHP Throw Ratio: 1.93-2.13:1 (Distance/Width) Image Size (Diagonal): 34.67” to 305” (0.9 to 7.7 m) Noise Level (standard/economy): 33dB/28dB Remote Control: Fully Featured IR Remote w/ Laser Pointer Monitor Loop Through: D-Sub 15 VGA Output (Functional in Both Normal and Standby Modes) Projection Distance: 4.8’ to 39.4’ (1.5 to 12 m) Computer Compatibility: XGA, SVGA, VGA, SXGA+ Resized, VESA, PC & Macintosh Compatible Video Compatibility: NTSC, PAL, SECAM, EDTV (480p), HDTV (576i/p, 720p, 1080i) Aspect Ratio: 4:3 Native, 5:4 &16:9 compatible Projection Lens: F = 2.35 ~ 2.47, f = 21.83 ~ 23.81 mm, 1.1x Manual Zoom and Focus Audio: One Internal 2-Watt Speaker Weight: 4.4 lbs (2.0 kg) Dimensions (W x H x D): 9.3” x 3.8” x 8.2” (238 x 96 x 210 mm) |
Keystone Correction: ± 16 degrees vertical Horizontal Scan Rate: 31.5 to 80 kHz Vertical Refresh Rate: 56 to 85 Hz Power Supply: AC Input 100 - 240V, 50-60Hz Power Consumption: 300 Watts, < 7W Standby power Operating
Temperature: Operating:
5 to 35°C, 80% humidity (Max) Displayable Colors: 16.7 Million, 256 shades of gray Projection Method: Front, Rear, Ceiling Mount, Table Top Uniformity: 85% User Controls: Advanced Adjustability Options through the On-Screen Display Security: One Kensington Lock Port I/O Connectors: DVI-D w/HDCP, D-Sub 15, VGA for Monitor Loop Through, S-Video, Composite Video, Audio Mini-Jack, RS-232 Standard Accessories: AC Power Cord, VGA to VGA Cable, RS-232 Cable, Composite Video Cable, Remote Control, Batteries for Remote, CD-ROM User’s Manual, Quick Start Guide, Warranty Card, Lens Cap and Carrying Case Optional Accessories: 15-pin to 3 RCA Component-HDTV Adapter, S-Video Cable, DVI to HDMI Adapter, GrayWolf II Series Screens, Ceiling Mount and Gold Service Warranty Warranty: 1 Year Limited Parts and Labor, 90 Days on Lamp |
Pros
- Very Quiet Operation
- Compact size
- Convenient Carrying Case
- Excellent Black Level Control
- Great Quality under $1k
Cons
- Jaggies on Standard and High Definition Settings
- Default whites oversaturate and wash out images
- No HDMI input
- Remote not backlit
EP749 Basic Setup and Inputs
The Optoma EP749 is primarily designed to be a multimedia data projector. However, it functions well as a home theater projector and one in which you can play video games on. For the price, this projector is a powerhouse. Being a budget-minded model, this Optoma EP749 is no sidekick, it really performs well in multiple applications… including its primary function as an outstanding data projector.
Things I really liked about this projector:
- Price: While there are other projectors on the market that may perform better than this one at higher price points. For the money, this one is a cut above.
- Remote Control: Although the remote for this projector is small and simple in design, it still gives the user a great deal of control over the projector with a wide range allowed to use the remote from many directions around it.
- Image Control: This projector provides a great deal of control over the image it casts onto a screen. Giving the user the ability to truly tailor the image to a specific need with regards to brightness and color control for the room or space it’s being used.
Optoma EP749 Basic Setup & First Impressions
In this particular review I went with a desktop setup configuration and began with the mindset that I would at least initially, use the projector in much the same way the average consumer who might purchase this projector would. I started with it table mounted without a screen and began my testing with it pointed directly at a blank white wall.
I plugged it in, connected it via VGA cable and an S-Video cable and got started. From here I wasn’t terribly concerned with throw distance measurements, screen type, screen and projector height or anything very technical. I wanted to work with it from a consumer “plug and play” perspective to start with. Later in my review I’ll get into more of the high level technical aspects of this projector.
Initially I connected a Dell Inspiron laptop computer to the EP749 to see how well it performed with PC graphics and processing. Once connected and the laptop was powered up, the projector automatically set itself to a default resolution and displayed the desktop image. I changed the setting using my laptop's screen resolution under Desktop Properties > Settings so that I could match the native resolution of the projector. Once the setting was adjusted the image just popped right off the screen (wall). At this point I had made no adjustments to color control or any other image control and it actually didn’t look too bad projected right onto a blank white wall.
From there I loaded a Power Point presentation from my laptop that was heavy with graphics and color. The Optoma EP749 performed quite well with this presentation. Showing animated graphics and high resolution images projected onto a blank white wall, with virtually no adjustment to the image at all. I did however need to adjust the front “foot” to raise the image a little and also used the rear adjustable “feet” to control the pitch of the image to get it straight and better centered.
After running through the various slides of the presentation, I booted up Internet Explorer to see how well it would do with an Internet browser running and flipped through some web pages with full motion video clips in them. I visited: www.cnn.com and clicked on a video story to view it through the projector. I did not have to make any adjustments to the projector or my laptop settings for the projector to automatically adapt to the proper screen resoluton, it was automatic and I liked it… a lot. I also visited www.youtube.com as well as www.abc.com to see more video clips. The projector reacted the same way with each internet video clip that I loaded and played.
It was then time to bring in the screen and get serious about running the projector through its paces. The screen I used for this review was a Da-Lite Deluxe Insta-Theater 80” screen. This screen was a great match for reviewing this particular Optoma projector. The Da-Lite Deluxe Insta-Theater screen is portable and comes in its own travel case. Installation is extremely easy, needing only to unlock the case, turn the “feet” out for support and pull up on the handle. It’s really just that simple.
Now that the screen was set up and in place, it was time to consider the connection options on the Optoma EP749. The input options available are: DVI-D, VGA (x2), S-Video and Composite.

The other connections available on the Optoma EP749 are: Audio In and Audio Out, VGA Out and an RS-232 control.
For the rest of this review I utilized the DVI-D, VGA and S-Video connections. I did not use either audio function or the Composite video connection, nor did I use the RS-232 or VGA Out options either. As mentioned earlier in this article, this review was intended to come from more of an average consumer perspective rather than a highly technical one.
EP749 Menu System and Remote Control
Scrolling through the menu settings I found a great deal of depth in its capabilities and was again, pleasantly surprised to see it packed with many image control and enhancement features. Features such as; Standard Brightness, Contrast, White Intensity, Color Temperature, Saturation, Sharpness…and even a De-Interlace control. All of these standard functions are found in the “Image – 1” menu.
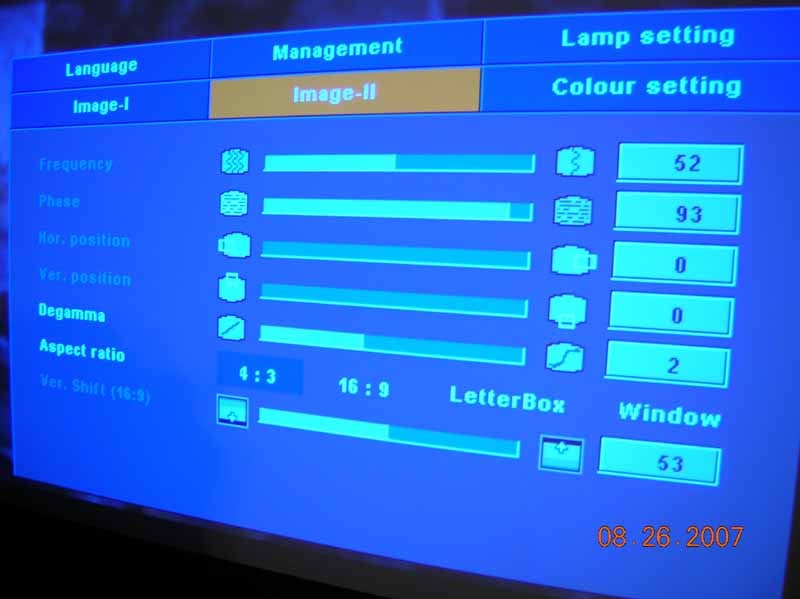 The “Image
II” menu began to get deeper into image control, offering features such as;
Frequency, Phase, Horizontal Position, Vertical Position, Degamma, Aspect Ratio
control (4:3 / 16:9 / Letterbox and Window) and a digital Vertical Shift
control to top it off.
The “Image
II” menu began to get deeper into image control, offering features such as;
Frequency, Phase, Horizontal Position, Vertical Position, Degamma, Aspect Ratio
control (4:3 / 16:9 / Letterbox and Window) and a digital Vertical Shift
control to top it off.
The aspect ratio control settings in the Image II menu were useful and appreciated. As my review continued I found myself very pleased with this relatively low level data projector. The Optoma EP749 was already proving itself to be a formidable competitor to other data projectors, some of which aren't as inexpensive as this one.
Cycling through the other menu options you’ll find tools such as the Lamp Setting window which shows you the lamp life, lamp usage, allows you to reset both of those controls as well as a lamp reminder, ECO mode, High Altitude, Auto Power ON and OFF along with a handy Sleep Timer to boot!
Another menu option is the Color Setting menu. This menu option is all about more specific color adjustments which give you the ability to adjust color in; global Red, Green or Blue settings. This also allows you to adjust those same colors independently and, going a step further, gives control for Yellow, Cyan and Magenta as well.
The Language menu option is self explanatory. It simply gives you the option to choose various dialects such as English, French, Spanish and others.
Remote Control
Included with the Optoma EP749 is a very basic but still comprehensive remote control that includes a laser pointer function for giving those presentations at the office. The remote gives you all of the basic functions such as access to the Menu settings, direct input selection, Re-Sync, AV Mute, Freeze control, a zoom function, volume control and Keystone controls. Unfortunately there is no remote control illumination. The buttons do not glow in the dark and there’s no back light to see the buttons in dimmed environments, making its use in a dark room somewhat of a challenge. It’s a good thing it’s a small and relatively simple remote so it’s not a terrible hassle to use regardless. I do like its small form factor and the laser pointer function, so it gets definite plus’ for those features.
EP749 Calibration, Viewing Tests and Conclusion
Out of the box, this projector was ready to put on a presentation without the need for too many adjustments. This is just fine for the weekly office meeting or the one off presentation that you may need to give. With the projector being a good “plug and play” unit, it is nice to not have to fuss with many controls to get it set up and ready to perform. I’ve worked with projectors in the past that required at the very least several minutes of adjustments right out of the box just to get a fair image produced. So once again, the EP749 was proving itself to be a top shelf budget projector.
After all of that, I did however decide to do some relatively low level calibration on the projector to see just how good I could get the image with tools that an average consumer might have access to. To calibrate this projector I used an Avia DVD. The Avia disc I used is one intended for Home Theater setup by the average consumer.
In order to get the most out of this projector I had it connected to a digital cable box and an Xbox 360. The Xbox allows for high definition gaming as well as progressive scan DVD playback.
The calibration functions I used from the Avia disc were; Advanced Audio and Video Calibrations from the main menu of the disc. From this menu I used the following test patterns: Standard color bars (SMPTE), Sharpness Control and Needle Pulse + Steps.
I also used, Black Bars and 1/2 Gray, Multiburst and the Blue Bars tools for calibrating this projector. Once I had the projector adjusted as well as it could get with these tools. I switched over to a standard definition input from the cable box and watched a few different channels of regular television programming. All of the images looked decent - as decent as the image can look at 80 inches and standard definition, that is. So while it wasn’t high definition, it still looked good. And that’s saying a lot for taking a standard definition image and blowing it up to 80 inches. So overall the standard definition NTSC television viewing showed a good result.
Daytime Viewing
When I used the projector in the daytime, having a large bay style window casting light directly onto the screen, the EP749 did a decent job. But I did have to bump the Brightness settings to get it to look fairly decent (alternatively, you can select a different Display Mode). Ambient light is normally an issue with most all projectors and this one is no exception to that. But even with a lot of light sunlight directly on the screen, it was still able to cast a viewable image.
Although the projector was able to perform in a high ambient light setting, it’s still recommended that you use this projector in a location with as little light as possible. A darkened room will still always give you a better quality image to look at on screen.
Viewing Tests
I then switched over to the Xbox 360 and put in a DVD. The first movie I put in and tested was 300.

This film has outstanding imagery and color control as well as a lot of fast paced action, which would all be pushing this entry level projector to its limits. I was very happy to see that this projector performed quite well with a film like this. The blacks were great, and the color was vibrant. Some of the fast action was a little lacking due to the scaling and processing capabilities of the EP749. So there were some jaggies in the images and visible processing issues. But to an untrained eye, I feel that it passed very well with this particular film as a test of its abilities.
The next film I viewed was Shrek 2.

I used this movie for its vibrant color and clean computer generated graphics. Here again, the EP749 performed very well, showing all of the vibrant color in the film and giving great image detail.
While I was using the Xbox 360 as a DVD player, I decided to throw in a couple of games as well to see just how well the EP749 produced video game graphics in high definition. The games that I put in for the test were Madden 07, and Oblivion. Both games have incredible imagery and color. The resolution was outstanding for such an entry level projector. I was truly impressed. As with the movies that I tested, the colors in the video games were shown to be very vibrant and as realistic as a video game could be. Image detail was great and fast motion was actually better with the video games than with movies or standard definition television.
Conclusion
The Optoma EP749 is an entry-level multimedia data projector that does its job very well. It also can double as home theater projector when it’s not being used at the office for the big presentations. Out of the box, this projector was ready to perform its intended function (presentations), but with a little tweaking and adjustments it proved itself to be a great consideration for the family looking to get into a projector for the home and not have to invest a lot of money. This projector provides decent quality on a budget. One downside I did find that I just couldn’t shake was the amount of heat that the projector emits. In a room size of 18 feet long by 13 feet wide, this small projector could serve as a space heater. So using the AC was a necessity when using the projector. Also keep in mind that picking the right screen is always a good thing, so even if you come down a little in money to get into this projector, keep in mind that the screen is also a highly important piece to the puzzle.
With the Optoma EP749’s entry level stamp and it’s somewhat limited capabilities, I will recommend this projector for the small business owner who may have to give frequent business presentations but wants to have the flexibility to utilize the unit as a home theater video projector. The EP749 performs very well for its modest price point and offers a great deal of function and features for not too much money. You’re definitely getting a great entry-level projector in the Optoma EP749.
Optoma
715 Sycamore Drive
Milpitas, CA 95035
www.optomausa.com
About Optoma
Optoma Technology, Inc. is a leading
manufacturer of award-winning digital display products and home entertainment
projectors for consumers, businesses, education, professional audio/video (Pro
AV) and CEDIA (Custom Electronic Design and Installation Association) channels.
Optoma has quickly become a global leader in the manufacturing of high resolution projection and digital display products. Optoma's product line-up includes: multimedia projectors for mobile, fixed installations and home theaters, as well as HDTVs and plasma displays.
The Score Card
The scoring below is based on each piece of equipment doing the duty it is designed for. The numbers are weighed heavily with respect to the individual cost of each unit, thus giving a rating roughly equal to:
Performance × Price Factor/Value = Rating
Audioholics.com note: The ratings indicated below are based on subjective listening and objective testing of the product in question. The rating scale is based on performance/value ratio. If you notice better performing products in future reviews that have lower numbers in certain areas, be aware that the value factor is most likely the culprit. Other Audioholics reviewers may rate products solely based on performance, and each reviewer has his/her own system for ratings.
Audioholics Rating Scale
 — Excellent
- — Very Good
- — Good
- — Fair
- — Poor
| Metric | Rating |
|---|---|
| Detail and Resolution | |
| Deinterlacing & Scaling | |
| Contrast and Black Levels | |
| Color Reproduction | |
| Noise Reduction | |
| Calibration Options | |
| Build Quality | |
| Ergonomics & Usability | |
| Ease of Setup | |
| Features | |
| Remote Control | |
| Fit and Finish | |
| Performance | |
| Value |