
Optoma EP1690 DLP Projector Review
Optoma EP1690 DLP Projector
- Product Name: EP1690 DLP Projector
- Manufacturer: Optoma
- Performance Rating:

- Value Rating:
- Review Date: September 17, 2006 20:00
- MSRP: $ 1899
|
Display Technology: Single 0.65-inch DarkChip2™ DLP™ Technology from Texas Instruments Brightness: 2500 lumens (typical)
Displayable Colors: 16.7 million Noise Level (typical): 30 dB standard
(27dB ECO) |
Projection Lens: f = 22.25 – 26.69 mm.
F/2.5 – 2.8, manual focus & zoom Uniformity: 85% Standard Accessories: AC Power Cord, VGA to VGA, S-Video, RS-232 Cable, Remote Control, Batteries for Remote, Lens Cap, Quick Start Guide, Warranty Card and User's Manual (on CD) Optional Accessories: Bering Ceiling Mount, 15-pin to 3 RCA-Component HDTV Adapter, DVI to DVI Cable, DVI to HDMI Adapter, Gold Service Warranty Dimensions: 13.6 x 9.7 x 3.7 in (344 x 246 x 94 mm) Weight: 7 lbs (3.2 kg) |
|
Pros
- Lots of features
- Great black levels
- Eye-popping color saturation
- Versatile inputs (including DVI-HDCP)
- 1080p compatible
- Laser pointer remote with mouse controls
- Built-in speaker for multimedia use
Cons
- No direct component video inputs
- May be awkward to use as a tabletop unit due to rather high projection angle
- Requires slightly longer throw distances
- Intrusive fan noise
- No vertical lens shift
DLP Technology, Features & Installation
Up until now I have found that most "dual use" projectors are more designed for the office or school and not so much for the home theater. In the case of the Optoma EP1690, we may have found the first unit capable of actually performing well in both situations. We can place the thanks for this partly on Optoma and partly on the advancement of DLP front projection technology which allows for greater contrast, better output levels and performance options not found a couple years ago. I'll outline the strengths and weaknesses of the EP1690 below, but I have to say that I am impressed overall and I could see a lot of office managers and teachers wanting to take this unit home from the classroom each night for "safe keeping".
DLP Technology
I've gone over general DLP technology in the past, so let's focus on the system found within this specific Optoma model. The EP1690 utilizes a 0.65" DDR (Double Data Rate) DLP chip. These chips increase contrast ratios by as much as 20-50% (potential, not actual calibrated performance) by:
- Increasing the mirror's tilt angle from +/- 10 degrees to +/- 12 degrees
- Increasing the amount of image data the chip can receive per second
- Increasing the amount of speed at which the micro-mirrors can move (related to the above data rate)
These new chips are utilizing what's known as "Dark Metal" technology (sounds kinda Sci-Fi doesn't it?) to essentially capture stray light that may escape to the underside of the chip (and thus to the screen which reduces contrast). The result is DarkChip2 tech which does seem to be making a noticeable difference in the perceived images we've seen from these "next generation" displays.
Features and Favorites
I like to go through the features that I feel make a unit stand out among its peers. In this way it's easy to spot things that you really need or useful functions that may surprise you.
-
Built-in 3W speaker
A necessity for use in multimedia presentations, the presence of an on-board speaker makes this projector fit for "taking on the road". While only 3W, it was plenty loud for our use and, provided you're not trying to entertain or educate an auditorium of listeners, you are sure to have enough volume for more intimate settings. -
DVI-D with HDCP support
While HDMI with audio processing capabilities would have been "off the hook" , the presence of an HDCP-compatible DVI-D input is welcome and ensures that this projector is fully home theater compatible. What's more, the DVI-D connector is much more stable than HDMI, so you won't have to worry about a loose connection interrupting a presentation. -
16:9 and 15:9 pixel mapping
While most projectors these days come in 16:9 native resolutions, rarely is any thought given to remapping pixels for display of both 15:9 (common PC resolutions of 1280x768) and 16:9 (720p) formats. The EP1690 will correctly map the pixels in both formats, making sure that your images are in the proper perspective. -
RGB Gain/Bias user controls
Since we really value user calibration of projector systems, it's nice to see RGB gain and bias controls that aren't hidden in the service menus. This is especially important with new calibration tools like DataColor's SpyderTV Pro hitting the market which make home calibration of projection and direct view systems more affordable.
There are many more features to be sure, but for now these really stood out to me during the use of this projector.
Basic Setup and Installation
Like many Optomas, this projector is a bit difficult to mount using a tabletop, due to its very high projection angle 舑 a potential concern when using it in the board room or for classroom instruction. Ceiling mounts are always preferred if this is appropriate for your particular room, but this reduces the "dual use" potential of this projector. For this review we utilized a Stewart Luxus Deluxe ScreenWall system with a StudioTek 130 100" diagonal screen. This is an excellent quality screen which is optimized for perfect color in a light-controlled room. Take a look at the 16:9 throw chart to see how the Optoma will work in your situation:
Throw Chart for Distancing the Projector from the Projection Screen
|
Screen Size
|
Size (Inches) |
Distance (Feet)
|
||
|---|---|---|---|---|
|
|
width |
height |
wide |
tele |
|
30 |
26.1 |
14.7 |
3.44 |
4.14 |
|
40 |
34.9 |
19.6 |
4.59 |
5.52 |
|
60 |
52.3 |
29.4 |
6.89 |
8.28 |
|
70 |
61.0 |
34.3 |
8.03 |
9.66 |
|
80 |
69.7 |
39.2 |
9.18 |
11.0 |
|
90 |
78.4 |
44.1 |
10.3 |
12.4 |
|
100 |
87.2 |
49.0 |
11.5 |
13.8 |
|
110 |
95.9 |
53.9 |
12.6 |
15.2 |
|
120 |
104.6 |
58.8 |
13.8 |
16.6 |
|
130 |
113.3 |
63.7 |
14.9 |
17.9 |
|
150 |
130.7 |
73.5 |
17.2 |
20.7 |
|
170 |
148.2 |
83.3 |
19.5 |
23.5 |
|
200 |
174.3 |
98.1 |
23.0 |
27.6 |
The first thing to note is that the EP1690 doesn't have much of a zoom range, so you'll have to carefully plan out the distance required to hit your desired screen size. Combined with the steep throw angle of the unit, I'd say this would be one of the more difficult projectors to place were it not for the excellent digital vertical keystone adjustment available in the unit. The ability of the projector to compensate for angle makes up for the difficult placement parameters. In fact, the only issue that remained was the lack of range in the feet leveling. When used as a front projector on a tabletop, the rear feet really need to be able to extend to about 3-4 times their current range (which is a laughable 3/8-inch.)
We positioned the projector in a temporary, but workable location. It was centered horizontally with the screen and set back exactly 11.5 feet - at the extreme of the wide setting for the lens. The projector had to be mounted almost ridiculously low in order for the high projection angle to hit the bottom of our screen without keystoning. By low, we mean that a 20" tall table didn't work for us. For ceiling installations you will have to ensure that your screen is mounted low enough on the wall to allow for a keystone-free installation.
While we're on the topic of keystoning, realize that while it will help you to have a more square picture to the screen, it will also result in a "dithering" of the image. This means that if you have a 1-pixel wide line of black next a 1-pixel wide line of white you will see three lines as soon as you initiate vertical keystoning. The third line will be the interpolated grey as the image seeks to re-render itself in the new position. This isn't the end of the world, however and the softening of the image can actually be beneficial for those sitting too close to the screen and subject to seeing the individual pixels on the screen. In some configurations, keystoning will be necessary, however we encourage you to avoid it if possible.
We ran two different cables to the projector for our tests. We rolled our own component video cable from materials supplied by Blue Jeans Cable and a well-built HDMI cable (supplied by DVIGear) enabled us to compare the digital video connection from our reference Denon DVD-3930CI player. An HDMI to DVI converter from Gefen, Inc allowed us to go from HDMI to the DVI-D input on the EP1690.
EP1690 Connections, Remote Control and Menu System
The EP1690 has the right connections for hybrid use, but was missing dedicated component video inputs which will turn off many users from this model. The VGA inputs will do well with even legacy PC systems or laptops and composite and s-video are provided if a DVD needs to be connected in a casual setting. As we mentioned, the conspicuously absent component video connection had us perplexed. The VGA1 input is component video-capable, but I believe a breakout connector or cable should have been provided with the unit (they can be found for ~$25-$60+ retail online).

The majority of tests were done using the DVI-D input. We also sent interlaced signal from the Denon DVD-3930CI to the Optoma projector and allowed the onboard deinterlacer to convert the video to progressive scan and provide 2:3 pulldown. It was easy to get at the connections and the DVI-D connector, though usually something we prefer to be replaced by HDMI, made a lot of sense given the hybrid nature of this model.
Remote Control
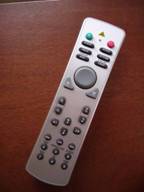 Optoma has more remote controls than projectors.
I think they must have an overzealous remote control buyer that spends tons of time overseas trying out
newfangled devices for controlling their projectors. Of the remotes Optoma has supplied to date, this is
certainly one of them. Yes, it's about average, except that it loses major points by not being
backlit (must we go over this again?) At this point any company who makes a projector without a backlit
remote should immediately be subjugated to some kind of consumer upheaval. This goes beyond common sense
in that a projector is DESIGNED to work in virtual darkness
舰
By very definition the remote NEEDS to
be backlit. If I were Donald Trump and the remote buyer was in the room with me,
"You're
Fired!"
would be the words you'd hear.
Optoma has more remote controls than projectors.
I think they must have an overzealous remote control buyer that spends tons of time overseas trying out
newfangled devices for controlling their projectors. Of the remotes Optoma has supplied to date, this is
certainly one of them. Yes, it's about average, except that it loses major points by not being
backlit (must we go over this again?) At this point any company who makes a projector without a backlit
remote should immediately be subjugated to some kind of consumer upheaval. This goes beyond common sense
in that a projector is DESIGNED to work in virtual darkness
舰
By very definition the remote NEEDS to
be backlit. If I were Donald Trump and the remote buyer was in the room with me,
"You're
Fired!"
would be the words you'd hear.
Backlighting aside, the remote has a laser pointer and full mouse control when configured for use with a PC. It fits well in the hand, but the menu navigation buttons are rather low and it does not have the universally accepted (except by Optoma's remote control buyer) central 'Enter' key. Instead, the 'Enter' key is located to the bottom right of the navigation keys. This isn't tragic, but it could be better. Mute, Re-sync, Freeze (handy for use in this review), Vertical keystone, Mode and Format buttons are handily locate don't he top of the remote. I utilized 'Freeze' quite a bit during the review process to capture screen shots as needed. In addition, the Format button is handy and can make switching between 4:3, 16:9 and letterbox modes a breeze. If you are going from day to nighttime viewing you can quickly flip through modes without entering the full menu system.
The Menu System
 There are four
menu areas in the Optoma EP1690's Setup menu. Each is well laid out and it was very easy to locate
all required functions. The menu stays up for 30 seconds without disappearing, giving you plenty of time
to access functions or think about which adjustments you'd like to make. I found the layout to be
easy to navigate. The only strange thing I noticed was the presence of a menu
'splash screen'
of sorts which really seemed to do nothing other than create an additional step when accessing the menu
system.
There are four
menu areas in the Optoma EP1690's Setup menu. Each is well laid out and it was very easy to locate
all required functions. The menu stays up for 30 seconds without disappearing, giving you plenty of time
to access functions or think about which adjustments you'd like to make. I found the layout to be
easy to navigate. The only strange thing I noticed was the presence of a menu
'splash screen'
of sorts which really seemed to do nothing other than create an additional step when accessing the menu
system.
Image menu
The
Image
menu provides access to the Display
Mode (Cinema, Bright, TV, sRGB, and User) as well as basic picture controls. An Advanced menu option is
located at the bottom which gives way to further options. The Display Mode allows you to select from 4
color presets, each optimized for a different use. Of the options, I found only TV mode to be completely
useless, resulting in unrealistic bluish color and an overall reduction in the dynamic range of the
picture -
especially in the blacks. The User setting will come in handy later as we calibrate the
projector to more closely match our desired home theater use ('Bright '
mode can always be
used effectively for presentations).
In the Advanced settings submenu we find options for setting the gamma curve, activating the Brilliant Color feature (which apparently adjusts brightness and contrast more than actual color), configuring the True Vivid level, and also modifying the color temperature. The color temperature control could use some better labeling, but basically there is a red, green and blue setting. We'll show you the temperature readings later in the review. Navigation into further submenus makes possible the adjustment of RGB gain/bias controls, changing the color space from YPbPr to RGB, and activating or deactivating various inputs (so the projector will not search for them). I really liked the menu structure. It is simple, clear and concise without missing the major requirements for user adjustments. One option I did miss was the ability to have multiple custom user controls. The workaround, of course, is to simply utilize the 5 given modes (Cinema, Bright, TV, sRGB, and User) and customize to your heart 's content - each mode will retain the settings.
Display menu
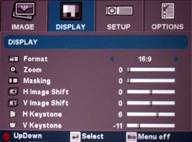 Here you will find access to all functions associated with the DLP panel and how
the image is physically displayed on the screen. This includes such items as the display format (16:9,
4:3, Letterbox [LBX] or Native). There is nothing new about these modes, but you will typically use 16:9
in home theater. If you want to watch standard 4:3 content that isn't stretched across the screen,
simply switch to 4:3 mode. One handy mode that I find myself using quite a bit with the Sci-Fi Channel
(which if they keep canceling shows like
Farscape
and
Stargate SG-1
won't be for
very long!) is the LBX, or Letterbox, mode. This actually zooms in the whole image so that you take an
image that is actually 4:3, but letterboxed, and bring it up to the full size of the projector screen.
You will perceive a loss of resolution in the process, but you do get to utilize the entire screen this
way (hey - you paid for it all, why not use it?)
Here you will find access to all functions associated with the DLP panel and how
the image is physically displayed on the screen. This includes such items as the display format (16:9,
4:3, Letterbox [LBX] or Native). There is nothing new about these modes, but you will typically use 16:9
in home theater. If you want to watch standard 4:3 content that isn't stretched across the screen,
simply switch to 4:3 mode. One handy mode that I find myself using quite a bit with the Sci-Fi Channel
(which if they keep canceling shows like
Farscape
and
Stargate SG-1
won't be for
very long!) is the LBX, or Letterbox, mode. This actually zooms in the whole image so that you take an
image that is actually 4:3, but letterboxed, and bring it up to the full size of the projector screen.
You will perceive a loss of resolution in the process, but you do get to utilize the entire screen this
way (hey - you paid for it all, why not use it?)
Masking allows you to crop the image, in the event that your source device puts out noise at the very edge of the projected image. The default setting is 0, and that's where I left it for the review. Zoom is self-explanatory, though it isn't as dramatic as you would expect (at least not until you get to 3 or 4) and handles maintaining resolution very well.
As mentioned above, keystone correction was acceptable on this projector, but dither was still apparent at even the lowest settings. You may have to use it, but hopefully you can find a mounting position or placement location for this to not be the case.
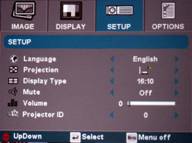 Setup menu
The
Setup
menu is the place to go to change the menu
language, projection type (front, rear, ceiling or tabletop), or display type (16:9 or
16:10 -
[really 15:9]). In the event you are controlling multiple projectors via RS-232, this
menu also allows you to set the ID from 0-99. Volume and Mute are present here though we highly suggest
making sure your multimedia program material is
'pre-leveled'so that you don't have to
jump to this menu during a presentation to adjust the volume (there is no volume control on the
remote).
Options menu
This is the place to go for configuring the menu
location and whether you want the unit to dynamically search for new available inputs or
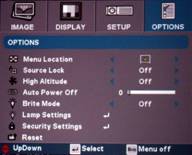 remain on the selected input at all
times (even when it loses sync). If you live in Colorado, the High Altitude function will be sure to keep
the fan on at high speed at all times to compensate for the thinner air. Auto Power Off lets you set the
unit to go into shutdown mode when no signal is present for a particular number of minutes (0-60 in 5
minute increments). Finally, a Bright Mode feature is provided to help customize the viewing experience.
This setting will reduce power consumption (*when disengaged) and help extend the life expectancy of the
bulb. You'll want to operate the unit with Brite Mode
'Off'
during home theater use and
turn the feature on during daylight viewing or for presentations. I configured and set the Brite Mode as
part of the calibration routine for setting the various projector modes. The final feature of the Options
menu allows you to view lamp hours, configure the reminder function and reset the unit when a new bulb is
inserted.
You can also reset all user settings from this menu (which I thought may have been more
appropriately placed in the
Setup
menu.)
remain on the selected input at all
times (even when it loses sync). If you live in Colorado, the High Altitude function will be sure to keep
the fan on at high speed at all times to compensate for the thinner air. Auto Power Off lets you set the
unit to go into shutdown mode when no signal is present for a particular number of minutes (0-60 in 5
minute increments). Finally, a Bright Mode feature is provided to help customize the viewing experience.
This setting will reduce power consumption (*when disengaged) and help extend the life expectancy of the
bulb. You'll want to operate the unit with Brite Mode
'Off'
during home theater use and
turn the feature on during daylight viewing or for presentations. I configured and set the Brite Mode as
part of the calibration routine for setting the various projector modes. The final feature of the Options
menu allows you to view lamp hours, configure the reminder function and reset the unit when a new bulb is
inserted.
You can also reset all user settings from this menu (which I thought may have been more
appropriately placed in the
Setup
menu.)
Calibration & Benchmark Tests
Get your black and white levels correct and you're apt to have a good viewing experience. The other important thing you want to pay attention to is the color temperature of the unit, as changed by the Modes and various settings in the menu system.
The CIE Chart is used to display the colors for the Optoma EP1690's HDTV color reference, as well as the gamut of colors that it is capable of creating. We observed that the Optoma DLP projector had slight deficiencies in all three primaries, but Red seemed to be the most affected in practical viewing.
Contrast ratio measured in at 532:1 before calibration (with some crushed blacks and an overall darker image). After calibration we saw a measured contrast of 304:1. Color temperature varied less than we would have expected for the various modes: Bright (6100K), Cinema (6400K), TV (7300K), and sRGB (6300K).
Here are some of the before and after measurements as shown by the DataColor ColorFacts Professional 6.0 system :
|
The default settings in the Cinema mode were not exactly spot on, though I felt that the image was pleasing to the eye and didn't have any dramatic color casts. |
After calibration, the EP1690 fell nicely into place. Red and Blue Gain and Bias had a very high interaction level so it was quite difficult to get the settings exactly perfect (I had to set a 5% tolerance). Overall the image looked fantastic and we were pleased with the results. |
|
While the original settings showed a darker image, the blacks were crushed up to 20 IRE. |
After calibrating the projector we have a nice smooth luminance histogram with a gamma that matches our target almost perfectly. |
|
Pre-calibration color temperature of Cinema mode was a nice 6400K - not bad and certainly a good place to start. |
A result of our calibration produced a slightly higher color temperature overall, but the improvements in performance were worth it. |
Audioholics/HQV Bench Testing Summary of Test
Results
Perfect Score is 130
Optoma EP1690 Benchmark Score: 63
(room for improvement, but this is still an excellent
performer)
|
Test** |
Max
|
Results |
Pass/Fail |
|---|---|---|---|
|
Color Bar |
10 |
10 |
Pass |
|
Jaggies #1 |
5 |
5 |
Pass |
|
Jaggies #2 |
5 |
3 |
Pass |
|
Flag |
10 |
5 |
Pass |
|
Detail |
10 |
10 |
Pass |
|
Noise |
10 |
0 |
Fail |
|
Motion adaptive Noise Reduction |
10 |
0 |
Fail |
|
Film Detail |
10 |
5* |
Pass |
|
Cadence 2:2 Video |
5 |
0 |
Fail |
|
Cadence 2:2:2:4 DV Cam |
5 |
0 |
Fail |
|
Cadence 2:3:3:2 DV Cam |
5 |
0 |
Fail |
|
Cadence 3:2:3:2:2 Vari-speed |
5 |
0 |
Fail |
|
Cadence 5:5 Animation |
5 |
0 |
Fail |
|
Cadence 6:4 Animation |
5 |
0 |
Fail |
|
Cadence 8:7 animation |
5 |
0 |
Fail |
|
Cadence 3:2 24fps film |
5 |
5 |
Pass |
|
Scrolling Horizontal |
10 |
10 |
Pass |
|
Scrolling Rolling |
10 |
10 |
Pass |
|
Total Points |
130 |
63 |
|
*Film detail showed a very slow lock on the first pass and then caught on quickly on
subsequent loops.
** All tests were done via DVI-D inputs at 480i
Comments on HQV Testing
We did all tests at 480i resolution using the DVI-D inputs of the Optoma EP1690. The source component was the new Denon DVD-3930CI which allowed us to send 480i from its HDMI output - a nice feature to have when testing the deinterlacing capabilities of front projection systems. We also tested 1080p into this projector, since it is a supported format. When switching from 480i directly to 1080p the projector was thrown for a loop - and even hitting the re-sync button didn't help. However, once we powered the projector down and brought it back on line, 1080p came up just fine. The scaler on the EP1690 did a very good job of allowing the 1080p/60 to fit into its native display and we noticed only a slight softening of the image overall.
Our moving zone plates test results were amazing. The projector occasionally took its time locking on (especially during the 2-3 diagonal movements) but overall the projector locked on and did much better than many models I've seen to date. This is the first projector we've testing using 480i through DVI-D inputs which might account for some of the performance gains, but regardless this was a very impressive performance. You aren't likely to have jaggie issues (due to bad edits or interlaced input) in real world viewing when using this projector.
I noticed no rainbows (RBE) on this projector during normal use and could, in fact, only see them on our Rainbow Dither test by rapidly darting my eyes from side to side. As I am susceptible to RBE (the RainBow Effect of the Red, Green, and Blue sequential firing from the DLP light engine) this impressed me and let me know that Optoma didn't skimp on this model, even though it isn't targeted solely for home theater use.
Viewing Evaluation and Conclusion
By now we were very impressed with the Optoma projector. It really appeared to have the skills to function well as a portable presentation and home theater projector. In settling down to watch some different shows and DVDs we snapped off some screenshots with commentary to outline some of our observations.
DVD: Hoodwinked
This animated featured didn't measure up to Pixar or Dreamworks SKG levels, but it was entertaining
and provided some good material for checking out the color reproduction
of the EP1690. I found the saturation levels of the image to be very
impressive and black levels were on par with what I'd expect. Detail was crisp and though this movie wasn't rendered with very realistic textures or hair patterns, the presence
of minutia on the screen was abundant enough to get a good feel of how
well minor image details came through.


Late Night in High Definition
Late night television always offers some excellent HD source
material, even if the lighting and colors found in some of the sets
look like they were developed by a crazed baboon who was given the keys
to the primary colors closet. Jay Leno's chin looked remarkable, but of course this had nothing to do with the
projector
- it's just so big it takes up most of the screen on close-ups. Clothing on
the guests came through very well with shadow detail and enough detail
to let you know that the HD feed was being well-represented by the
Optoma projector.
The color shown here is off a bit, but this was due to the camera. Colors were quite natural and pleasing and I was quite impressed when black sports coats showed up clearly against the dark backgrounds of the Letterman set. Overall watching late night TV (or any HD channels for that matter) was very enjoyable.


I had no idea Rick Moranis had a band and could sing. After watching his performance I can now confirm that he does indeed have a band. Rick certainly looked good on stage (how he sounded was another matter entirely). Conan and guests looked great and the set has enough interesting patterns and textures that they actually prompted me to take note and realize that the EP1690 was capturing the smaller background elements in a way that brought the entire picture to life. I really felt that the DLP engine and optics were quite impressive and did a fantastic job on these shows.
Discovery Channel
The Discovery Channel has always been a place that turns almost
anyone into a primitive, drooling idiot. For example, merely watch
someone flipping through channels and observe how they will pause on a
nature show and ogle at nearly anything -
ants foraging for food, a lemur grooming itself in a tree, a monkey
throwing its own -
voice. You get the idea. Now add HD. Yeah, it kind of gets worse. I
found myself gazing at the channel for about an hour until I realized I
should probably start taking some screen shots. By this time the show
had moved on to a safari theme and I grabbed some interesting and
mesmerizing close-up shots of a cheetah and elephants. The zebras are
in there for posterity, but you can certainly see that this display
doesn't show many jaggies (and much of this is due to good transmission
quality at the Discovery Channel HD network). The extreme close-up of
the cheetah is something I'm sure the camera man working that gig will never forget. After seeing
it in my theater, I will likely never forget it either. Elephant skin
is
"super"
textured and this and the colors present in the images were exceptional
and very pleasing to the eye.


Austin Stevens, [Egotistical] Snakemaster
This guy goes beyond being a ham and crosses over into the line of
"I'll do anything to any animal just to look cool". He really comes off as an ego-driven showman and from what I've seen so far he's not very good at handling any kind of animal without inflicting great
amounts of stress on them (the viewer is never stressed, in fact I am
always rooting for him to get bit so we can see how anti-venom works).
In either case, despite the ludicrous show, there were some very
excellent scenes that showed off the black level capabilities of this
DLP projector and might make for a good advertisement of DarkChip2
technology.


Conclusion
If you've made it this far you've seen that multi-purpose projectors don't have to lose face in the home theater. In the past, hybrid models have not impressed me all that much, but attention to detail (like updating the chipset to DC2 technology and providing a fast color wheel) and the inclusion of DVI-D with HDCP make this unit a serious consideration for those looking to have a model that can handle both work and play.
Optoma EP1690 DLP Projector
MSRP: $1899
715 Sycamore Drive
Milpitas, CA 95035 USA
(888) 289-6786
http://www.optomausa.com
About Optoma
Optoma Technology, Inc., a subsidiary of Coretronic Corporation, is
a global manufacturer of high-resolution digital and home entertainment
projectors for consumers, businesses, education, professional audio
video (Pro AV), and CEDIA (Custom Electronic Design and Installation
Association) channels. Headquartered in the heart of Silicon Valley,
Optoma Technology, Inc. was founded in 1991 and has quickly become an
industry leader in high-resolution projection and digital display
products.
The Score Card
The scoring below is based on each piece of equipment doing the duty it is designed for. The numbers are weighed heavily with respect to the individual cost of each unit, thus giving a rating roughly equal to:
Performance × Price Factor/Value = Rating
Audioholics.com note: The ratings indicated below are based on subjective listening and objective testing of the product in question. The rating scale is based on performance/value ratio. If you notice better performing products in future reviews that have lower numbers in certain areas, be aware that the value factor is most likely the culprit. Other Audioholics reviewers may rate products solely based on performance, and each reviewer has his/her own system for ratings.
Audioholics Rating Scale
 — Excellent
- — Very Good
- — Good
- — Fair
- — Poor
| Metric | Rating |
|---|---|
| Detail and Resolution | |
| Deinterlacing & Scaling | |
| Contrast and Black Levels | |
| Color Reproduction | |
| Noise Reduction | |
| Calibration Options | |
| Build Quality | |
| Ergonomics & Usability | |
| Ease of Setup | |
| Features | |
| Remote Control | |
| Performance | |
| Value |
Clint Deboer was terminated from Audioholics for misconduct on April 4th, 2014. He no longer represents Audioholics in any fashion.
View full profile