
Mitsubishi HC5000 Projector Review
Mitsubishi HC5000 3LCD Projector
- Product Name: HC 5000 Projector
- Manufacturer: Mitsubishi Digital Electronics America
- Distributor: ProjectorPeople.com
- Performance Rating:

- Value Rating:
- Review Date: June 27, 2007 09:19
- MSRP: $ 4495
|
Brightness:
1000 ANSI lumens (vivid
mode) |
Zoom:
Powered focus &
zoom (1.6:1) |
Pros
- VERY quiet
- No screen door effect
- Motorized lens shift, zoom, and focus
- Backlit remote
- Native 1080p/24/60 support
- HDMI 1.3 with 480i support
Cons
- Slow, noticeable, undefeatable auto-iris
- Weak remote signal
- HDMI didn't pass Blacker-than-black
- Cumbersome menu system
- Limited horizontal lens shift range
HC5000 Projector Setup and Installation
It seems these days there are almost too many projectors. What?! Too many? Nah, but it makes the playing field very confusing for consumers. In each review I try to narrow in on the type of person who might be looking for the product being reviewed - and consequently, the type of person for whom this product is targeted. I'd like to say that there are products out there which would make everyone happy, but that's not necessarily the case. With the Mitsubishi HC5000 projector, the focus is on combining high quality picture with absolute silence and much-appreciated convenience features. It's a pretty good match-up if you ask me, and it separates this projector from the absolute budget products that are simultaneously hitting the streets.
Things We Really Liked About This Projector
Continuing the above thought,
Mitsubishi has entered a projector into the marketplace with several very nice
convenience features which help distance it from the pack and set it apart:
- Side-loading
5000-hour Lamp
I almost always utilize my projectors in low-power modes for the deepest blacks possible. With a light-controlled room, this ensures you get the best possible black levels and has the added benefit of extending the life of your bulb. At 5000 hours (until 1/2 brightness) this is one of the longer lasting systems on the market. Now let's talk about lamp replacement. If you're like me, you'll mount your projector on the ceiling - and that means that with the Mitsubishi you don't have to remove it from the ceiling while performing a routine bulb replacement. One screw and you're done.
- 19dBA
Fan Noise in Low Mode
Whenever anyone figures out how far away they are when most manufacturers make fan noise measurements, let me know. Until then I'll classify projectors as loud, medium, or quiet. The Mitsubishi HC5000 is near-silent at any practical seating distance. It is one of the quietest projectors I've heard in a long time.
- Silicon
Optix Reon-VX HQV Processing
The Reon-VX chipset is nearly identical in practical performance to the acclaimed Realta and offers exceptional performance, especially when viewing standard definition DVDs and cableTV programming. Noise reduction and scaling should be particularly good on this projector.
Basic Setup and Installation
The HC5000 was easy to install in our viewing and testing room. We placed it onto our temporary front projection platform and set the horizontal and vertical lens shift to fine tune the projector, squaring it to the screen. This is when we discovered the bitter-sweet lens shift system. While it was refreshing to have a motorized system, the relatively tiny 5% horizontal allowance meant that this system is meant for an accurate placement with only minor adjustments. In a practical sense, this is perfectly acceptable - why would anyone not want to accurately mount their projector in the first place. But in our temp setup it caused us to do a bit more work before we aligned the system perfectly with no keystoning.
Zoom and focus are also powered and we had a hard time adjusting either with the remote in a front projection configuration until we changed the batteries on the remote. Even then the remote seemed to not have a very strong signal to the IR receiver - but more on that later. We took practical note of the easy-to-replace lamp and wondered why more manufacturers didn't take into consideration the fact that many people would like the ability to replace the lamp without first having to remove the projector from a ceiling mounted installation. I was proud of Mitsubishi for not requesting users remove the system from a ceiling mount before replacing the bulb. My Yamaha LPX-510 states this in the manual which seems ludicrous as it is another projector with ample side access to the lamp even with a ceiling mount installation. In summary, installation was a breeze and I don't expect any difficulties from installers or consumers.
Throw Chart for
Distancing the Projector from a 16:9 Projection Screen
The Mitsubishi HC5000 has an
adequate zoom lens, though as we mentioned, the limited lens shift made us have
to scramble for a better placement in our room to avoid any keystoning. With a
ceiling mount this will not be an issue for any users. In our room we had the
unit positioned from around 11 feet projecting onto a Studiotek 130 screen.
|
Screen
Size |
Size (Inches) |
Distance (Feet) |
||
|
|
width |
height |
wide |
tele |
|
50 |
44 |
25 |
5 |
8.2 |
|
60 |
52 |
29 |
6.1 |
9.8 |
|
70 |
61 |
34 |
7.1 |
11.5 |
|
80 |
70 |
39 |
8.2 |
13.1 |
|
100 |
87 |
49 |
10.2 |
16.4 |
|
150 |
131 |
74 |
15.4 |
24.8 |
|
200 |
174 |
98 |
20.7 |
33.1 |
HC5000 Inputs, Remote and Menu System
I liked my options on the HC5000. Typically a person isn't going to run multiple component video cables to a projector, so having one option for each connection type seemed very practical and reasonable. Notably, neither the DVI-D or HDMI are shown to support 1080p/24 (at 48Hz) in the user manual, however Mitsubishi claims that it is supported. Unfortunately, my Toshiba HD-XA2 HD DVD player doesn't (yet) so we'll have to pass on this test for now.

Mitsubishi HC5000 rear connections
The all-important 12V
trigger is present on the rear panel of the HC5000 as is a functional RS-232C
which will make this projector fully compatible with higher-end control
systems. The component inputs are for use with a maximum of 720p/1080i, so if
you've got your Xbox ready to output 1080p, downshift it to 1080i or get the
new version with HDMI outputs. Either way I'm betting it still looks great… and
since I'm not a betting man, I'll toss up the screenshots to prove it.
Mitsubishi HC5000 Remote Control
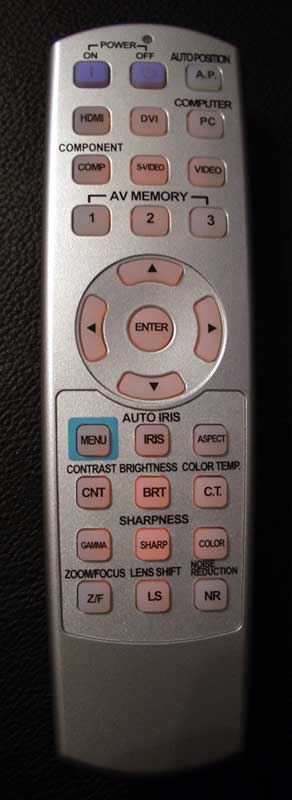 I liked the layout of the
HC5000's remote. All buttons were easily accessible and the backlit function
came on when ANY button was pressed - a feature I appreciate and request in any
projector remote. The backlight stays on for about 6 seconds which is
reasonable, and I liked the arrangement of buttons. What I didn't like was the
range and effectiveness of the remote. I was very difficult to control the
HC5000, even though I was only about 11.5 feet form the screen. At times I
found myself doing contortions to get the remote positioned just right, even
aiming it backwards at times when I finally got frustrated. There is no excuse
for this type of remote control behavior given the price of this unit and beta
testing which certainly must have revealed this prior to release. The reason it
is so frustrating is that it takes all of the positive features like motorized
zoom, focus and lens shift and turns them into "mini-hassles" which
must be endured. Had the remote controlled the system better, then I'd be
spending all this energy and literary real estate gushing about how cool it is
to use a remote to focus and dial-in the picture.
I liked the layout of the
HC5000's remote. All buttons were easily accessible and the backlit function
came on when ANY button was pressed - a feature I appreciate and request in any
projector remote. The backlight stays on for about 6 seconds which is
reasonable, and I liked the arrangement of buttons. What I didn't like was the
range and effectiveness of the remote. I was very difficult to control the
HC5000, even though I was only about 11.5 feet form the screen. At times I
found myself doing contortions to get the remote positioned just right, even
aiming it backwards at times when I finally got frustrated. There is no excuse
for this type of remote control behavior given the price of this unit and beta
testing which certainly must have revealed this prior to release. The reason it
is so frustrating is that it takes all of the positive features like motorized
zoom, focus and lens shift and turns them into "mini-hassles" which
must be endured. Had the remote controlled the system better, then I'd be
spending all this energy and literary real estate gushing about how cool it is
to use a remote to focus and dial-in the picture.
The Menu System
 With the exception of
getting in and out of the sub-menus, the menu system on the HC5000 is
straightforward and easy to navigate. Sub-menus are somewhat anti-ergonomic and
annoying because they force you to scroll all the way to the top to exit a
particular area or hit the Menu button rather than the far more intuitive 'left
arrow' exiting I see in many other projectors. All whining aside, I was at
least happy to see that most of the functions I look for were present and there
was a great deal of customization available in the User menu.
With the exception of
getting in and out of the sub-menus, the menu system on the HC5000 is
straightforward and easy to navigate. Sub-menus are somewhat anti-ergonomic and
annoying because they force you to scroll all the way to the top to exit a
particular area or hit the Menu button rather than the far more intuitive 'left
arrow' exiting I see in many other projectors. All whining aside, I was at
least happy to see that most of the functions I look for were present and there
was a great deal of customization available in the User menu.
Image Menu
This grants the user access to Gamma
(picture) modes and the typical adjustment settings for the projector like
Contrast, Brightness, etc. You can also save your settings to Memory positions
which can be recalled from the remote directly. This is very handy if you
decide to set up unique modes for difference types of viewing (daytime,
nighttime, black & white movies, etc.) AV Memory settings also work across
different inputs.
 Installation
Menu
Installation
Menu
The
Installation menu is simply where you configure the most basic functions of the
display such as auto on/off, background color (when no signal is present),
front/rear projection mode (called "image reverse") and the trigger
output. You can also call up a test pattern and lock the lens so that
adjustments cannot be made which would throw off the picture (handy for once a
system is installed in a ceiling mount configuration).
Feature Menu
This
menu is a catch-all for such controls as aspect ratio, Menu Dimmer/Position,
Setup (a black level mode that we found works best when in Auto or Off),
Language and Cinema (deinterlacing) modes.
 Signal Menu
Primarily
for PC interfacing, this menu gives you the ability to access vertical and
horizontal positioning, Fine Sync and Tracking adjustments. Users will also
find the Overscan function here - be sure to set it to 100% for best scaling
results.
Information
Menu
This
provides info on the currently active source input, delivering signal frequency
and resolution. It also shows the lamp hours which will let you know when
you're getting close to the time when a new lamp should be ordered.
Mitsubishi HC5000 Projector Calibration
Getting Those Black Levels Right!
 I was all set to calibrate the
Mitsubishi HC5000. In fact, I was looking forward to it. I broke out our trusty
datacolor
ColorFacts Professional software and connected the Spyder2 sensor to begin
measuring color temperature, build my CIE color chart and start the process.
When I completed my grayscale measurements I sat back and shook my head. This
projector, at least my evaluation unit, didn't really require calibration out
of the box. The numbers I got were good enough that exercising a full ISF
calibration seemed pointless - the gains would be too small (or likely, I'd
make it worse). I can't say with utter certainty that everyone else's
experiences would be the same (we've been burned before by "golden
units") but my understanding is that this is stock performance for the
HC5000. With that being the case, kudos to Mitsubishi for setting up their
projector properly and making it easy for custom installers to get a great
picture up front and hassle-free.
I was all set to calibrate the
Mitsubishi HC5000. In fact, I was looking forward to it. I broke out our trusty
datacolor
ColorFacts Professional software and connected the Spyder2 sensor to begin
measuring color temperature, build my CIE color chart and start the process.
When I completed my grayscale measurements I sat back and shook my head. This
projector, at least my evaluation unit, didn't really require calibration out
of the box. The numbers I got were good enough that exercising a full ISF
calibration seemed pointless - the gains would be too small (or likely, I'd
make it worse). I can't say with utter certainty that everyone else's
experiences would be the same (we've been burned before by "golden
units") but my understanding is that this is stock performance for the
HC5000. With that being the case, kudos to Mitsubishi for setting up their
projector properly and making it easy for custom installers to get a great
picture up front and hassle-free.
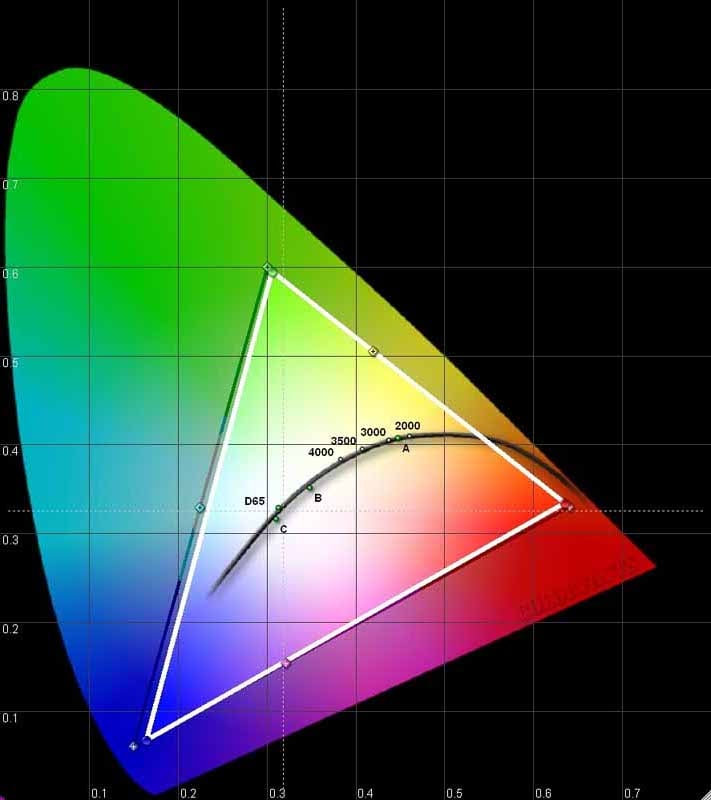
Speaking of doing it correctly, get a load of the CIE chart! The HC5000 has almost flawless color, with no saturation deficiency in either red, green, or blue. I have not seen color this good in a projector in a long time and am happily surprised by what I found in this model.
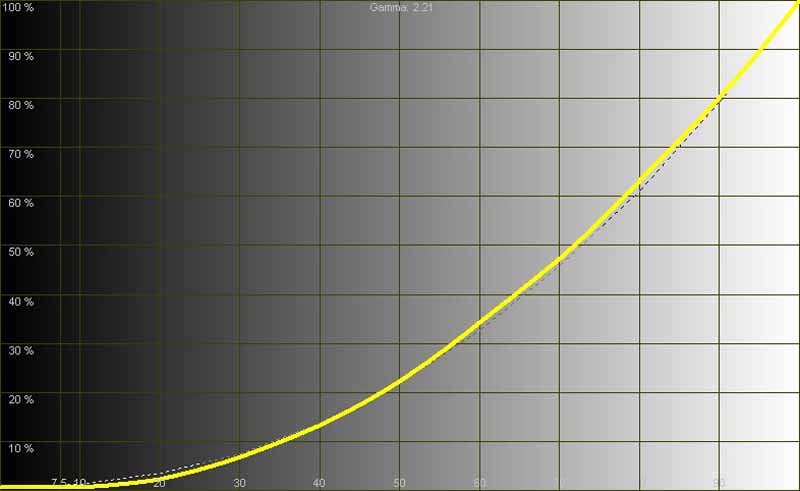
The Measurements
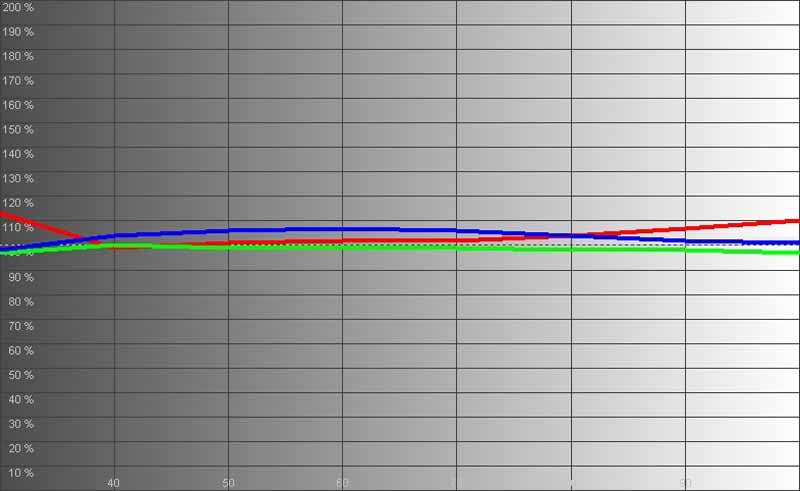
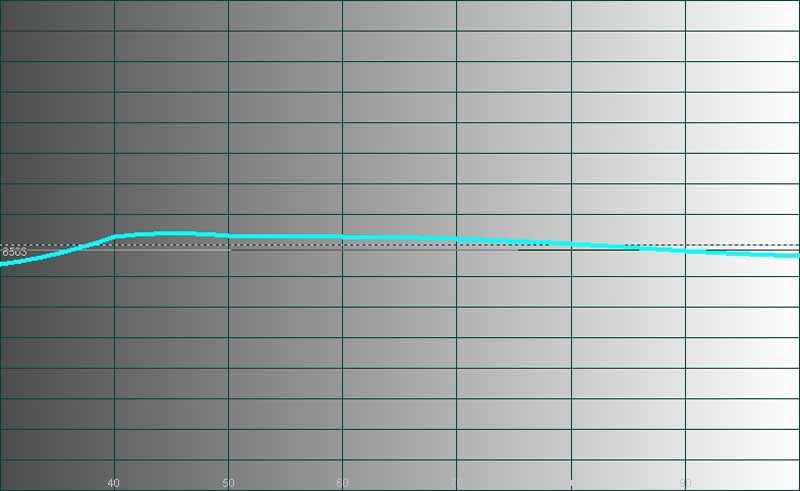
Check out the color temperature from 30 to 80 IRE. It's not flat as a ruler, but you can see that it varies by less than +/-100K across the board. I can live with that kind of tolerance and, unless your name is Joe Kane, so can you. RGB and luminance graphs told me instantly that I was going to leave this beauty alone and 'let it ride' as far as the performance was considered.
Now, getting the color temperature correct only happened with the right settings, and I'm going to give those to you. After setting black and white levels I proceeded to measure color temperature in the various modes. I found that having the projector set to Cinema Mode with color Temperature set to 'Medium' produced the best result (around 6600K at 80IRE). We also measured the color temperatures in various modes (again using an 80IRE field as our reference point):
- Cinema Mode (Warm) - 5700K, perfect for black and white movies!
- Cinema Mode (Medium) - 6600K, the preferred setting
- Cinema Mode (Cool) - 9050K, definitely bluish in hue and much brighter (perceptually)
- Cinema Mode (High Brightness) - 14000K, use this mode if you plan on using your projector for a Bat Signal
There are perceived contrast ratios and there are real contrast ratios. In my room I measured 680:1 in Low lamp Cinema Mode. Maxing out the system I attained 1425:1 using the High Brightness modes and Standard lamp power. I also measured the ability of the projector to hit the screen in the Cinema and max modes. I got 12.4 fL in the desired Cinema mode with low lamp and Medium color temperature. Powering up to maximum we achieved around 28.5 fL. Both measurements were to a 100-inch Stewart Studiotek 130 screen (1.3 gain) from 11.5 feet away.
As I mentioned above, the golden settings are Cinema gamma and Medium color temperature. Put your lamp in low mode if you have total light control in your room. If you feel you aren't getting enough light to the screen, then put the lamp into Standard mode and see how that does for you. Over time the bulb will decrease in intensity, so if you're like me you may not want to wait until the last second to replace it. By that time you may be watching around 7-8 foot-Lamberts and missing much of the picture detail.
HC5000 Benchtesting and Performance
Perfect SD Score is 130Perfect
HD Score is 100
Mitsubishi
HC5000 Benchmark SD Score: 105 (you are going to get an excellent
picture)
Mitsubishi
HC5000 Benchmark HD Score: 95 (you are going to get an excellent picture)
|
SD Test |
Max |
Results |
Pass/Fail |
|
Color Bar |
10 |
10 |
Pass |
|
Jaggies #1 |
5 |
5 |
Pass |
|
Jaggies #2 |
5 |
5 |
Pass |
|
Flag |
10 |
10 |
Pass |
|
Detail |
10 |
10 |
Pass |
|
Noise |
10 |
10 |
Pass |
|
Motion adaptive Noise Reduction |
10 |
10 |
Pass |
|
Film Detail |
10 |
10 |
Pass |
|
Cadence 2:2 Video |
5 |
5 |
Pass |
|
Cadence 2:2:2:4 DV Cam |
5 |
0 |
Fail |
|
Cadence 2:3:3:2 DV Cam |
5 |
0 |
Fail |
|
Cadence 3:2:3:2:2 Vari-speed |
5 |
5 |
Pass |
|
Cadence 5:5 Animation |
5 |
0 |
Fail |
|
Cadence 6:4 Animation |
5 |
0 |
Fail |
|
Cadence 8:7 animation |
5 |
0 |
Fail |
|
Cadence 3:2 24fps film |
5 |
5 |
Pass |
|
Scrolling Horizontal |
10 |
10 |
Pass |
|
Scrolling Rolling |
10 |
10 |
Pass |
|
Total Points |
130 |
105 |
|
The HC5000 was sent 480i via HDMI from a Denon DVD-3930CI. We also confirmed results with 1080i upconversion.
|
HD Test |
Max |
Results |
Pass/Fail |
|
HD Noise Reduction A & B |
25 |
20 |
Pass |
|
HD Video Resolution Loss |
20 |
20 |
Pass |
|
Jaggies A & B |
20 |
20 |
Pass |
|
Film Resolution Loss |
25 |
25 |
Pass |
|
Film Resolution Loss Stadium |
10 |
10 |
Pass |
|
Total Points |
100 |
95 |
|
The HC5000 was sent 1080i via HDMI from a Toshiba HD-XA2 HD DVD Player.
Comments on Bench Testing
The Silicon Image HQV Reon-VX chip is an excellent product. If it shaves $100 or so off the price of a product I'd take it over the Realta any day - the differences simply aren't noticeable in day to day use. Deinterlacing was rock solid and quick. Scaling was impressive, but make sure you rest the default Overscan setting to 100% for best results. Sharpness is initially set at around 6. I tried every setting and it appears, for the most part, to be a "dummy" control, having little effect on picture clarity. I could wax philosophical about how much better the picture looks when you set it here or there, but honestly it doesn't appear to make a lick of difference. I set it to -10 just for fun. Image clarity is among the best I've seen, with very fine detail coming through in a way that reveals a lot of picture depth. The Mitsubishi also produces amazing noise reduction which surpasses much of what I've seen to-date in non-HQV systems. If you overdrive the noise reduction, especially the MPEG-2 variety, you can attain a blotchy picture that loses all manner of detail, but when used properly, and especially with HD material, the noise reduction circuitry is impeccable.
As both HD and standard definition tests passed with flying colors, you can be sure that the HC5000's processing is ready for just about anything you can throw at it - and all without the use of an external video processor - not a bad deal. The more I used this projector, the more I liked it - well, except for the misfiring remote…
HC5000 Viewing Evaluations and Conclusion
Movies in HD- and Standard DVD
It goes without saying that when you pair an actual 1080i or 1080p signal with the Mitsubishi HC5000 you get the sort of visual nirvana not experienced by many in this hobby. I highly recommend you make this pairing as often and frequently as you are able. We ran a Toshiba HD-XA2 HD DVD player (courtesy of ProjectorPeople.com) in 1080p mode to the HC5000 and were blown away by the results. But that, of course, is to be expected. More than this, though, we were amazed at the clarity and detail found in standard definition discs - which we ran in 480i mode from our Denon DVD-3930CI (so as to evaluate the projector's total performance, not the DVD player's).
One thing I couldn't help but notice early on was the automatic Iris system. It's extremely slow and very noticeable in all modes (use Auto 1 for the least intrusive setting). As a scene shifts from very bright to very dark there will be a second or two delay and you will see the picture darken overall as the iris closes down. There is also no way to simply crank it down and lower overall light output without enabling the auto-adjustments or setting it to "Open" which brightens the overall image and destroys black levels. This is a feature in desperate need of being "lost". To not offer a fixed option for the Iris is a shame and is about the only thing keeping this projector from being a top-ranked contender. Somewhere I imagine there is an employee at Mitsubishi who is saying "see I told you so!"
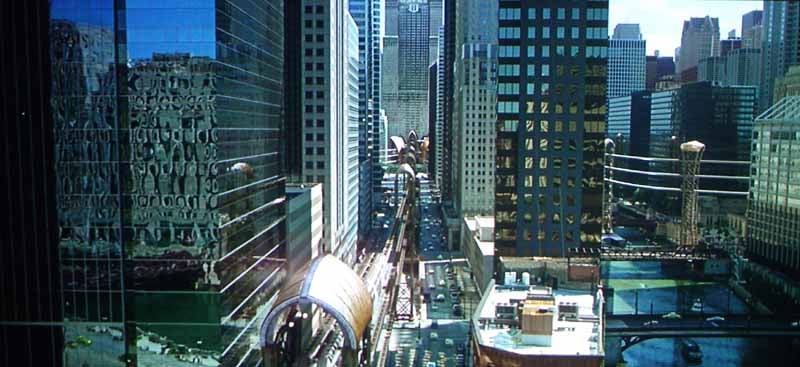
HD DVD - Batman
Begins
 This movie was dark… and detailed… and absolutely reference quality. I
loved the plot, but I loved watching the natural torture tests shown on-screen
even more. Whether it was pin-striped shirts, or city skylines that would make
any jaggie-reduction scream in terror, Batman Begins is a movie that you can
test nearly all aspects of a projector's video processing system with. I also
like the fact that you can enjoy your time while doing it. There are test
scenes that are absolutely horrendous to sit through - this movie makes it fun
and easy. I cautiously watched through the darkest scenes (nearly the whole
movie in fact) and tried to pick out loss of detail, crushed blacks or banding,
but found none. Everything came through impeccably and with the sort of
naturalness that gave the images rendered by the HC5000 a clarity and depth I
don't see all the time.
This movie was dark… and detailed… and absolutely reference quality. I
loved the plot, but I loved watching the natural torture tests shown on-screen
even more. Whether it was pin-striped shirts, or city skylines that would make
any jaggie-reduction scream in terror, Batman Begins is a movie that you can
test nearly all aspects of a projector's video processing system with. I also
like the fact that you can enjoy your time while doing it. There are test
scenes that are absolutely horrendous to sit through - this movie makes it fun
and easy. I cautiously watched through the darkest scenes (nearly the whole
movie in fact) and tried to pick out loss of detail, crushed blacks or banding,
but found none. Everything came through impeccably and with the sort of
naturalness that gave the images rendered by the HC5000 a clarity and depth I
don't see all the time.
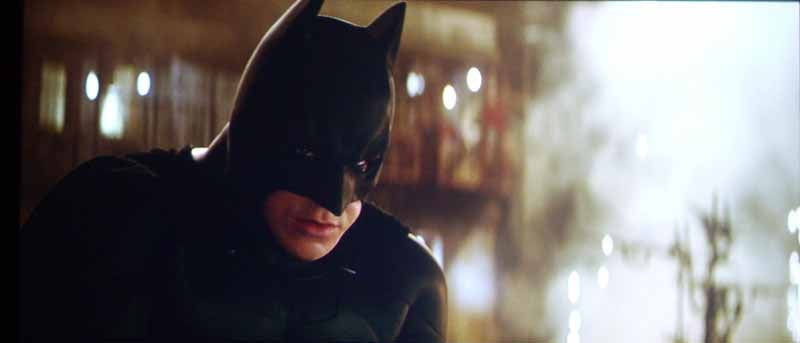
I could post about 10 more shots of the film, but I'll cover that in my HD DVD review of the movie which will be published shortly after this review.
HD DVD - We
Were Soldiers
 I can't believe I missed this movie
on initial release, but somehow I did. Mel Gibson and Randall Wallace
(Braveheart) teamed up to bring another epic title to the screen - and pulled
it off with gusto. This movie had a lot of detail mixed with extremely
fast-paced action. Due to the quality of the film, motion adaptive noise
reduction played a major roll here and the Mitsubishi didn't drop the ball. The
interesting picture also juxtaposed colorful breakaway sequences of the family
life the soldiers left behind and broke up the more earthy color sequences that
dominated the Vietnam battlefield. I loved looking around the scenes as they
went by, checking out the details in the earth and rocks as well as the
equipment, outfits and helicopters. It's a great movie, and though I would
hardly call it reference quality, it made for an excellent test-bed of the
HC5000's capabilities.
I can't believe I missed this movie
on initial release, but somehow I did. Mel Gibson and Randall Wallace
(Braveheart) teamed up to bring another epic title to the screen - and pulled
it off with gusto. This movie had a lot of detail mixed with extremely
fast-paced action. Due to the quality of the film, motion adaptive noise
reduction played a major roll here and the Mitsubishi didn't drop the ball. The
interesting picture also juxtaposed colorful breakaway sequences of the family
life the soldiers left behind and broke up the more earthy color sequences that
dominated the Vietnam battlefield. I loved looking around the scenes as they
went by, checking out the details in the earth and rocks as well as the
equipment, outfits and helicopters. It's a great movie, and though I would
hardly call it reference quality, it made for an excellent test-bed of the
HC5000's capabilities.

DVD - Tristan
& Isolde My wife picked out this movie and I was hesitant at the title until I
read a bit more about it. When it played out on screen I was amazed at how good
a movie could be that essentially blended the stories of Romeo and Juliet with that
of Guinevere and Lancelot (I highly recommend you read The Once and Future King by T.H. White). In short, the story is
excellent and the cast was brilliant. As for the picture, it was pretty good -
especially with regards to close-ups of faces and garments (which were all
hand-made to exquisite detail on-set). Because this movie had a lower budget,
the photography was a bit bland in terms of color, so this wasn't a great film
for stretching the depth of saturation the HC5000 is capable of delivering. For
detail and black level, however, Tristan
and Isolde was a great piece of test material. James Franco is definitely
on the upswing of his career.
My wife picked out this movie and I was hesitant at the title until I
read a bit more about it. When it played out on screen I was amazed at how good
a movie could be that essentially blended the stories of Romeo and Juliet with that
of Guinevere and Lancelot (I highly recommend you read The Once and Future King by T.H. White). In short, the story is
excellent and the cast was brilliant. As for the picture, it was pretty good -
especially with regards to close-ups of faces and garments (which were all
hand-made to exquisite detail on-set). Because this movie had a lower budget,
the photography was a bit bland in terms of color, so this wasn't a great film
for stretching the depth of saturation the HC5000 is capable of delivering. For
detail and black level, however, Tristan
and Isolde was a great piece of test material. James Franco is definitely
on the upswing of his career.


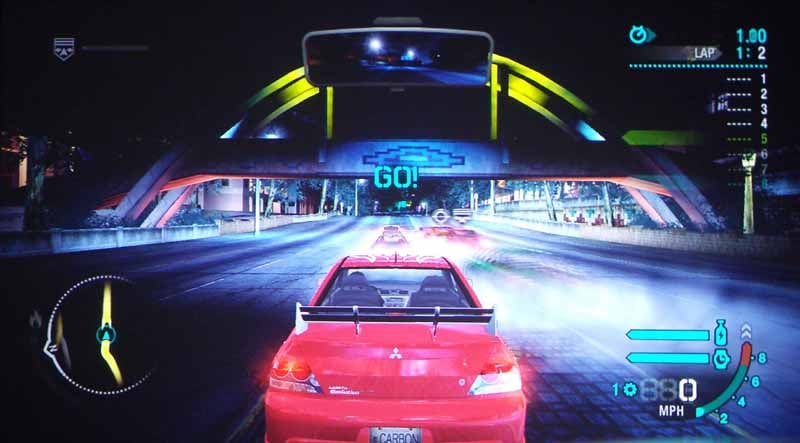
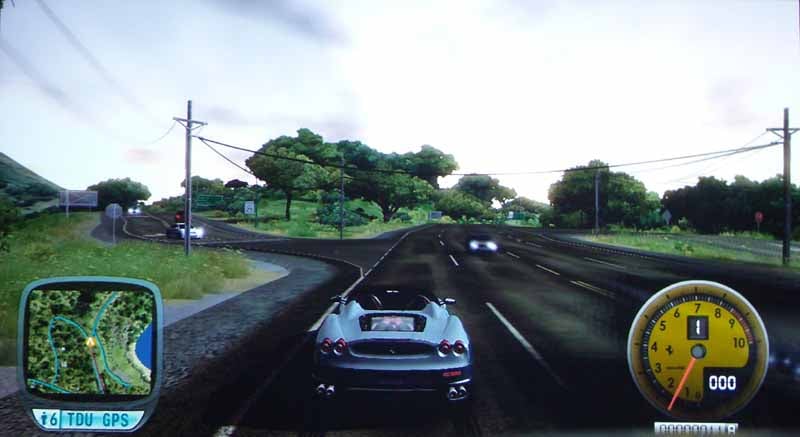
Xbox 360 at 1080i: Various Games
Between movies and my Xbox 360, I can say that I really enjoyed using the HC5000 projector. Games in particular (the Audioholics crew gets together every Wednesday night for some online playing) looked fantastic on this display and sitting just over 11 feet away from a 100-inch screen while playing Halo2, driving a $200,000+ Ferrari or picking off rogue South American dissidents is something not to be missed.
Conclusion
I was skeptical when I began this review. I am admittedly not a fan of Mitsubishi's other projectors, mostly due to the fact that they exhibit more rainbow effect (in my experience) than other models. The HC5000 3LCD projector is an amazing product. The C2Fine technology (thanks, Epson) renders an incredible picture and does indeed produce some excellent black levels. The automatic Iris system is the only major downfall of this projector that I witnessed. It is slow and noticeable when watching movies; you'll think a cloud suddenly rolled in as you switch from a bright scene to a dark scene since the change isn't instantaneous. With the current crop of video processing technology and pixel-level interpolation, I am surprised the system isn't faster at picking up and responding to averaged luminance changes - and dumbfounded that they didn't offer an option to effectively disable the iris system without blowing out black levels in the process.
Picture quality and video processing were way above par. This is not necessarily a budget projector, but considering the advanced features and "convenience package" Mitsubishi throws in with motorized lens shift, focus and zoom - not to mention the sleek lines and beautiful housing - you do indeed have a value product. One must also consider the calibration results - if this is consistent across all models, then the HC5000 gets my complete thumbs up as a "must-see" product and one of the nicest pictures I've witnessed this year. In a sea of new 1080p projectors being released this year, Mitsubishi has a distinctive product that sets it apart as a leader. If you're shopping for a 1080p model you owe it to yourself to check it out. If you're a custom installer this unit should be on your very short list as it's certain to make your customers ecstatic.
Mitsubishi HC5000 LCD Projector
MSRP: $4,495
Get a Great Price Now from ProjectorPeople.com
Mitsubishi
Digital Electronics America
9351 Jeronimo Road
Irvine, Calif., 92618
http://www.mitsubishi-presentations.com
About
Mitsubishi Digital Electronics America Presentation Products Division
Mitsubishi Digital Electronics America's Presentation Products Division markets
an extensive line of professional presentation, front-projection home
entertainment, and rear-projection video wall cube display systems and digital
signage monitors that are designed with DLP® or LCD technology, and is known
for its award-winning, high-quality, accurate color reproduction technology.
Products are sold through authorized distributors, resellers, retailers and
system integrators throughout the United States and Mexico. Mitsubishi Digital
Electronics America is located at 9351 Jeronimo Road, Irvine, Calif., 92618.
For more information, please call 888-307-0312 or visit http://www.mitsubishi-presentations.com.
The Score Card
The scoring below is based on each piece of equipment doing the duty it is designed for. The numbers are weighed heavily with respect to the individual cost of each unit, thus giving a rating roughly equal to:
Performance × Price Factor/Value = Rating
Audioholics.com note: The ratings indicated below are based on subjective listening and objective testing of the product in question. The rating scale is based on performance/value ratio. If you notice better performing products in future reviews that have lower numbers in certain areas, be aware that the value factor is most likely the culprit. Other Audioholics reviewers may rate products solely based on performance, and each reviewer has his/her own system for ratings.
Audioholics Rating Scale
 — Excellent
- — Very Good
- — Good
- — Fair
- — Poor
| Metric | Rating |
|---|---|
| Detail and Resolution | |
| Deinterlacing & Scaling | |
| Contrast and Black Levels | |
| Color Reproduction | |
| Noise Reduction | |
| Calibration Options | |
| Build Quality | |
| Ergonomics & Usability | |
| Ease of Setup | |
| Features | |
| Remote Control | |
| Fit and Finish | |
| Performance | |
| Value |
Clint Deboer was terminated from Audioholics for misconduct on April 4th, 2014. He no longer represents Audioholics in any fashion.
View full profile