
Mitsubishi HC1500 DLP Projector Review
Mitsubishi HC1500 DLP Projector
- Product Name: HC1500 DLP Projector
- Manufacturer: Mitsubishi
- Distributor: ProjectorPeople.com
- Performance Rating:


- Value Rating:
- Review Date: August 31, 2007 13:01
- MSRP: $ 995
|
Brightness:
1600 ANSI lumens (vivid
mode) |
Lens Shift: None
Keystone Correction: +/- 15 degrees (vertical) Lamp: 200W UHP, 3000 hours low mode Power Supply: 100-120 volts, 2.7A Power Consumption: 245W (high); 200W (low); 4W (standby) Operating Temperature: 32 – 104 degrees F (0 – 40 degrees C); 20-80% humidity (no condensation) Fan: 24dBA operation (19dBA in low mode) Remote Control: Backlit w/batteries included Standard Accessories: AC Power cable, RGB cable, RS-232C cable, Remote Unit (incl. battery), Light shade cover, Quick Start Card, User Manual, Safety Manual Warranty: 1 year parts & labor, 90-days lamp |
Pros
- 1080p/60 support
- Main menu shows input signal resolution
- RS-232C control
- Excellent color
- Good out-of-the-box performance
Cons
- No 480i support over HDMI
- Significant rainbow effect
- Default Sharpness setting too high
- Can crush blacks if not careful
HC1500 Introduction and Basic Setup
I like to include budgetary concerns in most of my shopping articles and buying guides. It's important and conveys my desire to see everyone make the best purchasing decisions they can within their means. With front projection prices dropping, these products are starting to becomes the bargains of the century in terms of price per square inch. We missed the boat on checking out the HD1000U and absolutely jumped at the chance to recoup our losses and get a close look at the new Mitsubishi HC1500 projector. The attraction is a clean system that handles up to 720p for a retail price that is less than $1000.
Things We Really Liked About This Projector
Continuing the above thought, Mitsubishi has entered a projector into the marketplace with several very nice convenience features which help distance it from the pack and set it apart:
- BrilliantColor
While not new, this function is nice in that it allows for a quick way to eek out more brightness to suit the time of day and ambient lighting conditions in your viewing room. It's almost like a built in day and night adjustment, however when activated it will crush your white levels so use sparingly.
- 12V
trigger
Many times this feature gets left out of lesser-priced units. It's nice to know that the HC1500 can be used with a motorized screen if desired.
- Price
& RS-232C
At under $1000 you really can't beat this 720p projector for getting HD into your living room without breaking the bank. To also include RS-232C control options (with clear codes at the Mitsubishi website) is absolutely unreal in terms of value.
Basic Setup and Installation
We placed the projector high up on our stand and configured it to hit our 100-inch Stewart Studiotek 130 screen. We found the throw distance was longer than we typically encounter and it required about 12 feet to fill our screen completely. Keep this in mind as you will need to position the unit precisely in your room due to the absence of lens shift. As always, we recommend avoiding any keystone adjustments.
Throw Chart for Distancing the Projector from a 16:9 Projection Screen
Here's a quick guideline for setting up the HC1500 to best meet the various available screen sizes.
| Screen Size Diagonal (inches) |
Size (Inches) | Distance (Feet) | ||
| width | height | wide | tele | |
| 50 | 44 | 25 | 5.9 | 7.1 |
| 60 | 52 | 29 | 7 | 8.6 |
| 70 | 61 | 34 | 8.3 | 10.1 |
| 80 | 70 | 39 | 9.5 | 11.6 |
| 100 | 87 | 49 | 11.9 | 14.4 |
| 106 | 92 | 52 | 12.6 | 15.3 |
| 120 | 105 | 59 | 14.4 | 17.5 |
 As you can see, you may
require some additional distance in order to fill your screen completely. This
isn't a big deal unless you have a room that is shorter in length or you find
the need to place the projector closer to the screen due to other physical
restrictions of the environment.
As you can see, you may
require some additional distance in order to fill your screen completely. This
isn't a big deal unless you have a room that is shorter in length or you find
the need to place the projector closer to the screen due to other physical
restrictions of the environment.
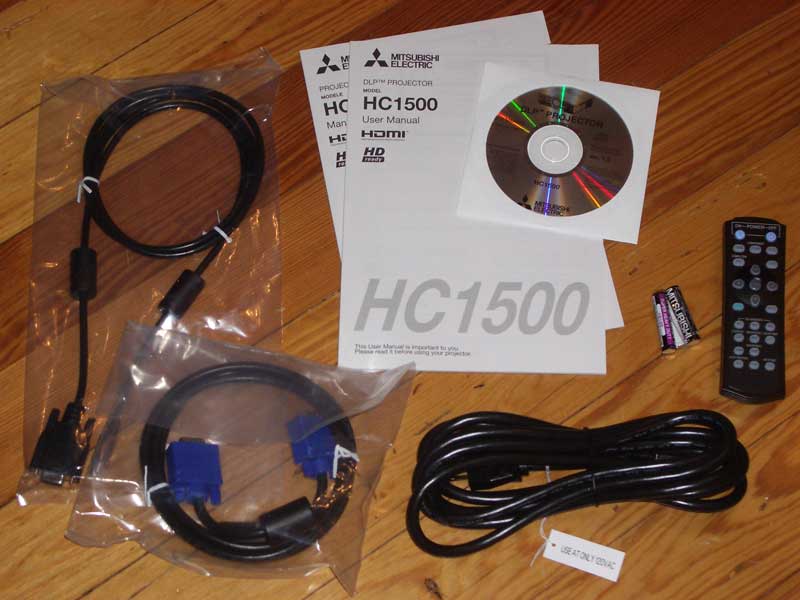
The projector itself comes with an AC Power cable, RGB (HD15) cable, RS-232C cable, remote control (including batteries), lens cover, Quick Start card, User Manual and a Safety Manual. You'll need an HDMI or component video cable if you're planning on using either of those inputs (recommended.)
HC1500 Inputs, Build Quality, Remote and Menus
There are sufficient connections on the back of the Mitsubishi HC1500 to satisfy anyone I know. You have HDMI and component, with another available component input via the HD15 (VGA) connection. For those of you who don't have any HD sources and feel the need to blow up 480i imagery to ridiculous sizes there is a composite and s-video input as well. The surprise on the back of this unit, for me at least, was the presence of a serial RS-232C connection. With an 8-pin DIN to D-sub adapter you can fully control the HC1500 with an advanced system such as those from AMX, Crestron or similar.
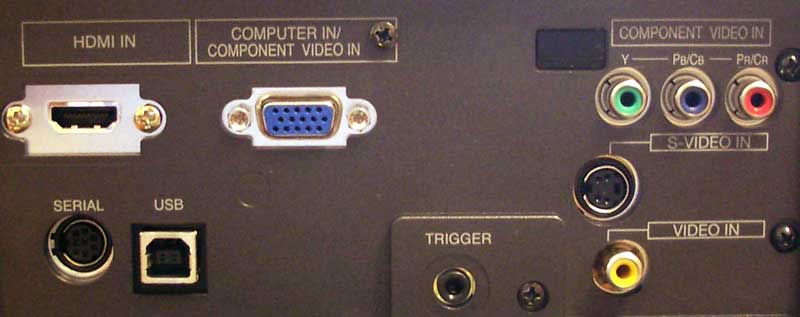
Mitsubishi HC1500 rear connections
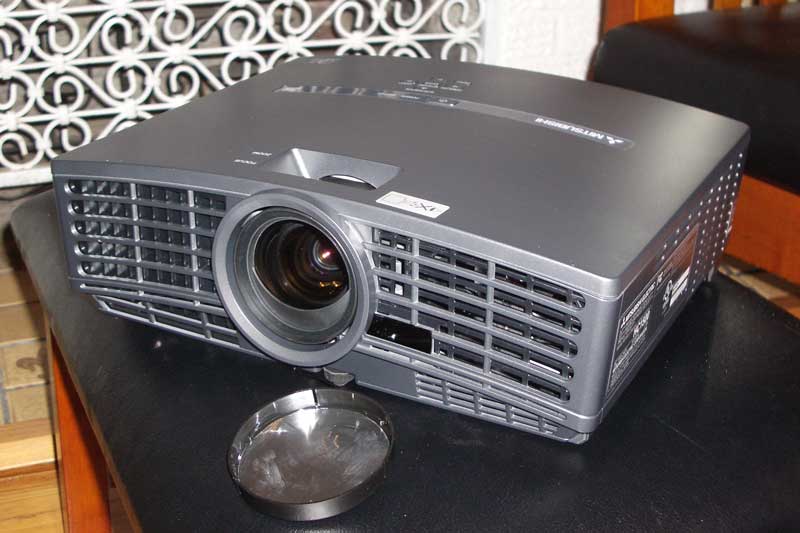 The HC1500 is really a great little
box. With this many inputs and the ability to handle both 1080p/60 input
signals (and with a 720p native panel resolution) it's going to be very hard to
beat for value. The physical box itself has the same look of the HD1000 and
HD4000 models. There is a manual focus and zoom adjustment just behind the lens
as expected and much of the front and side panels are devoted to airflow and
venting. As a result, there is a significant amount of light leakage from the
front and right side of the unit. Fan noise was consistent but not terribly
loud, though it did have a soft whine attached to it rather than a gentle
whisper. An attached lens cap keeps the dust from settling on the lens when not
in use. Aside from the remote, there are 7 buttons atop the unit for power,
menu control, input selection and keystone correction. These buttons are
multi-function and allow you to get the system up and running even if you are
unable to access the remote.
The HC1500 is really a great little
box. With this many inputs and the ability to handle both 1080p/60 input
signals (and with a 720p native panel resolution) it's going to be very hard to
beat for value. The physical box itself has the same look of the HD1000 and
HD4000 models. There is a manual focus and zoom adjustment just behind the lens
as expected and much of the front and side panels are devoted to airflow and
venting. As a result, there is a significant amount of light leakage from the
front and right side of the unit. Fan noise was consistent but not terribly
loud, though it did have a soft whine attached to it rather than a gentle
whisper. An attached lens cap keeps the dust from settling on the lens when not
in use. Aside from the remote, there are 7 buttons atop the unit for power,
menu control, input selection and keystone correction. These buttons are
multi-function and allow you to get the system up and running even if you are
unable to access the remote.
Remote Control
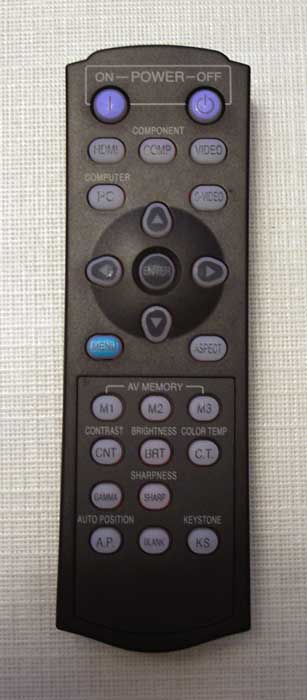 The HC1500 remote is pretty good,
especially given the low cost of entry for this projector. You have direct
access to input sources (all 5 input options) as well as some ways to
immediately interact with many of the primary picture controls (BrilliantColor
isn't one of these, however). Discrete On and Off buttons/commands are
available on the remote as well – and which enabled this remote to land a healthy 4/5 score. One of my favorite
features was the presence of three AV memory setting buttons. Selecting one of
these buttons allows configuration and/or recall of the Image Menu settings for
that selection. In this way I was able to configure a setting for nighttime
Cinema viewing, one for Daytime viewing and another for black & white films
(with a slightly lower/warmer color temperature). These are excellent features
to have and the Mitsubishi puts them right at your fingertips which is very
nice.
The HC1500 remote is pretty good,
especially given the low cost of entry for this projector. You have direct
access to input sources (all 5 input options) as well as some ways to
immediately interact with many of the primary picture controls (BrilliantColor
isn't one of these, however). Discrete On and Off buttons/commands are
available on the remote as well – and which enabled this remote to land a healthy 4/5 score. One of my favorite
features was the presence of three AV memory setting buttons. Selecting one of
these buttons allows configuration and/or recall of the Image Menu settings for
that selection. In this way I was able to configure a setting for nighttime
Cinema viewing, one for Daytime viewing and another for black & white films
(with a slightly lower/warmer color temperature). These are excellent features
to have and the Mitsubishi puts them right at your fingertips which is very
nice.
The remote was also very easy to use and the signal bounced from the screen to the projector in almost any position. I tried pretty hard to point the signal in places where it might not reach the unit and most of the time I had to quite deliberately aim away from anything in order to allow the remote to file to reach its target. The only thing keeping this remote from attaining a 5/5 was the fact that the backlight was so dim it was at times difficult to read the buttons. All remotes should work this well.
The Menu System
Simliar to other Mitsubishi projectors that share nearly identical software, the menu system on the HC1500 is straightforward and easy to navigate. I still don't like exiting interior levels of the submenus by either scrolling all the way to the top or by pressing the Menu button, but its certainly something one gets used to and the menu system will not be used all that much once you have everything configured to your liking. I went over most of the Menu functions in my review of the Mitsubishi HC5000 as well as our reviews of the HD4000. Not too much has changed so feel free to look up those reviews for more details. You can now access BrilliantColor from the Image menu, which also makes that feature part of the AV Memory functionality and Vertical Location adjustments can be made for those who may have devices which require adjustment of the vertical image.
HC1500 Measurements, Calibration and Bench Testing
 We continue to utilize datacolor
ColorFacts Professional software to measure and calibrate
projectors using the user controls. With the HC1500 you actually get very
acceptable picture quality out of the box, provided you start with the correct
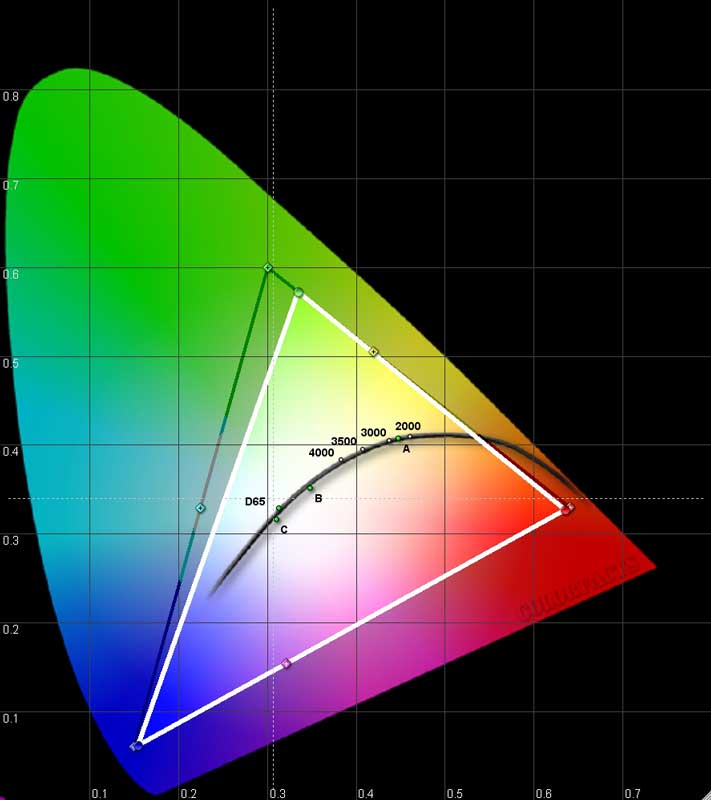
initial settings for Color Temperature and Black & White levels. Color potential wasn't bad according to the CIE chart here. If anything, the greens dipped a bit towards yellow but red and blue were almost spot-on. I also
recommend turning BrilliantColor down to 0 if you aren't trying to eek out as
much light output as possible (i.e. keep it off for theaters and light-controlled
rooms.) BrilliantColor is a nice feature, but it will cause excessive white
levels and throw additional light into the room which detracts from the image
on the screen. Here were my recommended settings:
We continue to utilize datacolor
ColorFacts Professional software to measure and calibrate
projectors using the user controls. With the HC1500 you actually get very
acceptable picture quality out of the box, provided you start with the correct
initial settings for Color Temperature and Black & White levels. Color potential wasn't bad according to the CIE chart here. If anything, the greens dipped a bit towards yellow but red and blue were almost spot-on. I also
recommend turning BrilliantColor down to 0 if you aren't trying to eek out as
much light output as possible (i.e. keep it off for theaters and light-controlled
rooms.) BrilliantColor is a nice feature, but it will cause excessive white
levels and throw additional light into the room which detracts from the image
on the screen. Here were my recommended settings:
- Gamma Mode: Cinema
- Contrast: +4
- Brightness: +4 (might want to bump to +5 or +6)
- Color Temp: Medium
- Sharpness: -5
- BrilliantColor: 0
With these settings I got the “Before” measurements you'll see below. Sharpness and Brilliant Color both defaulted to 3. For BrilliantColor this wasn't a bad initial setting, but the Sharpness control on this machine needs to be turned down completely for best results (it's not a dummy control, when turned up it will create edge enhancement artifacts – at least with the patterns we tested). Here is a breakdown of initial color temperature, measured at 80IRE, to give you an idea why we chose Medium of the available options:
- Warm: 6200K
- Medium: 6700K
- Cool: 9000K
- High Brightness: 6700K
We measured Contrast Ratio to be a healthy 975:1 (real world) at the above settings. With BrilliantColor at the default level of 3 this crept up to 1187:1 and it jumped to 1714:1 when we maxed it out to 10. In terms of color performance, our measurements showed excellent results for both red and blue with a slight tilt towards yellow for green (see pic of CIE chart).
Note: We're not opposed to using BrilliantColor, however I prefer to keep the lumens lower so as to not drive up Black levels and increase ambient room light from the screen.
The Measurements
We took our initial measurements once we located the best Color Temperature settings and configured the correct Black and White levels (imperative in any projector system, so be sure to use either Digital Video Essentials, AVIA Guide to Home Theater, or any THX DVD.) Here's what we got:
As you can see the 6700K measured color temperature extended across the board, and an elevated red and green dominated across the IRE range, but almost perfectly in unison, delivering a very nice picture overall. It would not be unthinkable for users of this projector to simply configure it with the proper Color Temp setting, Black and White level and be done with it.
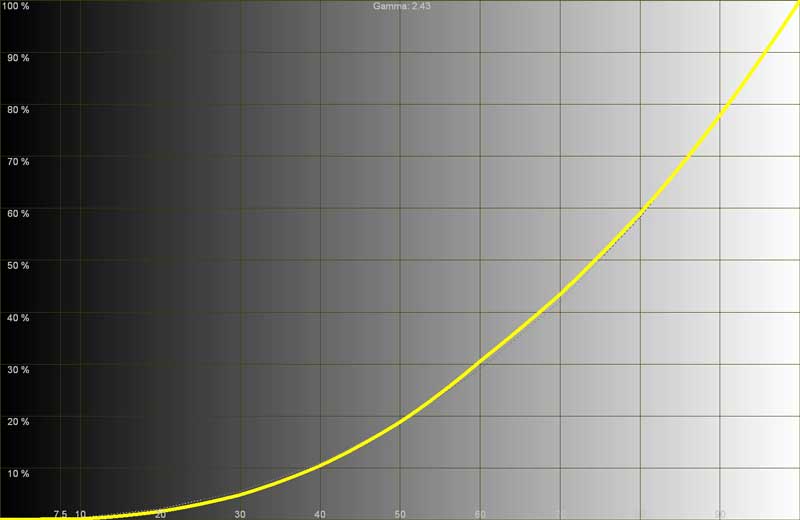
The before and after luminance histogram was almost identical, showing a smooth gradation throughout the entire range, though there was significant flatness at the bottom levels (<12 IRE). This led to some visibly crushed blacks in later video testing, so you may want to bump up black levels a notch or two above what is normal for test disc patterns. Calibration didn't affect this too much since our black and white levels were unmodified once we began.
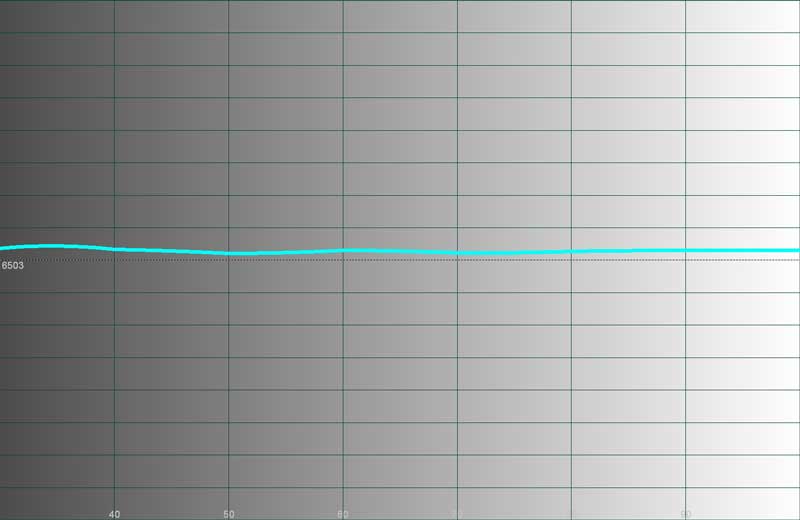
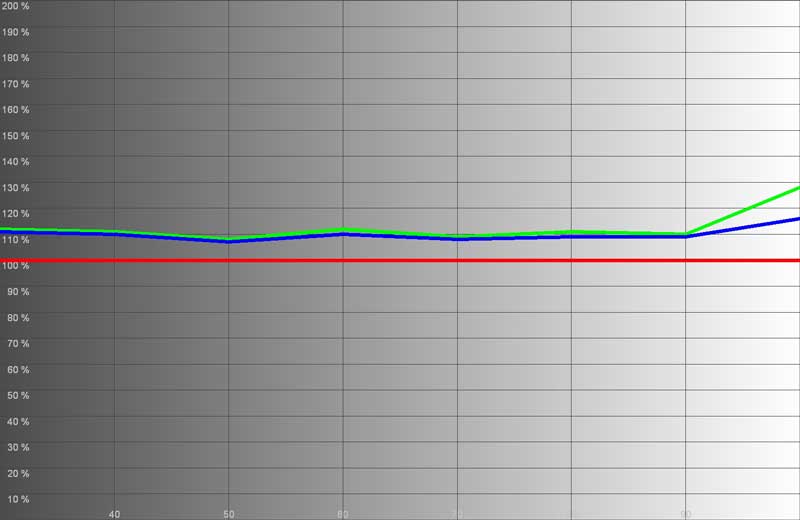
Here are our after results for temperature and RGB:

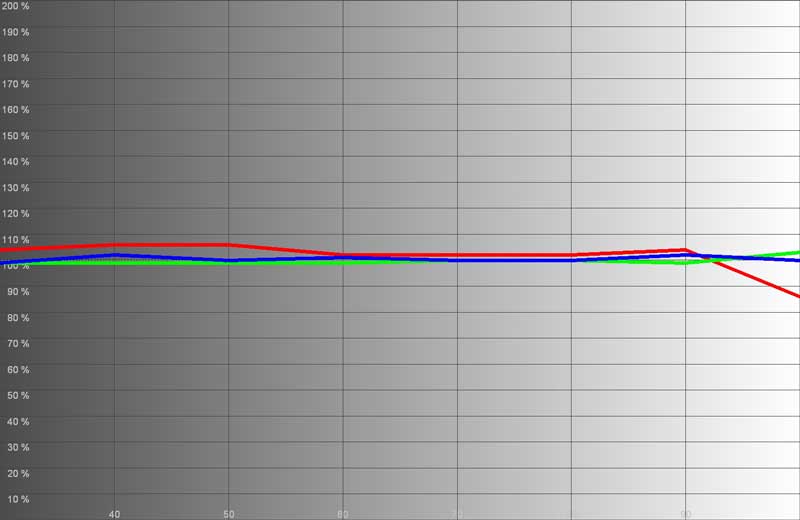
Color temperature was almost dead on throughout the entire luminance range and RGB looked much better with a slight bit of red carrying over across the range, making the picture lean just a tad to the warm side.
The max light output in Cinema mode with the Color Temperature set to Medium and black and white levels calibrated was 26.5 fL at the screen. At max brightness mode and BrilliantColor engaged at its maximum setting of 10 that number jumped to 46.9 fL (note that without adjusting BrilliantColor you won't get much more light out of the projector). Now, kick the lamp into Standard mode and that number jumps to almost 59 fL. If you want to use this projector in a room with some ambient light (for example during a sports party, etc, you'll be able to do so with very little difficulty (though you'll be absolutely crushing your white levels). In fact, you might burn a hole in your projector screen... just kidding… I think.
Now, getting the color temperature closer to the desired 6500K is possible with the right Color Temp setting, and I'm going to give that to you. After setting black and white levels I proceeded to measure color temperature in the various modes. I found that having the projector set to Cinema Mode with color Temperature set to 'Medium' produced the best result (around 6600K at 80IRE). We also measured the color temperatures in various modes (again using an 80IRE field as our reference point):
- Cinema Mode (Warm) - 5700K, perfect for black and white movies!
- Cinema Mode (Medium) - 6600K, the preferred setting
- Cinema Mode (Cool) - 9050K, definitely bluish in hue and much brighter (perceptually)
- Cinema Mode (High Brightness) - 14000K, use this mode if you plan on using your projector for a Bat Signal
Audioholics/HQV Bench Testing Summary of Test Results
Perfect
SD Score is 130
Perfect
HD Score is 100
Mitsubishi
HC1500 Benchmark SD Score: 66 (you are going to get a nice picture)
Mitsubishi
HC1500 Benchmark HD Score: 75 (you are going to get a nice HD
picture)
| SD Test | Max Points |
Results | Pass/Fail |
| Color Bar | 10 | 10 | Pass |
| Jaggies #1 | 5 | 3 | Pass |
| Jaggies #2 | 5 | 3 | Pass |
| Flag | 10 | 5 | Pass |
| Detail | 10 | 10 | Pass |
| Noise | 10 | 0 | Fail |
| Motion adaptive Noise Reduction | 10 | 0 | Fail |
| Film Detail | 10 | 10 | Pass |
| Cadence 2:2 Video | 5 | 0 | Fail |
| Cadence 2:2:2:4 DV Cam | 5 | 0 | Fail |
| Cadence 2:3:3:2 DV Cam | 5 | 0 | Fail |
| Cadence 3:2:3:2:2 Vari-speed | 5 | 0 | Fail |
| Cadence 5:5 Animation | 5 | 0 | Fail |
| Cadence 6:4 Animation | 5 | 0 | Fail |
| Cadence 8:7 animation | 5 | 0 | Fail |
| Cadence 3:2 24fps film | 5 | 5 | Pass |
| Scrolling Horizontal | 10 | 10 | Pass |
| Scrolling Rolling | 10 | 10 | Pass |
| Total Points | 130 | 65 |
|
The HC1500 was sent 480i via component from a Denon DVD-1930CI.
| HD Test | Max Points |
Results | Pass/Fail |
| HD Noise Reduction A & B | 25 | 0 | Fail |
| HD Video Resolution Loss | 20 | 20 | Pass |
| Jaggies A & B | 20 | 20 | Pass |
| Film Resolution Loss | 25 | 25 | Pass |
| Film Resolution Loss Stadium | 10 | 10 | Pass |
| Total Points | 100 | 75 |
|
The HC1500 was sent 1080i via HDMI from a Toshiba HD-XA2 HD DVD Player.
Comments on Bench Testing
The real trouble area for the HC1500 was in the area of noise reduction. The on-board processing did a very nice job of deinterlacing and jaggies were only occasionally noticeable in standard definition viewing. HD sources looked fantastic and what little noise I did experience in my HD source material didn't ruin the experience (I expect more from HD sources, so I tend to blame noisy sources rather than wish I had better noise reduction circuitry). Overall I was pleased with the apparent no-name video processor used in the Mitsubishi – it did a fair job at producing a great overall image. In particular, scaling of 1080p and 1080i content was above par, with very little distortion on even single-pixel test patterns.
HC1500 Viewing Evaluations - SD and HD
Movies were fun to watch on this projector for their color and black levels. As with other Mitsubishi's, however, I did have a significant problem with rainbows and they don't, for me at least, go away with time. Having interviewed enough people about this phenomenon, I no longer authoritatively say that everyone will experience rainbows as significantly as I – since everyone's perceptions of them are different. For me, the timings Mitsubishi uses (in this case a 4-speed, 7-segment wheel) wreak havoc with my optical system. My best recommendation to anyone is to try out this projector in your own home to see how you react. Don't look for rainbows, lest you find them, but find out if typical viewing material (include some high-contrast images with vertical line patterns) creates a problem for you.
Rainbows aside, I really enjoyed both the color and the detail this system afforded me. The better the signal you feed this projector, the better the results you will get – and you can get REALLY nice results.
HD DVD - Batman Begins
This movie came out
rather dark, as though the transfer was done poorly - the problem
is we know that the transfer was flawless base don other projector reviews.
Thinking back to my luminance graph I quickly realized that setting this projector
"by the book" will result in some crushed blacks - at least in my
experience. When setting black levels (Brightness) be sure you can raise the
value a notch or two higher than normal. Unfortunately, this raises your blacks
overall, but I’d rather than than lose the detail present in DVD and HD-DVD
images. There were moments of real detail and exceptional
opportunities to see how well the HC1500 handled gradients, skin tones,
deinterlacing of motion elements and detail. Batman Begins was a very
enjoyable movie to watch, and the Mitsubishi HC1500 gave an impressive
performance. Any perspective anomalies in the photos below are likely due to
the camera angle and type used and not the projector.

Both color and detail were present and beautifully portrayed through the HC1500 projector.
The problem with having a nice projector and a great movie like Batman Begins, is that I quickly got lost in the story and took entirely too long to grab some of these beautiful screen captures. It is a sure bet that you will enjoy the images shown by the HC1500 – they are stunning.
HD DVD - We Were
Soldiers
This HD DVD is best described as a DVD
that was reprocessed into HD DVD without much ado. The images are grainy, but
the detail pokes through at various times throughout the film and black levels
were honest and not crushed or clipped. Colors were vibrantly shown by the DLP
system and overall this reminded me of how standard definition DVDs looked like
on the HC1500 projector. The system doesn't enhance poor images, but it does a
great job of allowing the best possible picture to shine through.

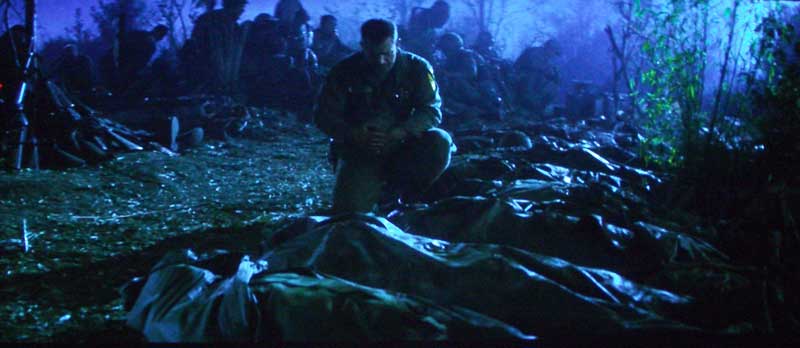
Blacks were rich and deep; and colors popped during the scenes that didn't involve the rather barren landscape of Vietnam.
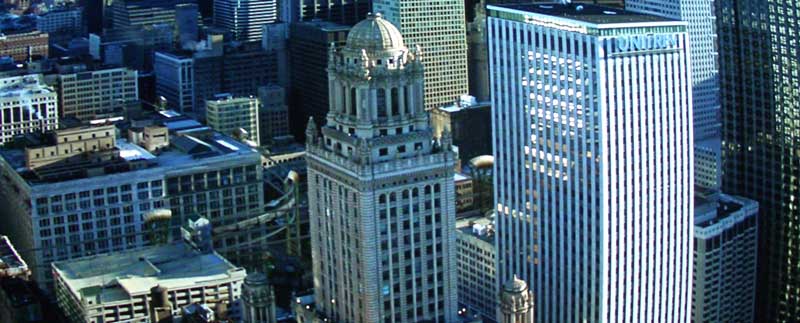
HDTV – Discovery HD Channel
I watched several shows on Discovery
HD, including Build It Bigger and Into the Lion's Den. Both had
some excellent imagery (as expected) and I was floored by the detail exhibited
by the Mitsubishi. This projector can really show off a nice image – the key is
finding them. With this unit you will find yourself watching more and more HD
content and quickly becoming an early adopter of HD-DVD formats simply to have
more material to view on the big screen.


Notice the hair detail in the above picture and the lack of crushed whites in both. This is partially due to the correct setting of White levels (Contrast) and disengaging the BrilliantColor feature.
Here are some additional screen captures form a DiscoveryHD promo I simply HAD to display:


Detail, detail, detail! And colors are absolutely vibrant – you will not be disappointed with this picture.
Conclusion
I give the HC1500 my full recommendation with a hearty warning: If you are susceptible to rainbows I highly suggest you get a look at this model before jumping into a purchase. To my eyes this was a significant issue, more so than other DLP models I have reviewed recently. This projector is worth a serious look – especially at the street pricing you'll find on this model. It's absolutely mind-blowing to me that we live in a time when a projector can be had for this price possessing the level of features and amenities that come with the HC1500. If you break it down into price per square inch, you are saving a bundle by going with front projection at this price – as of this writing you can barely get a decent 40-inch LCD TV for the same money. RUN to your nearest Mitsubishi dealer and check this one out for yourself – you owe it to your wallet.
The Score Card
The scoring below is based on each piece of equipment doing the duty it is designed for. The numbers are weighed heavily with respect to the individual cost of each unit, thus giving a rating roughly equal to:
Performance × Price Factor/Value = Rating
Audioholics.com note: The ratings indicated below are based on subjective listening and objective testing of the product in question. The rating scale is based on performance/value ratio. If you notice better performing products in future reviews that have lower numbers in certain areas, be aware that the value factor is most likely the culprit. Other Audioholics reviewers may rate products solely based on performance, and each reviewer has his/her own system for ratings.
Audioholics Rating Scale
 — Excellent
- — Very Good
- — Good
- — Fair
- — Poor
| Metric | Rating |
|---|---|
| Detail and Resolution | |
| Deinterlacing & Scaling | |
| Contrast and Black Levels | |
| Color Reproduction | |
| Noise Reduction | |
| Calibration Options | |
| Build Quality | |
| Ergonomics & Usability | |
| Ease of Setup | |
| Features | |
| Remote Control | |
| Fit and Finish | |
| Performance | |
| Value |
Clint Deboer was terminated from Audioholics for misconduct on April 4th, 2014. He no longer represents Audioholics in any fashion.
View full profile