
Epson Home Cinema 720 LCD Projector Review
Epson Home Cinema 720
- Product Name: Home Cinema 720
- Manufacturer: Epson America
- Performance Rating:

- Value Rating:
- Review Date: June 11, 2008 08:13
- MSRP: $ 1,299
|
Brightness: 1600 ANSI lumens (Dynamic mode) |
Power Consumption: 245W (high); 200W
(low); 4W (standby) Operating Temperature: 32 – 104 degrees F (0 – 40 degrees C); 20-80% humidity (no condensation) Fan: 33dB operation (in low mode) Remote Control: Backlit w/batteries included Standard Accessories: Power cord, Wireless remote control unit, batteries for remote control Warranty: 2 year parts and labor limited warranty, 90-day lamp warranty, including overnight replacement services and exclusive Epson PrivateLine toll-free technical support (U.S. and Canada only) Dimensions: 4.9" x 16" x 12.2" in (124 x 406 x 309 mm)Weight: 11.9 lbs (5.4 kg) |
Pros
- 720p for under $1300!
- Excellent contrast & color saturation
- Excellent performance "out of the box"
- Backlit remote
- Interpolated 1080p/24/60 support
- HDMI 1.3 with 480i support
Cons
- Only 1 HDMI input & 1 Component input
- Doesn't pass below black signals
- Tedious menu system
Overview, Setup and Basic Installation
I got an email the other day from a friend I hadn't heard from in a long time. We caught up with each other about a few things, and then he asked me: What's the best projector out there for under $1500? Wow, that's a good question, isn't it? A couple of years ago the level of quality you'd be able to expect from that price was much different. Today, it's almost amazing what consumers are getting for their money. I told him I was reviewing the Epson Home Cinema 720 LCD projector and that if it even remotely resembled its "bigger brother" the 1080 or 1080UB it would be high on my list. As I launched into the review process I found that some consumers might just do very well to eschew 1080p - especially if they are using smaller screens or sitting back more than 2x the screen width.
Hey, This Projector Looks Awfully
Familiar…
It was hard for me to
find any tangible differences between this projector and the stock Epson Pro
Cinema 810 (sans HQV external video processor, of course.) Epson has loosely
indicated that it is using a next-generation LCD panel in the new HC 720, but
from the specs alone it's impossible to tell. Even the difference in HQV scores
could possibly be attributed to by a slight difference in implementation of the
same processing circuitry. In either case, both are excellent projectors and we
noticed some exceptional color and black level potential on the Home Cinema 720:
| Epson Pro Cinema 810* | Epson Home Cinema 720 |
| HQV Score: 49 | HQV Score: 59 |
| 0.7-inch TFT Active Matrix | 0.7-inch TFT Active Matrix |
| Inputs: Composite S-video Component PC (HD15) HDMI SCART |
Inputs: Composite S-video Component PC (HD15) HDMI SCART |
| Noise: 26dB (HD/Silver) | Noise: 26dB (HD/Silver) |
| Contrast Ratio: 10,000:1 | Contrast Ratio: 10,000:1 |
| 1600 ANSI lumens (max) | 1600 ANSI lumens (max) |
| Video Processor: Pixelworks | Video Processor: Pixelworks |
| 12VDC Trigger | 12VDC Trigger |
| RS-232C: Yes | RS-232C: Yes |
| No 1080p/24/30/60 support | 1080p/24/30/60 support |
| Warranty: 2 years | Warranty: 2 years |
| MSRP: $1,599 | MSRP: $1,299 |
*As tested without the external HQV video processing option
There are two things consumer should know. First, Epson recently stopped selling its Pro Cinema models online. Second, this is the first model to come to market that gives a consumer model number to the Pro Cinema 810 (720p) projector. Am I saying they are exactly the same? No, no, no… yes. OK, so there are possibly tiny little differences (aside from the fact that the 810 is black), however for the most part, Epson has brought the $1599 pro model to consumers - and for even less money. To put it bluntly, the incredibly low cost of entry for the new Home Cinema 720 makes it a veritable steal.
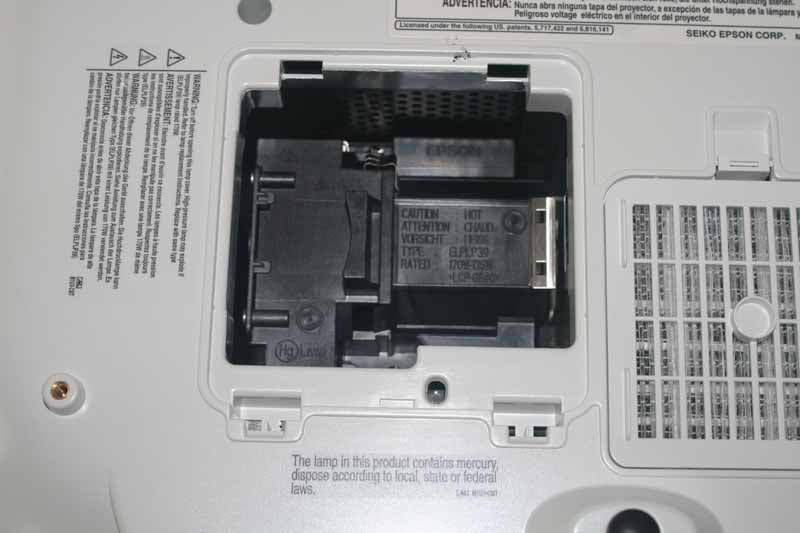 Let's pop the hood. Underneath the Epson you can find
easy access to the lamp replacement compartment. While the lid comes off
without any screws, its location means that you'll need to remove it from any
ceiling mount before you can replace the bulb. We prefer rear- or side-entry
locations for bulbs, but this isn't the end of the world. The two front feet
screw down for angling the projector upwards from a tabletop location. Epson
didn't include a "quick drop" mechanism, so you simply unscrew… and
unscrew… and unscrew… until the height is correct. Obviously, the better installs
for this projector will have the unit on a level platform so that the lens
shift, and not manual or digital keystoning, will be sufficient to hit the
screen perfectly.
Let's pop the hood. Underneath the Epson you can find
easy access to the lamp replacement compartment. While the lid comes off
without any screws, its location means that you'll need to remove it from any
ceiling mount before you can replace the bulb. We prefer rear- or side-entry
locations for bulbs, but this isn't the end of the world. The two front feet
screw down for angling the projector upwards from a tabletop location. Epson
didn't include a "quick drop" mechanism, so you simply unscrew… and
unscrew… and unscrew… until the height is correct. Obviously, the better installs
for this projector will have the unit on a level platform so that the lens
shift, and not manual or digital keystoning, will be sufficient to hit the
screen perfectly.
Basic Setup and Installation
Installation of the Epson Home Cinema 720 was just as simple as can be. Physically, we mounted a universal PRG-UNV Peerless Precision Gear projector mount to the four screw positions located at the bottom of the unit. After putting it into place, it was simply a matter of first dialing in the pitch and then the lens shift. The Epson HC 720 comes with 100% vertical and 50% horizontal lens shift - making it as easy to position as any projector I've installed to date. If you mount the unit anywhere within the projector screen's plane of existence, save the extreme corners, you'll be set for a perfect keystone-free viewing experience. The projector is light and, compared to our reference Marantz VP-15S1, it was a breeze to physically mount. We fed HDMI to the rear of the projector and easily connected it to our standard power feed cable. Focus and Zoom are manual, and with the incredible 2.1:1 ratio of the lens system we could hit our screen at a distance anywhere from roughly 9 1/2 to 20 feet away. Now that's flexibility.
Once installed, it was a simple matter to test the system out and grab the best initial settings, which we found to be Theatre Black 1 with the Absolute (Abs.) Color Temperature set to 7000K. We also recommend the use of the Dynamic Iris since it can only be located in the 'On' or 'Off' position. If left 'Off' it doesn't enable the Home Cinema 720 to reach its Blackest potential. I never found the Epson's iris system to be a nuisance and it certainly wasn't audible to me - even from just 5 feet away from my seated position.
Throw Chart for Distancing the Projector from a 16:9 Projection Screen
The Epson's amazing zoom lens is on this model as well and allows for a very flexible placement. In our room we had the unit positioned at around 11 feet back and projecting onto a Carada Masquerade Projection Screen Masking System with a 92-inch Precision Series Brilliant White Screen.
| Screen Size Diagonal (inches) |
Size (Inches) | Distance (Feet) | ||
| width | height | wide | tele | |
| 70 | 61.0 | 34.3 | 6.2 | 14.7 |
| 80 | 69.7 | 39.2 | 7.8 | 16.7 |
| 90 | 78.4 | 44.1 | 8.3 | 19.0 |
| 100 | 87.2 | 49.0 | 9.8 | 20.9 |
| 110 | 95.9 | 53.9 | 10.4 | 23.3 |
| 120 | 104.6 | 58.8 | 11.8 | 25.1 |
| 130 | 113.3 | 63.7 | 13.1 | 26.6 |
| 150 | 130.7 | 73.5 | 14.7 | 31.4 |
| 170 | 148.2 | 83.3 | 17.2 | 34.9 |
| 200 | 174.3 | 98.1 | 20.3 | 41.1 |
Connections
The connections on the Home Cinema 720 are identical to the both the Pro Cinema 720 and the Home Cinema 1080 models. You'll find one each of composite, S-video, component and HDMI, plus an SCART connection left over from the UK model. An RS-232C serial port means that Epson is serious about making this unit available for us in custom home theater systems and a trigger output is present for anyone wanting to signal a dropdown or electric screen system.

Home Cinema 720 rear connections
Remote, Calibration and Bench Testing
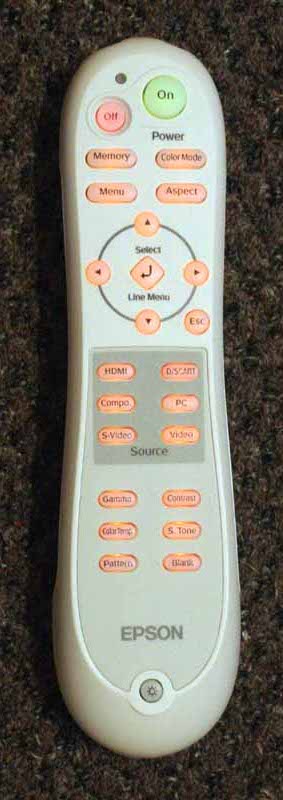 The remote
hasn't changed in years and is the same unit that ships with all current Epson
Home Cinema models. The range is still above average and the remote features
the direct input selection and discrete power functions for which Epson is
known. Direct access is provided to Color Mode, Memory functions, Aspect ratio,
Gamma, Contrast, Color Temp, and Skin tone controls. If anything, the remote
provides a few too many ways to screw up your image "on-the-fly", but
we won't complain too much. A Blanking function lets you quickly black out the
screen (but without shutting down the lamp) and a Pattern button brings up a
single blue-background crosshair test pattern that seems only useful for
setting focus and aligning the edges of the image. The most likely reason there
aren't additional patterns, say for setting black and white levels, is that
with those calibrations you want to configure the system, not the projector in and of itself. Having the projector
put up a gradient does nothing to help calibrate what happens when it is fed a
similar-type signal from your DVD or Blu-ray player.
The remote
hasn't changed in years and is the same unit that ships with all current Epson
Home Cinema models. The range is still above average and the remote features
the direct input selection and discrete power functions for which Epson is
known. Direct access is provided to Color Mode, Memory functions, Aspect ratio,
Gamma, Contrast, Color Temp, and Skin tone controls. If anything, the remote
provides a few too many ways to screw up your image "on-the-fly", but
we won't complain too much. A Blanking function lets you quickly black out the
screen (but without shutting down the lamp) and a Pattern button brings up a
single blue-background crosshair test pattern that seems only useful for
setting focus and aligning the edges of the image. The most likely reason there
aren't additional patterns, say for setting black and white levels, is that
with those calibrations you want to configure the system, not the projector in and of itself. Having the projector
put up a gradient does nothing to help calibrate what happens when it is fed a
similar-type signal from your DVD or Blu-ray player.
The Menu System
The Epson Home Cinema 720 menu system doesn't differ in any meaningful way from the Pro Cinema 810 model that we reviewed in great detail. Except for a lack of ISF-specific features, feel free to read that review for a specific breakdown of the menu screens and functions you can expect to see. What I will say is that the menu system remains a bit tedious, with multiple button presses required to enter and exit the menu and it's almost endless submenu systems. Each function seems to have to be activated first, and then adjusted rather than simply selected and adjusted. Epson would do well to look at some of its competition and learn a few things about user interface design.
Calibration and Initial Settings
 The Epson Home Cinema
720 didn't do so bad out of the box, though with the Auto Iris engaged you'll
end up netting a 2.5 Gamma curve overall (we prefer closer to 2.2). When we
calibrated the projector we did it with the Iris system 'Off', since leaving it
on would severely hamper our efforts at getting any sort of stable results. Once
Auto Iris was re-engaged, we double checked our Black and White levels and
allowed the system to expand the overall contrast by varying the light output
of the projector.
The Epson Home Cinema
720 didn't do so bad out of the box, though with the Auto Iris engaged you'll
end up netting a 2.5 Gamma curve overall (we prefer closer to 2.2). When we
calibrated the projector we did it with the Iris system 'Off', since leaving it
on would severely hamper our efforts at getting any sort of stable results. Once
Auto Iris was re-engaged, we double checked our Black and White levels and
allowed the system to expand the overall contrast by varying the light output
of the projector.
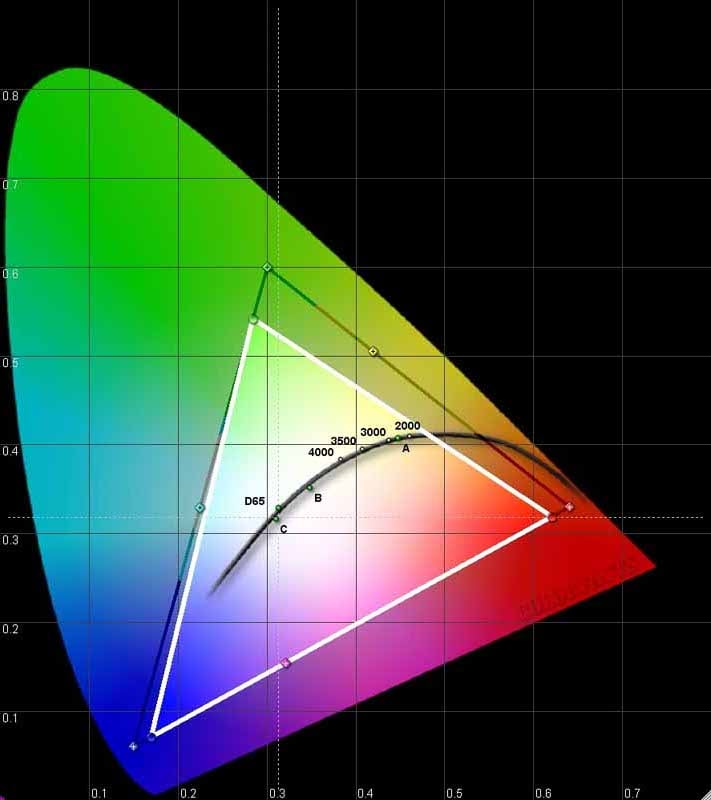
Using datacolor’s ColorFacts Professional software to calibrate and measure the grayscale response of the Epson projector, we again found that Epson put out a system which really does well out of the box. The CIE chart showed a deficiency in Green that tended towards Blue and also some slight Blue and Red deficiencies. I've measured some better color reproduction on other projectors, but I can't say that greens didn't look vibrant (plus we'd always prefer a tilt towards Blue over Yellow.)
Technical Note: We could not get the Home Cinema to pass below black signals when sent in YCbCr mode from a Denon DVD-3930CI (a source component we know to be capable of passing Blacker-than-Black). The projector does pass above White, but we had to calibrate Black levels without the aid of a below black signal (leading us to wonder if it was truncating or clipping anything else between 0 and 7.5 IRE. Please see our article on HDMI & Enhanced Black Levels for more information.
Taking a look at the RGB levels, it was apparent that only a slight deviation existed (+/-7%) across the entire spectrum from 30-80 IRE:

This really didn't translate into anything perceptible on the screen, though I'm sure there are some Hollywood colorists out there shaking their heads. While we did calibrate the system, we didn't find that the end results were enough of an improvement over the original to warrant recommending a third party calibration of the projector as a requirement for satisfactory performance. In addition, Color Temperature was almost spot on from 40-100 IRE only drifting a tiny bit within the midband of light output:

While the target color temperature ended up being around 6600K, the projector's Abs. Color Temperature setting had to be set to 7000K to achieve the results above.
Gamma wasn't the optimal 2.2 we love to see, but the picture quality still looked great and the curve lacked any S-curve issues we've seen with less competent displays and projectors:

Try lifting the Black Level up a notch if you feel that you are losing resolution in the lowest levels of dark pictures.
Light output from the Home Cinema 720 is pretty good. In fact, this 1600 lumen projector output a calculated 1121 lumens in Dynamic mode, taking into account the 1.4 gain screen and the total surface area of the system. Here is how the default color temperature and light output levels measured in our system (using a 100 IRE test pattern):
- Dynamic - 62 fL; 6800K (6500K setting)
- Living Room - 30 fL; 7900K (8000K setting)
- Natural - 15 fL; 5700K (6500K setting)
- Theater - 13 fL; 6600K (6500K setting)
- Theater Black 1* - 15 fL; 6600K (7000K setting)
- Theater Black 2 - 11 fL; 5600K (5500K setting)
- sRGB - 18 fL; 5800K (not adjustable)
*We set Black and White levels from the default settings before measuring.
I would highly recommend the use of Theater Black 1 mode for those with light-controlled rooms. In this mode we set Epson Super White to 'On' and our Black Level was set to 1 with the White Level dialing up to 8. We also, as indicated above, configured the Abs. Color Temperature to 7000K. This resulted in a very nice picture overall, with spot-on color accuracy and a beautiful image. For those who can't quite get all the lights out, try the Living Room mode, but dial back some of the Blue by dipping the Abs. Color Temperature control down to 7000K or 7500K. You can also disable the Auto Iris for even more light output.
Audioholics/HQV Bench Testing Summary of Test Results
Perfect Score is 130
Epson PowerLite Home Cinema 720 Benchmark Score: 59
(the Epson Home Cinema 720 gets the job done, but you'll do better with more
adept video sources )
| Test | Max Points |
HDMI Results |
HDMI Pass/Fail |
| Color Bar | 10 | 10 | Pass |
| Jaggies #1 | 5 | 3 | Pass |
| Jaggies #2 | 5 | 1 | Pass |
| Flag | 10 | 0 | Fail |
| Detail | 10 | 10 | Pass |
| Noise | 10 | 0 | Fail |
| Motion adaptive Noise Reduction | 10 | 0 | Fail |
| Film Detail | 10 | 10 | Pass |
| Cadence 2:2 Video | 5 | 0 | Fail |
| Cadence 2:2:2:4 DV Cam | 5 | 0 | Fail |
| Cadence 2:3:3:2 DV Cam | 5 | 0 | Fail |
| Cadence 3:2:3:2:2 Vari-speed | 5 | 0 | Fail |
| Cadence 5:5 Animation | 5 | 0 | Fail |
| Cadence 6:4 Animation | 5 | 0 | Fail |
| Cadence 8:7 animation | 5 | 0 | Fail |
| Cadence 3:2 24fps film | 5 | 5 | Pass |
| Scrolling Horizontal | 10 | 10 | Pass |
| Scrolling Rolling | 10 | 10 | Pass |
| Total Points | 130 | 59 |
|
The projector was sent as 480i via HDMI from a Denon DVD-3930CI.
Comments on Bench Testing
There is a menu function under Image > Advanced > Output Scaling that is defaulted to 'Normal'. This function is very similar to most "overscan" features of other projectors. If you want to defeat any overscan, simply set this to 'Larger'. I preferred the Sharpness setting at -2, however some will waver between that and -3 which seems a tad soft, but actually disables all artificial edge enhancement. Anything below -3 actually seems to blur the image on the screen. If you're attempting to overcome issues associated with screen door effect (something we never noticed on this projector) you would want to opt for manually defocusing the lens slightly, and avoid any software based pixel blurring.
Viewing Tests and Conclusion
I was surprised at just how good 720p looked. While 1080p is all the talk, 720p images still look seamless and beautiful from the right distance. With the Epson Home Cinema 720 that distance is about 11 feet or more, assuming a screen size no larger than 96-inches. From there you can do the math to see how it will affect a different seated distance or screen size. At this distance we noticed absolutely no screen door effect - and we were looking hard for it.
advertisement
Blu-ray - The
Fifth Element (Remastered)
We've run this disc
into the ground, but I can't help but continue to bring it back for more as I
test projectors to see how accurately they reproduce color and detail. Once
Sony fixed this disc and re-released the updated Blu-ray version it once again
found a home in my reference list of Blu-ray titles. I focus on several things
with this disc - there are so many to choose from. First off, we show the
incredible richness of the regeneration sequence and I also included some shots
which put forth a great example of high amounts of detail with little to no
noise present on the screen.

This is for color - it's almost surreal the color quality put out from this box
And this is for Black level and detail, which were superb
Blu-ray: Selections
I grabbed a selection
of clips from the Dolby: The Sound of High Definition Blu-ray disc. It was
actually tough to find adequate tracks, since the disc was kind of sucktacular
in the video department - obviously devoting most of its energy on the lossless
TrueHD tracks contained within. Nevertheless, I located some real gems which I
felt gave the Home Cinema 720 a chance to preen its features and display its
full plumage:
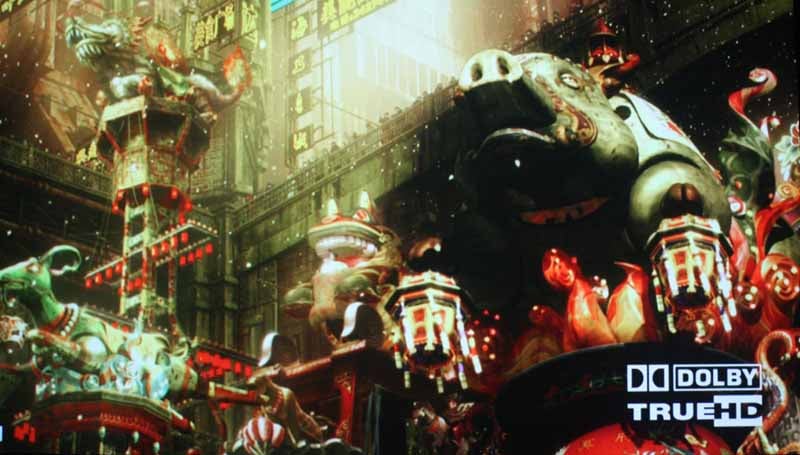
Ghost in the Shell 2 - you could truly peer into the dark areas of this scene
without losing all semblance of definition and detail.
This clip captured the vivid reds as
well as a whole host of Black level that cannot be ignored

Jane Monheit looked as real as could be singing "You Can't Take That Away
From Me" in the Legends of Jazz clip.

And what would an exposition of detail and black levels be without a colorized
clip from Harry Potter and the Goblet of Fire?
HDTV: Summerfest
I don't watch
much MTV, but their HD channel has a lot going for it. This week they played a
Summerfest show that really delivered some nice HD footage directly to my
screen in a way that couldn't be ignored:


HDTV: Golf Channel
I'd get
specific on which course, event, etc I recorded to capture these golf shots
below, but a) who cares, and b) anyone who cares is probably geeky enough to
recognize the course and the event. Now that I have alienated all of the
golfers let me just say that I have a new measurement for "resolution"
and "detail". If you want to know if your HDTV or HD projector is
detailed, simply watch golf and see if you can pick out the dimples in the ball
when it's lying on the green. If you can, you're in good shape. If you can't,
you are either not watching in HD or you probably have a low resolution
display:

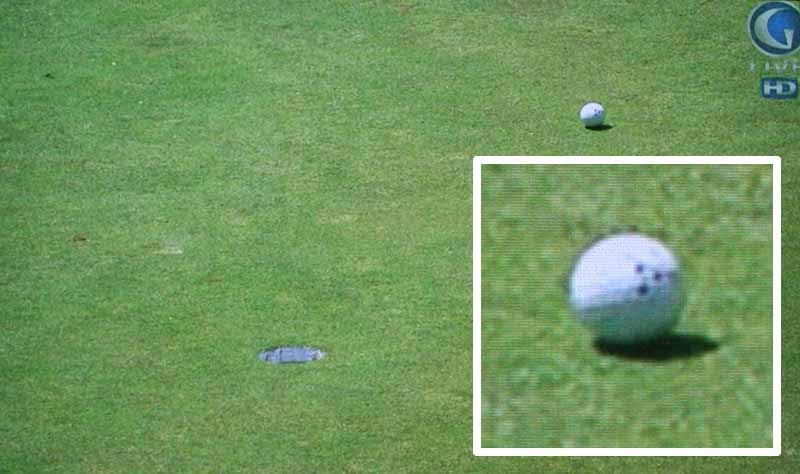
The inset at right is mine, but I could clearly see the dimpled ball lying on
the green during these setup shots which appear frequently in televised golf
tournaments.
Conclusion
The Home Cinema 720 is a great projector. At $1,299 retail this unit should just about fly off the shelves. There is a sort of stigma surrounding 720p projectors now that 1080p has flooded the scene, but the truth is 720p is often more than sufficient for most people's homes, especially if you ensure that you sit far enough back from the screen. In addition, Blu-ray looks just wonderful on 720p and most PS3 and Xbox 360 games are designed with that resolution in mind. We love 1080p projectors, but for those who are trying to trim their budgets and still get a fantastic picture, Epson is clearing a path to home theater bliss with the Home Cinema 720.
Epson PowerLite Home Cinema 720 LCD Projector
MSRP: $1,299
Epson
America, Inc.
One Epson Way
Secaucus, NJ 07094
www.epson.com
About
Epson
Epson
offers an extensive array of award-winning image capture and image output
products for the consumer, business, photography, and graphic arts markets. The
company is also a leading supplier of value-added point-of-sale (POS) printers
and transaction terminals for the retail market. Founded in 1975, Epson
America, Inc. is the U.S.
affiliate of Japan-based Seiko Epson Corporation, a global manufacturer and
supplier of high-quality technology products that meet customer demands for
increased functionality, compactness, systems integration and energy
efficiency. Epson America, Inc. is headquartered in Long Beach, Calif.
The Score Card
The scoring below is based on each piece of equipment doing the duty it is designed for. The numbers are weighed heavily with respect to the individual cost of each unit, thus giving a rating roughly equal to:
Performance × Price Factor/Value = Rating
Audioholics.com note: The ratings indicated below are based on subjective listening and objective testing of the product in question. The rating scale is based on performance/value ratio. If you notice better performing products in future reviews that have lower numbers in certain areas, be aware that the value factor is most likely the culprit. Other Audioholics reviewers may rate products solely based on performance, and each reviewer has his/her own system for ratings.
Audioholics Rating Scale
 — Excellent
- — Very Good
- — Good
- — Fair
- — Poor
| Metric | Rating |
|---|---|
| Detail and Resolution | |
| Deinterlacing & Scaling | |
| Contrast and Black Levels | |
| Color Reproduction | |
| Noise Reduction | |
| Calibration Options | |
| Build Quality | |
| Ergonomics & Usability | |
| Ease of Setup | |
| Features | |
| Remote Control | |
| Fit and Finish | |
| Performance | |
| Value |
Clint Deboer was terminated from Audioholics for misconduct on April 4th, 2014. He no longer represents Audioholics in any fashion.
View full profile