
BenQ W5000 DLP Projector Review
BenQ W5000
- Product Name: W5000 DLP Projector
- Manufacturer: BenQ
- Distributor: VisualApex
- Performance Rating:


- Value Rating:
- Review Date: July 23, 2008 20:38
- MSRP: $ 4999
|
|
Pros
- Support for anamorphic aspect ratio
- Excellent post-calibration performance
- Great value given street pricing
Cons
- Anemic 1.2x zoom lens
- No horizontal lens shift
- Poor out-of-the-box performance
- Overscan anomaly with SD material
W5000 Features and Build Quality
If you think you're having a hard time deciding which projector is the best, think about my job... I actually get to see, use, and calibrate most of them and yet I still have a hard time determining which is "best". Let me tell you that I do NOT envy the job manufacturers of projectors have these days. The market is ripe with bargains and price points are all but written in stone, with very clear distinctions between $1000, $2500, and $5000 models - all of which are competing for consumers' wallets. BenQ is clearly going after the custom installer market with its new W5000 DLP projector and that's good - because it gives them some leeway that wouldn't be granted for those pursuing consumers directly.
BenQ has a history of making some very excellent projectors. They now appear to be in a mode whereby they are attempting to really bring some incredible value and quality to consumers with their W5000 and W20000 DLP systems. The two projectors are remarkably similar; however the W5000 lacks some of the optical engine refinements of its bigger sibling and therefore has a slightly lower contrast ratio. The two share the same chassis, menu system and general features, so it's a good bet that many will find the W5000 to be the bargain of the lot.
The W5000 is a bit of an enigma, or a huge deal depending on your point of view, since it sells on the street for less than half its retail price point. In fact, the upper-scale W20000 has a street price that equals the retail price of the W5000. For a brand new product those are some steep discounts.
If you have been reading our reviews you'll find that the important differences which affect picture quality are getting harder to distinguish and lots of manufacturers are really getting it right. I guess that's a good thing, since negatives of late seem to center on obtuse vs. helpful menu systems, excellent vs. average calibration results and the general feature sets. For the W5000 image quality looks to be above average but we found a few surprises worth noting.
Mercedes BenQ?
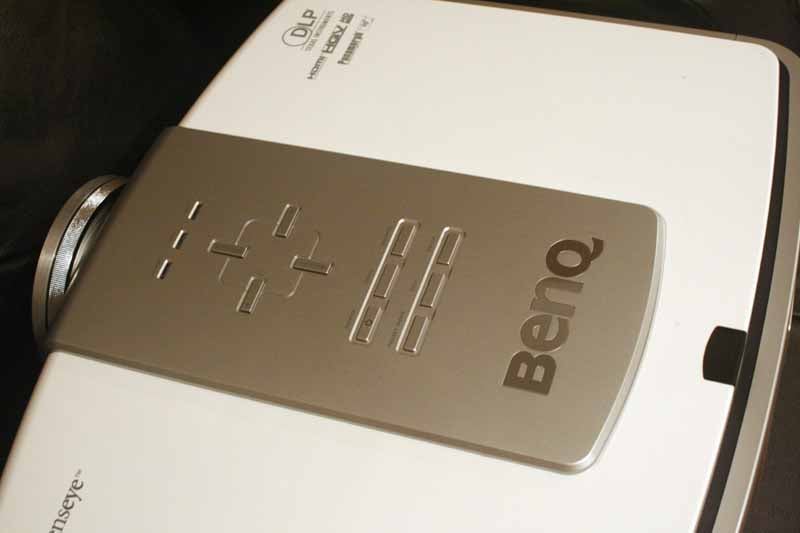
 Physically, the W5000
is an impressive projector. While not exactly elegant, it is a true machine. From my first glance at its
exterior I had to pop my eyes back in their sockets when I saw the enormously
deceptive size of the lens hood. The W5000 exudes high build quality, from its
looks, to the 21 pound weight and convenient side-entry lamp replacement.
Physically, the W5000
is an impressive projector. While not exactly elegant, it is a true machine. From my first glance at its
exterior I had to pop my eyes back in their sockets when I saw the enormously
deceptive size of the lens hood. The W5000 exudes high build quality, from its
looks, to the 21 pound weight and convenient side-entry lamp replacement.
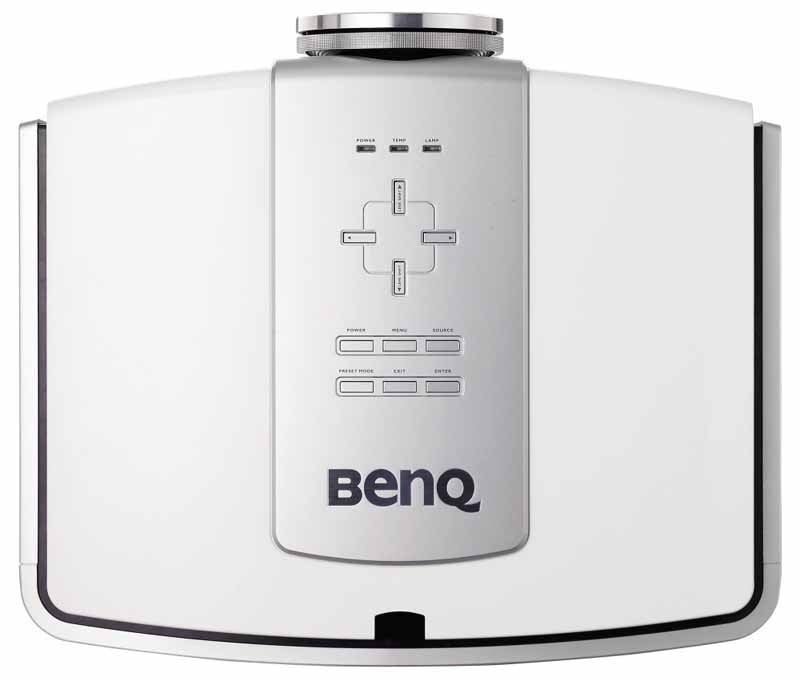
The top of the projector houses a real slick-looking control panel for menu, power, and source controls. You can also activate lens shift functions and toggle through presets. Three small lamps give you a quick overview of power, temperature and lamp status (you really only want to see one light on.) The enclosure itself is a beautiful mix of white and silver with some black trim thrown in for good measure. I'd easily cast my vote for having this thing show up as a small Decepticon in next year's Transformers 2 movie. Lamp access is via the left side (no need to remove the projector from its mounted position) and the filter can be replaced easily from the right side of the unit. Unlike most projectors I've seen, all four feet are adjustable. If you're not mounting this to a ceiling or other permanent fixture, however I think you'd be doing yourself a disservice.
W5000 vs. W20000
Some may be curious as to what differences there are between the W5000 and the W20000. Near as I can tell, the differences are about $2500 and 0.95-inch DarkChip3 DMD technology. The W20000 uses the new DC3 technology while the W5000 uses the less expensive (but still impressive) DC2 DMD. Both projectors utilize Philips' VIDI lighting technology which helps enhance both red and blue color performance to create a more accurate picture. Both projectors also appear to have identical features apart from the DMD chip, including the dual iris system and HQV Reon-VX video processing.
I Like the Way She Moves
 BenQ
seems to have spared no expense in equipping the W5000 with a slew of handy
features. Some I found useful, but all are very handy in terms of their ability
to allow this projector to dial in a nice picture and work well in a myriad of
installation scenarios. While DLP has a lot of catching up to do when it comes
to lens shift, the W5000 at least provides vertical shifting of the optical
system. This means that you have some height flexibility when mounting the
system in a front or rear projection scenario. The W5000 allows up to +120% and
-80% adjustments, giving you a wide range of placement options. Horizontal
shifting is unavailable - so you'll really have to nail your location or ensure
that your screen can be shifted slightly to get the perfect projected image.
BenQ
seems to have spared no expense in equipping the W5000 with a slew of handy
features. Some I found useful, but all are very handy in terms of their ability
to allow this projector to dial in a nice picture and work well in a myriad of
installation scenarios. While DLP has a lot of catching up to do when it comes
to lens shift, the W5000 at least provides vertical shifting of the optical
system. This means that you have some height flexibility when mounting the
system in a front or rear projection scenario. The W5000 allows up to +120% and
-80% adjustments, giving you a wide range of placement options. Horizontal
shifting is unavailable - so you'll really have to nail your location or ensure
that your screen can be shifted slightly to get the perfect projected image.
Other hardware advances include a dual iris system. This is cool, and it's rather complex. I personally like it because it allows me to get better black level output when high lumen output isn't so important. Then, once I choose my fixed Iris position, the Dynamic Black electronic iris kicks in and further refines the image on screen. Here's BenQ's graphical representation of how the Iris system works:
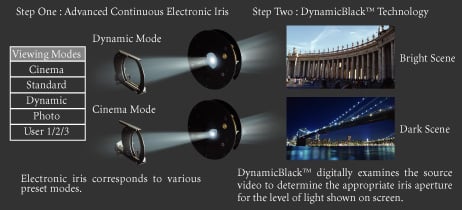
In our case, we dialed the fixed Iris down to 2 and enabled Dynamic Iris after we calibrated the unit to allow it clamp down during truly dark scenes. The way we understand it - you set the light output potential using the fixed iris, then you enable (or not) the Dynamic Black mode to further reduce light output (resulting in lower black levels) during darker scenes. Cool? Yeah it is.
Connections
BenQ provides a pair of HDMI inputs and dual component video connections, though the second is a BNC-style RGBHV input. Composite and S-video are included and should never be used with a projector at this price point. The RS-232 connection is a funky 8-pin din connector that requires a cable in order to connect to most serial control devices. Finally, a 12V trigger allows the projector to control a drop down projection screen or other device based on the status of the W5000.
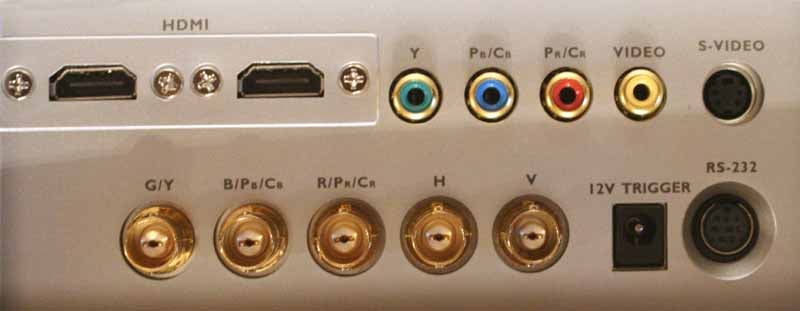
Dual HDMI, Dual component video (including 1 via BNC), 12V trigger and RS-232C control.
W5000 Throw Distance and Menu System
Once again I called upon my Peerless PRG-UNV Precision Gear universal projector mount to handle the duties of supporting and dialing in the physical orientation of the W5000. The BenQ comes with four threaded mounting holes - which sounds standard except that my reference Marantz VP-15S1 and the even the last projector I reviewed only had three mounting points. No matter how you slice it - four is better than three for mounting projectors over 15 pounds.
Physically setting up the projector is easy, provided your room is long enough. Primarily you want to configure it for front projection (ceiling mount in my case) and then dial in the vertical lens shift until you have it perfectly in line with the screen. Since there is no horizontal lens shift you must do a very good job of getting that lens centered to the screen, or ensure that you can slide the screen left or right as needed (most screens with the exception of Stewart and a few others allow the screen to be slipped horizontally as needed.) We connected both HDMI and component video to the W5000 to ensure we could thoroughly test it out in our system.
The 1.2x Zoom lens on this projector is pitifully weak. It allows for only a cursory zoom and as a result you will have a very strict window in order to hit your particular screen size. This seems to be a trend in DLP projectors and one I find disappointing. Pay close attention to the throw chart below as it will determine where you need to mount the projector in order to hit your particular screen size.
Throw Chart for Distancing the Projector from a 16:9 Projection Screen
As you'll see below, you'll need to be at least 13 feet 5-inches away to hit a 100-inch diagonal screen. That's a pretty long throw distance and one that I find a bit too restrictive for most people. While the image is extremely sharp and clear, the placement requirements of this projector may automatically rule it out for many consumers with smaller rooms.
|
Screen Size |
Size (Inches) |
Distance (Feet) |
||
|
|
width |
height |
wide |
tele |
|
70 |
61.0 |
34.3 |
9' 4" |
11' 3" |
|
80 |
69.7 |
39.2 |
10' 9" |
12' 11" |
|
90 |
78.4 |
44.1 |
12' 1" |
14' 6" |
|
100 |
87.2 |
49.0 |
13' 5" |
16' 1" |
|
110 |
95.9 |
53.9 |
14' 9" |
17' 8" |
|
120 |
104.6 |
58.8 |
16' 1" |
19' 3" |
|
150 |
130.7 |
73.5 |
20' 1" |
24' 2" |
|
170 |
148.2 |
83.3 |
22' 9" |
27' 4" |
|
200 |
174.3 |
98.1 |
26' 9" |
32' 2" |
Tweaking the Menu System
If I had to describe the menu system on the BenQ in one word I'd say: Simple. Intuitive. Logical. Then you'd say "Hey, that's three words." And I'd say "Whose article is this, anyway - go write your own." The menu system is well laid out and doesn't confuse users with a trendy, pictoral, or otherwise "innovative" (read: frustrating) user interface like so many other models. Menus should be simple, easy to access and logically laid out. This one is and that means you'll spend less time navigating around and more time getting things dialed in.
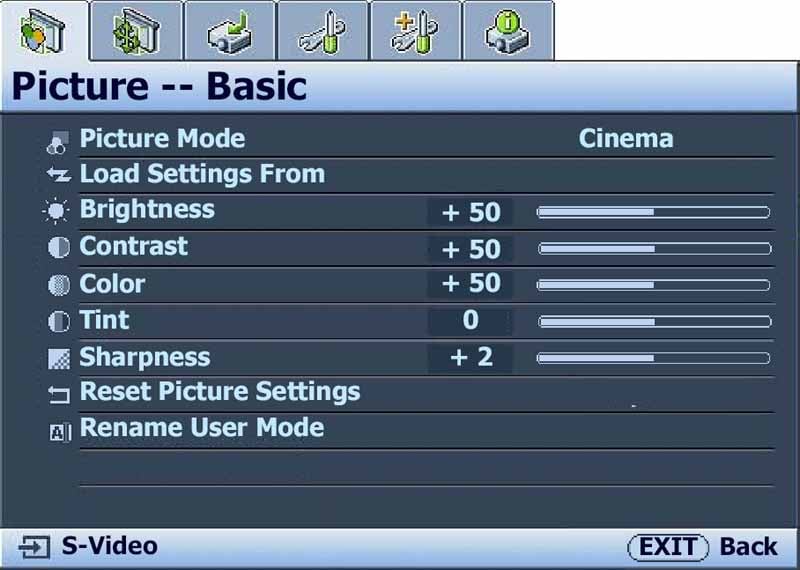 Picture - Basic
The
name of this menu section is accurate. It provides access to the basic picture
controls such as Brightness, Contrast, Color, Tint, and Sharpness. You can also
select the Picture Mode which is accompanied by any number of presets designed
to work well in different scenarios. As you'll see in our calibration section,
we highly recommend starting with Cinema Mode. Nearly any time you affect the
Picture mode you'll hear the rather "grating" sound of the powered
Iris system as it changes to accommodate the new setting.
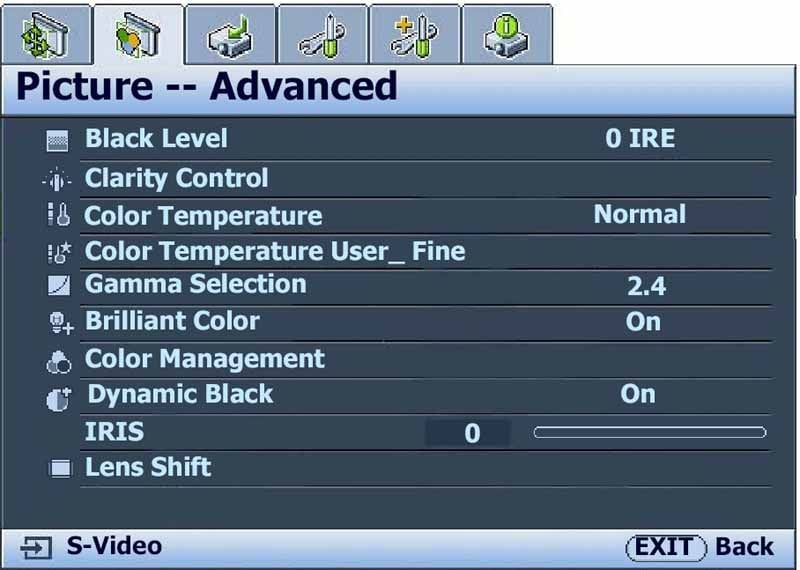 Picture - Advanced
Once
you are in the correct picture mode you can make many other adjustments to help
bring out the best picture quality possible. Black Level should be set to 7.5
IRE, not 0 in order to get the best response possible. We were not able to
achieve below black (blacker than black, or BTB) no matter what we tried,
however we weren't unsatisfied with our black level response. The Clarity
Control has its own submenu of four functions. Noise Reduction only works on
standard definition content (we recommend a setting of +2). Detail Enhancement
seemed fine at +1. Both Luma Transmission and Chroma Transmission looked better
to us in the Off (0) position, however it will definitely cause colors and high
contrast areas to pop. We just felt it added too much edge enhancement and took
away the film-like nature of the projected image.
The Gamma can be set, and after calibration we did indeed achieve close to the 2.4 setting we configured. Brilliant Color definitely cause colors to pop, but we felt it to be a tad artificial and not accurate. Skin tones looked oversaturated. We left it off both during and after calibration. The saturation of specific Primary and Secondary colors can be dialed in using the Color Management menu system. We didn't go this far, and indeed our results didn't indicate much of a need to affect global color saturations. Dynamic Black controls the secondary Iris system. We left this off for calibration, but enabled it afterwards. Not once did we notice it engaging during normal use. Of course, with our primary Iris set at just +2 the secondary iris (Dynamic Black) was doing very little overall.
The last item on this menu (which can also be accessed directly via the remote) is the vertical Lens Shift which we found incredibly useful. The W5000 can go +120% and -80% vertically. In our inverted ceiling-mounted position that meant it had more negative (down) range than up. In either case, it's an ample amount of lens shift and should do well for nearly any installation.
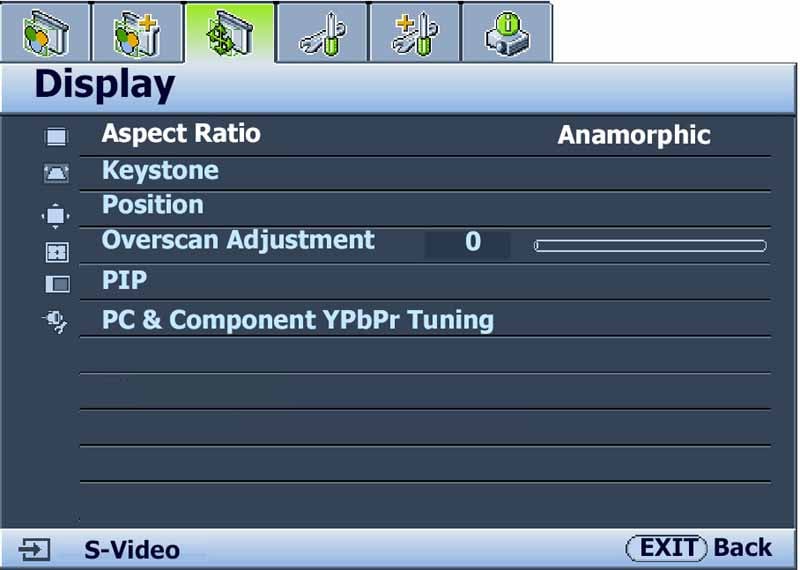 Display
The
Display menu is well laid out, however the Lens Shift would have been better
placed here alongside Keystone and Position functions which both digitally
alter the position of the image on the screen. Overscan Adjustment, as we
mention below, has a strange interaction with the Silicon Optix video
processing engine in that it needs to be set to +2 for best (smoothest)
deinterlacing response. We didn't notice any problems when progressive material
was sent to the projector. The PIP functionality is cool, however the second
source is only possible with S-video or composite sources. You cannot
simultaneously run two HD channels using the PIP mode. This is unfortunate;
however most of those with digital cableTV set top boxes will find they have
that functionality already built in.
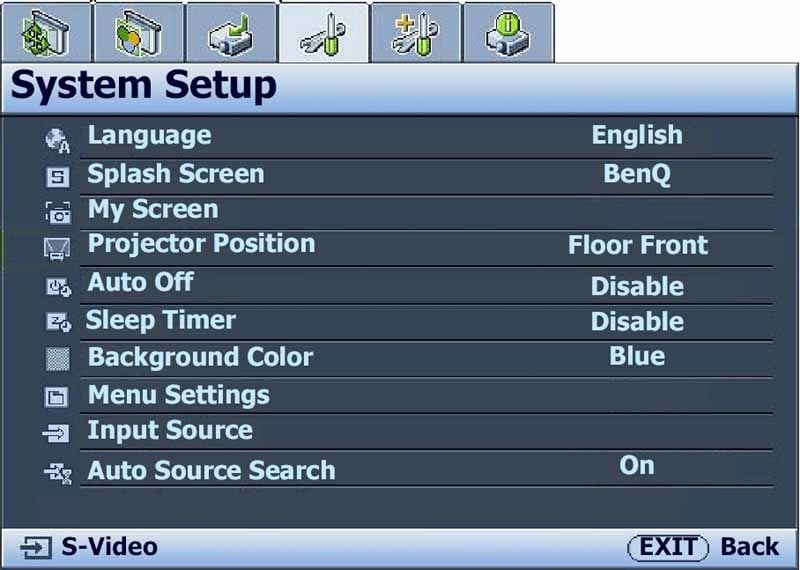 System Setup
This
menu contains the items which will likely be configured once and then never
used again. This includes the Projector Position, Language, Splash Screen
(which can be customized), Sleep Timer, Menu position and Auto Source Search. I
tend to disable auto source search, simply because the projector tends to freak
out when the cableTV switches resolutions - as it so often does when moving
between HD and SD channels. Custom Installers can use a laptop to set a custom
client screen with their logo (and perhaps phone number) as the startup screen.
Not a bad idea to make sure you get the follow up calls should your client
decide to do further upgrades.
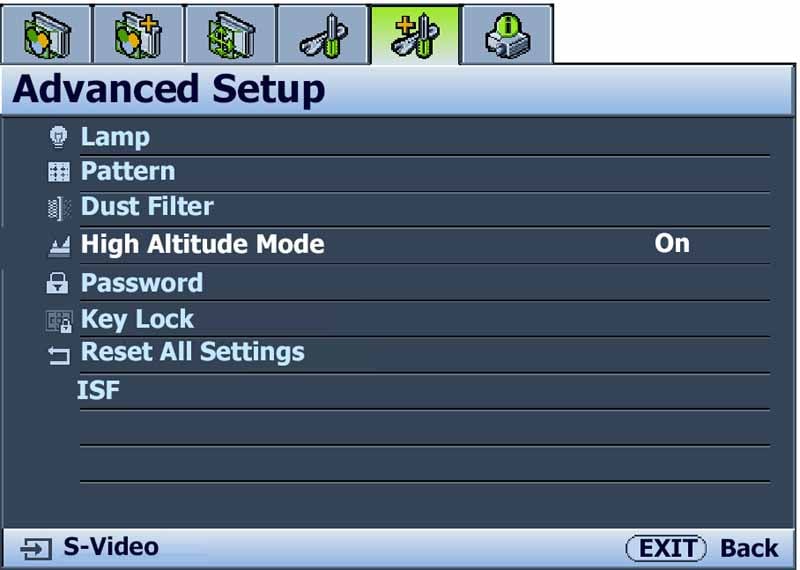 Advanced Setup
Advanced
setup contains such items as your Lamp Power level (we recommend Whisper as the
fan is noticeably louder with Normal
mode). You can activate High Altitude mode if you like excessive fan noise (or
I suppose if you live at high altitudes where the fan won't be as successful at
cooling down the lamp). The ISF password is also located here (I could tell you
what it is, but then I'd have to... you know the rest). You can
password-protect the settings and there is also a key lock function (which is
terribly easy to engage (too easy if you ask me) that can be turned off by
holding down the remote control's Exit button for 5 seconds. Key Lock disables
all remote control functions as well as the physical buttons on the projector
itself. This is a good idea for presentations or conventions and is certainly
better than a black piece of electrical tape over the IR sensor.
The last tab on the menu system is an Info display that shows the current input resolution, Picture Mode, Source, and Lamp and Dust Filter hours of use.
Remote Control
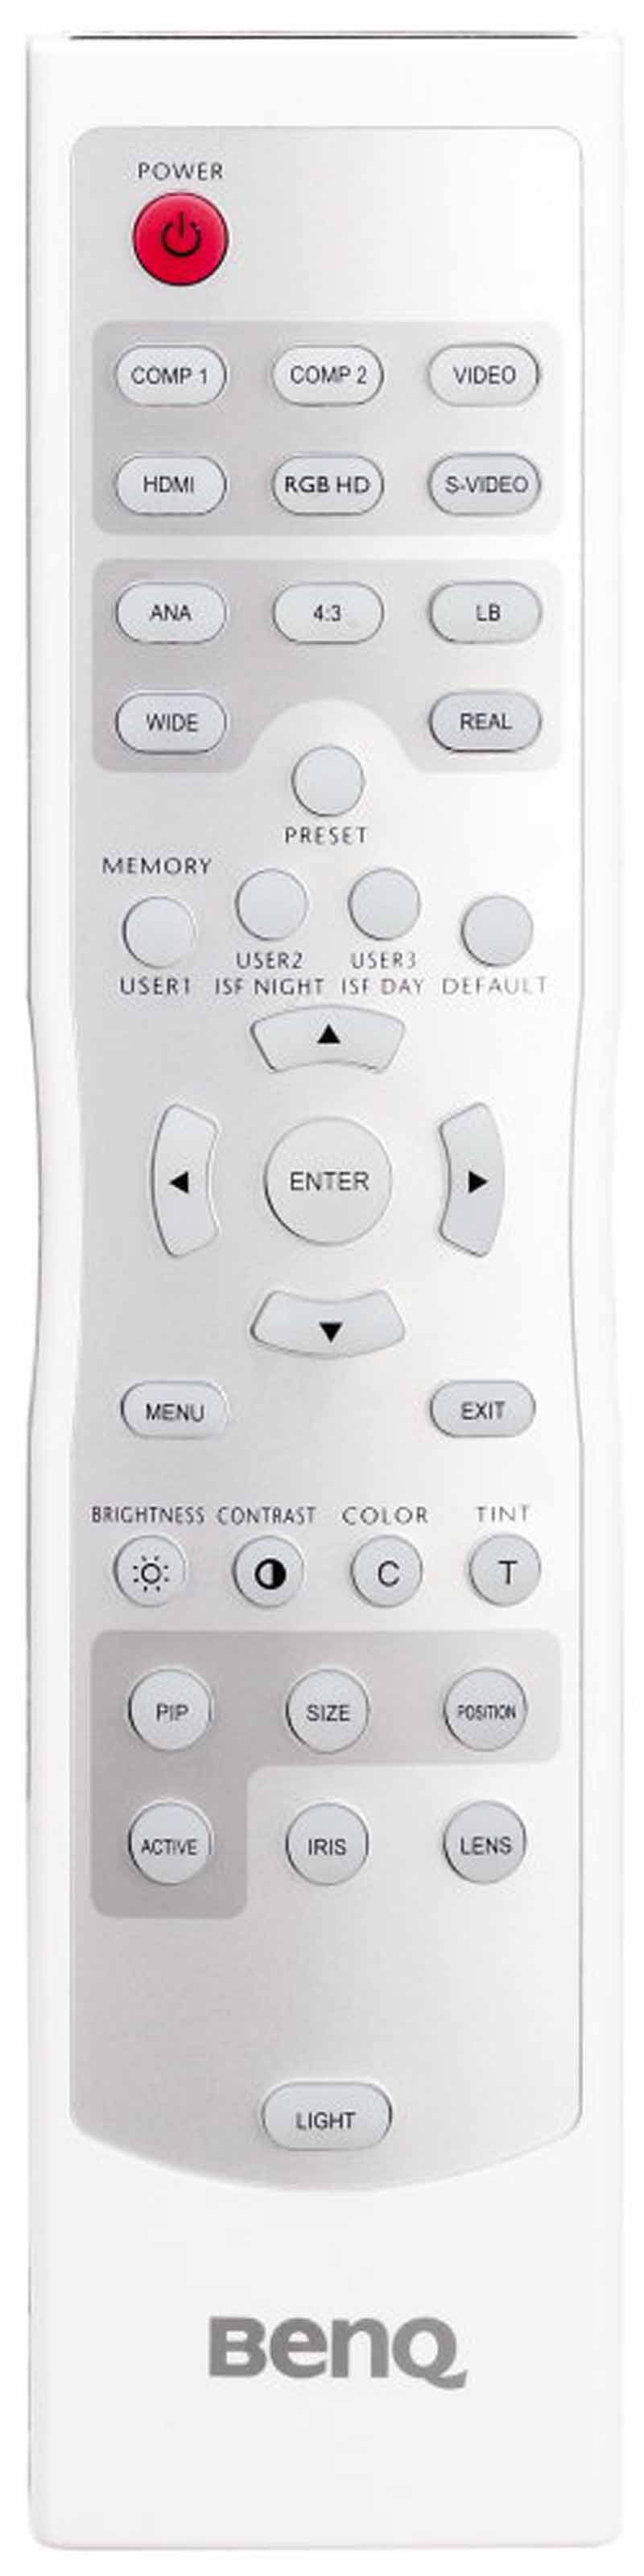 As I hinted, the remote is great, though a tad
large in the hand. It is completely backlit and the light can even be
deactivated by a second press of the 'Light' button. The remote has direct
input buttons for each input and has direct access to Memory settings and
common controls such as Brightness, Contrast, Iris and Lens Shift. About the
only negative I saw with this remote is the lack of discrete On and Off
controls at the top. It's becoming increasingly common to see "Double
Tap" power buttons for turning the projector off. I don't particularly
prefer this method as it's not as handy as a discrete power system, however
it's certainly not a major issue.
As I hinted, the remote is great, though a tad
large in the hand. It is completely backlit and the light can even be
deactivated by a second press of the 'Light' button. The remote has direct
input buttons for each input and has direct access to Memory settings and
common controls such as Brightness, Contrast, Iris and Lens Shift. About the
only negative I saw with this remote is the lack of discrete On and Off
controls at the top. It's becoming increasingly common to see "Double
Tap" power buttons for turning the projector off. I don't particularly
prefer this method as it's not as handy as a discrete power system, however
it's certainly not a major issue.
W5000 Calibration and Bench Testing
As always we utilize datacolor's ColorFacts Professional software with a Spyder2 sensor (tristimulus colorimeter). Our opening measurements were not all that hot, but certainly watchable. Color temperature was around 7500K and there was a noticeably bluish tint to the bright areas of the picture. It's almost as if this ISFccc-certified projector was made to include a calibration from an installer. As you'll see below it dials in quite nicely and we were more than pleased with our final results.
Checking out the various picture modes, we found the following when engaging the Whisper mode of lamp operation and color temperature set to Warm:
- Cinema Mode - 7500K, 15 fL
- Dynamic Mode - 14000K, 17.5 fL
- Standard - 9000K, 21 fL
We found it odd that Standard mode actually provided more light output than Dynamic mode. When turning the lamp to Normal mode, we saw some further light output improvements:
- Dynamic Mode - 21 fL
- Standard - 24 fL
Crank the lamp to Lamp Native mode and you'll see even more output (but the color accuracy gets thrown out the window). To dial in the best initial picture we chose Cinema Mode, selected the Warm Color Temperature and set Black Level to 7.5 IRE. Brightness needed to be set to +61 and Contrast dropped to +43. The lamp, as expected, was placed in Whisper mode (BenQ's version of Eco mode).
We performed our calibration on a Carada Masquerade Screen Masking system. Their Brilliant White screen material has a gain of 1.4 but is clean and presents no hotspots that we can detect. The grayscale color controls are very sensitive and any changes could be seen immediately on the screen. We knew right away that Blue was a bit high and we'd need to do some work to get the system perfectly dialed in. Fortunately, the system was extremely responsive and the results are some of the best we've ever seen in a projector.

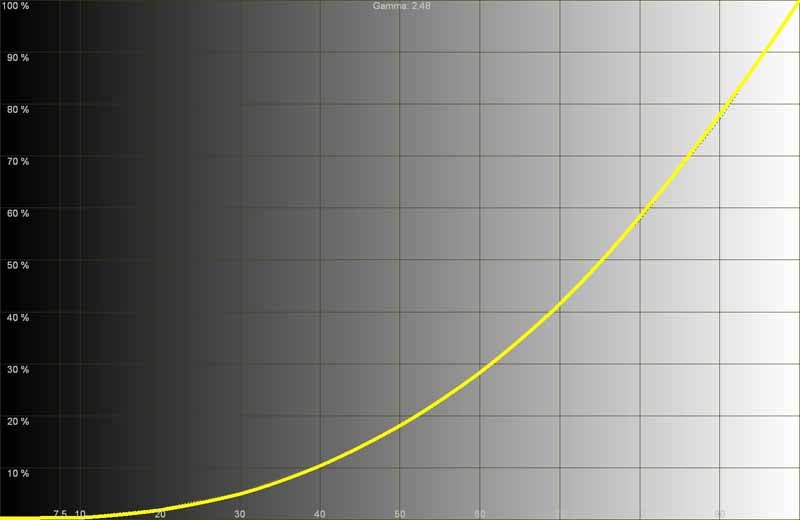
Final Gamma (right) was
between 2.4-2.5, a slight but marked improvement over the original 2.6 (left)
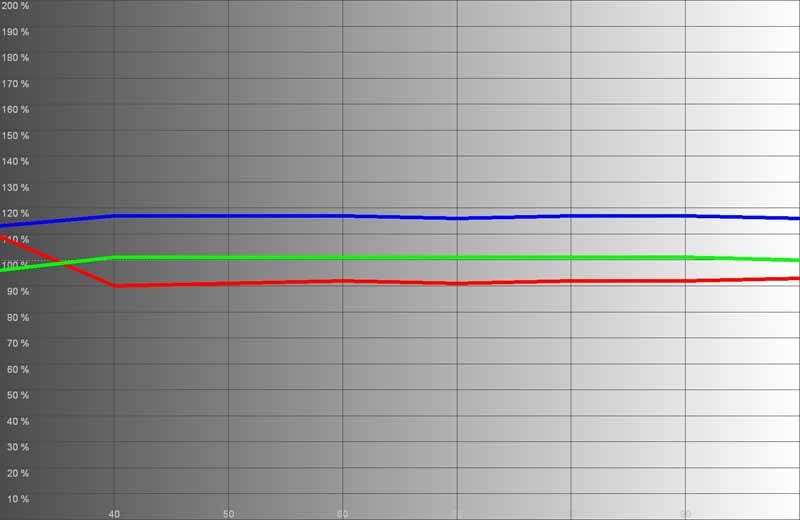
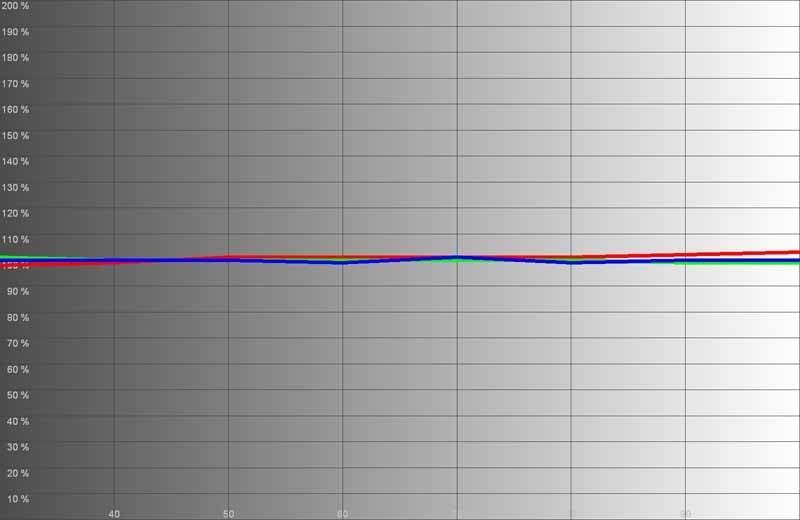
The grayscale,
initially dominated by blue (left), ended up nice and smooth after our
calibration (right)
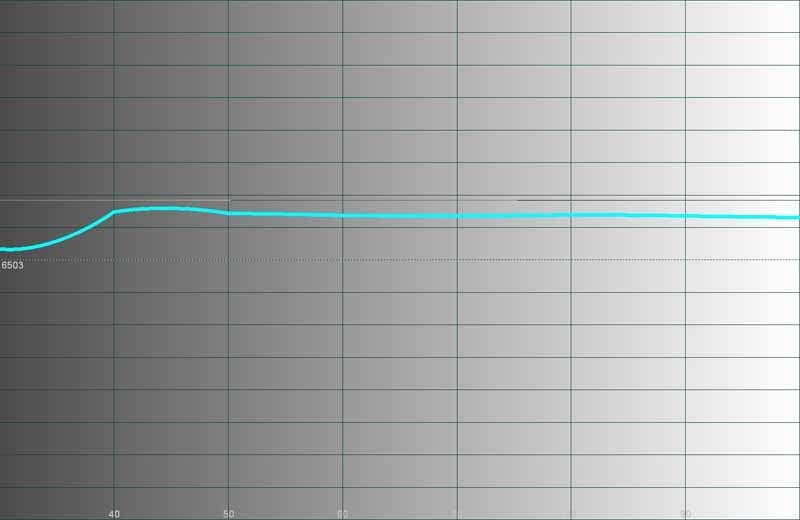
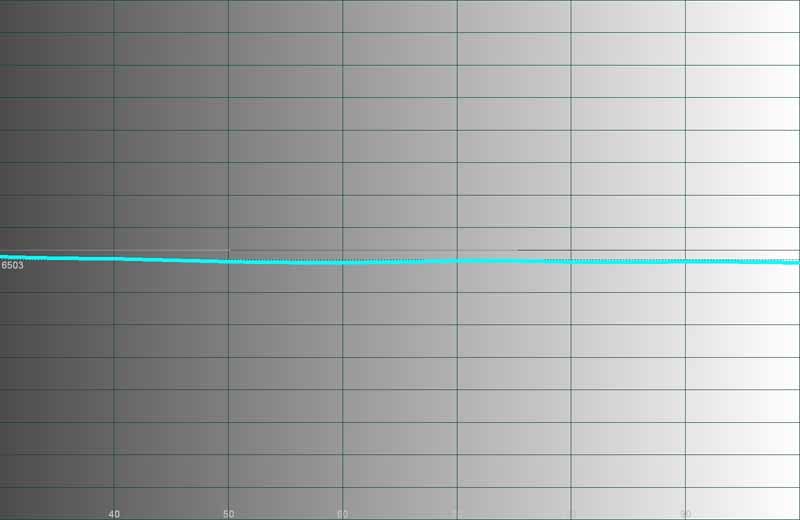
Color temperature
dropped from its initial 7500K (left) to an almost spot-on 6500K across the board
(right)
It's been a while since I experienced a projector this easy to calibrate and get to a really across-the-board result that I found to be near perfect. The menu system makes it easy to get around and the numerical controls aren't so ridiculously over-delineated that changes take forever to materialize on the screen. The W5000 is ergonomic and will make lots of home enthusiasts and custom installers very pleased.
Audioholics/HQV Bench Testing Summary of Test Results
Perfect Score is 130
BenQ W5000 Benchmark Score: 105 (Excellent performance - throw anything you want at it)
| Test | Max Points |
Results | Pass/Fail |
| Color Bar | 10 | 10 | Pass |
| Jaggies #1 | 5 | 5 | Pass |
| Jaggies #2 | 5 | 5 | Pass |
| Flag | 10 | 10 | Pass |
| Detail | 10 | 10 | Pass |
| Noise | 10 | 10 | Pass |
| Motion adaptive Noise Reduction | 10 | 10 | Pass |
| Film Detail | 10 | 10 | Pass |
| Cadence 2:2 Video | 5 | 5 | Pass |
| Cadence 2:2:2:4 DV Cam | 5 | 0 | Fail |
| Cadence 2:3:3:2 DV Cam | 5 | 0 | Fail |
| Cadence 3:2:3:2:2 Vari-speed | 5 | 5 | Fail |
| Cadence 5:5 Animation | 5 | 0 | Fail |
| Cadence 6:4 Animation | 5 | 0 | Fail |
| Cadence 8:7 animation | 5 | 0 | Fail |
| Cadence 3:2 24fps film | 5 | 5 | Pass |
| Scrolling Horizontal | 10 | 10 | Pass |
| Scrolling Rolling | 10 | 10 | Pass |
| Total Points | 130 | 105 |
|
*Tested with 480i via HDMI from a Denon DVD-3930CI
|
HD Tests (via Blu-ray @1080i) |
Max |
Results |
Pass/Fail |
|
HD noise |
25 |
0 |
Fail |
|
Video Resolution Loss |
20 |
20 |
Pass |
|
Video Reconstruction |
20 |
20 |
Pass |
|
Film Resolution Loss |
25 |
25 |
Pass |
|
Film Resolution Loss Stadium |
10 |
10 |
Pass |
|
Total Points |
100 |
75 |
|
Comments on Bench Testing
We encountered two really bizarre events as we calibrated the projector and explored its many features to find the optimal settings. The first we discovered while running the Jaggies #1 test. The rotating bar on the screen, while smooth, seemed to "judder" around rather than smoothly spin on its central axis. Changing the Overscan Adjustment setting to +2 (minimum is +1) fixed this and resulted in smooth spin. As near as we could tell the video processor had some issue with the +1 (lowest) setting.
The second event occurred when we attempted to experiment with the Dynamic Black setting. Once activated, the projector began making mechanical noises (not iris-related) that sounded like it was unable to control the black levels - and indeed the screen bore this out, with a constantly changing light output level. At first, disabling the Dynamic Black fixed it, however soon the noise came back and the Dynamic Black was once again out of control. After power cycling the projector this never again occurred.
In testing for rainbow effect we noticed two things. First, we could easily see RBE with any test pattern that showed a thin white line on black. Second, we couldn't see RBE in most of our real-world test material. This presents the scenario that if the on-screen image shows high contrast white on black you'll likely see it, but with 99% of viewing material this won't be an issue.
Recommendations
I like having Overscan essentially 'Off' so I'd like to see a firmware fix that addresses this particular video processing anomaly. I'd also leave it up to the user as to whether or not they engage Luma and Chroma Transmission in the Clarity Control settings section. My preference was to leave them off to avoid any edge artifacts, however you may prefer the increased color and luminance detail. I have to say, this is one of the most detail-rich, most naturally sharp projectors I've seen in a long time, so my preference for leaving these particular enhancements 'Off' didn't make me feel as if I was missing anything.
Noise Reduction seemed best when set to +2. It did an incredible job of reducing mosquito noise in the picture and I didn't encounter any disjointed "floating object" effects so often experienced when the noise reduction hits the edge of an object and unnaturally "floats" it over the background. There was no blurring on the Motion Adaptive tests we did, in either the HQV disc or real-world examples, so the noise reduction system is good for both static and moving images. Noise reduction does not, however, work for HD sources and it is grayed out when any progressive or 1080i signals are received. The Film Detail lock was as quick as anything I've seen, meaning that the HQV processor can recognize and grab onto an unflagged 2-3 pulldown scene with no difficulties.
W5000 Viewing Evaluation and Conclusion
I'd
like to leave this section with as few words as possible. The images truly
speak for themselves and we found the picture quality of the BenQ to be both
filmlike and crisply detailed. Detail was so good, in fact that I was able to
see definition and characteristics of on-screen elements in places I had never
been able to see before. I always espouse high definition as being able to see
the dimples in a golf ball when watching Tiger Woods in HD. With the W5000
you'll likely begin to notice the shadows in the pits. Everything below is taken with our reference Marantz VP-15S1 DLP projector in mind, a model we keep on hand to compare other products to and derive differences and capabilities.
advertisement
HDTV:
Deadliest Catch
This
is a great show on Discovery HD Theater, made even greater opportunities to see
how well your display stacks up against nighttime hi-def shots, rolling waves,
and a lot of fast pans with complex source material. Ever want to see how well
your front projector will follow a king crab flying across the screen into an
ice-soaked ship deck? OK, maybe I'm weird... Still, it looked really great on
the W5000.


The colors in this show really come out in the sky and the outfits worn by crew
members as they struggle to survive the brutal conditions associated with
fishing the Bering Sea.
HDTV:
My House is Worth What?
This
show is filmed with high quality HD cameras and utilizes ample lighting. The
result is a crisp, clean image that is hard to beat. Colors pop, edges are
crisp and the content does well to show off any projector's ability to render
crisp detail. In this particular episode, an establishing shot of the city
resulted in a real-world deinterlacing test which the W5000 passed with flying
colors.


Look at the buildings
here. At 1080i and in motion, this presented a great challenge.
HDTV:
MTVHD Bon Jovi Live Concert
We
got a chance to see some Bon Jovi in high definition courtesy of MTV's new HD
channel. It was well worth our time and the images we captured, while they
can't possibly do justice to what we saw, are at least representative of the
excellent material we viewed.


DVD:
Shrek
An
oldie, but goodie, I wanted to put something up which showed the excellent
film-like color reproduction possible with the W5000. Shrek seemed like a
perfect movie to use and we also got to see more of how well the BenQ projector
handles SD content upconverted to its natural 1080p resolution.

Colors popped but maintained a film quality
provided Brilliant Color was left off

Brilliant animation moments like this delivered
shadow detail and opportunities to see (a lack of) banding in difficult areas
of images such as fire on a kettle.
Conclusion
The street price of this projector is around half its retail. Given the quality and level of sharpness this system is capable of - plus the excellent Blacks it can produce thanks to its dual iris system - it's hard not to take notice. The BenQ W5000 is going to rival some more expensive projectors and certainly beats out the Epson 1080UB in terms of its ability to reproduce deep rich blacks. For those daring enough to risk even less lumen output and less contrast, you can dial down the iris to its lowest setting and really get some seriously low black levels. For those wanting some daytime use the W5000 offers enough flexibility to endure with ambient light and less-than-pristine viewing conditions.
I think BenQ hit one out of the park this go-around. The W5000 isn't perfect (heaven knows I'd like a shorter throw distance and horizontal lens shift) but for the price it's really, really, hard not to take some serious notice. We started by trying to figure out what price bracket the BenQ W5000 fit. The answer is that it is pretty much taking on, successfully, both the $2500 and $5000 markets. Put this on your short list and be sure to check it out.
BenQ W5000 DLP
Projector
MSRP $4999
15375 Barranca
Suite A205
Irvine, CA 92618
949-255-9500
www.benq.us
About
BenQ Corporation
BenQ Corporation consists
of three main business groups ¡X Digital Media Business Group, Integrated Manufacturing
Service Business Group and Mobile Communications Business Group. These three
business groups encompass a broad range of products and each possesses a focus
on providing consumer-oriented solutions designed for the digital lifestyle.
2006 revenues for BenQ Corporation exceeded US$6.2 billion dollars.
The Score Card
The scoring below is based on each piece of equipment doing the duty it is designed for. The numbers are weighed heavily with respect to the individual cost of each unit, thus giving a rating roughly equal to:
Performance × Price Factor/Value = Rating
Audioholics.com note: The ratings indicated below are based on subjective listening and objective testing of the product in question. The rating scale is based on performance/value ratio. If you notice better performing products in future reviews that have lower numbers in certain areas, be aware that the value factor is most likely the culprit. Other Audioholics reviewers may rate products solely based on performance, and each reviewer has his/her own system for ratings.
Audioholics Rating Scale
 — Excellent
- — Very Good
- — Good
- — Fair
- — Poor
| Metric | Rating |
|---|---|
| Detail and Resolution | |
| Deinterlacing & Scaling | |
| Contrast and Black Levels | |
| Color Reproduction | |
| Noise Reduction | |
| Calibration Options | |
| Build Quality | |
| Ergonomics & Usability | |
| Ease of Setup | |
| Features | |
| Remote Control | |
| Fit and Finish | |
| Performance | |
| Value |
Clint Deboer was terminated from Audioholics for misconduct on April 4th, 2014. He no longer represents Audioholics in any fashion.
View full profile