
Parasound Halo C2 Processor Review
Parasound Halo C1 C2 Processors
- Product Name: Halo C 2 Processor Checklist
- Manufacturer: Parasound
- Performance Rating:

- Value Rating:
- Review Date: December 07, 2006 10:45
- MSRP: $ 4000
|
|
Pros
- Automatic Speaker Distance Calibration
- Automatic Speaker Level Calibration
- Video Pass Through - No Power Required
- BNC Video Connection Inputs and Outputs
- Easy to Set-Up
- THX Ultra2
- On-The-Fly Channel Trims
- Preset volume adjustments for analog inputs
- RS-232 Interface
- Software Programmable
- Universal Remote MX-700 with Side-Kick
- Balanced XLR Inputs and Outputs
- 10-year warranty
Cons
- No Component Video Up-Conversion
- No Dolby Pro-LogicIIx (available soon via firmware)
- No 1394 IEEE Input or Output
- No HDMI or DVI Inputs (unavailable during the time of design)
- One Set of Global Speaker Settings
- Currently Decodes DTS 96/24 as 48kHz
- Only One Set of Multi-Channel Inputs
- Analog Bypass only with Balanced XLR Inputs
Parasound Halo C2 Introduction
Parasound, a privately owned U.S. company located in San Francisco, was founded in 1981. From their inception by President, Richard Schram, their mission has been to provide affordable audio components for high-end audiophiles, home theater enthusiasts and custom audio/video systems designers.
During an interview, Richard Schram once stated that, "we take listening very seriously," and we're sure that this philosophy likely resulted in the fundamental reason why Parasound created high quality products made to endure the scrutiny of most audiophiles while being affordable to the budget minded enthusiast. "If I didn't listen to the products we sold, or if John Curl, our legendary chief circuit designer, didn't listen to the products he designed, then we would have never won the respect of hundreds of dealers, the praise of most of the world's audio reviewers, and the earned loyalty many thousands of critical listeners who have chosen Parasound products for their own."
Parasound's chief designer for their amplifiers was John Curl. Curl's experience included hardware such as the classic Mark Levinson JC-2, the SOTA head amplifier, and the Vendetta preamplifier. He also wrote several definitive articles on circuit design and the influence of capacitor design on sound quality. Lately however, Curl has been promoting some views on cables which Audioholics does not agree with, but we believe this seemingly new found position didn't take away from his excellent circuit designs and understanding of the important metrics governing quality amplifier designs as seen in the Parasound A 21 and A 51.
Parasound Halo C2 Overview and Build Quality
Parasound introduced the Halo C2 and C1 in 2002, and both have been highly regarded among many audiophiles and professional installers not just for sound quality, but also the many unique features they offer. Features such as BNC video connections, video signal pass through (which allows video signals to pass through without the C2 power being on), customizable Aux channels, automatic calibration (which included automatically setting speaker distances and volumes), easy to use set-up menu, firmware upgradeability, software programmable all controlled by a sophisticated Universal MX-700 Remote Control (including a "Side-Kick" Remote), are simply not common place for many processors. For those who desire additional bells and whistles, the C1 even includes a 5" front panel TFT display for on board display of the setup menu along with extra filters and a more robust the power supply. Perhaps some of the increased power supply in the C1 may be used to run the 5" TFT, but it may also offer sonic performance improvements beyond that of the C2.
Front Panel Screen
Perhaps the obvious difference between the C1 and the C2 could be seen by the height, which made way for the 5" flat panel screen on the C1. The screen would probably come in very handy when setting up the C 1 in with a front projector especially when the C 1 is located on the same wall as the projector screen. The on-board flat panel display mimicked the On-Screen Display and could either be operated via the remote or on the buttons located directly on the C 1's front panel. Both methods proved to be extremely useful for the times we needed (or wanted) to set up the C 1 without a monitor. For example, I used this panel display quite a bit when listening to two channel CDs where I didn't want the distraction of my large Rear Projection Monitor but still required setup and configuration tweaks to optimize the sound, or switch the DSP modes. The OSD also had a "Temp Display" that could be set to "Full" or "Simple." In "Simple" mode, the C 1 displayed only the specified function, such as the DSP type, Input Selection, Volume and other line item functions. When set to "Full" the unit displayed the entire menu from the On-Screen Display.
The Front Panels of the Halos could also be adjusted in brightness. The C2 allowed for the display to be completely turned off or adjusted to three different brightness levels. The C 1's flat panel display could also be dimmed but it was not able to be completely turned off. Even in the lowest dim setting, there was a faint glow from the panel which could be seen peripherally when viewing movies in the dark if the unit is located to the side of the screen as was the case in Reference System 2. The dim setting adjustment for the flat panel display also varied the brightness of the text making it a bit harder to read in the dimmest settings.
Digital Architecture
What Audioholics review would be complete without our peak under the hood? The digital architecture of the Halo C 2 and C 1 included four dual channel AKM's AK 4393 Digital-To-Analog Converters and one Motorola Symphony 56367 24-Bit DSP. This Motorola DSP is common in several other receivers and processors from companies such like Aragon and Anthem.
Power Supply
What seemed to be missing from our look inside was the typical larger and heavier linear power supply we've seen in many other processors. In its place was a computerized digitally switching power supply which was the fundamental reason for the Halos lighter than average 18-lb (C 2) and 22-lb (C 1) weights. When we asked Richard and Tony Pointes (Head of Technical Department) about this power supply, they pointed out the following. One advantage of this design was that the Halos were able to automatically switch to different input voltages making them ready for an international marketplace. According to Parasound the digital switching power supply also proved to be more efficient by converting the frequency to much higher rates than the standard 60-Hz. Aside from the front panel display, the power supply is another differentiation for the C1 and C2 as Parasound informed us that the C 1 included additional filtering. Some of this was likely used to operate the TFT display
Enhanced Bass
The Halos included a very useful feature called "Enhanced Bass" which sends bass from channels set to "large" to the sub simultaneously. This feature was particularly useful when listening to two channel CD playback or Satellite TV, as it provided extra bass sound with the push of one button on the remote. However, when the front channel speakers were set to "small," the sub remained on at all times regardless of the menu which still allowed for "On" or "Off" to be selected. This was a bit confusing at first and it would have been a bonus feature to actually be able to control the Enhanced Bass with "small" speakers. The Enhanced Bass "On" and "Off" could also be toggled when switching to 7.1 channel inputs, but since the signal was bypassing the digital circuitry, it too was defeated though still selectable. While this wasn't the end of the world, it could be confusing to many operators thus why we noted it in our review.
Direct Mode
For most AV Controllers "Direct Mode" usually means Analog Mode or "Pure Direct" Mode but on the Halos, it actually referred to the mode of the source. Using the Direct mode allowed the C 1 and C 2 to automatically select the appropriate digital format for a digital source signal including stereo, mono, Dolby Digital,... and DTS.
7.1 Channel Analog Inputs
The Halos provided one set of 7.1 channel inputs for DVD-Audio and SACD. Unfortunately, there was only one set of global speaker level settings which made it challenging to switch between the two formats as the subwoofer outputs vary. So when switching, from one to the other, we had to adjust the subwoofer level volume by ear using just the On-The-Fly adjustments.
Other Analog Inputs
Both the Halo C 1 and C 2 came with 10 additional unbalanced analog inputs (via RCA) which could be used for CD players, turntables, VCR (for those still living in the past), and any other analog source of interest. It's important to note that these were processed in the digital domain. The Halos did provide pure analog inputs which bypassed the digital circuitry via a set of balanced XLR analog inputs and the 7.1 channel unbalanced RCA analog inputs. So in order to remain in total analog, it required using either of these connections.
Rack Mounting Brackets
I was pleased to see both the C1 and C2 offered brackets which could be easily installed on the units to make them ready to mount into a standard 19"-wide rack. This was likely provided for the custom installers and Audiophiles who don't just furnish their products, but solidly bolt them on to something robust and sturdy.
The Many Modes of the Halo
The Halos came equipped with an array of different modes which included all the basics.
|
Dolby Modes include:
|
THX Processing
|
|
DTS Modes include:
|
DSP Modes
|
Parasound Halo C2 Installation and Connections
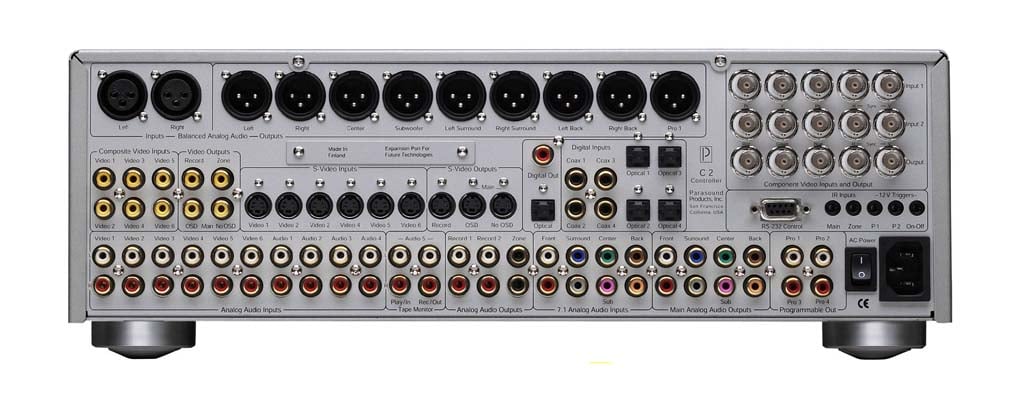

C2 Back Panel (left);
C1 Back Panel (right)
Installing the Halos proved to be extremely easy as the ergonomic back panel was effortless to work with and follow. What we first took note of was that the Halos offered BNC Video Connections (two sets of inputs and one set of outputs). This featured proved to be extremely handy with DVD-Players and Projectors which also included these types of true 75-ohm connections. Furthermore, the C 2 offered two Balanced XLR Inputs for pure analog connections. This also tended to be atypical with other processors we reviewed in this price class and was a commendable provision by Parasound.
The Halo C 2 and C 1 did not offer analog bypass via RCA inputs. When we made the connections via the unbalanced RCA analog inputs, the unit passed the signal through the DSP thereby converting it to digital. For most DVD and CD applications, this would not be a problem as the DACs in the Processor are likely to be a higher quality than the DACs in most players, with some exceptions. I tested this theory with our Denon DVD-2900 Universal Player simply by connecting it via its 7-channel output to the analog direct 7-channel RCA inputs of the Halos. When switching frantically between Audio Source 1 (digital input) and Multi-channel input (Analog Input), we found the sound quality of two channel CDs audibly improved when played through the digital connections which used the DACs in the Halo processors.
Both Halos offered a pair of balanced XLR analog audio inputs. Unfortunately we did not have a player with this type of balanced XLR output so we were unable to take advantage of this feature. While the Halos offered an array of RCA inputs for analog sources, they were converted into digital and passed through the digital bass management and DSP's. Not having true analog RCA inputs would likely only be a nuisance for analog purists using turntables, VCRs or tape decks as these signals will be converted to digital and not remain as true analog.
During our installation, we quickly realized that the Halos had nine Balanced XLR Outputs for connecting the four additional Aux programmable channels which was one short of the 10 total channels. When we questioned Richard Schram about this during CES 2004, he told us there simply wasn't enough room on the back panel for additional balanced outputs. Instead Parasound decided not to grow the size and weight of the processor therefore offering one Aux Channel (labeled as Pro 1), and four RCA Unbalanced Outputs for all four Aux channels (labeled as Pro 1, Pro 2, Pro 3 and Pro 4).
As for the rest of the back panel and available connections there were plenty and more than enough for the average Home Theater installation. But in an effort to keep this article concise, instead of elaborating on them in this review, we have opted to provide a download for the Halos User Manual (Click Here for C 1 User Manual) ( Click Here for C 2 User Manual ) which identifies the entire back panels.
Aux (Programmable) Channels
As discussed in the previous section, both Parasound Halos offered four Aux programmable channels as part of Parasound's "7.5 Enhanced Surround." Aux channels are not necessarily unique to the Halo products as they were also found on almost every Yamaha receiver we've reviewed (as two front effects channels), the Sunfire Theater Grand III and IV (as two side channels), and several other products. But what made Parasound's approach unique was not the provision of these Aux channels, but their programmability and versatility which could be tailored to individual tastes, needs and Theater Rooms. These extra channels were outlined and described in the User Manuals as follows:
-
Pro 1 and Pro 3 - Programmable from any or all 7.1 channels along with adjustment for bandwidth, level and delay;
- Pro 2 - Extra Subwoofer Output paralleling the main sub out for dual sub locations;
- Pro 4 - Extra Subwoofer Output but with all frequencies above 20-Hz filtered out which is ideal for floor shakers or an additional low frequency subwoofer.
Parasound formulated several mix recommendations for these channels which can be downloaded and viewed from the following .PDF file (Click For Link). Note, these were provided just as guidelines and it's completely up to the end user as to what specialized mix is implemented when these channels are used. We will elaborate on the performance enhancement with these channels within our listening test section.
Parasound Halo C2 Automatic Setup

The Halos came equipped with a microphone ("Cal Mic") and built-in firmware to measure the actual acoustic distance. Parasound President, Richard Schram tells us that this approach is incredibly accurate and that the volume levels could be automatically set to within +/- 0.2 dB and the distance to within +/- ½ foot. All it took to run this automatic calibration was positioning the Halos "Cal Mic" in the optimum listening location and patience to allow the Halo to cycle through the built in tones. The auto-calibration process took about two minutes while the Halo played repeated burst tones or pink tones through each channel.
When completed, the C1 and C2 were able to accurately configure the distances and volumes of each channel, and stored them as global settings. One word of caution however is that you should remove the AA battery from this microphone when not in use, as discussed in Parasound's user manual. I can attest that after three months of having the "Cal Mic" sitting around in the "off" position, the battery was completely drained down to 0-volts. When I went to do another auto-calibration, there was a red warning menu which popped up on the Halo and indicated that the "mic was not ready." Another note about the mic is that there was a dot in the up position, which equated to on. Due to my short attention span (common among Americans), I didn't read the helpful manual and with a 50/50 shot and Murphy's law, I selected the wrong position the first time through.
Auto-Calibration Speaker Volume Verification
After auto-calibrating I verified the accuracy of the results from the automatic volume level in two ways. First, we used a Radio Shack Sound Pressure Level Meter and the built in test tones from the C1 and C2. We quickly measured that all channels were indeed accurately set to at least within the accuracy of the SPL meter (+/- ½ db). We then used the Avia Pro DVD test tones and cycled through all channels once again measuring the volume with our SPL meter. When doing so, we found that both the C 1 and C 2 proved to accurately set their own volume levels. Furthermore the built-in Halo test tones were right on the money when compared to the external tones found on the Avia DVD's.
Auto-Calibration Speaker Distance Verification
 We then verified the accuracy the automatic distance setup with the
sophisticated measurement tool known as
a tape measure
. The C 1 and C 2 were again accurate
this time in their auto-calibration of speaker distances which proved to be within at least +/- 1
foot.
Richard Schram
informed us that even though the
display menu showed 1-foot increments, the auto-calibration distance was actually accurate to within
+/- ½ foot. Setting these distances manually however could only be done to within the 1-foot, so it was
best to use the automatic calibration feature. What's interesting was that when we manually changed
these distances to a delay that exceeded 2 m-seconds, there was a
red warning
which popped up on the OSM. We also learned that any speaker set to an unrealistic distance, such as
greater than 22-feet, would be highlighted in the On-Screen Menu with a different color. We did not
necessitate taking advantage of these features, but I'm sure there could be situations in other setups
where these warnings may indeed become helpful in identifying possible problems. This was especially
true if you're a custom installer and a customer who doesn't quite understand calibration and
inadvertently changes a setting. When doing so they should be able to quickly identify these warnings
and hopefully realize their error. Dare I say that this feature made configuring the Halos almost
fool-proof?
We then verified the accuracy the automatic distance setup with the
sophisticated measurement tool known as
a tape measure
. The C 1 and C 2 were again accurate
this time in their auto-calibration of speaker distances which proved to be within at least +/- 1
foot.
Richard Schram
informed us that even though the
display menu showed 1-foot increments, the auto-calibration distance was actually accurate to within
+/- ½ foot. Setting these distances manually however could only be done to within the 1-foot, so it was
best to use the automatic calibration feature. What's interesting was that when we manually changed
these distances to a delay that exceeded 2 m-seconds, there was a
red warning
which popped up on the OSM. We also learned that any speaker set to an unrealistic distance, such as
greater than 22-feet, would be highlighted in the On-Screen Menu with a different color. We did not
necessitate taking advantage of these features, but I'm sure there could be situations in other setups
where these warnings may indeed become helpful in identifying possible problems. This was especially
true if you're a custom installer and a customer who doesn't quite understand calibration and
inadvertently changes a setting. When doing so they should be able to quickly identify these warnings
and hopefully realize their error. Dare I say that this feature made configuring the Halos almost
fool-proof?
We did encounter a slight problem when calibrating the subwoofer which we later discussed with Richard. Given the Theater Room size for Reference 2 , we were unable to get the subwoofer far enough away (greater than 11-feet) for accurate automatic group delay calibration (distance) and level adjustments, at least on the C 2. But we were able to manually set the level using our trusty Radio Shack SPL meter and the distance using our handy calibrated tape measure. However, when we did the subwoofer calibration on the C 1 we did not experience this configuration hiccup thereby making the auto-calibration on the C 1 flawless.
Audio Setup
The Audio Setup Menu was pretty straight forward, but did include a few notable features such as reverb for Club and Concert Modes, and Dolby/DTS setup along with a few other nice parameters. The Dolby/DTS setup included the following adjustments:
- PLII Panorama, which sent some of the front channel sound to the surrounds for a wraparound effect;
- PLII Center Width, which spread the center channel to the left and right channels;
- PLII Dimension which adjusted the front and rear positioning of the surround field in PLII Music Mode and finally;
- Neo:6 Center Image which also created a wraparound effect by sending some of the front channel to the surrounds. These effects could either be defeated by entering 0, or maximized to a higher value all of which is a matter of personal preference and Home Theater room size/setup.
Preset Setup
The Preset Setup was a welcomed feature on the Halo C1 and C2. In this menu, there were five storage bins for presets which included adjustments for tone controls (bass, treble) and volume controls for the center, surround and subwoofer channels. These presets could be assigned to one or more specified input in the "Source" setup menu. These settings came in quite handy when listening to vintage two-channel CD's for example, where the bass needed just a bit more oomph to be appreciable. The other notable comment about these presets was the fact that they did not alter the auto-calibration volumes. They were independent and could be used simply to boost or decrease the volumes of a specified channel. The Presets were run through the digital circuitry and were defeated when using 7-channel analog inputs. Using these presets required some additional setup as they were only accessible via the On-Screen Menu however they could be conveniently assigned to each input. In fact, these parameters were also adjustable via the external downloadable software which could be done on your PC and then downloaded to the Halo.
Display Setup
It was apparent that Parasound thought about a global market for the Halos, not only based on the automatic input voltage adjustment, but also with the "Display" setup. In the Display setting we were able to select the TV system for either NTSC (the standard in the Western Hemisphere ) or PAL (the standard for Europe ). But for the custom installer, it's another potential hazard that could be inadvertently incorrectly implemented by a customer, which can then result in a problem, resulting in a phone call from your customer. When switched to PAL on a US TV, the OSD will blink and roll frantically. Knowing this ahead of time may save you the service call if your too busy to charge $$ for something this simple to fix.
Global Speaker Settings
The Halo C 1 and C 2 provided just one set global speaker settings. This became problematic when switching between SACD and DVD-Audio as the subwoofer output levels can be drastically different on many, if not all universal DVD players. Combine this issue with the fact that many universal DVD players still did not offer bass management or digital delay compensation for SACD or DVD-Audio. It makes you wonder when we will see the day of an all in one inclusion proprietary cable design with all manufacturers.
On The Fly Speaker Level Control
If you've experienced movie sound tracks where the voices from the center channel were difficult to hear, or if the surrounds just didn't have enough finesse to impress your friends, fear not because the Halos had the solution. When it came to adjusting speaker level volumes, the C 1 and C 2 offered more than their share of methods. Independent yet again of the auto-calibration and global volumes, and independent of the five Preset volumes (for center, surrounds and subwoofer), the Halos provided speaker level channel trims on-the-fly. These settings were easily accessible on the remote control in the same section as the adjustments for treble and bass settings, which by the way could also be altered on-the-fly. To me, this indicated that the Halos could be adjusted and configured for any situation, environment or source. It was unfortunate however that the On-The-Fly speaker level control could not be stored for each input.
Parasound Halo C2 Video Processing
Parasound Halos did offer yet another atypical feature not found in most other Home Theater Controllers; Passive Video Pass-Through. This unique feature allowed video from your sources to be viewed on the Display WITHOUT the Processor being turned on. I found this to be especially useful when I wanted to watch my satellite or DVD without the entire system being blasted throughout the living room. I'm sure you are aware of the times that the kids want to watch a movie, and you're working on something else and don't want them to mess with the processor. Well, now you can have them watch that DVD without even turning the Halos on.
Unfortunately the Halos were not equipped with video up-conversion making the number of connections from sources to the monitor a bit more complex. There are many new receivers hitting the market this year that will offer video up-conversion with 100-MHz bandwidth for transparent video throughput, but when the Halos were designed two years ago, this was not really a common feature. Without this feature, we had to switch inputs on our monitor in order to view different sources which may not be considered as problematic to most users. Our workaround for the On-Screen Menu was to use our projectors picture-in-picture mode. Most monitors sold today have picture-in-picture including the Sony KP-57WV600 which was used in Reference System 2 . We simply selected the "twin" mode on our Monitor and scaled it to the size that provided optimal viewing from our listening location as seen in the pictures below.


Picture-in-Picture controls
Digital Interfaces - Not Present
The Halos did come with four coaxial and four optical audio digital inputs along with one coaxial and one optical digital audio output. But the Halos did not offer HDMI, DVI, or 1394 IEEE inputs and outputs. It's not that Parasound didn't consider HDMI or DVD connections it's more that they were not commonplace 2+ years ago when the Halos were designed and released. But as you are aware from our 2004 CES Coverage , there are a number of products being released as now, which will have at least one of these connections or a proprietary connection. As for IEEE, again many other products offered this IEEE around the same time as the Halos, however, they did no good. For example, the IEEE is a daisy chain and most products offering this connection type typically only include one IEEE and not two (one in and one out). Without the two IEEEs on the A/V Controller, it is not possible to pass the signal from your source, through your processor to your display without breaking the daisy chain.
Halo Setup Software
I was very surprised when I read through the manual and found that the Halos could also be set up via a Windows based software program which could be downloaded directly from Parasound's website. Using this software allowed us to store our settings remotely on a PC, just in case there was a memory glitch in the Halo, or the wife or daughter messed up my original settings. Connection to the PC was done with ease using a standard RS-232 which is another valuable feature not only for users, but custom installers. This software allowed all setup information to be stored into a Laptop. This way in the event of a catastrophic failure (which usually occurs when customer pushes the wrong button), you're fully armed and operational with all original settings in just one quick download from the PC to the Halos and thereby solving the problem.
Set Up and Configuration
This section will not ponder on all the details for setting up the Halos which were covered adequately in the appropriate User Manuals. Instead, we will focus on a few of the highlights regarding the configurability and set up features of the Halos along with our experience with actual operations. To begin with, both Halos offered an On-Screen Menu that was easy to navigate through and configure either by front panel or remote. The C 1 included a 5" front panel display that mimicked the On-Screen Menu. I could imagine this display coming in quite handy when configuring the C 1 in a room with a front projector as it would allow the operator to fully calibrate and configure the C 1 without having the front projector blaring down upon them from behind.
Both Halos offered an extremely useful, much desirable feature which we haven't seen on many other processor/controllers; that being automatic speaker level and distance calibration.
Parasound Halo C2 Listening Tests and Conclusions
2-Channel CDs - Two Channel Without Sub
For several months I lavished in the sounds of my favorite CD's. I listed just a few of my audition CD's which I felt were perfect for testing performance in two channel digital and also DSP modes. Since Reference System 2 included bass cable speakers ( Canton Karat Reference 2 DC ), I conducted most of my stereo CD auditions without the subwoofer in the comfort of my listening chair. In stereo mode the Halos were able to present tremendous detail and imaging without sounding mechanical. I listened for hours on end to Marillion, Steely Dan, Cowboy Junkies, Mark Johnson and a host of other CDs. In all cases, I was quite impressed with the way the Halos performed and processed the digital material presented to them. There were times however, that I thought the bass wasn't quite as pronounced as I liked and so I boosted it via the "bass" adjustment which was easily accessible on the remote. And why not? I was in digital domain anyway so I didn't feel that using the digital bass management would have adverse effects on the sound quality.
My all time favorite two channel CD for listening to stereo and all DSP modes for that matter, was Mark Johnson's first solo CD. The first two songs, "Overture" and "Exit 33" are enough to get the bass slapping and the midrange fired up on any system. There's so much happening in these songs starting with smoking brass guitar to rhythmic drums and explosive percussions that on the right equipment it should prove to be more than enough to the shake the room with and without the sub. Luckily the Halos partnered with Parasound's A 51 and A 21 amplifiers were indeed the right equipment for bringing down the house . During my DSP modes audition, I was impressed by how well the Natural, Party, Club and Concert modes really sounded. The fact that the Halos provided reverb adjustments for Club and Concert modes really helped me control the non-tempered echo in my reflective room. I changed the reverb settings from "Dry" to "Wet" and the net effect was enough for me to appreciate and acknowledge. For my room, I left both on "Dry." I then implemented the same CD's with PLII Music and Neo:6 music. Once again, I was pleased to find useful adjustments for PLII which included "Panorama," "Center Width" and "Dimension" along with adjustment for Neo:6 which included "Center Image." These adjustments were extremely useful for creating a "wrap-around" effect from the front channels to all other channels. Once again, I was able to set them to an optimal setting for the room which houses Reference System 2.
Digital Satellite Radio - Two Channel With Sub
Since Reference System 2 was also my "live-in" system, most of my listening experience was with Digital Satellite as I listened to hours on end of Digital Radio Stations with a variety of music formats ranging from Jazz, to New Age, to Classic Rock. The only stations I didn't listen to were rap and country. Unlike my stereo audition with CDs where I did not use a subwoofer, much of my Satellite Radio listening was done in two-channel with the sub as I spent most of that time in the kitchen or surrounding rooms, either cooking or doing house work, and so I preferred a boost. This type of audition helped me better understand the depth of sound that the Halos were able to produce since I was out of the "sweat spot" most of the time. I was impressed with the Halos performance and dynamic reproduction of the music as the bass from the subwoofer sounded seamless when coupled with the mains. This was likely attributed to the auto-calibration which we have shown to be very accurate with the exception of the subwoofer on the C 2. When I actually had the time to sit in the "sweat spot" and listen to Digital Satellite, it too sounded impressive. Again, the Halos demonstrated they were not mechanical tinny sounding processors, but formidable contenders in a very competitive market.
Digital Satellite Shows and Movies - PLII:Movie, Neo6:Movie
The current firmware included in our C 1 and C 2 did not provide PLIIx. Our understanding from speaking with Parasound was that they will be updating the firmware soon to include this mode, but they have not yet provided an anticipated date for its release. We will likely amend this article once we've experienced PLIIx on these processors. For our auditions I listened to many of my favorite shows and a few good movies on HBO. Most of them were through TiVo as I typically didn't have the time to watch them when they were actually aired I'm convinced TiVo is the invention of our time as it streamlines the TV watching process by allowing us to skip commercials and blow through the bad parts while speeding to the good parts. Most TV and Movies I listened to from Satellite were done with PLII:Movie and Neo6:Movie. On the Halo C 2, I was impressed indeed with the presentation using these modes. Both the Halo C1 and C2 were a treat to listen to during my evening relaxation time with the family in front of the proverbial boob-tube(s).
Multi-Channel Audio
It was only when the wife and kid were away that I could really play. During those moments, how ever brief they seemed to be, I was able to initiate the multi-channel fuel that otherwise went un-listened or defused. My favorite multi-channel music listed above included DVD-Audio, SACD, and DTS sound tracks, all of which proved to be perfect audition material. Both the C1 and C2 bellowed through tracks such as "Magnification" from Yes, "Dirty Little Secrets" from Graham Nash, "Hey 19" from Steely Dan, and "Come Away with Me" from Norah Jones. Switching between the DTS tracks via digital input and the DVD-Audio tracks of the same disc was very interesting indeed. I found that the DTS tracks didn't sound as detailed as the DVD-Audio counterparts. DVD-Audio and SACD performance with these Halos was quite an enjoyable experience.
Parasound Halo Listening Tests: DVD Movies
On even rarer occasion, I actually have time to sit back and watch DVD Movies, including a few DVD Concerts, which include Eric Clapton's " One More Car, One More Rider ," Yes " Symphonic Live ," Rush "Live in Rio ," and a host of others. DVD Movie Tracks I love to use for movie performance include Terminator 3, The Lord of the Rings - Two Towers , and Jurassic Park III. Each of these movies had my favorite parts which are perfect for checking out performance of home theater products. For my DVD experience, I conducted my auditions with and without the extra channels. I created mixes for the extra channels based on those suggested by Parasound in the following downloadable document. I positioned the extra channel speakers in along the wall of each side of the room, about mid-way, and facing the center of the room. My thought was to try and emulate the speakers along the side wall of a movie theater. When doing so, I must admit that I was astonished to hear how these speakers really added to the movie experience. When turned on, it was as though these extra-channels completed the experience by encircling me with sounds that helped engulf me within the movie.
Overall Impressions
I must admit that when switching between to the C1 and C2, I had to give a slight edge to the C 1. Maybe it was based on my anticipation therefore preconceived, but I was certain that the Halo C1 presented more openness and spaciousness during my auditions. Recognizing there are too many variables that could cause this, such as setup and configuration, listening memory, I decided to peruse through the On Screen Menu to check my settings for "Panorama," "Center Width" and "Dimension" in order to determine if this could have been the reason. The settings were close, but not identical. In addition, unless we switch from A to B within a 2-3-second window, it would be difficult for us state with much authority that the two were decidedly different. In either case, they were both wonderful pieces that had a very defined soundstage. Implementing the additional channels also proved to be well worth the extra installation and setup as well as amplifier investment, especially in the large room used for our audition. But if you're in a smaller room under 12' in depth, perhaps these channels are best to leave alone.
Conclusion
Parasound created two wonders with their design of the Halo C1 and C2. For those on a budget, the C 2 offered a solid performing AV Controller with many useful features which made it a worthy contender when considering other processors in the $4,000 price range. It was sophisticated, easy to use and well built. If you have the upgrade budget and looking for more bells and whistles such as a 5" flat screen, then the C 1 was an option to consider, provided you are aware that at this price class of $6,000, other processors are coming available with video up conversion, firewire, DVI and HDMI switching. The C 1 was perfect for Home Theater Systems that required easy access to the set up menu via onboard controls and display which made it perfect for custom installers. Both Halos provided a Windows based software interface which can be downloaded from Parasound's website. This feature was uncommon in other product we've reviewed and was extremely handy for pro-installers we have talked with who wish to store calibration info just in case their customer push buttons they were not supposed too. I also liked the fact that the Halos provided video pass through. If you are the type that connects all your video sources through the AV Controller, this feature is extremely useful for times you don't want to turn on the Halo just to watch TV.
Another honorable mention was Parasound's selection of Remote Control. Perhaps you already know about our infatuation with the Universal Remote Home Theater Master MX-700 from our review of this wonderful controller. Several wise manufacturers such as Parasound have purchased OEM versions from Universal Remotes. Universal then placed the manufacturer's logo directly on the remote and the packaging. The MX-700 which came with the Halos also came with a "Side-Kick" remote which was the perfect wife-machine interface as it only provided critical operation buttons. Again, for those custom installers, the side-kick remote was the ideal controller to leave in the hands of those customers who are too inquisitive and push things they don't understand. There were many other redeeming qualities found in the Halo C1 and C2 as summarized:
-
Automatic Speaker Distance Calibration
-
Automatic Speaker Level Calibration
-
Video Pass Through - No Power Required
-
BNC Video Connection Inputs and Outputs
-
Easy to Set-Up
-
THX Ultra2 Certified
-
On-The-Fly Channel Trims
-
Volume in Analog Domain
-
Preset volume adjustments for analog inputs
-
Additional Customizable Channels
-
RS-232 Interface
-
Software Programmable
-
Universal Remote MX-700 with Side-Kick
-
Balanced XLR Inputs and Outputs
-
10-year warranty
But upon all things at least a little rain must fall. With the Parasound Halos, thankfully the list was short:
-
No Component Video Up-Conversion
-
No Dolby Pro-LogicIIx (Parasound indicates that this firmware update is pending)
-
No IEEE 1394 In and Out
-
No HDMI or DVI Inputs (which was notably unavailable during the time the Halos were designed)
-
One Set of Global Speaker Settings
-
Currently Decodes DTS 96/24 as 48kHz
-
Only One Set of Multi-Channel Inputs
-
Analog Bypass only with Balanced XLR Inputs
Over the past several years, receivers have made quantum leaps in advancements which have made them much more competitive to separates. Where I believe most of the benefits with separates can be experienced is in systems that require a great deal of good clean, raw power which some receivers are not prepared to provide. If you have or are installing a system that beckons for more power and your mindset is fixed upon separates then either Halo coupled with the Parasound A 51 and A 21 Amplifiers are worthy solutions. Stay tuned as we provide a detailed review of the Parasound Amplifiers.
The Score Card
The scoring below is based on each piece of equipment doing the duty it is designed for. The numbers are weighed heavily with respect to the individual cost of each unit, thus giving a rating roughly equal to:
Performance × Price Factor/Value = Rating
Audioholics.com note: The ratings indicated below are based on subjective listening and objective testing of the product in question. The rating scale is based on performance/value ratio. If you notice better performing products in future reviews that have lower numbers in certain areas, be aware that the value factor is most likely the culprit. Other Audioholics reviewers may rate products solely based on performance, and each reviewer has his/her own system for ratings.
Audioholics Rating Scale
 — Excellent
- — Very Good
- — Good
- — Fair
- — Poor
| Metric | Rating |
|---|---|
| Build Quality | |
| Fit and Finish | |
| Ergonomics & Usability | |
| Features | |
| Remote Control | |
| Audio Performance | |
| Video Performance | |
| Performance | |
| Performance | |
| Value |