
Emotiva Reference MMC-1 AV Processor Review
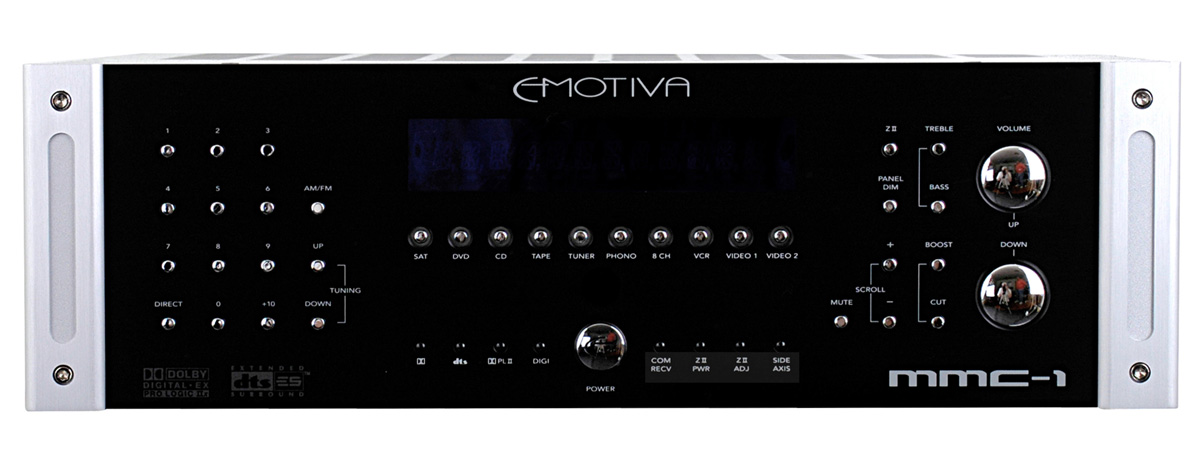
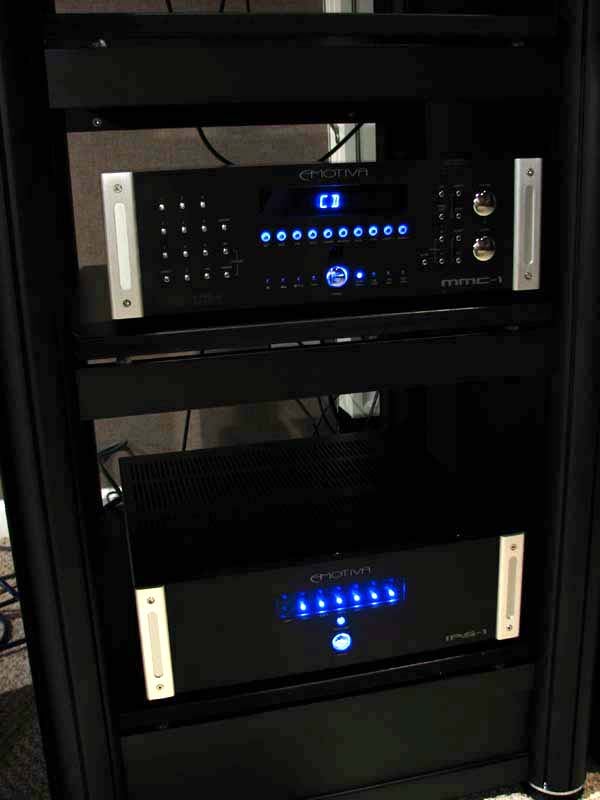
MMC-1 Front
- Product Name: Reference Series MMC-1
- Manufacturer: Emotiva
- Performance Rating:

- Value Rating:
- Review Date: May 14, 2007 19:30
- MSRP: $ 1199
- Precision Motorola Symphony™ based 7.1 Channel Dolby Digital, Dolby Digital EX, Dolby Pro-Logic II/IIx, DTS, DTS-ES, and DTS Neo:6 decoding
- OSD (On Screen Display) for easy set up and calibration.
- All inputs can be renamed and are completely configurable for triggers, zone assignment, gain trim, max level, etc.
- Second zone audio capability; can play sources independent of the main zone
- Full-time digital down-mix for two-channel tape recording, digital outputs, and second audio zone output from multi-channel digital sources
- Direct two-channel analog bypass mode
- Custom machined aluminum remote control
- High performance FM/AM tuner with 40 presets
- HDMI 2x1 internal switcher: Maintains 480i, 480p, 720p, 720i, and 1080i, 1080p resolutions
- Three sets of 100 Mhz+ HDTV compatible wide-bandwidth component video inputs with two buffered outputs
- Broadcast quality video up-conversion circuitry for all composite and S-video inputs.
- Six audio/video inputs, each with audio, S-video and composite video
- Three audio inputs
- Moving magnet phono input
- Eight channel analog audio input using RCA connectors for DVD-A, SACD, or other external multi-channel source. Ultra pure, all analog signal path.
- Digital audio (S/PDIF) inputs for six sources: four coax or optical and two coax only
- Coaxial and optical digital (S/PDIF) outputs provide two-channel digital down-mix from 5.1 sources for recording, etc
- Balanced output for .1 channel with 3 additional single ended subwoofer outputs
- All-digital bass manager with crossover frequencies of 40 to 160Hz
- DSP based tone controls
- Professional grade 24-bit A-to-D converter and 24-bit/192kHz Multi bit D-to-A converters
- Separate trigger outputs and infrared inputs for both zones
- High-current (500mA total) trigger outputs
- Flash upgradeable memory & RS-232 control port
- Modular internal construction
- 3RU chassis with milled aluminum faceplate and silver colored accent panels. Indirect cobalt blue illumination.
- Optional rack mounting hardware provided
- IEC power inlet, 120/230 VAC configurable.
- 5 year warranty
- Weight - 25 lbs.
- Dims: (HxWxD) 6” x 17.00 ” x 16 7/16"
Pros
- Sounds as good as it looks
- Super easy operation and setup
- High Value
Cons
- Lacks some of the most modern processor features as noted in our DMC-1 review
- Average noise performance on some tests (see notes)
Emotiva MMC-1 Introduction
Lately the Emotiva brand has been the talk of the town, at least on the internet that is. Perhaps it’s because of their very aggressive pricing or maybe their unconventional 40% off tradeup program on new processors for existing owners. Nah, I think it’s because their products look cool, sound great and are easy to operate. Whatever the reasoning, I am certainly finding a lot of great stuff to write about the brand.
In my opinion, however, Emotiva shines more with their amplifier offerings than their A/V processors. When Emotiva first introduced the DMC-1 a couple of years ago, it carried a hefty price tag of $3,500 and was pretty much outgunned (feature wise) by most of the big brand name receivers costing only ½ that price. This product was geared more towards the audiophile that desired simplicity and great sound over the latest video processing features or DSP mode to simulate the sound of your speakers submerged in a partially flushed toilet bowl. It had some operational quirks (such as component video upconversion issues, audio drop outs on DTS, or not properly engaging PLIIx modes, etc), but Emotiva was highly proactive in resolving them. For more details on this product, I suggest reading Clint’s review of the DMC-1.
In an effort to increase value to the consumer, Emotiva basically took the DMC-1 platform and updated it, eliminated a few features and brought the price tag down to $1,199 (nearly 67% cost reduction since the inception of the DMC-1). Enter the MMC-1, the newer and better A/V processor from Emotiva at a substantially reduced cost.
In order to understand the how the MMC-1 stacks up to the DMC-1, I have tabulated the differences for your convenience.
| MMC-1 | DMC-1 | |
| HDMI Functionality | 2x1 internal switcher w/ 1080p support | No HDMI, must use supplied external box |
| Balanced Outputs | Only sub out | 8 CH |
| Remote Control | Custom Non Learning | Universal Learning MX-500 |
| Weight | 25 lbs | 27lbs |
| Dimensions (HxWxD) | 6” x 17.00 ” x 16 7/16" | 6” x 17.00” x 16 7/16" |
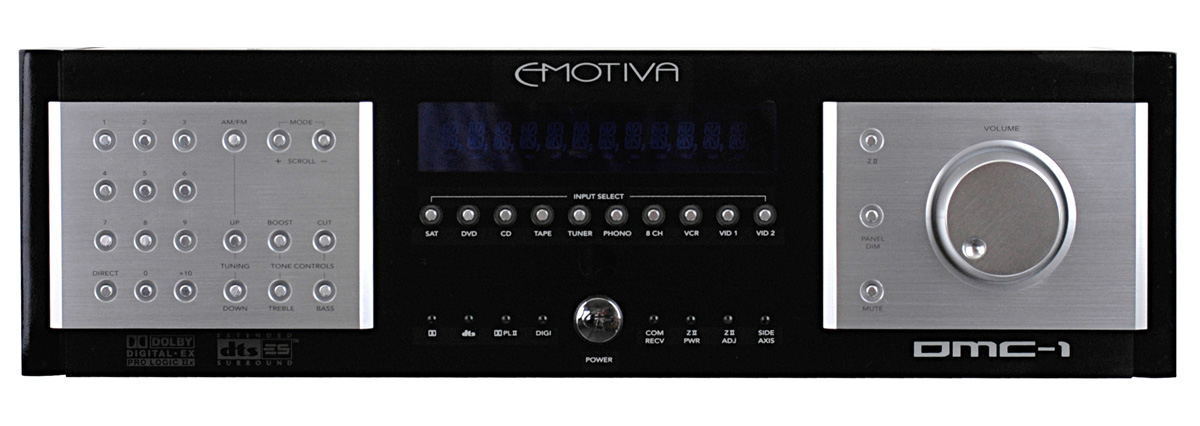
MMC-1 (left); DMC-1 (right)
Aside from these slight feature differences, there are cosmetic differences between the two products with the MMC-1 sporting Emotiva’s latest look which I am told by them will be their going forward appearance of their up and coming products. Personally I like this look at it reminds me of a Krell type product and isn’t as flashy or gimmicky looking as the DMC-1. The MMC-1 comes in a 3RU chassis with a milled aluminum faceplate and silver colored accent panel and has indirect cobalt blue illumination. My sample had rather sharp accent panels which Emotiva has told me they have filed down to make smoother since I noted it on this unit and my IPS-1 7CH test amplifier.
Editorial Note on Emotiva Build Quality
The MMC-1 utilizes an FR4 glass epoxy four layer mother board and in critical high speed areas such as the main DSP and video transcoder, up to eight layer PCB’s are used for signal integrity, ground plane, and impedance control purposes. The MMC-1 uses premium quality discrete A/D and D/A converters IC’s and a high performance, along with a high voltage 8 channel digitally controlled volume control IC. According to Emotiva, this is necessary for maximum headroom and enhanced sound quality, instead of a less costly multi-channel CODEC. Also employed is a low noise toroid power transformer and a fully regulated linear power supplies for the lowest possible electrical noise and radiated EMI. In contrast, many competitor processors use switch mode power supplies to save cost, but they usually do not offer the same noise performance.
Emotiva MMC-1 AV Processor Set-Up
 Normally I am
not one that shows pictures of product packaging in my reviews (in fact, I’ve
been known to make fun of this when my reviewers include them), but I must say,
I was quite taken by the very thorough packing job Emotiva did on these
products. Not only were the MMC-1 and IPS-1
double boxed, but the inner box had thick stryofoam molded inserts to ensure
the products were safe and snug – a great preventative countermeasure against
the tyranny of the disgruntled shipping guy who is working overtime delivering
your heavy package late in the day.
Normally I am
not one that shows pictures of product packaging in my reviews (in fact, I’ve
been known to make fun of this when my reviewers include them), but I must say,
I was quite taken by the very thorough packing job Emotiva did on these
products. Not only were the MMC-1 and IPS-1
double boxed, but the inner box had thick stryofoam molded inserts to ensure
the products were safe and snug – a great preventative countermeasure against
the tyranny of the disgruntled shipping guy who is working overtime delivering
your heavy package late in the day.
The user manual on the other hand is printed black and white single sided on a whopping 82 pages - can you guess how many trees it took to print this?) It’s held together with a big paper clip and reminds me of one of my weekly lab reports I had to turn in for my Fields and Waves Masters level class in engineering school. Despite its antiquated appearance, the user manual is actually well written and easy to follow for the most part. It even gives useful guidance, such as speaker placement suggestions and a couple of pages for you to write down your settings for future reference. To Emotiva’s credit, I later discovered they sent me an early production piece of the MMC-1 before their final manuals were printed. They informed me that manuals currently shipping with production units come in a plastic spined binder with heavy stock and double sided printed.
The system firmware can be updated as needed via the RS232 port on the backpanel. The latest firmware revision is located at: http://emotiva.com/support.shtm and I highly recommend periodically checking the site to ensure you have the latest revision. It’s good to see a company stand behind its product and continually improve upon its operation when issues arise.
 I checked the
firmware rev on my test unit and it displayed 2.02, which was not the current
version according to the Emotiva website.
Thus I broke out my DB9 cable and keyspan USB to RS232 cable and
connected my laptop up to the MMC-1. By
opening the executable file on Emotiva’s website, I was prompted to select a
COM port that the MMC-1 was connected to.
I selected “auto” and it found the processor on COM 4. I was then prompted with the screen capture
shown here and the downloading process began.
I noted the entire process took about 20 minutes so I strongly suggest
using AC power if you are using a laptop and/or to disable any screensaver or
powersaver options on your laptop to ensure no interruptions during the file
transfer process.
I checked the
firmware rev on my test unit and it displayed 2.02, which was not the current
version according to the Emotiva website.
Thus I broke out my DB9 cable and keyspan USB to RS232 cable and
connected my laptop up to the MMC-1. By
opening the executable file on Emotiva’s website, I was prompted to select a
COM port that the MMC-1 was connected to.
I selected “auto” and it found the processor on COM 4. I was then prompted with the screen capture
shown here and the downloading process began.
I noted the entire process took about 20 minutes so I strongly suggest
using AC power if you are using a laptop and/or to disable any screensaver or
powersaver options on your laptop to ensure no interruptions during the file
transfer process.
Editorial Note to Emotiva
It would be most useful if you provide a laundry list of changes and fixes for each firmware version so the consumer can decide whether or not to upgrade their unit.
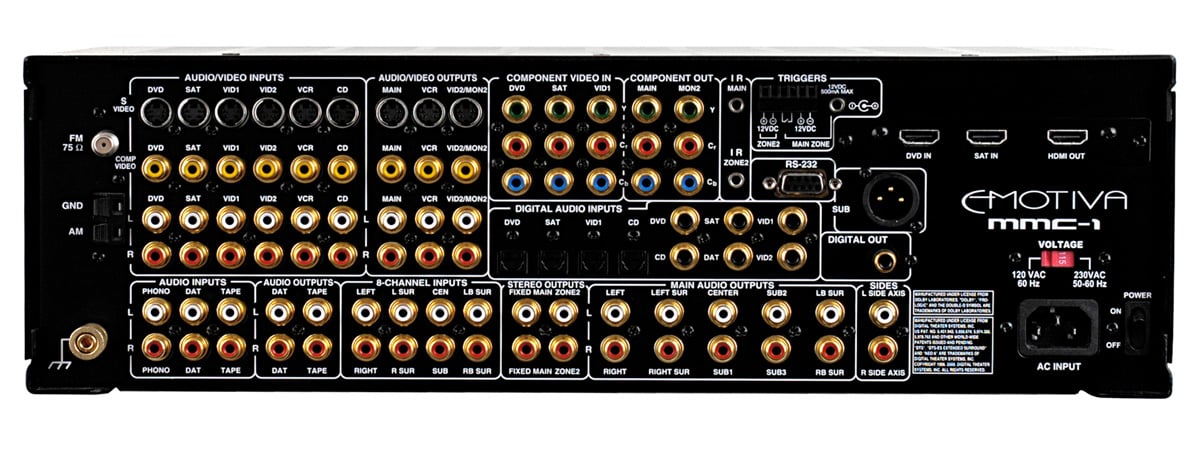
MMC-1 back panel view
Just like the DMC-1, the MMC-1 has a nice rear end. All of the RCA connectors are gold plated and the layout is clean, well organized and highly intuitive. Note the HDMI switching, a feature absent in the DMC-1. The MMC-1 still manages to support the high current (500mA) triggers, a feature rarely found on all but top end receivers and A/V processors.
 I
placed the MMC-1 and IPS-1 matching 7CH amplifier on my new Crystal rack from Audiav and sat in awe at how impressive
they looked once installed in this masterful rack. I had comments from many
industry folks that walked in my room and saw the Emotiva system powered on in
my rack. They almost always asked about
the cost and were dumbfounded when showed them the MSRP. “Surely
they cant sound that good at that price,” they’d say. I'd reply, “Sit down for a listen… and don’t call me Shirley.”
I
placed the MMC-1 and IPS-1 matching 7CH amplifier on my new Crystal rack from Audiav and sat in awe at how impressive
they looked once installed in this masterful rack. I had comments from many
industry folks that walked in my room and saw the Emotiva system powered on in
my rack. They almost always asked about
the cost and were dumbfounded when showed them the MSRP. “Surely
they cant sound that good at that price,” they’d say. I'd reply, “Sit down for a listen… and don’t call me Shirley.”
I connected the system up to my Denon DVD-5910CI and utilized a host of speakers under review as well as my own reference speaker system (RBH Sound T-30LSE and speaker package, Velodyne DD-15 subwoofer). All cables were furnished by Impact Acoustics (Sonicwave toslink) and Bluejeans Cable (10AWG speaker cable and analog interconnects).
I tested the MMC-1 in several scenarios including 7-channels for home theater, two-channels in various listening systems currently under review, and critical two-channel evaluations with my main speakers bi-amped.
Remote Control
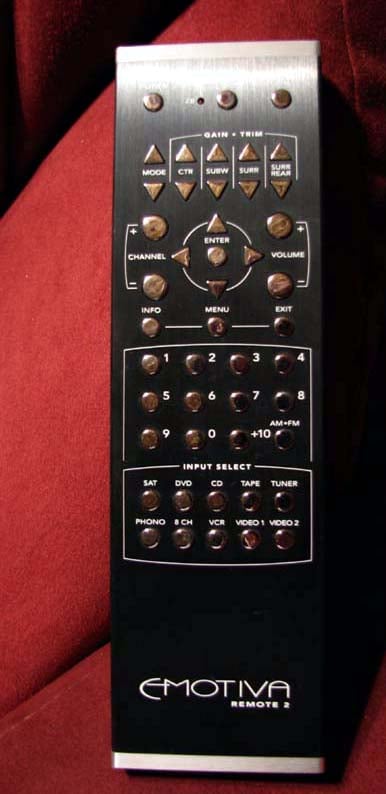 Perhaps the
biggest difference between the MMC-1 and its big brother the DMC-1 is the
supplied remote control. The DMC-1 gets
the venerable MX-500 Universal remote while the MMC-1 gets what I refer to as an
“Audiophiles delight” remote control.
The MMC-1 remote control is about as basic as it gets. No learning functions, no LCD display or
backlighting. Instead you are delighted
with an aluminum brushed casing engulfed in shiny silver buttons all neatly labeled
and identified in a very logical layout.
This remote carries some heft which can come in quite useful as a baton
should a prowler breach your theater room late at night.
Perhaps the
biggest difference between the MMC-1 and its big brother the DMC-1 is the
supplied remote control. The DMC-1 gets
the venerable MX-500 Universal remote while the MMC-1 gets what I refer to as an
“Audiophiles delight” remote control.
The MMC-1 remote control is about as basic as it gets. No learning functions, no LCD display or
backlighting. Instead you are delighted
with an aluminum brushed casing engulfed in shiny silver buttons all neatly labeled
and identified in a very logical layout.
This remote carries some heft which can come in quite useful as a baton
should a prowler breach your theater room late at night.
The gain and trim buttons are located towards the top with a 5 button circular configuration to handle all of your menu navigation options. Volume and channel buttons are located on each side with the channel presets located below, followed by discrete input buttons. Although there is no “source direct” button, I found by hitting the up/down “mode” button, the MMC-1 toggled to it. Overall this remote is useful and straightforward but you will want to invest in a separate universal type of remote control from the likes of Logitech or Universal should you want to control your entire theater system off of one remote control.
Emotiva MMC-1 AV Processor Listening Tests & Conclusion
CD: Dianne Reeves Never Too Far
 You may have noticed this CD pop up in several of my most
recent reviews. There is good reason for
my repetitiveness here. Many of the
tracks in this CD are an awesome test for a system's bass response and
accuracy. The bass track in Track #2 “Never
Too Far” will sound muddy on an improperly set up or mediocre system. I must have listened to this track 100 times
when tuning my reference system's subwoofers - all four of which run in mono,
cross over at 80Hz and are equalized through Audyssey MultEQ Pro. Turning off my two Velodyne DD-15 subs to do
a strict two-channel evaluation, I listened to the track again with only the
subs in my T30-LSE system handling the bass which were powered by the
Earthquake XJ-600R digital amplifiers. As I commented in my IPS-1 review, I felt the
IPS-1 was driving the bass portion of my speakers better than the more powerful
Earthquake digital amplifier. The MMC-1
sounded very transparent to me as well.
I did notice the noise floor greatly drop when engaged in “source
direct” mode via analog connections to my DVD-5910CI. Two channel purists will definitely want to
engage this mode when listening to 2CH analog sources.
You may have noticed this CD pop up in several of my most
recent reviews. There is good reason for
my repetitiveness here. Many of the
tracks in this CD are an awesome test for a system's bass response and
accuracy. The bass track in Track #2 “Never
Too Far” will sound muddy on an improperly set up or mediocre system. I must have listened to this track 100 times
when tuning my reference system's subwoofers - all four of which run in mono,
cross over at 80Hz and are equalized through Audyssey MultEQ Pro. Turning off my two Velodyne DD-15 subs to do
a strict two-channel evaluation, I listened to the track again with only the
subs in my T30-LSE system handling the bass which were powered by the
Earthquake XJ-600R digital amplifiers. As I commented in my IPS-1 review, I felt the
IPS-1 was driving the bass portion of my speakers better than the more powerful
Earthquake digital amplifier. The MMC-1
sounded very transparent to me as well.
I did notice the noise floor greatly drop when engaged in “source
direct” mode via analog connections to my DVD-5910CI. Two channel purists will definitely want to
engage this mode when listening to 2CH analog sources.
SACD: Patricia Barber – Modern Cool
 What good is critical music evaluation without
testing out some high resolution source material such as one of my trusty
Patricia Barber SACDs? Modern Cool is a superb sounding SACD
that in my opinion every jazz lover should add to their collection. Track #7 “Company” is a reference track I use
to separate REAL speakers from wimpy
ones. The same can be said with upstream
electronics, particularly amplification.
When listening to this track, I closed my eyes to attempt to place where
all of the instruments were coming from.
The trumpets were dead center (thanks to the magnificent imaging
capabilities of my reference speakers).
They came at you crystal clear with a bit more of a bite to them then I
recalled using the amplifiers in my Denon AVR-5805. The snare drums had plenty of snap to them
and seemed to be emanating around and behind the speakers. Cymbal crashes were effortless and well delineated. Listening to the drum solo and twanging of
the bass with my eyes closed gave me that “better
than being there” experience placing me right in front of the drum kit in a
cozy jazz cellar. All I was missing was
a brandy Sniffer and a fine Cuban (cigar that is). The Emotiva combo had no problems being
pushed hard on this song and the dual 10”s in my RBH T-30LSE’s loved the
workout. I would say the Emotiva Theater
Series combo has a larger than life sound quality not typically found at this
price point. In 2CH “source direct”
mode, you really get champagne taste at beer prices.
What good is critical music evaluation without
testing out some high resolution source material such as one of my trusty
Patricia Barber SACDs? Modern Cool is a superb sounding SACD
that in my opinion every jazz lover should add to their collection. Track #7 “Company” is a reference track I use
to separate REAL speakers from wimpy
ones. The same can be said with upstream
electronics, particularly amplification.
When listening to this track, I closed my eyes to attempt to place where
all of the instruments were coming from.
The trumpets were dead center (thanks to the magnificent imaging
capabilities of my reference speakers).
They came at you crystal clear with a bit more of a bite to them then I
recalled using the amplifiers in my Denon AVR-5805. The snare drums had plenty of snap to them
and seemed to be emanating around and behind the speakers. Cymbal crashes were effortless and well delineated. Listening to the drum solo and twanging of
the bass with my eyes closed gave me that “better
than being there” experience placing me right in front of the drum kit in a
cozy jazz cellar. All I was missing was
a brandy Sniffer and a fine Cuban (cigar that is). The Emotiva combo had no problems being
pushed hard on this song and the dual 10”s in my RBH T-30LSE’s loved the
workout. I would say the Emotiva Theater
Series combo has a larger than life sound quality not typically found at this
price point. In 2CH “source direct”
mode, you really get champagne taste at beer prices.
DVD-Audio: The Beatles Love
 The Beatles
Love DVD-A has become a benchmark multi channel recording that you will
find referenced in many of my reviews.
I would have never imagined the 40+ year old Beatles recordings could
sound so good. “Because” originally on Abbey Road, was revitalized on this recording.
The true dynamics of Lennon, McCartney and Harrison were revealed, reminding me
there will never be another band like the Beatles. “Within You Without
You/Tomorrow Never Knows” had a very psychedelic and floaty feel to it. I
wasn’t expecting near 20Hz bass extension in this recording, but it was there
for the T-30LSE system to playback without any contentions. I felt the floor
joists rumble on this track just as I did with my reference rig powering my
speaker system.
The Beatles
Love DVD-A has become a benchmark multi channel recording that you will
find referenced in many of my reviews.
I would have never imagined the 40+ year old Beatles recordings could
sound so good. “Because” originally on Abbey Road, was revitalized on this recording.
The true dynamics of Lennon, McCartney and Harrison were revealed, reminding me
there will never be another band like the Beatles. “Within You Without
You/Tomorrow Never Knows” had a very psychedelic and floaty feel to it. I
wasn’t expecting near 20Hz bass extension in this recording, but it was there
for the T-30LSE system to playback without any contentions. I felt the floor
joists rumble on this track just as I did with my reference rig powering my
speaker system.
Unfortunately the MMC-1’s HDMI inputs don’t support audio, so I had to use the old fashion 6CH analog connection route. I didn’t overlay PLIIx Music Mode in this scenario because I felt the added A/D and D/A conversion stage slightly corrupted the fidelity by raising the noise floor. In the next generation processor from Emotiva, this won’t be an issue so until you can take advantage of their 40% trade up program, you’re gonna have to live with multi channel DVD-A and SACD discs in 5.1. Isn’t the convenience of our modern lives so sickening that an issue like this even crosses our radar?
Measurement & Analysis
Frequency Response
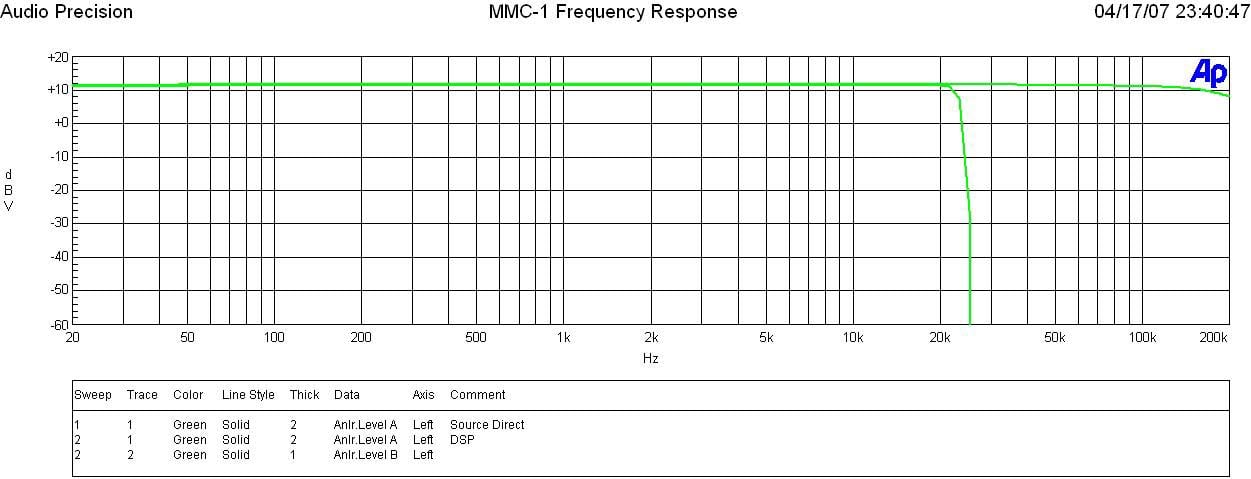
MMC-1 Frequency Response
In “source direct” mode, the Emotiva preamp is rule flat beyond 100kHz with a 3dB point in excess of my test gear which is limited to 200kHz. In normal stereo mode, the frequency response is limited to the ½ the sampling rate of the ADC as expected which in this case was 22kHz.
FFT Distortion Analysis

FFT Distortion Analysis at Full Power
At 3.5Vrms into a 600ohm load, the MMC-1 exhibited excellent distortion characteristics (10.865+77.616)dBv = 88.5dBV or 100*alog^-1(-88.5/20) = .0038% The slight rise in noise above 10kHz was perplexing, especially since the unit was engaged in “source direct”, but so low in the mud (-100dBV), that it really wasn’t worth further investigation.
Preamplifier Test Notes
The MMC-1, like the DMC-1 has an unusual amount of drive capability with a measured Max Vout of 6.5Vrms at less than 0.01% THD + N. The gain of the preamp is 7.28 or 17.2dB. This preamp has more than enough drive to hit maximum levels of any consumer audio amplifier I know of.
Signal to Noise ratio was less than stellar on this processor however. In “source direct” mode, I measured around 80dB (a-wt) with 200mV in and 1Vrms out which is quite good. With the ADC engaged, the SNR dropped nearly 30dB with the subwoofer on and nearly 40dB with the subwoofer off. The SNR corruption was mostly due to out of band noise so my measurements are far worse than what is actually audible. I found this unusual behavior to be only audibly noticeable if I was sitting within a few feet of my speakers with the volume gain cranked up to LOUD levels (>100dB at the listening position). Again this is not an issue if you use “source direct” for analog sources or if you stick your ears close to your speakers with the volume levels cranked.
Conclusions
My extensive listening and operational tests of the MMC-1 were virtually identical to that of the DMC-1 we previously tested. They are solid product offerings which are easy to operate, contain most of the features sought out in today’s more sophisticated home theaters, and in the new mantra of Emotiva – wont break the bank to own them. For those looking for a state of the art processor – look elsewhere or wait for the new batch of Emotiva processors do out early next year. For those seeking solid performance, with a high WAF, this is a good choice. Paired with the IPS-1 7CH power amp and Emotiva’s super trade up program on their processors, the Reference Theater Series separates combo becomes a great choice in the proverbial sea of consumer electronics options.
Emotiva Audio
Corporation
106
Mission Court
Suite 101
Franklin, TN 37067
877-EMO-TECH
Fax: 615-771-1128
MMC-1
Review
MSRP: $1,199
The Score Card
The scoring below is based on each piece of equipment doing the duty it is designed for. The numbers are weighed heavily with respect to the individual cost of each unit, thus giving a rating roughly equal to:
Performance × Price Factor/Value = Rating
Audioholics.com note: The ratings indicated below are based on subjective listening and objective testing of the product in question. The rating scale is based on performance/value ratio. If you notice better performing products in future reviews that have lower numbers in certain areas, be aware that the value factor is most likely the culprit. Other Audioholics reviewers may rate products solely based on performance, and each reviewer has his/her own system for ratings.
Audioholics Rating Scale
 — Excellent
- — Very Good
- — Good
- — Fair
- — Poor
| Metric | Rating |
|---|---|
| Frequency Response Linearity | |
| SNR | |
| Multi-channel Audio Performance | |
| Two-channel Audio Performance | |
| Video Processing | |
| Bass Management | |
| Build Quality | |
| Fit and Finish | |
| Ergonomics & Usability | |
| Remote Control | |
| Performance | |
| Value |
Gene manages this organization, establishes relations with manufacturers and keeps Audioholics a well oiled machine. His goal is to educate about home theater and develop more standards in the industry to eliminate consumer confusion clouded by industry snake oil.
View full profile