
Emotiva DMC-1 Preamp Processor Review
Emotiva DMC-1 Preamp Processor
- Product Name: DMC-1
- Manufacturer: Emotiva
- Performance Rating:

- Value Rating:
- Review Date: June 14, 2005 19:00
- MSRP: $ 2495
Surround Formats: Dolby Digital EX, Pro Logic IIx, DTS-ES Discrete 6.1 and Matrix 6.1, DTS Neo:6, DTS ES 96/24
DSP: Motorola / Free scale DSPD56367
Audio DACs: Analog Device AD1853
Audio ADCs: CS5394
Crossover: Left/Right: 40-160Hz in 10Hz increments; Center/Surrounds: 40-160Hz in 10Hz increments
Remote: MX-500 fully-backlit pre-programmed universal learning remote
Video Inputs: 3 (assignable) 100MHz Component Video, 6 sets of composite and s-video inputs
OSD: Available on component, S-video and composite. All S-video and composite signals automatically up converted to 480i component
Video Outputs: Two (2) 100MHz Component video output, 3 composite and s-video outputs, Multi-Zone composite video output
Audio Inputs: 7.1 external multi-channel inputs, 9 assignable stereo analogue inputs, 10 digital inputs (4 optical, 6 coaxial)
Audio Outputs: 1 optical and 1 coax digital output, 5 analogue audio outputs including main and Zone2, 7.1 balanced analogue outputs, 7.1 unbalanced analogue outputs plus Left/Ride side "axis" speakers
Additional Connections: RS-232C port for third party control Systems and software updates, 12V IR main/Zone2 remote I/O ports, 2 assignable +12V triggers (Main & Zone 2), inactive IEEE connection, detachable power cord
Dimensions: 17" W x 5.75" H x 15.5" D
Weight: 22lbs
Pros
- Two (2) HDTV-compatible component video outputs
- Fully backlit MX-500 universal remote control
- Easy to setup and use
- Four (4) subwoofer outputs (3 RCA; 1 XLR)
- Balanced 7.1 audio outputs
- High current (250mA) 12V triggers
- Phono input
- Flash-upgradeable memory
- 5-year warranty
Cons
- Quirky default remote control behavior
- No active IEEE 1394/Firewire interface
- No HDMI/DVI Video Switching
- No subwoofer distance/delay settings
- Subwoofer calibration test tone inaccurate
- No optional bass management / delay compensation on EXT Analog Inputs
Emotiva DMC-1 Introduction
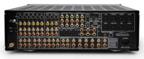
This was my first time using an Emotiva product, however I have thought their new line was quite beautiful and well-polished, putting form up there with function. Their upcoming Ultra-Lite series seems to extend this trend with an affordable "budget" multi-channel solution that has the appearance of a product that should cost a whole lot more. Regarding the DMC-1, first impressions abounded. The unit was simply stunning to look at. The front brushed aluminum accent panels are "lifted" from the chassis and accented by a blue LED backlight. The amount of backlit buttons and features are initially disturbing, but can be tempered or eliminated completely via a "Panel Dim" button on the front (there are three levels of dim as well as an 'off' setting).
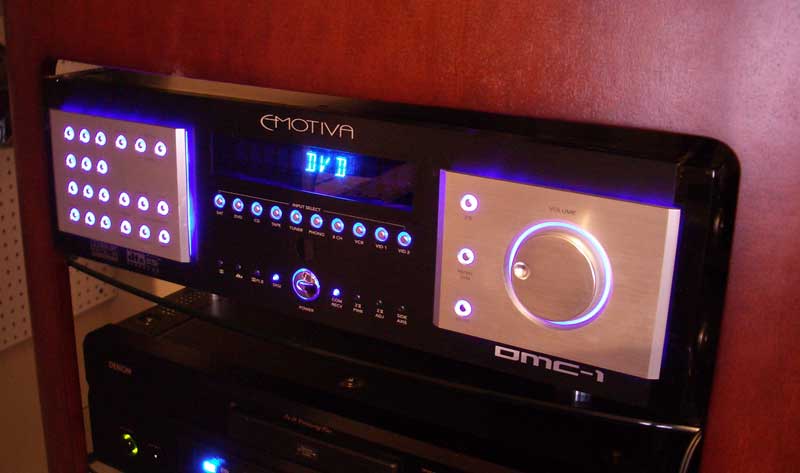
Speaking of buttons, there seem to be a lot of them on the front of the DMC-1. But really, it's the methodical arrangement of the buttons which gives one the feeling of having a science-fiction computer device at your fingertips. The volume control is very cool in that it functions digitally and allows volume to be changed in a non-linear fashion. The faster you turn the dial, the more dramatic the volume will ramp up or down. If you turn the dial slowly, you can easily adjust volume gradually in 0.5dB steps.
Emotiva DMC-1 Review: The Testing System & Listening Environment
The "Audiophile" experience. That term comes up a lot and it's hard to define what exactly makes up this somewhat mystical mojo so many strive for. Audioholics, in general, tends to harp on differentiating features, specifications, and measurable performance - but what about the sound? The experience? Well, the Emotiva DMC-1 is most definitely an Audiophile product, targeted towards audio aficionados who want the finest audiophile sonic performance coupled with a top-notch polished look to rival anything else available on the market. What's the bar, then? Exceptional sound quality and solid integration into a high-performance A/V system - fit for both two-channel and multi-channel sound. This review will assume an audiophile target audience, with supporting gear that sits at a price and performance level commensurate with the DMC-1 pre-processor. If you're looking for a bargain home theater solution - this review (and product) isn't meant for you.
With the objective in mind, and having already reviewed the MPS-1 7-channel modular amplifier from Emotiva, we were eager to get our hands on the matching DMC-1 processor and really experience what this latest controller distributed by AV123.com could do in terms of audio fidelity and performance. In particular, several features really stood out and drew attention to this unit, marking it a unique and flexible system:
- Two (2) HDTV-compatible component video outputs
- Fully backlit M X-500 universal remote control
- Four (3 unbalanced, 1 balanced) subwoofer outputs (though not independently controlled)
- Balanced 7.1 audio outputs
- Flash-upgradeable memory
Not too many processor platforms feature two component outputs
and I have to say, I found this to come in handy as a reviewer. While the main component output could
go to my primary display, the Yamaha LPX-510 LCD projector, another output could be hard-wired to a
secondary display such as the
Zenith Z26LZ5R 26" LCD TV
which I was reviewing concurrently with the Emotiva. If you own both a flat panel display for daytime
viewing and a front projection system for nighttime theater, this is a cool feature.
The Testing System & Listening Environment
The Emotiva DMC-1 was feeding a Rotel R MB-1095 5-channel amplifier powering an Atlantic Technology System 4200e . All equipment was located in the soon-to-be-inaugurated Reference System 2, a 17 x 14 listening room featuring room acoustics spec'd by Rives Audio. This room simply presents a blissfully transparent environment for both music and home theater listening.
The new Reference System 2 listening room has 9' ceilings and features an aspect ratio that makes it acoustically "tame" to bass frequencies. A combination of absorptive and diffuse treatments and natural materials make for some pleasant acoustics. When possible, I prefer to do it naturally, however for the optimal results Reference System 2 is having several RPG 7" Skyline diffusers installed in the ceiling as well as some absorption material added to the side and rear walls. Hunter Douglas Duet Honeycomb window blinds are spec'ed for the room's two windows, allowing for sufficient darkening of the room during screenings.
The listening position is set back from the center of the room and made up of three Berkline 088 leather theater seats located about 11 feet from the front wall, and 6 feet from the rear wall. The Atlantic Technology 4200e LRs are approximately 10' apart and the dipole surround speakers are 13' apart on the side walls to maximize their excellent imaging characteristics. A 642e subwoofer is situated inside of the right front loudspeaker and produced clean, articulate bass during listening sessions.
Emotiva DMC-1 First Impressions
Setting Up the Processor
I would have to say that this is one of the easiest processors I have ever had the pleasure of setting up. My "pre flight check" recommendations prior to configuring the system follow the normal suggestions: run your power and audio/video source interconnects, connect your preamp outputs (XLR recommended) to your power amplifier and ensure that your loudspeakers are correctly placed within your room. Once the externals are in place you will be ready to configure the processor and get everything set to run smoothly.
The Emotiva software has 5 main setup pages with various submenus. They are, in order of appearance (but not importance): TRIMS, MODES, TONE, INPUTS, and SETTINGS. The Setup Menu is accessed by pressing the " Menu" button on the M X-500 while in the EMO device control area. The Setup Menu does not, unfortunately, "loop" when you hit the bottom of any of the lists, so you'll have to up arrow all the way to the top if you are at the bottom of any particular screen or selection.
To start your setup adventure, begin with the SETTINGS submenu where you can adjust various options for your Main Zone, Zone 2, speakers, video, and RS-232C/IR controls. Jump into the SPEAKERS submenu first and set the SIZE, DISTANCE, level CALIBRATION, and crossover settings. A separate crossover frequency (40 - 160Hz in 10Hz increments) can be set for the Left and Right speakers and for the Center and Surround speakers.
Editor's Note on DMC-1 Bass Management
We strongly recommend setting your crossover's within 20Hz of each other to avoid bass recombination issues andor truncated LFE bass with this processor. There are various ways to handle LFE channels and bass management within processors and several schools of thought populate the marketplace. When the corresponding speakers are set to "Small", Emotiva has chosen to allow the Center/Surround crossover settings to truncate the LFE track frequency information. What this means is that if the LFE track contains frequency information going up to 100Hz, but your center/surround crossover is set at 40Hz for larger, floorstanding speakers, that LFE track will also be rolled off at 40Hz at a rate of 24dB/octave. The LFE track info from 40Hz - 100+Hz is greatly attenuated from the system. If you think about it, this will largely only affect those subscribing to the ITU 5.1 speaker configuration with larger (but not full range) speakers all around. If this describes you, you can select a higher LFE setting, or you can opt to try using your system with all speakers set to "Large" to see how well the bass integrates in your room. Bass management is largely about options, and simply knowing what is happening is the first step in making sure you get the best sound possible in your listening room.In our configuration, we were using a THX Select 2 System with both crossovers set to 80Hz. Setting the crossovers to 80Hz eliminated the truncation issue and resulted in well-balanced system integration. Simply keep these issues in mind as you configure your bass management and, particularly, select the crossover frequencies for your center and surround speakers.
When all crossovers are set to 80Hz, we see a perfect 12dB/oct HPF rolloff and -3dB @ 80Hz for all speakers set to "small", and 24dB/oct LPF rolloff and -6dB @ 80Hz for the sub/lfe channel as per THX recommendation. In most cases, this is the optimal configuration that you should at least use as reference point, only varying if your particular speaker system and/or room integration requires it.
Once you have set SIZE and the two L-R and C-SURR CROSSOVER frequencies, you can glance at the SUBWFR MODE setting, which allows a "double bass" or ENHANCED feature that sends signal to the Subwoofer even when your main speakers are set to "Large". This only affects 2-channel audio and has no effect with respect to 5.1 or 7.1 surround modes.
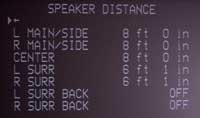 DISTANCE can also be set for your loudspeakers and is adjustable
in 1" increments. This exceeds most processors I've seen, who generally only go as low as .1 foot
increments. Take a ruler out and carefully measure the distance from the tweeters to the listening
position (where your head would be). Do this for all speakers and enter that info into the Emotive
DMC-1 so that delay compensation for your speakers
can be set. Since the Side Axis speakers are really just derivatives of the
Main Left/Right channels, they share delay settings and should not
affect your measurements. Conspicuously absent is any delay settings for the subwoofer. I wouldn't
think this to be a big issue as anyone spending this much on a high-end processor would have a
subwoofer with variable phase to solve any room integration issues but keep this in mind when picking
the right subwoofer(s) for mating with this processor.
DISTANCE can also be set for your loudspeakers and is adjustable
in 1" increments. This exceeds most processors I've seen, who generally only go as low as .1 foot
increments. Take a ruler out and carefully measure the distance from the tweeters to the listening
position (where your head would be). Do this for all speakers and enter that info into the Emotive
DMC-1 so that delay compensation for your speakers
can be set. Since the Side Axis speakers are really just derivatives of the
Main Left/Right channels, they share delay settings and should not
affect your measurements. Conspicuously absent is any delay settings for the subwoofer. I wouldn't
think this to be a big issue as anyone spending this much on a high-end processor would have a
subwoofer with variable phase to solve any room integration issues but keep this in mind when picking
the right subwoofer(s) for mating with this processor.
Editor's Note
We inquired with Emotiva about the Side Axis channels to get some additional information on how they are derived. Here is their informative response:The side-axis is an analog steering circuit fed from the analog L/R signals after the DSP (and all bass management) and is simply an L+R/L-R matrix circuit that provides roughly L - 0.28R to the Left side axis and R - 0.28L to the right side axis circuit. As such, it does provide needed fill for a video scene where a sound is panning from the front to the back. It makes the pan much smoother. Being in the analog domain after the DSP, it always tracks the speaker size and crossover points of the M ain L/R outputs. It has its own volume control chip and noise calibration trim, however.
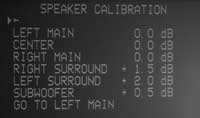
Our settings looked a little something like this:
|
Speaker |
Size |
dB SPL |
Distance |
|---|---|---|---|
|
LEFT M AIN |
Small |
0 |
8 ft 0 in |
|
RIGHT M AIN |
Small |
0 |
8 ft 0 in |
|
CENTER |
Small |
0 |
8 ft 0 in |
|
LEFT SURROUND |
Small |
+2.0 |
6 ft 1 in |
|
RIGHT SURROUND |
Small |
+1.5 |
6 ft 1 in |
|
LEFT SUR BACK |
Off |
-- |
-- |
|
RIGHT SUR BACK |
Off |
-- |
-- |
|
SUBWOOFER |
Yes |
+0.5 |
NA |
|
L-R CROSSOVER 80 Hz |
|||
|
C-SURR CROSSOVER 80 Hz |
|||
|
Reference Level Calibration to 75 dB SPL (SUBWFR M ODE = NOR M AL) |
|||
Emotiva DMC-1 Setup and Configuration (cont'd)
SPEAKER CALIBRATION is accomplished through the use of internal test tones. Levels can be set in 0.5dB increments and are adjustable to +/- 10dB. The test tones for the main, center and surround speakers were helpful in setting good reference levels, but the subwoofer test one was almost destructive in nature. It could be described as an earthquake and actually makes for a great subwoofer "slam" demo for your friends. For setting a solid level, however, I would recommend using AVIA or another setup disc to obtain a more accurate subwoofer level setting or just configure the system to taste. The typical Radio Shack SPL meter is not really up to the task of assimilating the rapid succession of sub-frequencies that this test tone produces and quickly shuts itself down in a fit of horror and outrage (OK, not really, but it would if it had any sense.)
Video Settings
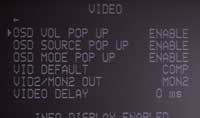 Entering the VIDEO submenu offers access to the On-Screen
Display functions, video delay, monitor output and default video settings.
Most of this is self-explanatory. Of note are the ability to set up to
60ms of video delay and enable/disable the OSD for volume adjustments, source, and mode changes. The
entire OSD system is switched into the video path only when utilized. This has the benefit of leaving
the video signal path very clean and unfettered for the most part. The only negative is that you will
see a flicker when making adjustments that invoke the OSD on either the s-video or composite outputs
(selectable).
None
of this affects the component video outputs which support no popup
functions. The OSD will work on the component video outputs; however a complete switch to the OSD
system will take place. You can tell that the OSD is not at all connected into the component video
circuits as an obvious signal switch on the display takes place whenever the
M
enu button is pressed that manifests itself as a quick flicker followed
by a brief delay before the OSD appears (about 3 seconds total). While the Emotiva does provide handy
component video upconversion from composite and s-video, it does not downconvert component to
s-video/composite, or even s-video to composite.
Entering the VIDEO submenu offers access to the On-Screen
Display functions, video delay, monitor output and default video settings.
Most of this is self-explanatory. Of note are the ability to set up to
60ms of video delay and enable/disable the OSD for volume adjustments, source, and mode changes. The
entire OSD system is switched into the video path only when utilized. This has the benefit of leaving
the video signal path very clean and unfettered for the most part. The only negative is that you will
see a flicker when making adjustments that invoke the OSD on either the s-video or composite outputs
(selectable).
None
of this affects the component video outputs which support no popup
functions. The OSD will work on the component video outputs; however a complete switch to the OSD
system will take place. You can tell that the OSD is not at all connected into the component video
circuits as an obvious signal switch on the display takes place whenever the
M
enu button is pressed that manifests itself as a quick flicker followed
by a brief delay before the OSD appears (about 3 seconds total). While the Emotiva does provide handy
component video upconversion from composite and s-video, it does not downconvert component to
s-video/composite, or even s-video to composite.
It's important to note that the two component outputs provided on the Emotiva are buffered. A buffer is an active gain stage that is used in electronic devices to maintain the signal quality when manipulating a video signal to perform various functions such as outputting to multiple destinations. Most manufacturers employ op-amps or chips for buffers which is an inexpensive way to ensure no degradation when providing multiple video outputs. What's even more remarkable is that more manufacturers do not offer this rather convenient option.
Another nice feature involves the ability to set the VID2/ M ON2 OUT function that configures the VID2/ MON2 output for use as either a record out (no OSD and muting the VID2 input) or second monitor output (with OSD). In high-end installations it is not uncommon to want a second monitor output simply to provide a small LCD TV for making changes to the processor in a remote area or decentralized equipment room.
Input Configuration
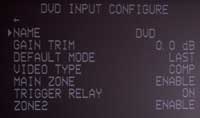 Each dedicated input of the Emotiva DMC-1 can be renamed. In addition, inputs can have their gain trim
adjusted so as to level out all input sources. This is helpful for when you connect a cable box, DVD
player, or phono device and have significantly different input levels resulting in dramatic volume
changes when switching sources. Even the Tuner has a gain trim (preset to -6dB). All inputs can be set
to a particular default DSP mode (stereo, PLII, DTS, Party, etc) and can be configured to receive
either composite, s-video or component video (where applicable). Inputs can be also be disabled in
the
M
ain Zone or Zone 2, making them unselectable.
The trigger relay on the rear of the DMC-1 can also
be set to turn on whenever the input is selected - helpful if you want to activate a video screen
whenever the DVD player is selected for example. Topping off the input settings is the 8-CH INPUT,
which also has its own Gain Trim and can be assigned to any input video source (typically
DVD).
Each dedicated input of the Emotiva DMC-1 can be renamed. In addition, inputs can have their gain trim
adjusted so as to level out all input sources. This is helpful for when you connect a cable box, DVD
player, or phono device and have significantly different input levels resulting in dramatic volume
changes when switching sources. Even the Tuner has a gain trim (preset to -6dB). All inputs can be set
to a particular default DSP mode (stereo, PLII, DTS, Party, etc) and can be configured to receive
either composite, s-video or component video (where applicable). Inputs can be also be disabled in
the
M
ain Zone or Zone 2, making them unselectable.
The trigger relay on the rear of the DMC-1 can also
be set to turn on whenever the input is selected - helpful if you want to activate a video screen
whenever the DVD player is selected for example. Topping off the input settings is the 8-CH INPUT,
which also has its own Gain Trim and can be assigned to any input video source (typically
DVD).
Surround Modes and Settings
Aside from being able to select the desired default Surround mode for each input, the Emotiva DMC-1 enables users to set the preferred sub-modes for each format. For example, when selecting DTS Neo:6, you can have it default to M usic or Cinema modes. The Emotiva supports adjustment of the DTS LFE channel in music mode (-10db) when set to " Music" as opposed to the unadjusted "Cinema" mode. The Emotiva is a no-nonsense processor, providing only one lone custom DSP mode, JazzClub, in addition to its Party mode which routes signal to all speakers (selectable by the user) in your system. The standard modes come with the expected adjustments for center width, panorama, and dimension (Pro Logic II/IIx M usic) and I found adjustment of these features to be unnecessary in my listening room.
Additional Helpful Settings
 There are some tremendously helpful settings for the
MAIN ZONE which allow for the POWERUP SOURCE to be selected
(or set to the LAST used input), the VOLume MODE to be set to either a preset dB amount or the last
used setting, and a
MAX VOLume setting that lets you
save your system from meddling fingers by setting a cap volume that cannot be exceeded with either the
remote control or the main unit volume controls. If you have children, teenagers and inquisitive guest
who frequent your home this is a
must-have
feature.
There are some tremendously helpful settings for the
MAIN ZONE which allow for the POWERUP SOURCE to be selected
(or set to the LAST used input), the VOLume MODE to be set to either a preset dB amount or the last
used setting, and a
MAX VOLume setting that lets you
save your system from meddling fingers by setting a cap volume that cannot be exceeded with either the
remote control or the main unit volume controls. If you have children, teenagers and inquisitive guest
who frequent your home this is a
must-have
feature.
"On-the-Fly" Trims are provided for the Sub, Center, Surround, Surround Back, and Side Axis speakers. These settings are meant to be used to tweak settings when you want to make subtle adjustments to your system without necessarily having to access the Main Menu. The remote supports on-the-fly adjustment of the Sub(s), Surrounds and Center Channel speaker. I'm not quite sure why the other on-the-fly adjustments were not included in the remote's initial programming. Regardless, I found these trims to be helpful, especially on poorly mixed cable television shows where I wanted to get a bit more volume out of the center channel. Channel trim settings are retained even when the unit is powered off, but are, of course, globally reset to zero whenever the loudspeakers are calibrated for level.
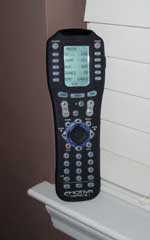
Emotiva DMC-1 MX-500 Universal Remote Control
 Pros
Pros
- Completely backlit
- Easy to program and reprogram
- Fully customizable
- Wide IR dispersion
- Great ergonomics
Cons
- Quirky pre-programmed Emotiva functionality
- No way to store or download remote control settings
This remote control is very close to my personal favorite, the Universal Remote MX-700 . It provides a wonderfully-ergonomic interface, with easy-to-reach buttons and a fully-programmable LCD interface. The fully-backlit remote lights up with a pleasant blue-green glow when the "Light" button located on the remotes right side is pressed and remains lit for 10 seconds or until the button is pressed again. Nearly identical to the MX-700, this remote differs slightly in the amount of programming and macros it will handle, the absence of a serial connection for computer-programming, and a slight rearrangement of several of the buttons. While the remote is exceptional, and I'll go into more detail in a minute, the IR receiver in the Emotiva is a bit lacking. I had the review sample located at the back of the room, along with my DVD player, cable box and other devices. While I was able to bounce IR commands off of my front Carada Criterion Series front projection screen for all of my other devices, the Emotiva simply would not pick up a signal until I pointed the remote directly at the unit. The Emotiva is at the top of the rack of equipment, meaning that it should be the easiest device to get within IR range; nevertheless, I found it to be very demanding and finicky in this respect. Those users placing the Emotiva at the front of the room should have no problems.
Source Switching
The MX-500 comes preprogrammed for the Emotiva but is not without its quirks. When returning from a device to the Main screen, the remote's Power button will still control the last device, rather than the Emotiva (regardless of how many times you hit the "Main" button on the remote control). This makes powering off your system take an additional step or two to actually select the EMO source and then activate the Power button (in addition, the "Off" button doesn't turn off the Emotiva either, rather the "Power" button toggles both on and off functions. When in the Main (top) level of the remote, pressing one of the available sources does not select that source on the Emotiva, instead you are merely brought to that device's screen where you can now control it via the MX-500. I found this to be extremely cumbersome as I would have preferred a macro so that the Emotiva would immediately select that input and have the remote ready to control the device. Here are the required steps to play a DVD (from everything being off) using the MX-500 (after your DVD player is programmed into the remote):
- Press the EMO button from the Main screen
- Press the "Power" button to wake up the Emotiva DMC-1
- Select the DVD source from the LCD screen
- Hit the MAIN button on the MX-500
- Hit the DVD button on the M ain LCD screen
- Press the "Power" button on the remote
- Press "Play"
Here are the sequences of steps I think there should be (requiring pre-programmed macros):
- Press the "Power" button to wake up the Emotiva DMC-1
- Press the DVD button from the Main screen (macro which selects the input and then goes to that device control screen)
- Press the "Power" button on the remote
- Press "Play"
Overall, I'm picky on remotes. I just feel that there's been enough time,
feedback, and complaints for everyone to get it right. On the
MPS-1 I think Emotiva did a pretty good job of getting most of the way
there. The
MX-500 is an excellent platform, and with
a few minor exceptions, this remote is almost perfect in its simplicity, ergonomics, and ease of use.
If anything could be added it would simply have to be more functions. There are more available screens
on the
MX-500 - let's use them. I'd love to see
on-the-fly trims for the Surround Back channels, and a way to dim the lights from the remote. While
we're offering suggestions, I'd also think the DMC-1
would benefit from having more options for switching and changing surround/DSP modes for the current
input. Currently, pressing the PL-II mode on the remote engages Dolby Pro Logic II, but will not
alternate between
Music and
Movie modes, which would be very helpful. This comes into play quite a
bit when switching between PCM
audio from a cable box
(Movie mode usually preferred) and
PCM
audio from a CD/DVD player (Music mode usually preferred).
Using Zone 2 Functions
Zone 2 is able to be engaged and disengaged from the front panel. However if you have Zone 2 Disabled via the setup menu and you hit the Zone 2 button while the unit is off, you'll have to wait 10 seconds for the unit to exit that mode before you can do anything else (including power on the Main Zone).
When Zone 2 is enabled - wow. Hit the Zone 2 button on the front of the unit and you will now be controlling the Emotiva for Zone 2, including powering it up, selecting inputs, etc. Better be quick, though as the Zone 2 button only allows you three seconds to switch inputs or make adjustments before jumping back to control of the main Zone. I found this to be an oddly quick delay since a 10 or 15 second automatic return to the Main Zone would have been more appropriate (and toggling the Zone 2 button could be used to effect a quicker change). The remote control allows access to many Zone 2 functions, such as changing the inputs, and functions via macros to get around the 3-second delay problem. And here you see the inherent reason for the quick delay. Without it, the remote control's accessing of Zone 2 functions might inhibit Main Zone remote functions while the unit remains in Zone 2 control mode. The solution would be to establish separate delays for front panel vs. IR-initiated Zone 2 functions.
From the Emotiva's Setup Menu Zone 2 can be configured to select from the Last source or a fixed source on power up. Like the main Zone, you can also set the power up volume mode (Preset, Fixed, or Last). You can also set the Max volume - a feature that is so sensible you wonder why all manufacturers do not utilize it.
Zone 2 does have its share of quirky features. For example, when attempting to access the M ain M enu, it allows access and exiting of the M ain M enu as well as vertical navigation through the Top Level. It does not, however, enable horizontal navigation to allow any submenus to be entered or settings to actually be changed - you'll need to switch back to Main Zone device control to do that. There is also an undocumented feature labeled ZONE2 OSD POP UP that doesn't seem to have any effect whatsoever on the main Zone or when using Zone 2.
Zone 2 can receive all inputs except the analogue 8-channel inputs as those are optimized to provide analogue-only high-quality source content through the Emotiva to the Main Zone. If you have a DVD-Audio or SACD player connected to the system you will want to take a separate 2-channel (stereo) mix of its output (available in many players) and route that to a separate input on the Emotiva so you can send that 2-channel information to your Zone 2.
Emotiva DMC-1: Comparison of Emotiva, Sherbourn, and Sunfire Processors
Due to multiple requests about the similarities between the various processors utilizing Bob Carver/Sunfire platform we felt it important to provide some perspective on the three main units available to consumers. Sherbourn Technologies and Emotiva both are able to have their products made through a manufacturer in China who is licensed to make these products based on the Bob Carver/Sunfire platform.
|
|
Sunfire
|
AV123
|
Sherbourn
|
|---|---|---|---|
|
Front |
|
|
|
|
Rear |
|
|
|
|
MSRP |
$4000 |
$2495 |
$2999 |
|
MSRP
w/200W
|
$7295
|
$4299 (combo)
|
$4999
|
|
Special Features |
Flash memory
|
Flash memory
|
Flash memory
|
|
Flash Memory |
upgradeable via CD |
upgradeable via RS-232 |
upgradeable via RS-232 |
|
Warranty |
2-years parts & labor |
5-years parts & labor |
5-years parts & labor |

As you can see, the units are essentially identical, except for cosmetics, pricing, warranty and some small details. A shoot-off would be silly, and you can likely get an idea of which product interests you by your needs, aesthetics preference, warranty requirements, etc.
We were glad to see the platform adapt a bit from the Theater Grand III. Added are 0.5db channel trims, component video upconversion, independent channel trims for each mode of operation, and a better overall signal to noise ratio.
DMC-1 Pre-Pro Build Quality
When I received the Emotiva, the unit was tightly encased in a well-padded box. My experiences with the various shipping carriers leaves me wondering when the next crushed box or banged up unit will arrive. When you receive as many products over the course of a year as we do, you start to feel edgy when nothing has broken in over a month! I say all of this because the Emotiva box looked like it could handle a couple drops off the business end of a delivery truck. It hadn't been damaged in the least, mind you, but the thick cardboard and interior padding had some substance.
Opening up the packaging I found a well-encased DMC-1 with a beautiful brushed aluminum "floating" faceplate, polished black lacquer wood side panels, all part of a 3U rackmountable chassis. The floating faceplate was a rather nifty effect, with the indiglo blue backlighting creating a surround effect that literally lifts the accent panels off the face of the unit. I have not seen a more beautiful product. If you are one who may be bothered by the 10,000 candle power LED's that grace the front of the DMC-1 have no fear, the front lighting has 3 dim settings in addition to 'Off'. This unit is complimented by a very obvious attention to detail that shows up in every facet of it's design. Even the power button features a sculpted 'E' logo and comes backlit.
Before opening up the unit I spun it around and took a look at the back panel and connections.
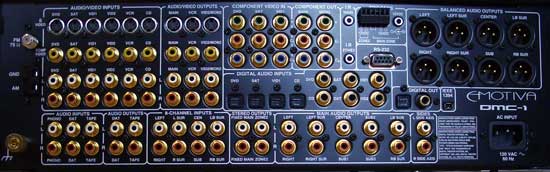
Back Panel of the Emotiva DMC-1 7.1 Home
Theater Processor
You cannot help but recognize the well-organized layout of the processor, with all inputs well-arranged and easy to reach. Connectors were ample, yet well-spaced and I felt that I was given plenty of room to maneuver my hands to get my source components connected. Emotiva chose to mirror this organized structure with the front panel buttons, providing almost a hybrid look of simplicity and functionality. While the processor has a plethora of buttons on the front, it maintains that "high-end" look that tends to model a more subdued feature-set and cleaner appearance.
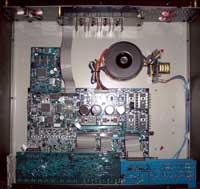 Not wanting to wait another second, I cracked open the
unit (no, not literally!) to take a peek inside of this processor and see what made it tick. Despite
the sparse initial appearance of the DMC-1, it only
takes a few moments to find out that the efficiently laid-out unit packs a whole lot of top-shelf
technology in its 27-pound chassis.
Not wanting to wait another second, I cracked open the
unit (no, not literally!) to take a peek inside of this processor and see what made it tick. Despite
the sparse initial appearance of the DMC-1, it only
takes a few moments to find out that the efficiently laid-out unit packs a whole lot of top-shelf
technology in its 27-pound chassis.
The Emotiva DMC-1 uses some pretty heavyweight chips to handle analogue to digital conversion and vice versa. The Cirrus Logic CS5394 24-bit/192kHz DAC and Analog Devices 24-bit AD1853 ADC make up this part of the processor while the high-end Motorola (Freescale) "Symphony" DSPD56367 chip handles all DSP functions including Dolby Digital, DTS decoding to the digital tone controls. You can see from the photo that while this device runs cool and requires only two amps of power, Emotiva elected to place a rather large toroidal transformer in the chassis as part of the power supply. I found the grounding of the unit to be excellent and the individual boards seemed to be well laid-out and securely fastened to the enclosure. Efficiency is a good thing and Emotiva put together a succinct and effective package.
Emotiva DMC-1 Listening Tests: Two-Channel
Having spent so much time discussing the features, set-up and configuration options of the Emotiva DMC-1, I was excited to finally get down to the important part of the review - listening to this processor and seeing how well it performed in my Reference System. I tried to go into the listening session with an open mind, relinquishing all preconceived ideas I had about how the processor would perform and attempting to gather an honest and open evaluation of the sound.
 CD:
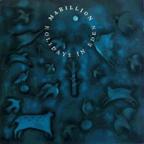
Marillion -
Holidays in Eden
CD:
Marillion -
Holidays in Eden
A new
favorite of mine is
Marillion's
Holidays
In
Eden
CD. An eclectic mix of some of their more commercial tracks, this CD conveys a lot of the
progressive rock feel that dominated the airwaves in the 80's and early 90's.
Track 1 of Disc 1, "Splintering Heart", started off with a building, almost pulsating subsonic intro that was fantastically clean. Whenever I play this song in the other room, my 2-year-old runs around the coffee table in circles for some unknown reason (yes, every time). Synthesizer detail trickled in across the soundstage as the vocals continued to build. The front vocals were powerful, with a soft, airy reverb that enveloped the listening room. Subtle element in this track continued to point out the clarity and detail that was possible with this system, especially since the entire intro of the song was a multi-layered entity lacking any non-synthesized instrumentation. I replayed the track in Dolby Pro Logic IIx Music mode and found that this was one of those CDs that benefited immensely from Dolby's DSP - almost turning it into a discreet 5.1 mix and surrounding the listening position with an accurate but encompassing mix of vocals, pads, guitar and reverb.
Now back in two-channel, a cascading, almost U2-like guitar intro began track 2 "Cover My Eyes" (Pain and Heaven) - quickly followed by some clean vocals. The chorus added a fuller mix that set just behind the main vocals. Drums were panned wide (a fairly consistent mixing technique on this album) and possessed an almost exquisite cymbal detail. This song simply came alive with the Emotiva.
Almost done, but not quite - I simply couldn't stop listening to this album. Track 4 "No One Can" put forth some gentle vocals and a steady beat which marked this song as one where you can really pay attention to the mix and break it down into its component parts. From the steady stick on the snare to the polite reverb that washed over the vocals and lent filler to the backgrounds, it was fun to just sit and enjoy this mix.
Despite the annoying 3-second looping bird sample on Track 5, the opening jet-by and casual feel to this song made up for its early transgressions. A strong back-beat and rather dry vocal made this a unique mix within the album. The vocal style, including the backgrounds, was very reminiscent of The Police. A Hammond B3 sound and alternating solo guitar emanated from the left and right speakers respectively, and served to develop this song before it came to its rather abrupt peaked ending.
 SACD: Jeff Wayne's Musical Version of The War of the Worlds
This almost epic undertaking is something of a fantastic enigma. It is essentially a contemporary
opera with classical instrumentation, punctuating a classic tale of science fiction. Are you picturing
it yet?
Don't bother, just
buy it
and check it out in your own system - you will not be disappointed.
Track 1 sets up what is a recurring theme for the entire piece. With synths, strings, flutes, and a syncopated drum track, there is much to enjoy and realize in terms of soundstage and detail. The mix is a constant modulation of crescendo, followed by individually revealed instrumentation. Among this ebb and tide of music is a dry voice over interjected by Rich ard Burton to carry along the story.
Once you think you have a feel for the musical content, and almost Jethro Tull vocal spits out a chorus lyric line. It was easy to pick out independent effects & instruments. The Emotiva allowed the full, rich definition of this audio opera to come forward.
Several minutes into the first disc there is a distinct acoustical guitar intro which felt as if it were being plucked exactly 8 feet in front of me. The realism was remarkable. I could go on, but we're talking about 90 minutes or so of musical content. I will tell you, however, that I was riveted enough by the sound to sit through the entire first Disc... and then I put in Disc 2.
Emotiva DMC-1 Listening Tests: Multi-Channel
Rather than assault readers with short snippets from ten thousand tracks, I selected two multi-channel discs that were known for their low noise floor and excellent attention to detail. I wanted at least one full, enveloping mix, with ample room to hear the soundstage of the Emotiva as well as the ability for it to reproduce full frequency-range tracks without hesitation and without missing any clarity or fidelity.
 DTS:
The
Moody Blues Days of Future Passed
DTS:
The
Moody Blues Days of Future Passed
The first track "The Day Begins" rose and fell gradually as the score pulsed and swelled with the underlying "Nights in White Satin" theme. I turned up the volume until it was at reference level and the experience was very much like being in front of the London Festival Orchestra. The instrumentation was not only so vivid ; it was coming to my ears from outside the confines of the room. I had to open my eyes after a period of time to get my bearings.
A brief first half of Track 4, "Lunch Break" had the feel of rush hour in New York City - reminiscent of an old Audrey Hepburn movie. The height of the brass and percussion really opened up the mix, rendering it as a rapid assault of the fantastic orchestral ensemble that was as real as standing in front of Tiffany's.
"The Afternoon" ("Tuesday Afternoon" for those not familiar with The Moody Blues' orchestral version nomenclature) brought this disc to a more intimate level, without collapsing what was being rapidly recognized as a gigantic soundstage. Some fun surround effects also made this a lively mix, even tossing some of the main vocals into the surrounds. Pop this disc in, close your eyes, and you will likely find yourself frittering away the afternoon listening to some amazingly detailed and fantastically mixed ear candy. The Emotiva did a terrific job of rendering every detail of this well-mixed masterpiece.
 DVD-Audio: R.E.M.
Out of Time
DVD-Audio: R.E.M.
Out of Time
"Radio Song" started off the album and set up the upbeat tone of this DVD-Audio remix by Elliot Scheiner. Immediately you were put knee deep into the performance. Again, the height of some of the elements of this mix was simply astounding - they left the boundaries of the room. The tacks are placed within the sound field in such a way as to envelop, rather than necessarily recreate a live performance.
I found that these new DVD-Audio remixes of the original tracks made good use of DVD-Audio's additional headroom. The dynamic range seemed to be much improved and the songs sounded much more "live".
Track 3 "Low" made creative use of the surrounds to spread the percussion throughout the room. The Emotiva preserved all of the elemental detail and revealed even subtle instrumentation such as the background bass that was well back in the mix during verses.
I liked how nothing seemed overdone in these remixed tracks. The DMC-1 held to an honest rendition, never pushing, and certainly never missing or rolling off any subtleties. "Shiny Happy People" was a good example of a song with depth, providing an intimate mix of vocals and instruments while still enjoying the freedom and flexibility of the 5.1 channel format by overtly utilizing the surrounds during choruses and vocal harmonies.
This disc could fit well into anyone's collection. If you aren't already an R.E.M . fan you just might be converted after listening to Out of Time in 5.1. Conversely, if you aren't yet an Emotiva fan, a few select tracks in a reference room may just change that as well.
Emotiva DMC-1 Measurements and Analysis
The frequency response via the analog outputs of the DMC-1 are ruler flat out to about 50kHz with a -3dB point of around 200kHz.
When the analog preamp was driven at 1Vrms (typically ½ signal strength to achieve ½ of max power of most power amps with voltage gain of 29dB) distortion levels were (+.0.18 + 106.062)dBv = 106.242dBv or 100*alog(-106.242/20) = .000487%. This is excellent performance for a preamp.
When the analog preamp was driven at 6Vrms (more gain than you should ever need to drive any power amp to maximum power) distortion levels were (+.15.761 + 76.607)dBv = 92.368 or 100*alog(-92.368/20) = .00241%. Again this is excellent performance and indicates distortion is not an issue with this preamp at any unclipped drive level.
Signal to Noise Ratio Tests
Using the EXT 8CH Input and setting the source to 200mV in, and adjusting the output of the D M C-1 until it produced 1Vrms Output, we measured the following:
-105.703dBra without signal
-19.448dBra with signal
< 10 Hz - 22k Hz bandwidth , no option filter.
SNR: 86.3dBra (unweighted)
This is very good performance. Though a few dB shy of what we consider stellar noise performance for a preamp we never heard any noise issues in real world listening tests. This is a marked improvement over what we observed when we conducted our review of the Sunfire Theater Grand III.
At Max Output
Ch-A SIGNAL to NOISE RATIO
-105.86 dB below 16.46 dBV or 6.6Vrms; Reference Level (at 0.10 % THD+N)
< 10 Hz - 22k Hz bandwidth , no option filter.
Via CD Analog Input (A/D conversion)
210mV in, 1V out
-94.122 without signal
-19.531dBrA with signal
< 10 Hz - 22k Hz bandwidth , no option filter.
SNR: 74.6dBrA (unweighted)
As you can see, going through ADC to DAC conversion stages on native analog signals adds about 12dB of noise. We recommend using the digital inputs on the D M C-1 on sources (assuming they have digital outputs) you wish to add DSP processing to for the best possible performance.
Subwoofer Output
Subwoofer output distortion was significantly higher than the rest of the preamp outs, though likely inaudible due to our ears perception of distortion at low frequencies. It was about .15% at all unclipped levels and reached clipping about +7.5Vrms which is more gain than you will likely use in any application.
Maximum Preamp Signal Levels
The processor outputs provided maximum output levels 6.6Vrms unclipped and accepted a maximum unclipped input signal of 5.5Vrms.
Emotiva DMC-1 Conclusions and Overall Perceptions
The Emotiva is a beautiful processor to look at - as much a piece of artwork as it is a high-performance machine for high-end audio. This product is geared towards audio enthusiasts who desire the best sound quality possible. With an MSRP of $2495 it also comes in at almost $1500 less than the Sunfire Theater Grand IV, which has nearly identical innards and the same processing core. Add an MPS-1 7-channel amplifier and you beat an equivalent Sunfire combo by almost $3000. If you want all the latest features and gadgets, or if you are trying to spend as little as possible for your home theater system then look elsewhere, this product isn't for you. If, however, you want to enter the realm of high-end audio and experience separates at a competitive price to their peers, then the DMC-1 is a great processor to drive the reference system in your listening room.
Emotiva DMC1 Review Sample Firmware Settings
|
LOGIC |
JLPP10-B0 |
|
FRONT PANEL |
1.1 |
|
DSP |
AX6_RI13P |
|
VFC |
1.01 |
|
BOOT CODE |
2.00 |
|
MAIN CODE |
1.3 |
The Score Card
The scoring below is based on each piece of equipment doing the duty it is designed for. The numbers are weighed heavily with respect to the individual cost of each unit, thus giving a rating roughly equal to:
Performance × Price Factor/Value = Rating
Audioholics.com note: The ratings indicated below are based on subjective listening and objective testing of the product in question. The rating scale is based on performance/value ratio. If you notice better performing products in future reviews that have lower numbers in certain areas, be aware that the value factor is most likely the culprit. Other Audioholics reviewers may rate products solely based on performance, and each reviewer has his/her own system for ratings.
Audioholics Rating Scale
 — Excellent
- — Very Good
- — Good
- — Fair
- — Poor
| Metric | Rating |
|---|---|
| Frequency Response Linearity | |
| Multi-channel Audio Performance | |
| Two-channel Audio Performance | |
| Build Quality | |
| Fit and Finish | |
| Ease of Setup | |
| Features | |
| Remote Control | |
| Performance | |
| Value |
Clint Deboer was terminated from Audioholics for misconduct on April 4th, 2014. He no longer represents Audioholics in any fashion.
View full profile